2D Editor
The 2D Mission Editor is the primary tool for creating both singleplayer and multiplayer scenarios in majority of Bohemia Interactive's products.
The focus of this article is explaining the function and effect of each option, rather than recommending which option should be used to create a desired outcome. Many options create different effects depending on different circumstances. The sheer amount of information presented may seem daunting at first, but remember games based on Real Virtuality engine are more complex than many other games, and there is always more than one way to create the desired effect.
Starting the Editor
Editor is accessible from the main menu through the button labelled "Mission Editor" or just "Editor". In Arma 2 and Take On Helicopters, this button can be found in the Singleplayer subcategory.


Controls
| Keyboard Shortcuts | |||||
|---|---|---|---|---|---|
| Function | OFP | ArmA | Arma 2 | TKOH | Arma 3 |
| Units | F1 | ||||
| Groups | F2 | ||||
| Triggers | F3 | ||||
| Waypoints | F4 | ||||
| Synchronization | F5 | ||||
| Markers | F6 | ||||
| Modules | N/A | F7 | |||
| New | R | Ctrl + N | |||
| Load | Ctrl + O | ||||
| Save | Ctrl + S | ||||
| Save As | S | Ctrl + ⇧ Shift + S | |||
| Merge | M | Ctrl + M | |||
| Show IDs | Ctrl + I | ||||
| Show Textures | T | Ctrl + T | |||
| Preview | Enter ↵ | ||||
| Continue | |||||
| Intel | |||||
| Exit | Esc | ||||
| Debug Console | N/A | Ctrl + D | |||
| Functions | N/A | Ctrl + F | |||
| Config Viewer | N/A | Ctrl + G | |||
Map Controls
- Clicking and holding
 anywhere on the map allows the user to pan around the map by moving the mouse.
 - The mouse wheel and numpad +/- keys control the map zoom level.
 on an entity selects it. Selected entities are opaque, non selected entities are slightly transparent.
 on an entity generally opens the entity's editing menu. In Waypoint mode, double left clicking on a object will create a waypoint for the selected group that is attached to the clicked object.
- on empty space will create a new entity, if it is possible in the current editing mode.
- Clicking and holding on an entity allows it to be dragged around the map. It is not possible to move units in group mode or move waypoints in synchronize mode.
- Clicking and holding on empty space allows a drag box to be created for selecting multiple entities.
- Holding Ctrl allows the user to select more than one entity using the drag box or individually by left clicking on them.
- ⇧ Shift + on an unit or waypoint will select all entities associated with that unit's group.
- ⇧ Shift + holding on a selected entity rotates the selected entities.
- ⇧ Shift + on an object with a waypoint attached to it selects the underlaying object.
- ⇧ Shift + entity with a waypoint on it opens the appropriate entity's menu (rather than the waypoints).
- Del will erase the entity under the mouse cursor.
- ⇧ Shift + Del will erase all selected entities.
- Ctrl + X will cut the selected entities to the clipboard.
- Ctrl + C will copy the selected entities to the clipboard.
- Ctrl + V will paste a copy of entities from the clipboard. Copy and pasted named entities automatically have a number appended to their names to avoid conflicts.
- Ctrl + ⇧ Shift + V will paste a copy of entities on their original position (useful when copying units between missions).


Status Bar
Status bar on the bottom of a screen displays current map grid and cursor's XYZ coordinates.
Mission Modes
This drop down list allows you to choose which component of a mission you are currently editing. A single mission stores all objects and mission parameters for the intro and outro cutscenes completely separately from the gameplay component of a mission. It is not essential to use any of these other than the mission component. While each component requires a player unit if it is to be used, the player will only have control of the unit in the Mission component. In the Intro and Outros, AI will control the player's unit. The Intro and Outros will not end when the player unit dies, but must be ended using a trigger.
- Mission is the default. This defines the interactive component of a mission. It is the only essential part of a mission.
- Intro plays before the briefing screen.
- Outro - Win will play after the debriefing screen in the case of a Win 1-6 trigger being activated.
- Outro - Loose will play after the debriefing screen in the case of a Lose trigger being activated.
Editing Modes
The mission editor is always in one of these seven modes. Each different mode allows the creation and manipulation of different types of map entities. The required mode can be set by either clicking on the modes name/icon or pressing the associated function key. The modes are set out in the basic order they would be used while creating a mission.
 Units
Units
Main article: Mission Editor: Units
Unit mode is used to add individual units, vehicles and objects on the map. To do so, double click on the empty space where you would like to add a unit. This will open the Unit Menu. You can also open the unit menu of an existing unit while in any editing mode other than waypoints by double clicking on the unit. Note that if there is no player unit on the map, the unit menu will only allow valid player units may be placed.


 Groups
Main article: Mission Editor: Groups
Group editing mode can be used in several ways. The primary use is to join previously placed individual entities together into groups. Joining individual units together into groups can greatly improve their combat abilities. A group will move together, share information about enemy units and can bring greater firepower to bare on a target. Each individual unit on the map that has no visible group links is actually in a group of it is own. When a unit is created near another unit of the same side, it will automatically be placed in the other unit's group. To join a unit into an existing group, simply left click and hold on the unit, then drag a line to any unit of the group you wish to add it too. Release the button to join the unit into that group. Group links are displayed by light blue line drawn from the leader to each other unit in the group. Removing a unit from a group is done by left clicking and holding on the unit and dragging the group link line into empty space, then releasing. The highest ranking unit in a group will generally be the leader. While it is possible to create extremely large groups, huge formations of AI units create path finding issues and can be very hard to manage for a human leader.


 Triggers
Main article: Mission Editor: Triggers
A trigger is an abstract game entity that will wait until it is condition block returns true, then carry out the On Activation string. When used effectively, they can make your mission seem much more dynamic and realistic. For example, you can use a trigger to set off a siren and call reinforcements when the player is spotted near an enemy base, or to start a convoy moving when the player gives a radio command.
Triggers are represented in the mission editor by a dark blue ellipse or rectangle with a small blue flag in the centre. Triggers may be linked to an object in Groups Mode (F2), which generally means that only that object or group can activate the trigger. Triggers can be used in various ways, for example the location and dimensions of a trigger are not always used as part of it is conditions, and triggers do not necessarily require an On Activation block, instead being used to return a list of objects that satisfy it is conditions. Each trigger's Condition block will be checked approximately twice every second for the duration of the mission. To add a new trigger to your mission, double left click in some empty map space. The Trigger Menu will open.


 Waypoints
Main article: Mission Editor: Waypoints
Waypoints are used to define the route and behaviour of a group during the mission. At any point in time a group will have one active waypoint (generally the waypoint they are to move towards). Once a waypoint's conditions have been met, it will become complete and the group's next waypoint automatically becomes active. Some of a waypoint's settings will take place as the waypoint becomes active, others when the waypoint is complete.


 Synchronization
Main article: Mission Editor: Synchronization
Synchronization mode is used to make different groups carry out their waypoint orders at the same time, and optionally only under specific circumstances. Synchronization can seem a hard concept to understand at first, but it is a very powerful and easy to use tool. For example, synchronization can be used to organize friendly forces to wait until everyone is in position before launching a mass attack, or wait in ambush until an enemy convoy is in the perfect location before opening fire. Synchronizing links can be made between any of a group's waypoints and any number of other group's waypoints, and any number of triggers. A synchronized waypoint will not complete until all waypoints it is linked with are ready to complete, and all synchronized triggers are activated. Synchronizing links are displayed by a dark blue line connecting the entities.
To create a synchronized link between a waypoint and another group's waypoint or a trigger, simply left click and hold on the waypoint, move the mouse to the desired waypoint/trigger then release. To remove synchronization lines from a waypoint or trigger, left click on it, hold and drag a line into empty space. Note this will remove all synchronizing lines from that entity, so be careful.
 Markers
Main article: Mission Editor: Markers
Marker mode is primarily used to place visual map icons and zones on the mission map. Markers are only visible while the mission editor is in marker mode, but can still be manipulated while in other modes. To do so, hover the mouse cursor over a marker's position to display it is name. The second use of markers is to define a possible starting position for any number of objects. To do this, create a group link between the marker and the object. The object will begin the mission at any one of the markers it is grouped with or at it is original position, chosen at random. This offers another way to create some randomness in a mission, with more precise control compared to using the object's Placement radius option. Note that any marker used in this way will still be drawn on the mission map (although setting the axis sizes to 0 can be used to hide a marker). Markers can not be attached to objects. To create a map marker, double left click in empty space.


Main article: Mission Editor: Modules
Modules offers complex scripted solutions


Basic Operations
 New
New
Remove all map entities such as units, waypoints, markers and triggers. Settings such as those defined in the Intel are retained. Be warned that there is no undo function in the mission editor.
 Load
Load
Allows you to load a previously saved mission. Only uncompressed mission folders in your current profiles missions folder can be loaded.
 Save As
You can save your current mission with this menu.
- User missions - These missions are only available through the mission editor while using the current user profile. Note that if you save your mission under a new name, only the Mission.sqm file will be written in the new folder. Saving a already named User mission also reloads any mission support files that are in the chosen mission folder, such as Description.ext and Init.sqs.
- Export to single missions/multiplayer missions - You can also choose to export your mission to either the single mission or multiplayer mission folders. This process creates a pbo file of the current mission folder (includes all files) in "Mission" or "MPMissions" folder in game's root.
- Note: You have to manually create the folders, otherwise mission won't be exported.
- Send by e-mail - This option will create a pbo file of the mission folder and load your default email program using it as an attachment.
 Save
Save
Saves a currently edited mission without opening any menu, unless mission was not saved previously.
 Merge
Merge
Merge will import all map data (units, groups, waypoints, triggers, etc) from one mission into the currently loaded mission. Other settings such as those set in the Intel Display are not imported.
 Show IDs
Every object defined in the terrain you are using has an assigned ID number that can be used to refer to the object in script code. These IDs are normally hidden for clarity, and this button toggles them on or off. IDs are only visible at high zoom levels.
 Show Textures
Clicking on this option will backfill the map with the satellite map texture rather than the default white. This gives the user an idea of the type of terrain found in an area, although the satellite map does not always correspond exactly with the ground detail textures as seen at close range.
 Preview
Preview will start the mission from within the editor so that you can test the results of your labour. A player unit must be on the map for the preview button to be visible. If shift is held down while clicking on the preview button, the mission preview will include the mission briefing and debriefing. Note that in preview mode, some aspects of a mission may not always behave in the same way as they would if the mission was played as a single mission. It is wise to check your mission in "single mission mode" (outside of the mission editor) before considering release.
 Continue
After you have exited from the preview mode, clicking 'Continue' will allow you resume the mission from the point you left it. Note that any changes made in the editor since you exited the preview will not be shown. You must click 'Preview' again to restart with the updated version of your mission.
Intel
Main article: Mission Editor: Intel
Intel display allows you to name your mission, give it a brief description, set the mission starting date and time, the current and forecast weather and which sides resistance forces are friendly to. Clicking on the Intel box will bring up the Intel menu.


Easy / Advanced
The mission editor has two modes, easy and advanced. The easy mode simply hides aspects of the mission editor and takes away a lot of the control you have as a skilled designer, but could distract you when new to the editing.
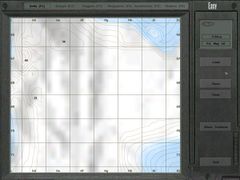
Easy
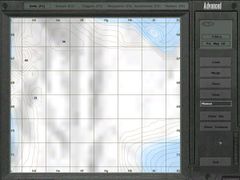
Advanced

 Exit
Exit
Will exit the mission editor and return to the main menu. Any unsaved work will be lost. A confirmation menu is shown.
Advanced Operations
 Functions
Main article: Functions
Functions Viewer show list of scripting functions, both official and community made.


 Config Viewer
Config Viewer allows to explore games' config files, including list of vehicles, weapons, displays etc.


 Debug Console
Main article: Arma 3: Debug Console
Debug Console allows designer to watch desired values and execute custom codes.

External Editing
Main article: Mission Editor: External
Mission editor provides majority of tools required for designing a mission, but finishing touches are usually made outside of it. Briefings, custom scripts, multiplayer settings or final packing are only handled by separate files programs.
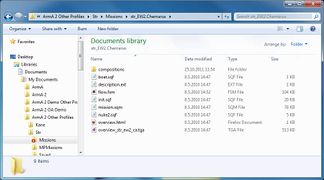
Mission Folder


Mission Export
Main article: Mission Export
When the mission is finished, you can export it to PBO format and release it, so anybody can play it.