AI Squad Command – Arma 2
(User Interface of squad control) |
(Command Menus) |
||
| Line 7: | Line 7: | ||
==2. Your Squad== | ==2. Your Squad== | ||
So you have a acquired a group of the blighters. What now? I would begin by accustoming yourself to one of the cleaner facets of | So you have a acquired a group of the blighters. What now? I would begin by accustoming yourself to one of the cleaner facets of ArmA II’s UI. | ||
[[Image:Guide01x-1-.jpg|alt=ArmA 2 User Interface|ArmA 2 User Interface]] | [[Image:Guide01x-1-.jpg|alt=ArmA 2 User Interface|ArmA 2 User Interface]] | ||
| Line 15: | Line 15: | ||
Should you have more than ten members in your squad you will be able to scroll through 'pages' using the F11 and F12 keys, which makes creating sub-groups important. They can be chosen by tapping your way through the appropriate F-keys, but you can create preset groups that can be selected easier. This will be covered later on in the guide. | Should you have more than ten members in your squad you will be able to scroll through 'pages' using the F11 and F12 keys, which makes creating sub-groups important. They can be chosen by tapping your way through the appropriate F-keys, but you can create preset groups that can be selected easier. This will be covered later on in the guide. | ||
==3. Command Menus== | |||
There are several menus that fill with options depending upon what you have selected. They offer a wide range of conditions that allow you to configure how you wish your squad to behave in and out of combat | |||
Each menu is assigned to your number keys ‘1 – 9’. It should be noted that some menus alter depending the type of unit selected as well as based upon the context of what you’re currently aiming at. | |||
The following are covered in this guide: | |||
* Quick Command (spacebar) | |||
* Engagement (3) | |||
* Combat Mode (7) | |||
* Formation (8) | |||
* Team Assignment (9) | |||
Revision as of 10:45, 4 April 2010
1. Introduction
This is a guide originally published in the BIS forums in order to reduce the problems caused by its being buried and people having to use search the Author was asked if it could be transferred and adapted for use in the BIS Wiki.
Author
Original text by rotkeps [1]
2. Your Squad
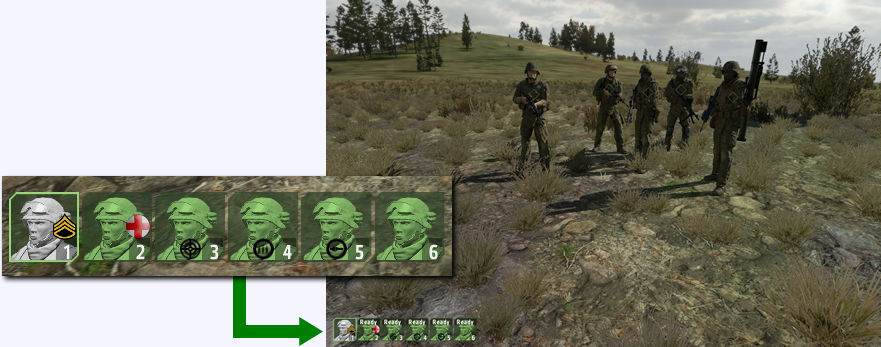
So you have a acquired a group of the blighters. What now? I would begin by accustoming yourself to one of the cleaner facets of ArmA II’s UI.

If you have squad members, this should be in the bottom-left of your screen. Those portraits are your window to status of your bit-induced buddies. The colour as well as any icons attached represent each soldiers condition, armaments and what action they’re currently undertaking. You may also notice that each of them is handily numbered, which is used in their selection. This is a pretty straight forward process which can be performed in a number of ways.
Pressing (space-bar) to open the Quick-Command menu will select all of your squad. Selecting individual soldiers can either be done by aiming at them and left clicking whilst in the Quick-Command menu or by pressing the F-key that corresponds to the numbers found on the portrait.
Should you have more than ten members in your squad you will be able to scroll through 'pages' using the F11 and F12 keys, which makes creating sub-groups important. They can be chosen by tapping your way through the appropriate F-keys, but you can create preset groups that can be selected easier. This will be covered later on in the guide.
3. Command Menus
There are several menus that fill with options depending upon what you have selected. They offer a wide range of conditions that allow you to configure how you wish your squad to behave in and out of combat
Each menu is assigned to your number keys ‘1 – 9’. It should be noted that some menus alter depending the type of unit selected as well as based upon the context of what you’re currently aiming at.
The following are covered in this guide:
- Quick Command (spacebar)
- Engagement (3)
- Combat Mode (7)
- Formation (8)
- Team Assignment (9)