Probing Mechanics – Arma 3
Jump to navigation
Jump to search
Lou Montana (talk | contribs) m (Move category) |
Lou Montana (talk | contribs) m (Text replacement - "{{SpoilerWarning" to "{{Feature|spoiler") |
||
| Line 1: | Line 1: | ||
{{TOC|side}} | {{TOC|side}} | ||
{{ | {{Feature|spoiler|[[Arma 3 Contact]]'s "First Contact" campaign}} | ||
Revision as of 22:11, 1 February 2021
2

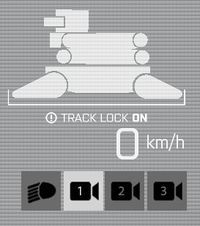
Track Lock Indicator
The track lock indicator (when the tracks are prevented from moving the vehicle) can be triggered with the following code. This concerns the UI indicator only, actual track locking is done by attaching the Mini UGV to e.g. a game logic in order to stop it.
nameOfVehicle setVariable ["BIN_ugv_trackLock", true];

Mini UGV MFD Animations
The following animations can be used with the animateSource script command to control the exterior MFD statuses. Most of these animations are hidden by default. In order to unhide them, you have to animate them to 0 phase.
| Animation Name | Functionality | Selection |
|---|---|---|
| Detector1Light1_Green | Hiding the green light on the gas detector (top light) | 3 |
| Detector1Light1_Red | Hiding the red light on the gas detector (top light) | 3 |
| Detector1Light2_Green | Hiding the green light on the gas detector (bottom light) | 4 |
| Detector1Light2_Red | Hiding the red light on the gas detector (bottom light) | 4 |
| Detector2Aux_hide | Hiding the icon for the auxiliary attachment on the side MFD | 1 |
| Detector2Speaker_Off | Hiding the 'Speakers Off' icon on the side MFD | 2 |
| Detector2Speaker_On | Hiding the 'Speakers On' icon on the side MFD | 2 |
| ChemDetectorLight | Hiding the threat detected light on the chemical detector | 6 |
| ChemDetectorLevel1 | Hiding the chemical detector's 1st status bar | 7 |
| ChemDetectorLevel2 | Hiding the chemical detector's 2nd status bar | 7 |
| ChemDetectorLevel3 | Hiding the chemical detector's 3rd status bar | 7 |
| BiopsyCapacity | Setting the biopsy probe capacity (goes from 1 to 100) | 5 |
Example code to unhide all elements:
{
	ugv animateSource [_x, 0, true];
} forEach [
	"Detector1Light1_Green",
	"Detector1Light1_Red",
	"Detector1Light2_Green",
	"Detector1Light2_Red",
	"Detector2Aux_hide",
	"Detector2Speaker_Off",
	"Detector2Speaker_On",
	"ChemDetectorLight",
	"ChemDetectorLevel1",
	"ChemDetectorLevel2",
	"ChemDetectorLevel3"
];
ugv animateSource ["BiopsyCapacity", 100];
Probing Event Handlers
probingStarted
Event handler returns following information:
- 0. object: Object - object which was scanned
- 1. material: String - name of the material
- 2. completion: Number - how much information about that material was gathered (from 0 to 100)
BIN_ProbeEvent_1 = [missionNamespace, "probingStarted", {
	params["_object", "_data", "_completion"];

	if (_object isEqualTo Probe_2) then
	{
		if(_data isEqualTo "alien") then
		{
			hint "Probing started, hold left mouse button until the scan is completed.";
		} else {
			hint "Try pointing at the center of the probe when the cover is open.";
		};
	} else {
		// ...
	};
}] call BIS_fnc_addScriptedEventHandler;
probingEnded
- 0. data: Array - array containing following information:
- 0. object: Object - object which was scanned
- 1. material: String - name of the material
- 2. completion: Number - how much information about that material was gathered (from 0 to 100)
- 1. success: Boolean - returns true if probing was fully completed (meaning laser probing was not interrupted for example)
BIN_ProbeEvent_2 = [missionNamespace, "probingEnded", {
	params ["_data", "_success"];

	if (_success && {(_data # 0 == Probe_2) && (_data # 1 == "ALIEN")}) then
	{
		hint "Scan completed";

		player setCurrentTask (simpleTasks player # 2);
		(simpleTasks player # 1) setTaskState "Succeeded";
		["BIN_tskProbe1", "SUCCEEDED"] call BIS_fnc_taskSetState;
		"BIN_tskProbe2" call BIS_fnc_taskSetCurrent;
		[missionNamespace, "probingStarted", BIN_ProbeEvent_1] call BIS_fnc_removeScriptedEventHandler;
		[missionNamespace, "probingEnded",   BIN_ProbeEvent_2] call BIS_fnc_removeScriptedEventHandler;
	};
}] call BIS_fnc_addScriptedEventHandler;
Probe Tip Animations
Note that the Probe is referred to as "Alien Network" in the game. Probe tips can be animated with the following function:
[nameOfProbe, state, speedFactor, soundTypes] call BIN_fnc_probeAnim;
Parameters:
- nameOfProbe: Object - name of the probe you would like to animate
- state: Number - 0 or 1 where 1 means that the inner tissue will be expanded
- speedFactor (Optional): Number - animation speed factor (default is 1)
- soundTypes (Optional): Number - custom sounds for probe tip animations (default ["SoundSetSource_Sfx_Probe_Retract_01","SoundSetSource_Sfx_Probe_Expand_01"])
Example code:
[nameOfProbe, 1] call BIN_fnc_probeAnim;
Example Mission