Module Framework – Arma 3

From Bohemia Interactive Community
Revision as of 15:48, 20 December 2016 by Str (talk | contribs)
Jump to navigation Jump to search


Arma 3 introduces a module framework, which lets designer to simplify the configuration and chose how the module function will be executed (e.g., globally and for every player who joins later).

How to Create a Module

When creating a new module, follow these steps:

  1. Create a module addon.
    • Make a folder named myTag_addonName a create a config.cpp file in it.
    • Inside, declare a CfgPatches class with your addon and its modules (in the units array). Without this, the game wouldn't recognize the addon.
    • Make sure the addon and all objects start with your tag, e.g. myTag
    class CfgPatches { class myTag_addonName { units[] = {"myTag_ModuleNuke"}; requiredVersion = 1.0; requiredAddons[] = {"A3_Modules_F"}; }; };
  2. Select a module category
    • Modules are placed into basic categories which makes finding a desired module easier for an user. Use can use on of the existing categories:
    class displayName
    Effects Effects
    Events Events
    Modes Gameplay Modes
    GroupModifiers Group Modifiers
    Intel Intel
    NO_CATEGORY Misc
    Multiplayer Multiplayer
    ObjectModifiers Object Modifiers
    Sites Sites
    StrategicMap Strategic
    Supports Supports

    Alternatively, you can create your own one:

    class CfgFactionClasses
    {
    	class NO_CATEGORY;
    	class myTag_explosions: NO_CATEGORY
    	{
    		displayName = "Explosions";
    	};
    };
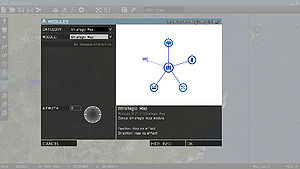


  3. Create config for module logic
    • All in-game objects (soldiers, vehicles, buildings, logics, modules, ...) are defined in CfgVehicles class.
    • All modules must inherit from Module_F parent class, either directly or through some additional sub-parent. While modules inheriting from some other class will be still displayed in the Modules menu (F7), they won't be using the module framework and all benefits tied to it.
    • Modules functions are by default not executed when in Eden Editor workspace. It can be enabled using is3DEN property, but that will also change format of function params (see the section about writing a function below).
    class CfgVehicles { class Logic; class Module_F: Logic { class AttributesBase { class Default; class Edit; // Default edit box (i.e., text input field) class Combo; // Default combo box (i.e., drop-down menu) class Checkbox; // Default checkbox (returned value is Bool) class CheckboxNumber; // Default checkbox (returned value is Number) class ModuleDescription; // Module description class Units; // Selection of units on which the module is applied }; // Description base classes, for more information see below class ModuleDescription { class AnyBrain; }; }; class myTag_ModuleNuke: Module_F { // Standard object definitions scope = 2; // Editor visibility; 2 will show it in the menu, 1 will hide it. displayName = "Nuclear Explosion"; // Name displayed in the menu icon = "\myTag_addonName\data\iconNuke_ca.paa"; // Map icon. Delete this entry to use the default icon category = "Effects"; // Name of function triggered once conditions are met function = "myTag_fnc_moduleNuke"; // Execution priority, modules with lower number are executed first. 0 is used when the attribute is undefined functionPriority = 1; // 0 for server only execution, 1 for global execution, 2 for persistent global execution isGlobal = 1; // 1 for module waiting until all synced triggers are activated isTriggerActivated = 1; // 1 if modules is to be disabled once it's activated (i.e., repeated trigger activation won't work) isDisposable = 1; // // 1 to run init function in Eden Editor as well is3DEN = 1; // Menu displayed when the module is placed or double-clicked on by Zeus curatorInfoType = "RscDisplayAttributeModuleNuke"; // Module attributes, uses https://community.bistudio.com/wiki/Eden_Editor:_Configuring_Attributes#Entity_Specific class Attributes: AttributesBase { // Arguments shared by specific module type (have to be mentioned in order to be present) class Units: Units { property = "myTag_ModuleNuke_Units"; }; // Module specific arguments class Yield: Combo { // Unique property, use "<moduleClass>_<attributeClass>" format to make sure the name is unique in the world property = "myTag_ModuleNuke_Yield"; displayName = "Nuclear weapon yield"; // Argument label description = "How strong will the explosion be"; // Tooltip description typeName = "NUMBER"; // Value type, can be "NUMBER", "STRING" or "BOOL" defaultValue = "50"; // Default attribute value. WARNING: This is an expression, and its returned value will be used (50 in this case) class Values { class 50Mt {name = "50 megatons"; value = 50;}; // Listbox item class 100Mt {name = "100 megatons"; value = 100;}; }; }; class Name: Edit { displayName = "Name"; description = "Name of the nuclear device"; // Default text filled in the input box // Because it's an expression, to return a String one must have a string within a string defaultValue = """Tsar Bomba"""; }; class ModuleDescription: ModuleDescription{}; // Module description should be shown last }; // Module description. Must inherit from base class, otherwise pre-defined entities won't be available class ModuleDescription: ModuleDescription { description = "Short module description"; // Short description, will be formatted as structured text sync[] = {"LocationArea_F"}; // Array of synced entities (can contain base classes) class LocationArea_F { description[] = { // Multi-line descriptions are supported "First line", "Second line" }; position = 1; // Position is taken into effect direction = 1; // Direction is taken into effect optional = 1; // Synced entity is optional duplicate = 1; // Multiple entities of this type can be synced synced[] = {"BLUFORunit","AnyBrain"}; // Pre-define entities like "AnyBrain" can be used. See the list below }; class BLUFORunit { description = "Short description"; displayName = "Any BLUFOR unit"; // Custom name icon = "iconMan"; // Custom icon (can be file path or CfgVehicleIcons entry) side = 1; // Custom side (will determine icon color) }; }; }; };
    In the game, the description is available after clicking on "Show Info" button when inserting / editing the module
    • Pre-defined sync preview entities are:
      • Anything - Any object - persons, vehicles, static objects, etc.
      • AnyPerson - Any person. Not vehicles or static objects.
      • AnyVehicle - Any vehicle. No persons or static objects.
      • AnyStaticObject - Any static object. Not persons or vehicles.
      • AnyBrain - Any AI or player. Not empty objects
      • AnyAI - Any AI unit. Not players or empty objects
      • AnyPlayer - Any player. Not AI units or empty objects
      • EmptyDetector - Any trigger


  4. Configure a module function
  5. class CfgFunctions { class myTag { class Effects { file = "\myTag_addonName\functions"; class moduleNuke{}; }; }; };
  6. Write the module function
    • Create the functions folder within the addon folder and place *.sqf or *.fsm files there.
    • Example: \myTag_addonName\functions\fn_moduleNuke.sqf
    • Input parameters differ based on value of is3DEN property.
    Default // Argument 0 is module logic. _logic = param [0,objNull,[objNull]]; // Argument 1 is list of affected units (affected by value selected in the 'class Units' argument)) _units = param [1,[],[[]]]; // True when the module was activated, false when it's deactivated (i.e., synced triggers are no longer active) _activated = param [2,true,[true]]; // Module specific behavior. Function can extract arguments from logic and use them. if (_activated) then { // Attribute values are saved in module's object space under their class names _bombYield = _logic getVariable ["Yield",-1]; //(as per the previous example, but you can define your own.) hint format ["Bomb yield is: %1", _bombYield ]; // will display the bomb yield, once the game is started }; // Module function is executed by spawn command, so returned value is not necessary. // However, it's a good practice to include one. true Eden Editor Compatible When is3DEN = 1 is set in module config, different, more detailed params are passed to the function. _mode = param [0,"",[""]]; _input = param [1,[],[[]]]; switch _mode do { // Default object init case "init": { _logic = _input param [0,objNull,[objNull]]; // Module logic _isActivated = _input param [1,true,[true]]; // True when the module was activated, false when it's deactivated _isCuratorPlaced = _input param [2,false,[true]]; // True if the module was placed by Zeus // ... code here... }; // When some attributes were changed (including position and rotation) case "attributesChanged3DEN": { _logic = _input param [0,objNull,[objNull]]; // Module logic // ... code here... }; // When added to the world (e.g., after undoing and redoing creation) case "registeredToWorld3DEN": { _logic = _input param [0,objNull,[objNull]]; // Module logic // ... code here... }; // When removed from the world (i.e., by deletion or undoing creation) case "unregisteredFromWorld3DEN": { _logic = _input param [0,objNull,[objNull]]; // Module logic // ... code here... }; // When connection to object changes (i.e., new one is added or existing one removed) case "connectionChanged3DEN": { _logic = _input param [0,objNull,[objNull]]; // Module logic // ... code here... }; }; true