Vehicle Hitpoint Creation – Arma 3

From Bohemia Interactive Community
Jump to navigation Jump to search
m (R3vo moved page Arma Vehicle Hitpoint Creation to Arma 3 Vehicle Hitpoint Creation: Naming convention)
(33 intermediate revisions by 3 users not shown)
Line 1: Line 1:
[[Category:Arma 3: Tutorials]]
[[Category:Arma 3: Editing]]
[[Category:Arma 3: Editing]]
{{Cfg ref|start}}
{{Cfg ref|start}}
=Intro=
=Intro=
Basic tips about building vehicle fire geometry and hit points. This article assumes you are already pretty competent at making vehicle addons for Arma 3.
This article gives basic suggestions for building vehicle fire geometry and hit points. It assumes you are already familiar with making vehicle addons for Arma 3.


=Damage vs. Penetration=
Take a look at the following images. Using the fire geometry LOD of a generic "tank", they tell you a lot about how fire geometry ('''"FG"''') and hitpoints ('''"HP"''') should be set up:
It's important to understand that penetration and damage are not exactly the same thing in Arma 3--they have a slightly indirect relationship. For damage to occur, a vehicle must have:
*[https://community.bistudio.com/wiki/LOD#Fire_Geometry Fire Geometry] modeled in its P3D file and
*[https://community.bistudio.com/wiki/LOD#Hit-points HitPoints] defined in its config.cpp file


'''Simply put: an attack must ''simultaneously'' penetrate ''both'' fire geometry and a hitpoint radius to cause (significant^) damage to a vehicle.'''
[[File:basic fg hp layout 01.png|400px]]


(^ In actuality, the game will perform a damage calculation as long as any fire geometry is hit--even if ''no'' hitpoint spheres are penetrated. However, the amount of damage caused by this effect is pretty negligible. So, while case D below produces no damage, case C produces some minimal damage.)
[[File:basic fg hp layout 03.png|400px]]


[[File:damage summary diag 2.JPG]]
[[File:basic fg hp layout 02.png|400px]]


In the diagram above, attacks A-D are examples of direct attacks (indirectHit & indirectHitRange = 0). Attack E is an example of an indirectHit attack. As the diagram shows, armor (in the form of fire geometry) can protect against direct damage--but indirectHit damage can easily occur ''without'' penetration (especially when indirectHitRange is large). Only a hitpoint's minimalHit and explosionShielding values can protect against indirectHit reaching through armor to cause damage.
*Transparent blue: armor FG
*Solid-colored boxes: HP FG (different colors representing different HP classes / components / types)
*Transparent spheres: HP spheres (a visual representation of your vehicle config "radius" values)


The consequences of the damage system for armor modeling is discussed [[#Armor_Methods_.26_Recommendations|later in this page]].
=The Four Commandments=
'''1. Pieces of FG should not overlap (as little as possible anyway)--even if the pieces all belong to the same component'''


==Fire Geometry Placement==
'''2. Leave SPACE between DIFFERENT types of FG--between armor and HP, or between one HP component and another. These should DEFINITELY NOT overlap.'''
Some 'rules of thumb' regarding the preparation of vehicle FG:


*Use the most detailed and accurate armor data you can when creating your vehicle's P3D FG (armor). Correctly calibrated weapons are only going to give realistic results if your armor settings are realistic.
'''3. HP FG should be encased within an EVENLY SPACED matrix of HP spheres.'''
**Use accurate thicknesses, accurate angles, and accurate materials. Arma's penetration simulation is very detailed and takes all these factors into account to generate an accurate "line-of-sight" path of a projectile through vehicle materials/armor.
**Of course, the FG model is simplified and does not need to contain every little piece of geometry. Use just enough detail to capture the key armor areas of the vehicle (the Samples_F T-72 tank is a reasonably good example--although it could be just a bit more detailed).


*The material used for armor pieces should usually be "armour.rvmat" (with thickness is defined by your model geometry). Preset-thickness materials ("armour_plate", etc.) respect LOS thickness, so you can use those where necessary.
'''4. HP spheres CAN overlap BUT they should only be in contact with ONE type of HP FG.'''
**Regardless of what the real vehicle uses for armor (aluminum, composite, etc.), the best practice is to translate them into RHA-equivalent thickness. (To be specific, we are speaking here of "RHAe-KE": the equivalent thickness of rolled homogenous armor steel vs. kinetic attack).


*Very thin components/armor (below 10mm thickness of the convex component) should be modelled via plate materials, as the penetration accuracy for full material like "armour.rvmat" is not enough for such thin components.
Refer to the images in the Intro for a visual example of these rules.


*Internal structure should be blocked in for receiving damage--see [[#Hitpoint Placement for Damage Consistency]] below.
=More Detail (If You Need It)=
This section is optional, in case you're looking for a more detailed discussion beyond the Commandments section above.


*Avoid overlapping FG. Arma projectiles can skip through interpenetrating pieces of FG without noticing some of them. Arma projectiles tend to only "notice" the ''first'' piece of FG they hit if other FG is embedded within it. The greater the interpenetration, the more likely the error.
===1. No FG overlap===
**In fact, it's ''desirable'' to leave some space--at least a few cm--between pieces of FG that don't need to be directly touching.
*The less the better, with none being the ideal. A little overlap is most tolerable in pieces of armor, or within a single type of HP FG (e.g. several convex pieces of FG that make up your vehicle's engine compartment).


==General Hitpoint Placement & Armor==
===2. Space between different FG types===
[[#Damage vs. Penetration|As discussed earlier]], Hitpoints are required for a vehicle to take damage. The style of hitpoint placement affects how a vehicle takes damage with respect to things like armor and penetration. One of the reasons that (stock) Arma vehicles take damage [[#The Typical Damage Process|in the somewhat puzzling way that they do]] is due to their choice of hitpoint placement.
*There should be an airspace buffer between HP FG--which will be taking damage--and armor FG--which should cause marginal to no damage.
*You also need airspace buffer between different HP components (engine, turret, gun, etc.). It's not the exact airspace distance that matters per se. The point is to have enough space to prevent an HP sphere encasing one component from touching a second component. When a sphere touches 2 different types of FG, damage on one component will "leak" to the other.
*Meeting these requirements, you will typically find yourself needing somewhere on the order of 12" (25cm) between different FG components.


===Hitpoint Radii===
===3. Encase FG evenly in HP spheres===
Recall from the [[#Damage vs. Penetration|"Damage vs. Penetration section]] that an attack must simultaneously affect both fire geometry and a hitpoint to produce damage.
*Each HP component should be as evenly encased as possible within a "bubbly" matrix of overlapping HP spheres.
*"Evenly encased" means:
**...that the spheres should overlap with each other to fully encase the FG without leaving gaps.
**...that the sphere matrix should be a completely regular 3D grid--the distance between each sphere should be identical
**...that the FG should be evenly encased by your HP sphere matrix. It's as if you converted the FG into a voxel network of spherical cells--part of the FG should not be sticking out of the sphere matrix.
*Arrange the relationship between the vertex spacing (in the P3D) and the "radius" value (in the vehicle config) so that the HP spheres overlap substantially with each other in the matrix.
*This will create more even coverage of your FG. (See the Intro images above and the diagram below to get an idea of "substantial overlap").
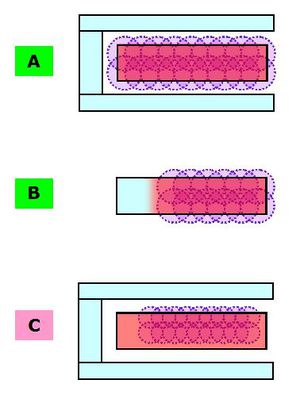
*[[File:hitpoint guide.JPG|300px]]
*You want case "A" above (where blue FG is armor and orange FG is an HP component that receives damage).
**You should avoid case "B" (unless you really know what you are doing).
**Under no circumstances should you have a situation like "C", which has the following problems:
***... the HP spheres are irregularly positioned over the FG.
***... there is FG sticking out of the sphere matrix.
*It will probably make your life MUCH EASIER if you simply standardize all HP at a single radius--rather than using slightly different radii for different HP.
**This way you can space the "grid" or "matrix" of HP sphere verts just once--and simply copy and paste from there in your vehicle's HitPoints LOD.


Consider the following two approaches to hitpoint placement for the same vehicle--the front view of a simplified AFV. The polygons represent FG and the purple circles represent the virtual spheres created by hitpoint vertices and their radii.
===4. HP spheres should only touch one type of HP===
*This is already explained #2 above.


'''Old Arma Approach'''
=Bad Things That Happen If You Don't Follow These Rules=
 
*Weapons which don't penetrate your vehicle's armor will cause damage (even though they shouldn't).
[[File:armor-hp-1.jpg|300px]]
*HP will take totally erratic damage depending on the angle of the weapon impact.
 
*HP which are not in the path of a penetrating weapon will take damage anyway.
'''Modified "Internal" Approach'''
 
[[File:armor-hp-2.jpg|300px]]
 
In the first approach, the vehicle will take major damage from non-penetrating hits. This is because the hitpoint spheres poke through the vehicle's FG. In the second approach, the hitpoints are constrained to be inside the armor layer (blue polygons). The second vehicle will take only trivial damage from non-penetrating hits.
 
Obviously, if you have non-armored parts of a vehicle that ''should'' be damaged by non-penetrating hits (tires, glass windscreens, unarmored vehicle parts, etc.), then their hitpoint spheres ''should'' "poke through" the FG in the "old" manner.
 
===Hitpoint Stacking===
Now let's consider two different approaches to hitpoint "stacking":
 
'''Old Arma Approach to Stacking'''
 
[[File:armor-hp-4.jpg|300px]]
 
'''Modified "Overlapping" Approach'''
 
[[File:armor-hp-3.jpg|300px]]
 
In the first example, hitpoint spheres are stacked so they do not overlap. This occurs frequently in Arma 3 vehicles. The second approach allows the spheres to overlap, with two resulting benefits:
*Generally a smaller number of (higher-radius) spheres can be used to define a volume.
*There are less "holes" between the spheres where a projectile can pass through without causing damage.
There don't appear to be any negative side effects to the overlapping approach; for example, overlapping spheres do not cause "extra" damage when a projectile penetrates through the overlap. BI itself increasingly has been using overlapped hitpoints in their models, so this approach should be considered safe.
 
===Hitpoint Placement Recommendations===
'''In summary: combine the two "modified" approaches for improved armor and damage performance:'''
*''All'' hitpoint spheres should be '''"overlapping"''', and
*Any hitpoint spheres ''protected by armor'' should be '''"internal"'''
 
Note: BI itself has been moving away from the "Old Arma" method of hitpoint placement. Looking at recent revisions of the game (2015), you will notice that their tanks in particular largely follow the "modified" approach.
 
==Hitpoint Placement for Damage Consistency==
The previous section focused on general hitpoint placement with respect to armor and the penetration sim. But your FG must also accommodate the way the ''damage'' sim works. It is '''''extremely''''' easy to get '''''very random''''' damage results if you don't build your damage-receiving fire geometry and hitpoint (spheres) according to some very specific rules.
 
[[File:hitpoint guide.JPG]]
 
The diagram above shows 3 different methods of assigning hitpoint spheres to fire geometry ("FG"). The red FG represents an area you want to receive damage, while the blue FG represents armor that should not cause damage when hit. The purple circles represent hitpoint spheres (P3D vertices with radii defined by hitpoint class config file).
 
* '''A''' is the recommended way to handle FG. The damage-FG is separate from the armor FG and is '''''evenly encased within hitpoint spheres'''''. Whenever the damage-FG is hit, it will receive consistent, predictable damage.
** To reiterate: the damage-FG should be fully ''inside'' the hitpoint spheres.
** While you could accomplish this with one giant hitpoint sphere, that would likely overlap with lots of other FG/armor. So a greater number of smaller-radius spheres are preferable.
* '''B''' is not ideal but can still work. It is not as predictable in its damage results as "A". In this case, the area without hitpoint spheres is intended to function as armor--receiving minimal/no damage. The rest of the geometry is encased in hitpoint spheres as in "A".
* '''C''' is '''''not''''' an acceptable approach. It combines several problems, and hits on geometry like this will produce very inconsistent damage results:
** the damage FG is not fully encased in spheres
** the spheres are not evenly placed within the FG
** several of the spheres are submerged inside the FG
 
==Hitpoint Properties==
The recommendations above will do nothing to make a vehicle safe from explosive damage--termed "indirectHit" damage in Arma terminology. IndirectHit damage reaches freely through fire geometry to damage hitpoints.
 
The only way to protect a vehicle from such damage is by adjusting ''minimalHit'' and ''explosionShielding'' properties. (These properties apply to hitpoint locations--BI has also recently added equivalent properties for global vehicle health called ''minTotalDamageThreshold'' and ''explosionShielding''). Armored vehicles in particular should have a large enough minimalHit and small enough explosionShielding value to protect against minor indirectHit weapons. But they should not be so heavily protected that they are immune to large-scale indirectHit weapons (IED's, laser-guided-bombs, etc.).
 
=Useful Links=
(The VBS links are very useful, but do contain some obsolete/irrelevant information)
 
[https://community.bistudio.com/wiki/Arma_3_Damage_Description More Detailed Damage Description]
 
[https://resources.bisimulations.com/w/index.php?title=Damage_Modeling:_Objects VBS:Damage Modeling:Objects]
 
[https://resources.bisimulations.com/w/index.php?title=CfgAmmo_Config_Reference VBS:CfgAmmo Reference]
 
[https://resources.bisimulations.com/w/index.php?title=Damage VBS:Damage Flowchart]
 
[https://resources.bisimulations.com/w/index.php?title=Damage_Modeling:_Simulation VBS:Damage Modeling:Simulation Formulas]
 
[https://community.bistudio.com/wiki/Config_Properties_Megalist Config Properties Mega-List]


[https://community.bistudio.com/wiki/Arma_3_Damage_Description For a much more detailed discussion of vehicular damage, go here]. It explains the research behind this article.
{{Cfg ref|end}}
{{Cfg ref|end}}

Revision as of 20:27, 5 April 2019

Template:Cfg ref

Intro

This article gives basic suggestions for building vehicle fire geometry and hit points. It assumes you are already familiar with making vehicle addons for Arma 3.

Take a look at the following images. Using the fire geometry LOD of a generic "tank", they tell you a lot about how fire geometry ("FG") and hitpoints ("HP") should be set up:

basic fg hp layout 01.png

basic fg hp layout 03.png

basic fg hp layout 02.png

  • Transparent blue: armor FG
  • Solid-colored boxes: HP FG (different colors representing different HP classes / components / types)
  • Transparent spheres: HP spheres (a visual representation of your vehicle config "radius" values)

The Four Commandments

1. Pieces of FG should not overlap (as little as possible anyway)--even if the pieces all belong to the same component

2. Leave SPACE between DIFFERENT types of FG--between armor and HP, or between one HP component and another. These should DEFINITELY NOT overlap.

3. HP FG should be encased within an EVENLY SPACED matrix of HP spheres.

4. HP spheres CAN overlap BUT they should only be in contact with ONE type of HP FG.

Refer to the images in the Intro for a visual example of these rules.

More Detail (If You Need It)

This section is optional, in case you're looking for a more detailed discussion beyond the Commandments section above.

1. No FG overlap

  • The less the better, with none being the ideal. A little overlap is most tolerable in pieces of armor, or within a single type of HP FG (e.g. several convex pieces of FG that make up your vehicle's engine compartment).

2. Space between different FG types

  • There should be an airspace buffer between HP FG--which will be taking damage--and armor FG--which should cause marginal to no damage.
  • You also need airspace buffer between different HP components (engine, turret, gun, etc.). It's not the exact airspace distance that matters per se. The point is to have enough space to prevent an HP sphere encasing one component from touching a second component. When a sphere touches 2 different types of FG, damage on one component will "leak" to the other.
  • Meeting these requirements, you will typically find yourself needing somewhere on the order of 12" (25cm) between different FG components.

3. Encase FG evenly in HP spheres

  • Each HP component should be as evenly encased as possible within a "bubbly" matrix of overlapping HP spheres.
  • "Evenly encased" means:
    • ...that the spheres should overlap with each other to fully encase the FG without leaving gaps.
    • ...that the sphere matrix should be a completely regular 3D grid--the distance between each sphere should be identical
    • ...that the FG should be evenly encased by your HP sphere matrix. It's as if you converted the FG into a voxel network of spherical cells--part of the FG should not be sticking out of the sphere matrix.
  • Arrange the relationship between the vertex spacing (in the P3D) and the "radius" value (in the vehicle config) so that the HP spheres overlap substantially with each other in the matrix.
  • This will create more even coverage of your FG. (See the Intro images above and the diagram below to get an idea of "substantial overlap").
  • hitpoint guide.JPG
  • You want case "A" above (where blue FG is armor and orange FG is an HP component that receives damage).
    • You should avoid case "B" (unless you really know what you are doing).
    • Under no circumstances should you have a situation like "C", which has the following problems:
      • ... the HP spheres are irregularly positioned over the FG.
      • ... there is FG sticking out of the sphere matrix.
  • It will probably make your life MUCH EASIER if you simply standardize all HP at a single radius--rather than using slightly different radii for different HP.
    • This way you can space the "grid" or "matrix" of HP sphere verts just once--and simply copy and paste from there in your vehicle's HitPoints LOD.

4. HP spheres should only touch one type of HP

  • This is already explained #2 above.

Bad Things That Happen If You Don't Follow These Rules

  • Weapons which don't penetrate your vehicle's armor will cause damage (even though they shouldn't).
  • HP will take totally erratic damage depending on the angle of the weapon impact.
  • HP which are not in the path of a penetrating weapon will take damage anyway.

For a much more detailed discussion of vehicular damage, go here. It explains the research behind this article. Template:Cfg ref