FBX Import – Arma Reforger
| (7 intermediate revisions by 2 users not shown) | |||
| Line 1: | Line 1: | ||
{{TOC|side}} | {{TOC|side}} | ||
* following pipeline is verified as compatible with | * following pipeline is verified as compatible with 3ds Max, Maya and Blender | ||
* it is possible to export the FBX from any of the software and import it into any other software and edit it without loosing any data | * it is possible to export the FBX from any of the software and import it into any other software and edit it without loosing any data | ||
== General | == General Rules and Habits == | ||
* syntax is not case-sensitive (all can be written with both small and large letters) | * syntax is not case-sensitive (all can be written with both small and large letters) | ||
* do not use spaces or any special symbols /\<>:"|?* | * do not use spaces or any special symbols /\<>:"|?* | ||
** if such symbol is used in material name it gets converted to "_"(underscore) during FBX import, what causes inconsistency between source(fbx) vs. engine(xob.meta file) data, what prevents Bohemia Blender Tools addon to properly match material name(stored in FBX) -> emat | ** if such symbol is used in material name it gets converted to "_"(underscore) during FBX import, what causes inconsistency between source(fbx) vs. engine (xob.meta file) data, what prevents Bohemia Blender Tools addon to properly match material name(stored in FBX) -> emat | ||
[[ | [[File:armareforger-fbx-import-general.png|1200px]] | ||
* for good readability it is strongly recommended to use LARGE letters for prefixes and suffixes and small letter for text in the core name of an object | * for good readability it is strongly recommended to use LARGE letters for prefixes and suffixes and small letter for text in the core name of an object | ||
| Line 19: | Line 19: | ||
== Alignment == | == Alignment == | ||
* '''always align assets pointing along Z+ axis in Enfusion'''; for this asset must be oriented as pointing along/towards the '''Y+ axis in Blender, | * '''always align assets pointing along Z+ axis in Enfusion'''; for this asset must be oriented as pointing along/towards the '''Y+ axis in Blender, 3ds Max and Maya''' | ||
* Weapons: Barrel along Z+ (Enfusion) | * Weapons: Barrel along Z+ (Enfusion) | ||
* Vehicles: Nose pointing along Z+ (Enfusion) | * Vehicles: Nose pointing along Z+ (Enfusion) | ||
* Buildings: Main entrance pointing along Z+ (Enfusion) | * Buildings: Main entrance pointing along Z+ (Enfusion) | ||
[[ | [[File:armareforger-fbx-import-weapon.png|300px]] [[File:armareforger-fbx-import-house.png|300px]] [[File:armareforger-fbx-import-car.png|300px]] | ||
| Line 37: | Line 37: | ||
{| class="wikitable" | {| class="wikitable" | ||
|[[ | | [[File:armareforger-fbx-import-blender-lod.png|300px]] | ||
|[[ | | [[File:armareforger-fbx-import-enfusion-lod.png|300px]] | ||
|- | |- | ||
| Blender setup | | Blender setup | ||
| Line 47: | Line 47: | ||
{| class="wikitable" | {| class="wikitable" | ||
| [[ | | [[File:armareforger-fbx-import-colliders-all.jpg|300px]] | ||
| [[ | | [[File:armareforger-fbx-import-colliders-max.png|300px]] | ||
| [[ | | [[File:armareforger-fbx-import-colliders-enfusion.png|300px]] | ||
|- | |- | ||
| All possible collider shapes | | All possible collider shapes | ||
| | | 3ds Max setup | ||
| Enfusion after import | | Enfusion after import | ||
|} | |} | ||
| Line 65: | Line 65: | ||
** '''UTM'''_ - triangle mesh (trimesh) | ** '''UTM'''_ - triangle mesh (trimesh) | ||
* most collider shapes can't be scaled just by one or two axis, otherwise they will lost their shape and will not be imported. The only scaling that will work will be scale along vertical axis of capsule and cylinder + '''trimesh and box can be scaled along all axis.''' | * most collider shapes can't be scaled just by one or two axis, otherwise they will lost their shape and will not be imported. The only scaling that will work will be scale along vertical axis of capsule and cylinder + '''trimesh and box can be scaled along all axis.''' | ||
** In '''Blender''' it can be achieved via [https://docs.blender.org/manual/en/latest/scene_layout/object/editing/apply.html#options '''Apply -> Rotation & Scale'''] (but not Location!) function | |||
* origin of '''UCL, UCS or USP''' colliders need to be at '''center of the object''' | |||
** In '''Blender''' it can be done by selecting collider object and then using [https://docs.blender.org/manual/en/latest/scene_layout/object/origin.html#set-origin '''Set Origin -> Origin to Geometry'''] function | |||
* Maximum number of verts of faces of any of the collider is '''65535''' | |||
**If you will reach this limit, you will get following error{{Feature|important|RESOURCES (W): Trimesh collider exceeded maximal number of vertices/faces}} | |||
* collider shape with corrupted/not recognized shape is ignored (current solution) | * collider shape with corrupted/not recognized shape is ignored (current solution) | ||
** Incorrect colliders will be reported in Log Console in following way {{Feature|important|RESOURCES (W): Invalid collider 'name_of_collider'. Export skipped}}If you encounter such issue, check '''origin''' first and then '''rotation and scale''' of object. You can also take a look at example colliders linked below | |||
{{Feature|informative|Example colliders models can be | {{Feature|informative| | ||
Example colliders models can be downloaded from {{Link|https://github.com/BohemiaInteractive/Arma-Reforger-Misc/blob/main/Art/Model%20Examples/collider_shapes_examples.FBX|'''Arma-Reforger-Misc'''}} Github repository. | |||
}} | |||
== Collider | |||
== Collider Hierarchy == | |||
* collider hierarchy in FBX is important for correct hit-zone detection and possibly other simulations. Rules are simple: | * collider hierarchy in FBX is important for correct hit-zone detection and possibly other simulations. Rules are simple: | ||
| Line 75: | Line 84: | ||
== Collider | == Collider Usage == | ||
=== General | === General Rules === | ||
{{Feature|important| | {{Feature|important| | ||
Two main rules apply: | |||
# | # every collider should be '''as simple as possible''' | ||
# | # when artist is in doubt, refer to rule number 1 | ||
}} | |||
| Line 88: | Line 98: | ||
* Primitives and Convex colliders can have only one physical material per collider | * Primitives and Convex colliders can have only one physical material per collider | ||
* Triangle mesh collider (Trimesh) can have assigned physical material per triangle [[ | * Triangle mesh collider (Trimesh) can have assigned physical material per triangle [[File:armareforger-fbx-colliders-merge-mesh.png|right|400px]] | ||
** must have checked '''Merge Tri Meshes''', otherwise all UTMs will stay separate even if they share the same Layer Preset | ** must have checked '''Merge Tri Meshes''', otherwise all UTMs will stay separate even if they share the same Layer Preset | ||
** UTMs with different Layer Preset (custom property) will not be merged even with "'''Merge Tri Meshes'''" ON | ** UTMs with different Layer Preset (custom property) will not be merged even with "'''Merge Tri Meshes'''" ON | ||
| Line 103: | Line 113: | ||
- '''less amount of more complex colliders is much better than bigger amount of less complex colliders with the same amount of triangles''' | - '''less amount of more complex colliders is much better than bigger amount of less complex colliders with the same amount of triangles''' | ||
[[ | [[File:armareforger-fbx-colliders-performance.png|600px]] | ||
=== Restrictions === | === Restrictions === | ||
{| class="wikitable" | {| class="wikitable" | ||
! | |||
! Static | |||
! Dynamic | |||
|- | |- | ||
| Collisions | | Collisions | ||
| Line 131: | Line 141: | ||
** simple street mail box could be one box shape in collision | ** simple street mail box could be one box shape in collision | ||
** power transmitters can often be approximated by several (less than 10) convex shapes, if not use one triangle mesh in collision | ** power transmitters can often be approximated by several (less than 10) convex shapes, if not use one triangle mesh in collision | ||
* '''if the geometry is very similar to View or Fire geometry, consider sharing View / Fire and Collision as one slightly more complex Collision layer that can be shared with Fire/View...it is better than to have multiple layers just because of few triangles''' | * '''if the geometry is very similar to View or Fire geometry, consider sharing View / Fire and Collision as one slightly more complex Collision layer that can be shared with Fire/View... it is better than to have multiple layers just because of few triangles''' | ||
==== Dynamic Objects ==== | ==== Dynamic Objects ==== | ||
| Line 141: | Line 151: | ||
== Avoid | == Avoid Overlaps == | ||
* overlap of more objects is totally unacceptable | * overlap of more objects is totally unacceptable | ||
| Line 147: | Line 157: | ||
* best is to split the the overlapping collider | * best is to split the the overlapping collider | ||
[[ | [[File:armareforger-fbx-colliders-overlaps.png|400px]] | ||
| Line 158: | Line 168: | ||
** its name is '''"usage"''' and in value are/will be all defined usages like this: '''"FireGeo"''' (only for detection of bullet impacts in this case) and possible others | ** its name is '''"usage"''' and in value are/will be all defined usages like this: '''"FireGeo"''' (only for detection of bullet impacts in this case) and possible others | ||
** if a collider shape '''has no usage parameter''', then it '''collides (simulates) in every layer''' and warning message will appear in console log | ** if a collider shape '''has no usage parameter''', then it '''collides (simulates) in every layer''' and warning message will appear in console log | ||
** '''for creating custom attributes in | ** '''for creating custom attributes in 3ds Max, use only the Parameter editor in Animation menu''', otherwise the properties in exported FBX can't be edited in Maya. So doing it with Object Properties/User defined is '''FORBIDDEN''' | ||
| Line 167: | Line 176: | ||
[[File:armareforger-fbx-layers-blender-1.png|frame|left|200px|Blender - manual input]] | [[File:armareforger-fbx-layers-blender-1.png|frame|left|200px|Blender - manual input]] | ||
[[File:armareforger-fbx-layers-blender-2.png|frame|left|200px|Blender - using plugin]] | [[File:armareforger-fbx-layers-blender-2.png|frame|left|200px|Blender - using plugin]] | ||
[[File:armareforger-fbx-layers-max.png|frame|left|200px| | [[File:armareforger-fbx-layers-max.png|frame|left|200px|3ds Max example]] | ||
[[File:armareforger-fbx-layers-maya.png|frame|left|200px|Maya example]] | [[File:armareforger-fbx-layers-maya.png|frame|left|200px|Maya example]] | ||
{{Clear}} | {{Clear}} | ||
== Physical material (Game material) == | == Physical material (Game material) == | ||
* Game materials ''(used for physics, vehicles, sound, vfx)'' like dirt, concrete, glass, snow, etc. are being assigned to colliders through material name in 3D software ( | * Game materials ''(used for physics, vehicles, sound, vfx)'' like dirt, concrete, glass, snow, etc. are being assigned to colliders through material name in 3D software (3ds Max, Maya, Blender,...) | ||
* If you want to have your material automatically linked to existing game material, you should use following naming convention for material | * If you want to have your material automatically linked to existing game material, you should use following naming convention for material | ||
** | ** MaterialName_MaterialGUID - example: ''Weapon_metal_3B2D2687F56BB4EF'' | ||
** GUID of material can be obtained by clicking with right mouse button on gamemat and then selecting "'''Get Resource GUID(s)'''" option from contextual menu | ** GUID of material can be obtained by clicking with right mouse button on gamemat and then selecting "'''Get Resource GUID(s)'''" option from contextual menu | ||
** Blender users can use Collider Setup menu if they have '''Enfusion Blender Tools''' installed | ** Blender users can use Collider Setup menu if they have '''Enfusion Blender Tools''' installed | ||
| Line 185: | Line 193: | ||
[[File:armareforger-fbx-geometry-reset.png|frame|right|200px|Resetting Geometry Params]] | [[File:armareforger-fbx-geometry-reset.png|frame|right|200px|Resetting Geometry Params]] | ||
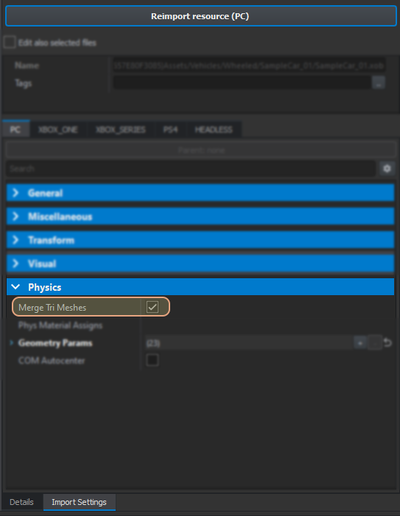
{{Feature|informative|'''Whenever you wanna changed Game material on any collider''', first reset '''Geometry Parameters''' in '''Import Settings''' for an asset (.xob), otherwise new .gamemat won't be assigned and you will still see the old one. This can be done in two ways | {{Feature|informative| | ||
'''Whenever you wanna changed Game material on any collider''', first reset '''Geometry Parameters''' in '''Import Settings''' for an asset (.xob), otherwise new .gamemat won't be assigned and you will still see the old one. | |||
This can be done in two ways: | |||
* By clicking with Right Mouse Button on Geometry Params property and selecting Reset do default value option | * By clicking with Right Mouse Button on Geometry Params property and selecting Reset do default value option | ||
* By clicking on arrow on the right side of Geometry Params property | * By clicking on arrow on the right side of Geometry Params property | ||
Once that is done, Reimport resource button can be pressed. After resource was reimported, proper Layer Presets should be visible in the Geometry Params array}} | Once that is done, Reimport resource button can be pressed. After resource was reimported, proper Layer Presets should be visible in the Geometry Params array. | ||
}} | |||
| Line 197: | Line 208: | ||
* names of the materials in your 3D software are used by '''Enfusion''', when '''Enfusion''' creates materials automatically after import. So name them carefully, so we don't have names of materials like ''Default1'' and so on. | * names of the materials in your 3D software are used by '''Enfusion''', when '''Enfusion''' creates materials automatically after import. So name them carefully, so we don't have names of materials like ''Default1'' and so on. | ||
* please avoid using special characters in material's name as Enfusion alter them during FBX import | * please avoid using special characters in material's name as Enfusion alter them during FBX import | ||
** in case of: | ** in case of: {{hl|/\<>:"{{!}}?*}}, Enfusion replaces them with {{hl|_}} (underscore) character | ||
** in case of: . (dot) , Enfusion strip string eg. M923A1_Base_Grating.008 -> M923A1_Base_Grating, mainly '''Blender''' user should pay attention as Blender names duplicates with '''.xxx''' | ** in case of: . (dot) , Enfusion strip string eg. M923A1_Base_Grating.008 -> M923A1_Base_Grating, mainly '''Blender''' user should pay attention as Blender names duplicates with '''.xxx''' | ||
** both cases cause inconsistency between source(fbx) vs. engine(xob.meta file) data, what prevents Bohemia Blender Tools addon to properly match material name(stored in FBX) -> emat | ** both cases cause inconsistency between source(fbx) vs. engine(xob.meta file) data, what prevents Bohemia Blender Tools addon to properly match material name(stored in FBX) -> emat | ||
== Center of | == Center of Mass == | ||
* center of mass can be defined through empty dummy/null object, with prefix '''COM_''' | * center of mass can be defined through empty dummy/null object, with prefix '''COM_''' | ||
| Line 220: | Line 231: | ||
** Boxes thinner than 30 cm are turned into planes | ** Boxes thinner than 30 cm are turned into planes | ||
** '''Occluders cannot be triangulated!!!''' | ** '''Occluders cannot be triangulated!!!''' | ||
== Probes and Probe Volumes == | == Probes and Probe Volumes == | ||
| Line 240: | Line 252: | ||
* Probe itself must be created in engine as a '''child of building entity in the building prefab'''. Upon creation the probe is paired with volumes existing in the model. | * Probe itself must be created in engine as a '''child of building entity in the building prefab'''. Upon creation the probe is paired with volumes existing in the model. | ||
* '''Probes should be [[Arma Reforger:Data Modding Basics#Using .22Inherit in....22 function|inherited]] from respective base prefabs''': | * '''Probes should be [[Arma Reforger:Data Modding Basics#Using .22Inherit in....22 function|inherited]] from respective base prefabs''': | ||
** | ** {{Link|enfusion://ResourceManager/~ArmaReforger:Prefabs/Structures/Core/ProbeHouse_Base.et|\Prefabs\Structures\Core\ProbeHouse_Base.et}} | ||
** | ** {{Link|enfusion://ResourceManager/~ArmaReforger:Prefabs/Structures/Core/ProbeExterior_Base.et|\Prefabs\Structures\Core\ProbeExterior_Base.et}} | ||
** | ** {{Link|enfusion://ResourceManager/~ArmaReforger:Prefabs/Structures/Core/ProbeEnvCave_base.et|\Prefabs\Structures\Core\ProbeEnvCave_base.et}} | ||
* When you wanna have an '''extra probes using its custom volumes''' in a building prefab, the only way right now is by creating the volumes in engine in world editor, ideally inheriting from respective prefab and attaching the volume as a child of the second probe that is child of the building prefab. | * When you wanna have an '''extra probes using its custom volumes''' in a building prefab, the only way right now is by creating the volumes in engine in world editor, ideally inheriting from respective prefab and attaching the volume as a child of the second probe that is child of the building prefab. | ||
** these volumes created in engine can't be adjusted by cutting planes and are just simple box or sphere shapes. | ** these volumes created in engine can't be adjusted by cutting planes and are just simple box or sphere shapes. | ||
** volume base prefab: | ** volume base prefab: {{Link|enfusion://ResourceManager/~ArmaReforger:Prefabs/Structures/Core/ProbeVolume_Base.et|\Prefabs\Structures\Core\ProbeVolume_Base.et}} | ||
== Portals == | == Portals & BSP Geometry == | ||
=== BSP Geometry === | |||
'''BSP geometry''' is used in conjunction with portals for volume analysis, i.e., room placement, connectivity. The geometry should represent simplified sketch of the building with walls, openings, etc. | |||
* The geometry should be as simple as possible (close to or simpler than tri-mesh colliders used for player collisions) | |||
** If there's a narrow wall, all vertices of that wall should lay in a single plane | |||
** When in doubt lock view to certain cardinal direction and scale wall vertices to 0 | |||
** Ideally create the BSP geometry from scratch by extruding a cube...safest way | |||
** Difference between UTM and BSP geometry can be seen below in the embedded .gif, the BSP geometry covers only the area with active portals, attic is not covered because it is not accessible by player: | |||
** Naming is '''BSP_xxx''' where '''xxx''' is some convenience name, there can be many of these as separate geometry which will be merged together | |||
** Material must be '''[enfusion://ResourceManager/~ArmaReforger:Common/Materials/dummyvolume.emat dummyvolume] ( GUID: D3975B51F51E6BD5)''' | |||
The BSP geometry should represent enclosed space by walls, ceilings, with openings for doors and windows | |||
An example building with portal placement is below right, it shows a top-down orthographic view of [https://enfusionengine.com/api/redirect?to=enfusion://ResourceManager/~ArmaReforger:Assets/Structures/Houses/Village/House_Village_E_1I01/House_Village_E_1I01.xob House_Village_E_1I01.xob] | |||
[[File:armareforger-fbx-UTM-BSP.gif]] | |||
* Walls outline is in orange | |||
* Probe volume is yellow-ish | |||
* Portal placement is highlighted in blue | |||
* Portals '''1-7''' are outside windows/doors '''aligned with probe volume''' and '''configured to emit light''' | |||
* Portals '''a, b''' are structural to split the living room, bathroom and L shape corridor apart. They have '''"Emit light" checkbox disabled''' in their material | |||
* Placement of a, b portals is close to wall geometry due to door prefab placement in the resulting model - these '''portals should be in the middle of door geometry if possible''' | |||
=== Portals === | |||
{{Feature|informative|Light portals will show correctly only in "building prefab" with necessary components}} | |||
Portals define openings (hence the name) in the geometry through which light and sound can be propagated from the outside of the model to the inside and between rooms in the model, i.e., doors, windows, etc. | |||
* They are specified as '''plane primitive''' with '''4 vertices''' w/o triangulation (see screenshot below), their '''normal should be facing inwards the model''' (if they are representing door or windows to the exterior) | |||
* The '''size should be slightly larger than the actual opening''' in the geometry | |||
* The position should be '''in the middle of the window/opening''' - ideally aligned with probe volume if possible (see below right). Must not be aligned with the inner or outer wall of the window or be in front of it - that leads to incorrect or degenerate cases | |||
* A material specifying portal properties must be assigned - '''material class''' must be set to '''MatLightPortal''' (see below right middle) | |||
* Naming is '''PRT_n''' where '''n''' stands for portal id (not used anywhere in the code, it's for your convenience) | |||
Optional portal volume may be assigned as parent, i.e., several portals can have single portal volume. Volumes are used for clipping to light to prevent leaking through thin walls, ceilings etc. | |||
* Naming is '''PRTVOL_m''' where '''m''' stands for volume id (not used anywhere in the code, it's for your convenience) | |||
* Rules for creation are the same as for boxvolumes for probes, see above '''BOXVOL''' | |||
* Material must be '''[enfusion://ResourceManager/~ArmaReforger:Common/Materials/dummyvolume.emat dummyvolume] ( GUID: D3975B51F51E6BD5)''' | |||
There are rules to the hierarchy inside the FBX (see an example from Blender below left): | |||
* One window/door <==> one portal - portal model can be child of window/door socket, must be child of optional portal volume | |||
Upon import, portals will be consumed and used for BSP construction - you first need to visit '''Import settings''' in Workbench, go to general → common and '''check that you want to Generate BSP''' and reimport the model (see below left middle). Excluding the generate BSP option itself, these are: | |||
''' | * Force create portals - ''ideally should not be used.'' It overrides BSP creation by forcing single root node with all the portals registered to it, BSP geometry is skipped altogether | ||
* Export opaque leaves - use this for '''debugging only''' as it increases the resulting model size and opaque leaves aren't useful for anything besides debugging | |||
* BSP grid cell size - use this to increase/decrease the granularity of the helper grid, e.g., if you have very thin geometry that isn't properly registered as opaque | |||
* Export BSP occupancy - use this for '''debugging only''', it increases resulting model size and is used only for visualization of the occupancy grid used during construction, it doesn't have any runtime usage besides that | |||
* Export BSP connectivity - use this for '''debugging only''', it increases resulting model size and is used for active leaf visualization (i.e., the one with camera inside) and all leaves connected to it | |||
* Export BSP geometry - use this for '''debugging only''', it increases resulting model size and is used for visualization of the input geometry used for BSP construction, so you can asses the builder output | |||
{{Feature|important|Make sure before publishing mod that the '''debugging only''' options are left '''unchecked.'''}}<gallery mode="packed-overlay" widths="300" heights="500"> | |||
File:armareforger-fbx-prt-vol-setup.png|Portal Volumes and Portals hierarchy | |||
File:armareforger-fbx-light-portals-import-options.png|Model BSP related import settings | |||
File:armareforger-fbx-portal-material-settings.png|MatLightPortal material settings | |||
File:armareforger-fbx-house-bsp-portals.png|Portals in BSP | |||
</gallery> | |||
== Sockets == | |||
* defined as dummy/null object | |||
* dummies/sockets can be parented into hierarchical structure if needed | |||
* points of origins for various things like particle effects, prefabs,... | |||
* based on purpose of these, there are various naming conventions for different types of assets (weapon, vehicle, character,..) | |||
* currently there is no naming convention that will influence the import, except for '''COM_''' ('''center of mass''') | |||
== Land Contacts == | |||
* defined as dummy/null object, with prefix '''LC_''' | |||
* used for snapping object to the ground and at least 2 '''Land Contact''' points must be created for this to work | |||
* object will be snapped and skewed following the ground slope under the object | |||
[[File:armareforger-fbx-land-contact.png|400px]] | |||
[[File:armareforger-fbx- | |||
== FBX Export == | == FBX Export == | ||
| Line 338: | Line 349: | ||
{{Clear}} | {{Clear}} | ||
* Always export FBX with smoothing groups/hard edges, otherwise the FBX is worthless as a potential source file | * Always export FBX with smoothing groups/hard edges, otherwise the FBX is worthless as a potential source file | ||
* '''Autodesk software''': Type must be '''Binary''', so it can be opened in all 3D suites, and '''Version''' parameter should be set to '''FBX 2014/2015''' ''(version 7.4)'' | * '''Autodesk software''': Type must be '''Binary''', so it can be opened in all 3D suites, and '''Version''' parameter should be set to '''FBX 2014/2015''' ''(version 7.4)'' | ||
| Line 346: | Line 356: | ||
{{Clear}} | {{Clear}} | ||
Do not forget to check '''"Custom Properties"''' property when exporting to FBX from Blender - otherwise '''Layer Presets''' settings (among with other properties) '''will be lost'''! | |||
In case of exporting '''model with skeleton''', it is also important to make sure that '''Armature''' is selected in '''Object Types''' and that '''Add Leaf Bones''' option is '''unchecked'''. {{Clear}} | |||
[[File:armareforger-new-weapon-export-blender2.png|frame|left|800px|Blender export settings]] | [[File:armareforger-new-weapon-export-blender2.png|frame|left|800px|Blender export settings]] | ||
== Import Process in the Workbench == | |||
[[File:armareforger-fbx-import-register2.png|frame|left|400px|Resource Browser]] | |||
# Put the FBX into your game template data structure and find it in the Resource browser | |||
# Right-click on it and you have two options: '''Register''' or '''Register and Import'''{{Clear}}<br>[[File:armareforger-fbx-import-model.png|frame|right|400px|Import as model]][[File:armareforger-fbx-import-settings2.png|frame|left|400px|Import Settings]] | |||
# Upon clicking on '''Register''', then as a Model, a meta file is created and you can set '''Import Settings''' | |||
# Upon clicking on '''Register and Import''', then as a '''Model''', it will give you '''Import Settings''' and create '''.txo''' and '''.xob''' (''binary version of .txo'') file, which is now our converted FBX.<br><br><!-- | |||
-->'''Import Settings''': | |||
#* '''Merge Meshes:''' means merge all meshes of each visual LOD geometry with the same material into one mesh (optimization for faster render) - meshes with different number of UV sets don't merge! | |||
#* '''Export Skinning:''' loads skinning data (required only if there is skeleton available, maximum 4 bones can affect single vertex) | |||
#* '''Export Scene Hierarchy:''' loads bones/dummies as a sockets (slot, snap points and others) | |||
#* '''Modify material names:''' ... | |||
#* '''Legacy Support:''' turns ON old import pipeline, which overrides the new one. '''It should not be used!'''{{Clear}}[[File:armareforger-fbx-import-context.png|frame|left|400px|Reimport option in context menu]] | |||
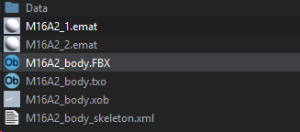
# When the '''Import Settings''' are set, click either on '''Import Resource button''' (above '''Import Settings''' tab) or right-click on the FBX or XOB file in resource browser and click on '''Reimport'''<br>[[File:armareforger-fbx-import-files.png|frame|right|400px|Skeleton]] | |||
# After import, more files are created'''. All materials and meta files are automatically created in data folder next to FBX''', using names from materials in the FBX.<br>[[File:armareforger-fbx-geometry-reimport.png|frame|center|400px|Reimport button]]{{Clear}} | |||
# If you were importing model with skinning or hierarchy, you can verify skeleton in Bones section<br>{{Clear}}[[File:armareforger-fbx-import-bones.png|frame|left|400px|bones]] | |||
{{Clear}} | |||
{{GameCategory|armaR|Modding|Tutorials|Assets}} | {{GameCategory|armaR|Modding|Tutorials|Assets}} | ||
Latest revision as of 14:55, 20 March 2024
- following pipeline is verified as compatible with 3ds Max, Maya and Blender
- it is possible to export the FBX from any of the software and import it into any other software and edit it without loosing any data
General Rules and Habits
- syntax is not case-sensitive (all can be written with both small and large letters)
- do not use spaces or any special symbols /\<>:"|?*
- if such symbol is used in material name it gets converted to "_"(underscore) during FBX import, what causes inconsistency between source(fbx) vs. engine (xob.meta file) data, what prevents Bohemia Blender Tools addon to properly match material name(stored in FBX) -> emat

- for good readability it is strongly recommended to use LARGE letters for prefixes and suffixes and small letter for text in the core name of an object
- the import into Enfusion doesn't take into account any layers, so you can put your models into any layers you want. In other words, you can organize you source file however you want.
- keep in mind that duplicated object names might problem from Blender and sometimes might confuse Workbench FBX importer, therefore it is recommend to use unique names for objects
Alignment
- always align assets pointing along Z+ axis in Enfusion; for this asset must be oriented as pointing along/towards the Y+ axis in Blender, 3ds Max and Maya
- Weapons: Barrel along Z+ (Enfusion)
- Vehicles: Nose pointing along Z+ (Enfusion)
- Buildings: Main entrance pointing along Z+ (Enfusion)


LODs
- to detect what mesh object is part of what LOD, the engine is looking at a suffix in a name of a model
- name for LOD model object must look like this = name_of_the_object_LODx = Car_LOD0, Bowl_big_LOD3....
- LODs suffixes are starting with LOD0, LOD1, LOD2 and can go to whatever LODx number you want.
- more meshes/models per LOD are possible = Car_LOD0, Trunk_LOD0, Wheel_LOD0 will all be imported to LOD0.
- if the mesh doesn't meet any known prefix or suffix convention, it will go to LOD0
- if mesh has for example only _LOD0, _LOD2 and LOD4 meshes, LOD2 will behave like LOD1 and LOD4 like LOD2

|

|
| Blender setup | Enfusion after import |
Collider shape

|

|

|
| All possible collider shapes | 3ds Max setup | Enfusion after import |
- name for collider shape model = COLLIDER SHAPE_name_of_the_object = UBX_Car or UCS_wall1_part1 for example.
- collider shapes (primitives, which can be created in most 3d software):
- UBX_ - box
- UCX_ - convex
- USP_ - sphere
- UCS_ - capsule
- UCL_ - cylinder
- UTM_ - triangle mesh (trimesh)
- most collider shapes can't be scaled just by one or two axis, otherwise they will lost their shape and will not be imported. The only scaling that will work will be scale along vertical axis of capsule and cylinder + trimesh and box can be scaled along all axis.
- In Blender it can be achieved via Apply -> Rotation & Scale (but not Location!) function
- origin of UCL, UCS or USP colliders need to be at center of the object
- In Blender it can be done by selecting collider object and then using Set Origin -> Origin to Geometry function
- Maximum number of verts of faces of any of the collider is 65535
- If you will reach this limit, you will get following error
- collider shape with corrupted/not recognized shape is ignored (current solution)
- Incorrect colliders will be reported in Log Console in following way If you encounter such issue, check origin first and then rotation and scale of object. You can also take a look at example colliders linked below
Collider Hierarchy
- collider hierarchy in FBX is important for correct hit-zone detection and possibly other simulations. Rules are simple:
- when asset contains animated and non-animated parts, The static colliders must not have any parent in the hierarchy. Only animated parts must be children of corespondent bones. In other words...if static collider, which always moves and rotates with asset's root, is child of root bone, it is wrong. There must simply be no parent for such a collider.
Collider Usage
General Rules
Other things worth to consider:
- Primitives and Convex colliders can have only one physical material per collider
- Triangle mesh collider (Trimesh) can have assigned physical material per triangle
- must have checked Merge Tri Meshes, otherwise all UTMs will stay separate even if they share the same Layer Preset
- UTMs with different Layer Preset (custom property) will not be merged even with "Merge Tri Meshes" ON

- Trimesh objects should have closed mesh, as backface don't react. Can be left open if backface is not accessible (access closed by different mesh)
- in Trimesh avoid very small, degenerated or huge triangles...make the triangle mesh as uniform as possible, even if its gonna have a bit more triangles because of that
- the less triangles in Trimesh the better
- the smaller number of colliders the better
- avoid overlapping colliders as much as possible
Performance
- less amount of more complex colliders is much better than bigger amount of less complex colliders with the same amount of triangles

Restrictions
| Static | Dynamic | |
|---|---|---|
| Collisions | All | NEVER Trimesh, otherwise all |
| Fire / View | All | All |
How To
Static (buildings, infrastructure, trees)
- prefer one triangle mesh over multiple primitive shapes (houses with lots of windows, doors etc....door and windows separate colliders though)
- try to make the triangle mesh as uniform as possible
- try to make the number of triangles as low as possible
- prefer primitive or convex shapes where it makes sense
- street light can be approximated as two cylinders in collision
- simple street mail box could be one box shape in collision
- power transmitters can often be approximated by several (less than 10) convex shapes, if not use one triangle mesh in collision
- if the geometry is very similar to View or Fire geometry, consider sharing View / Fire and Collision as one slightly more complex Collision layer that can be shared with Fire/View... it is better than to have multiple layers just because of few triangles
Dynamic Objects
(e.g vehicles, weapons, magazines, small destructible objects (also tree _dst parts) etc.)
- the process of selecting a correct shape should follow these rules:
- use one primitive shape if possible (ideal case)
- if multiple primitive shapes can be replaced with one convex shape then use the convex
- avoid trimesh ( just static parts of vehicles should be merged in trimesh in fire/view; wheels can by cylinders)
Avoid Overlaps
- overlap of more objects is totally unacceptable
- overlap of just two object is acceptable in edge-cases when necessary
- best is to split the the overlapping collider

Setting Layer Preset on colliders (usage parameter)
- We are talking here about models for simulations like Collision, and possible others like NavMesh, Fire geometry, View geometry or others
- One collider shape can have many usages (can serve for different simulations), different mix of usages are defined through a Layer preset as custom parameter/attribute/property in the data...we name it COLLIDER USAGE
- General rules:
- it is a string parameter
- its name is "usage" and in value are/will be all defined usages like this: "FireGeo" (only for detection of bullet impacts in this case) and possible others
- if a collider shape has no usage parameter, then it collides (simulates) in every layer and warning message will appear in console log
- for creating custom attributes in 3ds Max, use only the Parameter editor in Animation menu, otherwise the properties in exported FBX can't be edited in Maya. So doing it with Object Properties/User defined is FORBIDDEN


Physical material (Game material)
- Game materials (used for physics, vehicles, sound, vfx) like dirt, concrete, glass, snow, etc. are being assigned to colliders through material name in 3D software (3ds Max, Maya, Blender,...)
- If you want to have your material automatically linked to existing game material, you should use following naming convention for material
- MaterialName_MaterialGUID - example: Weapon_metal_3B2D2687F56BB4EF
- GUID of material can be obtained by clicking with right mouse button on gamemat and then selecting "Get Resource GUID(s)" option from contextual menu
- Blender users can use Collider Setup menu if they have Enfusion Blender Tools installed
- triangle mesh collider shape (trimesh) can have more materials assigned (each polygon different), other colliders shapes can have only one material per object assigned

Materials
- names of the materials in your 3D software are used by Enfusion, when Enfusion creates materials automatically after import. So name them carefully, so we don't have names of materials like Default1 and so on.
- please avoid using special characters in material's name as Enfusion alter them during FBX import
- in case of: /\<>:"|?*, Enfusion replaces them with _ (underscore) character
- in case of: . (dot) , Enfusion strip string eg. M923A1_Base_Grating.008 -> M923A1_Base_Grating, mainly Blender user should pay attention as Blender names duplicates with .xxx
- both cases cause inconsistency between source(fbx) vs. engine(xob.meta file) data, what prevents Bohemia Blender Tools addon to properly match material name(stored in FBX) -> emat
Center of Mass
- center of mass can be defined through empty dummy/null object, with prefix COM_
- when FBX doesn't have center of mass defined via empty object with COM_ prefix, engine will create center of mass in 0,0,0 coordinates
- when there are two or more COM_dummies, engine will take the first one it find and ignore the rest
Occluders
- occluders are defined as plane / box mesh with prefix OCC_
- general hint about occluders:
- Make them as big as possible. If it covers only small part of building, it's not worth it. Choose another place instead.
- You can extend them little bit under ground. 1-2m is enough. If you'll extend them too much, you'll make them artificially bigger so the system will count with them on mucg bigger distance without a benefit - they become burden instead of speed-up.
- Total number per building should be rather low. Max 3-4 is reasonable
- Occluder must be aligned with one of the axes (X, Y, Z)
- Minimum reasonable size is about 4-5 m
- Boxes thinner than 30 cm are turned into planes
- Occluders cannot be triangulated!!!
Probes and Probe Volumes
- define area which is affected by interior lighting probe
- they are defined either as box primitive which can be scaled in any axis. They must be named following naming conventions (even for SPHVOL create box shape. It will transform to sphere during import in engine. It must be done with box as engine can't currently recognize object transformations from actual sphere mesh):
- name BOXVOL_n = box volume where n stands for volume ID number like (01, 02, etc.)
- name SPHVOL_n = sphere volume where n stands for volume ID number like (01, 02, etc.)
- example: BOXVOL_01 , SPHVOL_02 , BOXVOL_03 , SPHVOL_04 , ...
- assign them material named "dummyvolume"
- upon FBX import dummyvolume.emat is created. In Material Assigned re-link the material to the one in /Common/Materials and delete the newly created one.
- we are able to cut off peaces of volume by defining cutting planes with plane primitive. We can do this in order to make volume shapes more precise and matching actual visual model. They must be created following some rules:
- create them as mesh part (mesh element) of the volume (BOXVOL or SPHVOL) objects. In other words, after you created the planes for a particular volume, merge them with the volume object.
- planes create infinitely large cutting planes in the engine
- orient them with vertex normals pointing towards the area you want to cut out
- you can create 4 cutting planes per volume as maximum. These influence only the volume they are merged with.
- we can set how hard or smooth the border of the volume is by:
- legacy support should not be used on new assets
- correct way - setting it in Enfusion workbench, in building *.xob import settings in Visual/Volume Params
- Probe itself must be created in engine as a child of building entity in the building prefab. Upon creation the probe is paired with volumes existing in the model.
- Probes should be inherited from respective base prefabs:
- When you wanna have an extra probes using its custom volumes in a building prefab, the only way right now is by creating the volumes in engine in world editor, ideally inheriting from respective prefab and attaching the volume as a child of the second probe that is child of the building prefab.
- these volumes created in engine can't be adjusted by cutting planes and are just simple box or sphere shapes.
- volume base prefab: \Prefabs\Structures\Core\ProbeVolume_Base.et
Portals & BSP Geometry
BSP Geometry
BSP geometry is used in conjunction with portals for volume analysis, i.e., room placement, connectivity. The geometry should represent simplified sketch of the building with walls, openings, etc.
- The geometry should be as simple as possible (close to or simpler than tri-mesh colliders used for player collisions)
- If there's a narrow wall, all vertices of that wall should lay in a single plane
- When in doubt lock view to certain cardinal direction and scale wall vertices to 0
- Ideally create the BSP geometry from scratch by extruding a cube...safest way
- Difference between UTM and BSP geometry can be seen below in the embedded .gif, the BSP geometry covers only the area with active portals, attic is not covered because it is not accessible by player:
- Naming is BSP_xxx where xxx is some convenience name, there can be many of these as separate geometry which will be merged together
- Material must be dummyvolume ( GUID: D3975B51F51E6BD5)
The BSP geometry should represent enclosed space by walls, ceilings, with openings for doors and windows
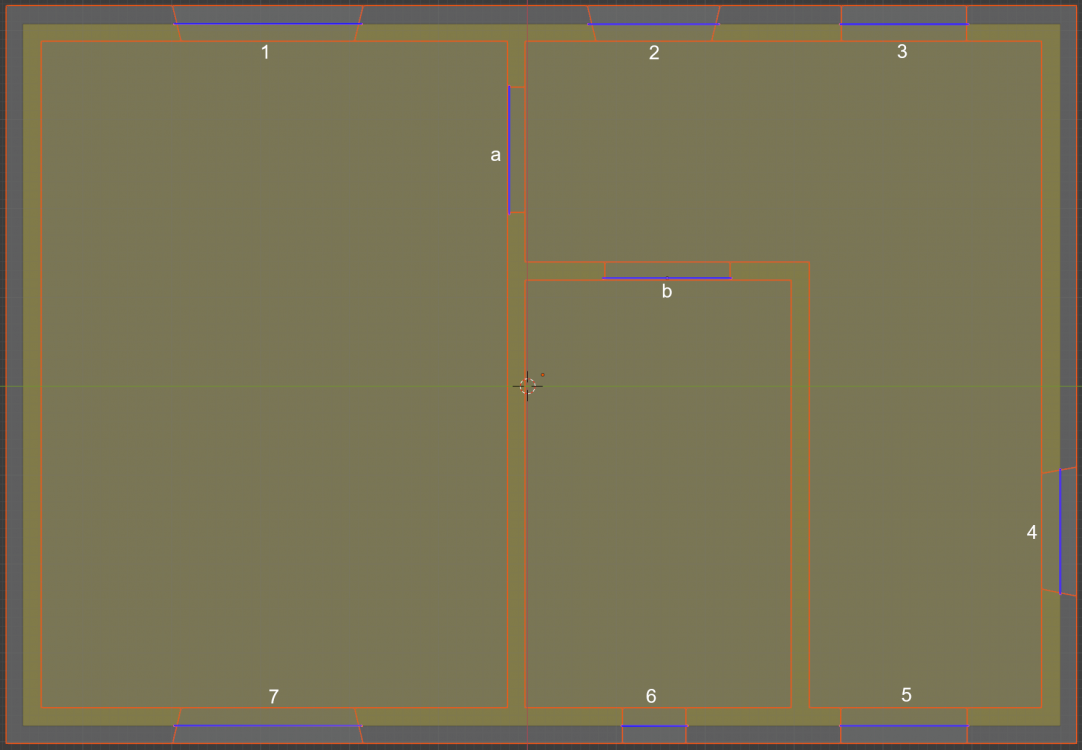
An example building with portal placement is below right, it shows a top-down orthographic view of House_Village_E_1I01.xob

- Walls outline is in orange
- Probe volume is yellow-ish
- Portal placement is highlighted in blue
- Portals 1-7 are outside windows/doors aligned with probe volume and configured to emit light
- Portals a, b are structural to split the living room, bathroom and L shape corridor apart. They have "Emit light" checkbox disabled in their material
- Placement of a, b portals is close to wall geometry due to door prefab placement in the resulting model - these portals should be in the middle of door geometry if possible
Portals
Portals define openings (hence the name) in the geometry through which light and sound can be propagated from the outside of the model to the inside and between rooms in the model, i.e., doors, windows, etc.
- They are specified as plane primitive with 4 vertices w/o triangulation (see screenshot below), their normal should be facing inwards the model (if they are representing door or windows to the exterior)
- The size should be slightly larger than the actual opening in the geometry
- The position should be in the middle of the window/opening - ideally aligned with probe volume if possible (see below right). Must not be aligned with the inner or outer wall of the window or be in front of it - that leads to incorrect or degenerate cases
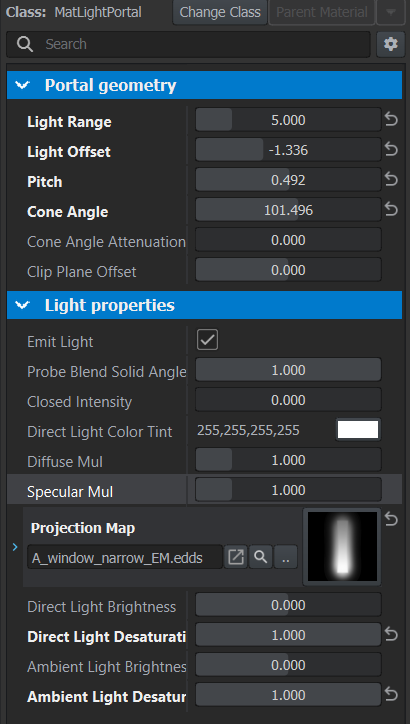
- A material specifying portal properties must be assigned - material class must be set to MatLightPortal (see below right middle)
- Naming is PRT_n where n stands for portal id (not used anywhere in the code, it's for your convenience)
Optional portal volume may be assigned as parent, i.e., several portals can have single portal volume. Volumes are used for clipping to light to prevent leaking through thin walls, ceilings etc.
- Naming is PRTVOL_m where m stands for volume id (not used anywhere in the code, it's for your convenience)
- Rules for creation are the same as for boxvolumes for probes, see above BOXVOL
- Material must be dummyvolume ( GUID: D3975B51F51E6BD5)
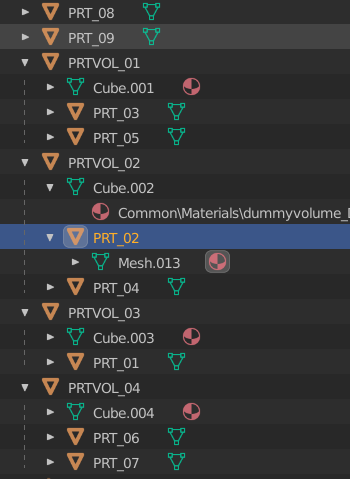
There are rules to the hierarchy inside the FBX (see an example from Blender below left):
- One window/door <==> one portal - portal model can be child of window/door socket, must be child of optional portal volume
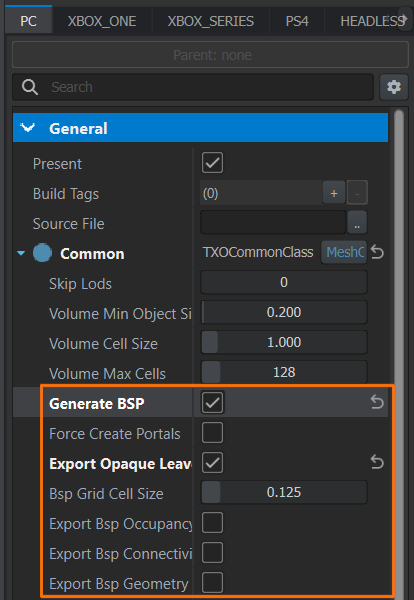
Upon import, portals will be consumed and used for BSP construction - you first need to visit Import settings in Workbench, go to general → common and check that you want to Generate BSP and reimport the model (see below left middle). Excluding the generate BSP option itself, these are:
- Force create portals - ideally should not be used. It overrides BSP creation by forcing single root node with all the portals registered to it, BSP geometry is skipped altogether
- Export opaque leaves - use this for debugging only as it increases the resulting model size and opaque leaves aren't useful for anything besides debugging
- BSP grid cell size - use this to increase/decrease the granularity of the helper grid, e.g., if you have very thin geometry that isn't properly registered as opaque
- Export BSP occupancy - use this for debugging only, it increases resulting model size and is used only for visualization of the occupancy grid used during construction, it doesn't have any runtime usage besides that
- Export BSP connectivity - use this for debugging only, it increases resulting model size and is used for active leaf visualization (i.e., the one with camera inside) and all leaves connected to it
- Export BSP geometry - use this for debugging only, it increases resulting model size and is used for visualization of the input geometry used for BSP construction, so you can asses the builder output
Portal Volumes and Portals hierarchy
Model BSP related import settings
MatLightPortal material settings
Portals in BSP


Sockets
- defined as dummy/null object
- dummies/sockets can be parented into hierarchical structure if needed
- points of origins for various things like particle effects, prefabs,...
- based on purpose of these, there are various naming conventions for different types of assets (weapon, vehicle, character,..)
- currently there is no naming convention that will influence the import, except for COM_ (center of mass)
Land Contacts
- defined as dummy/null object, with prefix LC_
- used for snapping object to the ground and at least 2 Land Contact points must be created for this to work
- object will be snapped and skewed following the ground slope under the object

FBX Export
There are few rules which have to be followed when exporting FBX:
- Export mesh with reset/applied transforms
- Always export FBX with smoothing groups/hard edges, otherwise the FBX is worthless as a potential source file
- Autodesk software: Type must be Binary, so it can be opened in all 3D suites, and Version parameter should be set to FBX 2014/2015 (version 7.4)

Do not forget to check "Custom Properties" property when exporting to FBX from Blender - otherwise Layer Presets settings (among with other properties) will be lost!
In case of exporting model with skeleton, it is also important to make sure that Armature is selected in Object Types and that Add Leaf Bones option is unchecked.

Import Process in the Workbench

- Put the FBX into your game template data structure and find it in the Resource browser
- Right-click on it and you have two options: Register or Register and Import
 Import as model
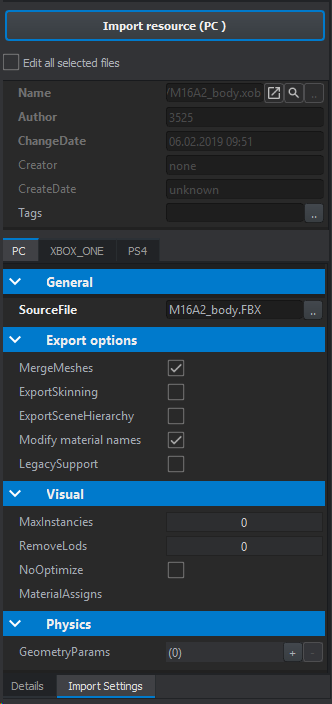 Import Settings
 - Upon clicking on Register, then as a Model, a meta file is created and you can set Import Settings
- Upon clicking on Register and Import, then as a Model, it will give you Import Settings and create .txo and .xob (binary version of .txo) file, which is now our converted FBX.
Import Settings:- Merge Meshes: means merge all meshes of each visual LOD geometry with the same material into one mesh (optimization for faster render) - meshes with different number of UV sets don't merge!
- Export Skinning: loads skinning data (required only if there is skeleton available, maximum 4 bones can affect single vertex)
- Export Scene Hierarchy: loads bones/dummies as a sockets (slot, snap points and others)
- Modify material names: ...
- Legacy Support: turns ON old import pipeline, which overrides the new one. It should not be used!
 Reimport option in context menu
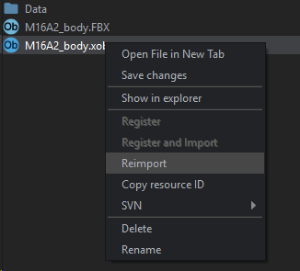
- When the Import Settings are set, click either on Import Resource button (above Import Settings tab) or right-click on the FBX or XOB file in resource browser and click on Reimport
 Skeleton
 - After import, more files are created. All materials and meta files are automatically created in data folder next to FBX, using names from materials in the FBX.
 Reimport button
 - If you were importing model with skinning or hierarchy, you can verify skeleton in Bones section
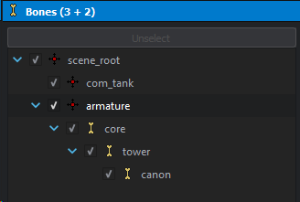 bones
bones


