Weapon Creation/Prefab Configuration – Arma Reforger
Lou Montana (talk | contribs) m (Remove after class' semicolons) |
(replaced mention of Inherit Prefab in Addon with Inherit in links) |
||
| (One intermediate revision by the same user not shown) | |||
| Line 12: | Line 12: | ||
In this case we will use '''{{Link|enfusion://ResourceManager/~ArmaReforger:Prefabs/Weapons/Core/Rifle_Base.et|Rifle_Base.et}}''' as parent prefab. | In this case we will use '''{{Link|enfusion://ResourceManager/~ArmaReforger:Prefabs/Weapons/Core/Rifle_Base.et|Rifle_Base.et}}''' as parent prefab. | ||
To do so, navigate in '''Resource Browser | To do so, navigate in '''Resource Browser''' to '''''Prefabs\Weapons\Core''''' and locate {{Link|enfusion://ResourceManager/~ArmaReforger:Prefabs/Weapons/Core/Rifle_Base.et|Rifle_Base.et}} prefab. | ||
Once you are there, click with right mouse button on that prefab and select '''{{Link|Arma_Reforger:Data_Modding_Basics#Using_. | Once you are there, click with right mouse button on that prefab and select '''{{Link|Arma_Reforger:Data_Modding_Basics#Using_.22Inherit_in....22_function|Inherit in}}''' from context menu. | ||
When asked about new name of prefab, consider calling this new prefab ''WeaponName_base'' - this might be especially useful when you plan to have multiple variants of weapon, since it will help you to keep your structure nice and clean. After new inherited prefab is created, relocate it to some more fitting location like the {{hl|Prefabs/Weapons/Rifles}} directory. | When asked about new name of prefab, consider calling this new prefab ''WeaponName_base'' - this might be especially useful when you plan to have multiple variants of weapon, since it will help you to keep your structure nice and clean. After new inherited prefab is created, relocate it to some more fitting location like the {{hl|Prefabs/Weapons/Rifles}} directory. | ||
| Line 340: | Line 340: | ||
Depending on the type of ammo are you preparing, there are few '''core prefabs''' for various types of ammunition located in Prefabs/Weapons/Core folder. In general, there are three suggested approaches: | Depending on the type of ammo are you preparing, there are few '''core prefabs''' for various types of ammunition located in Prefabs/Weapons/Core folder. In general, there are three suggested approaches: | ||
*Creating new prefab inheriting from {{Link|enfusion://ResourceManager/~ArmaReforger:Prefabs/Weapons/Core/Ammo_Bullet_Base.et|Ammo_Bullet_Base.et}} ''via'' '''[[Arma Reforger:Data Modding Basics#Using .22Inherit Prefab in Addon.22 function|Inherit | *Creating new prefab inheriting from {{Link|enfusion://ResourceManager/~ArmaReforger:Prefabs/Weapons/Core/Ammo_Bullet_Base.et|Ammo_Bullet_Base.et}} ''via'' '''[[Arma Reforger:Data Modding Basics#Using .22Inherit Prefab in Addon.22 function|Inherit in]]''' functionality | ||
*Duplicating one of existing ammo prefabs via [[Arma Reforger:Data Modding Basics#Using .22Duplicate to....22 function|'''Duplicate in''']] option - this might be useful for instance on rockets, if i.e. you don't want to use some of the components but still want to keep some of the configuration from it | *Duplicating one of existing ammo prefabs via [[Arma Reforger:Data Modding Basics#Using .22Duplicate to....22 function|'''Duplicate in''']] option - this might be useful for instance on rockets, if i.e. you don't want to use some of the components but still want to keep some of the configuration from it | ||
* [[Arma Reforger:Prefabs Basics#Creating inherited prefab|Inheriting from one of existing prefabs]] - this can be used if you are trying to do some variant of existing ammo. This method could be for example used when you {{Link|enfusion://ResourceManager/~ArmaReforger:Prefabs/Weapons/Ammo/Ammo_545x39_Ball_7N6.et|5.45x39 7N6}} vanilla bullet if you would like to do newer variant of that bullet (for instance {{Link|https://en.wikipedia.org/wiki/5.45%C3%9739mm#Basic_specifications|7N10}}) with slightly changed characteristics | * [[Arma Reforger:Prefabs Basics#Creating inherited prefab|Inheriting from one of existing prefabs]] - this can be used if you are trying to do some variant of existing ammo. This method could be for example used when you {{Link|enfusion://ResourceManager/~ArmaReforger:Prefabs/Weapons/Ammo/Ammo_545x39_Ball_7N6.et|5.45x39 7N6}} vanilla bullet if you would like to do newer variant of that bullet (for instance {{Link|https://en.wikipedia.org/wiki/5.45%C3%9739mm#Basic_specifications|7N10}}) with slightly changed characteristics | ||
| Line 748: | Line 748: | ||
Second method is recommended method although it might require setting some parameters again, like '''Init Speed''', '''Air Drag''', penetration and so on. Tracer bullets are quite often designed in a way, that they have very similar ballistic properties to regular bullets of selected rifle, so they can be used with same optics or iron sights. | Second method is recommended method although it might require setting some parameters again, like '''Init Speed''', '''Air Drag''', penetration and so on. Tracer bullets are quite often designed in a way, that they have very similar ballistic properties to regular bullets of selected rifle, so they can be used with same optics or iron sights. | ||
To create such prefab, simply use [[Arma Reforger:Data Modding Basics#Using .22Inherit | To create such prefab, simply use [[Arma Reforger:Data Modding Basics#Using .22Inherit in....22 function|Inherit in]] option on {{Link|enfusion://ResourceManager/~ArmaReforger:Prefabs/Weapons/Core/Ammo_BulletTracer_Base.et|Ammo_BulletTracer_Base.et}} and call that new bullet i.e. ''Ammo_65x39_FMJBT_Tracer.et.'' If you are using this method, you can skip to tracer projectile configuration chapter. | ||
====Entity Type Change==== | ====Entity Type Change==== | ||
Revision as of 17:14, 25 May 2023
In this chapter we will learn how fuel is simulated in game and we will change following things:
- Creating new rifle prefab
- Configuring basic weapon parameters
- Configuring ammo parameters
Prefab Setup
When making prefabs of weapons it is recommended to inherit from one of the already existing prefabs located in Prefabs\Weapons\Core - those prefabs should have most of the necessary configuration for various kinds of weapons.
In this case we will use Rifle_Base.et as parent prefab. To do so, navigate in Resource Browser to Prefabs\Weapons\Core and locate Rifle_Base.et prefab. Once you are there, click with right mouse button on that prefab and select Inherit in from context menu. When asked about new name of prefab, consider calling this new prefab WeaponName_base - this might be especially useful when you plan to have multiple variants of weapon, since it will help you to keep your structure nice and clean. After new inherited prefab is created, relocate it to some more fitting location like the Prefabs/Weapons/Rifles directory.

After new prefab is created, it is possible to start modifying it. It can be done by either by opening prefab in Prefab Edit Mode button or by placing prefab manually in World Editor. In this tutorial Prefab Edit Mode was used to edit the SampleWeapon_01_base.et prefab.
Once prefab is loaded, first step would be assigning correct model - in this case it is SampleWeapon_01.xob - to MeshObject component.

If you inherited from core weapon type like Rifle_Base.et then you will need to add few components listed below. In case of duplication of existing prefab, it might be still worth to adjust data in those components before moving to next section of this tutorial, since some of the values might need to be adjusted, like for example damage in SCR_MeleeWeaponProperties.
- RigidBody - this component is responsible for all kind of collisions and without it will be impossible to pick up weapon.
- Once component is created it will be necessary to check Model Geometry parameter so its enabled
- SCR_MeleeWeaponProperties - this component defines how much damage does this weapon when its used in melee fight
- For rifles Damage value of 45 is a good starting point - for smaller weapon feel free to use lower value

Additional, it might be also worth adding another CaseEjectingEffectComponent to Muzzle Component, which is going to emit muzzle smoke. To do so, click with Right Mouse Button on MuzzleComponent and select from context menu option Add child component and select CaseEjectingEffectComponent from the list.


In component itself, following changes will be required:
- Assign fitting particle effect to Particle Effect field - i.e. Smoke_M16A2.ptc
- In Effect Position parameter click on set class button and pick EntitySlotInfo class and call it for instance Muzzle
- Inside Effect Position, change Pivot ID to barrel_muzzle
- Change Has Sound parameter to disabled state
Additionally, you might also want to adjust:
- What kind of cartridges are ejected by the weapon - this is defined in CaseEjectingEffectComponent - over here you can select from many particle effects like for instance Casing_556x45.ptc and assign them to Particle Effect property
- Muzzle effect of the weapon - this is controlled by Particle Effect parameter in SCR_MuzzleEffectComponent - again, you can pick from some existing effects like Muzzle_AK74.ptc or create your own effects like mentioned in Weapon Modding documentation
Inventory Configuration

In SCR_WeaponAttachmentsStorageComponent it is possible to adjust some of the basic item properties related to inventory but there is also one section which is used for defining weapon IK pose (RV veterans might find it similar to handAnims parameter). Animation IK pose is not going to be described in this paragraph though so let's move to inventory configuration.
When looking at SCR_WeaponAttachmentsStorageComponent, multiple Attributes can be observed:
- Item Display Name - as name suggest, here it is possible to change Name and Description (on-hover tool tip visible in in-game inventory)
- Item Phys Attributes - various physical attributes of the item like mass, volume, etc
- Item Animation Attributes - here are defined item IK poses defined
Besides these attributes, there are also Custom Attributes where it is possible to change e.g. Item Inspection Anim or the character's maximum speed when a given item is equipped, or PreviewRenderAttributes, which controls the weapon preview in the inventory menu - if your weapon has an odd size, it might be necessary to adjust the camera parameters there.
In Reforger, inventory system is no longer using pictures' to for model thumbnails but instead, 3D models are rendered inside inventorymenu. How this item is rendered inside inventory is controlled by PreviewRenderAttributes, where you have bunch of camera controls', and In case of SampleWeapon_01_base.et, some tweaks to will be required to the camera distance. Since this bullpup weapon is smaller than regular rifles, it looks quite small in inventory menu. To fix this, navigate to PreviewRenderAttributes class in Custom Attributes and change Camera Distance To Item parameter from 1 to 0.8.

This will put camera closer to the weapon so in inventory menu, weapon should fill whole tile it has available.
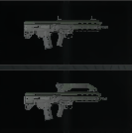
Camera Distance To Item set to 1

Camera Distance To Item set to 0.8


In Rifle_Base prefab, Item Phys Attributes is not configured and it is necessary to use "set class" button next to that property. Pressing this button will show additional section where you can freely change parameters.
For this Sample Weapon, the following changes were done:
- In Item Display Name section, Name property was changed to name of the weapon - in this case it is just "Sample Weapon"
- In Item Phys Attributes:
- Weight parameter was adjusted to somehow match the weight of real weapon without any accessories (including magazine). This parameter is using kilograms and in this example it was set to 4kg
- Size Setup Strategy was setup to Volume. This means that size of that object will be calculated using Item Volume.
- Item Volume (in cm3) defines how much space in inventory takes that object. In this example it is set to 2500 just to showcase how it works, normally, 3000 is used for machine guns, while rifle like AK74 has this value set to 1500
Additionally, it will be also necessary to add one entry to Custom Attributes. This can be done by clicking on arrow icon (1) to the right of it and then selecting ItemOneHandAnimAttributes class. This class controls the behavior of the weapon when it is held with one hand only - i.e. when the gadget is equipped - and in most cases the default values are good enough for rifles.
Action Contexts Adjustment
Add New Action Context

Interactions with weapon in game world, like being able to take weapon from ground or performing some actions in inspect menu, are controlled by ActionsManagerComponent. Rifle_Base.et prefab should already have most of the Action Contexts and Additional Actions configured although if your weapon is capable of mounting some optic - like Sample Weapon - it might be necessary to add another context for handling optic-related actions it.
To do add new Action Context, simply click on plus icon next to it and then inside of it (by default it should be called UserActionContext), locate Context Name property and type in optic. After that click on set class button next to Position property and select PointInfo class - this will be used to adjust position where the action is located.
ActionsManagerComponent Debug
Once all contexts are in place, it will be most likely to do some adjustments to the context properties like tweaking position or radius where action is available. Typing in seemingly magic values and then checking it in play mode might be bit time consuming so that is why it is recommended to use some of the existing debugs to speed up configuration process.

After clicking on ActionManagerComponent with Right Mouse Button in Object Properties window, you should see multiple debugs listed in Custom section like:
- Draw context(s) diagnostics for selected entity only - toggle if debug should be available only for selected entity - mutual exclusive with below debug
- Draw context(s) diagnostics for all entities - toggle if debug should be available only for all entities in the world - mutual exclusive with above debug
- Toggle context(s) transform gizmo visualization - show little gizmos next to context action
- Toggle context(s) radius visualization - show radius of all action contexts
- Toggle context(s) visibility angle visualization - toggle angle visibility of actions. Only active for non Omnidirectional action contexts (can be used to have actions which are i.e. available from side of the weapon)
- Create user action context(s) from bones - small tool for creating multiple action contexts (see Car Creation documentation for more details)
In this case, it will be enough to enable contexts transform visualization. At later stage, it will be also handy to enable radius visualization when adjusting Radius parameter. Once it is enabled, World Editor viewport should look like this:

As you can notice, most of the actions are located at center of the model and need to be moved to more logical places.
Action Contexts Location Change
It might seem that adjusting of action contexts position is a tedious job but thankfully it is possible to adjust their position directly in viewport using gizmos. To do so, go to selected Action Context - in this case it will be firemode - and click once on one of the fields in Offset parameter. After that, you should see a gizmo snapped to this action context, which can be freely adjusted.

Additionally it is also possible to use Pivot ID to snap action to one of the bones or snap points. Even after Pivot ID is selected, it is still possible to do some tweaks manually using Offset parameter (including tweaking it in viewport).

After all Action Contexts are set, weapon in viewport should look like this:

Action Contexts Radius Adjustment
Last step will be adjusting radius of actions. Default action context is used for instance for picking up weapon from the ground so preferable it should cover the whole gun. Most of the actions which are inherited from Rifle_Base.et prefab have already reduced radius but since optic was created action context was created from scratch, it might still need some tweaking. Default value of Radius parameter on optic action context will cause that this action will fight for attention with all other actions and might also appear to early. To fix this, simply reducing Radius from 0.3 to 0.1 should effectively fix this issue.
Weapon Characteristics

Most of the weapon firing characteristic can be changed in MuzzleComponent which is child of WeaponComponent. Over there, it is possible to Fire Modes, Dispersion, Bullet Init Speed Coef, Magazines and others. In this segment, focus would be but on getting fire modes set correctly, which were already partially covered in the Weapon Modding tutorial.
Starting with Fire Modes, Rifle_Base prefab has by default fire modes - Safe & Single fire mode, therefore it is assumed that any rifle has a safe mode. If it is not the case for the asset that you are preparing, then it might be necessary to create new base prefab based of Weapon_Base prefab - this scenario is not going to be described here though.
For purpose of this tutorial, Sample Weapon is equipped with three fire modes - safe, single & full auto. Since parent prefab has only two fire modes, a new one has to be added through ➕ sign (1) on the right side of the Fire Modes property. Once it is there, it can be filled with proper data.
'BaseFireMode with MaxBurst set to 1 will work as single fire mode'. On newly added BaseFireMode, Max Burst should be set to -1 - this fire mode will work as full auto mode.
Burst fire weapons can be configured by setting Max Burst property to something above 1. In this case, new property will appear - Burst Type. Over there it is possible to select 3 types of burst fire:
- Uninterruptible - once player presses fire button, weapon will fire exactly the amount of shots defined in Max Burst (unless weapon runs out of ammo)
- Interruptible - burst fire will be interrupted once player release fire button. Burst memory is present (Burst Mode (weapons))
- InterruptibleAndReseting - same as above but without burst memory
Weapon Behaviour Configuration
Weapon recoil is in configured on of the sub classes of Weapon Aim Modifiers. Rifle_Base prefab is missing RecoilWeaponAimModifier & ZeroingWeaponAimModifier subclasses in Weapon Aim Modifiers, therefore those have to be added to it. While ZeroingWeaponAimModifier doesn't need any tweaks, RecoilWeaponAimModifier class will have to be set from scratch by hand. As reference, either pictures below or AK74 prefab can be used as reference.


When tweaking recoil values, following table might be useful to get general concept of what Linear, Angular & Turn Offset Data does. Tooltips above parameters should provide enough information on how to set data.
| Recoil |
X |
Y |
Z |
|---|---|---|---|
| Linear
(1u = 1m) |
|
|
|
| Angular
(1u = 1°) |
|
|
|
| Offset
(1u = 1rad) |
|
|
not used, should be left to 0 |


Zeroing
First, you need to setup SightsComponent and fill in Sights Ranges with desired zeroings of your weapon. The position of the camera when you aim down sights is controlled by Sights Position and if you have the eye snap point placed in the correct spot, then no further adjustments to it should be necessary.
Sample weapon setup is bit special since iron sights are mounted on RIS rail and are not integrated part of the weapon. They also have only one zeroing mod set to 300 meters so its not a good example to show how iron sights should be set.
Because of that, here is more general explanation how zeroing works using the game's AK74 as an example. Unlike in Arma 3, weapons in Arma Reforger are not using magic ballistic computer which is automatically adjusting angle of bullet which leaves the barrel but zeroing is working just like in real life. Bullets are affected by gravity and air friction, so if the target is a little farther away, it is necessary to aim higher if you still want to hit your target, and that's basically how mechanical iron sights work. In principle, iron sights are forcing you to look at certain angle which corresponds to ballistic curve of bullet.

Setting points for the proper rotation of iron sights would be a tedious process, but fortunately there is an automated way built into Workbench to assist you in this process.
To use it, following things has to be done:
- Click with
 on SightsComponent and select Toggle sight point diag from context menu - this will show position of sights point which zeroing generator will use
 - In SightsComponent, set class PointInfo (via set class) on Sights Point Front & Sights Point Rear parameters
- Adjust position of Sights Point Front so it sits on tip of front iron sight. You can use view port gizmo to do so after clicking on Offset parameter inside Sights Point Front. You can also use snap points and assign them in Pivot ID if you prefer to do so
- Adjust position of Sights Point Rear so it sits on tip of rear iron sight
- Make sure that both front & rear points are in one line
- In Zeroing Generator property in Sights Component, set class to BaseZeroingGenerator


Next on the list preparing a list of all available zeroing modes. AK74 iron sights can be zeroed between 100 & 1000 meters and first zeroing mode is a 'battle zero' — a fixed preset configured for a likely combat distance. By aiming at an enemy's center of mass, one may be certain that the trajectory of the projectile will make contact, neither overflying or falling short. This means that in total there are 11 zeroing modes.
Zeroing modes are listed inside of Sights Ranges array in SightsComponent. Using the ➕ button next to that parameter, add 11 entries in that array which will represent all available zeroing modes.
Each SightRangeInfo has Range parameter which need to be filled manually - and the Weapon Position class - which is generated by zeroing generator. In Range, X value represents animation source value & Y represents desired zeroing range in meters (note that this value is also shared by UI).
Zeroing animation (which is not going to be created yet) goes from 0 to 1, where first entry in Sights Range array is 0 and last one is 1. Since there are 11 zeroing modes, interval between each zeroing mode can be set to 0.1 - this was calculated by using following equation 1/(number of frames - 1).
This means that you should have following zeroing modes:
| Animation Source Value | Range [m] |
|---|---|
| 0 | 440 |
| 0.1 | 100 |
| 0.2 | 200 |
| 0.3 | 300 |
| 0.4 | 400 |
| 0.5 | 500 |
| 0.6 | 600 |
| 0.7 | 700 |
| 0.8 | 800 |
| 0.9 | 900 |
| 1.0 | 1000 |
Once you have filled Sights Ranges you can click with right mouse button on Sights Component & then select from context menu "Process zeroing data". Generator will ask which muzzle you want to process and in most cases first muzzle will be the only choice. After confirming selection, generator will automatically calculate necessary offsets for Weapon Positions and store those generated values the currently selected weapon entity. Therefore, it will be necessary to use Apply to prefab button and save current world afterwards.
At this stage we won't bother with animating iron sights and we will get back to it once there is animation graph set in.
Ammunition Creation
Ammo Configuration

Depending on the type of ammo are you preparing, there are few core prefabs for various types of ammunition located in Prefabs/Weapons/Core folder. In general, there are three suggested approaches:
- Creating new prefab inheriting from Ammo_Bullet_Base.et via Inherit in functionality
- Duplicating one of existing ammo prefabs via Duplicate in option - this might be useful for instance on rockets, if i.e. you don't want to use some of the components but still want to keep some of the configuration from it
- Inheriting from one of existing prefabs - this can be used if you are trying to do some variant of existing ammo. This method could be for example used when you 5.45x39 7N6 vanilla bullet if you would like to do newer variant of that bullet (for instance 7N10) with slightly changed characteristics
In this tutorial, Sample Weapon is supposed to use a variant of 6.5 Grendel ammo but unlike in A3, this round won't be caseless to show how to configure spent cartridge ejection. Because of that, inheriting from Ammo_Bullet_Base.et was selected for configuration of this new bullet.
When trying to configure a bullet that exists in real life, it is good to gather as much reference material as possible. The Arma 3 variant of the 6.5x39mm is a fictional bullet, so as an inspiration, PRVI PARTIZAN 6.5 mm Grendel FMJ BT 7.10 g with 6.5x39mm dimensions (instead of 6.5x38mm) was used, since there is a decent amount of information available for it.
After creating new inherited prefab called Ammo_65x39_FMJBT.et, first step will be creating Ammo folder in Prefabs/Weapons folder and then moving Ammo_65x39_FMJBT.et prefab from Prefabs/Weapons/Core to the Ammo folder.
Once prefab is in correct place, you can start editing it in World Editor by for example entering into Prefab Edit mode.
In Prefab itself, there are two things you will want to adjust before moving on to more complex topics. First one will be adjusting things in Projectile itself like changing following parameters:
- In Projectile Model assign model of the bullet itself - this model is visible after it is being fired
- In Cartridge Model assign model of the cartridge (bullet+case). Right now it is not being rendered in game though, unless loose bullet is placed in World Editor.
If you don't have models for neither Projectile or Cartridge Model , then you can use of the existing ones. In this case Bullet_762x51_M62.xob and Cartridge_762x51_M62.xob were used since they are closest thing which matches Lapua FMJ BT round.
Next, go to InventoryItemComponent and click on set class button next to Item Phys Attributes. Over there you will set inventory values which could be useful when i.e. taking single rounds (which normally in the game doesn't happen) try to tweak following parameters:
- Weight - weight of the cartridge in kilograms - in this case it was set to 22 grams - influences weight of the magazine
- Size Setup Strategy - change it to Volume
- Item Volume - set it up to your linking. 7 is a good starting point
- Size - change it to SLOT_1x1

Ballistic Properties
Formula

Bullets, just like in real life, are affected by air resistance. Simulating air resistance in a very realistic way is a very demanding task for the CPU - especially if you want to have firefights with hundreds of soldiers all with fully automatic weapons. Therefore, some compromises are necessary and the air drag in the game is calculated using the following formula:

where
- is the drag force
- is the (de)acceleration of bullet
- is the speed of the bullet
- is the mass of the bullet


Setting Air Drag Parameter
Since the acceleration value is usually nowhere to be seen, you can try to set the correct value for air drag by guessing the value and seeing if it matches the data you already have. In this case, it is quite obvious that your first task in setting up ballistic properties will be to look for references and hard data.
Try to match the bullet type and barrel length used for measurements to get the best results. In this case, Sample Weapon uses 14.5 inch barrel and there is limited ballistic data available on ammo producer website.
|
Range [m] |
0 | 50 | 100 | 150 | 200 | 250 | 300 |
|---|---|---|---|---|---|---|---|
|
Velocity [m/s] |
840 | 802 | 765 | 730 | 695 | 661 | 628 |
On producer page you can also find information that this data was measured for 24inch barrel.
In some cases, you might even find for detailed ballistic charts like below one - in such case you can consider lucky and move ahead to filling data in table and try to fill Excel spreadsheet.

Quite often though, the only data that is available is ballistic coefficient, speed or time it takes bullet to reach certain range. If you don't have those but at least have muzzle velocity, weight and dimensions of the bullet, you can try to calculate ballistic coefficient yourself to get rough approximation of the value.
Ballistic Coefficient
First, lets start with establishing what Ballistic Coefficient is. As per Wikipedia:
In ballistics, the ballistic coefficient (BC, Cb) of a body is a measure of its ability to overcome air resistance in flight.
If there is some BC (ballistic coefficient) specified for bullet you are looking for, it will be most likely a G model value. Beside BC in G model, you would also need bullet weight, muzzle velocity and some ballistic calculator in order to prepare ballistic chart.
There are bunch of online calculators which are capable of creating ballistic tables like:
- Hornady ballistic calculator - provides quite good selection of customization
- Fedral ballistic calculator - bit more simple but it still provides good data
There is a lot of other calculators online too and you might already be using one of them. Above list though, contains calculators which are capable of providing data in metric system, which is quite handy when trying to match data game air drag.
Additionally, you can also try using Ballistics for Excel addon, which allows you to customize a lot of parameters.
Using G1 vs G7
Once you have decided which calculator you want to use, it is now necessary to decide which model should be used to create ballistic table, if i.e. both values for G1 and G7 are provided.
G1 and G7 refer both refer to aerodynamic drag models based on particular “standard projectile” shapes. The G1 shape looks like a flat-based bullet. The G7 shape is quite different, and better approximates the geometry of a modern long-range bullet. So, when choosing your drag model, G1 is preferable for flat-based bullets, while G7 is ordinarily a “better fit” for longer, boat-tailed bullets.
Creating Ballistic Table
Online Calculator
Assuming you have found G7 BC for your bullet, you can use previously mentioned Hornady ballistic calculator to generate ballistic tables. On that page, fill following information:
- Change unit system to metric
- Type in ballistic coefficient ( in this case G7 BC is equal to 0.204 )
- Change velocity so it matches your bullet velocity - in this case it was set to 840m/s
- Adjust weight parameter so it matches bullet weight. Keep in mind this value is in grains
- Change drag coefficient so it matches ballistic coefficient of your bullet. In this example G7 was used
Once its ready, you can click on Calculate button at the bottom of the page and after few seconds you should get ballistic table like one below.

Please note that Ballistic for Excel addon excel and i.e Hornady ballistic calculator are using different default values for atmospheric situation which influences how bullets are influenced by the air drag. Because of that, you can notice that different calculators can have different results even though they seem to use identical values.
BfX addon is using by default ICAO weather data where Hornady Ballistic Calculator utilizes US Army Standard Metro values.
| Pressure | Temperature C | Humidity | ||||||||
|---|---|---|---|---|---|---|---|---|---|---|
|
unit |
Pascal |
mmHg |
inHg |
C |
F |
K |
% |
kg/m3 |
lb/ft3 | |
| ICAO | 101324,6 | 760,00 | 29,92 | 15,00 | 59 | 288,15 | 0 | 1,22552 | 0,076506 | |
| US Army Standard Metro | 99991,8 | 750,00 | 29,53 | 15,00 | 59 | 288,15 | 78 | 1,20333 | 0,075121 | |
| Mayeveski Ingalls | 101591,7 | 762,00 | 30,00 | 15,56 | 60 | 288,71 | 67 | 1,22099 | 0,076224 | |
Excel Addon
Alternatively, if you want to use Ballistics for Excel addon, air drag calculator contains small section which utilizes this addon and creates ballistic table based on selected ballistic model & coefficient. First, make sure that you have installed this addon as per instructions on this page and then download & open Weapons_Ballistic_Coefs.xlsm spreadsheet. This spreadsheet is using VBA macros to calculate air drag so when asked to enable them, please do so.
Once this spreadsheet is loaded, you would need to modify following fields:
- Muzzle velocity - in m/s
- Ballistic Model - plugin accepts model from G1 to G8
- Ballistic Coef - ballistic coefficient value in selected model
Optionally, you can also change interval at which data will be calculated by changing Interval parameter (in meters).

Air Drag Calculation
Once you have ballistic table, it will be time to utilize excel spreadsheet to guesstimate correct air drag value.
To do so, download & open spreadsheet Weapons_Ballistic_Coefs.xlsm and enable macros - this spreadsheet is using VBA script to calculate values of air drag at selected range.
After file is opened, start with typing basic data like Muzzle Velocity (in m/s) and Mass (in kg) of the bullet. Next, fill in data in data from firing tables columns according to what you have available at hand. You can also adjust Interval value to better match the source data.

Final step include tweaking of air drag value till somewhat matches the data from ballistic stables. Every time Air Drag parameter is changed, VBA script will recalculate values located in Data from game section. Below you will find two graphs showing the speed & time of bullet according to in-game algorithms and previously created ballistic tables.
Depending on the data that you have, you can try to match your ammo by speed or by its time of flight.


Since air friction works in bit simplified way compared to real world (or even G1 or G7 ballistic models) it will be necessary to do some compromises. Discrepancies between real life data and what can be achieved in game are especially visible for machine gun ammo above 1km. While it might not sound like a big problem for infantry used weapons, it can for instance prevent from using real life reticles on tanks or APCs, since discrepancy between their ballistic in-game and reticle will be noticeable.
After fiddling a little bit with Air Drag value you should get values matching firing tables. In this case Air Drag with value 0.00007 seems to match real life equivalent of the bullet quite nicely, therefore we will assign such number to Air Drag property in General section of ShellMoveComponent in bullet prefab.
Next, adjust the Mass parameter in the Movement Config section of the ShellMoveComponent and set it to match the weight of the bullet - in this case it was set to 0.0071 [kG].
Weapon ballistics data
Barrel Length vs Muzzle Velocity
Ballistic data for bullet that we picked was measured on weapon with 24 inch long barrel, while the Sample Weapon is using 14.5 inch barrel. In general, the shorter barrel is, the lower muzzle velocity is. Of course, this effect is not always linear and in case of some bullets, the muzzle velocity might slightly drop after reaching certain length so it is best to try gathering some source data for particular bullet type. For instance on Ballistic By The Inch page you can find data about many different calibers available on the market.
Getting back to 6.5 Grendel ammo, on following page - https://www.gunbuilders.com/blog/the-65-grendel-ar15-build-guide/ - you can find data for 6.5 Grendel 129 grain Hornady bullet.
| Barrel length [inch] | Velocity [m/s] |
|---|---|
| 14.5 | 682 |
| 16 | 704 |
| 20 | 728 |
| 24 | 752 |
As it is visible, around ~10% muzzle velocity loss when firing from 14.5 barrel compared to 24 inch one, which is quite plausible number. Since there is no concrete data for this particular bullet, we can have bit of freedom with setting the value and agree on 0.91 coefficient for 14.5 inch barrel
Now, there are two approaches how to set it in data:
- Reduce Init Speed in ShellMoveComponent of bullet itself by 9% (to 764m/s) and leave Muzzle Init Speed Coef in MuzzleComponent of weapon unchanged (1.0).
- Set Init Speed in ShellMoveComponent to value matching 24 inch barrel (840/ms) and reduce Muzzle Init Speed Coef in MuzzleComponent of weapon to 0.91, so bullet leaves this weapon with lower velocity (~764m/s).
Both solutions have pros and cons and its worth to think which weapon should be used as baseline for different barrel calculations. For instance M16A2 (20 inch barrel) is quite often used as baseline for 5.56 ballistic and because of that, it might be worth to use this as a base and i.e. reduce Muzzle Init Speed Coef on your 14.5 inch M4 rifle. If there are some community mods which could potentially use, then perhaps check if someone tried to establish some standards already.
Since in this case, it's rather unlikely anyone would use this semi fictional 6.5x39mm round and also because of the fact, that 14.5 inch barrel was also base line for 6.5x39 weapon in Arma 3, first method was picked and Init Speed in ShellMoveComponent was set to 764 meters per second.
Penetration Data
Since there is no concrete data about penetration of reference 6.5 Grendel bullet, M855A1 penetration properties are used as reference. By checking Wikipedia article about 5.56x45 ammunition, we can see that M855A1 can penetrate 9.5 mm of mild steel at 350 meter. Now, to translate this into game, few steps are necessary like:
- Checking density of target material and how it matches materials present in game
- Calculating speed of bullet at reference range (350 meters)
- Filling in data
Theory
When bullet hits for instance an metal plate in game, there are two major variables which influences whether bullet will pass through such object or not - its bullet penetration ability and material resistance.
Penetration ability of the bullet is configured in ShellMoveComponent and is calculated using the following formula:
After filling values in above parameters inside of ShellMoveComponent you click on that component with Right Mouse Button and select from context menu Show penetration config option. After activating it, penetration ability of the bullet will be printed in Log Console window.
Material resistance on the other hand is linked to the collider & game material (which is described bit more in detail below) that is used on it. The following formula is used to calculate material resistance:
Now, if impact speed of bullet is larger than material resistance, then bullet will penetrate such object - otherwise it is assumed that projectile was stopped by the obstacle.
Game Materials
Game materials contain information about material density, their coefficient versus kinetic and chemical projectiles and sometimes they can also have thickness overrides inside of them.
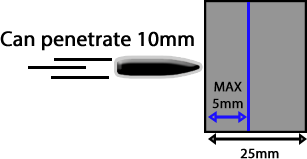
If Thickness Override is set to None, then penetration is calculated by measuring actual thickness of the collider (including slope effect). If Thickness Override is enabled, then one of the following situations might happen depending on settings which was selected:
- Min - Thickness of the collider is used but it's capped to the value specified Thickness parameter. For instance if bullet impacts at 90 degrees at collider which is 25mm thick but Thickness is set 5mm, then game will use 5mm in material resistance calculations. In same situation but with collider being 2mm thick visually, game would use 2mm in material resistance calculations since this value is smaller from two values which are compared.
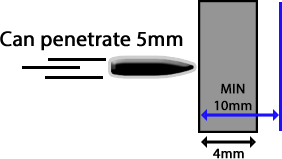
- Max - Thickness of the collider is used but minimal thickness of this object is equal to Thickness parameter. For instance if bullet impacts at 90 degrees at collider which is 25mm thick but Thickness is set 5mm, then game will use 25mm in material resistance calculations. In same situation but with collider being 2mm thick visually, game would use 5mm in material resistance calculations since this value is larger from two values which are compared.
- Clamp - Returns value clamped to the inclusive range of min and max
- Value - Game is using exact value as specified in Thickness in material resistance calculations

Bullet can penetrate 10mm of Armor material. Collider is using armor material with Thickness Override set to min 5mm and has thickness of 25mm. Due to to thickness override, bullet will penetrate this collider since lower value (5mm) will be selected
Bullet can penetrate 10mm of Armor material. Collider is using armor material with Thickness Override set to max 5mm and has thickness of 25mm. Due to to thickness override, bullet will not penetrate this collider since higher value (25mm) will be selected
Bullet can penetrate 5mm of Armor material. Collider is using armor material with Thickness Override set to min 10mm and has thickness of 4mm. Due to to thickness override, bullet will penetrate this collider since lower value (4mm) will be selected

Bullet can penetrate 5mm of Armor material. Collider is using armor material with Thickness Override set to max 10mm and has thickness of 4mm. Due to to thickness override, bullet will not penetrate this collider since higher value (10mm) will be selected


Material density of object affects how much resistance it will give to projectile which hits it.
Penetration Resistance coefficients like Kinetic Penetration Resistance or Chemical Penetration Resistance are used depending whether projectiles is a kinetic (like bullet) or chemical penetrator (f.e. HEAT jet). In game, Kinetic Penetration Resistance is also used to determine hardness of the material or its general capabilities to stop the bullet, since i.e. homogeneous armor (RHA) is much better at stopping bullets even though it doesn't seems to be the case when just looking at their density. Because of that, metal game material has 0.6 kinetic and CE coefficient. Penetration Resistance parameters influence final material resistance value.
Below is small table showing density and penetration resistance coefficients.
| Material | Density [g/cm^3] | KE | CE |
|---|---|---|---|
| 7.860 | 1 | 1 | |
| 7.870 | 0.6 | 0.6 | |
| 7.870 | 0.6 | 0.6 | |
| 2.700 | 0.5 | 0.5 | |
| 0.650 | 0.7 | 1 | |
| 1.922 | 0.8 | 0.8 | |
| 2.300 | 1 | 1 | |
| 2.6 | 1.4 | 1 | |
| 5.700 | 2 | 1 |
Penetration Data Calculation
Armor game material reflects rolled homogeneous armor and serves as a baseline for penetration calculation. Because of that, there are few approaches how to translate 9.5mm of mild steel into game value:
- Try to find a material which would fill description of mild steel that was used in such test
- Try to convert mild steel thickness into RHA
In this case we are going with second method which is trying to convert mild steel to RHA. Metal game materials can already be considered a kind of regular steel and it is using 0.6 coefficient compared to RHA material. Since we are using M855A1 as reference we will convert 9.5mm mild steel into RHA. After multiplying 9.5 by previously mentioned RHA coefficient - 0.6, we will get that 5.7mm of RHA is equivalent of 9.5mm mild steel plate.
Next, we need to calculate speed of the bullet at 350 meters which were mentioned on Wiki. Furthermore, we want to achieve 9.5mm at 350m performance when firing round from 14.5 inch barrel of Sample New Weapon.
To do so, we will adjust muzzle velocity in ballistic chart that we generated before and see what speed it has at 350 meters.

After ballistic chart is recalculated, it is possible to write down speed of the bullet - 538m/s. Now, we should have all the information to fill in Penetration section of ShelMoveComponent in Ammo_65x39_FMJBT prefab :
- Penetration Depth should be set to 5.7 [mm]
- Penetration Density should be set to 7.860 [g/cm^3] - this is the density of RHA material - armor.gamemat
- Penetration Speed should bet set to 538 [m/s] - at this speed bullet will penetrate 5.7mm of RHA plate

If everything went fine, you could verify penetration of your weapon on some test map and check how it performs versus various target with Game Code → Projectiles → Show shell trajectory debug turned on. One of the Grendel advantages is its good performance at higher ranger compared to i.e. 5.56x45 round and this should be quite visible in game too.
Extra Things
Init Speed Variation - in real life bullets are not leaving barrel at precisely same speed and there is some variation with than. For rifles, usually difference is +/- 10m/s and as can it be seen with AK74, where most sources are claiming muzzle velocity of 880m/s and Soviet official ballistic firing tables are calculated for 900m/s. In this case, truth most likely lies in between and 880m/s is minimal observed muzzle velocity and 900m/s is maximal one. In this case, you should set Init Speed to middle value (890m/s) and configure Init Speed Variation to 10m/s
Dispersion Multiplier - this parameter controls dispersion of the bullet living the barrel and can be for example used to simulate precision munition variants like 7.62x54R 7N1 rounds, which are more precise variants of 7.62x54R When trying to simulate more precise ammunition, it is good to combine Dispersion Multiplier parameter with reduced Init Speed Variation.
Tracer Projectiles
Tracer projectiles can be created in 3 ways:
- Creating new TracerProjectile entity via Create tab in World Editor and filling all the data manually
- Creating inherited prefab from Ammo_BulletTracer_Base.et
- Inheriting from some existing bullet prefab and changing entity type in text editor
First method is not really recommended since it most likely will be quite difficult to maintain such file. There might be some use cases for it though, if you are creating Sci-fi equipment.
Base Tracer Prefab Inheritance
Second method is recommended method although it might require setting some parameters again, like Init Speed, Air Drag, penetration and so on. Tracer bullets are quite often designed in a way, that they have very similar ballistic properties to regular bullets of selected rifle, so they can be used with same optics or iron sights.
To create such prefab, simply use Inherit in option on Ammo_BulletTracer_Base.et and call that new bullet i.e. Ammo_65x39_FMJBT_Tracer.et. If you are using this method, you can skip to tracer projectile configuration chapter.
Entity Type Change
The third method is used on most vanilla bullets and while in this method, you just inherit all ballistic properties of standard bullet, it requires tinkering with text editor outside of Workbench.
First, start by creating new inherited prefab from basic round of your choice - in this case it would be Ammo_65x39_FMJBT prefab.

Tracer Projectile Configuration
Once you have tracer prefab prepared, there will be still few parameters to configure like
- Tracer Burn Start After - type here time in seconds when tracer is supposed to start burning. Quite often specs of the bullet are starting distance, instead of time, but using spreadsheet from air drag calculations chapter, you can estimate roughly estimate that time.
- Tracer Burn Time - duration in seconds when tracer should be burning.
- Projectile Model - model of the tracer. There are already few models of tracers available - all of them with different color - which can be used here:
If you want and have available data, you can also type specific values for tracer bullet like different init speed, mass or penetrability.
Damage
Kinetic damage is currently automatically calculated via following formula:
where Penetration Ability is bullet penetration ability (described in penetration segment), Diameter is a parameter inside ShellMoveComponent inside General section & Init Speed is initial speed of the bullet. This value can be previewed by using Show penetration config available in context menu after clicking with RMB on ShellMoveComponent.
Example output Show penetration config 6.5x39mm FMJBT bullet
DEFAULT : PenetrationDepth: 5.700
DEFAULT : PenetrationDensity: 7.860
DEFAULT : PenetrationSpeed: 538.000
DEFAULT : PenetrationAbility: 0.083
DEFAULT : DamageValue: 114.049
AI Target Selection
AI relies on AICombatPropertiesComponent to select a target and the weapon. Not having this on equipment will prevent AI from using that equipment.
Usage
AICombatPropertiesComponent must be attached to:
- Magazine prefabs
- Grenade prefabs - it is only relevant for grenades which can be used by AI to attack a target - e.g smoke grenades don't require it
- UGL grenade prefabs
- Rocket prefabs
Note that weapons do not need the AICombatProperties component except for throwable grenades.
Most likely base prefabs of such equipment already have this component.
Weapon & Target Selection
AI weapon & target selection algorithm evaluates all known targets and all available weapons and magazines available to an AI soldier. Then it selects best target, weapon and magazine for attack.
This evaluation takes into account multiple parameters of target and weapon.
- Target parameters: distance to target, target type, target priority, is target aiming at us, is target in cover.
- Weapon parameters: can this be used against that target type, priority of this weapon compared to other available weapons, min range of the weapon (relevant for rockets and grenades).
Also AI separate their targets into those which they can attack directly and those which they can attack indirectly. Indirect attack means that we don't have to hit the target precisely to cause damage, for instance think of a frag grenade or rocket. Targets available for indirect attack are currently those which we have lost behind cover, but didn't totally forget about. The Direct attack means that we see the target and can shoot it directly.
Properties
- Used Against - most important property. It specifies against which target types this equipment can be used. Example: AK-74 magazine is configured to be used against infantry and unarmored vehicles.
- Priority - priority value of this equipment. If all other properties are same, AI will choose the equipment with highest priority.
- Priority Against Vehicles - priority of this equipment against vehicles. If the default value is used, it will have same priority against vehicles as against infantry.
- Indirectly Used Against - specifies against which target types AI will prefer to use the weapon for indirect attacks. Example: grenades are configured to be used indirectly against infantry.
Priority Values
The minimal requirement is that priority values must make sense for all equipment combinations available for AI in generic case. For example, if in our faction we don't have an AI soldier carrying both PKP and M249 at the same time, it makes no sense to think which one the AI should use first, and which one should have higher priority. But it makes sense to think of a the real AI soldier configuration in the faction: he has a handgun and some rifle, therefore most likely handgun magazines should have lower priority than rifle magazines, so that the soldier uses rifle first.
Another thing which must be thought is priority of equipment in turrets, if such turrets have multiple weapons, for example the BTR-70 turret.
Priority does not always mean higher damage. For instance, a weapon might have high single shot damage but huge reload time, so that it is less practical than a generic rifle. A turret might have two machineguns, an HMG and an LMG, and we might want AI to use LMG against infantry first, and save HMG for vehicles.
If you do not know what priority value to use, please refer to values on existing comparable magazine/weapon prefabs. We can't quote recommended values here because they might change.
Examples
| Type | Prefab | Comment |
|---|---|---|
| Generic Rifle Magazine | ||
| Frag Grenade | It has a small priority, it is configured to be used for indirect attacks. AI decides to use the grenade against targets which hide behind cover. | |
| UGL Grenade | It also has small priority, but higher than normal grenade. It has higher priority against vehicles. Like the frag grenade, it's configured for indirect attacks, but only against infantry. | |
| Armor-Piercing Rocket | ||
| LMG/HMG APC turret ammo | HMG magazine priority against infantry is smaller than LMG magazine priority to make AI prefer LMG against infantry. |
AI Ballistic Tables
As describe in Weapon Modding tutorial, there is still one important thing to do when creating new ammo type - generation of AI Ballistic Tables. Those tables are used by AI soldiers to estimate how much they need to adjust their weapon to hit desired target. Details of the setting AI tables are described on previously mentioned Weapon Modding tutorial so here is short version of what is necessary to create and configure such tables:
- Create new AI Ballistic Table in Resource Browser (recommended location - Config →Weapons →AIBallisticTables folder) by clicking Create button and then selecting from the context menu Config file option
- When asked about type of config, select BallisticTableArray
- It is recommended to use AIBT_nameOfAmmoPrefab.conf name for ballistic tables - i.e. AIBT_65x39_FMJBT.conf
- Open ammo prefab and in ShellMoveComponent locate Ballistic Table Config parameter in Ballisitc Tables section
- Assign AIBT (AIBT_65x39_FMJBT.conf) config to Ballistic Table Config proper & save prefab
- Click on ShellMoveComponent with Right Mouse Button and from context menu select Generate ballistic tables option
- Whole process might take few seconds depending on air drag value of the bullet - higher values tend to result in higher computing times
- Once process is complete, save changes in World Editor by i.e. Ctrl + S combo

Magazine Well
Magazine wells are classes which help to establish multi weapon (and mods) magazine compatibility. Any magazine which is using the selected class will be usable in any other weapon, which is using exactly the same magazine well.
In Arma Reforger, there are already plenty of magazine wells available but since this sample weapon is using rather unique magazine well, a new one has to be created.
A new magazine well can be added to the list by creating a new script file in one of the game script folders (f.e. Scripts/Game/Weapon folder can be used - if you don't have such folder, then you need to create it manually). There are no requirements to the name of the script file but it is suggested to use the TAG_MagazineWell_ prefix naming convention. Such setup is sort of necessary since unlike models or prefabs, scripts don't use metafiles, and they can be replaced by placing file with exact name and relative location as original one. Once the script file is created and opened in Script Editor, the only remaining thing is to create a new class which inherits from BaseMagazineWell.
In example above, new magazine well is called MagazineWell65x39C_SampleWeapon.
After magazine well is created, it will be necessary to recompile all game scripts via either Compile and Reload Scripts (⇧ Shift + F7) option in Script Editor or Reload Game Scripts (Ctrl + R) in World Editor.
Once scripts are compiled it should be possible to assign that class in Magazine Well property found both in MagazineComponent of magazine and MuzzleComponent of weapon. If there is already some class assigned in the Magazine Well property, then you can still change it by a right-click on it and selecting change class option from the context menu.
Magazine Prefab Setup
New magazine prefab can be easily created by inheriting from Magazine_Base.et prefab. Once new prefab inheriting from Magazine_Base.et is prepared, it is possible to assign magazine model in MeshObject.
Next step will be modification of magazine related properties in MagazineComponent. Over there, it is possible to set things like ammo which is used or capacity of magazine.
In InventoryItemComponent, similar to main weapon, it is possible to change inventory related properties like name or weight. In this example, values were set as on picture below.
Tracer Magazine Setup
Crate Filling
Once weapon and magazine are ready, it is possible to add those to crates, so they can be picked up either in Conflict armory or during Game Master sessions. In principle, there are two types of crates available in game:
- Arsenal crates - those can be either unlimited or be single use. Closely tied to playable Factions. It is impossible to precisely specify the amount of available items.
- Regular storage crates - using standard storage system, where creator defines exact amount of items, which are available inside of the crate.
Arsenal Crates
Content of Arsenal Crates is closely tied with faction configs and Faction Manager. If for instance given faction is not present in currently present game mode, then such faction specific will be empty in game. Content of those crates is defined through Entity Catalogs which are placed inside of faction configs.

Adding to existing crates
Adding new items to existing Faction Arsenals crates involves the following steps:
- Creating override of existing Arsenal config - either US_InventoryItems.conf (used by US Army), FIA_InventoryItems.conf (used by FIA) or USSR_InventoryItems.conf (used by the USSR faction) - by using Override in "addon name" functionality
- Open overridden file and add new element to one of the sub containers in Multi Lists array.
- For instance, if you want to add new weapon, then click on plus + arrow (1) on the right side of Multi Lists → Weapons and add new element of SCR_EntityCatalogInventoryItem.
- Assigning prefab of item, which is supposed to be visible in Arsenal crate, to Entity Prefab property. This can be done either by clicking on button with two dots or by dragging and dropping prefab on this field
- In Entity Data List property, add new SCR_ArsenalItem element to the list by clicking on plus button (2)
- In Arsenal Data entry added in previous step, select proper Item Type & Item Mode from the drop down menu
- For rifles, Item Type can be set to RIFLE and Item Mode to WEAPON
- For rifle magazines, Item Type can be set to RIFLE and Item Mode to AMMUNITION
- If you want to have your item visible in Racks (like E_WeaponRackCabinetArsenal_FIA.et or one visible in Conflict armory), then it is also necessary to add entry (3) to Arsenal Display Data
- Over there, fill in Item Offset & Item Rotation Values so item is correctly displayed on weapon rack
- Repeat above steps until you have added all items which you wish to have in Arsenal.
Once those changes are performed, it might be necessary to Reload Game Scripts or even restart the Workbench; after that, those new items should be visible in existing crates in both Game Master and Conflict game mode
Creating new faction-less crates
Alternative to adding items to one of the existing arsenal crates is creating a new, faction less variant. This is possible by using Arsenal Override Config located in SCR_ArsenalComponent of Arsenal crate prefab.
- Duplicate one of the existing crates or inherit from ArsenalBox_Base.et if you want to create new crate from scratch
- In case of Sample New Weapon, ArsenalBox_USSR.et was duplicated using "Duplicate to" functionality.
Once box is ready, it is time to prepare content of the crate itself. First step towards it will be preparing of alternative arsenal config - unfortunately config prepared for Entity Catalog is not compatible with override config, so it is necessary to create new one. To do so, create a new config file of SCR_ArsenalItemListConfig type in Configs→ Arsenal folder - in this example it is called ArsenalConfig_SampleNewWeapon.conf. Once config file is created, you should be greeted with somehow familiar parameters that previously found in Entity Catalog configuration.
After filling ArsenalConfig_SampleNewWeapon.conf with all the data, the config should be ready to be used. To do so, open previously prepared Arsenal Box in i.e. Prefab Edit Mode and assign arsenal config to Arsenal Override Config in SCR_ArsenalComponent. Once that ready, don't forget to save prefab - at this stage this box should be testable in any World Editor scenario - even if there are no factions defined.
Once all steps completed, you might wish to make this prefab visible in Game Master, to do so, you would need to make editable variant of Arsenal Box via instructions mentioned on Editable Entities Configuration page and then follow the steps mentioned on Asset Browser Mod Integration page to register it in Game Master itself.
Regular Crates
If it is desired to have some specific amount of items, then it is possible to use UniversalInventoryStorageComponent (or its SCR_ equivalent) which can be added to basically to any entity with physics enabled.
First step is to locate the prefab where the new item should be stored. In this tutorial AmmoBox_545x39_2160rnd.et was duplicated to addon as AmmoBox_SampleWeaponMagazines.et and then used as an example on how to add new magazines to it. Once that duplicated prefab is present in target addon, following things have to be done:
- Navigate to SCR_UniversalInventoryStorageComponent
- Add new entry to Multi Slots array
- Set Slot Template to InventoryStorageSlot and assign to it some unique name, i.e. Magazines
- Assign magazine prefab to Prefab slot in this newly created Slot Template
- Change number of items present in this slot by modifying Num Slots value (f.e. it can be set to 25)
After that, this crate should have 25 magazines of your choice inside.