Buldozer Manual: Difference between revisions
(→Use Buldozer: keys) |
|||
| (6 intermediate revisions by one other user not shown) | |||
| Line 2: | Line 2: | ||
= What's Buldozer = | = What's Buldozer = | ||
Buldozer is a viewer for the Real Virtuality 4 Engine. It comes on some of sub program of the main application (here, Arma 3) that’s able to load environments and models in a basic setup to show a preview of your work from Object Builder and Terrain Builder. | [[Buldozer]] is a viewer for the Real Virtuality 4 Engine. It comes on some of sub program of the main application (here, Arma 3) that’s able to load environments and models in a basic setup to show a preview of your work from Object Builder and Terrain Builder. | ||
== Notes == | == Notes == | ||
| Line 10: | Line 10: | ||
== Substitute Drive P == | == Substitute Drive P == | ||
===What's that?=== | ===What's that?=== | ||
Firstly, you will need the famous P:Drive, created (mounted) | Firstly, you will need the famous P:Drive, created (mounted) and populated by Work Drive. P is not a virtual drive but a substitute drive, the concept is very simple: It associates a path (from anywhere in your file system) to a drive letter, in some kind, a shortcut, a letter for a directory. P is well known to be used even necessary to use Bulldozer. | ||
To explain a little, most of the tools are prepared with P in mind because it’s simple for everyone, the community and us (BI developers). | To explain a little, most of the tools are prepared with P in mind because it’s simple for everyone, the community and us (BI developers). | ||
The first iteration of the tools (without P: drive) was more meant for expert users who should be able to set their own working drive according to their needs in all tools (and may name it even differently than P: drive). | The first iteration of the tools (without P: drive) was more meant for expert users who should be able to set their own working drive according to their needs in all tools (and may name it even differently than P: drive). | ||
| Line 17: | Line 17: | ||
# '''Acquisition''': Download Arma 3 Tools from Steam (Tools library) | # '''Acquisition''': Download Arma 3 Tools from Steam (Tools library) | ||
# '''Installation''': Run (play say Steam) Arma 3 Tools at least once from Steam to perform the installation (registry and other additional stuff like binMakeRules) | # '''Installation''': Run (play say Steam) Arma 3 Tools at least once from Steam to perform the installation (registry and other additional stuff like binMakeRules) | ||
# '''Preparation''': (optional) By default, the P drive will be located in the | # '''Preparation''': (optional) By default, the P drive will be located in the document folder (e.g.: C:\Users\UserNamel\Documents\Arma 3 Projects) but you may want to change it.<br/>Here, two methods: | ||
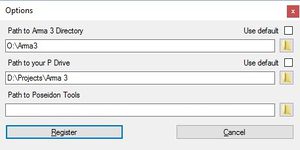
## Run Arma3Tools.exe, click “Preferences” >> “Edit Settings” (or CTRL+E), then, go into P Drive tab, uncheck “Use default” and define your path<br/>[[File:a3ct_settings.jpg|300px|||]] | ## Run Arma3Tools.exe, click “Preferences” >> “Edit Settings” (or CTRL+E), then, go into P Drive tab, uncheck “Use default” and define your path<br/>[[File:a3ct_settings.jpg|300px|||]] | ||
## You can also edit your file settings.ini (root directory of Arma 3 Tools) manually, the result will the same with an additional risk of error. | ## You can also edit your file settings.ini (root directory of Arma 3 Tools) manually, the result will the same with an additional risk of error. | ||
# Test: Now, let’s mount P, just to be sure it’s working. | # Test: Now, let’s mount P, just to be sure it’s working. Open [[Arma 3 Tools Launcher]] and click on mount the Project Drive. | ||
==Buldozer installation== | ==Buldozer installation== | ||
If at this stage, you were able to mount your P, you’re good for the next. So, now, it’s time to install Buldozer. | If at this stage, you were able to mount your P, you’re good for the next. So, now, it’s time to install Buldozer. | ||
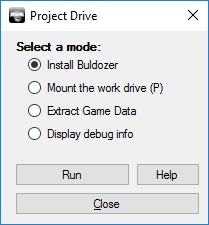
# From Arma3Tools.exe, at the bottom, there is a group called “misc”, click over “P: Drive (DevP)” | # From Arma3Tools.exe, at the bottom, there is a group called “misc”, click over “P: Drive (DevP)” | ||
# “default” and click “Run” <br/>[[File:a3ct_mainExe_devp.jpg | # “default” and click “Run” <br/>[[File:a3ct_mainExe_devp.jpg]] | ||
# This step is automatic, you just need to wait (generally, it takes from 30 seconds to 2 minutes) | # This step is automatic, you just need to wait (generally, it takes from 30 seconds to 2 minutes) | ||
# Let’s check if it succeeded, at this step, you should have a working P: Drive containing: | # Let’s check if it succeeded, at this step, you should have a working P: Drive containing: | ||
#: “p:\Bin\” | #: “p:\Bin\” | ||
#: “p:\Core\” | #: “p:\Core\” | ||
| Line 34: | Line 34: | ||
#: “p:\steam_api.dll” | #: “p:\steam_api.dll” | ||
#: “p:\steam_appid.txt” | #: “p:\steam_appid.txt” | ||
#: "p:\Tobii.EyeX.Client.dll" | |||
'''Or''' you can also use an alternate method | '''Or''' you can also use an alternate method | ||
* Copy the executable of the game “Arma3.exe” to P and rename it to “buldozer.exe” | * Copy the executable of the game “Arma3.exe” to P and rename it to “buldozer.exe” | ||
* Use BankRev -f to extract bin.pbo of the game into P:\Bin | * Use BankRev -f to extract bin.pbo of the game into P:\Bin | ||
* Use BankRev -f to extract core.pbo of the game into P:\Core | * Use BankRev -f to extract core.pbo of the game into P:\Core | ||
* Copy | * Copy “Tobii.EyeX.Client.dll” from the Arma 3 directory to P:\ | ||
* Copy | * Copy Steam_api.dll and steam_appid.txt to P:\ | ||
* Copy Steam_api.dll and steam_appid.txt to P:\ | * Copy Steam_api.dll and steam_appid.txt to P:\ | ||
==Buldozer configuration== | ==Buldozer configuration== | ||
By default [[Work Drive]] will do this step and apply the default settings (Ultra) but in case you want to change this, you just need to generate the configuration and set the path and startup parameters from Object Builder and/or Terrain Builder, depends on what you need. This step is really quick! | |||
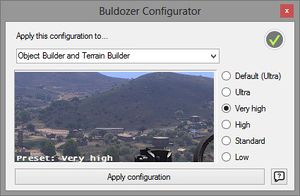
# Run Buldozer Configurator | # Run Buldozer Configurator | ||
# Select the preset you want and click apply configuration | # Select the preset you want and click apply configuration | ||
| Line 50: | Line 52: | ||
* Open Object Builder, go into “File” >> “Options” | * Open Object Builder, go into “File” >> “Options” | ||
* Set the following parameters:<br/>[[File:a3ct_objectBuilder_options.jpg|300px|||]] | * Set the following parameters:<br/>[[File:a3ct_objectBuilder_options.jpg|300px|||]] | ||
** External Viewer: '''P:\buldozer.exe -buldozer -name=Buldozer -window -noLand -exThreads=0 -noLogs -noAsserts | ** External Viewer: '''P:\buldozer.exe -buldozer -name=Buldozer -window -noLand -exThreads=0 -noLogs -noAsserts -cfg=p:\buldozer.cfg''' | ||
** DLL Folder: '''<steamPath>\steamapps\common\Arma 3 Tools\ObjectBuilder''' | ** DLL Folder: '''<steamPath>\steamapps\common\Arma 3 Tools\ObjectBuilder''' | ||
(replace <SteamPath> with the full path to your Steam directory), in the end, this must points the root directory of Object Builder. | (replace <SteamPath> with the full path to your Steam directory), in the end, this must points the root directory of Object Builder. | ||
| Line 68: | Line 70: | ||
:'''-noLogs''' we don't want to log events and slowdown Buldozer | :'''-noLogs''' we don't want to log events and slowdown Buldozer | ||
:'''-noAsserts''' we don't want to be bothered with asserts in Buldozer | :'''-noAsserts''' we don't want to be bothered with asserts in Buldozer | ||
:'''-cfg=p:\buldozer.cfg''' alternative placement for per-user .cfg | :'''-cfg=p:\buldozer.cfg''' alternative placement for per-user .cfg | ||
| Line 103: | Line 104: | ||
'''ENTER''' Select next animation | '''ENTER''' Select next animation | ||
'''BACKSPACE''' Select previous animation | |||
'''Mouse wheel''' (animate the selection) | '''Mouse wheel''' (animate the selection) | ||
Square brackets '''[''' and ''']''' Animate the selection (slow) (on german keyboard it's ü and + keys) | |||
'''SHIFT+[''' and '''SHIFT+]''' Animate the selection (very slow) | |||
''*Keys may differ from a keyboard map to another'' | ''*Keys may differ from a keyboard map to another'' | ||
Revision as of 22:23, 18 August 2016
What's Buldozer
Buldozer is a viewer for the Real Virtuality 4 Engine. It comes on some of sub program of the main application (here, Arma 3) that’s able to load environments and models in a basic setup to show a preview of your work from Object Builder and Terrain Builder.
Notes
You will probably need to mount the drive P after each startup of your workstation, no worry, this takes no more than 2 seconds.
How to install
Substitute Drive P
What's that?
Firstly, you will need the famous P:Drive, created (mounted) and populated by Work Drive. P is not a virtual drive but a substitute drive, the concept is very simple: It associates a path (from anywhere in your file system) to a drive letter, in some kind, a shortcut, a letter for a directory. P is well known to be used even necessary to use Bulldozer. To explain a little, most of the tools are prepared with P in mind because it’s simple for everyone, the community and us (BI developers). The first iteration of the tools (without P: drive) was more meant for expert users who should be able to set their own working drive according to their needs in all tools (and may name it even differently than P: drive).
Installation
- Acquisition: Download Arma 3 Tools from Steam (Tools library)
- Installation: Run (play say Steam) Arma 3 Tools at least once from Steam to perform the installation (registry and other additional stuff like binMakeRules)
- Preparation: (optional) By default, the P drive will be located in the document folder (e.g.: C:\Users\UserNamel\Documents\Arma 3 Projects) but you may want to change it.
Here, two methods:- Run Arma3Tools.exe, click “Preferences” >> “Edit Settings” (or CTRL+E), then, go into P Drive tab, uncheck “Use default” and define your path
- You can also edit your file settings.ini (root directory of Arma 3 Tools) manually, the result will the same with an additional risk of error.
- Run Arma3Tools.exe, click “Preferences” >> “Edit Settings” (or CTRL+E), then, go into P Drive tab, uncheck “Use default” and define your path
- Test: Now, let’s mount P, just to be sure it’s working. Open Arma 3 Tools Launcher and click on mount the Project Drive.

Buldozer installation
If at this stage, you were able to mount your P, you’re good for the next. So, now, it’s time to install Buldozer.
- From Arma3Tools.exe, at the bottom, there is a group called “misc”, click over “P: Drive (DevP)”
- “default” and click “Run”
- This step is automatic, you just need to wait (generally, it takes from 30 seconds to 2 minutes)
- Let’s check if it succeeded, at this step, you should have a working P: Drive containing:
- “p:\Bin\”
- “p:\Core\”
- “p:\Buldozer.exe”
- “p:\ PhysX3*.dll” (4 files)
- “p:\steam_api.dll”
- “p:\steam_appid.txt”
- "p:\Tobii.EyeX.Client.dll"

Or you can also use an alternate method
- Copy the executable of the game “Arma3.exe” to P and rename it to “buldozer.exe”
- Use BankRev -f to extract bin.pbo of the game into P:\Bin
- Use BankRev -f to extract core.pbo of the game into P:\Core
- Copy “Tobii.EyeX.Client.dll” from the Arma 3 directory to P:\
- Copy Steam_api.dll and steam_appid.txt to P:\
- Copy Steam_api.dll and steam_appid.txt to P:\
Buldozer configuration
By default Work Drive will do this step and apply the default settings (Ultra) but in case you want to change this, you just need to generate the configuration and set the path and startup parameters from Object Builder and/or Terrain Builder, depends on what you need. This step is really quick!
- Run Buldozer Configurator
- Select the preset you want and click apply configuration
- Buldozer is configured!

Or you may want to handle the process manually, as usual, there is an additional risk of error:
- Open Object Builder, go into “File” >> “Options”
- Set the following parameters:
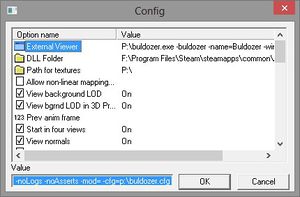
- External Viewer: P:\buldozer.exe -buldozer -name=Buldozer -window -noLand -exThreads=0 -noLogs -noAsserts -cfg=p:\buldozer.cfg
- DLL Folder: <steamPath>\steamapps\common\Arma 3 Tools\ObjectBuilder

(replace <SteamPath> with the full path to your Steam directory), in the end, this must points the root directory of Object Builder.
- Path for textures: P:\
- Open Terrain Builder, go into “Tools” >> “Preferences”
- Set the following parameters:
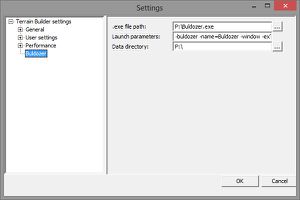
- .exe file path: P:\Buldozer.exe
- Launch parameters: -buldozer -name=Buldozer -window -exThreads=0 -disableSteam -noAsserts -cfg=p:\buldozer.cfg
- Data Directory: P:\

Notes
Here some details about the startup (launch) parameters for buldozer:
- -buldozer Force to run the subprogram “Buldozer”, otherwise, it will run in normal mode (Arma3 game)
- -window we want to run windowed
- -noLand (Object Builder Only) Load the program without world entry (a grey world is generated)
- -exThreads=0 When omitted Buldozer loads 20 times slower
- -noLogs we don't want to log events and slowdown Buldozer
- -noAsserts we don't want to be bothered with asserts in Buldozer
- -cfg=p:\buldozer.cfg alternative placement for per-user .cfg
How to use it?
From Object Builder
Run Buldozer and basics
You need to have a loaded model (p3d), then, just click on the “red icon” (this is the icon of the very first game of the series: Arma: Cold War Assault) and click “Start/Restart”.

From this red icon, you can refine what Buldozer shows, here an example with hidden textures & materials and shown wireframe & shadow:

Use Buldozer
You can use keyboard and mouse to perform actions: Take note that you can define have a look at the controls from the game (Configure >> Controls >> Keyboard >> “Show” development)
A, W Change height
Z, Q, S, D Move the camera
E Move the camera forward (faster than Z)
X, C Lateral move of the camera
(Num. pad) 5 Reset camera and object rotation
(Num. pad) 2,4,6,8 Rotate the object (the camera won't move)
(Num. pad) + Zoom in
(Num. pad) – Zoom out
ENTER Select next animation
BACKSPACE Select previous animation
Mouse wheel (animate the selection)
Square brackets [ and ] Animate the selection (slow) (on german keyboard it's ü and + keys)
SHIFT+[ and SHIFT+] Animate the selection (very slow)
*Keys may differ from a keyboard map to another

From Terrain Builder
Run Buldozer and basics
You need a loaded project with at least a configured map frame, click Tools, then “Connect to Buldozer”.

You can use the menu item “Connect to Buldozer”, or run a “steamed” instance, also, you can start Buldozer with the “clap” icon located in tools bar.

Use Buldozer
Soon
Conclusion
For some of you, Buldozer will be a bit difficult to take in hand but in the end, it's a really powerful asset for your creations, and after all, it's always better to see a creation in live! If you have any question, feedback or request, we invite you to give a look at our forums.
Contextual ressources: