Modding Basics – DayZ
m (→Creating a mod) |
Lou Montana (talk | contribs) m (Text replacement - "\{\{( *)Important( *)\|" to "{{$1Feature$2|$2important$2|") |
||
| (8 intermediate revisions by 4 users not shown) | |||
| Line 1: | Line 1: | ||
{{TOC|side}} | |||
Step by step creation of a simple mod for DayZ. | |||
== Requirements == | |||
* Steam copy of '''DayZ''' | |||
* '''DayZ Tools''' (Available through steam by navigating through Library -> Tools) | |||
== | == Setup == | ||
It is recommended to setup a '''Project Drive''' with extracted game data for optimal workflow: | It is recommended to setup a '''Project Drive''' with extracted game data for optimal workflow: | ||
* Launch DayZ Tools from Steam | * Launch DayZ Tools from Steam | ||
| Line 20: | Line 19: | ||
* Wait for the process to finish | * Wait for the process to finish | ||
If you wish to use '''Workbench''' and its '''Script Editor''', follow the setup guide here: [[DayZ:Workbench_Script_Debugging#Workbench_Setup|Workbench Setup]] | |||
== Creating a mod == | == Creating a mod == | ||
In the spirit of simplicity, let us create a mod which will print a message into the log upon a certain condition. | In the spirit of simplicity, let us create a mod which will print a message into the log upon a certain condition. | ||
In order to do so, we will need to pack our mod into a '''.pbo''' file and load it when launching the game. A mod can have several .pbo files but most smaller ones will only ever need a single one. | In order to do so, we will need to pack our mod into a '''.pbo''' file and load it when launching the game. | ||
A mod can have several .pbo files but most smaller ones will only ever need a single one. | |||
'''Scripting syntax''' documentation is located here | '''Scripting syntax''' documentation is located here: [[DayZ:Enforce_Script_Syntax]] | ||
=== Step by step === | === Step by step === | ||
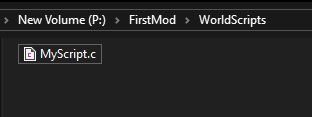
* Start by creating a mod folder, in this example we will create one in our P: drive called '''FirstMod''' | * Start by creating a mod folder, in this example we will create one in our P: drive called '''FirstMod''' | ||
* Inside the '''FirstMod''' folder, create another folder which will contain our modded class. We will call it '''WorldScripts''' | * Inside the '''FirstMod''' folder, create another folder which will contain our modded class. We will call it '''WorldScripts''' | ||
* '''PlayerBase.c''' contains a function suitable for our mod named '''OnJumpStart()''' which is called every time player jumps - we will use it in this example | * '''PlayerBase.c''' contains a function suitable for our mod named '''OnJumpStart()''' which is called every time player jumps - we will use it in this example | ||
* Create '''MyScript.c''' file in the '''WorldScripts''' folder with the following contents | * Create '''MyScript.c''' file in the '''WorldScripts''' folder with the following contents | ||
[[Image:dz_modbasics_structure.png]] | :[[Image:dz_modbasics_structure.png]] | ||
<syntaxhighlight lang=" | :<syntaxhighlight lang="cpp"> | ||
modded class PlayerBase | modded class PlayerBase // modded keyword for modding existing class | ||
{ | { | ||
override void OnJumpStart() // overriding existing function | override void OnJumpStart() // overriding existing function | ||
{ | { | ||
super.OnJumpStart(); // call the original jump function so we don't break stuff | super.OnJumpStart(); // call the original jump function so we don't break stuff | ||
Print("My first mod, yay!"); // our modded print | Print("My first mod, yay!"); // our modded print | ||
} | } | ||
} | } | ||
</syntaxhighlight> | </syntaxhighlight> | ||
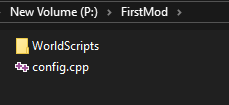
* All we need now is '''config.cpp''', which is a representation of our pbo as described here: [[DayZ:Modding_Structure#PBO_structure|PBO Structure]] | |||
:[[Image:dz_modbasics_structure2.png]] | |||
* All we need now is '''config.cpp''', which is a representation of our pbo as described here | :<syntaxhighlight lang="cpp"> | ||
[[Image: | |||
<syntaxhighlight lang=" | |||
class CfgPatches | class CfgPatches | ||
{ | { | ||
class FirstMod | class FirstMod | ||
{ | { | ||
requiredAddons[]={""}; | requiredAddons[]= | ||
{ | |||
// "" | |||
}; | |||
}; | }; | ||
}; | }; | ||
| Line 66: | Line 66: | ||
class FirstMod | class FirstMod | ||
{ | { | ||
type = "mod"; | |||
class defs | |||
{ | |||
class worldScriptModule | |||
class worldScriptModule | { | ||
value = ""; | |||
files[] = {"FirstMod/WorldScripts"}; | |||
}; | |||
}; | |||
}; | |||
}; | }; | ||
</syntaxhighlight> | </syntaxhighlight> | ||
: Using the correct '''script module''' is '''{{Color|red|very important!}}''' | |||
: Vanilla file PlayerBase.c (which contains PlayerBase class we are modding) is located in '''4_World''' so we need to define path to '''worldScriptModule''' scripts in our config.cpp in order for our PlayerBase script mod to work. | |||
* Done! It is time to pack our mod into a pbo file. | |||
== Packing into pbo == | |||
* Using the DayZ Tools launcher, open '''Addon Builder''' | * Using the DayZ Tools launcher, open '''Addon Builder''' | ||
* Set addon '''source''' directory, in our case ''P:\FirstMod'' | * Set addon '''source''' directory, in our case ''P:\FirstMod'' | ||
* Set '''destination''' directory, for example ''P:\PackedPbos'' | * Set '''destination''' directory, for example ''P:\PackedPbos'' | ||
* In options, set a '''path to project folder''', in our case it will be ''P:\'' | * In options, set a '''path to project folder''', in our case it will be ''P:\'' | ||
* Move our freshly packed .pbo into a new mod folder (as described here: [[DayZ:Modding_Structure#Mod_structure|DayZMod Structure]]): ''P:\FirstModPacked\Addons'' and put our '''pbo''' inside ''Addons'' | |||
* Done! Mod can now be loaded using launch parameter ''-mod=P:\FirstModPacked'' | |||
== Testing the mod == | == Testing the mod == | ||
Make sure to always properly test your mod before releasing to public! | {{Feature|important|Make sure to always properly test your mod before releasing to public!}} | ||
=== Testing mod in singleplayer === | === Testing mod in singleplayer === | ||
| Line 107: | Line 102: | ||
Many mods can be tested in SP environment which you can easily set up by creating a ChernarusPlus custom mission folder, for example '''myMission.ChernarusPlus''' with a '''init.c''' file inside of it with following contents | Many mods can be tested in SP environment which you can easily set up by creating a ChernarusPlus custom mission folder, for example '''myMission.ChernarusPlus''' with a '''init.c''' file inside of it with following contents | ||
<syntaxhighlight lang=" | <syntaxhighlight lang="cpp"> | ||
class CustomMission: MissionGameplay | class CustomMission: MissionGameplay | ||
{ | { | ||
void CustomMission() | |||
{ | |||
} | |||
}; | }; | ||
Mission CreateCustomMission(string path) | Mission CreateCustomMission(string path) | ||
{ | { | ||
return new CustomMission(); | |||
} | } | ||
void main() | void main() | ||
{ | { | ||
| Line 127: | Line 122: | ||
// Set your gear | // Set your gear | ||
player.CreateInInventory("TShirt_Black"); | player.CreateInInventory("TShirt_Black"); | ||
// Select player | // Select player | ||
GetGame().SelectPlayer(NULL, player); | GetGame().SelectPlayer(NULL, player); | ||
| Line 134: | Line 129: | ||
Modify the init.c to suit your testing needs, then launch '''DayZDiag_x64.exe''' with the following parameters | Modify the init.c to suit your testing needs, then launch '''DayZDiag_x64.exe''' with the following parameters | ||
''-mission=pathToMission\myMission.ChernarusPlus -mod=P:\FirstModPacked'' | |||
''-mission=pathToMission\ | |||
which will start the game with a mod in SP environment. | which will start the game with a mod in SP environment. | ||
If you are using the '''Script Editor''', you will now see the custom message in the output section every time you jump. | |||
If you are using the '''Script Editor''', you will now see the custom message in the output section every time you jump. If you are not, navigate to your profiles folder ( default: ''WindowsProfilePath\AppData\Local\DayZ'' ) and open the most recent '''script.log''' file, which will contain the printed message. | If you are not, navigate to your profiles folder ( default: ''WindowsProfilePath\AppData\Local\DayZ'' ) and open the most recent '''script.log''' file, which will contain the printed message. | ||
=== Testing in multiplayer === | === Testing in multiplayer === | ||
When testing in MP environment, launch the '''DayZDiag_x64.exe''' in a server mode using the launch parameters | When testing in MP environment, launch the '''DayZDiag_x64.exe''' in a server mode using the launch parameters | ||
''-server -config=serverDZ.cfg -mod=P:\FirstModPacked'' | |||
''-server -config=serverDZ.cfg -mod=P:\FirstModPacked'' | |||
where '''serverDZ.cfg''' can be copied from the DayZ Server distribution on Steam. You will need to modify following options: | where '''serverDZ.cfg''' can be copied from the DayZ Server distribution on Steam. You will need to modify following options: | ||
<syntaxhighlight lang=" | <syntaxhighlight lang="cpp"> | ||
BattlEye = 0; // turn off BE since diag exe does not run with it | BattlEye = 0; // turn off BE since diag exe does not run with it | ||
verifySignatures = 0; // if testing mods which aren't properly signed yet | |||
</syntaxhighlight> | |||
You can then join the server using '''DayZDiag_x64.exe''' with ''-mod=P:\FirstModPacked'' parameter.<br> | |||
< | You can also use ''-connect=127.0.0.1 -port=2302'' launch parameters to connect to the server directly, skipping the need to go through menu | ||
== Publishing == | == Publishing == | ||
Additional steps you will need to go through when you want to share the mod with the world | Additional steps you will need to go through when you want to share the mod with the world: | ||
* Use '''DS utils''' (DayZ Tools) to create a private and public bikey and use it to sign your pbo, as well as include the public bikey in your mod | |||
* Use '''Publisher''' (DayZ Tools) to upload to Steam Workshop | |||
[[Category: DayZ: Tutorials|Basics]] | |||
Revision as of 03:12, 7 February 2021
Step by step creation of a simple mod for DayZ.
Requirements
- Steam copy of DayZ
- DayZ Tools (Available through steam by navigating through Library -> Tools)
Setup
It is recommended to setup a Project Drive with extracted game data for optimal workflow:
- Launch DayZ Tools from Steam
- Navigate to Settings
- Set a Drive Letter and your Path to the Project Drive
- Click apply
- Navigate to Tools -> Extract Game Data
- Wait for the process to finish
If you wish to use Workbench and its Script Editor, follow the setup guide here: Workbench Setup
Creating a mod
In the spirit of simplicity, let us create a mod which will print a message into the log upon a certain condition.
In order to do so, we will need to pack our mod into a .pbo file and load it when launching the game. A mod can have several .pbo files but most smaller ones will only ever need a single one.
Scripting syntax documentation is located here: DayZ:Enforce_Script_Syntax
Step by step
- Start by creating a mod folder, in this example we will create one in our P: drive called FirstMod
- Inside the FirstMod folder, create another folder which will contain our modded class. We will call it WorldScripts
- PlayerBase.c contains a function suitable for our mod named OnJumpStart() which is called every time player jumps - we will use it in this example
- Create MyScript.c file in the WorldScripts folder with the following contents
modded class PlayerBase	// modded keyword for modding existing class
{
	override void OnJumpStart()	// overriding existing function
	{
		super.OnJumpStart();			// call the original jump function so we don't break stuff
		Print("My first mod, yay!");	// our modded print
	}
}

- All we need now is config.cpp, which is a representation of our pbo as described here: PBO Structure
class CfgPatches
{
	class FirstMod
	{
		requiredAddons[]=
		{
			// ""
		};
	};
};

class CfgMods
{
	class FirstMod
	{
		type = "mod";

		class defs
		{
			class worldScriptModule
			{
				value = "";
				files[] = {"FirstMod/WorldScripts"};
			};
		};
	};
};
- Using the correct script module is very important!
- Vanilla file PlayerBase.c (which contains PlayerBase class we are modding) is located in 4_World so we need to define path to worldScriptModule scripts in our config.cpp in order for our PlayerBase script mod to work.

- Done! It is time to pack our mod into a pbo file.
Packing into pbo
- Using the DayZ Tools launcher, open Addon Builder
- Set addon source directory, in our case P:\FirstMod
- Set destination directory, for example P:\PackedPbos
- In options, set a path to project folder, in our case it will be P:\
- Move our freshly packed .pbo into a new mod folder (as described here: DayZMod Structure): P:\FirstModPacked\Addons and put our pbo inside Addons
- Done! Mod can now be loaded using launch parameter -mod=P:\FirstModPacked
Testing the mod
Testing mod in singleplayer
Many mods can be tested in SP environment which you can easily set up by creating a ChernarusPlus custom mission folder, for example myMission.ChernarusPlus with a init.c file inside of it with following contents
class CustomMission: MissionGameplay
{
	void CustomMission()
	{
	}
};

Mission CreateCustomMission(string path)
{
	return new CustomMission();
}

void main()
{
	// Create player
	PlayerBase player = PlayerBase.Cast( ( GetGame().CreatePlayer( NULL, "SurvivorF_Linda", "2200 10 2200", 0, "NONE") ) );

	// Set your gear
	player.CreateInInventory("TShirt_Black");

	// Select player
	GetGame().SelectPlayer(NULL, player);
}
Modify the init.c to suit your testing needs, then launch DayZDiag_x64.exe with the following parameters
-mission=pathToMission\myMission.ChernarusPlus -mod=P:\FirstModPacked
which will start the game with a mod in SP environment.
If you are using the Script Editor, you will now see the custom message in the output section every time you jump. If you are not, navigate to your profiles folder ( default: WindowsProfilePath\AppData\Local\DayZ ) and open the most recent script.log file, which will contain the printed message.
Testing in multiplayer
When testing in MP environment, launch the DayZDiag_x64.exe in a server mode using the launch parameters
-server -config=serverDZ.cfg -mod=P:\FirstModPacked
where serverDZ.cfg can be copied from the DayZ Server distribution on Steam. You will need to modify following options:
BattlEye = 0;			// turn off BE since diag exe does not run with it
verifySignatures = 0;	// if testing mods which aren't properly signed yet
You can then join the server using DayZDiag_x64.exe with -mod=P:\FirstModPacked parameter.
You can also use -connect=127.0.0.1 -port=2302 launch parameters to connect to the server directly, skipping the need to go through menu
Publishing
Additional steps you will need to go through when you want to share the mod with the world:
- Use DS utils (DayZ Tools) to create a private and public bikey and use it to sign your pbo, as well as include the public bikey in your mod
- Use Publisher (DayZ Tools) to upload to Steam Workshop