Layered Terrain Surface Representation: Difference between revisions
(Initial version.) |
m (→Layer Map: Fixed file names.) |
||
| Line 34: | Line 34: | ||
=====Layer Map===== | =====Layer Map===== | ||
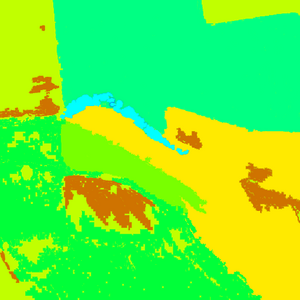
[[Image: | [[Image:Layer-map_lco.png|thumb|left|Layer Map]] | ||
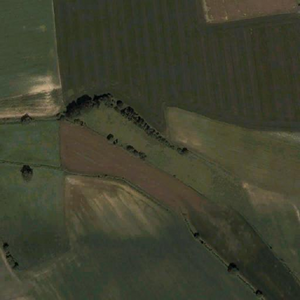
[[Image: | [[Image:Satellite-map_lco.png|thumb|left|Satellite Map]] | ||
| Line 77: | Line 77: | ||
class Legend | class Legend | ||
{ | { | ||
// | // see above | ||
}; | }; | ||
</pre> | </pre> | ||
Revision as of 08:35, 9 November 2006
Terrain surfaces for the whole world are represented by a pair of textures covering the whole world: Satellite Map and Layer Map. PNG format is used for both textures, both textures are split when imported to Visitor and Layer Map is converted to Layer Mask during the process.
Note: The import process can be very time consuming because of the huge amount of data being processed. The full import of data for 20x20 km world with resolution 1 takes about 10 hours on a 2 GHz computer. The conversion is incremental, therefore if you edit only a small part of the maps, the next iteration is a lot faster, but it still can take about 1 hour (only launching Buldozer to check the results takes around 15 minutes). Be sure to tune your surfaces with small world first and once you are happy with the results, proceed with the large one.
Layer Legend
Legend is an image accompanied with a config, defining conversion from RGB to layers. Config defines which color represents what surface type. One surface type can be represented by multiple colors, which makes creating smooth blends between multiple surface type pairs possible. Only first line of the image is read, the rest is ignored and can be used for annotations.
There are few limitations imposed on the legend file - main being no color can exist twice in the image. The sample legend was created using gradient Rainbow in Photoshop, with added gradients to black and white on the ends using gradient between two colors.
Config desribing basic surfaces for this legend might look like this:
class Legend
{
  picture="layertest\src\mapLegend.png";
  class Colors
  {
    /// color names should correspond to surface layer names
    snow[]={{255,255,255}};
    wetSand[]={{0,0,0}};
    grass[]={{0,255,131},{255,255,0}};
    sand[]={{207,115,0}};
    rock[]={{0,255,255},{121,255,0}};
    mud[]={{0,255,0}};
  }
};
Layer Map
Layer map is edited as an RGB image. Each pixel of the map image is interpreted as follows:
- best matching color in the Legend is found
- based on nearest left and right basic surface corresponding surface blend is used
There is another config file describing the layer map. It defines what legend is used, and it also defines surface materials for basic surfaces. Surface materials used in one layer map need to have all parameters except the textures referenced identical. Textures used should not use SRGB color conversions, which implies _lco texture type should be used.
class Layers
{
  class Grass
  {
    texture="layertest\data\grass_lco.paa";
    material="layertest\data\grass.rvmat";
  };

  class Sand
  {
    texture = "#(argb,8,8,3)color(0.5,0.5,0.5,1)";
    material="layertest\data\sand.rvmat";
  };

  class Rock
  {
    texture = "#(argb,8,8,3)color(0.5,0.5,0.5,1)";
    material="layertest\data\rock.rvmat";
  };

  class Mud
  {
    texture = "#(argb,8,8,3)color(0.5,0.5,0.5,1)";
    material="layertest\data\mud.rvmat";
  };
};

class Legend
{
  // see above
};
Editing Layer Map and Satellite Map
Assume texture folder is defined as LayerTest\Data in the Visitor for given world. All source files are assume to be located in LayerTest\Source unless specified otherwise.
Preparations:
- create a legend image
- create a config layers.cfg defining surfaces and legend used
- in Tools/Project Preferences decide on the satellite map segment size. Because of texture connecting the segmens need to overlap slightly - good overlap size is around 16 texels. Satellite map segment size is given as a multiply of basic landscape grid. Example: Mějme ostrov o rozměrech 10240*10240 m s gridem 40 m (tedy 256x256 čtverců) , sat. texturu s rozlišením 7680*7680 (rozlišení sat. textury musí být takové, aby na jeden čtverec krajiny připadl celý počet texelů, tedy její velikost musí být násobek velikosti krajiny ve čtvercích). Chceme, aby jednotlivé segmenty měly cca 512x512 texelů, a jelikož potřebujeme přesah cca 16 pixelů, budeme počítat 496x496. Jeden texel má 10240m/7680 (1.3333 m), takže 496 texelů je 661.33 m. Při gridu 40 m dostáváme 661.33/40 = 16.5, zadáme nejbližší menší celé číslo, tedy 16. (Pokud máme jiný grid textur, než je grid krajiny, nestačí volit menší celé číslo, ale musí se zvolit nejbližší menší násobek poměru gridu textur ke gridu krajiny. Při gridu krajiny 5 a gridu textur 20 musí být např. satelitní grid násobek 4.
Editing cycle: (editing is usually done in Photoshop with Buldozer not running)
- edit satellite map in Photoshopu (file Satellite-map_lco.png). Note: you need to use _lco or _draftlco as a texture type.
- edit layer map masku ve Photoshopu (file Layer-map_lco.png). Note: you need to use _lco or _draftlco as a texture type.
- run Tools / Import Satellite + Mask, select Satellite-map_lco.png, Layers.cfg, Layer-map_lco.png files in the file browser
- run Buldozer to check the result

