Making Satellite Texture and Mask
Introduction
A little background information about Sahrani
Fictional map
Sahrani is a fictional terrain, there is no place with Sahrani's landscape layout, therefore it was necessary to make all the textures from scratch and paint them by hand. If real terrain/aerial images + proper matching DEM's are used as reference then this method could be skipped.
On the fly
There was some limits while building Sahrani; the map was under constant development and many changes occurring frequently. It happened in both objects layout (road network, cities, vegetation) and terrain (peaks, coastline etc.). It was important to keep many project elements in editable form, and to have the possibility to easily update basic layers of source PSD for both satellite texture and surface mask. It sometimes lead to work with massive PSB file of 8 GB...
References
Map design
The first and initial information for satellite texture design is the intent of map designer. It is always good to know what style of landscape you're after, what locations you want to create, what do you plan to use as reference and how good your references are going to be. These decisions influence not just how the map will look like, but also how many surfaces you will need. This is the simplified version of plan for Sahrani:
Northern Sahrani:
- Central-European landscape and urbanized areas
- Fields, pastures, broad leaf and fir forests
- Mountains, rocky peaks, elevated flatlands
- Sandy and rocky beaches
Southern Sahrani:
- Tropical and desert character
- Urban areas in Mediterranean and Close-Eastern style
- Arid mountains, rocky peaks
- Desert sand - dunes, sandy beaches
North Sahrani
South Sahrani


Resources
Most useful source of graphics and reference information are websites containing satellite or aerial imagery:
- Google Earth
- Mapy.CZ
- Purchased aerial photography in high resolution
- Landscape photos (Google, photo banks, private resources)
- Reference from Visitor project (explained later)
- Zaba Search where you can type a name and they will show an exact map of the area of where they live
Preparation
Grid representation of landscape
Terrain Size
This is the setting for number of terrain cells. In case of Sahrani, it is 2048x2048 cells. In old style OFP maps, they have a size 256x256 elevations cells.
Terrain cell size
This is the distance between elevation vertices. For Sahrani, it is 10x10 meters, for OFP maps, it is 50x50 meters.
Map size
Sahrani has cell size 10m and grid size 2048x2048 cells, the resulting map has a size of 20480x20480 meters. Since resolutions of texture and mask was 1px/1m, the bitmap for Sahrani was 20480'x20480 pixels.

Satellite texture grid
- During import to Visitor, satellite texture and mask are cut into smaller squares.
- Size and number of squares is determined by so-called Satellite grid value, which is function of map size, texture size and desired square size. Calculation is described in Landscape Surface Editing.
- Squares overlap a little, so that no artifacts would appear on their borders due to texture filtering.
Visitor - Export of project layout
Resolution of satellite texture for Sahrani was 1m/px. It is necessary to edit most features on both texture and surface mask with maximum precision, therefore it is necessary to have reliable reference on your Visitor project. An excellent way of getting the knowledge of objects layout in project is to export kinda "print" of the whole project's area.
Prior to exporting the image, it is good to set proper visualization of objects in Visitor to achieve useful information:
Terrain
- Menu View > Define configuration... CTRL+F
- Section Colors - height
- We suggest to set Minimal/Maximal ground height to gradient from white to 50% gray.
- Color of contours is good to set to some less distinct shade.
- For tweaking beach textures, Elevation interval style was set to 1m, so that waterline contour can be used as reference for painting beaches. Working on inland terrain, it is better to entirely switch off contours or select broader interval of 10-50m.
- Turn off drawing of features that are not needed, e.g. square grid.
Objects
When selecting forest surface based on vegetation, for artificial shadows of trees or painting of roads, you can use symbology of objects in Visitor to your advantage. For better selection of objects in Photoshop, it is useful to have same color for object border and body:
- Dialogue Tools > Nature objects..., it is possible to adjust colors of all natural objects in project; you may either choose the same color for all or use different colors for broad leaf and coniferous species. You may also use ellipse instead of rectangle symbol.
- Dialogue Tools > Roads..., it is possible to change color of various road types.
- Dialogue Tools > Artificial objects..., same thing can be done as for natural objects. You will definitely make use of position of artificial objects, especially when painting surfaces in cities. Some objects can be selected (e.g. using script) and added to selection. This allows hiding of object groups regardless of their type and may prove useful as well.
Export of project printout
- Dialogue Project > Export Map As Image...
- Choose EMF as file type! It is impossible to export image in big resolution as BMP. Resolution should be the same as target satellite image PLUS the size of "blue edge" (TM)', visible on left and bottom side of the map in Visitor. On Sara, it was 20480x20480, for OFP maps, this would be 12800x12800. Blue edge will be cut out, it needs to added because output of whole map in same resolution as texture is needed.
Size of "blue edge" (TM) is the size of one elevation cell in pixels of satellite texture:
- See, what is the terrain square size.
- Calculate, how many pixels of satellite texture are present on an elevation cell:
[size of sat. texture's row or column]/[number of cells in row or column]
- On Sahrani, terrain grid cell is 10x10 px, thus the size of image you will need to export is 20490x20490 px.
Conversion of EMF to PNG
There is no way of opening a completed EMF file as big of size as Sahrani. A custom tool was then created for converting EMF to PNG. In the Visitor folder, there is tiny executable named EmfToPng.exe, this tool will do the converting to EMF for you.
Example:
EmfToPng c:\path\filename.emf
Magnification function(increases row/column size 2,5x):
EmfToPng c:\path\filename.emf
Pre-processing of printout for satellite texture
Exported PNG won't have the correct size and would not match when pasted to into your satellite map image. You need to cut the "blue edge" from left and bottom edge of image. Once you remove the blue edge, you should end with image of correct size, where imagery of all landscape elements should match with content of project.
Photoshop - Size of working files
PSB format
Satellite texture of Sahrani has size 20480x20480 px, which can be sometimes hard to process or work with. The original method of separately editing of smaller parts did not work well especially when global tweaks needed to be synchronized. Most common windows applications can only handle files of maximum size of 2.5 GB, which is very easy to exceed in the case of Sahrani. Therefore it is necessary to use a format capable of handling the size over 2.5 GB, such as the Photoshop PSB format.
PhotoShop can use this format since CS (8.0) release and has no size restriction. You may need to allow its use in PS:
- In Photoshop, open menu Edit > Preferences > File Handling...
- Check Enable Large Document Format (.psb)
Scratch disks and memory
It is not a big problem to work with files of size exceeding ~4.5 GB. On PC with P4 processor with 1GB DDR RAM, work was pretty fluent. The most time-consuming part of working with such a large texture is saving, exporting and application of filter on the whole raster. It is useful to have some RAM reserves and use additional disk space as scratch disks for these operations. To help with the performance allow PhotoShop to swap on 2 physical drives:
- In Photoshop, open dialogue Edit > Preferences > Plug-Ins & Scratch Disks...
- In Scratch Disks section, set all available physical drives; the influence on performance is quite significant.
Basic surfaces
Deciding of number and types of surfaces used in mask is not easy process, especially if you handle diverse environments and/or want to have greater number of surfaces. There are several factors limiting the use of detailed surfaces; they originate in map size, terrain grid size and satellite texture grid (how the big mask is cut to squares).
Surfaces-per-square limit
It is possible to have maximum of 4 surface types on single square of satellite mask, including the area which overlaps with neighbor squares. Square size for Sahrani is 512x512 px, which means that on quarter of 1 square kilometer, you are allowed to have maximum of four detailed surface types (e.g. grass, rock, sand, mud). Therefore it is of utmost importance to decide what basic surfaces to use to be able to sufficiently represent all the landscape features. It is wise to limit the design decision to as little surfaces as possible, it's always good to have reserve space for an additional surface on a square if such need arises.
Sahrani map consists of these basic surface types:
Northern Sahrani
- Lush grass
- Granite rock
- Does-it-all urban surface
Southern Sahrani
- Dry grass
- Sandstone rock
- Sand
- Does-it-all urban surface
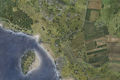
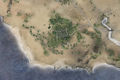
In the transition of southern and northern part (Corazol), there are squares with simultaneous occurrence of both basic grass surfaces, which limited the use of further surface types. Only additional surfaces used were basic sand and urban texture; see images for further illustration of surfaces layout.
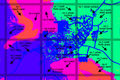
Corazol City mask
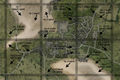
Corazol City texture
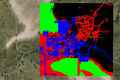
Corazol City ingame


Representation of surfaces by mask
Colors representing materials in mask
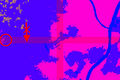
Visitor during import of satellite texture and mask regenerates its own material definition for each square it cuts and processes. It lists the detail surfaces to be used, the position is defined in mask square. For optimization purposes, mask square contains only discrete values of 4 basic RGB colors:
- Red RGB 255,0,0
- Green RGB 0,255,0
- Blue RGB 0,0,255
- Black RGB 0,0,0
This clearly show why there is surface number limit. However, composition of the surfaces on particular squares may differ. If mask should be edited as a whole, and not just as hundreds of small squares, there must be more than these 4 basic RGB shades present on the map as representation of all the surfaces. Therefore to be continued...
Each material has its own RGB values, which are used in big mask. These RGB values must be set for every surface type in Layers.cfg, which is required for importing satellite texture and mask in Visitor.
Overlapping of mask squares
Import of source data to Visitor
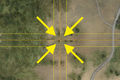
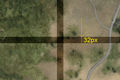
As was mentioned above, Visitor cuts big input rasters to small squares according to project settings. In case of Sahrani, squares are 512x512 px, same value is suggested for remake of OFP maps. The squares must overlap on the edges to avoid artifacts caused by texture filtering. This leads to sharing 16-pixel border on the edges.
It is important to watch the extent and number of surfaces in squares, especially where there are more surfaces combined on area of few squares. You will need to keep the extent of surfaces, which are not present on both adjacent squares, outside the shared borders in order to avoid strange interpretation of mask during square generation and subsequent visual issues in the game.
Images show how the texture squares overlap and where it is necessary to watch for material combinations on adjacent squares:
Texture overlap 1
Texture overlap 2
Mask overlap 3


