Multimaterial
Motivation, goal
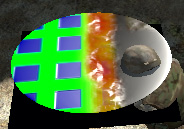
MultiMaterial is shader that allows composition of textures used in material from multiple layers of common textures via defined mask. Primary purpose is reducing number of sections, thus on surface which mixes multiple materials is needed only one material to combine them all - rendering pass in just one call. Advantage of using MultiMaterial is similar like with landscape (technology is similar) - saves textures, higher detail, prevents repeating. There is no Fresnel for specularity so it is not that valuable for glossy surfaces. Name of this new shader (vertex as well as pixel) is "Multi".
Definition of individual stages in material
Material uses more than 8 stages (14) and must use alternative write for TexGen definition - with "class TexGenX". Details are visible in example. All CO maps may have own TexGen. Mask may have own text gen naturally too. Only first 3 SMDI maps may have own TexGen, fourth using TexGen identical with CO4. MC and AS maps using TexGen identical with mask.
0-3 CO map
Usual CO maps - noteworthy is that it's using also stage 0. On the contrary in model it's awaited that no texture is assigned. While model has also link to texture then it will multiple with stage 0 similarly to macro-map.
4 MASK map
Mask determining in RGB components mixing of separate layers.
5-8 DTSMDI map
Map similar to SMDI map which keeps detail map inside R channel.
9 MC map
Usual macro map - uses same texture coordinates as mask. Calculations with macro map in this shader is different than usual (so LERP with basic map). With macro map we aim to influence only median/average color in the given place - thus original layers aren't overlapped. This technique was taken from mixing with satellite map which is done on terrain.
10 AS map
Usual ambient map - uses same texture coordinates as mask.
11-14 NO map
Usual NO maps.
Example
See Mondkalb's MultiMaterial Tutorial for a detailed walkthrough on how to implement the MultiMaterial.
ambient[]={1,1,1,1.000000};
diffuse[]={1,1,1,1.000000};
forcedDiffuse[]={0.000000,0.000000,0.000000,0.000000};
emmisive[]={0.000000,0.000000,0.000000,1.000000};
specular[]={1.000000,1.0000,1.00000,1.000000};
specularPower=100.000000;
PixelShaderID="Multi";
VertexShaderID="Multi";

class TexGen0
{
	uvSource="tex";
};
class TexGen1
{
	uvSource="tex";
};
class TexGen2
{
	uvSource="tex";
};
class TexGen3
{
	uvSource="tex";
};
class TexGen4
{
	uvSource="tex";
};
class TexGen5
{
	uvSource="tex";
};
class TexGen6
{
	uvSource="tex";
};
class TexGen7
{
	uvSource="tex";
};

class Stage0
{
	texture="ca\MultiTest\kostky_CO.paa";
	texGen=0;
};
class Stage1
{
	texture="ca\MultiTest\oblaka_CO.paa";
	texGen=1;
};
class Stage2
{
	texture="#(rgba,8,8,3)color(0,0,0,1)";
	texGen=2;
};
class Stage3
{
	texture="#(rgba,8,8,3)color(0,0,0,1)";
	texGen=3;
};
class Stage4
{
	texture="ca\MultiTest\maska_MASK.paa";
	texGen=4;
};
class Stage5
{
	texture="ca\MultiTest\kostky_DTSMDI.paa";
	texGen=5;
};
class Stage6
{
	texture="ca\MultiTest\oblaka_DTSMDI.paa";
	texGen=6;
};
class Stage7
{
	texture="ca\MultiTest\kostky_DTSMDI.paa";
	texGen=7;
};
class Stage8
{
	texture="#(rgba,8,8,3)color(0.5,0,1,1)";
	texGen=3;
};

class Stage9
{
	texture="#(rgba,8,8,3)color(1,1,1,0)"; // MC map
	texGen=4;
};
class Stage10
{
	texture="#(rgba,8,8,3)color(0,1,1,1)"; // AS map
	texGen=4;
};
class Stage11
{
	texture="ca\MultiTest\kostky_NO.paa";
	texGen=0;
};
class Stage12
{
	texture="ca\MultiTest\oblaka_NO.paa";
	texGen=1;
};
class Stage13
{
	texture="#(rgba,8,8,3)color(0.5,0.5,1,1)";
	texGen=2;
};
class Stage14
{
	texture="#(rgba,8,8,3)color(0.5,0.5,1,1)";
	texGen=3;
};
Alternate layout
ambient[]		= {1,1,1,1};
diffuse[]		= {1,1,1,1};
forcedDiffuse[]	= {0,0,0,0};
emmisive[]		= {0,0,0,1};
specular[]		= {1,1,1,1};
specularPower	= 50;
PixelShaderID	= "Multi";
VertexShaderID	= "Multi";
// BLACK
class TexGen0 	{uvSource="tex";	class uvTransform{aside[]={1,0,0};	up[]={0,1,0};	dir[]={0,0,1};	pos[]={0,0,0};};};
class TexGen5 	{uvSource="tex";	class uvTransform{aside[]={1,0,0};	up[]={0,1,0};	dir[]={0,0,1};	pos[]={0,0,0};};};
class Stage0	{texture="#(argb,8,8,3)color(0,0,0,1,co)";										texGen="0";};
class Stage5	{texture="#(argb,8,8,3)color(0.5,0,1,1,DTSMDI)";								texGen="5";};
class Stage11	{texture="#(argb,8,8,3)color(0.5,0.5,1,1,NOHQ)";								texGen="0";};
// RED
class TexGen1 	{uvSource="tex";	class uvTransform{aside[]={1,0,0};	up[]={0,1,0};	dir[]={0,0,1};	pos[]={0,0,0};};};
class TexGen6 	{uvSource="tex";	class uvTransform{aside[]={1,0,0};	up[]={0,1,0};	dir[]={0,0,1};	pos[]={0,0,0};};};
class Stage1	{texture="#(argb,8,8,3)color(1,0,0,1,co)";										texGen="1";};
class Stage6	{texture="#(argb,8,8,3)color(0.5,0,1,1,DTSMDI)";								texGen="6";};
class Stage12	{texture="#(argb,8,8,3)color(0.5,0.5,1,1,NOHQ)";								texGen="1";};
// GREEN
class TexGen2 	{uvSource="tex";	class uvTransform{aside[]={1,0,0};	up[]={0,1,0};	dir[]={0,0,1};	pos[]={0,0,0};};};
class TexGen7 	{uvSource="tex";	class uvTransform{aside[]={1,0,0};	up[]={0,1,0};	dir[]={0,0,1};	pos[]={0,0,0};};};
class Stage2	{texture="#(argb,8,8,3)color(0,1,0,1,co)";										texGen="2";};
class Stage7	{texture="#(argb,8,8,3)color(0.5,0,1,1,DTSMDI)";								texGen="7";};
class Stage13	{texture="#(argb,8,8,3)color(0.5,0.5,1,1,NOHQ)";								texGen="2";};
// BLUE
class TexGen3 	{uvSource="tex";	class uvTransform{aside[]={1,0,0};	up[]={0,1,0};	dir[]={0,0,1};	pos[]={0,0,0};};};
class Stage3	{texture="#(argb,8,8,3)color(0,0,1,1,co)";										texGen="3";};
class Stage8	{texture="#(argb,8,8,3)color(0.5,0,1,1,DTSMDI)";								texGen="3";};
class Stage14	{texture="#(argb,8,8,3)color(0.5,0.5,1,1,NOHQ)";								texGen="3";};
// MASK, MC, AS/ADS
class TexGen4 	{uvSource="tex1";	class uvTransform{aside[]={1,0,0};	up[]={0,1,0};	dir[]={0,0,1};	pos[]={0,0,0};};};
class Stage4	{texture="#(argb,8,8,3)color(1,0,0,1,Mask)";									texGen="4";};
class Stage9	{texture="#(argb,8,8,3)color(0,0,0,0,MC)";										texGen="4";};
class Stage10	{texture="#(argb,8,8,3)color(1,1,1,1,ADS)";										texGen="4";};
Multimaterial for Autodesk 3DS MAX
Shader settings
See above ^
// Get the mask content
half3 mask = tex2D(sampler4, input.tMSK_DT0.xy);
// Get the masked CO map
half3 mCO = tex2D(sampler0, co0.xy).rgb;
mCO = lerp(mCO, tex2D(sampler1, co1.xy).rgb, mask.r);
mCO = lerp(mCO, tex2D(sampler2, co2.xy).rgb, mask.g);
mCO = lerp(mCO, tex2D(sampler3, co3.xy).rgb, mask.b);
// Get the masked avg CO map
half3 mCOavg = tex2Dlod(sampler0, co0).rgb;
mCOavg = lerp(mCOavg, tex2Dlod(sampler1, co1).rgb, mask.r);
mCOavg = lerp(mCOavg, tex2Dlod(sampler2, co2).rgb, mask.g);
mCOavg = lerp(mCOavg, tex2Dlod(sampler3, co3).rgb, mask.b);
// Sample the macro map
half4 macro = tex2D(sampler9, input.tMSK_DT0.xy);
// Modify the base color by macro map (the same turn is used in Terrain shader)
half3 adjust = (macro.rgb/mCOavg);
adjust = min(2,max(adjust,0));
mCO = lerp(mCO, mCO * adjust, macro.a) ;
// Calculate the color
fout.color.rgb = mCO * mSMDI.r * 2.0;
fout.color.a = 1;
along this setting You can create other shaders for another programs
Progress
Needed Filters / Plugins
- ctrl_Colors for Max v1.0
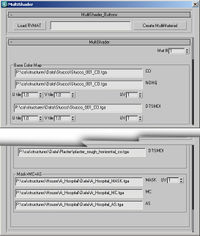
Pre-defined material 3DMAX
- now is available script which creates material by defined values
- it can read data from RVMATs
- works only for MENTALRAY
- You may find script on address
- someURL://VM_MultiShader.mcr
- it's MacroSkript
- load into 3DMAX\UI\MacroScripts\
- run MAX
- v CUSTOMIZE -> CUSTOMIZE USER INTERFACE -> TOOLBARS -> CATEGORY = "VM's" -> "MULTISHADER"
- with help of "Render To Texture" -> render resulting Diffuse channel
- Each texture is named TYPE_CHANNEL
- non-filled or incorrectly-filled texturs aren't created (default settings will be used)
- then there is no problem with entering procedural textures
- in slot Diffuse is saved entire color -> baked material
- in slot Ambient is saved DTSMDI information for entire material (Ambient because it wasn't possible otherway)
- in slot Bump is NOHQ information for entire material
- all slots ready for bake
Step by Step
- run script
- fill corresponding cells for textures
- or load RVMAT (works only for MultiShader materials)
- click onto Create Multimaterial
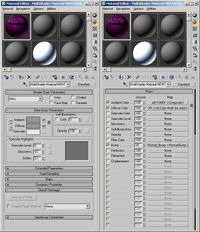
- material will be autocreated inside Material Editor
- Bake standalone "DIFFUSE"(colormap) ,standalone "NORMAL"(normalmap) and standalone "AMBIENT"(through BLEND)(DTSMDI)
External links
- LERP , wikipedia


