Sample Mission 1 – Take On Helicopters
Lou Montana (talk | contribs) m (Text replacement - "Category:Scripting_Commands_Take_On_Helicopters" to "Category:Scripting Commands Take On Helicopters") |
Lou Montana (talk | contribs) m (Some wiki formatting) |
||
| (4 intermediate revisions by 2 users not shown) | |||
| Line 1: | Line 1: | ||
<noinclude> | <noinclude> | ||
__TOC__ | __TOC__ | ||
==Overview== | == Overview == | ||
This mission is designed to introduce players that are completely unfamiliar with the editor with some fun, easily customisable gameplay. | This mission is designed to introduce players that are completely unfamiliar with the editor with some fun, easily customisable gameplay. | ||
* Introduces users to the major features of the editor: [[Mission_Editor:_Units|Units]], [[Mission_Editor:_Groups|Groups]], [[Mission_Editor:_Triggers|Triggers]], [[Mission_Editor:_Waypoints|Waypoints]], [[Mission_Editor:_Synchronization|Synchronization]], and [[Mission_Editor:_Markers|Markers]]. | * Introduces users to the major features of the editor: [[Mission_Editor:_Units|Units]], [[Mission_Editor:_Groups|Groups]], [[Mission_Editor:_Triggers|Triggers]], [[Mission_Editor:_Waypoints|Waypoints]], [[Mission_Editor:_Synchronization|Synchronization]], and [[Mission_Editor:_Markers|Markers]]. | ||
* Demonstrates the deployment of [[BIS_fnc_wpSlingLoadAttach|Custom Waypoints]] | * Demonstrates the deployment of [[BIS_fnc_wpSlingLoadAttach|Custom Waypoints]] | ||
* Introduces the concept of [[:Category:Scripting Commands Take On Helicopters|Scripting Commands]]. | * Introduces the concept of [[:Category:Scripting Commands Take On Helicopters|Scripting Commands]]. | ||
==Text Guide== | == Text Guide == | ||
</noinclude> | </noinclude> | ||
===Getting Started=== | === Getting Started === | ||
# '''Pick Seattle''' | # '''Pick Seattle''' | ||
#* Select "Singleplayer" > "Editor" > "Seattle" to open up the editor screen. | #* Select "Singleplayer" > "Editor" > "Seattle" to open up the editor screen. | ||
| Line 19: | Line 19: | ||
</gallery> | </gallery> | ||
===Creating the Mission=== | === Creating the Mission === | ||
# '''Create a Save''' | # '''Create a Save''' | ||
#* Select the "Save" Icon (or press Ctrl + S) to open the save dialogue | #* Select the "Save" Icon (or press Ctrl + S) to open the save dialogue | ||
| Line 64: | Line 64: | ||
===Creating the Gameplay=== | === Creating the Gameplay === | ||
# '''Place a Container Crate''' | # '''Place a Container Crate''' | ||
#* With the Unit Icon still selected double click nearby the ship to open the "Insert Unit" interface. | #* With the Unit Icon still selected double click nearby the ship to open the "Insert Unit" interface. | ||
| Line 70: | Line 70: | ||
#* Zoom in the view and move the object, by clicking, holding, and dragging it, so it is positioned directly above the empty ship. | #* Zoom in the view and move the object, by clicking, holding, and dragging it, so it is positioned directly above the empty ship. | ||
#* To make it sit on the deck, we now need to raise the object by around two meters. Double click on the crate the open the "Edit Unit" Interface. | #* To make it sit on the deck, we now need to raise the object by around two meters. Double click on the crate the open the "Edit Unit" Interface. | ||
#* In the 'initialisation' field, type | #* In the 'initialisation' field, type <sqf inline>this setPos [position this select 0, position this select 1, 2]</sqf> and click "OK". | ||
#** ''note, this is an example of a scripting command, what we're doing is setting the position of the object, relative to where you place it, by adding 2 to the Z-axis of the object in 3D space'' | #** ''note, this is an example of a scripting command, what we're doing is setting the position of the object, relative to where you place it, by adding 2 to the Z-axis of the object in 3D space'' | ||
# '''Place a Trigger''' | # '''Place a Trigger''' | ||
| Line 81: | Line 81: | ||
# '''Set an Effect''' | # '''Set an Effect''' | ||
#* Double click on the trigger to open the "Edit Trigger" interface. | #* Double click on the trigger to open the "Edit Trigger" interface. | ||
#* In the "On Act.:" field, | #* In the "On Act.:" field, type <sqf>setWind [10,10,true];</sqf> and click OK. | ||
#** ''note, here, we're triggering a [[:Category:Scripting Commands Take On Helicopters|scripting command]] that forces the wind to blow, which will make picking up the cargo a bit more of a challenge!'' | #** ''note, here, we're triggering a [[:Category:Scripting Commands Take On Helicopters|scripting command]] that forces the wind to blow, which will make picking up the cargo a bit more of a challenge!'' | ||
# '''Create a Waypoint''' | # '''Create a Waypoint''' | ||
| Line 116: | Line 116: | ||
===Finishing the Mission=== | === Finishing the Mission === | ||
# '''Create a Final Waypoint''' | # '''Create a Final Waypoint''' | ||
#* With the Waypoints Icon still selected, double click near the '(H)WT42' symbol (which is where a helipad is positioned) to open the Insert Waypoint interface. | #* With the Waypoints Icon still selected, double click near the '(H)WT42' symbol (which is where a helipad is positioned) to open the Insert Waypoint interface. | ||
#* Select "SCRIPTED - HELICOPTERS" in the Category selection box, and "LAND" in the "Select Type" box. | #* Select "SCRIPTED - HELICOPTERS" in the Category selection box, and "LAND" in the "Select Type" box. | ||
#* To trigger the end of the mission, type in the "On Act.:" field | #* To trigger the end of the mission, type in the "On Act.:" field <sqf>endMission "DEFAULT"</sqf> | ||
#** ''note: there are different types of ending, but you can learn more elsewhere!'' | #** ''note: there are different types of ending, but you can learn more elsewhere!'' | ||
# '''Add some Markers''' | # '''Add some Markers''' | ||
| Line 141: | Line 141: | ||
<noinclude> | <noinclude> | ||
[[Category: | [[Category: Mission Editing]] | ||
</noinclude> | </noinclude> | ||
Latest revision as of 01:17, 22 July 2022
Overview
This mission is designed to introduce players that are completely unfamiliar with the editor with some fun, easily customisable gameplay.
- Introduces users to the major features of the editor: Units, Groups, Triggers, Waypoints, Synchronization, and Markers.
- Demonstrates the deployment of Custom Waypoints
- Introduces the concept of Scripting Commands.
Text Guide
Getting Started
- Pick Seattle
- Select "Singleplayer" > "Editor" > "Seattle" to open up the editor screen.
- Editor interface
- We've updated the community wiki page, which explains the basic principles, icons, etc: Mission Editor
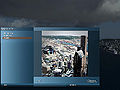
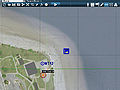
Seattle Terrain in the Editor menu

Creating the Mission
- Create a Save
- Select the "Save" Icon (or press Ctrl + S) to open the save dialogue
- Enter a save-name to store your mission as Mission Folder.
- Place the Heliport
- Select the "Modules" Icon (or press F7)
- Double-click anywhere on the map, pick "Heliport", and click "OK".
- This will spawn (create) the 'heliport composition' (3D objects of hangar, landing pads, etc) and also set up some other simple things, which will make designing your mission easier (we needn't go into detail now).
- The 'Heliport' is spawned near the marker '(H)WT42'. You should be familiar with this from playing the Career Mode and Challenges.
- Place a Unit
- Find the Heliport (WT42)
- note, if you select the "Textures" Icon, you can toggle hiding/revealing the ground textures - useful for placing objects!
- Select the "Units" Icon (or press F1), and double click near the heliport to open the "Insert Unit" Interface.
- Choose a player, by setting: Side ("civilian"), Faction ("Story"), Class ("People"), and Unit ("Tom Larkin").
- note, you can choose any character you like by changing the selections here.
- In the "Variable Name" field, enter hsim_Player, and click "OK".
- note, this will assign an identity to the unit.
- Find the Heliport (WT42)
- Place a Helicopter
- With "Units" still selected, double click at the heliport again to open the "Insert Unit" interface.
- place an empty heavy helicopter, by setting: Side ("Empty", Class ("Helicopters (Heavy)") and Unit ("Larkin Aviation [Story]")
- note, you needn't be to precise about where you place this, as the 'Heliport Module' will set it up for you
- Synchronize!
- Select the Synchronize Icon (or press F5)
- Click and hold on where you placed the 'Heliport Module', drag your cursor to the helicopter, and release.
- You should see a thin line drawn between the two symbols, which shows they are 'synchronized'.
- note, here you're connecting up the game's logic, telling the heliport which is the helicopter you want the player to fly.
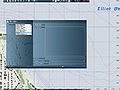
- Place a Ship
- Scroll the map nearby in Elliot bay, select the Unit Icon, and double click in the water to open the "Insert Unit" interface.
- Place an empty ship, by setting: Side ("Empty"), Class ("Ships"), Unit ("Cargo Ship [empty, blue]").
- note: you can change the orientation of the ship by clicking and holding the LMB, holding the 'Shift' key, and moving the mouse
- Preview the Mission
- Save the mission (Ctrl-S or the "Save" Icon) and click "Preview"
- You should start, at the heliport, in a heavy helicopter, and might be able to see the ship you placed.
- If you don't, something is wrong, and you should check to see if you've made an error!
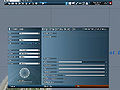
Modules interface with heliport selected
Unit interface with Player selected
Unit interface with heavy heli selected
Unit interface with Player selected
Unit interface with a ship selected
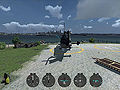
A heavy helicopter facing Seattle


Creating the Gameplay
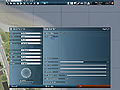
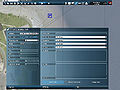
- Place a Container Crate
- With the Unit Icon still selected double click nearby the ship to open the "Insert Unit" interface.
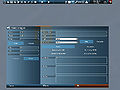
- Place a crate, by setting: Side ("Empty"), Class ("Objects (Military)"), Unit ("Container in net"), and click "OK".
- Zoom in the view and move the object, by clicking, holding, and dragging it, so it is positioned directly above the empty ship.
- To make it sit on the deck, we now need to raise the object by around two meters. Double click on the crate the open the "Edit Unit" Interface.
- In the 'initialisation' field, type this setPos [position this select 0, position this select 1, 2] and click "OK".
- note, this is an example of a scripting command, what we're doing is setting the position of the object, relative to where you place it, by adding 2 to the Z-axis of the object in 3D space
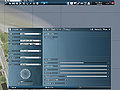
- Place a Trigger
- Select the "Trigger" Icon (or press F3) and double click somewhere nearby the ship and cargo.
- We want to enlarge the 'area' of the trigger by setting Axis a (100) and Axis b (100).
- Group the Trigger with the Player
- Select the "Group" Icon (or press F2), click and hold the trigger, drag your cursor above the Player, and release.
- You should see a thin, highlighted line showing the trigger is now grouped with the unit.
- note, here, you're grouping the trigger with the unit, this sets the 'activation' of the trigger to this vehicle.
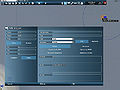
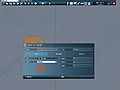
- Set an Effect
- Double click on the trigger to open the "Edit Trigger" interface.
- In the "On Act.:" field, type and click OK.
- note, here, we're triggering a scripting command that forces the wind to blow, which will make picking up the cargo a bit more of a challenge!
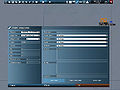
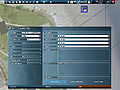
- Create a Waypoint
- Select the "Waypoint" Icon (or press F4), and then click on the Player unit, Tom Larkin.
- Scroll back over to the "Container in Net" object, and double click to select it, and open the "Insert Waypoint" interface.
- note, make sure you select the Container, not the ship!
- Select "SCRIPTED - HELICOPTERS" in the Category selection box, and "ATTACH SLINGLOAD" in the "Select Type" box.
- Enter '6' in the "Completion Radius" field, and '[5]' in the Arguments field, and click OK.
- note, here we're changing some basic conditions of a slingload task, which are explained in better detail here
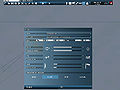
- Create another Waypoint
- With the "Waypoint" Icon still selected, scroll back to the heliport, find an open patch of ground, and double click to open the Insert Waypoint interface.
- note, toggling the 'Textures' icon can help here.
- Select "SCRIPTED - HELICOPTERS" in the Category selection box, and "DETACH SLINGLOAD" in the "Select Type" box, and click OK.
- note, you should notice that the waypoint order field now reads '1', which means it happens after the first waypoint, '0',
- With the "Waypoint" Icon still selected, scroll back to the heliport, find an open patch of ground, and double click to open the Insert Waypoint interface.
- Preview the Mission
- Save the mission (Ctrl-S or the "Save" Icon) and click "Preview"
- note, be sure to select Preview and not "Continue", which resumes your previous state.
- You should start, at the heliport, in a heavy helicopter, and might be able to see the ship you placed.
- You should have a waypoint (if you have them visible) to go pick up the cargo.
- When you get near you might see a PiP screen appear (if you have it enabled).
- Hovering low over the cargo will trigger the attach.
- You should then be prompted to fly back and drop off the cargo.
- If you don't, something is wrong, and you should check to see if you've made an error!
- Save the mission (Ctrl-S or the "Save" Icon) and click "Preview"
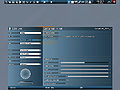
Screenshot of the Edit Unit interface with a cargo and init script
Insert Trigger Interface edited axis variables
Connecting the unit to the trigger
Insert Trigger Interface with edited On Act. variables
Insert Waypoint Interface with scripted slingload attach
Insert Waypoint Interface with scripted slingload detach


Finishing the Mission
- Create a Final Waypoint
- With the Waypoints Icon still selected, double click near the '(H)WT42' symbol (which is where a helipad is positioned) to open the Insert Waypoint interface.
- Select "SCRIPTED - HELICOPTERS" in the Category selection box, and "LAND" in the "Select Type" box.
- To trigger the end of the mission, type in the "On Act.:" field endMission "DEFAULT"
- note: there are different types of ending, but you can learn more elsewhere!
- Add some Markers
- Select the "Markers" Icon (or press F6), and double click near the ship to open the "Insert Marker" interface.
- Enter a Name ("hsim_PickUp") and Text ("Pick Up").
- note, the "Text" field is visible in game via the map.
- repeat the process by adding another marker to the drop-off point.
- Enter some Briefing info
- Double click on the Time & Date to open the "Intel" interface.
- Enter a Name for your mission and, if you like, a description.
- note, the description is only visible in Multiplayer, the single-player overview is defined elsewhere
Insert Waypoint Interface with scripted land
Insert Marker Interface
Intel interface


Sample mission 2 is designed to specifically build upon the techniques introduced in this mission.