Reyhard/Sandbox/Character Gear Creation/Headgear/Asset Preparation – User
(Created page with " = Mesh Preparation = == General == When it comes to character gear, you might notice that default rotation of character is different compared to other assets. This is caused...") |
(No difference)
|
Revision as of 15:43, 31 July 2023
Mesh Preparation
General
When it comes to character gear, you might notice that default rotation of character is different compared to other assets. This is caused by the fact, that in game animations are created using motion capture & Motion Builder software, which expects different orientation that the game. Fortunately, it is no longer necessary to rotate equipment by 180 degrees.
Positioning of helmet without any reference points is quite tricky and that's why it might be handy to load some reference model. To do so, perform following steps:
- Import HeadSize_Template.fbx into scene with your model
- This special contains all vanilla heads available molded into one entity - with this you can ensure that there will be no clipping with any of the existing models
- Adjust position of the helmet and straps so it fit that universal head
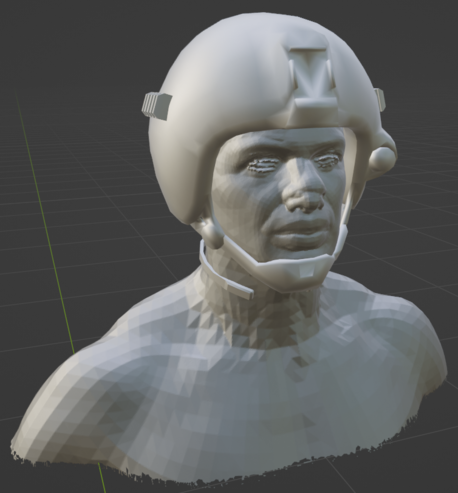
If everything went fine, you should end up with something like this:
Once you verified that helmet model doesn't need more adjustments, delete HeadSize_Template mesh from the scene since it will be no longer necessary.
Rigging
After properly positioning model, it is time for getting skeleton in and then rigging the asset. Sample Helmet is an asset imported from A3, so it already has some skinning on it, which in case of helmets will be fully usable but if you have some fresh asset, you can consider two options, which are described below.
In any case, first step on to do list will be
Importing skeleton
- Make sure that you also imported empty objects (from Memory Points collections)
- Leave Armature object name as Armature
- It is important that model contains only Armature and empty objects from the template!
- In total, 163 bones/objects should be present when model is imported into Workbench
Skinning asset
- Future proofing - skinning of the helmet strap is not technically necessary right now but in future it will be necessary for correct movement of strap when facial animations are played
- If you are using model from A3, you can also try to renaming Vertex Groups so they match Arma Reforger bones
- Transfer weights https://docs.blender.org/manual/en/latest/sculpt_paint/weight_paint/editing.html#transfer-weights
- In Modifiers tab, add new Armature modifier ( https://docs.blender.org/manual/en/latest/modeling/modifiers/deform/armature.html )
- In Object property, select Armature as object to deform with
Colliders
Helmets in Arma Reforger are using actual colliders for protection of the character so its quite important to set it correctly. First step
Creating colliders
- Shape should fit the helmet
- Should be fairly simple
- It is not recommended to use exact thickness of the helmet - instead it is enough to use material with predefined thickness
- UTM (Trimeshes) colliders can be used
Setting relations: Using Make Parent
- https://docs.blender.org/manual/en/latest/scene_layout/object/editing/parent.html#bone-parent
- Select collider object
- Select as second object Armature with Shift-LMB
- Switch to edit mode
- Select head bone
- Switch to pose mode
- Select Head bone
- Tip: you can turn on bone names for easier navigation!
- Open Menu Search ( https://docs.blender.org/manual/en/latest/interface/controls/templates/operator_search.html#menu-search - https://docs.blender.org/manual/en/latest/interface/keymap/industry_compatible.html#general )
- Search for Make Parent & select it
Setting relations: Using Relations tab
- Create a new object and in Relations tab set relation to Head
- Reposition collider to correct location
- If collider is suddenly very small, make sure that scale of the armature is correct
Creating material
- Perform research - try to find thickness and density of material
- Create new inherited material - usage of one of the existing materials is recommended
- This way, you will inherit for instance correct particle effects, sounds and decals
- In vanilla game those visual & sound effects are still being worked on (0.9.9)
- Fill in those values to that new material and then adjust Kinetic Resistance so it matches desired protection level
- You can use following spreadsheet for those calculations
Materials & Layer Preset
- Collider should FireGeo Layer Preset
- Use previously created material or one of the existing gamemats from game, which matches ballistic properties of your helmet
Creating Item variant
- Copy fbx of your helmet
- Remove skeleton and all empty objects
- Modify model of helmet so it appears like lying on flat surface
- For instance, straps can be deformed so they are resting on surface
- No skeleton needed
- Collider can be even simpler shape, but it is also possible to reuse previously created one
- Layer Preset is changed from FireGeo to ItemFireView
Importing model
- Make sure that Export skinning option is checked and reimport the model via Reimport resource button
- Make sure that you have 163 bones in total
- In Details tab, you can find current amount of bones and dummies in Bones section. First number represents amount of bones and second, number of dummies. By default, bones which are not affecting any mesh (there is no Vertex Group representing
