RoF/Sandbox – User
mNo edit summary |
mNo edit summary |
||
| Line 93: | Line 93: | ||
Once it's finished the P drive should now look like this | Once it's finished the P drive should now look like this | ||
[[File:arma3-final p drive.png | [[File:arma3-final p drive.png]] | ||
Revision as of 09:49, 17 October 2024
TODO Sample files
TODO Add warning about disabling arma tools auto mount first
Recommended Software
I'm going to be using only free programs for this guide. I won't cover how to install them, as it's basically just a matter of pressing 'Next' a few times in the installer. Programs like Arma Tools I will cover!
Text editor: Notepad++
Image editor: GIMP
Terrain Editor: L3DT Pro Now freeware, but you do have to login to the trial page still.
TODO Mirror link
Arma 3 Tools
On steam search for and install Arma 3 Tools, after it downloads run it. Agree to the license if it pops up, click Addon Builder so all the windows registry is setup. Close Addon Builder and Arma 3 Tools.
The Tools launcher has a habit of breaking Terrain Builder / Buldozer, so we need to make shortcuts to the programs we want.
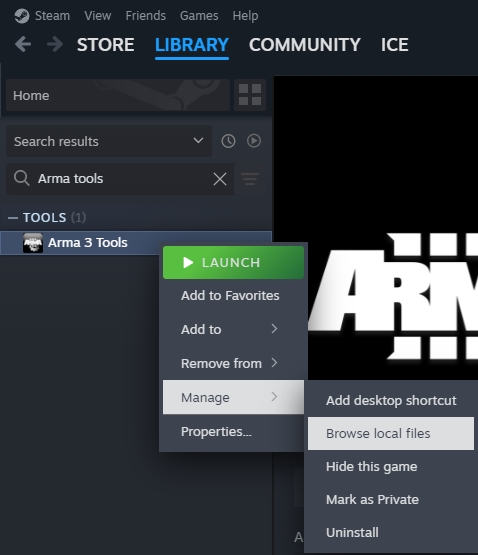
Right click Arma 3 Tools in Steam > Manage > Browse local files
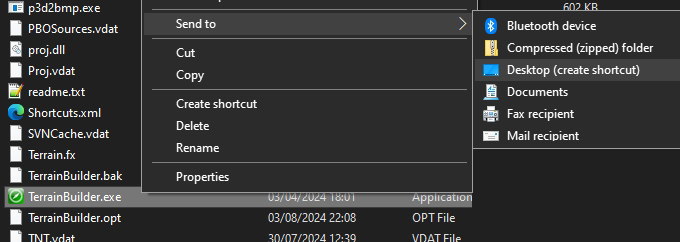
Go into the TerrainBuilder folder. Find and right click TerrainBuilder.exe > Send to > Desktop
Go back to the Arma 3 Tools folder, but this time go into the TerrainProcessor folder. Find and right click TerrainProcessor.exe > Send to > Desktop
You should now have 2 icons on your desktop. Use these when working on your map, don't load Terrain Builder via Arma 3 Tools launcher!
Mikero's Tools
Mikero's Tools are a must when terrain making, download the "Mikero_AiO_Installer" from his website. There is a paid version, but the free version works fine for making terrains. Once it's download, simply run the installer.
P Drive
So a lot of people struggle with setting up the P drive (also known as workdrive), but it's pretty simple when done correct. One of the main steps is not to use Arma 3 Tools to do it!
You need to make a folder on your PC, this should be on a drive with at least 40gb+ free space! It's not recommended to use the root of C:\ drive. This folder is where Arma's files will be extracted to, an where you will be editing all your terrain files.
Make a new folder and call it whatever you want, I'm calling mine "P Drive", after creating the folder go into it. Copy the folder path from the folder address bar.
Go to the extracted sample files you downloaded at the start. Find "Mount P Drive.bat" and right click it > Edit
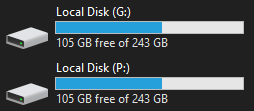
Where it says subst p: "Paste path of P drive folder here", paste the file path we copied then save the file. Example subst p: "G:\P Drive"
Double click "Mount P Drive.bat", go to your list of drives you should now see a P:\ drive listed (press F5 to refresh view if it's not showing).
Go into the P drive, it should be empty. The P drive is just a mirror of the folder we made, but mounted as a drive.
Go to the extracted sample files, go into "Files to be placed in P Drive" copy both "yourtag" and "source_files" folders. Go back to the P drive and paste the files into it.
Arma3p
Now we need to extract Arma 3's files to the P drive, to do this we use Mikero's Arma3p. You should have it installed if you followed the steps so far...
Click Start on your desktop, and type arma3p and click on it when it shows.
The Arma3p window will open and ask enter drive to extract to E..Z Press "P" since we want to extract to that drive.
It will then ask full extraction including layers, dubbing and missions? [Y,N]? Press N, since we have no need for any of that, an it wastes a lot of file space!
Let it run till it completes, if it shows any errors verify the game files in Steam
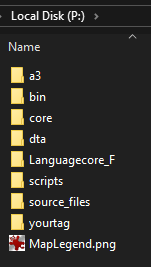
Once it's finished the P drive should now look like this
Setting up your Project Files
Now we need to rename our files before we can start terrain making. You need to choose a "yourtag", a tag helps avoid conflicts with other mods and should ideally be unique. Try to keep it short and avoid using one that has been used by others, don't use "cup" or "rhs" etc! You also need to choose your mapname.
With this all in mind, go to your P drive, go into the "source_files" folder, rename "MapName" to what you want your map to be called. Go into that folder and open layers.cfg. (you can just right click > edit with Notepad++, if you haven't set file associations)


