RoF/Sandbox – User
m (more tutorial stuff) |
mNo edit summary |
||
| (15 intermediate revisions by the same user not shown) | |||
| Line 1: | Line 1: | ||
TODO Sample files | == TODO Sample files == | ||
TODO Add warning about disabling arma tools auto mount first | == TODO Add warning about disabling arma tools auto mount first == | ||
== | == Recommended Software == | ||
I'm going to be using only free programs for this guide. I won't cover how to install them, as it's basically just a matter of pressing 'Next' a few times in the installer. Programs like Arma Tools I will cover! | I'm going to be using only free programs for this guide. I won't cover how to install them, as it's basically just a matter of pressing 'Next' a few times in the installer. Programs like Arma Tools I will cover! | ||
Text editor: [https://notepad-plus-plus.org/ Notepad++] | Text editor: [https://notepad-plus-plus.org/ Notepad++] | ||
| Line 14: | Line 12: | ||
Image editor: [https://www.gimp.org/ GIMP] | Image editor: [https://www.gimp.org/ GIMP] | ||
Terrain Editor: [http://www.bundysoft.com/L3DT/downloads/pro-trial.php L3DT Pro] Now freeware, but you do have to login to the trial page still. | Terrain Editor: [http://www.bundysoft.com/L3DT/downloads/pro-trial.php L3DT Pro] Now freeware, but you do have to login to the trial page still. You will need it for the tutorial, even if you are doing real world location! | ||
TODO Mirror link | TODO Mirror link | ||
== Arma 3 Tools == | |||
On steam search for and install Arma 3 Tools, after it downloads run it. Agree to the license if it pops up, click Addon Builder so all the windows registry is setup. Close Addon Builder and Arma 3 Tools. | On steam search for and install Arma 3 Tools, after it downloads run it. Agree to the license if it pops up, click Addon Builder so all the windows registry is setup. Close Addon Builder and Arma 3 Tools. | ||
| Line 42: | Line 40: | ||
{{Feature|informative|After an Arma 3 Tools update, you should load the tools at least once. Simply repeat the steps you did at the start, Load the tools via Steam > Agree to the license if it pops up > click Addon Builder so all the windows registry is setup. Close Addon Builder and Arma 3 Tools. Then continue working on your map via the shortcuts you made}} | {{Feature|informative|After an Arma 3 Tools update, you should load the tools at least once. Simply repeat the steps you did at the start, Load the tools via Steam > Agree to the license if it pops up > click Addon Builder so all the windows registry is setup. Close Addon Builder and Arma 3 Tools. Then continue working on your map via the shortcuts you made}} | ||
== Mikero's Tools == | |||
Mikero's Tools are a must when terrain making, download the "Mikero_AiO_Installer" from his [https://mikero.bytex.digital/Downloads website]. There is a paid version, but the free version works fine for making terrains. Once it's download, simply run the installer. | |||
== P Drive == | == P Drive == | ||
In the | So a lot of people struggle with setting up the P drive (also known as workdrive), but it's pretty simple when done correct. One of the main steps is not to use Arma 3 Tools to do it! | ||
You need to make a folder on your PC, this should be on a drive with at least 40gb+ free space! It's not recommended to use the root of C:\ drive. This folder is where Arma's files will be extracted to, an where you will be editing all your terrain files. | |||
Make a new folder and call it whatever you want, I'm calling mine "P Drive", after creating the folder go into it. Copy the folder path from the folder address bar. | |||
[[File:arma3-copy p drive folder path.png]] | |||
Go to the extracted sample files you downloaded at the start. Find "Mount P Drive.bat" and right click it > Edit | |||
[[File:arma3-edit p drive bat.png]] | |||
Where it says <code>subst p: "Paste path of P drive folder here"</code>, paste the file path we copied then save the file. Example <code>subst p: "G:\P Drive"</code> | |||
Double click "Mount P Drive.bat", go to your list of drives you should now see a P:\ drive listed (press F5 to refresh view if it's not showing). | |||
[[File:arma3-p drive example.png]] | |||
Go into the P drive, it should be empty. The P drive is just a mirror of the folder we made, but mounted as a drive. | |||
{{Feature|informative|If P drive isn't showing, remove the :: before Pause in the .bat, save and run again to see any errors}} | |||
Go to the extracted sample files, go into "Files to be placed in P Drive" copy both "yourtag" and "source_files" folders. Go back to the P drive and paste the files into it. | |||
== Arma3p == | |||
Now we need to extract Arma 3's files to the P drive, to do this we use Mikero's Arma3p. You should have it installed if you followed the steps so far... | |||
Click Start on your desktop, and type arma3p and click on it when it shows. | |||
The Arma3p window will open and ask <code>enter drive to extract to E..Z </code> Press "P" since we want to extract to that drive. | |||
It will then ask <code>full extraction including layers, dubbing and missions? [Y,N]?</code> Press N, since we have no need for any of that, an it wastes a lot of file space! | |||
[[File:arma3-mikero arma3p extract files.png]] | |||
Let it run till it completes, if it shows any errors [https://help.steampowered.com/en/faqs/view/0C48-FCBD-DA71-93EB verify the game files in Steam] | |||
Once it's finished the P drive should now look like this | |||
[[File:arma3-final p drive.png]] | |||
== Setting up your Project Files == | |||
Now we need to rename our files before we can start terrain making. You need to choose a "tag", a tag helps avoid conflicts with other mods and should be unique. Try to keep it short and avoid using one that has been used by others, don't use "cup" or "rhs" etc! You also need to choose your mapname. | |||
With this all in mind, go to your P drive, go into the "source_files" folder, rename "MapName" to what you want your map to be called. Go into that folder and open layers.cfg. (you can just right click > edit with Notepad++, if you haven't set file associations) | |||
=== Layers.cfg === | |||
After opening layers.cfg in Notepad++, press ctrl + F or search > find, in the toolbar. In the "find what" box enter "yourtag" in the "Replace with" box put your tag, click "Replace All". Next do the same for "mapname" and replace with your own map name, then save the file. Don't use spaces, use underscore (cooltag_myfirstmap) instead and it's best to get in the habit of using lowercase to avoid stress later. | |||
[[File:arma3-replace tag in notepad plusplus.png]] | |||
=== Map Folder === | |||
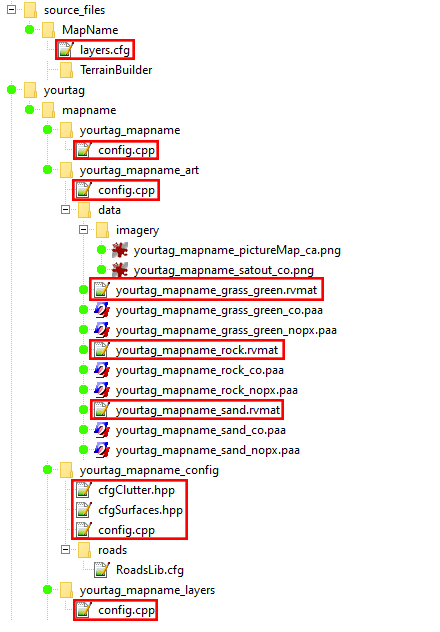
Go back to the root of the P drive. Now you need to rename all the folders and files inside and including the "yourtag" folder. Follow the image below, anything with a green dot needs the file renamed, anything with a red rectangle needs opening in notepad++ (you can just right click > edit with Notepad++, if you haven't set file associations) and search and replace like you did layers.cfg. | |||
[[File:arma3-sample files to rename.png]] | |||
== Terrain Builder== | |||
Next we will setup our Terrain Builder project, an decide on a map size! Load up Terrain Builder via the shortcut we created earlier (remember don't use Arma Tools Launcher!). | |||
=== Terrain Builder UI === | |||
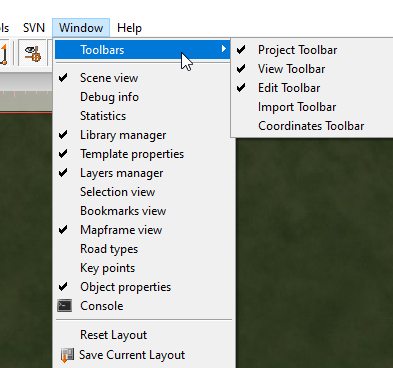
By default a number of views are turned off, in Terrain Builder go to "Windows" on toolbar and match your version to the image below. | |||
[[File:arma3-terrain builder windows.png]] | |||
You can drag the menu's around to have the layout you want, this is how mine looks | |||
[[File:arma3-terrain builder layout.png|thumb|left]] | |||
=== Create Mapframe === | |||
From the toolbar click Mapframes > Add Mapframe | |||
[[File:arma3-terrain builder add mapframe.png]] | |||
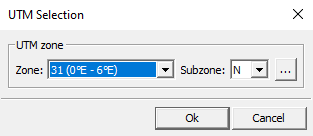
UTM selection menu will open, just use the default settings and press ok. Zone - 31 (0E - 6E) Sunzone N. Don't change this, even if you are making a real world terrain! You can change this in your config.cpp later. | |||
[[File:arma3-terrain builder utm selection.png]] | |||
==== Location ==== | |||
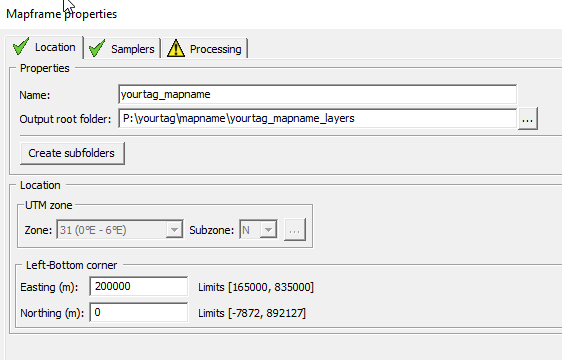
The Mapframe Properties window will now open. The first tab is "Location" use the following settings, but obviously change the yourtag and mapname to your own tag and mapname | |||
Name: yourtag_mapname | |||
Output root folder: P:\yourtag\mapname\yourtag_mapname_layers | |||
Easting: 200000 | |||
Northing: 0 | |||
{{Feature|warning|The mapframe must be at 200000, 0. Even if it's real world location! DO NOT use other coordinates!}} | |||
[[File:arma3 terrain builder mapframe properties location.png]] | |||
==== Samplers ==== | |||
Click the "Samplers" tab at the top. | |||
I'm just giving basic info here, for a better understanding read [https://github.com/pennyworth12345/A3_MMSI/wiki/Mapframe-Information Pennyworth's Mapframe Information] page. | |||
This is where we set out terrain size and detail. I would advise you to start small, but I know full well you will start with a large terrain! | |||
So the first 2 settings are where we set size and detail. | |||
''Terrain Sampler:'' | |||
Grid: This is the heightmap size (NOT terrain size!). 8192 x 8192 is broken in Arma 3 and is not recommended, so stick with 4096 x 4096 or smaller. | |||
Cell size: This is the distance between points on your heightmap. If the cell size is small, the points are close together, so the terrain can be more detailed (ditches etc), and if it’s large, the points are farther apart so there is less terrain detail. This also controls how large your terrain is, larger cell gives you a bigger map but at the cost of terrain detail. Lower cell size will give a smaller more detailed terrain but affect performance more. | |||
Don't use weird cell sizes, use 3, 3.25, 3.50, 3.75 4, 5, etc. It's recommended you don't go below 2 cell size, as it can be buggy in game. | |||
I recommend you use whole numbers for this tutorial! As it will make the L3DT steps easier, even if you choose to do a real world location, I'd still use whole numbers. | |||
I'm keeping the map small so am using these settings, 1024 (grid) x 2 (cell size) = 2048 (terrain size) | |||
''Satellite/Surface (mask) source images:'' | |||
Size (px): this should match your "terrain" size from above. The image files themself will also need to be the same size. | |||
Resolution (m/px): This should be 1, so 1 metre in game equals 1 pixel (m/px). | |||
'''Satellite/Surface (mask) tiles:''' | |||
Size (px): This controls the tile size your satellite and mask are cut into. Also affects the mask... but that's for explaining later! Just use 512 x 512. | |||
Desired Overlap (px): Set this 16. Its for how much the tiles overlap. You won't end up with this size, the "actual overlap" is shown over on the right hand side. 16 is what you should always use! | |||
''Texture Layer:'' | |||
Size(m): This must be as close to 40 x 40 as you can get it! Otherwise you can get the error "LandGrid reference exceeded the range" or A.I. won't work correct, an it can break object collision and other strange errors! For large terrains using a cell size bigger than 10, it's best to use 4 x cell size. So if cell size is 20, you would use 80 x 80 | |||
These are the settings I'm using. | |||
TODO arma3_terrain_builder_mapframe_properties_samplers.png | |||
Make sure you know your terrain and cell size, you will need it in a bit! | |||
==== Processing ==== | |||
Click the Processing tab. Click the 3 dots on layers config file and choose your layers.cfg in <code>P:\source_files\mapname\layers.cfg</code> | |||
Press "Rebuild terrain" click Yes on the warning that pops up. Then click ok to close the mapframe window. | |||
TODO arma3_terrain_builder_mapframe_properties_processing.png | |||
If you done it all correct, you should have your tag and map name showing in the mapframe window and you should have an empty black square in rasters. If you want to check your map frame settings again later (to find terrain and cell size), you can just double click it. | |||
TODO arma3_terrain_builder_mapframes_rasters.png | |||
=== Saving Project === | |||
Now save your project file > save as | |||
TODO arma3_terrain_builder_save_project.png | |||
Save it in P:\source_files\MapName\TerrainBuilder, call the file yourtag_mapname | |||
TODO arma3_terrain_builder_save_location.png | |||
Before you close Terrain Builder, make sure you know your terrain and cell size, remember you can always double click it in mapframe window to get back to it! | |||
== Heightmap, Satelite and Mask == | |||
So now you got to choose what terrain you make, I'm going to guide you through making a fake and real world terrain. Skip to whatever one you want. | |||
=== Fake terrain === | |||
Download and install [http://www.bundysoft.com/L3DT/downloads/pro-trial.php L3DT Pro] if you haven't already. | |||
Load L3DT, click File > New Project | |||
{{Feature|informative|In most windows in L3DT there is a "On-line help" button down the bottom left corner. Clicking it takes you to it's website and explains how those settings works, an sometimes has pictures showing examples}} | |||
In the window that opens select "Designable map (recommended)", press next to go to the "Heightfield Size" window. | |||
Now you need to match this to your mapframe settings in Terrain Builder like in the image below. | |||
TODO arma3-terrain_builder_l3dt_heightfield.png | |||
Press Next, leave the Design map size on the default 64 and press next again to open Design map parameters. | |||
Design map parameters is where you tell L3DT what type of map to generate. Set it to what you want to use, also set the "default climate" down the bottom to "Demo-grass-rock-sand". Don't worry too much about the settings as you can adjust the terrain a bit more later. But I do recommend putting erosion up high otherwise the terrain looks very basic! | |||
TODO arma3-l3dt_design_map_parameters.png | |||
On the next screen "Calculation queue" just tick "Design map" and click ok. | |||
Now you will be presented with a super simple terrain. We can shape this a little bit and L3DT will then generate a heightmap based on it. I want an island on one side of the map, so I'm going to click "Edit mouse mode" on the toolbar, an tick Altitude and set a height of -5 and tick Relative. As I'm using relative it will take -5m of the terrain every time I click. If you was just wanting to set the height to -5m you can just untick relative. | |||
Also set climate to "Demo-grass-rock-sand", I can never remember if that needs to be on or not... so just enable it! | |||
TODO arma3-l3dt_design_map_brush.png | |||
Once you ready to proceed click "Calc" on the toolbar | |||
TODO arma3-l3dt_calc_button.png | |||
On the "Calculation queue" window, click the following options, Heightfield, Water map, Attributes map and Texture map. Click Next | |||
TODO arma3-l3dt_calculation_queue.png | |||
On the "Water flooding" screen just leave it all as default. Water in Arma 3 is always at 0m, if you want it higher than that, you have to use pond objects which are buggy. | |||
Revision as of 19:39, 6 November 2024
TODO Sample files
TODO Add warning about disabling arma tools auto mount first
Recommended Software
I'm going to be using only free programs for this guide. I won't cover how to install them, as it's basically just a matter of pressing 'Next' a few times in the installer. Programs like Arma Tools I will cover!
Text editor: Notepad++
Image editor: GIMP
Terrain Editor: L3DT Pro Now freeware, but you do have to login to the trial page still. You will need it for the tutorial, even if you are doing real world location!
TODO Mirror link
Arma 3 Tools
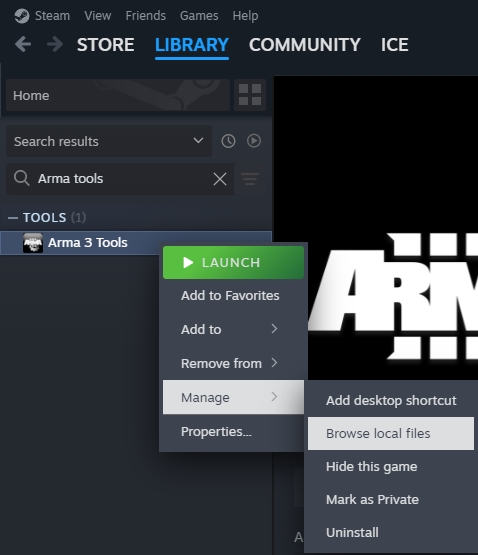
On steam search for and install Arma 3 Tools, after it downloads run it. Agree to the license if it pops up, click Addon Builder so all the windows registry is setup. Close Addon Builder and Arma 3 Tools.
The Tools launcher has a habit of breaking Terrain Builder / Buldozer, so we need to make shortcuts to the programs we want.
Right click Arma 3 Tools in Steam > Manage > Browse local files
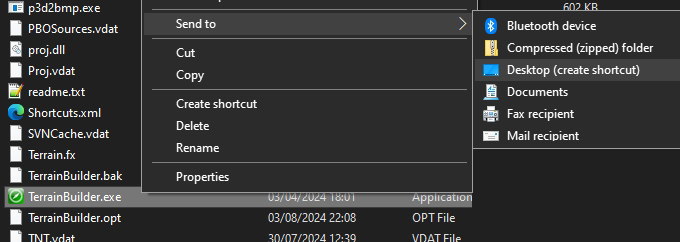
Go into the TerrainBuilder folder. Find and right click TerrainBuilder.exe > Send to > Desktop
Go back to the Arma 3 Tools folder, but this time go into the TerrainProcessor folder. Find and right click TerrainProcessor.exe > Send to > Desktop
You should now have 2 icons on your desktop. Use these when working on your map, don't load Terrain Builder via Arma 3 Tools launcher!
Mikero's Tools
Mikero's Tools are a must when terrain making, download the "Mikero_AiO_Installer" from his website. There is a paid version, but the free version works fine for making terrains. Once it's download, simply run the installer.
P Drive
So a lot of people struggle with setting up the P drive (also known as workdrive), but it's pretty simple when done correct. One of the main steps is not to use Arma 3 Tools to do it!
You need to make a folder on your PC, this should be on a drive with at least 40gb+ free space! It's not recommended to use the root of C:\ drive. This folder is where Arma's files will be extracted to, an where you will be editing all your terrain files.
Make a new folder and call it whatever you want, I'm calling mine "P Drive", after creating the folder go into it. Copy the folder path from the folder address bar.
Go to the extracted sample files you downloaded at the start. Find "Mount P Drive.bat" and right click it > Edit
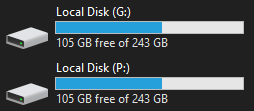
Where it says subst p: "Paste path of P drive folder here", paste the file path we copied then save the file. Example subst p: "G:\P Drive"
Double click "Mount P Drive.bat", go to your list of drives you should now see a P:\ drive listed (press F5 to refresh view if it's not showing).
Go into the P drive, it should be empty. The P drive is just a mirror of the folder we made, but mounted as a drive.
Go to the extracted sample files, go into "Files to be placed in P Drive" copy both "yourtag" and "source_files" folders. Go back to the P drive and paste the files into it.
Arma3p
Now we need to extract Arma 3's files to the P drive, to do this we use Mikero's Arma3p. You should have it installed if you followed the steps so far...
Click Start on your desktop, and type arma3p and click on it when it shows.
The Arma3p window will open and ask enter drive to extract to E..Z Press "P" since we want to extract to that drive.
It will then ask full extraction including layers, dubbing and missions? [Y,N]? Press N, since we have no need for any of that, an it wastes a lot of file space!
Let it run till it completes, if it shows any errors verify the game files in Steam
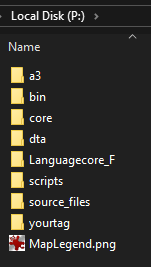
Once it's finished the P drive should now look like this
Setting up your Project Files
Now we need to rename our files before we can start terrain making. You need to choose a "tag", a tag helps avoid conflicts with other mods and should be unique. Try to keep it short and avoid using one that has been used by others, don't use "cup" or "rhs" etc! You also need to choose your mapname.
With this all in mind, go to your P drive, go into the "source_files" folder, rename "MapName" to what you want your map to be called. Go into that folder and open layers.cfg. (you can just right click > edit with Notepad++, if you haven't set file associations)
Layers.cfg
After opening layers.cfg in Notepad++, press ctrl + F or search > find, in the toolbar. In the "find what" box enter "yourtag" in the "Replace with" box put your tag, click "Replace All". Next do the same for "mapname" and replace with your own map name, then save the file. Don't use spaces, use underscore (cooltag_myfirstmap) instead and it's best to get in the habit of using lowercase to avoid stress later.
Map Folder
Go back to the root of the P drive. Now you need to rename all the folders and files inside and including the "yourtag" folder. Follow the image below, anything with a green dot needs the file renamed, anything with a red rectangle needs opening in notepad++ (you can just right click > edit with Notepad++, if you haven't set file associations) and search and replace like you did layers.cfg.
Terrain Builder
Next we will setup our Terrain Builder project, an decide on a map size! Load up Terrain Builder via the shortcut we created earlier (remember don't use Arma Tools Launcher!).
Terrain Builder UI
By default a number of views are turned off, in Terrain Builder go to "Windows" on toolbar and match your version to the image below.
You can drag the menu's around to have the layout you want, this is how mine looks
Create Mapframe
From the toolbar click Mapframes > Add Mapframe
UTM selection menu will open, just use the default settings and press ok. Zone - 31 (0E - 6E) Sunzone N. Don't change this, even if you are making a real world terrain! You can change this in your config.cpp later.
Location
The Mapframe Properties window will now open. The first tab is "Location" use the following settings, but obviously change the yourtag and mapname to your own tag and mapname
Name: yourtag_mapname Output root folder: P:\yourtag\mapname\yourtag_mapname_layers Easting: 200000 Northing: 0
Samplers
Click the "Samplers" tab at the top.
I'm just giving basic info here, for a better understanding read Pennyworth's Mapframe Information page.
This is where we set out terrain size and detail. I would advise you to start small, but I know full well you will start with a large terrain!
So the first 2 settings are where we set size and detail.
Terrain Sampler:
Grid: This is the heightmap size (NOT terrain size!). 8192 x 8192 is broken in Arma 3 and is not recommended, so stick with 4096 x 4096 or smaller.
Cell size: This is the distance between points on your heightmap. If the cell size is small, the points are close together, so the terrain can be more detailed (ditches etc), and if it’s large, the points are farther apart so there is less terrain detail. This also controls how large your terrain is, larger cell gives you a bigger map but at the cost of terrain detail. Lower cell size will give a smaller more detailed terrain but affect performance more.
Don't use weird cell sizes, use 3, 3.25, 3.50, 3.75 4, 5, etc. It's recommended you don't go below 2 cell size, as it can be buggy in game.
I recommend you use whole numbers for this tutorial! As it will make the L3DT steps easier, even if you choose to do a real world location, I'd still use whole numbers.
I'm keeping the map small so am using these settings, 1024 (grid) x 2 (cell size) = 2048 (terrain size)
Satellite/Surface (mask) source images:
Size (px): this should match your "terrain" size from above. The image files themself will also need to be the same size. Resolution (m/px): This should be 1, so 1 metre in game equals 1 pixel (m/px).
Satellite/Surface (mask) tiles:
Size (px): This controls the tile size your satellite and mask are cut into. Also affects the mask... but that's for explaining later! Just use 512 x 512. Desired Overlap (px): Set this 16. Its for how much the tiles overlap. You won't end up with this size, the "actual overlap" is shown over on the right hand side. 16 is what you should always use!
Texture Layer: Size(m): This must be as close to 40 x 40 as you can get it! Otherwise you can get the error "LandGrid reference exceeded the range" or A.I. won't work correct, an it can break object collision and other strange errors! For large terrains using a cell size bigger than 10, it's best to use 4 x cell size. So if cell size is 20, you would use 80 x 80
These are the settings I'm using.
TODO arma3_terrain_builder_mapframe_properties_samplers.png
Make sure you know your terrain and cell size, you will need it in a bit!
Processing
Click the Processing tab. Click the 3 dots on layers config file and choose your layers.cfg in P:\source_files\mapname\layers.cfg
Press "Rebuild terrain" click Yes on the warning that pops up. Then click ok to close the mapframe window.
TODO arma3_terrain_builder_mapframe_properties_processing.png
If you done it all correct, you should have your tag and map name showing in the mapframe window and you should have an empty black square in rasters. If you want to check your map frame settings again later (to find terrain and cell size), you can just double click it.
TODO arma3_terrain_builder_mapframes_rasters.png
Saving Project
Now save your project file > save as
TODO arma3_terrain_builder_save_project.png
Save it in P:\source_files\MapName\TerrainBuilder, call the file yourtag_mapname
TODO arma3_terrain_builder_save_location.png
Before you close Terrain Builder, make sure you know your terrain and cell size, remember you can always double click it in mapframe window to get back to it!
Heightmap, Satelite and Mask
So now you got to choose what terrain you make, I'm going to guide you through making a fake and real world terrain. Skip to whatever one you want.
Fake terrain
Download and install L3DT Pro if you haven't already.
Load L3DT, click File > New Project
In the window that opens select "Designable map (recommended)", press next to go to the "Heightfield Size" window.
Now you need to match this to your mapframe settings in Terrain Builder like in the image below.
TODO arma3-terrain_builder_l3dt_heightfield.png
Press Next, leave the Design map size on the default 64 and press next again to open Design map parameters.
Design map parameters is where you tell L3DT what type of map to generate. Set it to what you want to use, also set the "default climate" down the bottom to "Demo-grass-rock-sand". Don't worry too much about the settings as you can adjust the terrain a bit more later. But I do recommend putting erosion up high otherwise the terrain looks very basic!
TODO arma3-l3dt_design_map_parameters.png
On the next screen "Calculation queue" just tick "Design map" and click ok.
Now you will be presented with a super simple terrain. We can shape this a little bit and L3DT will then generate a heightmap based on it. I want an island on one side of the map, so I'm going to click "Edit mouse mode" on the toolbar, an tick Altitude and set a height of -5 and tick Relative. As I'm using relative it will take -5m of the terrain every time I click. If you was just wanting to set the height to -5m you can just untick relative.
Also set climate to "Demo-grass-rock-sand", I can never remember if that needs to be on or not... so just enable it!
TODO arma3-l3dt_design_map_brush.png
Once you ready to proceed click "Calc" on the toolbar
TODO arma3-l3dt_calc_button.png
On the "Calculation queue" window, click the following options, Heightfield, Water map, Attributes map and Texture map. Click Next
TODO arma3-l3dt_calculation_queue.png
On the "Water flooding" screen just leave it all as default. Water in Arma 3 is always at 0m, if you want it higher than that, you have to use pond objects which are buggy.
