Game Updater Manual: Difference between revisions
No edit summary |
(→Logs) |
||
| Line 63: | Line 63: | ||
== Logs == | == Logs == | ||
There are two log files, stored in "Arma 3 Tools\Logs": | There are two log files, stored in "''Arma 3 Tools\Logs''": | ||
# GameUpdaterYYYY-MM-DD.rpt: | # ''GameUpdaterYYYY-MM-DD.rpt'': Main log of Game Updater | ||
# GameUpdaterChildYYYY-MM-DD.rpt | # ''GameUpdaterChildYYYY-MM-DD.rpt'': For child processes | ||
Additional logs from Steam can be find in "Arma 3 Tools\Game Updater\logs", the most relevant is "stderr.txt", | Additional logs from Steam can be find in "Arma 3 Tools\Game Updater\logs", the most relevant is "stderr.txt", filled in case of error. | ||
[[Category:Arma 3 Official Tools Manual]] | [[Category:Arma 3 Official Tools Manual]] | ||
Revision as of 15:21, 24 August 2015
Foreword
This page contains all necessary data to install and use Game Updater (hereafter, GU). Game Updater aims to improve the experience of switching between branches of the game by avoiding the fuss of additional downloads every time you change. More information can be found here: Game Updater.
Notes
Firstly, you need to have Arma 3 Tools installed correctly. Installation manual can be found here: Arma 3 Tools Installation.
How to install
Then, from Game Updater itself, on the first startup, click ok in the message box telling you GU is not installed and:
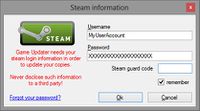
- Type your Steam credentials (leave Steam Guard Code empty) and click "Ok"
- A console window appears, to check your Steam account
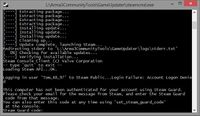
- If your account is protected by Steam Guard, it will ask you the code that you will find in your emails (sent automatically)
- Type the given code and hit ENTER
- After a few seconds, the time to check your Steam license, the console window will close itself and the main form of GU should appears
- Congratulations, GU is installed and ready to work
Notes
In case of mistake on the Steam logging info, you will need to run "Delete user data.bat", located in the directory "Arma 3 Tools\Game Updater"
How to use it?
Parameters
Once it's installed, there are two forms in which you should have a look.
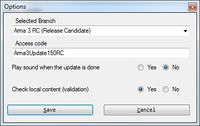
Options
From the main form of GU, click on "options"
- "Select Branch" permits you to select what branch you want to use to install or update
- "Play sound when the update is done" is pretty much self explained
- "Check local content" is an important option.
- If checked, It will check for errors or corrupted files in the existing data. The update process will be a bit longer but it's the safer method.
- Otherwise, it will just download the modified data from your version to the newer, without any check on existing files.
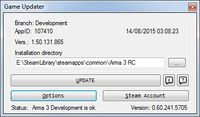
In the main form, the only available option is the path to the installation to add or update. By default, this is "...\YourSteamPath\steamapps\common\Arma 3 [development]", change it if needed.
Notes
Be careful on your installation path when you change the branch. The main form give you some information about the version found in the selected directory (based on the executable).
The update process
- Run Game Updater
- Double check the branch and the installation path
- Click on Update
If Steam client is running live (started and on online mode), it will ask you to continue or not
- A message box is displayed, click yes to proceed (by clicking "No", the main form will be displayed)
- Here you are, just wait until the end of the update process
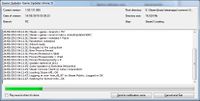
- Once the update done, you can open the installation directory or just exit Game Updater.
Notes
- Game Updater has some child processes, ran in asynchronous mode, to get better stability and performances. This is why the information displayed are not in real time. The delay can be from seconds to minutes.
- If for some reason the update fails, check out the output and the step
- You can send Game Updater to the notification zone during the update. A balloon tool tip will be displayed as soon as the update process is completed
- You can cancel the update at any time, "Resume update" is handled.
- Update steps are:
- Preparing: Prepare account info and game data
- Starting: Check parameters and run child processes
- Validating: Validate the local data if option is set to "Yes"
- Preallocating: Reservation of the disk space needed
- Downloading: Download of the new files
- Success: Self explained
Logs
There are two log files, stored in "Arma 3 Tools\Logs":
- GameUpdaterYYYY-MM-DD.rpt: Main log of Game Updater
- GameUpdaterChildYYYY-MM-DD.rpt: For child processes
Additional logs from Steam can be find in "Arma 3 Tools\Game Updater\logs", the most relevant is "stderr.txt", filled in case of error.
