Animations: Difference between revisions
mNo edit summary |
Lou Montana (talk | contribs) m (Text replacement - "[[Image:" to "[[File:") |
||
| (8 intermediate revisions by 4 users not shown) | |||
| Line 1: | Line 1: | ||
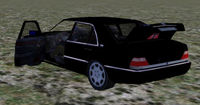
[[ | [[File:AnimatedDoors.jpg|right|thumb|200px|Car with animated doors & trunk]] | ||
This articles talks about simple, single-p3d animations, where parts of a model rotate around an axis (like a car door, or a tank turret). | This articles talks about simple, single-p3d animations, where parts of a model rotate around an axis (like a car door, or a tank turret). | ||
| Line 24: | Line 19: | ||
The 'action point' (the position the player has to be close to, in order to be able to activate this animation) is called 'doorbell'. | The 'action point' (the position the player has to be close to, in order to be able to activate this animation) is called 'doorbell'. | ||
<syntaxhighlight lang="cpp"> | |||
class Animations | |||
{ | |||
class MoveDoor | |||
{ | |||
type = "rotation"; // always "rotation" | |||
animPeriod = 1; // how long it takes for the movevement to finish | |||
selection = "door"; // the name of the moving object | |||
axis = "door axis"; // the name of the axis | |||
angle0 = 0; // the start angle | |||
angle1 = -2.0; // the end angle, in radians (= degrees/57.3 = degrees * 180/pi) | |||
}; | |||
}; | |||
class UserActions | |||
{ | |||
class OpenDoor // action to open the door | |||
{ | |||
displayName = "Open Door"; // string that's displayed in the action menu | |||
position = "doorbell"; // name of the 'action point' | |||
radius = 1.5; // how close the player has to be see this action | |||
condition = "this animationPhase ""MoveDoor"" < 0.5"; // check whether the door has moved already | |||
statement = "this animate[""MoveDoor"", 1]"; // and if not, then start the animation | |||
onlyForPlayer = true; // requirement by ArmA - presumably defines if AI can/cannot open doors etc | |||
}; | |||
class CloseDoor // action to close the door | |||
{ | |||
displayName = "Close Door"; | |||
position = "doorbell"; | |||
radius = 1.5; | |||
condition = "this animationPhase ""MoveDoor"" < 0.5"; | |||
statement = "this animate[""MoveDoor"", 0]"; | |||
onlyForPlayer = true; | |||
}; | |||
}; | |||
</syntaxhighlight> | |||
{{GameCategory|ofp|Modelling}} | |||
{{GameCategory|ofpe|Modelling}} | |||
{{GameCategory|arma1|Addon Editing}} | |||
Latest revision as of 23:10, 20 November 2023
This articles talks about simple, single-p3d animations, where parts of a model rotate around an axis (like a car door, or a tank turret).
Complex animations for soldier's movements for example are a different issue altogether...
To create a model animations, these are the requirements:
Create the movable object in the ResolutionLOD and give it a name.
If the animation would affect the ( Fire) GeometryLOD, copy the selection into those LODs as well.
In the MemoryLOD define the rotational axis via two vertexes. Select both of those points and give them a name.
Still in the MemoryLOD create a single vertex (this will be the 'action point') and give it a name.
In the Config.cpp for your model you need to define two classes: Animations & UserActions.
The Animations class defines how the object moves, and the UserActions class defines when it moves.
The following example is for an object that has been named 'door', which turns around an axis named 'door axis'.
The 'action point' (the position the player has to be close to, in order to be able to activate this animation) is called 'doorbell'.
class Animations
{
	class MoveDoor
	{
		type = "rotation";	// always "rotation"
		animPeriod = 1;		// how long it takes for the movevement to finish
		selection = "door";	// the name of the moving object
		axis = "door axis";	// the name of the axis
		angle0 = 0;			// the start angle
		angle1 = -2.0;		// the end angle, in radians (= degrees/57.3 = degrees * 180/pi)
	};
};

class UserActions
{
	class OpenDoor // action to open the door
	{
		displayName = "Open Door";	// string that's displayed in the action menu
		position = "doorbell";		// name of the 'action point'
		radius = 1.5;				// how close the player has to be see this action
		condition = "this animationPhase ""MoveDoor"" < 0.5";	// check whether the door has moved already
		statement = "this animate[""MoveDoor"", 1]";			// and if not, then start the animation
		onlyForPlayer = true;		// requirement by ArmA - presumably defines if AI can/cannot open doors etc
	};
	class CloseDoor // action to close the door
	{
		displayName = "Close Door";
		position = "doorbell";
		radius = 1.5;
		condition = "this animationPhase ""MoveDoor"" < 0.5";
		statement = "this animate[""MoveDoor"", 0]";
		onlyForPlayer = true;
	};
};
