GranQ/Sandbox – User
No edit summary |
No edit summary |
||
| (10 intermediate revisions by 2 users not shown) | |||
| Line 1: | Line 1: | ||
Weapon Animation/Adding bipod functionality | |||
== Introduction == | |||
This guide is for adding bipod to a weapon which doesn't inherit it from another prefab. | |||
It assumes you already have the weapon setup, animated in all other aspects and solely focus on the bipod. | |||
There is three things we need to do: | |||
* Setup the deployment points in the prefab | |||
* Setup the hands position in the prefab | |||
* Adjust the animations | |||
== Deployment points == | |||
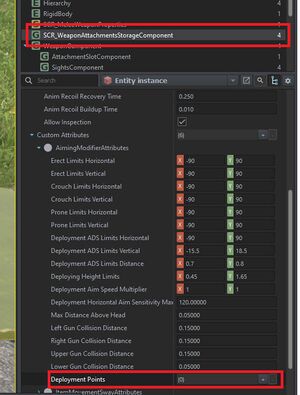
Start with adding two new deployment points under SCR_WeaponAttachmentsStorageComponent. Click the + twice. | |||
The first point will be our rotation point with the bipods folded and the second point will be used to define the points with the aimpoint down. | |||
[[File:bipod tutorial deploymentpoints.jpg|thumb|Add new Deployment points under the SCR_WeaponAttachmentsStorageComponent]] | |||
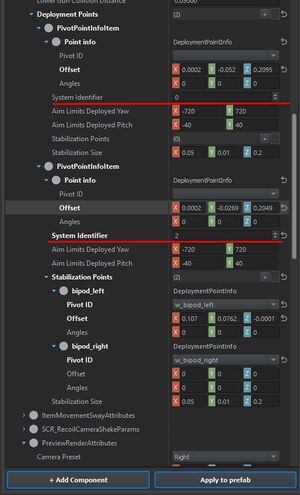
Next we start adjusting the values, the first one will have a system identifier as 0, this will be bipod up. | |||
Notice on the second that we have system identifier as 2, this is bipod down. For this one, also add two stabilization points. | |||
[[File:bipod tutorial2.jpg|thumb|Notice the system identifier and the stabilization points]] | |||
[[File:bipod tutorial3.jpg|thumb|Move the stablisation points so they are aligned with the bipod, also make sure they are attached to the bone.]] | |||
== Hands == | |||
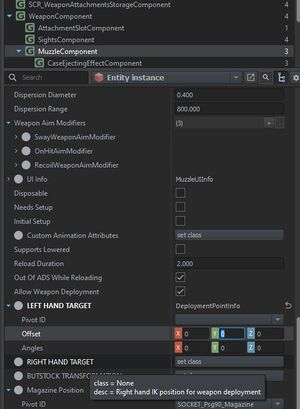
[[File:bipod tutorial4.jpg|thumb|Change the position of the hands if needed, as far as I know you can't change fingers etc.]] | |||
[[Category:Sandbox]] | |||
Latest revision as of 21:09, 28 October 2023
Weapon Animation/Adding bipod functionality
Introduction
This guide is for adding bipod to a weapon which doesn't inherit it from another prefab.
It assumes you already have the weapon setup, animated in all other aspects and solely focus on the bipod.
There is three things we need to do:
- Setup the deployment points in the prefab
- Setup the hands position in the prefab
- Adjust the animations
Deployment points
Start with adding two new deployment points under SCR_WeaponAttachmentsStorageComponent. Click the + twice.
The first point will be our rotation point with the bipods folded and the second point will be used to define the points with the aimpoint down.
Next we start adjusting the values, the first one will have a system identifier as 0, this will be bipod up.
Notice on the second that we have system identifier as 2, this is bipod down. For this one, also add two stabilization points.


