Prefabs Basics – Arma Reforger
No edit summary |
|||
| (6 intermediate revisions by 3 users not shown) | |||
| Line 24: | Line 24: | ||
* A file with '''.conf''' extension that can be referenced from entities, components and config objects. | * A file with '''.conf''' extension that can be referenced from entities, components and config objects. | ||
* Can contain | * Can contain a config object, its children, sub-children etc (recursively). | ||
=== Config object === | === Config object === | ||
| Line 30: | Line 30: | ||
* Config object is a small sub-object of entity, component or any other config object. | * Config object is a small sub-object of entity, component or any other config object. | ||
* In GUI it's visible only as a set of sub-properties. | * In GUI it's visible only as a set of sub-properties. | ||
* Config objects can be recursively nested inside of | * Config objects can be recursively nested inside of other config objects. | ||
=== Prefab member === | === Prefab member === | ||
* It's an entity stored in a prefab file. It's only valid term for entity prefabs. | * It's an entity stored in a prefab file. It's only a valid term for entity prefabs. | ||
* Prefab contains one or more prefab members with hierarchy. | * Prefab contains one or more prefab members with hierarchy. | ||
| Line 44: | Line 44: | ||
* It's a set of entities in scene that are created together from a specific prefab at the same moment. | * It's a set of entities in scene that are created together from a specific prefab at the same moment. | ||
* Prefab instance is always exact mirror of Prefab and because of that it can't have different count of members | * Prefab instance is always exact mirror of Prefab and because of that it can't have a different count of members than '''Prefab'''. | ||
=== Prefab instance member === | === Prefab instance member === | ||
| Line 54: | Line 54: | ||
* Special mode of World Editor which is initiated when user opens [[#Prefab|prefab (.et)]] file (initiated from '''prefabs opened in tab''' of '''Resource Manager''' via '''Edit prefab''' button - see [[Arma Reforger:Prefabs Basics#Opening prefab in Prefab Edit Mode|opening prefab in Prefab Edit Mode]] paragraph) | * Special mode of World Editor which is initiated when user opens [[#Prefab|prefab (.et)]] file (initiated from '''prefabs opened in tab''' of '''Resource Manager''' via '''Edit prefab''' button - see [[Arma Reforger:Prefabs Basics#Opening prefab in Prefab Edit Mode|opening prefab in Prefab Edit Mode]] paragraph) | ||
* This mode is | * This mode is specialised in editing prefabs - i.e. ''Save World'' option is replaced with '''''Save prefab''''' action | ||
* In this mode, no world is being stored on drive and '''World Editor''' and when save occurs, only changes to currently edited prefab are stored on drive. '''Changes done to entities are lost after editor is closed''' | * In this mode, no world is being stored on drive and '''World Editor''' and when save occurs, only changes to currently edited prefab are stored on drive. '''Changes done to entities are lost after editor is closed''' | ||
| Line 62: | Line 62: | ||
=== Creating entity instance === | === Creating entity instance === | ||
Create and setup one or more entities in scene as you wish to have it in prefab. There are three methods | Create and setup one or more entities in scene as you wish to have it in prefab. There are three methods to do this: | ||
==== Create tab ==== | ==== Create tab ==== | ||
Create new empty entity instances by selecting entry some entry from '''Create tab''' (''for example GenericEntity'') and then drag and dropping it into '''World Editor viewport'''. This method is good to create first base prefabs that will | Create new empty entity instances by selecting entry some entry from '''Create tab''' (''for example GenericEntity'') and then drag and dropping it into '''World Editor viewport'''. This method is good to create first base prefabs that will not inherit any other prefabs. | ||
[[Image:armareforger-prefabs-basics-create-tab.gif]] | [[Image:armareforger-prefabs-basics-create-tab.gif]] | ||
| Line 75: | Line 75: | ||
==== Drag and drop model ==== | ==== Drag and drop model ==== | ||
Create new ''GenericEntity'' by drag and dropping some registered '''XOB model''' from Resource Browser into '''World Editor viewport'''. This action will create new '''GenericEntity''' entity with '''MeshObject''' component using model that was dropped into viewport. | Create a new ''GenericEntity'' by drag and dropping some registered '''XOB model''' from Resource Browser into '''World Editor viewport'''. This action will create a new '''GenericEntity''' entity with '''MeshObject''' component using the model that was dropped into viewport. | ||
[[Image:armareforger-prefabs-basics-drag-and-drop-xob.gif]] | [[Image:armareforger-prefabs-basics-drag-and-drop-xob.gif]] | ||
=== Adding new components to entity instance === | === Adding new components to entity instance === | ||
Once entity instance is present in the world and selected in hierarchy, it is now possible to add new components to it. There are two methods | Once entity instance is present in the world and selected in hierarchy, it is now possible to add new components to it. There are two methods to do it. | ||
==== Add component button ==== | ==== Add component button ==== | ||
| Line 93: | Line 93: | ||
=== Adding child component === | === Adding child component === | ||
Some components might only work when they have certain components set as their children (''f.e. WeaponComponent''). New '''Child Components''' can be added clicking | Some components might only work when they have certain components set as their children (''f.e. WeaponComponent''). New '''Child Components''' can be added by right clicking on some existing component in '''Object Properties''' list and then selecting the '''Add child component''' option from the context menu | ||
[[Image:armareforger-prefabs-basics-add-new-child-component.gif]] | [[Image:armareforger-prefabs-basics-add-new-child-component.gif]] | ||
=== Removing components === | === Removing components === | ||
Components can be removed entity instance by simply clicking on them with '''Right Mouse Button''' and then selecting '''Delete Component''' option from context menu. Removing components from prefabs is bit more tricky, since you need to select desired prefab in inheritance list first and after that | Components can be removed from an entity instance by simply clicking on them with '''Right Mouse Button''' and then selecting the '''Delete Component''' option from the context menu. Removing components from prefabs is a bit more tricky, since you need to select the desired prefab in inheritance list first and after that you should be able to delete such components. | ||
[[Image:armareforger-prefabs-basics-remove-component.gif]] | [[Image:armareforger-prefabs-basics-remove-component.gif]] | ||
=== Saving entity instance as new prefab === | === Saving entity instance as new prefab === | ||
Set up your entities into common hierarchy (use drag & drop in the '''Hierarchy''' window). There must to be only one entity root. Then finish the prefab creation process by following the next two steps. | |||
1) drag the root entity of hierarchy and drop it into '''Resource Browser''' window to an arbitrary folder where you want to create new prefab file | 1) drag the root entity of hierarchy and drop it into '''Resource Browser''' window to an arbitrary folder where you want to create the new prefab file | ||
2) after the drop, enter a prefab name into dialog. That's it - your entity prefab file will be created in selected location. | 2) after the drop, enter a prefab name into dialog. That's it - your entity prefab file will be created in selected location. | ||
| Line 112: | Line 112: | ||
== Creating component prefab == | == Creating component prefab == | ||
Creating new [[#Component_prefab|Component Prefabs (.ct)]] can be done in two steps. Assuming that you have already selected some entity with required component, you need to perform following actions: | Creating a new [[#Component_prefab|Component Prefabs (.ct)]] can be done in two steps. Assuming that you have already selected some entity with required component, you need to perform the following actions: | ||
1) drag the component item from '''Object Properties''' window and drop it | 1) drag the component item from '''Object Properties''' window and drop it into '''Resource Browser''' window (see the picture). | ||
2) after drop, enter a prefab name into dialog (picture). That's all. Your component prefab file will be created. | 2) after drop, enter a prefab name into dialog (picture). That's all. Your component prefab file will be created. | ||
[[Image:armareforger-prefabs-basics-new-component-prefab.gif]] | [[Image:armareforger-prefabs-basics-new-component-prefab.gif]] | ||
== Changing class == | |||
Already present '''components''' or '''entities''' can be changed to different, compatible class by: | |||
1) Clicking on selected '''component/entity''' with '''Right Mouse Button''' | |||
2) Selecting '''Change class''' option from the context menu | |||
3) Selecting one of the '''compatible class'''es from the list{{Feature|important|Only compatible classes are shown in the '''Change class''' list! In case there are no compatible classes available, a pop up window with '''There are no compatible classes to change!''' message will appear.}}{{Feature|informative|Entities can be basically changed to any available class. For instance clicking on '''GenericEntity''' and then selecting '''Change Class''' option will let you select all classes that are normally available in '''Create''' window.}}[[File:armareforger-prefabs-basics-change-component-class.gif]] | |||
== Creating config object prefab == | == Creating config object prefab == | ||
To create new config object prefab, following steps have to be performed: | To create a new config object prefab, the following steps have to be performed: | ||
1) Select an arbitrary config object in property grid. | 1) Select an arbitrary config object in property grid. | ||
2) Drag config object item from property grid to and drop it into resource browser window. | 2) Drag the config object item from property grid to and drop it into resource browser window. | ||
[[Image:armareforger-prefabs-basics-new-config-prefab.gif]] | [[Image:armareforger-prefabs-basics-new-config-prefab.gif]] | ||
== Duplicating prefab == | == Duplicating prefab == | ||
Any existing prefab can be duplicated - during such operation, selected prefab will be literally duplicated - meaning all parameters and settings are copied over - but file will get new GUID. | Any existing prefab can be duplicated - during such operation, selected prefab will be literally duplicated - meaning all parameters and settings are copied over - but the file will get a new GUID. | ||
[[Image:armareforger-prefabs-basics-duplicate-prefab.gif]] | [[Image:armareforger-prefabs-basics-duplicate-prefab.gif]] | ||
== Creating inherited prefab == | == Creating inherited prefab == | ||
There are two methods | There are two methods to create a prefab inherited from another prefab. | ||
=== Using Inherit Prefab option === | === Using Inherit Prefab option === | ||
Use dedicated action in context menu of '''Resource Browser''' window. Select prefab and choose '''Inherit | Use the dedicated action in the context menu of '''Resource Browser''' window. Select a prefab and choose '''Inherit''' from the context menu. | ||
[[Image:armareforger-prefabs-basics-new-inherited-prefab.gif]] | [[Image:armareforger-prefabs-basics-new-inherited-prefab.gif]] | ||
=== Drag and drop method === | === Drag and drop method === | ||
Create prefab by drag & drop as described above in [[Arma_Reforger:Prefabs_Basics#Creating_entity_instance|'''Create new entity prefab''']] segment and then [[Arma_Reforger:Prefabs_Basics#Saving_entity_instance_as_new_prefab|save this entity instance as new prefab]]. This method will create an inherited prefab automatically. | Create a prefab by drag & drop as described above in [[Arma_Reforger:Prefabs_Basics#Creating_entity_instance|'''Create new entity prefab''']] segment and then [[Arma_Reforger:Prefabs_Basics#Saving_entity_instance_as_new_prefab|save this entity instance as a new prefab]]. This method will create an inherited prefab automatically. | ||
== Editing entity prefab properties == | == Editing entity prefab properties == | ||
Select an entity which is an instance of the prefab. | Select an entity which is an instance of the prefab. Then use one of the following two methods to continue | ||
{{Feature|important|In both cases, changes to prefabs are permanently stored on the drive '''only after saving currently opened world'''. Without save, all your '''changes will be lost after World Editor is closed'''.}}{{Messagebox|'''Tip''': If you are editing some world and just want to save changes to prefabs, use '''Save world with options''' ({{Controls|1=Ctrl|2=Shift|3=S}}) to selectively store your changes on the drive permanently|✩|#88cc88}} | |||
In both cases, changes to prefabs are permanently stored on the drive '''only | |||
=== Using inheritance tree === | === Using inheritance tree === | ||
Switch combo box in '''Object Properties''' window from "'''Entity instance'''" to one of inherited prefabs which you can see there (picture). Then you can edit properties of the prefab directly. Changes will instantly affect all entities that use the prefab (include all inherited prefabs). | Switch combo box in '''Object Properties''' window from "'''Entity instance'''" to one of inherited prefabs which you can see there (picture). Then you can edit properties of the prefab directly. Changes will instantly affect all entities that use the prefab (include all inherited prefabs). | ||
| Line 156: | Line 163: | ||
=== Using Apply to prefab button === | === Using Apply to prefab button === | ||
Keep combo box in '''Object properties''' window on '''Entity instance''' | Keep the combo box in '''Object properties''' window on '''Entity instance''' selection. Then you will edit entity and component properties on local entity instance only, but when you are satisfied with your changes, you can apply (propagate) changes from '''local entity instance''' to a specific inherited prefab by '''Apply to prefab''' action which is available in bottom section of the '''Object Properties''' window. The action transfers all the changes from '''entity instance''' and its components instance to any specific inherited prefab. | ||
If entity or component is inherited from more than one prefab, then you can choose to which prefab you wish apply your changes. | |||
This method is good when you want to test your changes before applying to prefab. | |||
[[Image:armareforger-prefabs-basics-change-prefab-apply-to-button.gif]] | [[Image:armareforger-prefabs-basics-change-prefab-apply-to-button.gif]] | ||
| Line 163: | Line 174: | ||
[[Image:armareforger-prefabs-basics-change-prefab-apply-to-value.gif]] | [[Image:armareforger-prefabs-basics-change-prefab-apply-to-value.gif]] | ||
=== Using Prefab Edit Mode === | |||
Prefabs opened in [[Arma Reforger:Prefabs Basics#Opening prefab in Prefab Edit Mode|Prefab Edit Mode]] will be using the inheritance tree by default. It is still necessary to use '''Save Prefab''' option ('''{{Controls|Ctrl|S}}''') to '''store your changes permanently on the drive'''. | |||
== Editing component prefab properties == | == Editing component prefab properties == | ||
| Line 172: | Line 186: | ||
You can add a new entity to an existing prefab by these steps: | You can add a new entity to an existing prefab by these steps: | ||
1) Create a | 1) Create a temporary prefab instance somewhere in the scene (just drop entity prefab file to scene) or use any existing prefab instance. | ||
2) Create and | 2) Create and set up a temporary entity instance which you want to add to the prefab. Place it in the scene somewhere near the prefab instance. It can be a new unique entity or any prefab instance. | ||
3) Transform the entity to the exact position/orientation as you wish to have it in prefab. | 3) Transform the entity to the exact position/orientation as you wish to have it in prefab. | ||
| Line 196: | Line 210: | ||
== Instancing entity prefab == | == Instancing entity prefab == | ||
There are three methods | There are three methods to do it. | ||
=== Drag and drop prefab method === | === Drag and drop prefab method === | ||
Latest revision as of 14:51, 21 January 2025
Glossary
Prefab
- Prefab is in generally a set of properties stored in a standalone file.
- In world editor we use prefabs as a template to create entity and component instances so we have entity prefabs and component prefabs.
- Prefab can be inherited from another prefab and all the inherited parameters can be overridden there.
- All prefab parameters can be overridden in a final prefab instance in scene.
Entity prefab
- A file with .et extension. It means entity template but it's a legacy name.
- Entity prefab contains entities with hierarchy, components and config objects.
- Entity prefabs can be recursively nested inside of another entity prefabs without any restrictions.
Component prefab
- A file with .ct extension. It means component template but it's a legacy name.
- Component prefabs contain only components and their config objects.
Config object prefab
- A file with .conf extension that can be referenced from entities, components and config objects.
- Can contain a config object, its children, sub-children etc (recursively).
Config object
- Config object is a small sub-object of entity, component or any other config object.
- In GUI it's visible only as a set of sub-properties.
- Config objects can be recursively nested inside of other config objects.
Prefab member
- It's an entity stored in a prefab file. It's only a valid term for entity prefabs.
- Prefab contains one or more prefab members with hierarchy.
Prefab root
- It's a prefab member (entity) on the top level of prefab hierarchy. All other prefab members are its children or sub-children.
Prefab instance
- It's a set of entities in scene that are created together from a specific prefab at the same moment.
- Prefab instance is always exact mirror of Prefab and because of that it can't have a different count of members than Prefab.
Prefab instance member
- It's a single entity of prefab instance.
- There is no possibility to delete only one instance member. You can delete only whole prefab instance.
Prefab edit mode
- Special mode of World Editor which is initiated when user opens prefab (.et) file (initiated from prefabs opened in tab of Resource Manager via Edit prefab button - see opening prefab in Prefab Edit Mode paragraph)
- This mode is specialised in editing prefabs - i.e. Save World option is replaced with Save prefab action
- In this mode, no world is being stored on drive and World Editor and when save occurs, only changes to currently edited prefab are stored on drive. Changes done to entities are lost after editor is closed
Prefabs operations
Creating entity prefab in World Editor
Creating entity instance
Create and setup one or more entities in scene as you wish to have it in prefab. There are three methods to do this:
Create tab
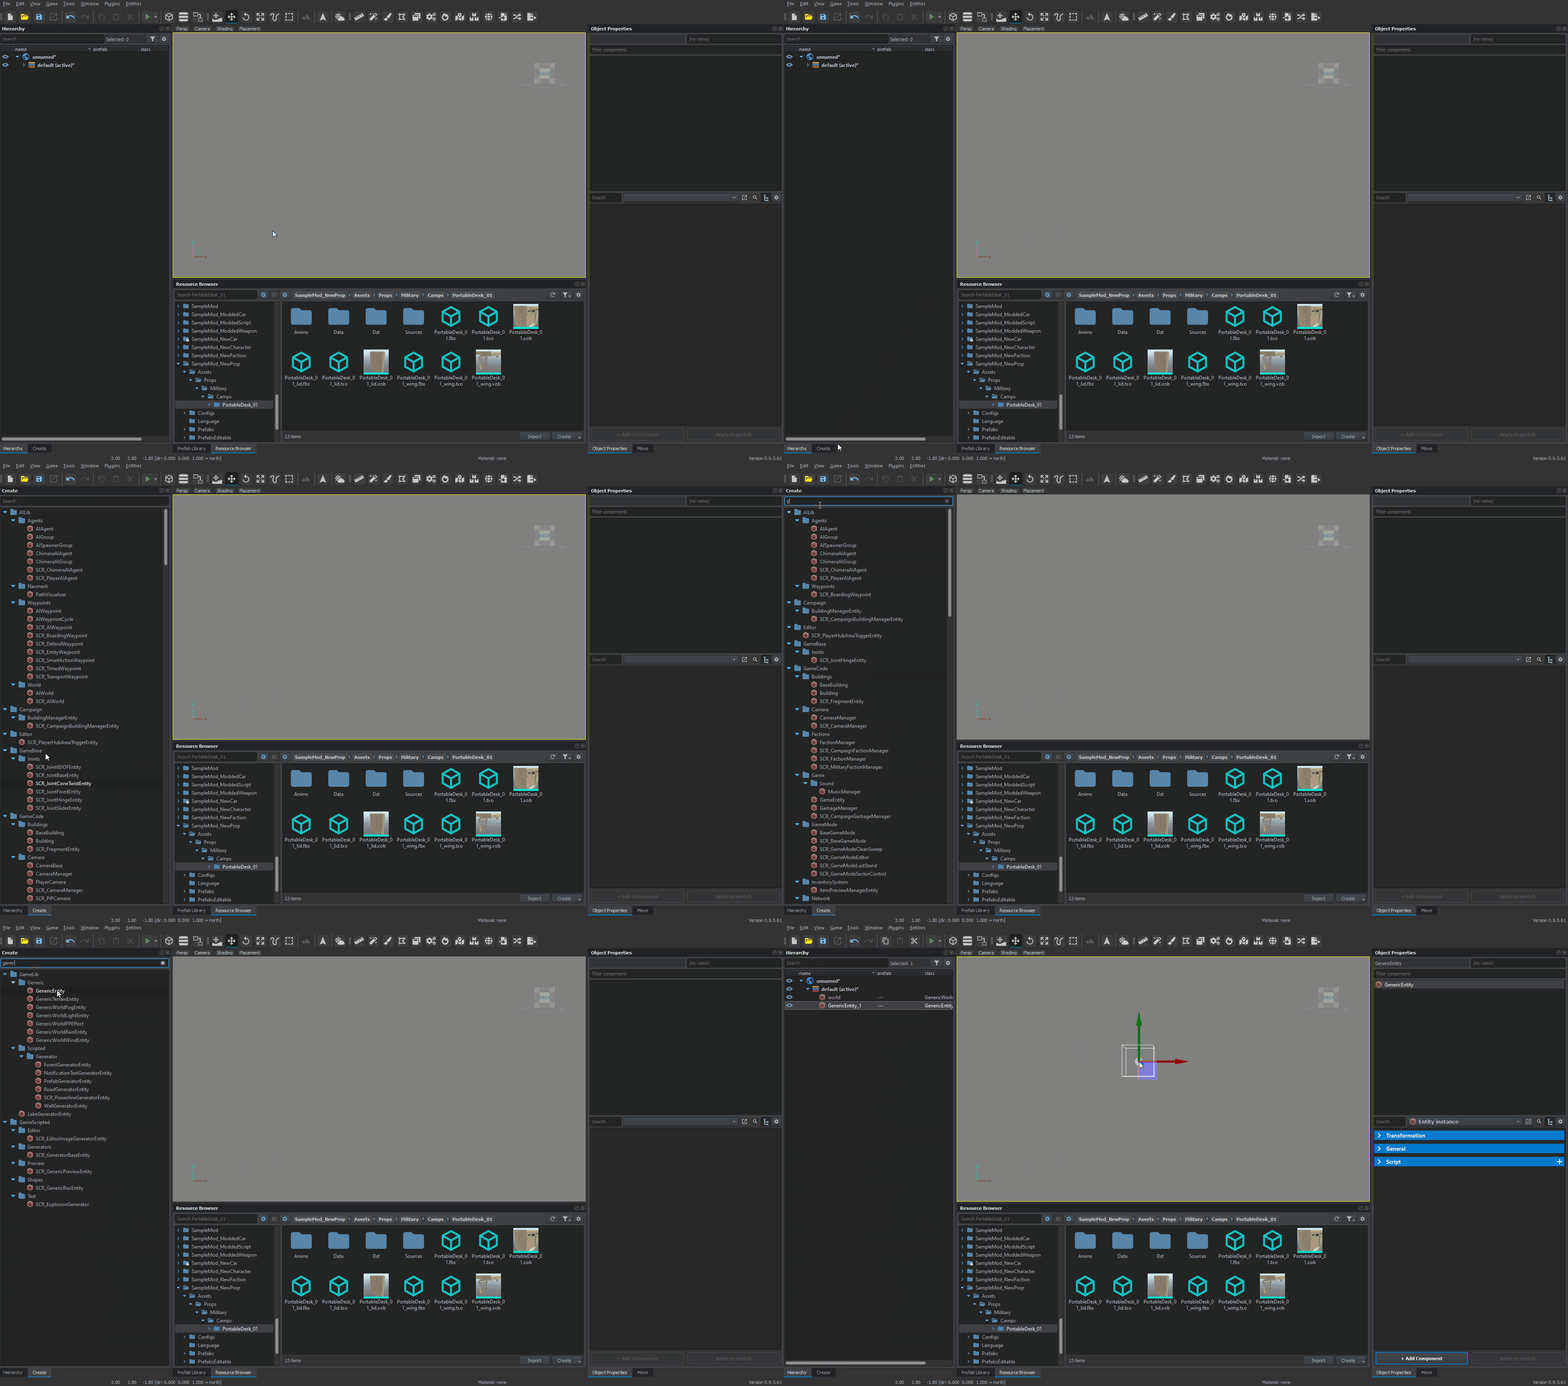
Create new empty entity instances by selecting entry some entry from Create tab (for example GenericEntity) and then drag and dropping it into World Editor viewport. This method is good to create first base prefabs that will not inherit any other prefabs.
Drag and drop prefab
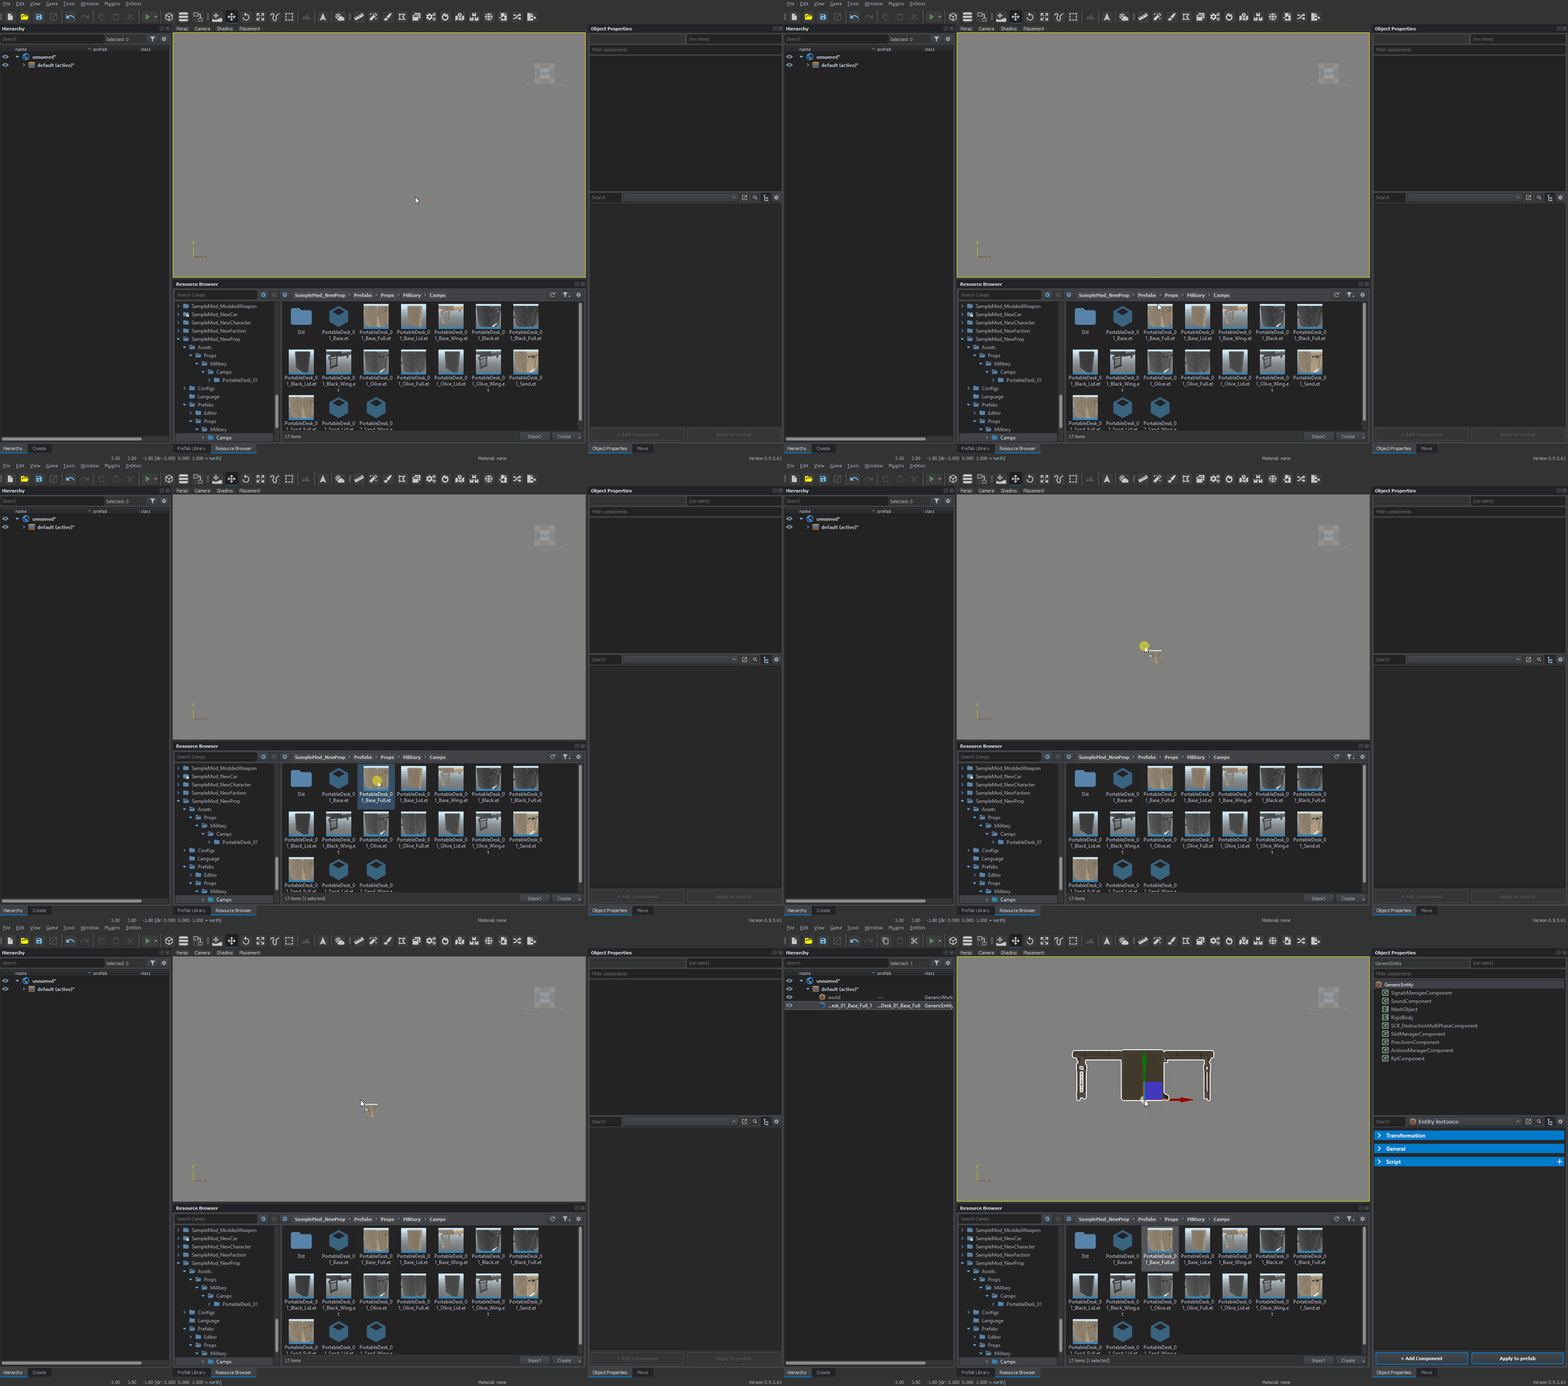
Create entity instances of other existing prefabs by drag and dropping some existing prefab (file with .et extension) from Resource Browser into World Editor viewport. Using this method you will create inherited or nested entity prefabs.
Drag and drop model
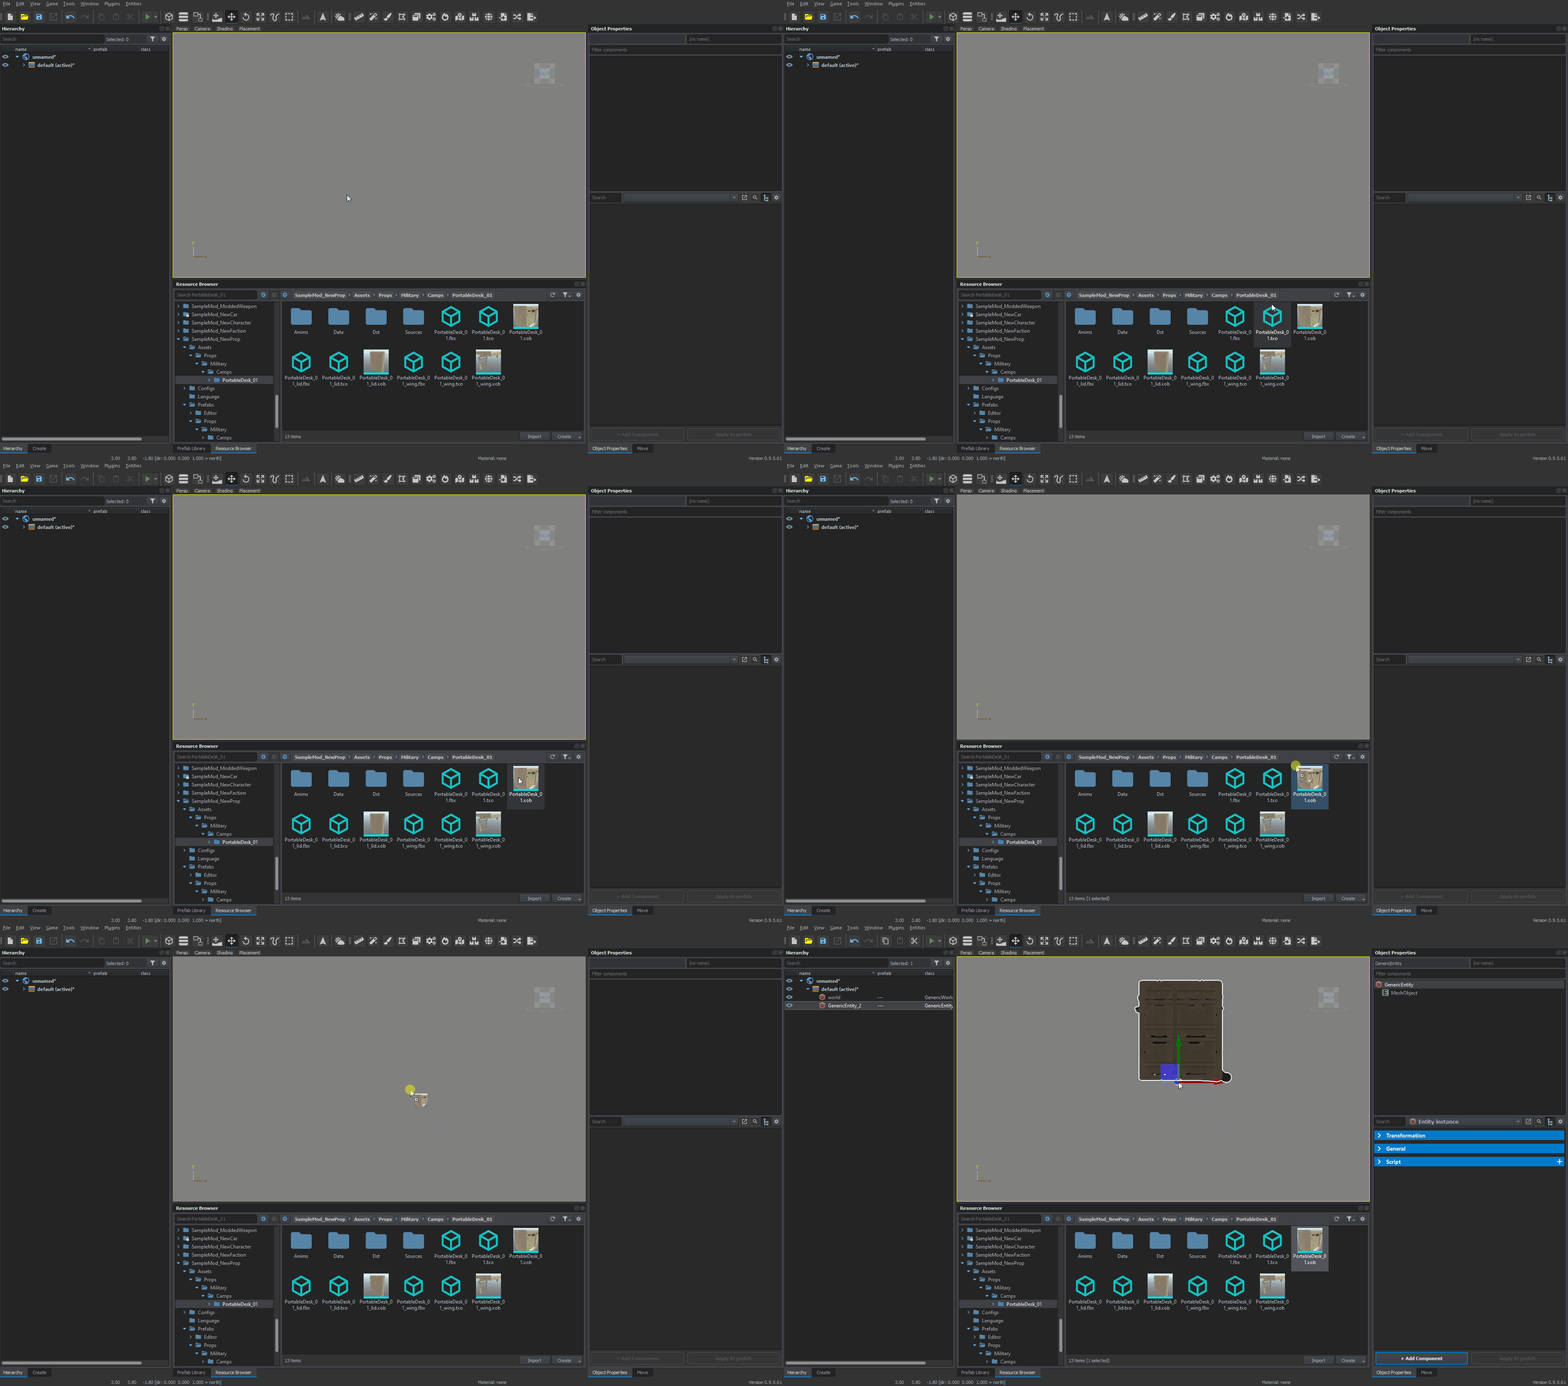
Create a new GenericEntity by drag and dropping some registered XOB model from Resource Browser into World Editor viewport. This action will create a new GenericEntity entity with MeshObject component using the model that was dropped into viewport.
Adding new components to entity instance
Once entity instance is present in the world and selected in hierarchy, it is now possible to add new components to it. There are two methods to do it.
Add component button
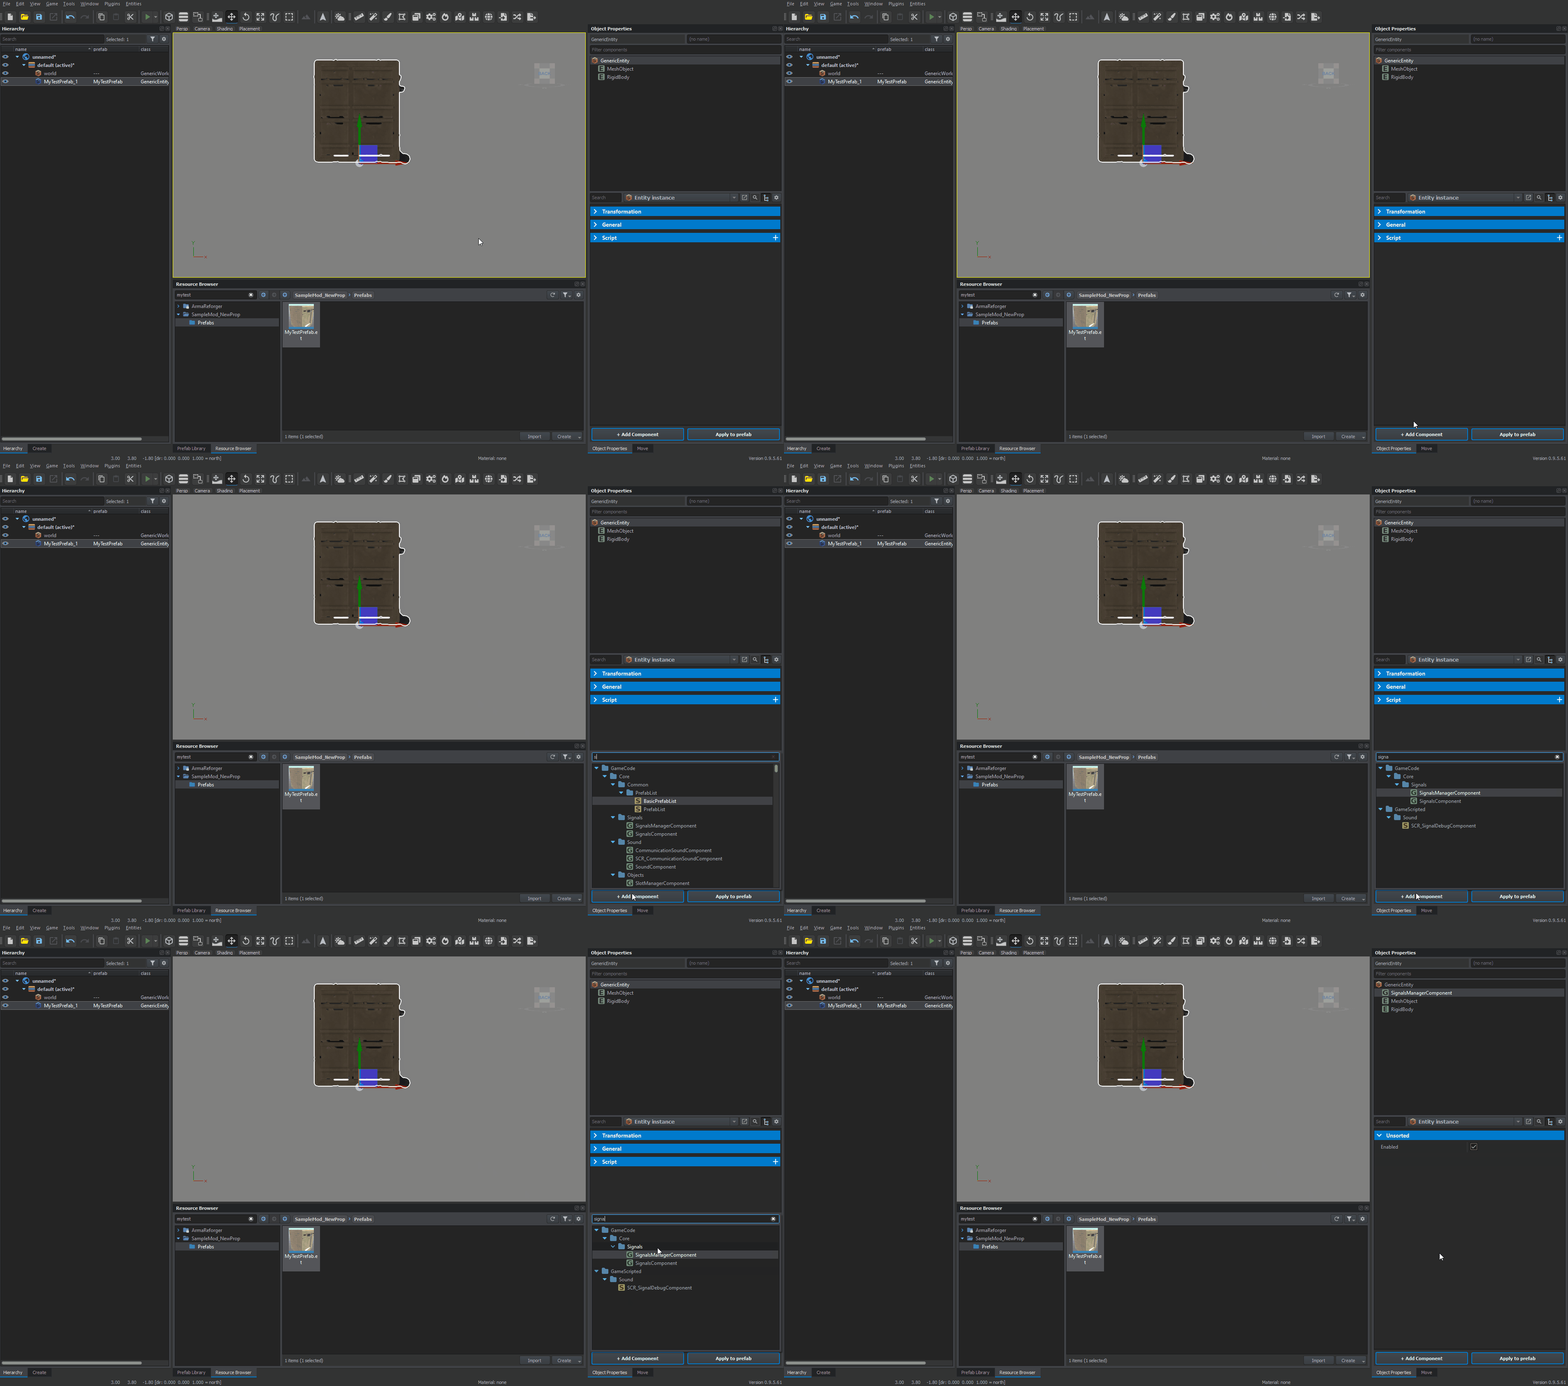
New empty components can be added via Add component button in Object Properties window. Once that button is pressed, desired component can be selected from pop up list.
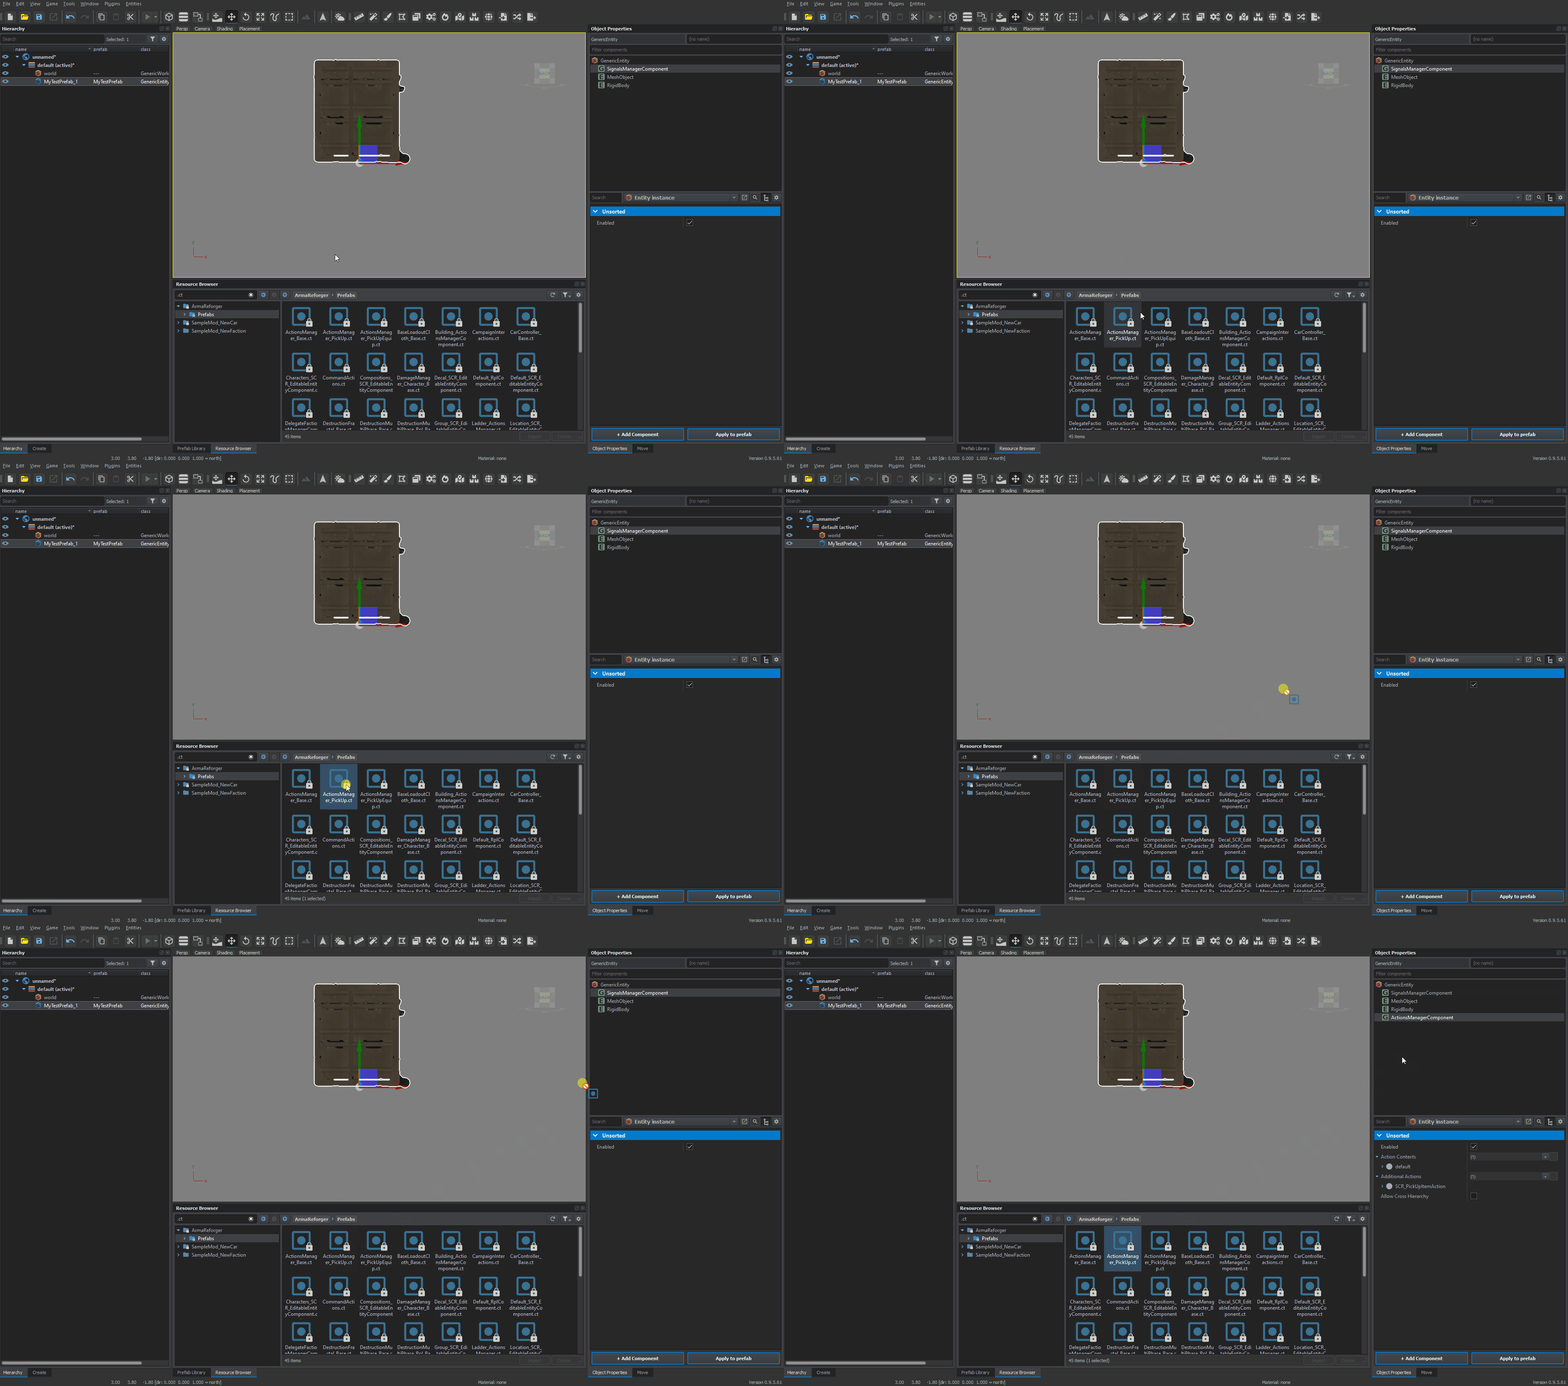
Component prefabs
New components can be also created from existing Component Prefabs. By using this method, you will create inherited Component Prefabs. Just drag .ct file and drop it to property grid
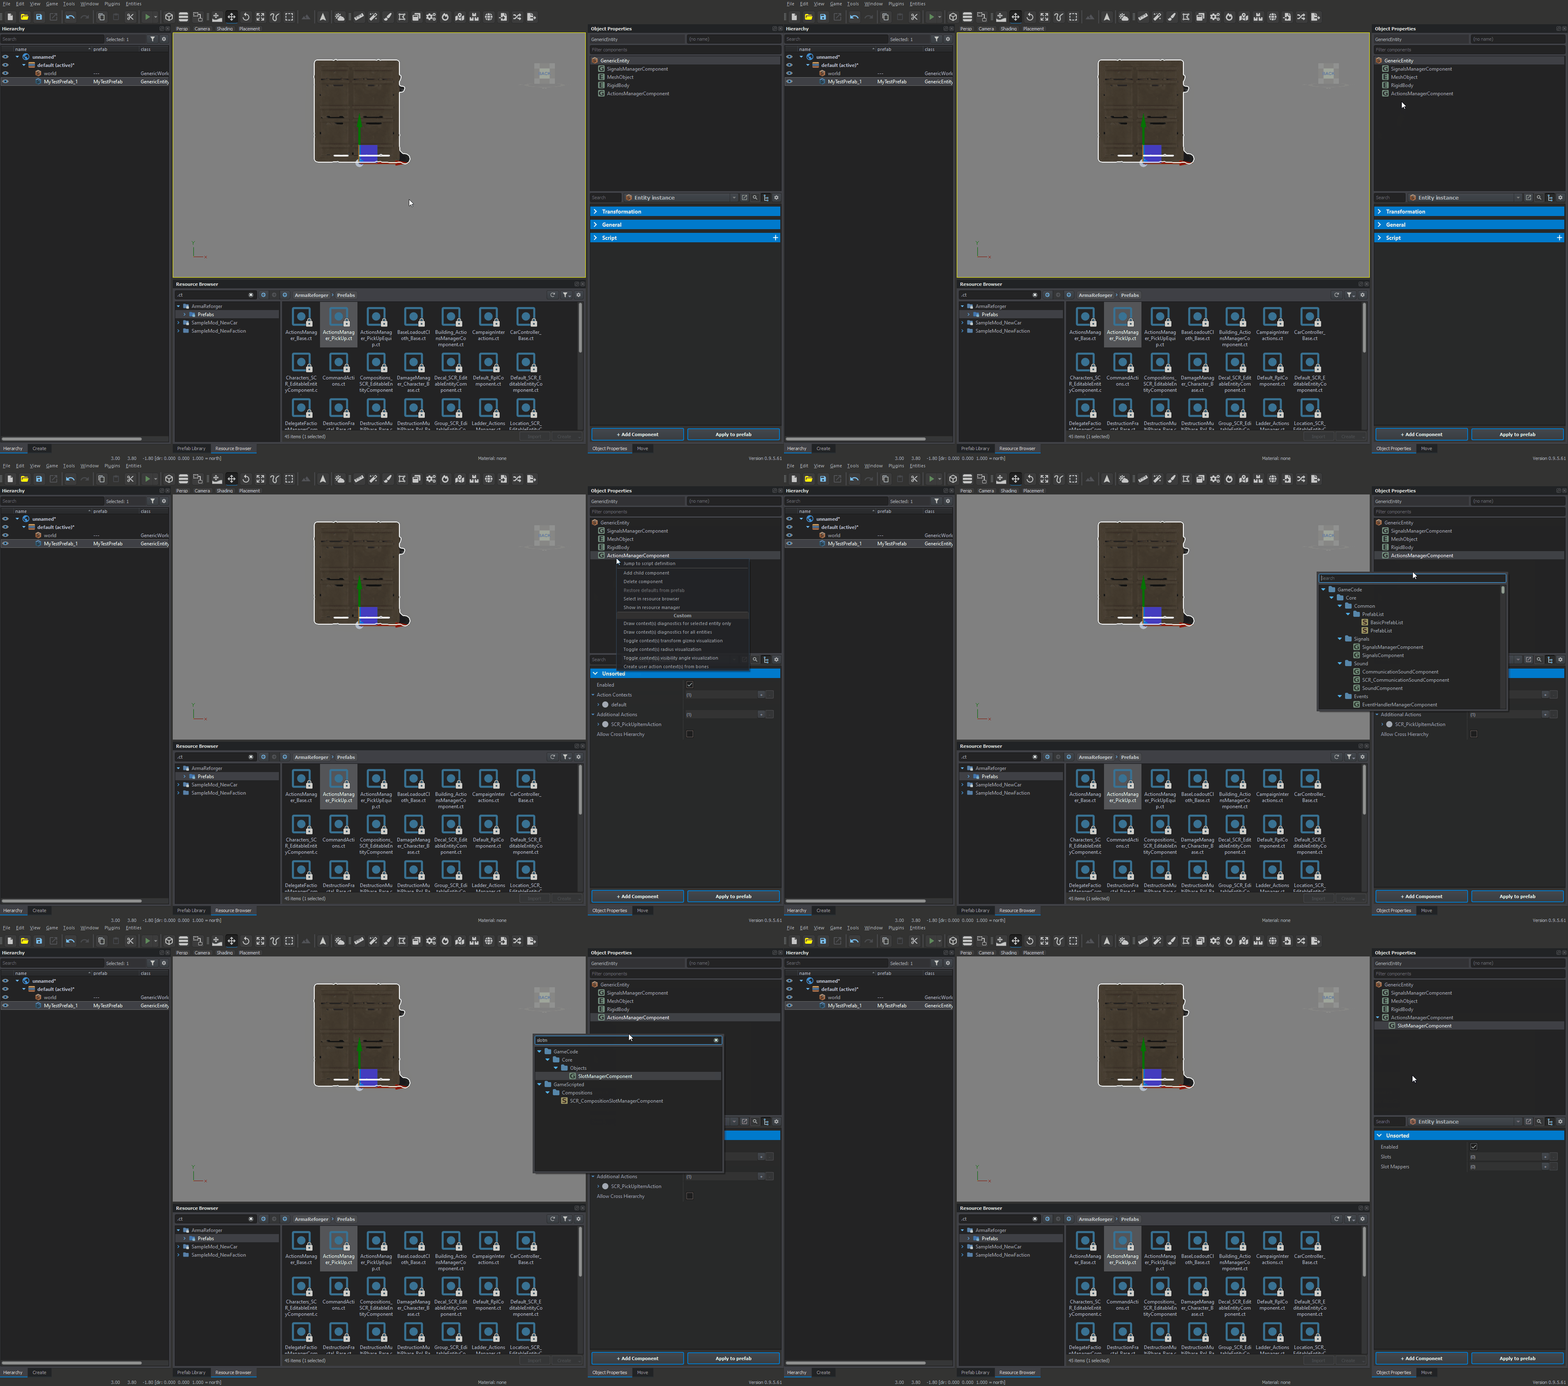
Adding child component
Some components might only work when they have certain components set as their children (f.e. WeaponComponent). New Child Components can be added by right clicking on some existing component in Object Properties list and then selecting the Add child component option from the context menu
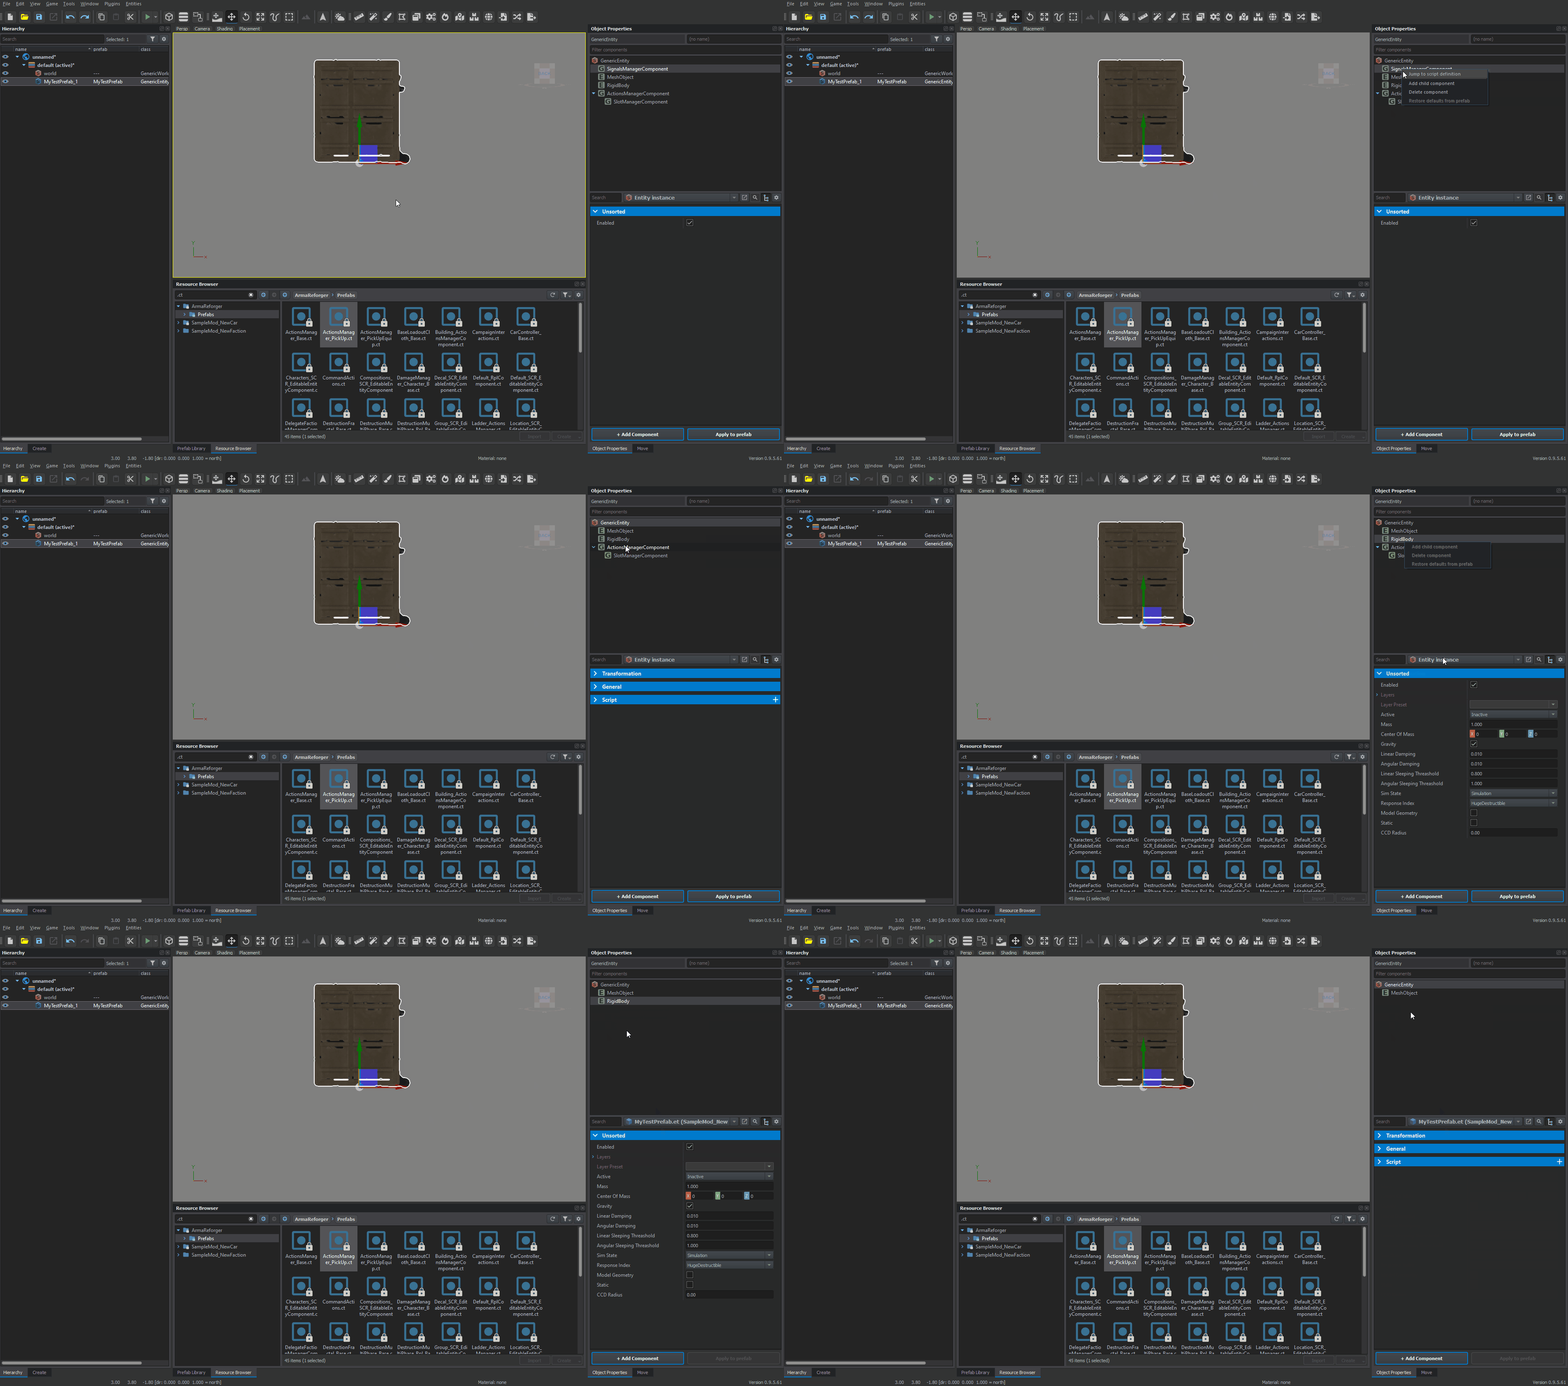
Removing components
Components can be removed from an entity instance by simply clicking on them with Right Mouse Button and then selecting the Delete Component option from the context menu. Removing components from prefabs is a bit more tricky, since you need to select the desired prefab in inheritance list first and after that you should be able to delete such components.
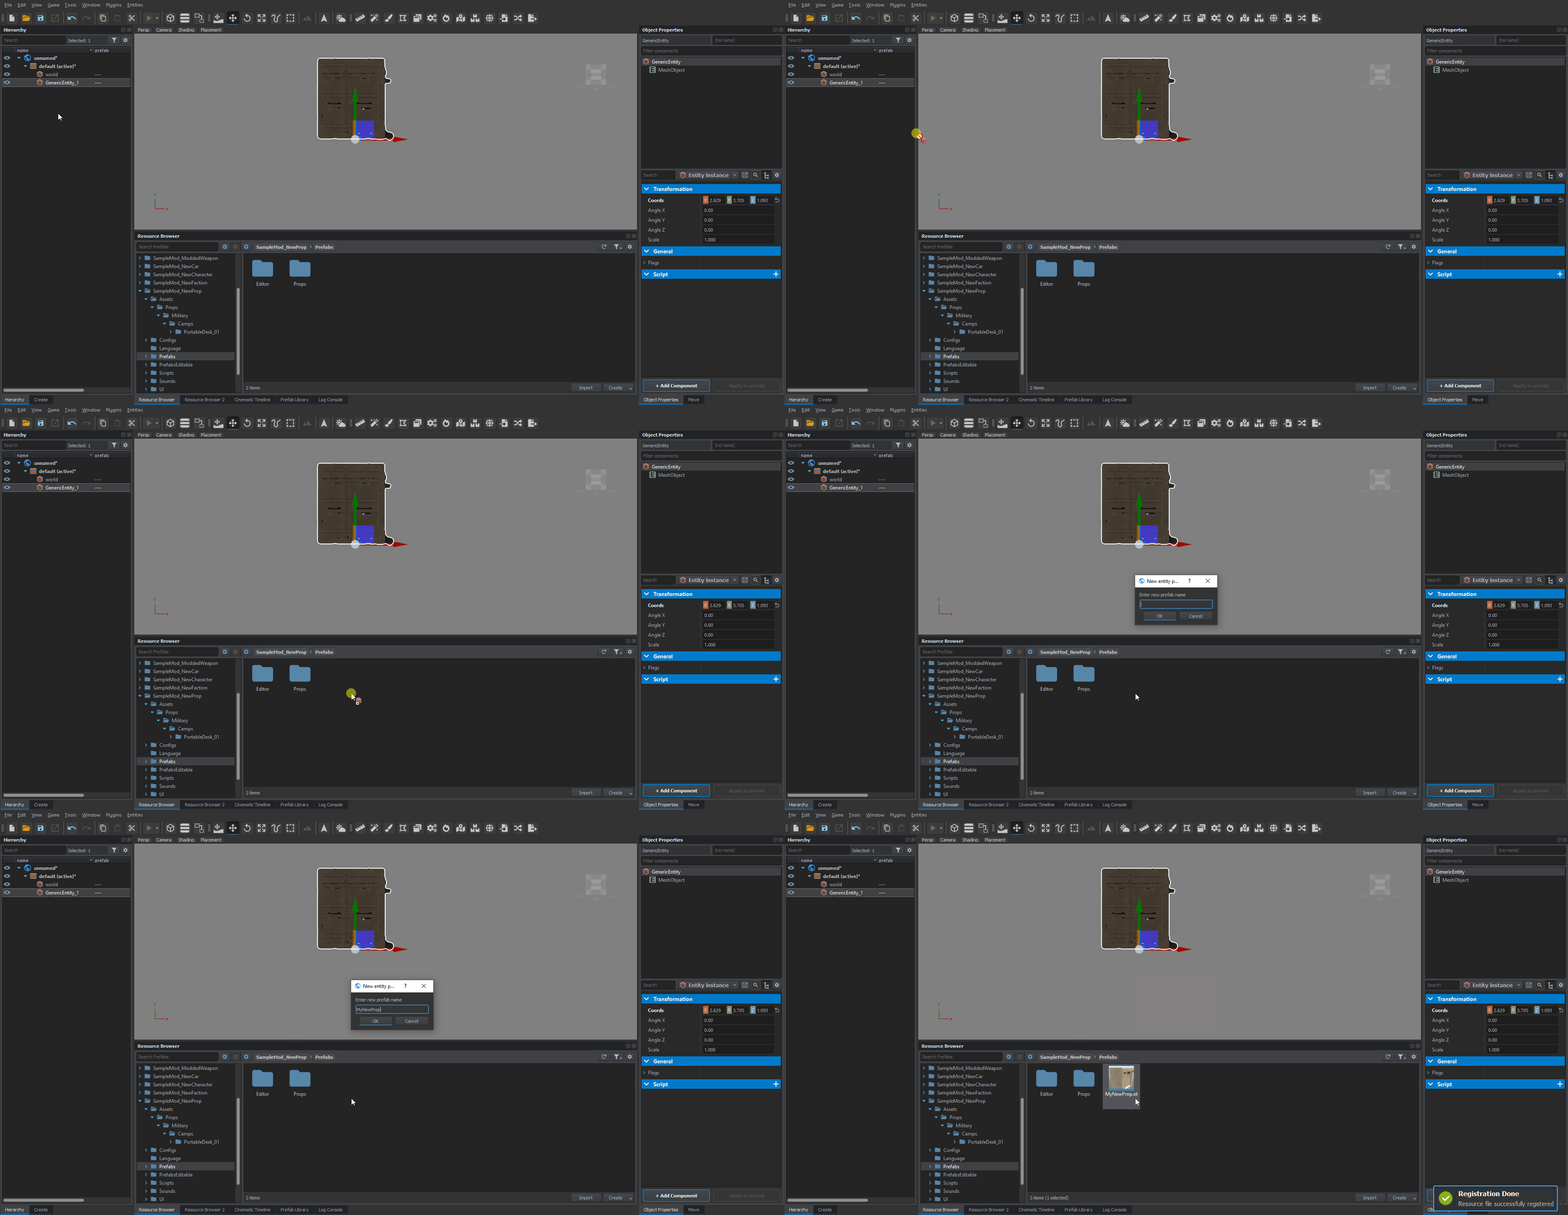
Saving entity instance as new prefab
Set up your entities into common hierarchy (use drag & drop in the Hierarchy window). There must to be only one entity root. Then finish the prefab creation process by following the next two steps.
1) drag the root entity of hierarchy and drop it into Resource Browser window to an arbitrary folder where you want to create the new prefab file
2) after the drop, enter a prefab name into dialog. That's it - your entity prefab file will be created in selected location.
Creating component prefab
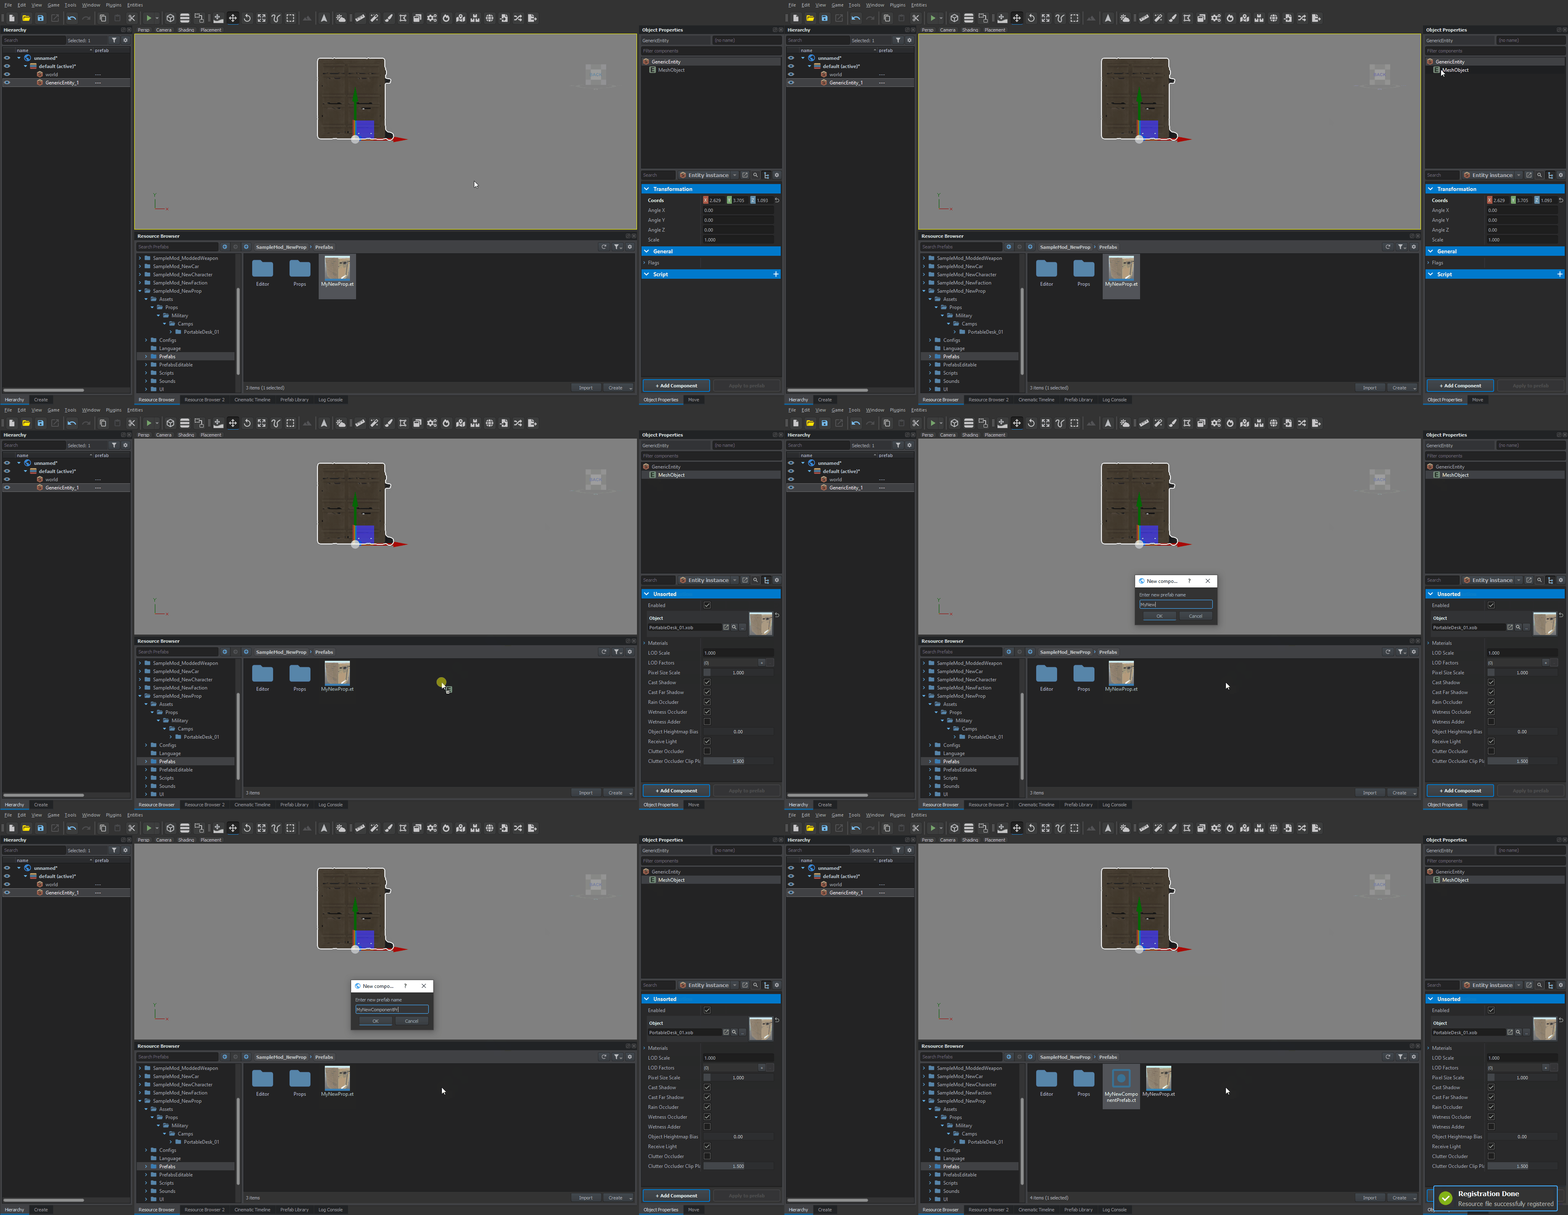
Creating a new Component Prefabs (.ct) can be done in two steps. Assuming that you have already selected some entity with required component, you need to perform the following actions:
1) drag the component item from Object Properties window and drop it into Resource Browser window (see the picture).
2) after drop, enter a prefab name into dialog (picture). That's all. Your component prefab file will be created.
Changing class
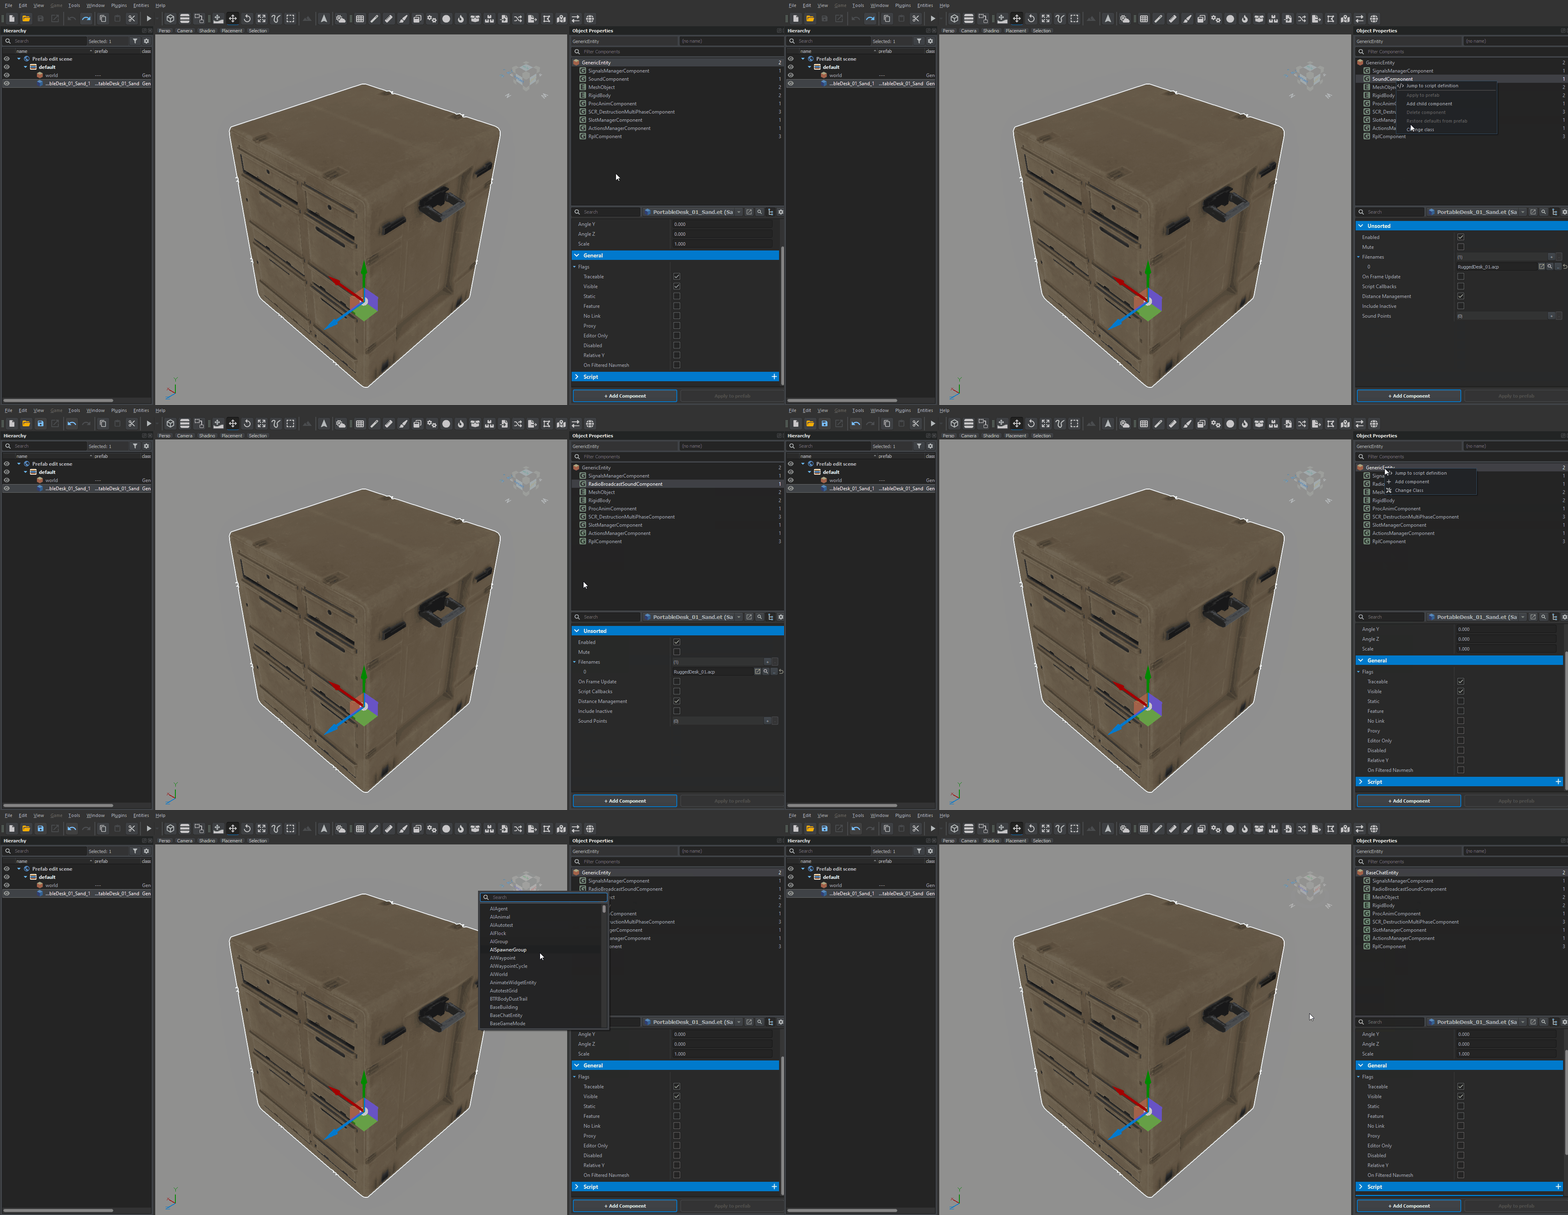
Already present components or entities can be changed to different, compatible class by:
1) Clicking on selected component/entity with Right Mouse Button
2) Selecting Change class option from the context menu
3) Selecting one of the compatible classes from the list
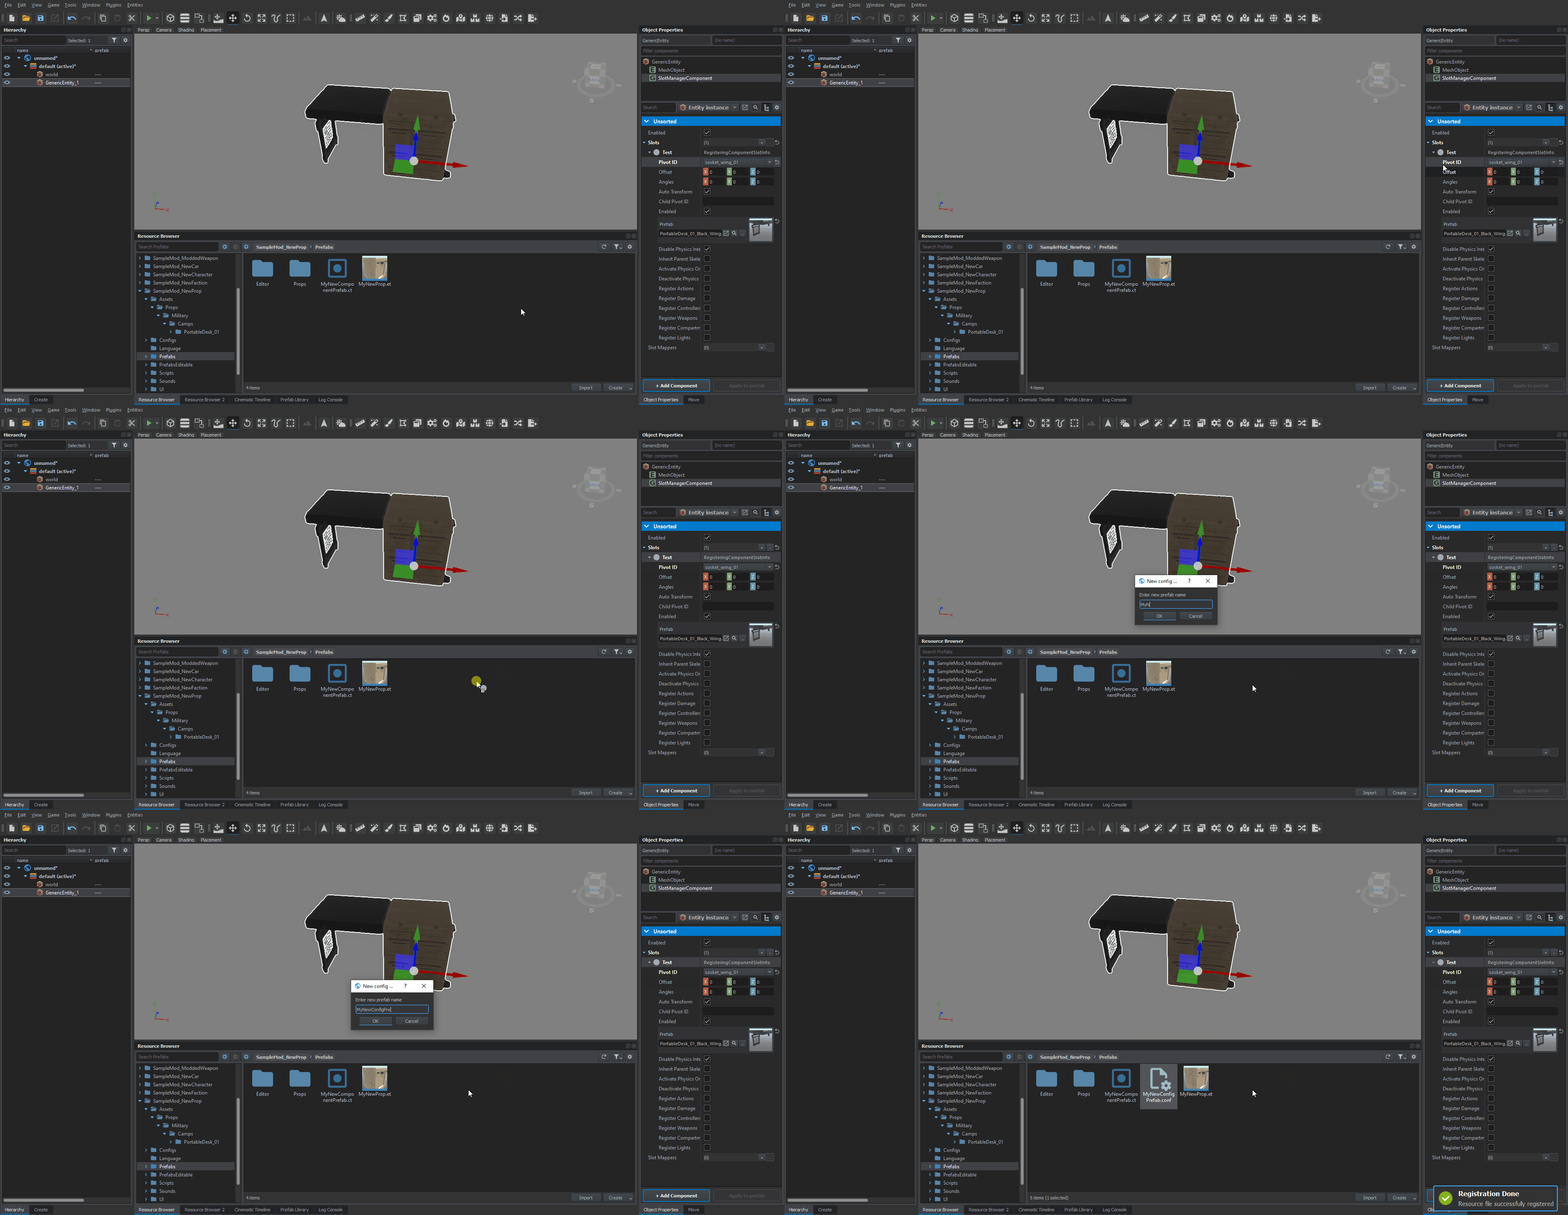
Creating config object prefab
To create a new config object prefab, the following steps have to be performed:
1) Select an arbitrary config object in property grid.
2) Drag the config object item from property grid to and drop it into resource browser window.
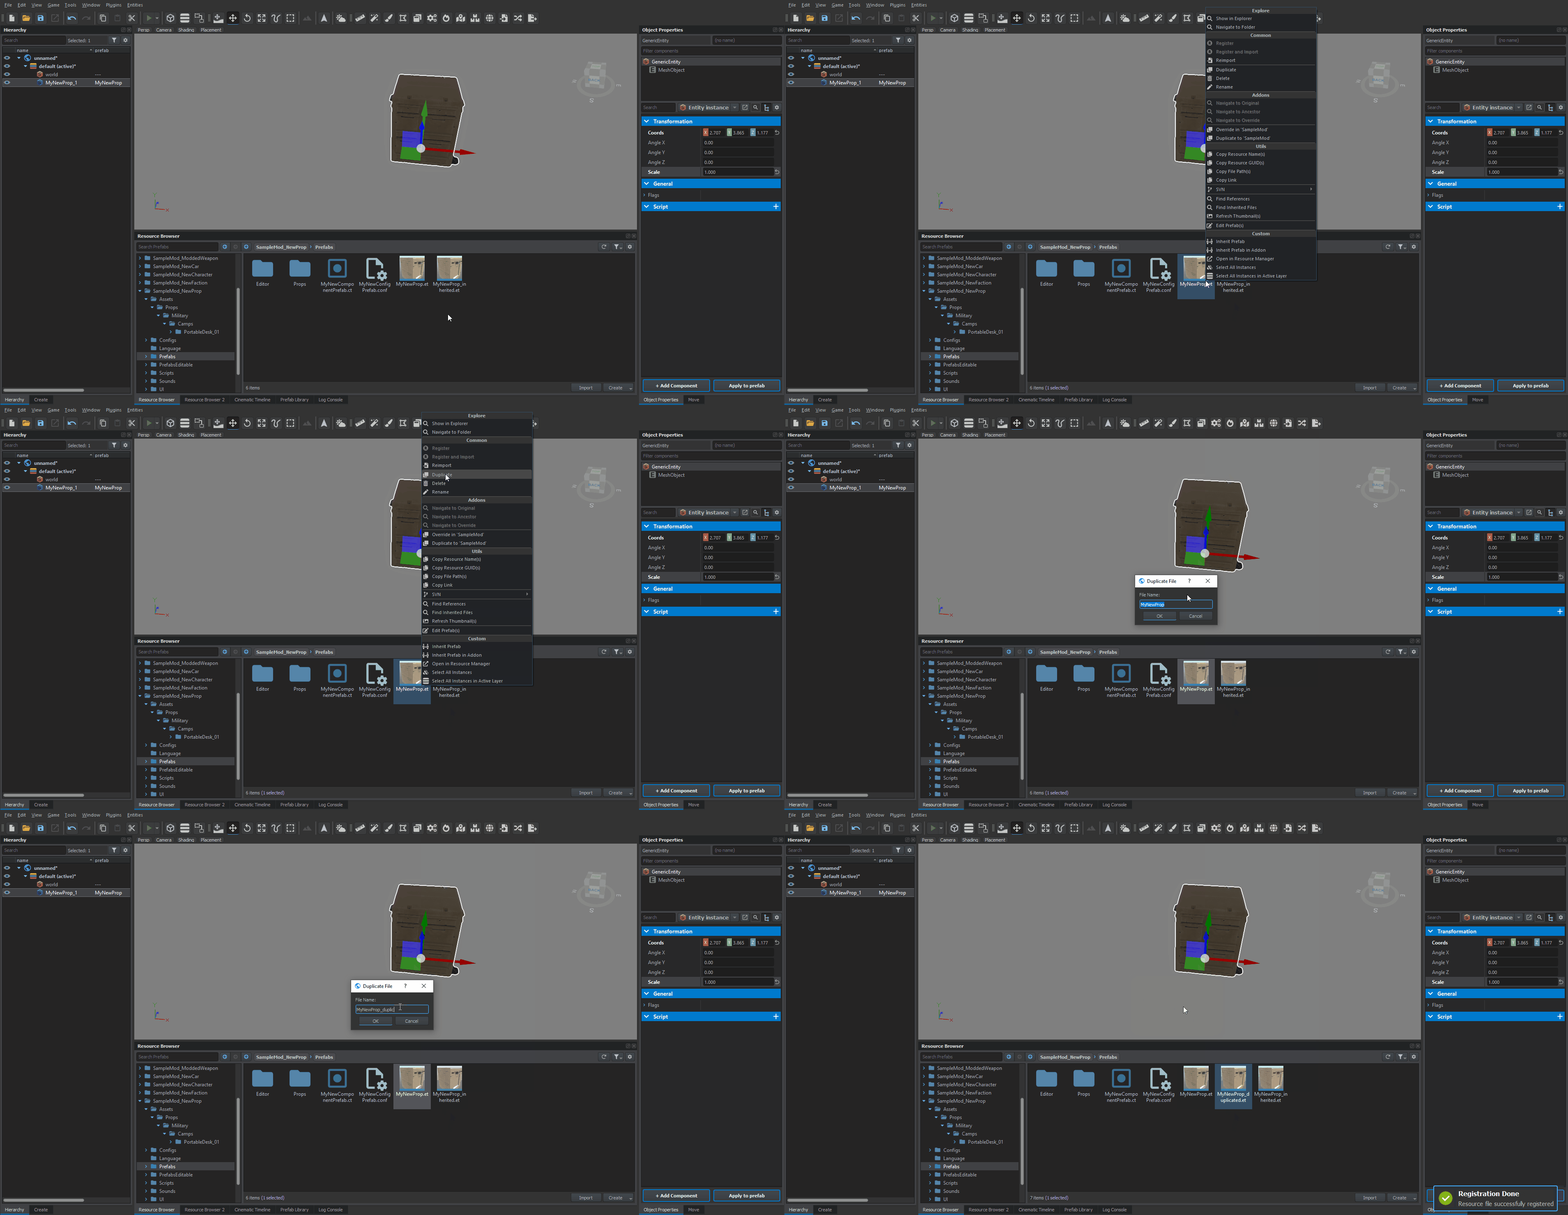
Duplicating prefab
Any existing prefab can be duplicated - during such operation, selected prefab will be literally duplicated - meaning all parameters and settings are copied over - but the file will get a new GUID.
Creating inherited prefab
There are two methods to create a prefab inherited from another prefab.
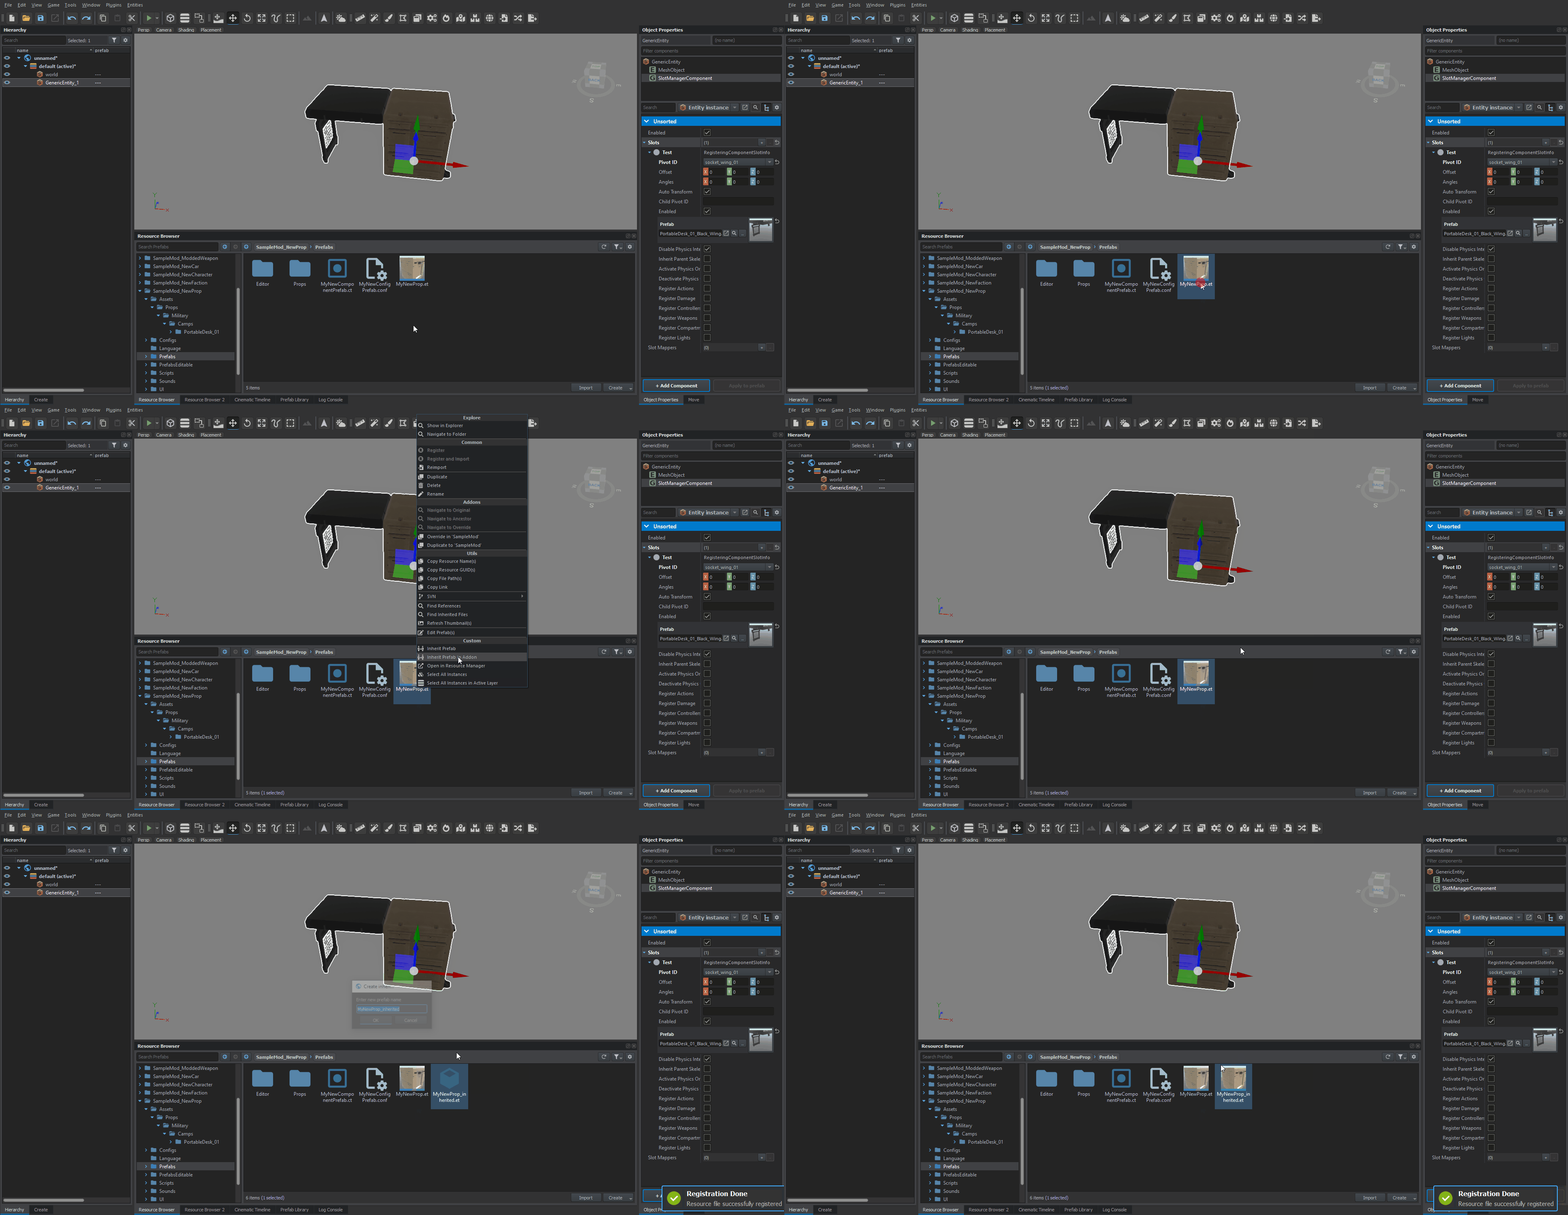
Using Inherit Prefab option
Use the dedicated action in the context menu of Resource Browser window. Select a prefab and choose Inherit from the context menu.
Drag and drop method
Create a prefab by drag & drop as described above in Create new entity prefab segment and then save this entity instance as a new prefab. This method will create an inherited prefab automatically.
Editing entity prefab properties
Select an entity which is an instance of the prefab. Then use one of the following two methods to continue
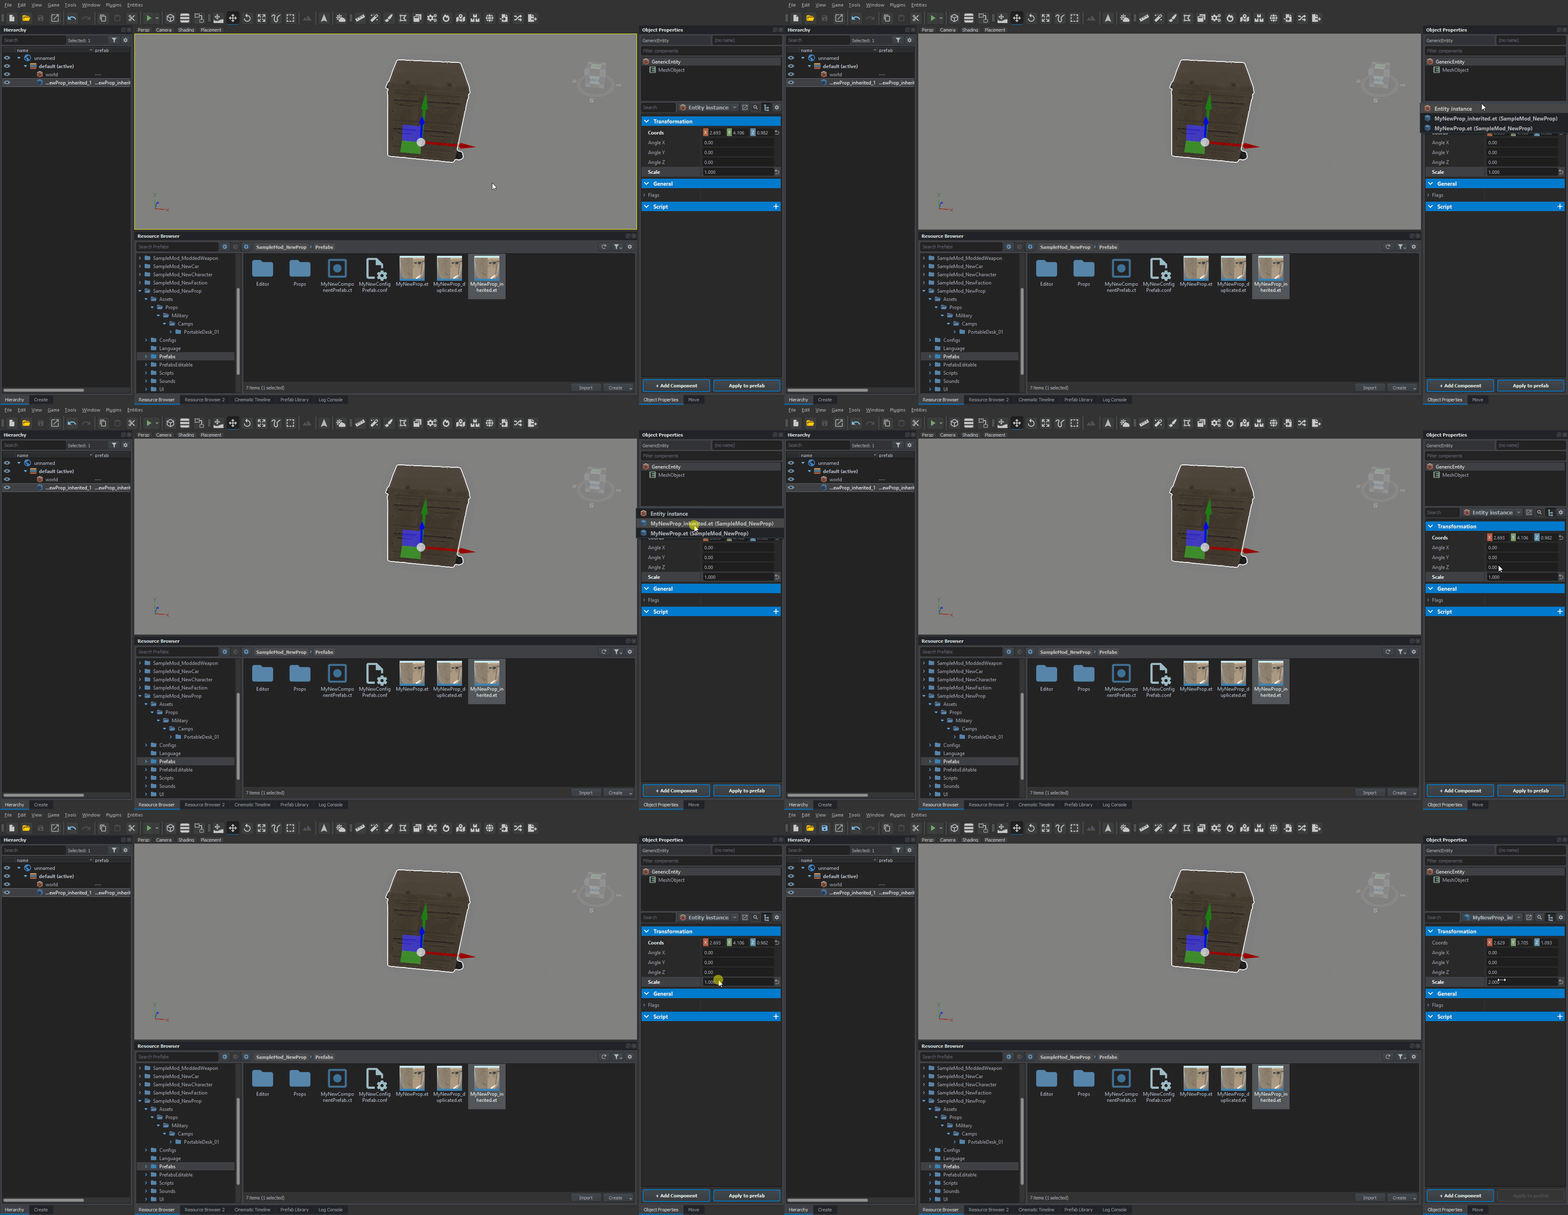
Using inheritance tree
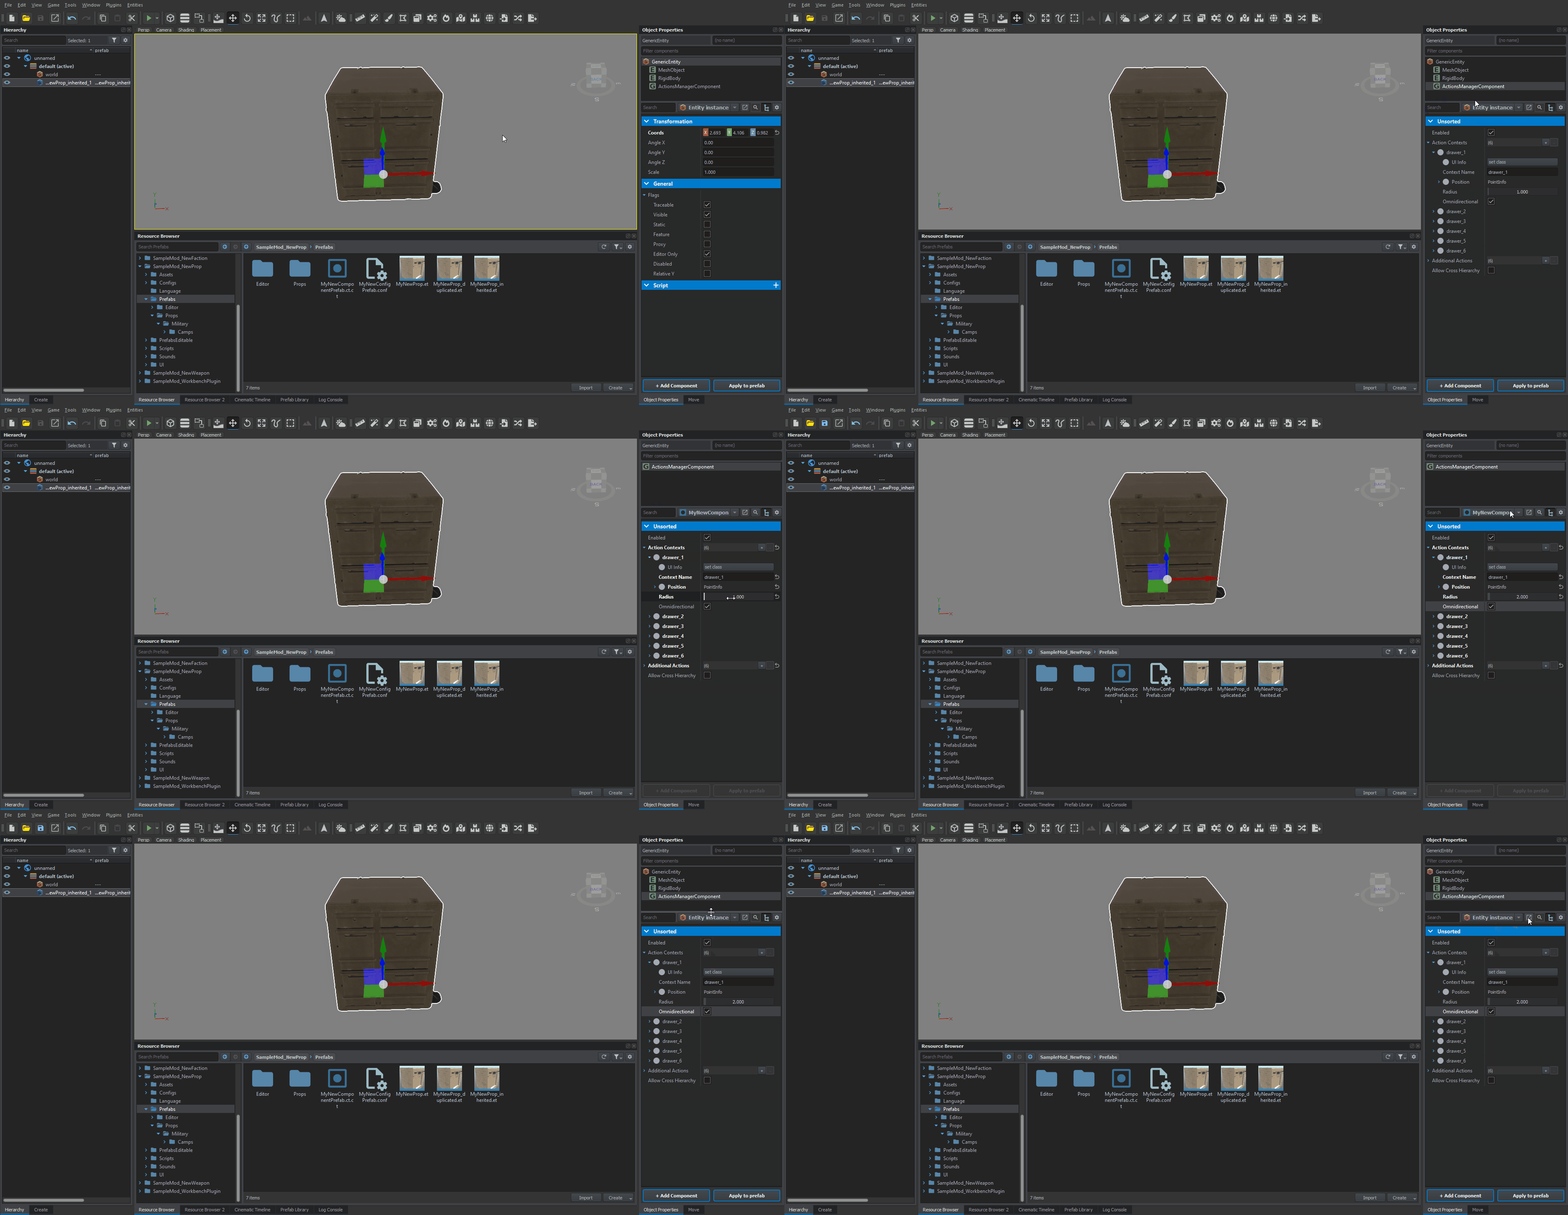
Switch combo box in Object Properties window from "Entity instance" to one of inherited prefabs which you can see there (picture). Then you can edit properties of the prefab directly. Changes will instantly affect all entities that use the prefab (include all inherited prefabs).
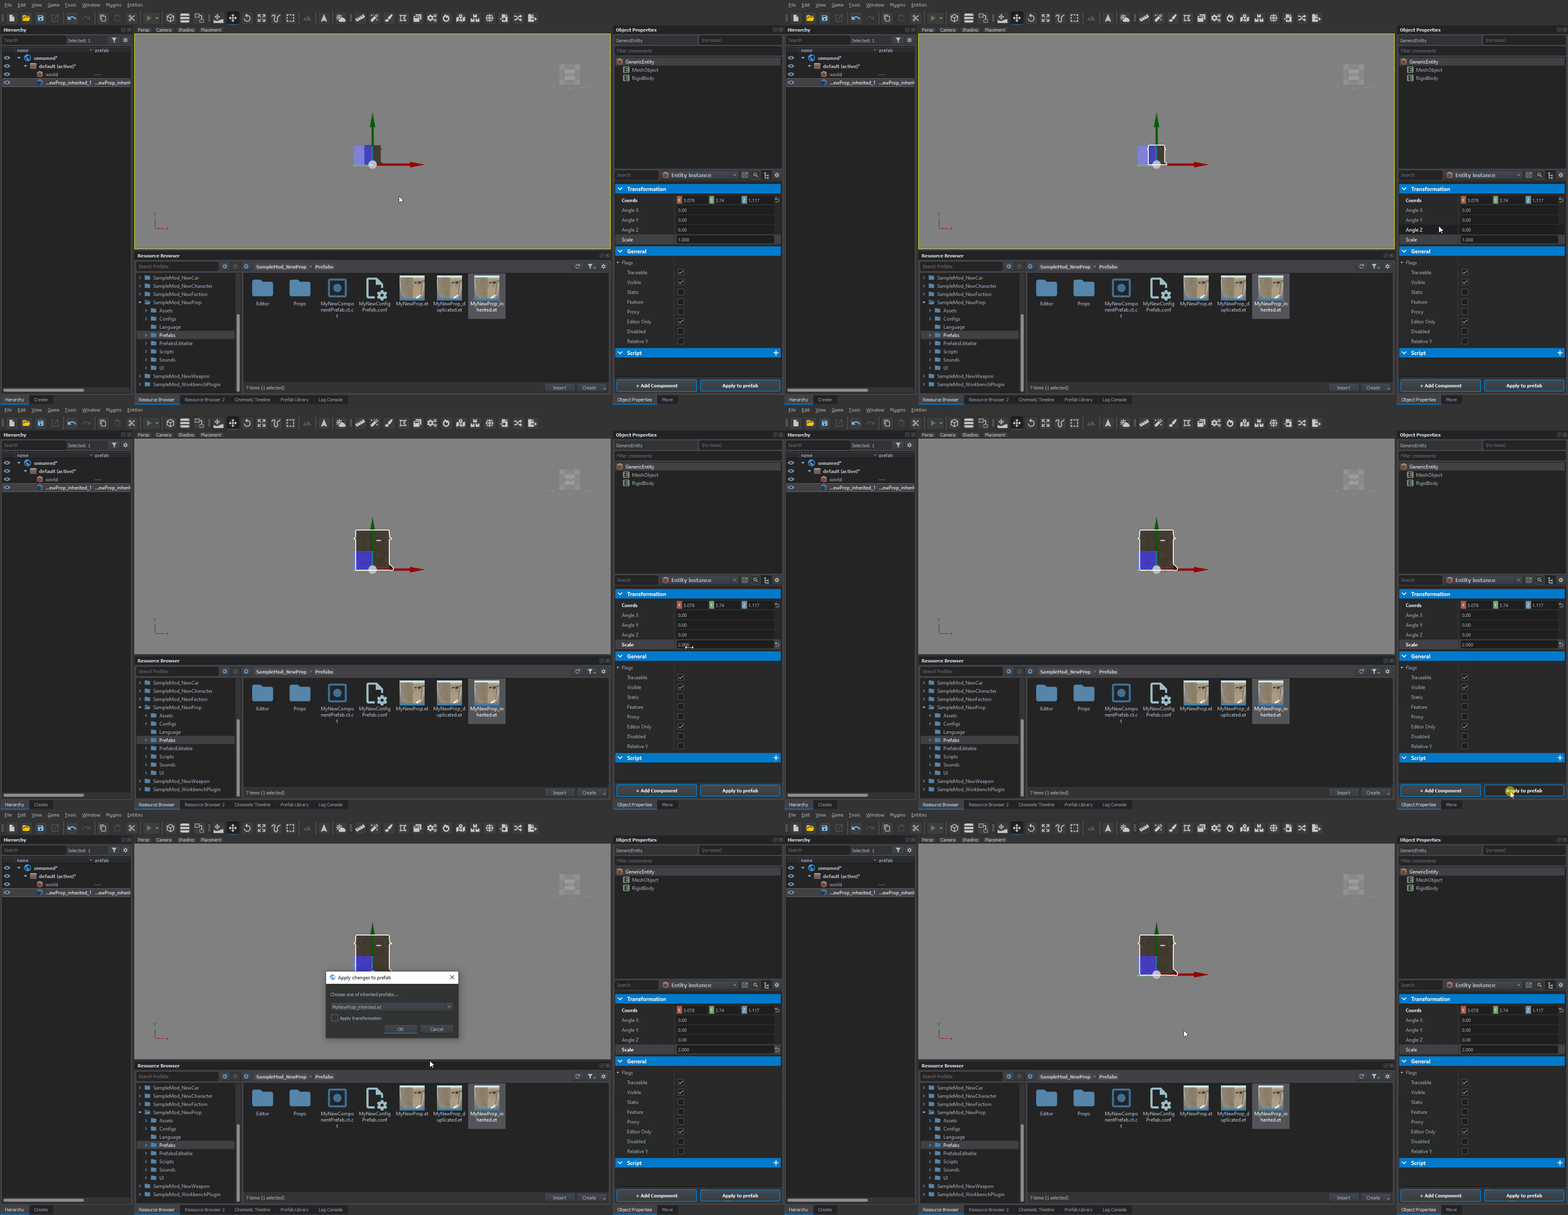
Using Apply to prefab button
Keep the combo box in Object properties window on Entity instance selection. Then you will edit entity and component properties on local entity instance only, but when you are satisfied with your changes, you can apply (propagate) changes from local entity instance to a specific inherited prefab by Apply to prefab action which is available in bottom section of the Object Properties window. The action transfers all the changes from entity instance and its components instance to any specific inherited prefab.
If entity or component is inherited from more than one prefab, then you can choose to which prefab you wish apply your changes.
This method is good when you want to test your changes before applying to prefab.
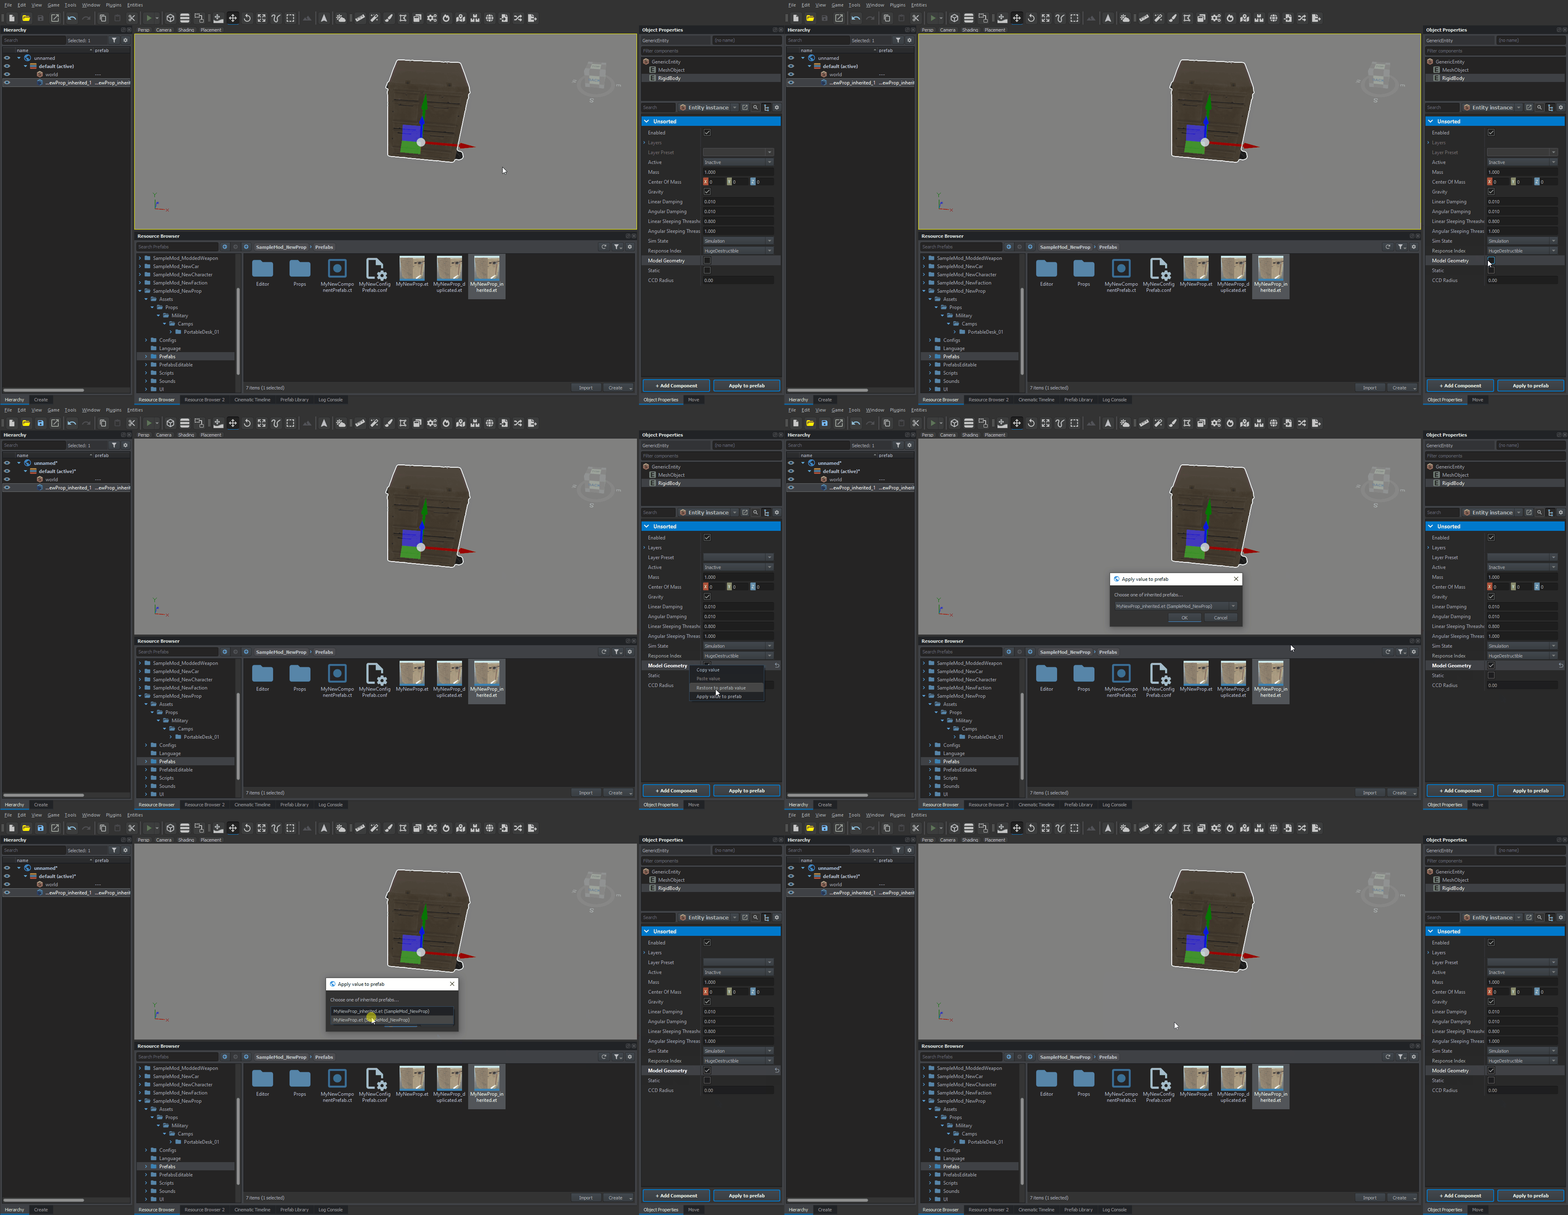
Alternatively, it is also possible to use Apply value to prefab option from property context menu. In this case, only that single change will be applied to selected prefab.
Using Prefab Edit Mode
Prefabs opened in Prefab Edit Mode will be using the inheritance tree by default. It is still necessary to use Save Prefab option (Ctrl + S) to store your changes permanently on the drive.
Editing component prefab properties
Editing of Component Prefabs is very similar to doing modifications to regular prefabs. In this case, when selected Component is inheriting from Component Prefab, it will be possible to select that Component Prefab from inheritance tree property. To exit that mode, click on Go to object button located to the right of inheritance tree drop down menu.
Adding entities to prefab
You can add a new entity to an existing prefab by these steps:
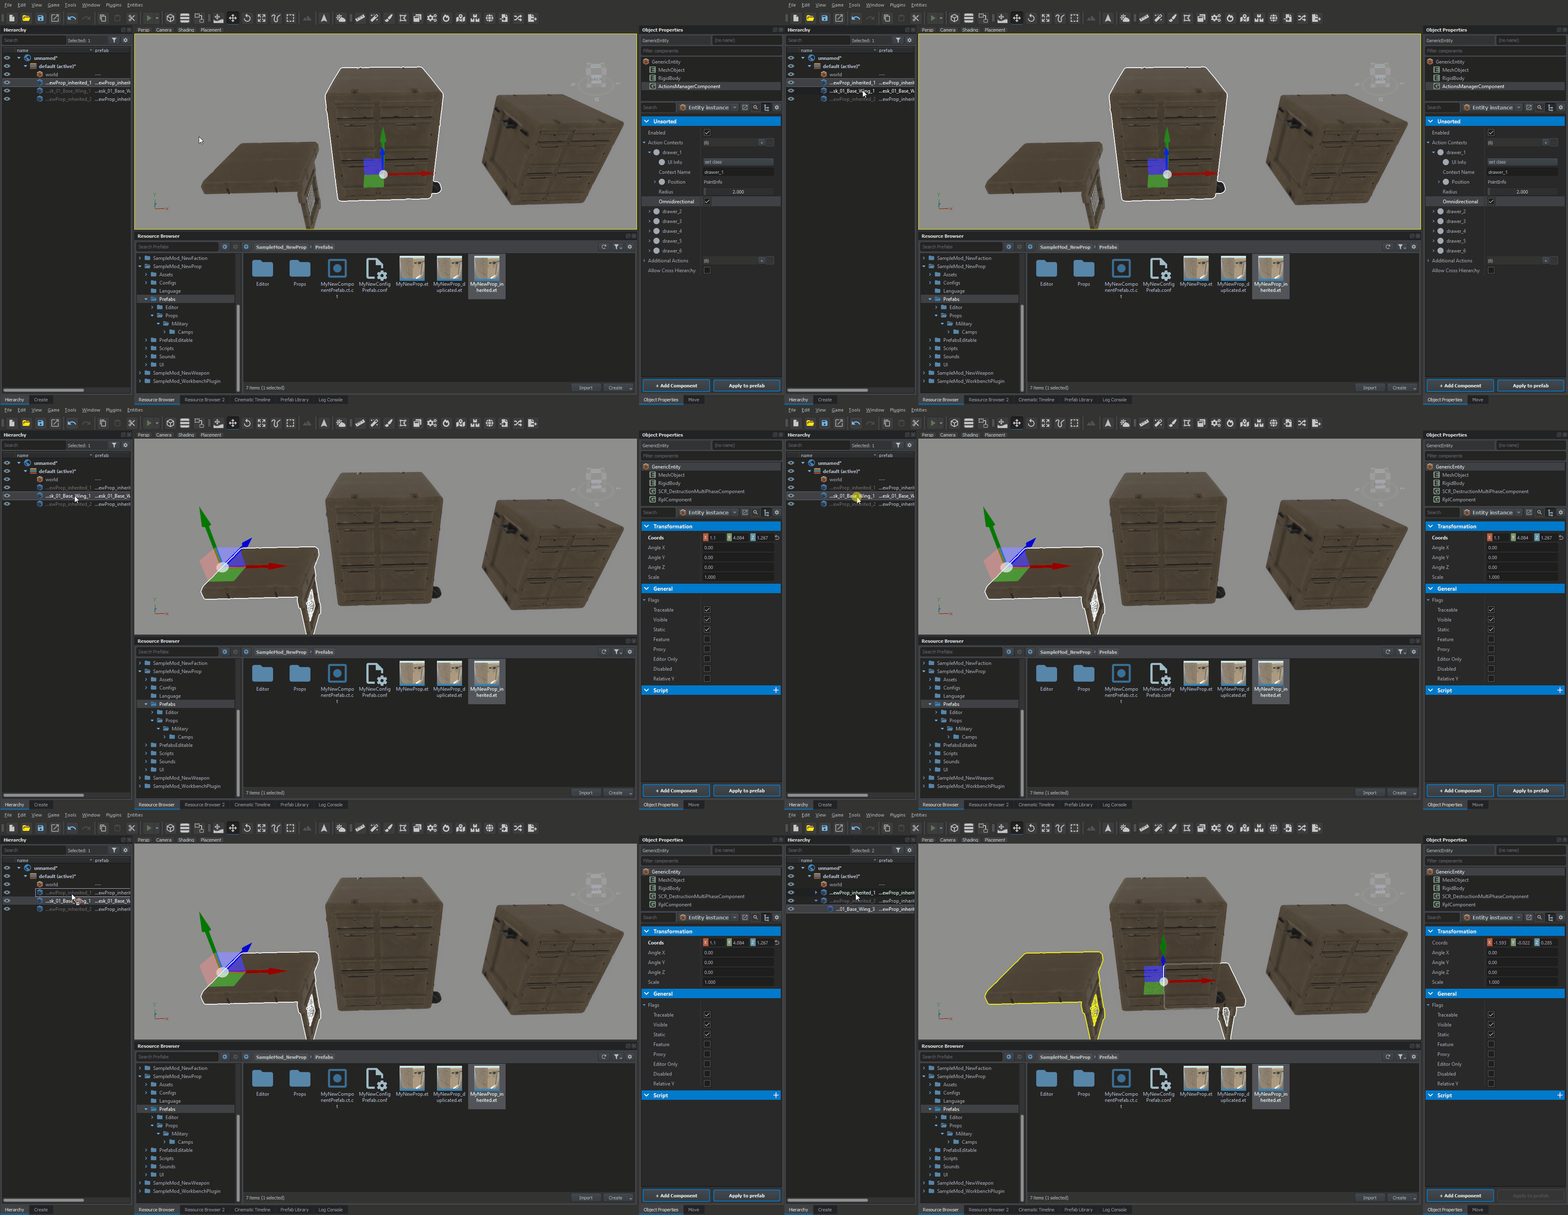
1) Create a temporary prefab instance somewhere in the scene (just drop entity prefab file to scene) or use any existing prefab instance.
2) Create and set up a temporary entity instance which you want to add to the prefab. Place it in the scene somewhere near the prefab instance. It can be a new unique entity or any prefab instance.
3) Transform the entity to the exact position/orientation as you wish to have it in prefab.
4) ![]() Press and hold Alt key.
Press and hold Alt key. ![]()
5) Drag the entity item in Hierarchy window and drop it somewhere into hierarchy of your prefab instance.
6) That's all. Your entity will be added to the prefab. This action will instantly affect all prefab instances in scene that use the prefab (include all inherited prefabs). Using Apply To Prefab button is necessary.
Note: If your entity has some children, they will be added to prefab with hierarchy as well.
Deleting entities from prefab
In case you want to delete some child entity from prefab, following action has to performed:
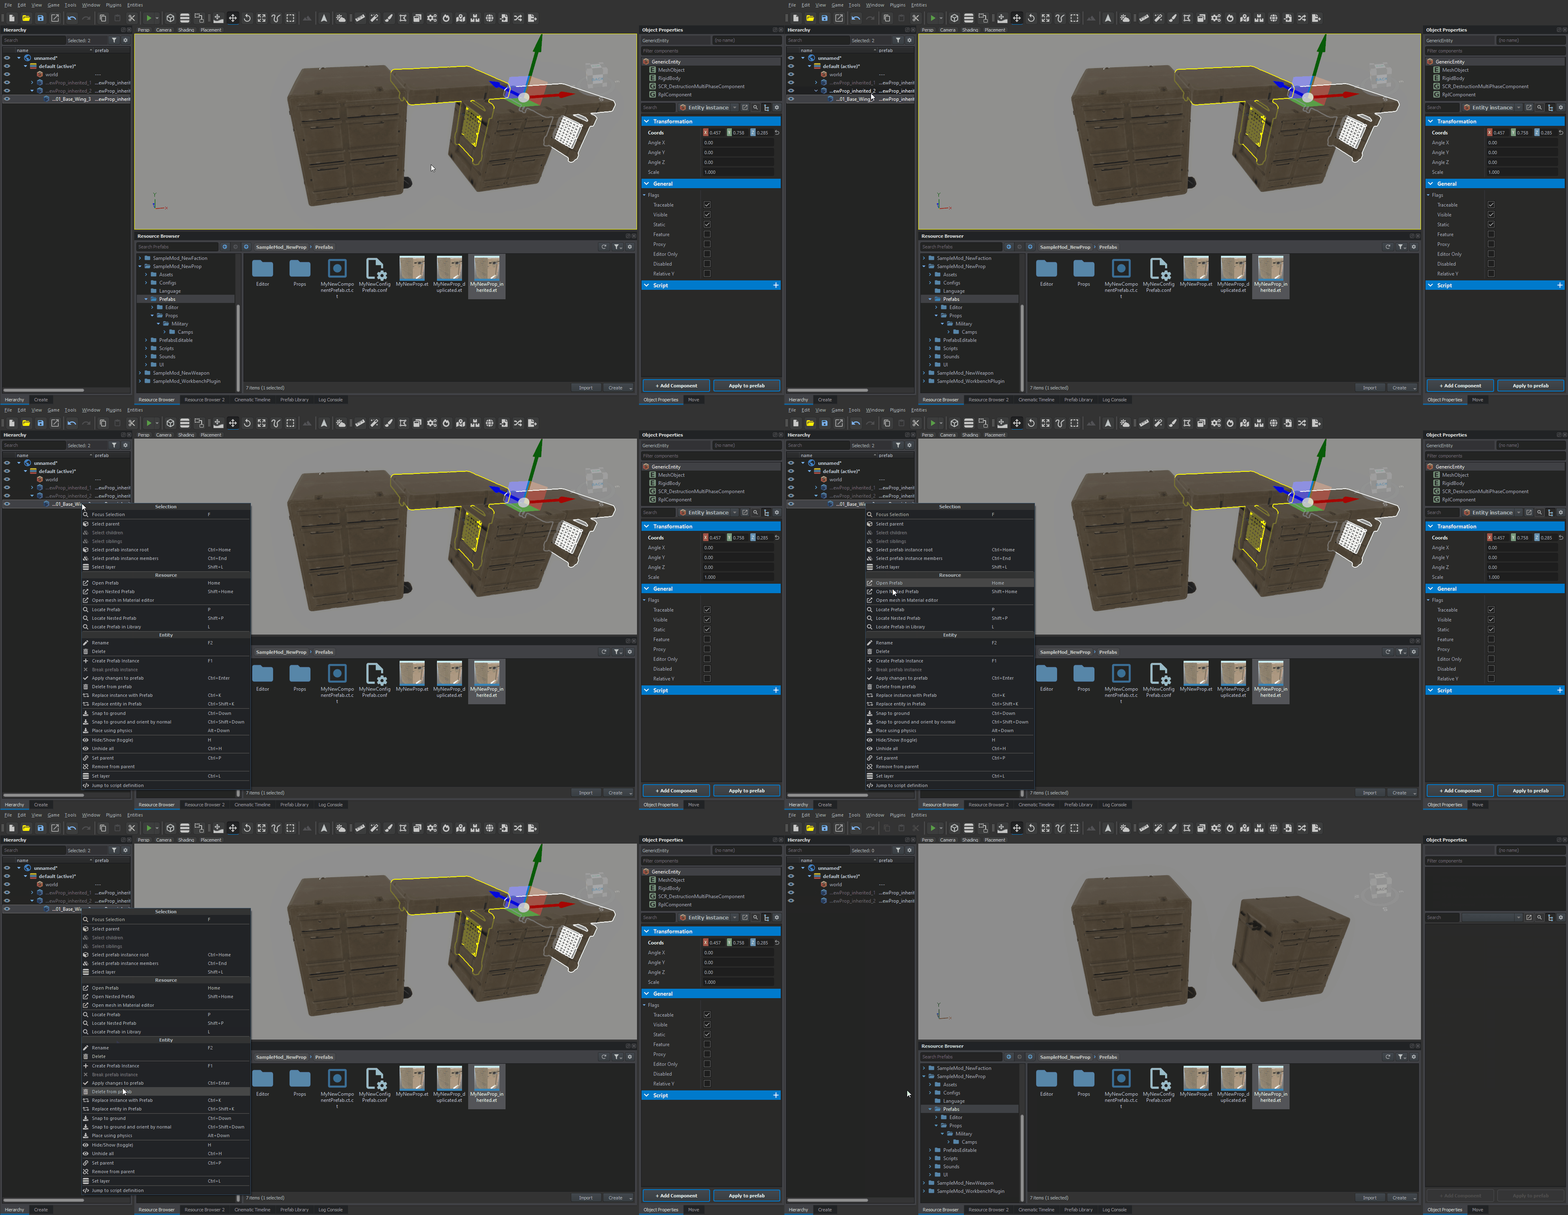
1) Select a prefab instance entity in map and use context menu action Delete from prefab.
Instancing entity prefab
There are three methods to do it.
Drag and drop prefab method
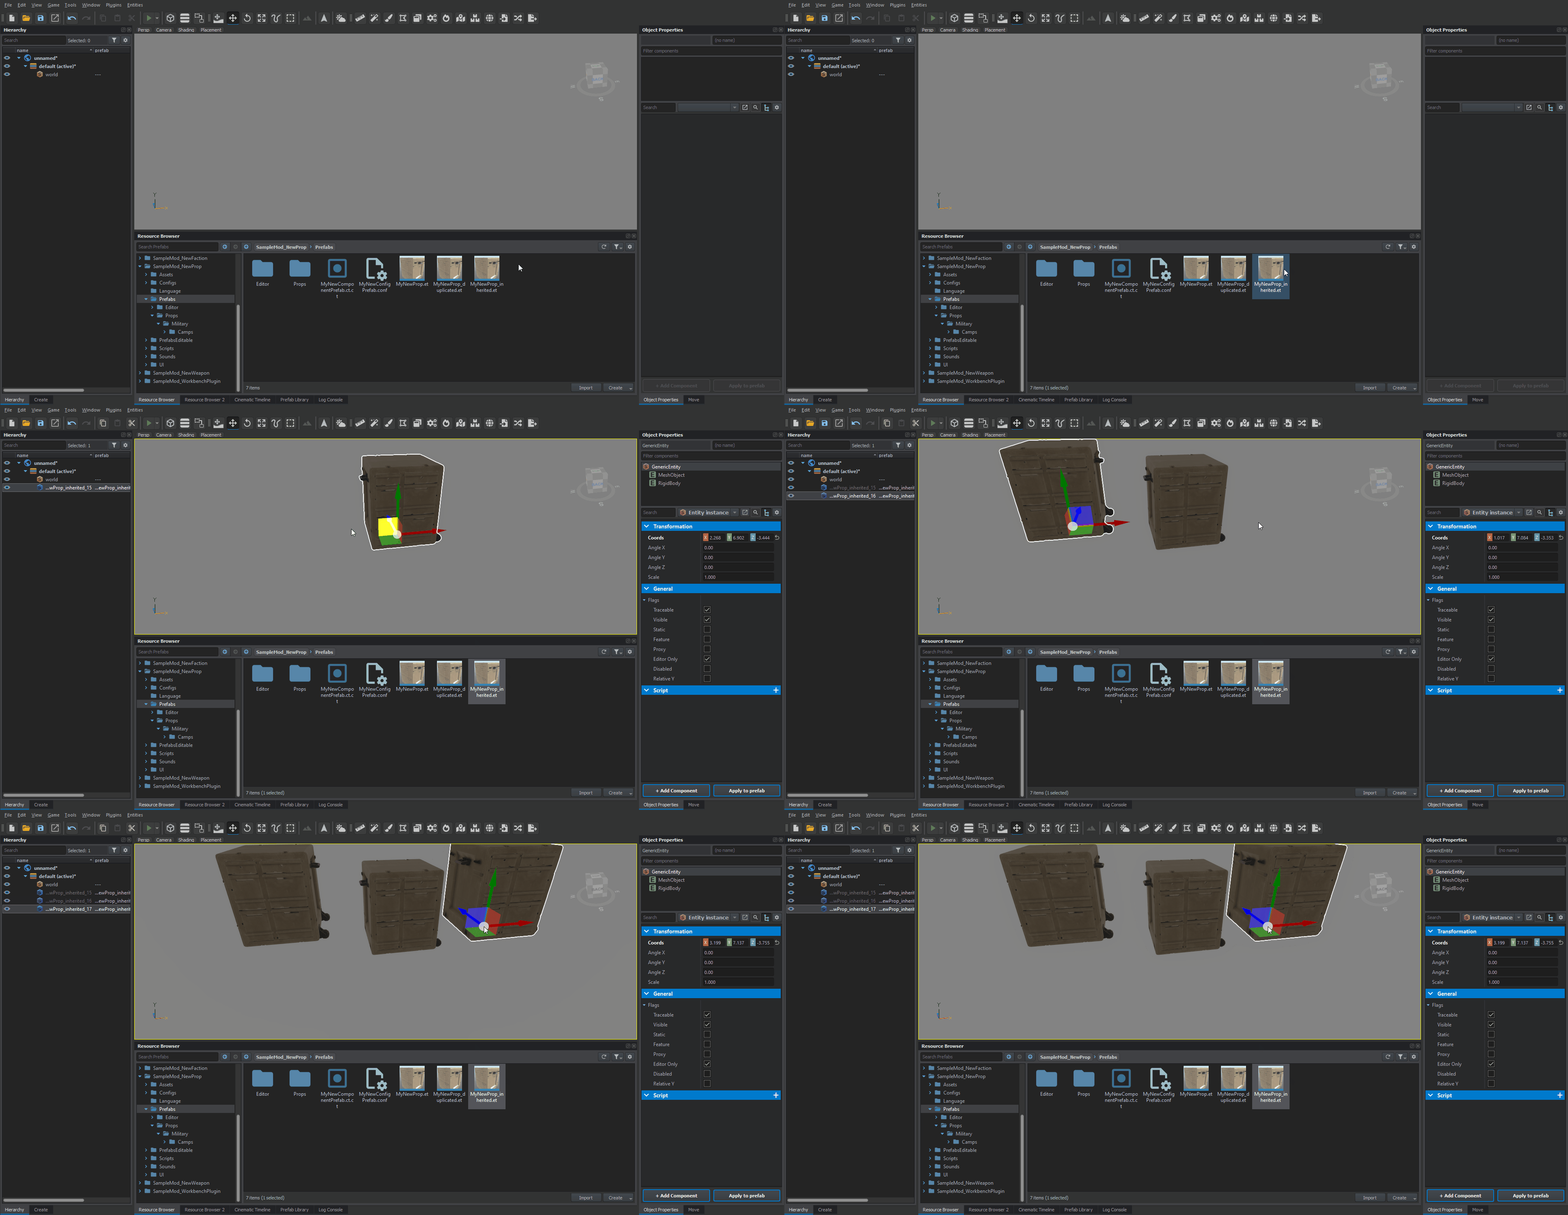
Drag prefab file icon from Resource browser window and drop it to Scene window as described in previous segment
F1 method
Select prefab in Resource browser window, place mouse cursor somewhere to scene and press F1 key. Prefab instance will be created at mouse cursor position. This method is very convenient when you want to place a lot of prefab instances repeatedly.
Copy & paste method
Use copy & paste functionality - ctrl+c & ctrl+v. Just copy an arbitrary prefab instance root entity and paste it to scene. Result will the same like method 1 or method 2 described above.
Instancing component prefab
See Component prefabs segment for more information
Instancing config object prefab
1) Select an arbitrary config object prefab file (.conf) in Resource browser window.
2) Drag config object prefab file item and drop it into a property grid window. You can drop it only to a compatible single object properties that have no assigned object yet or into an compatible object array.
3) After drop config an object prefab instance will be created. It's indicated by blue color icon.
Prefab instance identification:
There are few methods how to identify if entity is a member of some prefab instance or not.
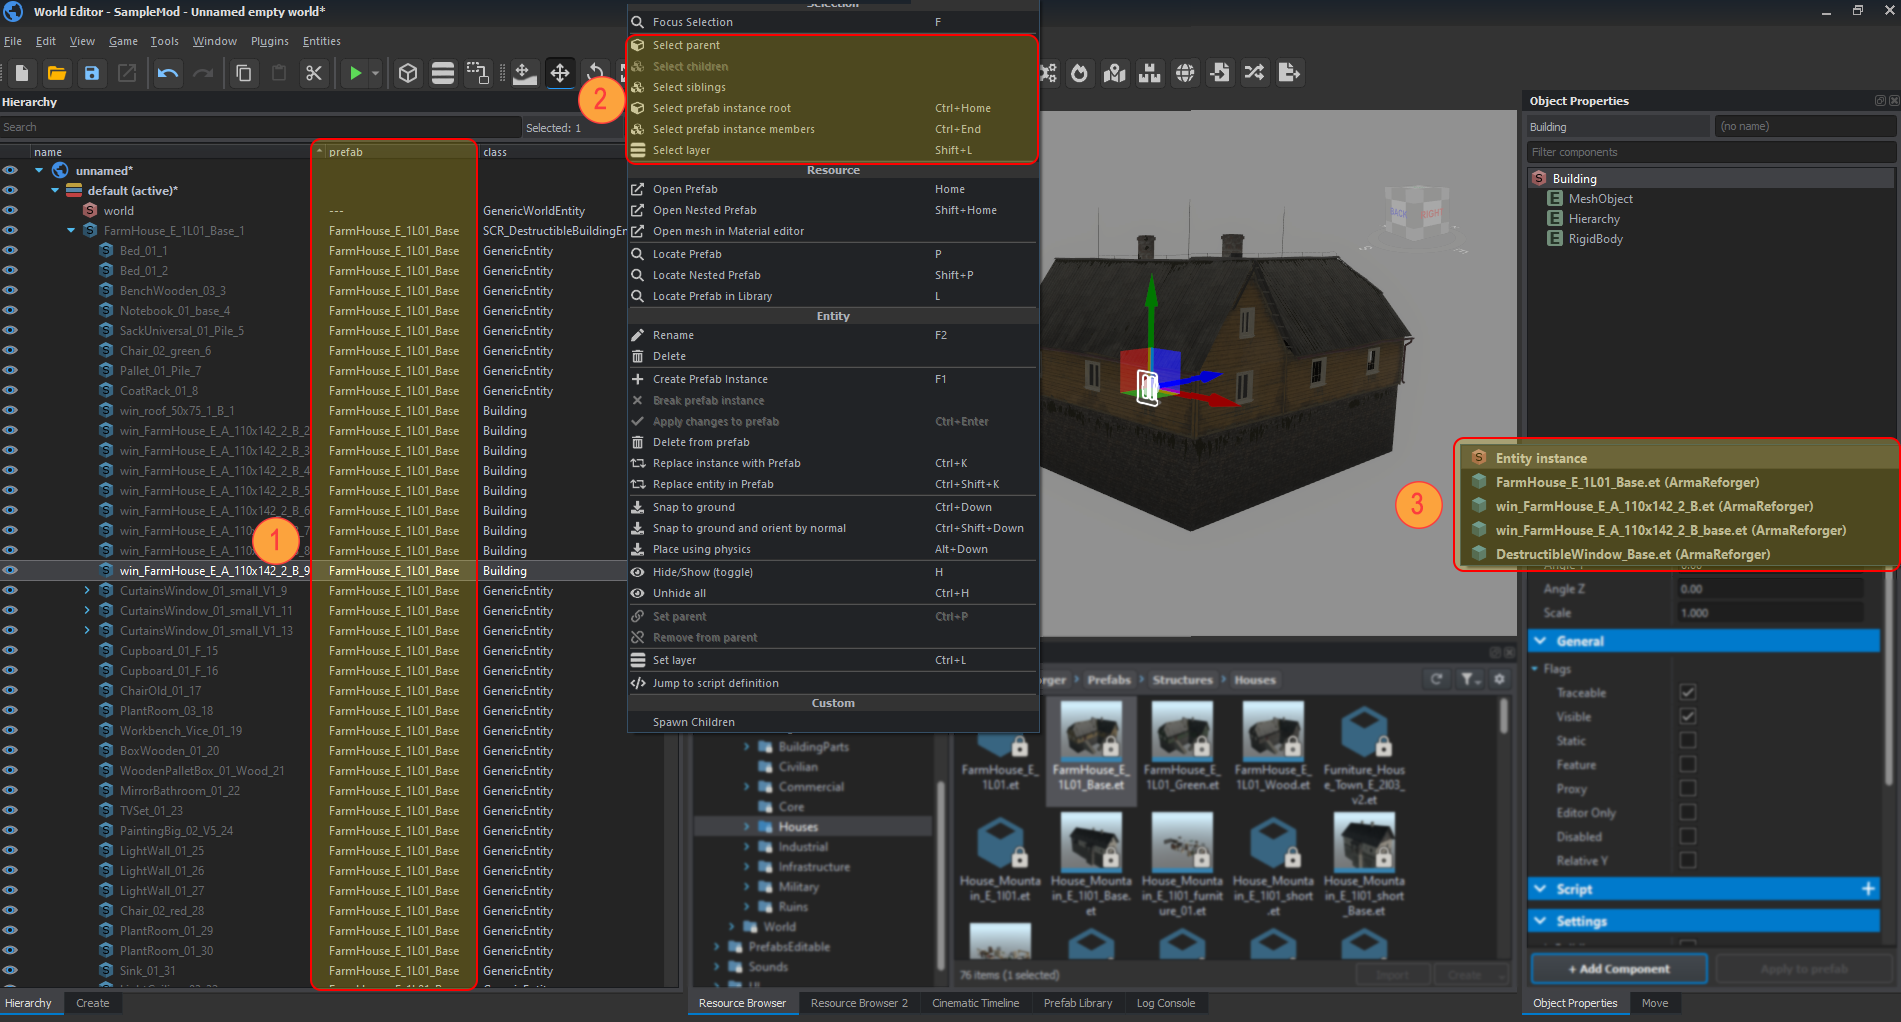
1) Prefab column in Hierarchy window contains prefab names of all entities in scene.
2) Some functions in context menu of Hierarchy window can help you identify a whole prefab instance.
- Select prefab instance root - Selects the root entity of the prefab instance form which is selected entity from.
- Select prefab instance members - Selects whole prefab instance (all prefab members).
- Show prefab in resource manager - Selects prefab file in Resource manager window. Using this you can see whole prefab instance in empty scene.
3) If you want to know which prefabs are inherited by some specific entity, you can see it in combo box of Object properties window.
Prefab overriding
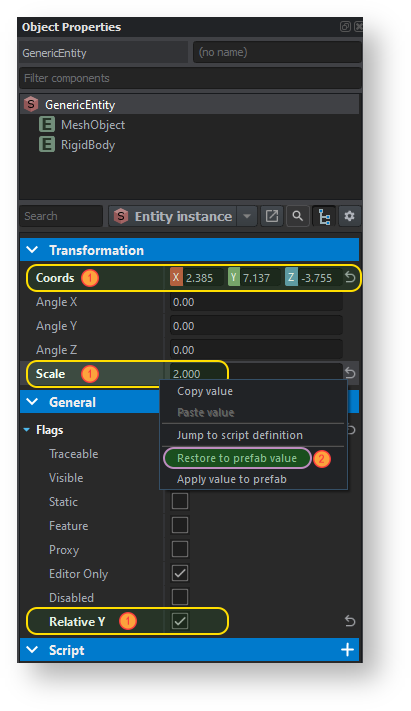
It's very important to know which parameters in prefab are overridden (stored in a prefab file). For this purpose there are property indicators in Object properties window. There's a simple rule. If property name is highlighted by bold font (1), then the property is overridden. If prefab inherits some other prefab then highlighted property indicates that property value overrides value of the inherited prefab. In case where prefab is a base (it does not inherit other prefab) highlighted property indicates that property value overrides a default value. It is also possible to revert user made changes in entity instance to prefab values by selecting Restore to prefab value (2) option from property context menu.
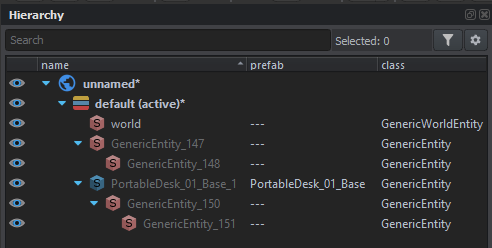
Second important thing is to know that some prefab parameter is overridden in a specific prefab instance in scene. Indicators of changed properties in Object properties window works for it as well, but in this case there are very useful another indicators in Hierarchy window.
this entity icon indicates that entity is not a prefab instance. It's just simple class instance.
this entity icon indicates that entity is a prefab instance.
Unprefabing
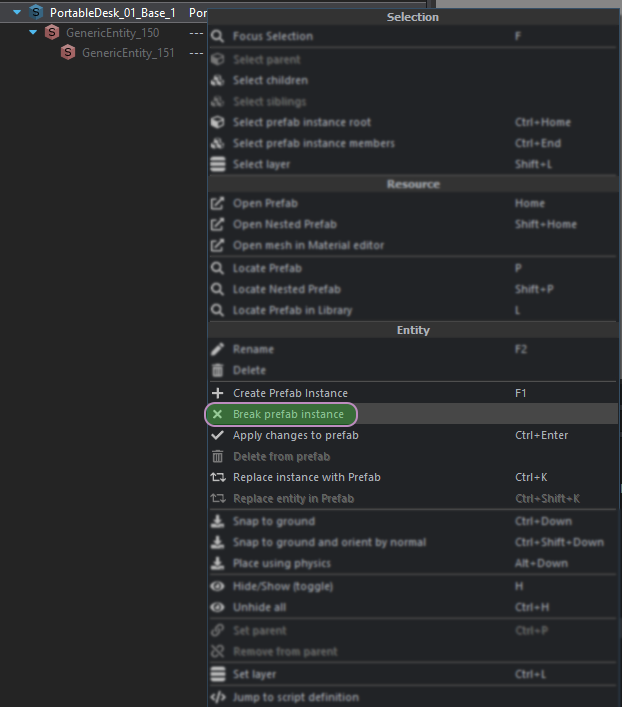
There is a possibility how to convert one or more prefab instances to normal entities without any links to prefabs. For this purpose you have to select just simple entity called prefab instance root and choose a Break prefab instance action from context menu (picture). That's all. Alternatively you can select more entities where are some prefab instances included and use a Break prefab instance action again. The action will affect all prefab instances inside selection.
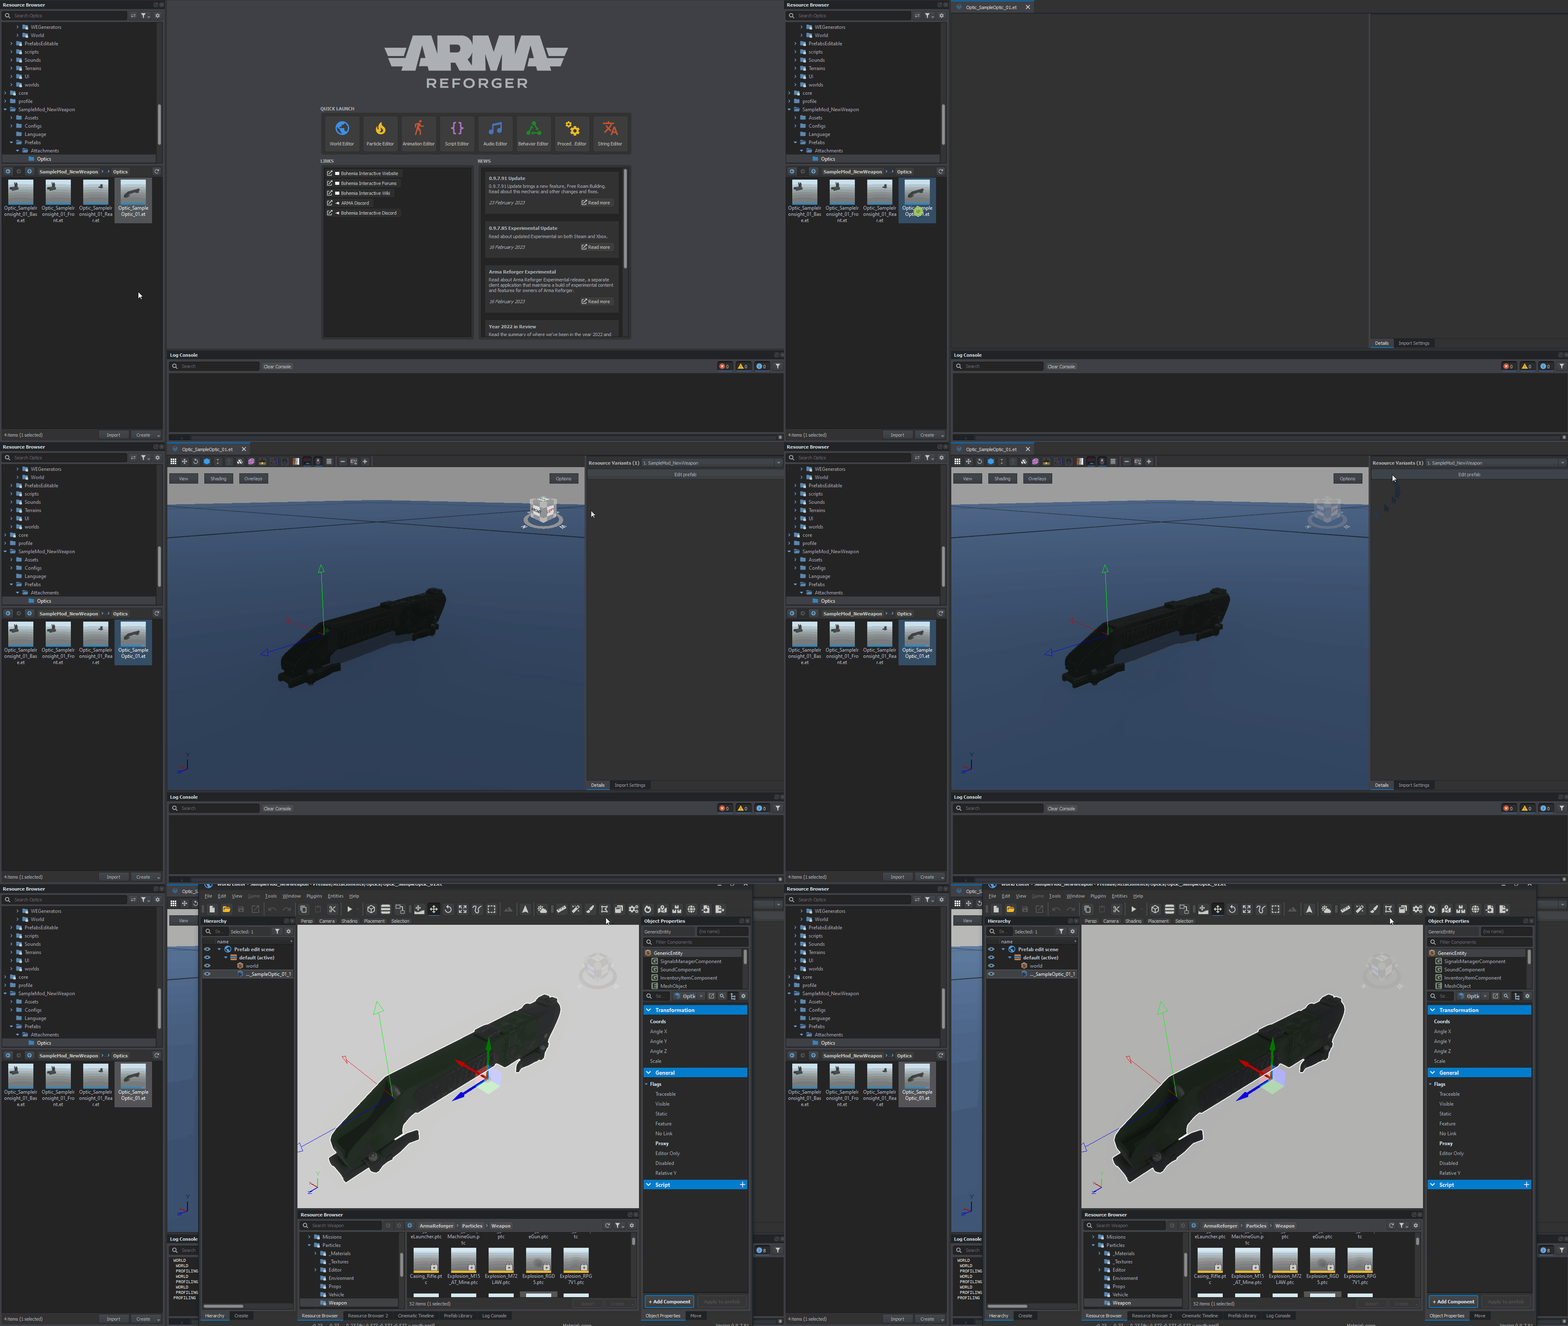
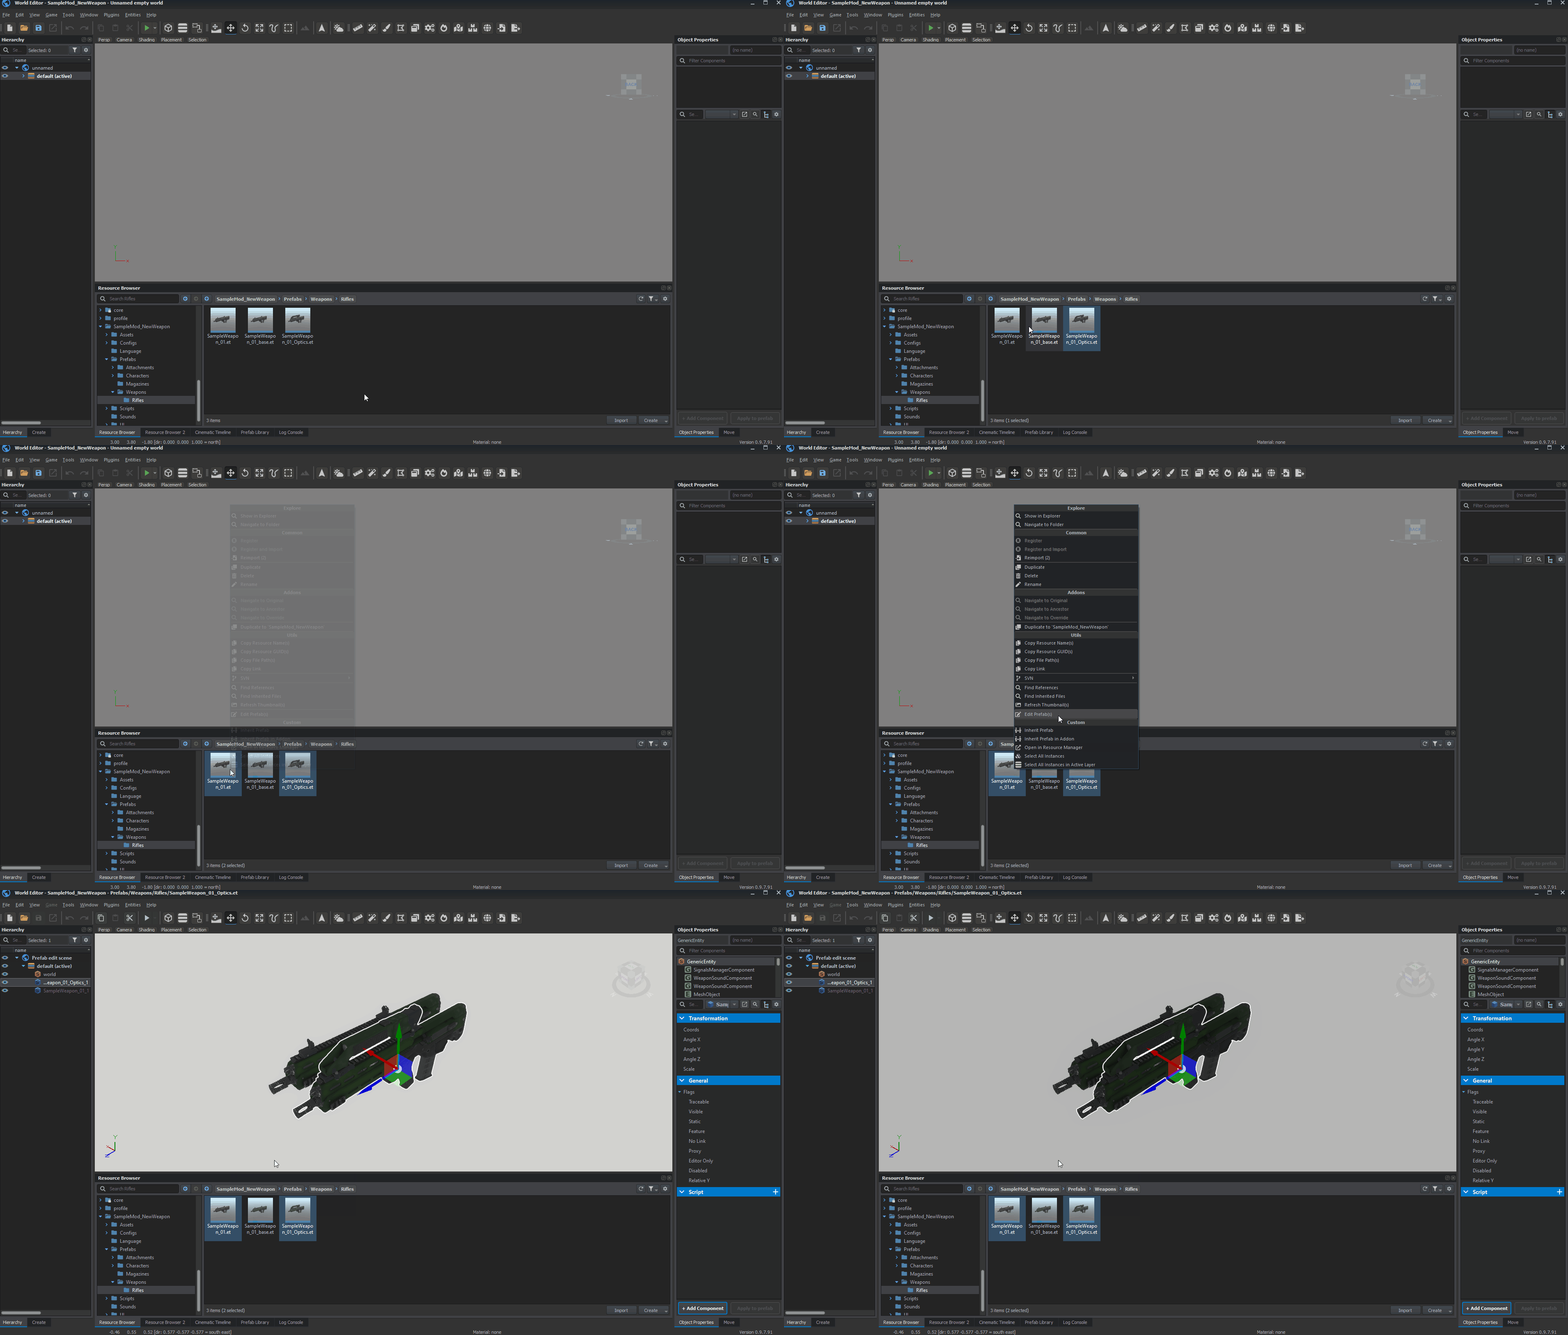
Opening prefab in Prefab Edit Mode
Prefabs can be opened in Prefab Edit Mode either via:
1) Edit prefab button if prefab is opened in Resource Manager
2) Using context menu option Edit prefab(s) available after clicking with ![]() on prefab(s) in Resource Browser. In this method it is possible to open multiple prefabs at once
on prefab(s) in Resource Browser. In this method it is possible to open multiple prefabs at once
