Multiplayer Custom Sounds Tutorial: Difference between revisions
michaelger (talk | contribs) m (→File location) |
Lou Montana (talk | contribs) m (Text replacement - "{{arma2}}" to "{{GameCategory|arma2|link= y}}") |
||
| (25 intermediate revisions by 6 users not shown) | |||
| Line 1: | Line 1: | ||
[[ | {{TOC|side}}{{GVI|arma1|1.00}}{{GVI|arma2|1.00}}{{GVI|arma3|1.00}} | ||
[[:Category:Operation Flashpoint|{{ofp}}]], [[:Category:ArmA: Armed Assault|{{arma1}}]], {{GameCategory|arma2|link= y}} and {{GameCategory|arma3|link= y}} support players having their own custom radio sounds in multiplayer which can be used to both amuse and annoy other players. However, many players make the mistake of using too high bitrates resulting in unnecessarily high file sizes causing extra lag and longer load/join times. The {{Link|https://en.wikipedia.org/wiki/Vorbis|Vorbis ("OGG")}} codec used by BIS handles low bitrates quite well resulting in small yet usable sound files. | |||
== File location == | == File location == | ||
Create a directory "''Sound''" in your players profile directory and place your OGG-files there. | Create a directory "''Sound''" in your players profile directory and place your OGG-files there. | ||
ArmA: | {| class="wikitable" | ||
! Game !! O/S !! Path | |||
|- | |||
| rowspan="2" | {{GVI|arma1|1.00}} | |||
| Windows XP || "''C:\Documents and Settings\UserName\My Documents\Arma (or Arma Other Profiles)\Sound''" | |||
|- | |||
| Windows Vista/7/8/10 || "''C:\Users\UserName\Documents\ArmA Other Profiles\PlayerName\Sound''" | |||
|- | |||
| rowspan="2" | {{GVI|arma2|1.00}} | |||
| Windows XP || "''C:\Documents and Settings\UserName\My Documents\Arma 2\Sound''" | |||
|- | |||
| Windows Vista/7/8/10 || "''C:\Users\UserName\Documents\Arma 2\Sound''" | |||
|- | |||
| rowspan="2" | {{GVI|arma3|1.00}} | |||
| Windows XP || "''C:\Documents and Settings\UserName\My Documents\Arma 3\Sound''" | |||
|- | |||
| Windows Vista/7/8/10 || "''C\:Users\UserName\Documents\Arma 3\Sound''" | |||
|} | |||
== Known restrictions == | == Known restrictions == | ||
*'''Filesize''': max. 50 KB (beside possible server-side restrictions) | * '''Filesize''': max. 50 KB (beside possible server-side restrictions) | ||
* '''Filetype''': OGG | |||
*'''Number of custom sounds''': max. 10 | |||
== Filename == | == Filename == | ||
Although there is no special restriction, the filename becomes the text which will be shown in the chat | Although there is no special restriction, the filename becomes the text which will be shown in the chat | ||
while you play your custom sound. So if | while you play your custom sound. So if your sound file says something | ||
like "I need a medic" then it would make sense to name your soundfile "I need a medic.ogg". | like "I need a medic" then it would make sense to name your soundfile "I need a medic.ogg". | ||
== How to use In-game== | |||
== How to use In-game == | |||
In Multiplayer use your custom sound radio menu (0-9-x) to play your custom sounds. "x" is the number of the listed sound file. So push | In Multiplayer use your custom sound radio menu (0-9-x) to play your custom sounds. "x" is the number of the listed sound file. So push | ||
*Key "0" | * Key "0" | ||
*Key "9" | * Key "9" | ||
*Key "x", where x is 0,1,2,3,4,5,6,7,8 or 9 | * Key "x", where x is 0,1,2,3,4,5,6,7,8 or 9 | ||
== Converting your custom sounds to OGG format == | |||
There are several tools to convert sound files to OGG. Let's explain the method with two of them: | There are several tools to convert sound files to OGG. Let's explain the method with two of them: | ||
* | * {{Link|http://audacity.sourceforge.net/|Audacity}} (Open Source), sound editor | ||
* | * {{Link|http://www.rarewares.org/ogg.html|oggdropXPd}} (Free to use), OGG converter only | ||
; Tips | |||
* Sampling rate of 44.1 kHz is OK. | * Sampling rate of 44.1 kHz is OK. | ||
* Stereo isn't really needed, and as benefit mono will reduce filesize | * Stereo isn't really needed, and as benefit mono will reduce filesize | ||
* For simulated radio transmissions 16 Bit sampling format is best. For better quality stay with 32 Bit, but consider the bigger filesize. | * For simulated radio transmissions 16 Bit sampling format is best. For better quality stay with 32 Bit, but consider the bigger filesize. | ||
==Audacity== | |||
#Load your soundfile into Audacity (File -> Open) | === Audacity === | ||
#Set bitrate if necessary (see Fig. 2) | |||
#Export to OGG-format (File -> Export to OGG) | # Load your soundfile into Audacity (File -> Open) | ||
# Set bitrate if necessary (see Fig. 2) | |||
# Export to OGG-format (File -> Export to OGG) | |||
{| | {| | ||
|[[ | | [[File:Audacity_main.jpg|thumb|'''Fig.1: Audacity''': Main window]] | ||
|[[ | | [[File:Audacity_bitrate.jpg|thumb|'''Fig.2: Audacity:''' Bitrate settings]] | ||
|[[ | | [[File:Audacity_settings.jpg|thumb|'''Fig.3: Audacity:''' Properties]] | ||
|} | |} | ||
'''Enhancements''' | '''Enhancements''' | ||
| Line 65: | Line 75: | ||
If your filesize as OGG is still bigger than 50 KB then you may consider to reduce the quality of your OGG file. Under "Edit -> Properties -> Fileformats" (see Fig. 3) you can set the quality of your OGG export from 0 to 10 (preset is 5). | If your filesize as OGG is still bigger than 50 KB then you may consider to reduce the quality of your OGG file. Under "Edit -> Properties -> Fileformats" (see Fig. 3) you can set the quality of your OGG export from 0 to 10 (preset is 5). | ||
==oggdropXPd== | === oggdropXPd === | ||
'''Remark''': Your original sound file has to be in WAV format. | '''Remark''': Your original sound file has to be in WAV format. | ||
# Download the newest version of | # Download the newest version of {{Link|http://www.rarewares.org/ogg.html|oggdropXPd}}. Extract and run the program. | ||
# Right click the oggdrop window and select encoding options. | # Right click the oggdrop window and select encoding options. | ||
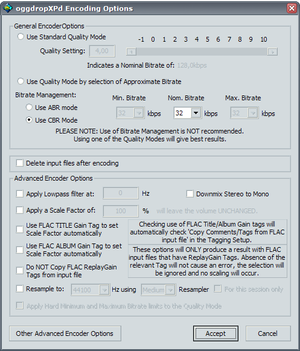
#Set you compression options, only the uppermost options are relevant in most cases. I personally prefer "Use CBR mode" and 32Kbits, it produces sufficient quality while keeping most of my short clips under 10KB. Click accept after you have chosen your options. | # Set you compression options, only the uppermost options are relevant in most cases. I personally prefer "Use CBR mode" and 32Kbits, it produces sufficient quality while keeping most of my short clips under 10KB. Click accept after you have chosen your options. | ||
#Now, drag your WAV file into the oggdrop main window and an .ogg file should be generated into the same directory where the origal WAV file is located. Play the .ogg file with an audio player just to make sure it | # Now, drag your WAV file into the oggdrop main window and an .ogg file should be generated into the same directory where the origal WAV file is located. Play the .ogg file with an audio player just to make sure it is working. | ||
#Move the resulting .ogg file into your user folder's "'' | # Move the resulting .ogg file into your user folder's "''Sound''" subfolder. | ||
{| | {| | ||
|[[ | |[[File:Step3.png|thumb|'''Fig.4: oggdropXPd''': Selecting the encoding options.]] | ||
|[[ | |[[File:Step4.png|thumb|'''Fig.5: oggdropXPd''': Setting your encoding options]] | ||
|} | |} | ||
==Useful links== | |||
*[http://www.brickfilms.com/index.php?action=tutorials&op=view&tutorialname=Radio%20Transmission%20Sound%20Effect%20in%20Audacity Radio transmissions sound effects in Audacity] | == Useful links == | ||
*[http://wiki.audacityteam.org/index.php?title=Audacity_Wiki_Home_Page Audacity Wiki] | |||
* [http://www.brickfilms.com/index.php?action{{=}}tutorials&op{{=}}view&tutorialname{{=}}Radio%20Transmission%20Sound%20Effect%20in%20Audacity Radio transmissions sound effects in Audacity] | |||
* [http://wiki.audacityteam.org/index.php?title{{=}}Audacity_Wiki_Home_Page Audacity Wiki] | |||
[[Category: | |||
[[Category:Arma Scripting Tutorials|Multiplayer Custom Sounds Tutorial]] | |||
Latest revision as of 13:01, 19 March 2024
Operation Flashpoint, Armed Assault, Arma 2 and Arma 3 support players having their own custom radio sounds in multiplayer which can be used to both amuse and annoy other players. However, many players make the mistake of using too high bitrates resulting in unnecessarily high file sizes causing extra lag and longer load/join times. The Vorbis ("OGG") codec used by BIS handles low bitrates quite well resulting in small yet usable sound files.
File location
Create a directory "Sound" in your players profile directory and place your OGG-files there.
| Game | O/S | Path |
|---|---|---|
| Windows XP | "C:\Documents and Settings\UserName\My Documents\Arma (or Arma Other Profiles)\Sound" | |
| Windows Vista/7/8/10 | "C:\Users\UserName\Documents\ArmA Other Profiles\PlayerName\Sound" | |
| Windows XP | "C:\Documents and Settings\UserName\My Documents\Arma 2\Sound" | |
| Windows Vista/7/8/10 | "C:\Users\UserName\Documents\Arma 2\Sound" | |
| Windows XP | "C:\Documents and Settings\UserName\My Documents\Arma 3\Sound" | |
| Windows Vista/7/8/10 | "C\:Users\UserName\Documents\Arma 3\Sound" |
Known restrictions
- Filesize: max. 50 KB (beside possible server-side restrictions)
- Filetype: OGG
- Number of custom sounds: max. 10
Filename
Although there is no special restriction, the filename becomes the text which will be shown in the chat while you play your custom sound. So if your sound file says something like "I need a medic" then it would make sense to name your soundfile "I need a medic.ogg".
How to use In-game
In Multiplayer use your custom sound radio menu (0-9-x) to play your custom sounds. "x" is the number of the listed sound file. So push
- Key "0"
- Key "9"
- Key "x", where x is 0,1,2,3,4,5,6,7,8 or 9
Converting your custom sounds to OGG format
There are several tools to convert sound files to OGG. Let's explain the method with two of them:
- Audacity (Open Source), sound editor
- oggdropXPd (Free to use), OGG converter only
- Tips
- Sampling rate of 44.1 kHz is OK.
- Stereo isn't really needed, and as benefit mono will reduce filesize
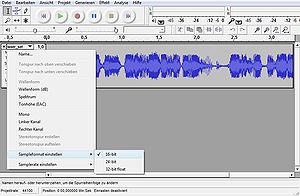
- For simulated radio transmissions 16 Bit sampling format is best. For better quality stay with 32 Bit, but consider the bigger filesize.
Audacity
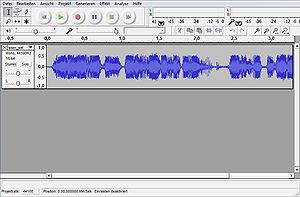
- Load your soundfile into Audacity (File -> Open)
- Set bitrate if necessary (see Fig. 2)
- Export to OGG-format (File -> Export to OGG)
Enhancements
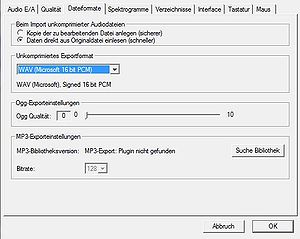
If your filesize as OGG is still bigger than 50 KB then you may consider to reduce the quality of your OGG file. Under "Edit -> Properties -> Fileformats" (see Fig. 3) you can set the quality of your OGG export from 0 to 10 (preset is 5).
oggdropXPd
Remark: Your original sound file has to be in WAV format.
- Download the newest version of oggdropXPd. Extract and run the program.
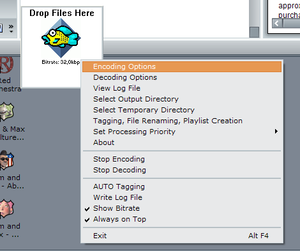
- Right click the oggdrop window and select encoding options.
- Set you compression options, only the uppermost options are relevant in most cases. I personally prefer "Use CBR mode" and 32Kbits, it produces sufficient quality while keeping most of my short clips under 10KB. Click accept after you have chosen your options.
- Now, drag your WAV file into the oggdrop main window and an .ogg file should be generated into the same directory where the origal WAV file is located. Play the .ogg file with an audio player just to make sure it is working.
- Move the resulting .ogg file into your user folder's "Sound" subfolder.

