Game Editor (Workbench) Entity Editing: Difference between revisions
Lou Montana (talk | contribs) m (Text replacement - "[[Image:" to "[[File:") |
|||
| (12 intermediate revisions by 3 users not shown) | |||
| Line 1: | Line 1: | ||
== Entity Editing == | == Entity Editing == | ||
In basis it | In basis it is a mainly about manipulation with entities, their properties and their scripts. The main windows when you work with entities are: | ||
* Entity Manipulation tool | * Entity Manipulation tool | ||
| Line 10: | Line 10: | ||
==== Inserting a basic entity ==== | ==== Inserting a basic entity ==== | ||
In Entity List window is a bookmark "Create". There is a list of all entities which can be putted in, it | In Entity List window is a bookmark "Create". There is a list of all entities which can be putted in, it is sorted by their type. To put entity in just use a drag & drop function. | ||
==== Insert entity from template ==== | ==== Insert entity from template ==== | ||
| Line 34: | Line 34: | ||
=== Entity Manipulation tool === | === Entity Manipulation tool === | ||
[[File:Entities_CurrentTool.jpg|thumb|]] | [[File:Entities_CurrentTool.jpg|thumb|]] | ||
<br | <br> | ||
[[ | [[File:Tool_Entity.jpg]] Icon of the tool. <br> | ||
There are two basic modes of manipulation: | There are two basic modes of manipulation: | ||
<br | <br> | ||
* '''Ground''' | * '''Ground''' | ||
| Line 58: | Line 58: | ||
Use bounding box insted collision envelope. | Use bounding box insted collision envelope. | ||
==== Create new only in selected layer ==== | |||
Obsolete | |||
==== Snap to grid ==== | ==== Snap to grid ==== | ||
Very useful when entity is needed to be seted exactly next to other entity (both entities have to be seted with this option on). | Very useful when entity is needed to be seted exactly next to other entity (both entities have to be seted with this option on). | ||
==== Snap to grid individually ==== | |||
Works only when you have selected more entities. | |||
If checked every entity in selection will be placed by the grid, else only the main entity in selection (the one with visualizer ) will by placed on the grid. | |||
==== Snap in vertical axis ==== | ==== Snap in vertical axis ==== | ||
Snaping to the grid can be 3D -> this will enable it. | |||
==== Lock child offsets ==== | ==== Lock child offsets ==== | ||
When you moving with entities using ground tool, the parented entities changing offset from the parent ( offset is 3D ) if you don't want this, check this up. | |||
==== Snap to ground ==== | ==== Snap to ground ==== | ||
| Line 85: | Line 88: | ||
{| class="wikitable" | {| class="wikitable" | ||
| | |- | ||
!colspan="2"|ShortCuts | |||
|- | |- | ||
| Line 116: | Line 120: | ||
List of all inserted entities in the world (with the world itself). You can sort the entities by Name, template, class, layer or spawnlayer. Context Menu: | List of all inserted entities in the world (with the world itself). You can sort the entities by Name, template, class, layer or spawnlayer. Context Menu: | ||
Look On <br | Look On <br> | ||
Delete <br | Delete <br> | ||
Rename <br | Rename <br> | ||
Copy <br | Copy <br> | ||
Add Childs To Selection <br | Add Childs To Selection <br> | ||
Edit Scripts <br | Edit Scripts <br> | ||
==== Selected ==== | ==== Selected ==== | ||
List of just selected entities <br | List of just selected entities <br> | ||
Context Menu: <br | Context Menu: <br> | ||
Same as previous but: <br | Same as previous but: <br> | ||
<br | <br> | ||
Add Childs To Selection <br | Add Childs To Selection <br> | ||
Edit Scripts <br | Edit Scripts <br> | ||
Unselect <br | Unselect <br> | ||
Unselect all except this <br | Unselect all except this <br> | ||
Get Selected Count <br | Get Selected Count <br> | ||
==== Create ==== | ==== Create ==== | ||
List of all entities which can be placed in the world. <br | List of all entities which can be placed in the world. <br> | ||
No Context Menu available. <br | No Context Menu available. <br> | ||
Entities can be placed into the world by drag and drop. <br | Entities can be placed into the world by drag and drop. <br> | ||
==== Layers ==== | ==== Layers ==== | ||
Every entity can have a layer defined. It can be defined in Entity Template Manager. <br | Every entity can have a layer defined. It can be defined in Entity Template Manager. <br> | ||
Here you can show/hide all entities from each layer. <br | Here you can show/hide all entities from each layer. <br> | ||
==== SpawnLayers ==== | ==== SpawnLayers ==== | ||
| Line 148: | Line 152: | ||
=== Entity Selection === | === Entity Selection === | ||
[[File:Entities_Properties.jpg|thumb|]] | [[File:Entities_Properties.jpg|thumb|]] | ||
Details of selected entity. <br | Details of selected entity. <br> | ||
<br | <br> | ||
'''Properties tab:''' <br | '''Properties tab:''' <br> | ||
Basics: Coords, Angle, Angle2, Angle3. <br | Basics: Coords, Angle, Angle2, Angle3. <br> | ||
Additional: Specific for each entity type. <br | Additional: Specific for each entity type. <br> | ||
<br | <br> | ||
'''Scripts tab:''' Double Click on Event to Open Game Script Pane and start write script. | '''Scripts tab:''' Double Click on Event to Open Game Script Pane and start write script (only named entity can be scripted). | ||
Latest revision as of 23:11, 20 November 2023
Entity Editing
In basis it is a mainly about manipulation with entities, their properties and their scripts. The main windows when you work with entities are:
- Entity Manipulation tool
- Entities
- Entity Selection
Insert an Entity
There are a three possibilities how to insert entity into to world.
Inserting a basic entity
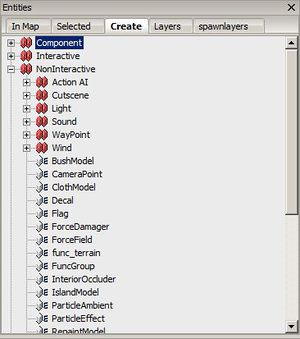
In Entity List window is a bookmark "Create". There is a list of all entities which can be putted in, it is sorted by their type. To put entity in just use a drag & drop function.
Insert entity from template
Entity from the Template Manager can also inserted by the drag & drop but also with the "T" key ( with the some entity selected in template manager). Your cursor have to be above some geometry to place the entity this way.
Insert entity by paste
You can copy already inserted entity a then than paste it. There two inserting options:
- Ctrl+V
Entity will be placed on cursor position in the Content Window
- Ctrl+Q
Entity(es) will be placed on exactly same place as the copied entity(es). You can not see on the firt that the entities are over each other.
Select an Entity
Inserted entities can be selected in Entites List or Content Window (Entity manipulation tool have to be selected). In both types you can select more entities and make a selection. In content window you can click (LMB) with holding the SHIFT key or holding LMB and mouse drag. If you click or drag with shift on already selected entity it will unselect it. Unselect of all entities can be made by doublick.
Focus in selection
In selection is always one entity with focus. This entity is marked by white color (the others are yellow). This entity has different behavoiur in different situations (center of rotation for example ). For the change of the entity with focus you can just click (not with SHIFT) on an other entity in selection.
Entity Manipulation tool
![]() Icon of the tool.
Icon of the tool.
There are two basic modes of manipulation:
- Ground
The vizualizer show as small blue thing on the pivot of entity. You can catch the entity and move with it and its stays on the ground.
- Exact
In this mode you can rotate with entity around all axis and change the manipulation tool oriented space (world, entity-local, parent entity ).
Common rotate origin
If checked the entities will rotate around own their z axis. If unchecked the entities will rotate around the z axis of the focused entity (from selection).
Entities as ground
When you placing new entity into the world, with this option checked, the new enitity will be placed on another entity.
Water as ground
Same as entities above.
Place new by bound box
Use bounding box insted collision envelope.
Create new only in selected layer
Obsolete
Snap to grid
Very useful when entity is needed to be seted exactly next to other entity (both entities have to be seted with this option on).
Snap to grid individually
Works only when you have selected more entities. If checked every entity in selection will be placed by the grid, else only the main entity in selection (the one with visualizer ) will by placed on the grid.
Snap in vertical axis
Snaping to the grid can be 3D -> this will enable it.
Lock child offsets
When you moving with entities using ground tool, the parented entities changing offset from the parent ( offset is 3D ) if you don't want this, check this up.
Snap to ground
All selected entities will be placed on the ground (terrain). Doesn't matter if they’re under or above the terrain. The positioing is not made by physics nor bounding boxes. Its just place the pivot of the entity on the ground.
Move physically
The selected entities must be above the terrain, because this option just work like physical fall. And its takes some time before the fallen entities calm down.
Numeric move
(offset) Will move the selected entities for given offset and direction.
Insert with angles
Will insert the entity from entity template manager with randomized angles or with offset.
| ShortCuts | |
|---|---|
| Ctrl + A | Switch ground a exact mod |
| Shift + LMB On Vizualizer | Rotate with entity |
| Ctrl + LMB On Vizualizer in ground mode | Vertical movement with entity |
| Ctrl + down arrow | Snap entities to the ground |
| T + mouse cursor above terrain | Insert entity into map from template manager |
Entities
In Map
List of all inserted entities in the world (with the world itself). You can sort the entities by Name, template, class, layer or spawnlayer. Context Menu:
Look On
Delete
Rename
Copy
Add Childs To Selection
Edit Scripts
Selected
List of just selected entities
Context Menu:
Same as previous but:
Add Childs To Selection
Edit Scripts
Unselect
Unselect all except this
Get Selected Count
Create
List of all entities which can be placed in the world.
No Context Menu available.
Entities can be placed into the world by drag and drop.
Layers
Every entity can have a layer defined. It can be defined in Entity Template Manager.
Here you can show/hide all entities from each layer.
SpawnLayers
There can be more than one mission on one island and the missions are defined as spawn layers. In spawnLayers you can show/hide each spawnlayer itself. It's good for better overview.
Entity Selection
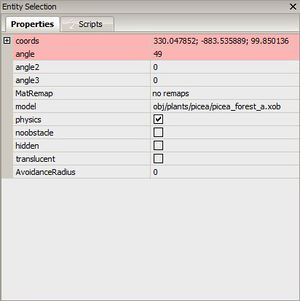
Details of selected entity.
Properties tab:
Basics: Coords, Angle, Angle2, Angle3.
Additional: Specific for each entity type.
Scripts tab: Double Click on Event to Open Game Script Pane and start write script (only named entity can be scripted).


