Game Editor (Workbench) HeightMap Editing: Difference between revisions
(Created page with "= HeightMap Editing = == Basic Tools == right === Add === Move terrain higher ( LMB ) or lower ( alt + LMB ) depending of strength of the tool. ==...") |
Lou Montana (talk | contribs) m (Text replacement - "<br/>" to "<br>") |
||
| Line 23: | Line 23: | ||
* '''Strength''' designates how much the tool will modify the original data. | * '''Strength''' designates how much the tool will modify the original data. | ||
On the image you can see how these parameters are visualize in editor ( for the round tool ) <br | On the image you can see how these parameters are visualize in editor ( for the round tool ) <br> | ||
[[File:HeightMap_ToolVizualization.jpg]] | [[File:HeightMap_ToolVizualization.jpg]] | ||
| Line 70: | Line 70: | ||
[[File:HeightMap_constraintsSelected.jpg|right]] | [[File:HeightMap_constraintsSelected.jpg|right]] | ||
Here you can ( if you check up the box ) set the limits for editing. <br | Here you can ( if you check up the box ) set the limits for editing. <br> | ||
The limits are active only when the window is open. | The limits are active only when the window is open. | ||
<br | <br> | ||
<br | <br> | ||
<br | <br> | ||
<br | <br> | ||
<br | <br> | ||
<br | <br> | ||
<br | <br> | ||
<br | <br> | ||
<br | <br> | ||
<br | <br> | ||
== Editing Speed == | == Editing Speed == | ||
It's time between apply iterations (while holding LMB for example ).<br | It's time between apply iterations (while holding LMB for example ).<br> | ||
For better experience not change the value. :) | For better experience not change the value. :) | ||
Latest revision as of 13:34, 14 March 2020
HeightMap Editing
Basic Tools
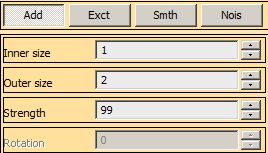
Add
Move terrain higher ( LMB ) or lower ( alt + LMB ) depending of strength of the tool.
Exct
This tool set the terrain height onto exact value. The value is set by strength of tool. You can use the “X†key which automatically change any other height editing tool into this one and set the strength value taken from height under mouse cursor.
Smth
Used this tool for smoothing the local terrain spikes (holes) etc. The tool strength is count of iterations ( of Gauss smoothing ).
Nois
Add local random noise, on strength depending the maximum of random value.
Tools Parameters
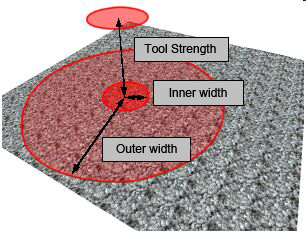
Each tool is defined by his outer width, inner width, strength, shape outline and progression between inner and outer width.
- Outer width designates tool influence (behind the edge the modification has no influence at all ).
- Inner width designates area of max influence (given by the tool strength)
- Strength designates how much the tool will modify the original data.
On the image you can see how these parameters are visualize in editor ( for the round tool )

| ShortCuts | |
|---|---|
| Ctrl + LMB + Mouse Up | Increase Strength |
| Ctrl + LMB + Down | Decrease Strength |
| Ctrl + Wheel Up | Increase Inner and Outer Range of the tool |
| Ctrl + Wheel Down | Decrease Inner and Outer Range of the tool |
| Ctrl + RMB + Mouse Up | Increase Outer Range of the tool |
| Ctrl + RMB + Mouse Down | Decrease Outer Range of the tool |
Tools Shape
You can also set the tool shape, you can use predefined ones ( Round or Square ). Or you can make you own shape and load it through the user option. Supported files types are: PNG, BMP, RAW.
Tools Edge
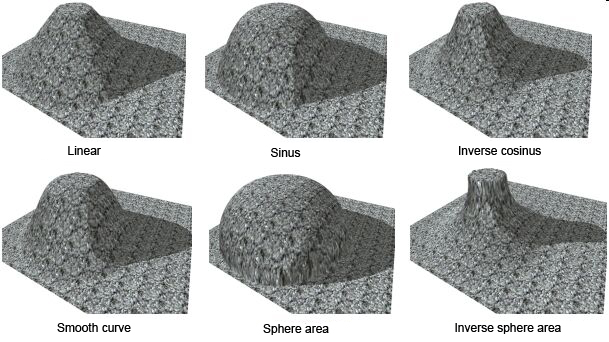
Using the right edge of tool can helps a lot while editing. It's actually behaviour of the function between inner and outer width of tool. As was written above inner width designates max influence of the tool and outer width max distance. So we can say that the terrain data out of the outer width is affected by 0 x strength of tool and data which are closer than inner width is affected by 1 x strength of tool. The data is interpolated between them (by the selected curve).
Constraints
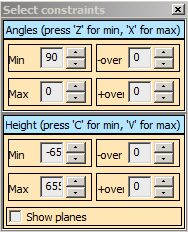
Here you can ( if you check up the box ) set the limits for editing.
The limits are active only when the window is open.
Editing Speed
It's time between apply iterations (while holding LMB for example ).
For better experience not change the value. :)


