RoF/Sandbox – User
m (added another error) |
m (fixed link) |
||
| Line 14: | Line 14: | ||
[[File:arma3-bad texel mapping.png|left|thumb]] | [[File:arma3-bad texel mapping.png|left|thumb]] | ||
| Line 60: | Line 61: | ||
[[File:arma3-texture layer.png|left|thumb]] | [[File:arma3-texture layer.png|left|thumb]] | ||
| Line 140: | Line 142: | ||
See image example of how to match L3DT to Terrain Builder Mapframe, so images are high resolution and avoiding bad texel mapping error. | See image example of how to match L3DT to Terrain Builder Mapframe, so images are high resolution and avoiding bad texel mapping error. | ||
[[File:arma3-l3dt to tb mapframe.png|left|thumb]] | [[File:arma3-l3dt to tb mapframe.png|left|thumb]] | ||
| Line 189: | Line 192: | ||
Eden has this feature built in BUT it's broke on certain rotations. Use the mod | Eden has this feature built in BUT it's broke on certain rotations. Use the mod [https://steamcommunity.com/sharedfiles/filedetails/?id=1174073713 E2TB] instead. | ||
Export your objects in Eden using scenario > export > export to Terrain Builder (E2TB, absolute position). It will then save the objects to your clipboard, open notepad and paste them into a new file and save as Whatever_name_you_want.txt | Export your objects in Eden using scenario > export > export to Terrain Builder (E2TB, absolute position). It will then save the objects to your clipboard, open notepad and paste them into a new file and save as Whatever_name_you_want.txt | ||
| Line 195: | Line 198: | ||
Open your terrain in Terrain Builder, go to Layers Manager > Objects > Add New Layer. If you don't see Layer Manager, go to Toolbar > Window > Layers Manager. | Open your terrain in Terrain Builder, go to Layers Manager > Objects > Add New Layer. If you don't see Layer Manager, go to Toolbar > Window > Layers Manager. | ||
With the new layer selected, go to File > Import > Objects. Select your .txt file you saved. Click advanced and use relative or absolute depending on what you exported using E2TB. In this case we used absolute position. | |||
{{Feature|informative|If you drag the .txt file into Terrain Builder, it will always import as relative!}} | {{Feature|informative|If you drag the .txt file into Terrain Builder, it will always import as relative!}} | ||
==Dialog - TxTImport - Wrong file format or source template not found== | ==Dialog - TxTImport - Wrong file format or source template not found== | ||
| Line 210: | Line 214: | ||
Import objects to the new layer, then right click object layer > show info. | Import objects to the new layer, then right click object layer > show info. | ||
[[File:arma3-tb objects context menu.png|left|thumb]] | [[File:arma3-tb objects context menu.png|left|thumb]] | ||
| Line 264: | Line 270: | ||
Find the missing object(s) on the P drive and add it to your template library. Import the .txt file again until you no longer receive the error. To avoid the risk of duplicate objects, clear the layer and re-import the .txt file. | Find the missing object(s) on the P drive and add it to your template library. Import the .txt file again until you no longer receive the error. To avoid the risk of duplicate objects, clear the layer and re-import the .txt file. | ||
== Heightmap / Shapes etc not showing in Terrain Builder == | |||
Todo | |||
== Adding water to your terrain == | |||
Todo | |||
Revision as of 14:34, 26 September 2024
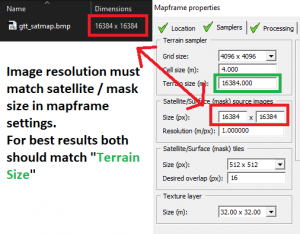
Error: Layers generation - Bad texel mapping for surface mask image
This tends to be caused by your image files having the wrong image resolution for satellite / mask, compared to what you have in mapframe settings.
Open Terrain Builder and double click your project in the Mapframes panel. If you don't see Mapframes panel, make sure it's enabled in Window > Mapframe View.
In the Mapframe window, click the Samplers tab. Compare the size of the "Satellite / Surface (mask) source images" and make sure your images resolution matches it. For the best visual results in the game, the size should match the "Terrain Size".
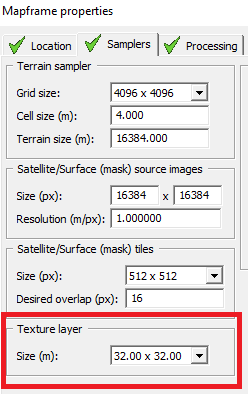
Error: LandGrid reference exceeded the range [1024, 1024], it is [1337, 123]
(numbers are different depending on your map)
The Texture Layer in the Mapframe settings is incorrect. You should aim to get as close to 40 x 40 as possible. Having the wrong Texture Layer size can break AI and physics.
For large terrains with a cell size larger than 10, it's recommended to be 4 x cell size. So if cell size is 20, you would use 80 x 80.
Error: Too many objects in grid rectangle 64,64
This error happens when your roads are "outside" the mapframe (i.e your terrain). If you are getting the error in game and haven't placed roads yet, check your config.cpp that newRoadsShape is set to empty, otherwise it will load the roads of the map you inherit from, most likely Altis.
newRoadsShape = ""; // would be correct in the case of no roads
newRoadsShape = "\A3\Map_Altis\data\roads\roads.shp"; // this would load Altis roads, which is most likely bigger than your terrain, an trigger the error
If you have neither then add newRoadsShape = ""; to your config.cpp
L3DT to Terrain Builder
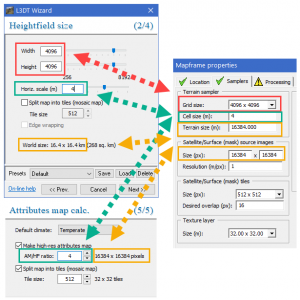
See image example of how to match L3DT to Terrain Builder Mapframe, so images are high resolution and avoiding bad texel mapping error.
Import objects from Eden to Terrain Builder
Eden has this feature built in BUT it's broke on certain rotations. Use the mod E2TB instead.
Export your objects in Eden using scenario > export > export to Terrain Builder (E2TB, absolute position). It will then save the objects to your clipboard, open notepad and paste them into a new file and save as Whatever_name_you_want.txt
Open your terrain in Terrain Builder, go to Layers Manager > Objects > Add New Layer. If you don't see Layer Manager, go to Toolbar > Window > Layers Manager.
With the new layer selected, go to File > Import > Objects. Select your .txt file you saved. Click advanced and use relative or absolute depending on what you exported using E2TB. In this case we used absolute position.
Dialog - TxTImport - Wrong file format or source template not found
This comes up when you import an objects .txt file from Eden or other in-game editors. If you don't have a certain object that you are using in your template library, then you will receive the above error.
To fix it, go to Layers Manager > Objects > Add New Layer. If you don't see Layer Manager, go to Toolbar > Window > Layers Manager.
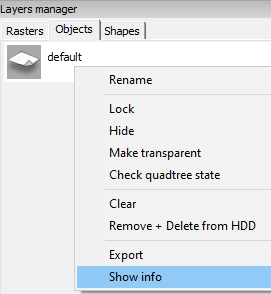
Import objects to the new layer, then right click object layer > show info.
A menu will then pop up, showing the object count. For example, if there are 150 objects, open the text file you are trying to import, line 151 will be the missing object. Windows basic Notepad doesn't show lines numbers, so use Notepad++ (free) or something similar.
Find the missing object(s) on the P drive and add it to your template library. Import the .txt file again until you no longer receive the error. To avoid the risk of duplicate objects, clear the layer and re-import the .txt file.
Heightmap / Shapes etc not showing in Terrain Builder
Todo
Adding water to your terrain
Todo


