Mod Localisation – Arma Reforger
This page describes process of adding localization to addons. It's recommended to go through String Editor documentation first since most of the procedures are shared.
Creating new localization table
Creating of new string table (.st) file is described on String Editor - New *.st file page and below is quick rehearsal of those instructions
Creating new localization files
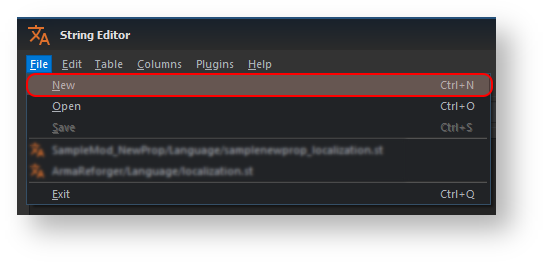
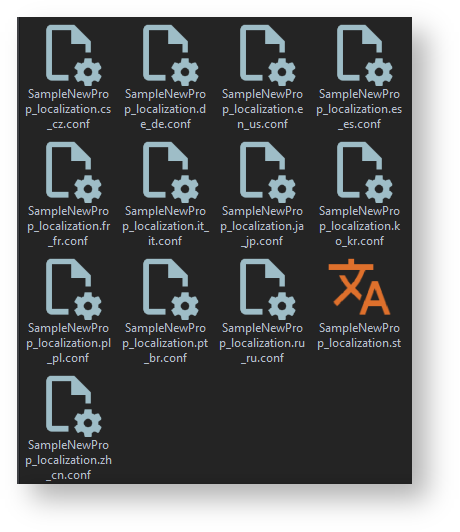
New localization files - string table and runtime string tables - can be simply created via File → New option (alternatively, Ctrl+N shortcut can be used). Once activated, a new pop up window will appear and ask you to provide file name and location of new localization files. After it is confirmed with OK button, String Editor will create new .st file and runtime configs for all languages available in-game (see this table for list of languages - Localization Targets Table).
If you don't plan to translate your addon into all languages (see , you can safely remove unnecessary config files and recreate them at later point manually.
In any case, at this stage it is possible to move forward and register both string table and runtime stringtable configs in Workbench options. To do so, skip to Register Localization Table segment
Manual method
Creating new string stable
|
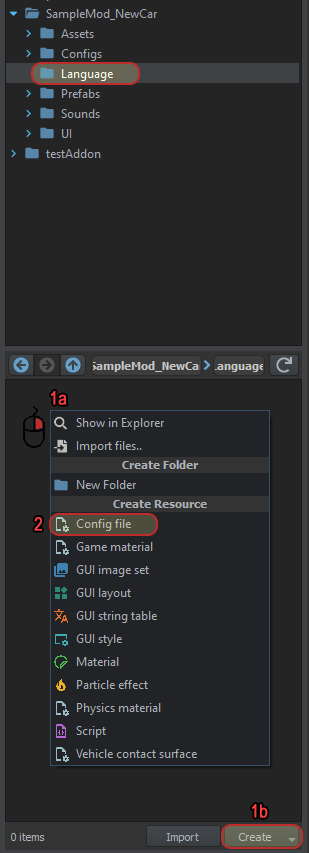
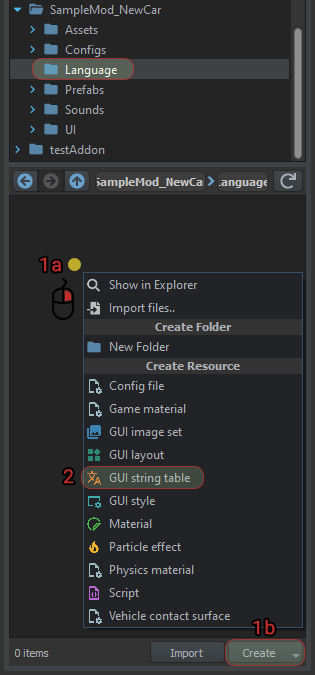
1. In Resource Browser select a folder where you want to create a new *.st file - In this example it is SampleMod_NewCar/Language folder.
Next, either click with Right Mouse Button on Resource Manager field (1a) or use Create button (1b) In both cases, new context menu should appear - pick "GUI string table" (2) from that list. |
|
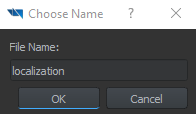
2. Set the name of the file. It's highly recommended to use some unique tag in front of the file name (f.e. samplenewcar_localization.st) to avoid GUID clashes. |
|
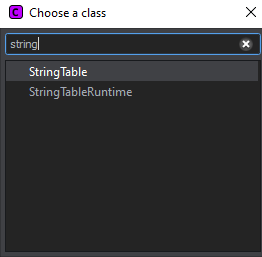
3. Choose StringTable class and confirm by clicking once on it StringTable entry with Left Mouse Button |
Setting basic parameters
If those steps above were performed successfully, a new localization_MyAddon.st should be now visible in Resource Manager asset browser.
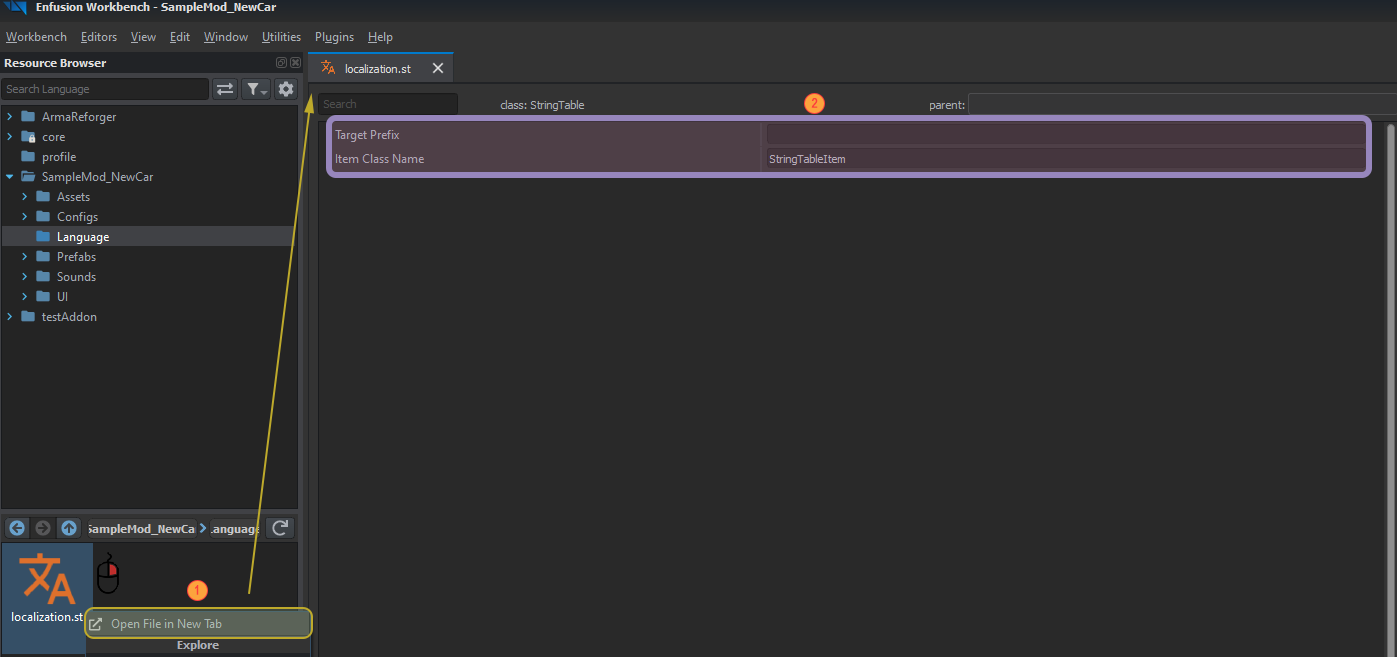
Click on newly created localization.st file with Right Mouse Button and select Open File in New Tab (1) option from context menu. This should open that string table in new tab, where some of the internal bits of string table class can be changed.
By default, newly created string tables are using platform agnostic settings and both Target Prefix & Item Class Name parameter have to be changed in order to be used in String Editor. Following values must be used
- Target Prefix: Target_
- Item Class Name: CustomStringTableItem
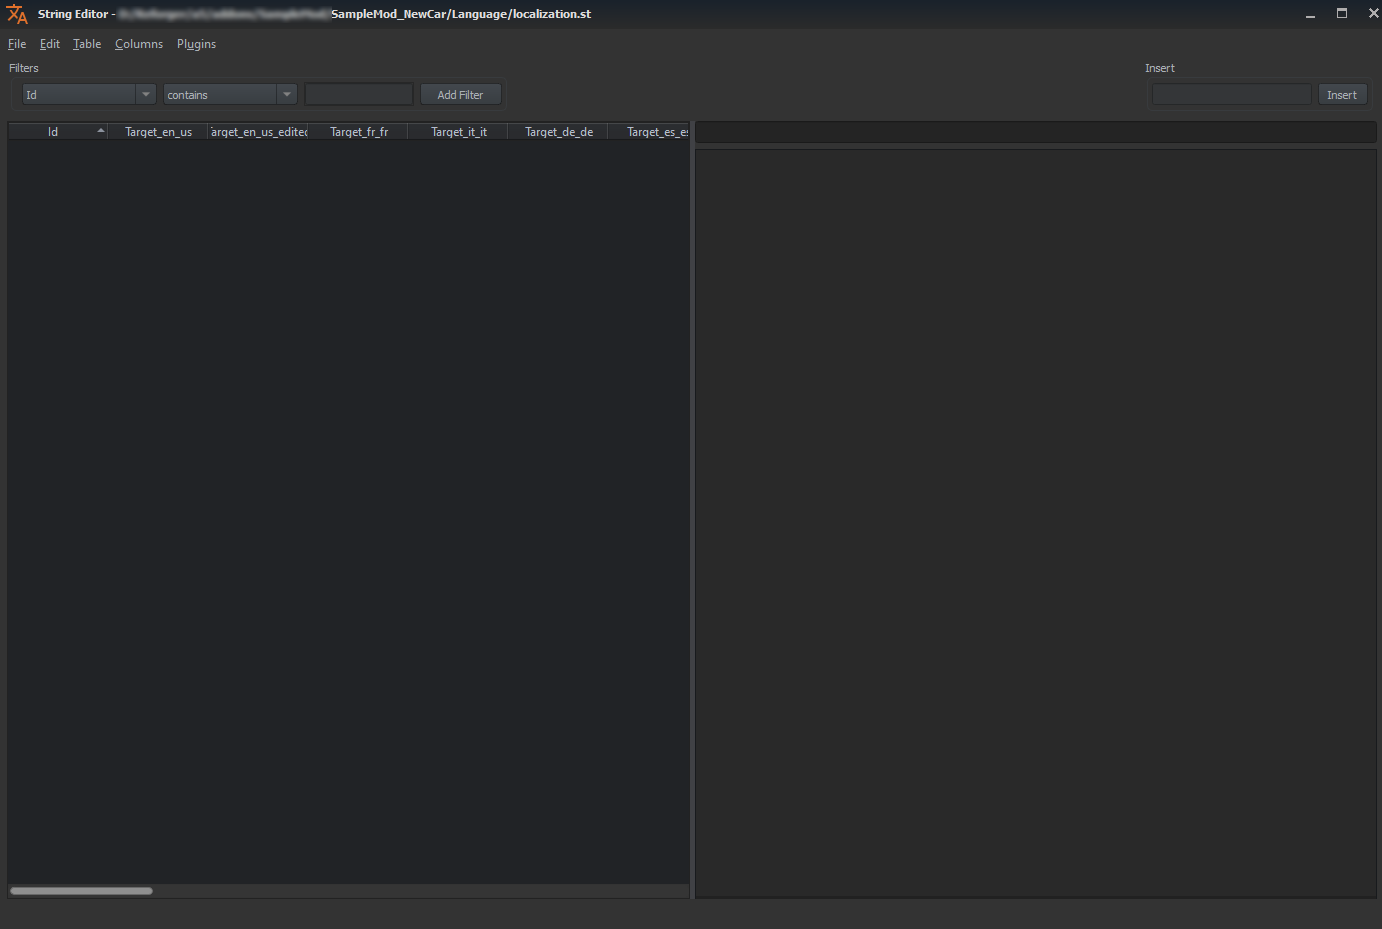
After that, localization.st file should be ready to be used by String Editor. Simple test can be performed by either double clicking with Left Mouse Button on localization.st resource in Resource Browser (this will open that file in String Editor) or by manually opening String Editor (Editors → String Editor) and then using File → Open option.
Adding runtime string tables
Runtime string tables are files which are used by the game itself and they are created in very similar way to regular string tables.
Main difference is fact that instead of selecting GUI string table context menu, you should pick Config file (2) option instead of GUI string table.
In next dialog, fill name of that new run time string table (i.e. samplenewcar_localization.en_us.conf). Once that step is completed, a new window will appear, asking you to choose a class of new config - this time StringTableRuntime should be used.
Depending on how many languages are supposed to be translated, repeat above steps till all translation variants are created.
↑ Back to spoiler's topLocalization targets table
Below is small table showing various localization targets shortcuts
| en_us | English (United States)
Serves as a source for translated texts. If proofreading or translation is in progress, use 'Target_en_us_edited' instead. |
| en_us_edited | English (United States)
Use this when the string is being processed by proofreaders or translators. Once it is done, the Localization Manager will move this text to 'Target_en_us' |
| fr_fr | French (France) |
| it_it | Italian (Italy) |
| de_de | German (Germany) |
| es_es | Spanish (Spain) |
| cs_cz | Czech (Czech Republic) |
| pl_pl | Polish (Poland) |
| ru_ru | Russian (Russia) |
| ja_jp | Japanese (Japan) |
| ko_kr | Korean (South Korea) |
| pt_br | Portuguese (Brazil) |
| zh_cn | Chinese (China) |
Registering localization table
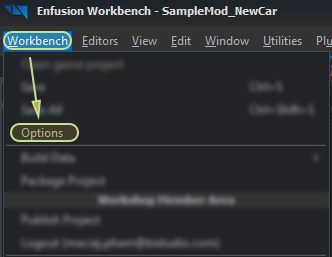
Next step is registering of localization table in game project file. To do so, navigate to Workbench → Options
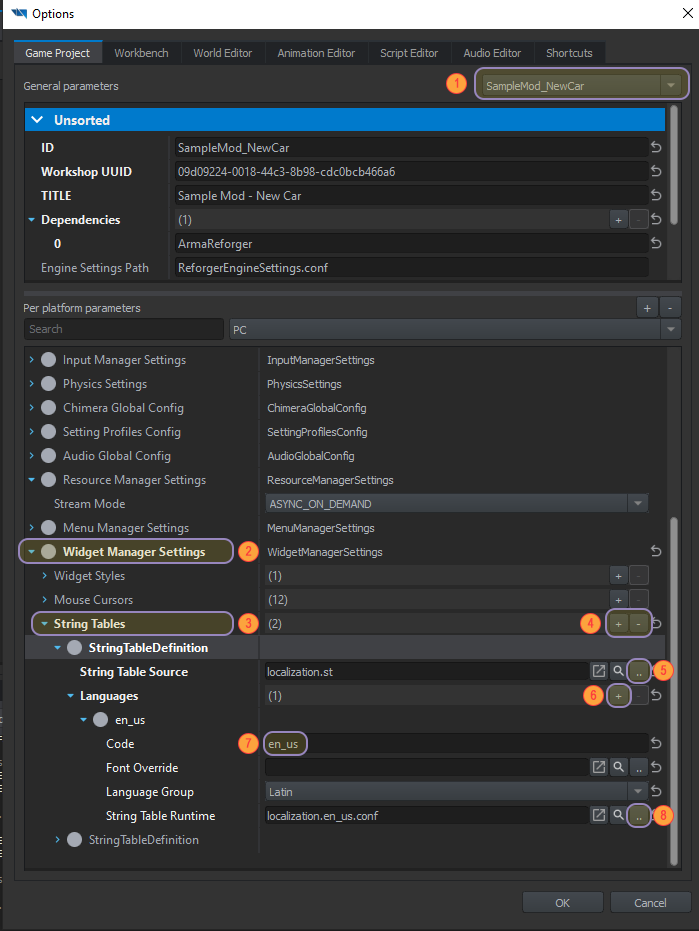
- Make sure that you are editing correct game project by checking which addon is shown in drop down menu (1). In this case it's SampleMod_NewCar
- Navigate to Widget Manager Settings (2)
- Locate String Tables (3) entry and expand it by pressing on little blue arrow on the left side
- Add new element to String Tables array by clicking on small plus sign (4). This will be a new entry holding information about string table file created previously
- Locate previously created string table (.st) file by clicking on three small dots (5) and then selecting that file
- Add new element to Languages array by clicking on dot on the right side (6)
- Type code of new language (see table above for available codes) to field marked with number 7 on the picture
- Select runtime stringtable file (8) appropriate to the language code which was created in previous step. In this case code is en_us, so String Table Runtime is samplenewcar_localization.en_us.conf
If all steps were performed correctly, new string table should be now ready to be used!
Localizing assets
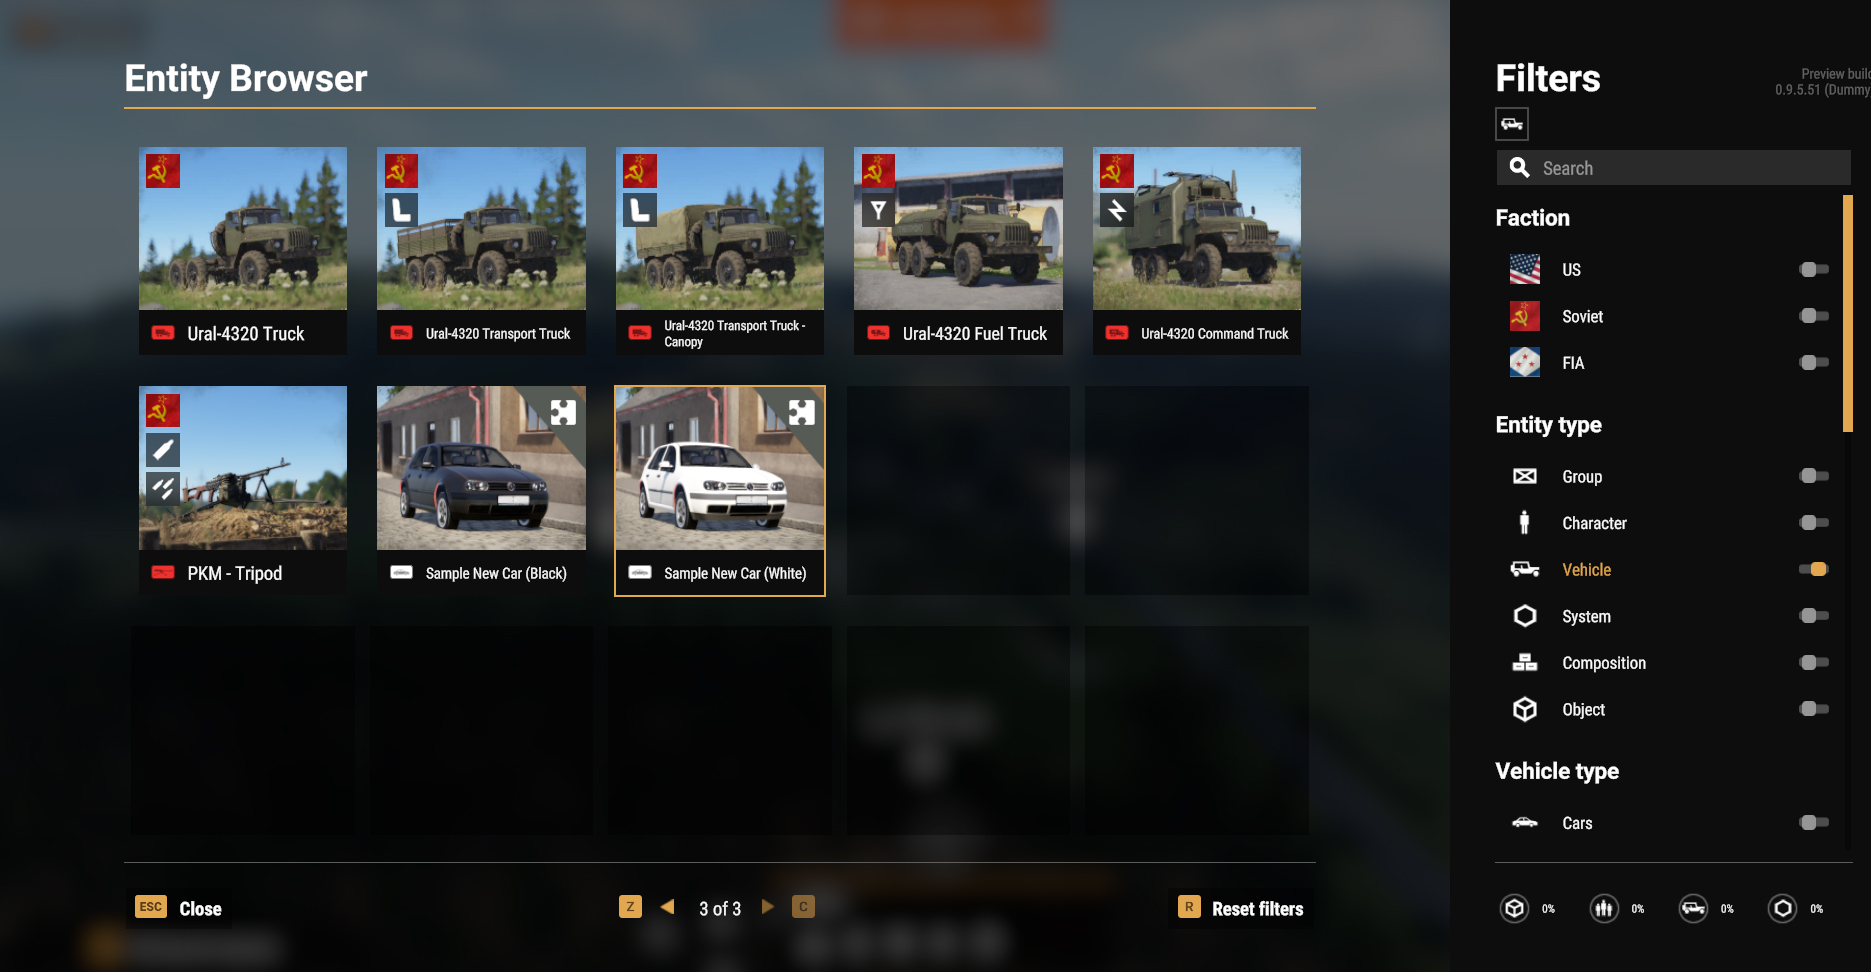
In this chapter, name of Sample New Car visible in in-game Editor will be localized.
Localizing asset via plugin
Alternative method involves using Resource Manager plugin called "Localize Selected Assets".
This plugin automates most of the process by searching for strings defined by a config file. Localization parser configs (selected through Config Path parameter in Localize Selected plugin) contain various look up rules, default string table where to store changes & prefix settings. While having string table & prefix defined in config might be quite useful when working on projects involving multiple people, it is also possible to override String Table Path & Prefix parameters, so it is also possible to utilize existing Arma Reforger configs in smaller addons.
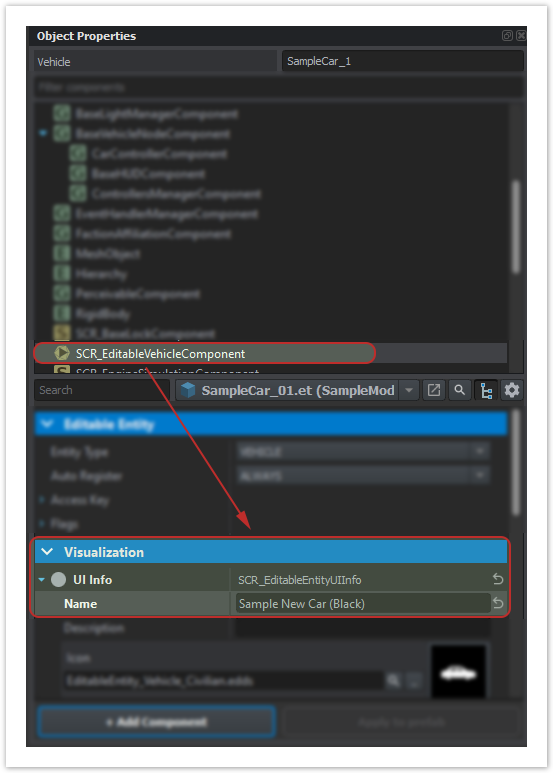
Vehicles in-game Editor display name is defined in SCR_EditableVehicleComponent - there, in Visualization section, a Name parameter can be found. In this case, Name parameter was set to Sample New Car (Black) and goal is to have that string present in runtime string table.
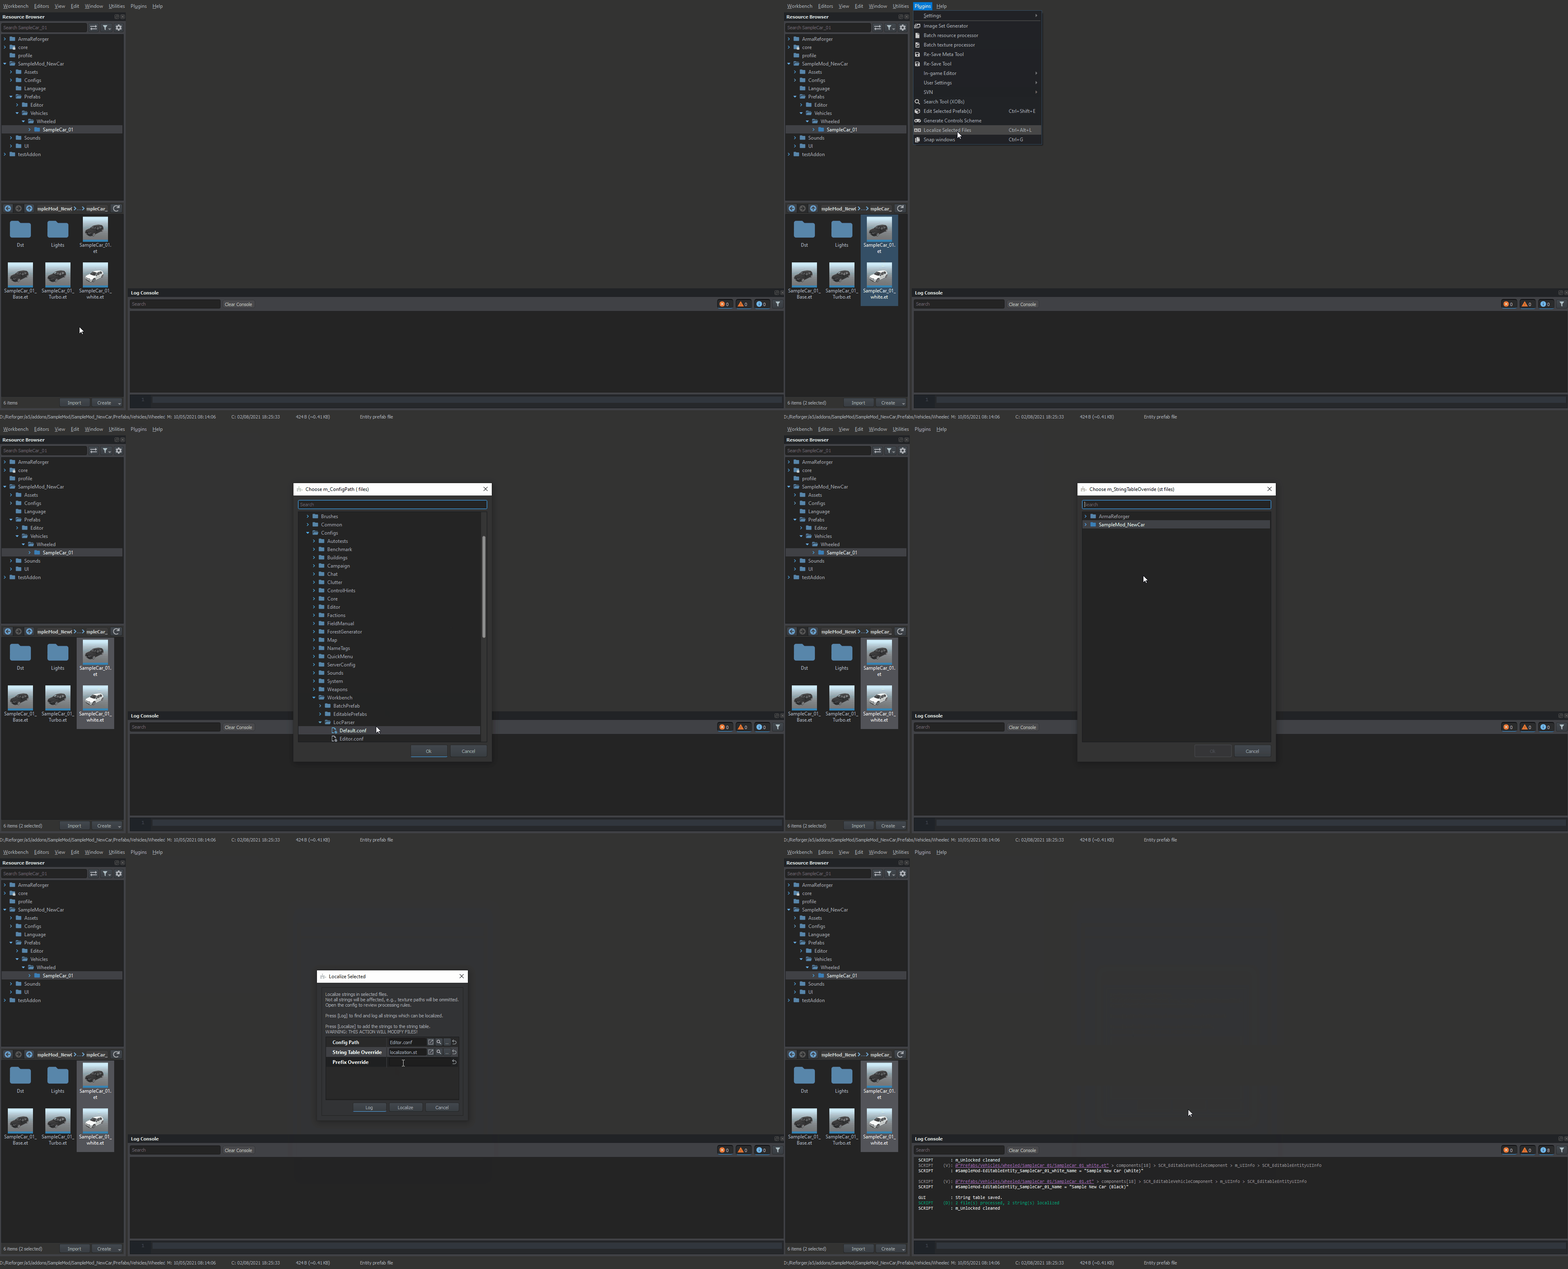
To do so, select in Resource Browser assets to localize and then navigate to Plugins → Localize Selected Files in top navigation bar or use Ctrl+Alt+L shortcut.
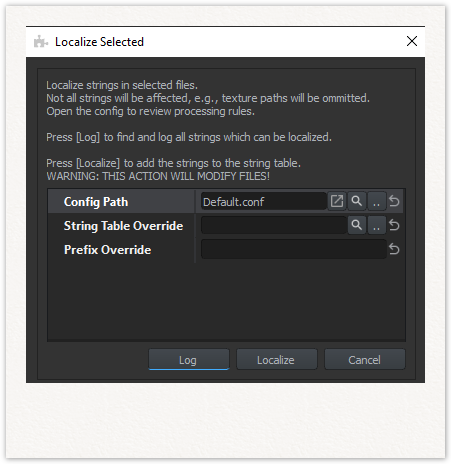
Localize Selected File plugin window should now appear. Following changes to default parameter values need to be performed:
- Changing Config Path param to Editor.conf - this config will ensure that all editor related strings (like this vehicle display name) will be properly localize
- Changing String Table Override - by default plugin is storing all changes to the string table defined in config file itself. Since duplicating this config file might be an overkill for localizing 2 assets, it is possible to change string table which is used by selecting another string table in plugin itself. In this case localization.st in SampleMod_NewCar is selected
- Changing Prefix Override - similar to string table, string prefix is stored in config file. In this case, prefix is changed to SampleMod- to ensure that those new string tables will not clash with vanilla data.
Once parameters are adjusted, it is possible to localize those files - to do so, press Localize button.
After that, plugin will open String Editor (if it's not open already), open string table defined in String Table Override property, perform scan for any editor related entries & then finally store it in string table.
Localizing asset manually
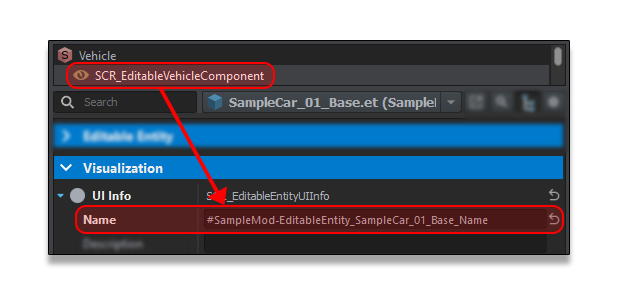
It is also possible to manually change Name property in Editable Component and then add that string to string table. To do so, it is necessary to replace Name property in Editable Component with variant containing # prefix - i.e. #SampleMod-EditableEntity_SampleCar_01_Base_Name.
Next, it possible to add that string to String Table by following instructions on String Editor page. In principle, following steps have to be done:
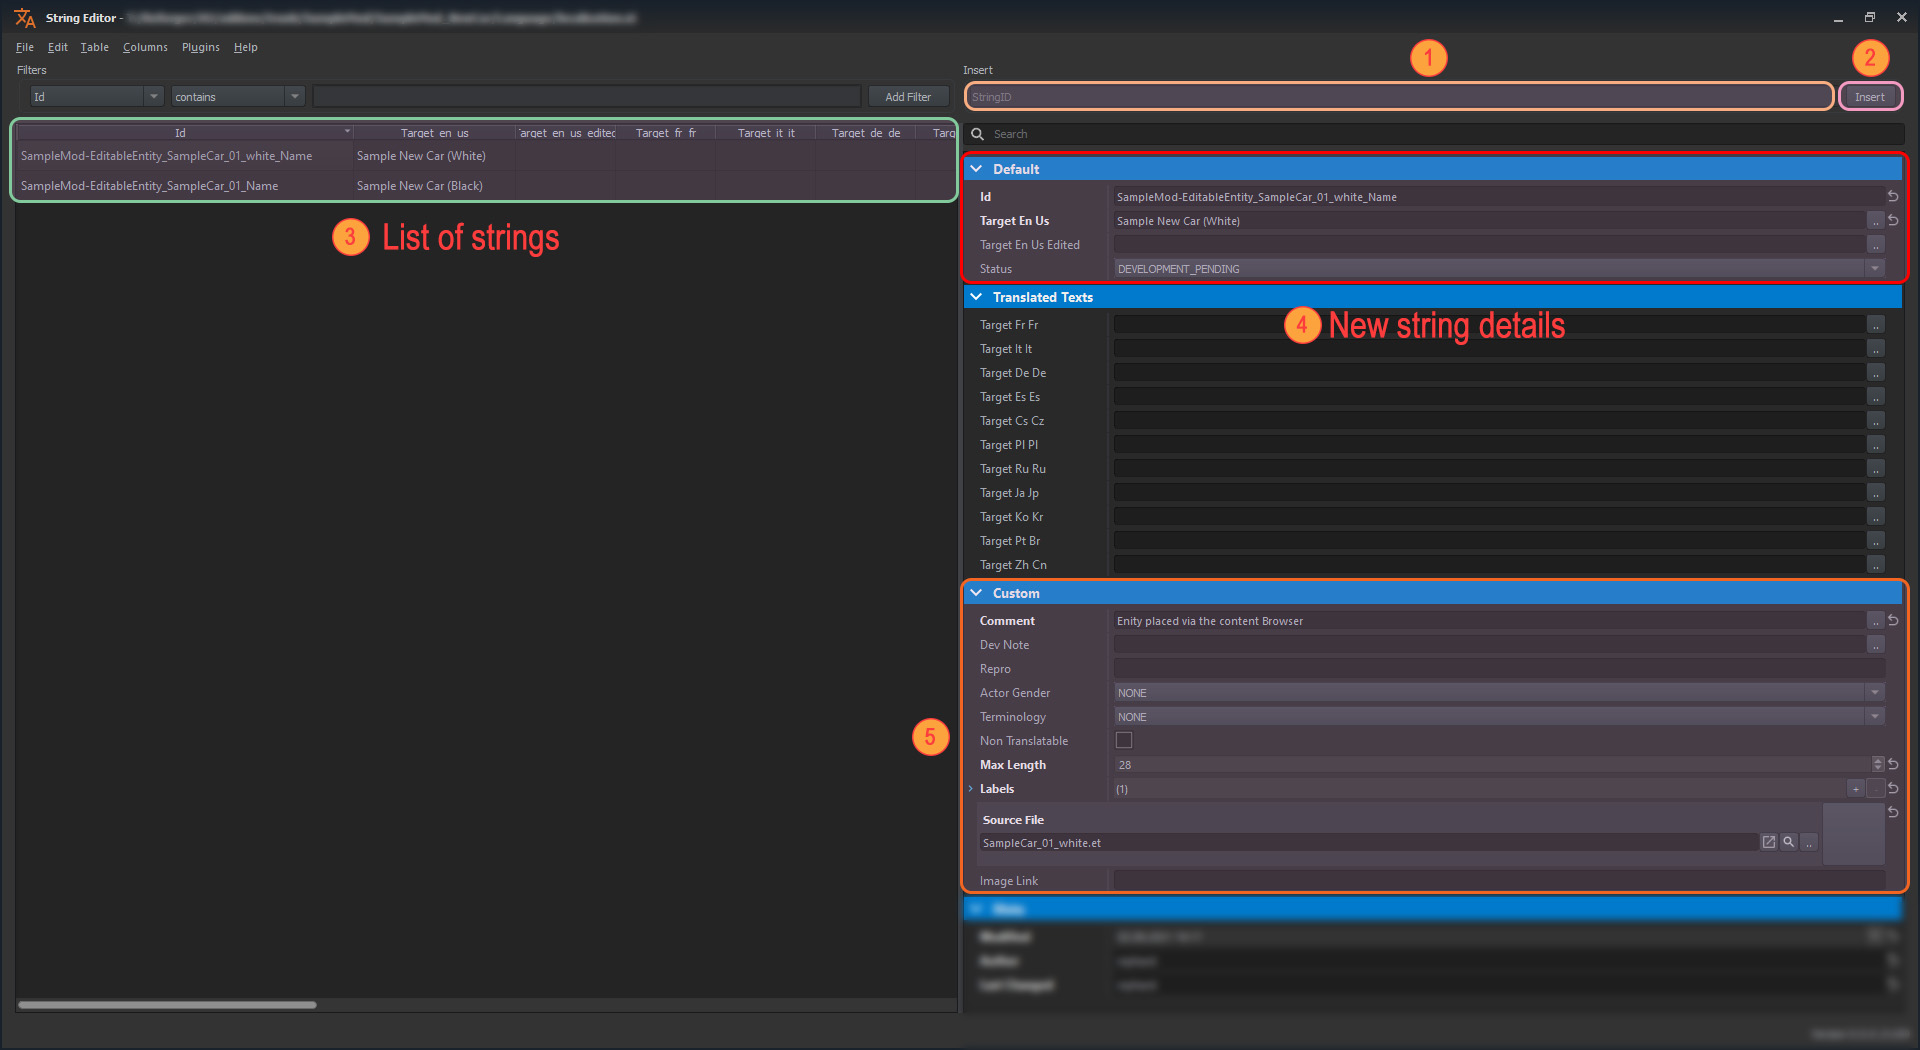
- Fill in new string name (without hastag in front!) into StringID field
- Click on Insert button (2). After that, new string should be added to list of available strings (3)
- Write English version of the string in Target En Us field located in Default (4) section
- Add localization for rest of languages - if field is empty, English is used.
Parameters in Custom (5) section are usually filled by the plugin and those serve as hint for localization team, so they are aware of string/sentence context. That section is non mandatory.
Regenerating runtime tables
If all strings were properly added to string table then it's time to generate runtime tables. Without runtime tables, game will be not able to see strings located in string table file. Only after string table is parsed to optimized, game ready format, strings will be ready to use. To do so, head to String Editor and select from top bar Table → Build Runtime Table (also accessible under Ctrl+B shortcut). That's it - process should take just few seconds and runtime string table should be ready to go.
Localizing scripts
By default, any engine will try to localize any string (LocalizedString ) in UI if it is starting with hash (#) sign. There is no equivalent of Arma 3 Localize script command.
Testing result in-game
String can be verified in game by launching i.e. in game editor and checking if strings are showing proper data instead of hashtag prefixed strings.
It is also possible to verify if strings are localized by selecting from Diag Menu → UI → Disable → Disable Loc option. This debug will disable automatic localization of strings and will show names in their original, with hash tag prefix, form.

