Ceeeb/Sandbox – User
Load
Allows you to load a previously created mission. Only uncompressed missions in your current profiles missions folder can be loaded.
Merge
Merge will import all map data (units, groups, waypoints, triggers, etc) from one mission into the currently loaded mission. Other settings such as weather and mission name etc are not imported.
Save
You can save your current mission with this dialogue. Note that you save a mission under a new name, only the mission.sqm file is written in the new folder, any supporting files such as description.ext will not be copied. You can also choose to export your mission to either the single mission or multiplayer mission folders. This process creates a new pbo file containing the current missions folder including all files. Saving a mission also reloads files such as description.ext.
Clear
- this will wipe the map clean. Use with caution!
The drop-down menu beneath the 'Clear' button shows four options - Mission, Intro, Outro Win and Outro Lose (or 'Outro Loose'). Intros and outros combined with cutscenes can give your mission a more cinematic feel, expanding on the storyline and involving the player. More info required here.
Show IDs
- the map you design a mission on has trees, bushes, houses etc, and each of these is assigned an ID number. These are normally hidden for clarity, and the button toggles them on or off.
Show Textures
- clicking on this will show you an estimation of what the island will look like when textured, and is only really useful when placing things on a runway at an airport.
Preview
- this will run the mission from within the editor so that you can test the results as you go along.
Continue
- if you exit the preview mode, clicking 'Continue' will resume the mission. Changes made between will not be shown, and you must click 'Preview' to update the mission.
Exit
- this will exit to the main menu. Remember to save your work.
Map controls (the bit along the top)
These are the controls used for placing things and manipulating them on the map. Click on the required option to select it, then double-click on the map to activate the dialog.
Units
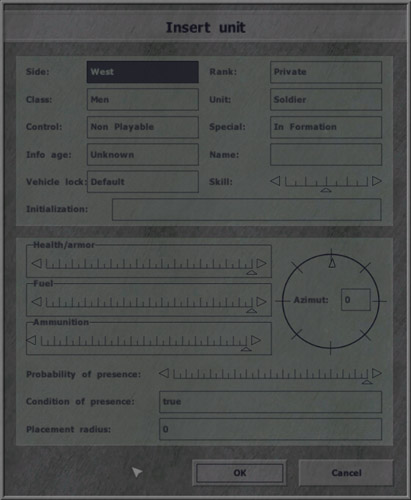
Side - There are four 'sides' in Flashpoint which units can be assigned to: West, East, Resistance and Civilian. The last two are usually thought of as the same thing, the Resistance being armed Civilians. West will always fight East, and vice versa. The Resistance fights either West or East - see the Intel dialog.
Class - This is the kind of unit you are placing. It can be confusing, as tanks are units, ammoboxes are units, even tables are units. However, the Class field is split into categories to make things easier for us mission editors. Soldiers are found in the 'Men' Class.
Control - This defines who controls the unit. For now, think of this as either the player or the computer.
Info Age - When an enemy unit is reported to a commander an icon appears on the map. The accuracy of this position depends on the Info Age.
Vehicle Lock - If the unit is a vehicle, this defines whether the player can use it or not.
Rank - This defines how high up the command structure the unit is. Lower ranked units can be grouped to higher ranked units.
Unit - This is the type of unit within the Class field that you want to place, for example if the Class is 'Armour' the Unit would be the type of tank, if the Class is 'Men' then the Unit would be the type of soldier.
Special - Units will be placed 'In Formation' by default. If you wish to place them independantly, choose 'None' from this list. Be aware that if a unit is part of a group, it will try to return to formation when the mission begins. If the unit is an aircraft, selecting "Flying" will put it in the air. If the group which the unit is a part of includes a vehicle with cargo spaces, choosing "In Cargo" will place the unit in one of those cargo spaces. Remember that this control defines the starting position for the units at the very beginning of a mission. They can be manipulated later.
Name - This is a very useful field. Whatever you put in this field can be used as a name to reference the unit later on in scripts. Like all variable names, you should make it something meaningful.
Skill - At highest skill units will see farther, shoot more accurately and be generally more devious. At lowest skill units will be less observant, poor marksmen and generally stupid. Skill will be automatically set on choosing a unit, but you can tweak the settings for your own purposes.
Initialisation - This is where you can put script commands to further define the unit's properties. Anything put in this field will take effect at the very beginning of the mission. More on this later.
The next three sliders, Health/armour, Fuel and Ammunition define how much of each the unit has at the start of the mission. If you put the Health/armour slider to 0, the unit will start the mission dead.
The Azimut setting defines which direction the unit will be facing. You can drag the pointer around the circle, or type in the number of degrees.
Probability of Presence (PoP) defines how likely it is that the unit will be present. This can be used to add a bit of randomness to missions. A maximum PoP will ensure the unit is always there. A PoP of 0% means the unit will never appear.
Condition of presence relies on some other factor to decide whether or not the unit appears in the mission. By default this reads 'true' which means it will appear, but for example if you wanted to have the unit appear only if the user's benchmark was over 5000, you could insert
benchmark > 5000
Finally, Placement Radius defines an area within which the unit's starting position could be, in metres.
Groups
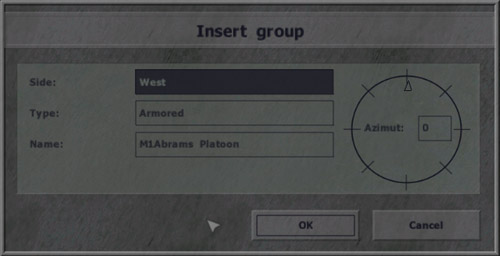
Instead of placing individual units and grouping them manually, you can create groups intact.
Side - again, this declares the side of the group: West, East or Resistance.
Type - the type of group, e.g. infantry, armour or mobile infantry.
Name - kind of group. For example if you chose an armoured group, it could be a group of M1A1 tanks, or a group of M60 tanks.
Azimut - the direction in which the group is facing.
Triggers
Triggers are used to define the consequences of a certain event depending on the conditions specified, e.g. you want the enemy to raise the alarm when the player is spotted, or you want a convoy to begin moving when the player gives a radio command.
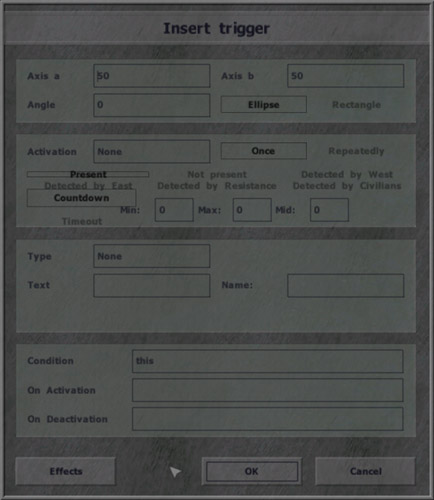
Axis a/Axis b - these controls define the size of the trigger in metres. Axis a is West-East, Axis b is North-South.
Angle - the angle of the trigger. It can be set within the dialog, but for more control click and hold the trigger on the map and hold down the left Shift key. Then move the mouse around until the trigger is at the correct angle.
Ellipse/Rectangle - the shape of the trigger.
Activation - this is a list of who or what can activate the trigger, for example a unit of a certain side, or a radio command.
Once/Repeatedly - how many times the trigger can be activated.
Present/Not Present etc - if the activator is a unit or a side, you can control the condition on which the trigger fires. For example, if you want the trigger to activate when any West unit enters it, select 'West' from the Activation list, and 'Present'.
Countdown/Timeout - These can add a degree of randomness to triggers.
Next to the Countdown and Timeout buttons you will see three boxes; Min, Max and Mid. These define the period of trigger activity in seconds between the Min and Max values, gravitating towards the Mid value. If all three were 10, then the period would be 10 seconds, with no randomness. If Min was 5, Max was 15 and Mid 10, the period would be somewhere between 5 and 15 seconds, close to 10.
Choosing Countdown means that once the trigger's conditions are met (the soldier walks into the trigger area) the trigger will wait the specified amount of time before activating the consequences (the alarm is raised).
Choosing Timeout means that the trigger's conditions must be met for the duration of the specified amount of time before the trigger fires. So for example, if the soldier walks into the trigger area, and then leaves the area before the timeout is complete, the trigger will not fire.
Type - there are several types of trigger.
- Guarded by - this creates an area to which the side specified will go when an enemy is detected within them. Units or groups given a Guard waypoint will automatically support these areas.
- Switch - this is useful for breaking units or groups out of looping waypoints.
- End # - this type of trigger will end the mission once the conditions are met. There are 6 winning endings plus a losing ending.
Text - the text displayed within the editor to identify what the trigger is.
Name - a name by which the trigger can be accessed through script.
Condition - usually reads 'this', which means the conditions you create within the dialog. The Condition field can contain multiple conditions.
On Activation - script that is executed when the trigger conditions are met.
On Deactivation - script that is executed when the trigger conditions have been met, but are no longer true, for example when a soldier leaves a 'Present' trigger.
Further information can be found here.
Waypoints
Waypoints (WP) are what make units and groups move and are one of the most powerful tools within the mission editor. Some (e.g. Move, Cycle, Hold) can be put anywhere, others (e.g. Destroy, Get in) work best when placed on an object or vehicle.
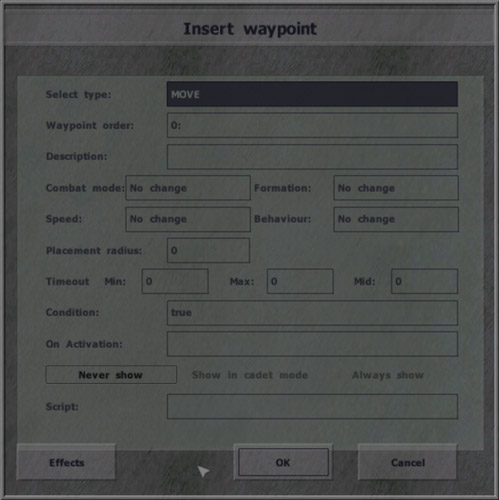
Select Type - there are several types of waypoint.
- Move - unit or group will move to this point.
A note on MOVE (and most other WPs, if not all) WP: If you put the WP on certain buildings (on the map: lighter boxes and select churches) there will be a new box that states what position that unit goes to inside the building. it will be under the "Behaviour" box on the "Insert/Edit Waypoint" menu. It is listed as "Position In House" with a drop box next to it. Most positions are next to windows. But use common sense. A tank can't roll upstairs and hide just inside a window, and a UH-60 can't even begin to squeeze through the front door. So it is for personnel-based units.
- Destroy - unit or group will move to this point and destroy whatever the waypoint is placed upon. Do not expect units to obey this waypoint if they are incapable of destroying the target (rifleman vs. tank). The waypoint will not be complete until the target is destroyed or if the unit refuses the order.
- Get in - if placed over a vehicle with extra room, the unit will attempt to board it. If synchronized with a vehicle’s waypoint, the vehicle will stop and wait to be boarded.
- Seek & Destroy - unit or group will move to this point and begin searching for enemies.
- Join - When synched with another unit’s waypoint, this individual will become part of that unit's group.
- Join & Lead - Same as above, but the individual becomes that group’s leader.
- Get out - unit or group controlling vehicle will disembark.
- Cycle - very useful waypoint; orders the unit to consider the nearest waypoint its next waypoint, creating a waypoint loop. Good for patrols.
- Load - vehicle will wait for units to board in cargo.
- Unload - vehicle will wait for units in cargo to leave vehicle.
- Transport Unload - vehicle will wait for units which began in vehicle to leave cargo.
- Hold - unit or group will stay at this position. Only a 'switch' trigger or scripting can move the group from this point.
- Sentry - The unit will hold position until any member spots an enemy. At that point, the unit will proceed to their next waypoint. If the unit is not set to hold fire, they may engage the enemy on the way.
- Guard - if a 'Guarded By' trigger is located nearby the group will move to and protect it. Additional information on the use of this waypoint can be found here.
- Talk - Used in combination with the “effects” button on the bottom of the waypoints screen. If you set the sounds:voice section to a voice, the unit leader will say the given phrase. This waypoint is not a destination, and goes to the next waypoint when the phrase is completely spoken.
- Scripted - executes the script that is in the “script” box on the bottom of the waypoints screen. You can not use individual script commands, you must refer to an external script file. This waypoint is not a destination, and it is considered complete when the external script reaches its EXIT command.
- Support - A very useful waypoint; any unit given this waypoint will remain here until another unit calls for support. At this time, the waiting unit will proceed to the location where support was called for. Only medics, ambulances, fuel and ammo supply vehicles can use this waypoint. You can tell medics to board vehicles prior to this WP, and they will drive to the support call.
Markers
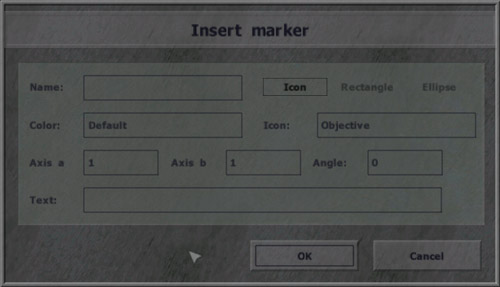
Markers appear on the map and are essential for directing the player to mission areas. They can also be changed using script.
Name - this will be the marker's unique identifier.
Icon/Rectangle/Ellipse - the type or shape of the marker.
Color - the colour the icon will be.
Icon - if you choose the 'Icon' style of marker, this will offer a choice of icons.
Axis a/Axis b - the size of the marker, default is 1.
Angle - the angle of the marker.
Text - any text you wish to appear next to the marker.
