Roller
by the Roller Dev Team
Project Summary
Roller is a community made software developed by Spooner to convert and process OFP and ArmA island files.
It can read:
- 4WVR WRP (OFP unbinarized)
- 8WVR WRP (ArmA unbinarized)
It can write:
- 8WVR WRP (ArmA unbinarized)
- XYZ height data (text file)
- Object data list (text file)
- Mask texture (PNG)
Additional features
- Generate Mask texture (customizable coloring based on terrain point height, definition of forest and urban areas, customizable texture size)
- Replace forest block with customizable single objects (type, densitity, relative frequency)
- Replace single objects with optional offset (1:n and n:1)
- Reduce cell size for more height data points (smooth terrain shape)
- Make terrain bumpy
- Rise/lower sea level
- Generate list of unique objects present in source file
- Replace textures (1:n and n:1)
- Set terrain point height at the edges (to avoid endless repeated terrain)
- Processing summary
Preface
You need be able to use the command line or at least able to edit a batch file to tell the app what to do. There is no GUI available to access the app. The app can be called sequentially to perform a batch operation to process multiple files easily.
Installation
Requirments
- Download and install Visitor 3 as well as buldozer.
- This means to have a P:\ partition with all ArmA source files available.
- Install BI Tools first.
- Use unBuildArmA by MadDogX to mass unpack all ArmA pbos to P:\ or use cpbo by Kegetys to do it one by one yourself.
- Download and unpack the BI Sample Models to P:\. Overwrite existing files.
- No requirements for Roller. Its a self-contained application.
Download
Enduser version
Open source version
For the source you need at least Ruby 1.8.6 installed, along with FXRuby (this is included in the Ruby installer for Windows, but is easily available as a gem if it is not included in your distribution). Recommended development IDE is NetBeans IDE 'Ruby' version.
Additional helpers
- Object definition templates (ODT):
- Sample PEW files (TODO) for OFP standard island files (128, 256, 512, 1024 terrain size and 50m cell size) with object definition templates already imported.
- Sample batch file to execute Roller with given parameter defined in the batch file:
- Copy the given text in a new file called Roller.bat (for windows systems).
- Check the following Roller Instructions section below to understand how to configure the batch file.
- Adapt the path to the Roller application and the path to the source data (wrp files) in the first section of the file.
- Run the batch file.
RunRoller.bat
rem 'Adapt to your local settings':

set FILE_SOURCE=X:\Roller\sourceFiles
set PARTITION_OF_ROLLER=X:
set PATH_TO_ROLLER=X:\Roller


rem 'DO NOT TOUCH'

%PARTITION_OF_ROLLER%
cd %PATH_TO_ROLLER%

rem 'DO NOT TOUCH'

rem 'Example: Only XYZ export from WRP with logfile'.
rem ruby %PATH_TO_ROLLER%\Main.rb %FILE_SOURCE%\EXAMPLE.wrp --xyz %FILE_SOURCE%\EXAMPLE.xyz -f > %FILE_SOURCE%\EXAMPLE_log.txt

rem 'Example: Almost all params (apart from mask generation)'.
rem ruby %PATH_TO_ROLLER%\Main.rb %FILE_SOURCE%\EXAMPLE.wrp --replace-blocks ofp_forest_blocks_to_aceip_single_object_forest.yaml --replace-objects ofp_objects_to_aceip_objects.yaml,ofp_objects_to_arma_objects.yaml --terrain-cell-size 3.125 --terrain-bumpiness 0.5 --object-template EXAMPLE_export_obj_t.txt --unique-objects EXAMPLE_unique_objects.txt --xyz EXAMPLE_export.xyz -f

rem 'Example: Show all available params.'
rem ruby %PATH_TO_ROLLER%\Main.rb -?


rem 'Adapt param list':

ruby %PATH_TO_ROLLER%\Main.rb -?
Instructions
Roller
| short param | paramater | type | description |
|---|---|---|---|
| -F | --replace-forests A,B,C | Comma-separated list of filenames | Replace OFP forest block objects with individual trees and bushes, according to comma-separated list of YAML files (occurs after object replacement) |
| -o | --replace-objects A,B,C | Comma-separated list of filenames | Replace objects according to comma-separated list of YAML files (occurs before forest replacement) |
| -t | --replace-textures A,B,C | Comma-separated list of filenames | Replace textures according to comma-separated list of YAML files |
| -c | --terrain-cell-size N | Float | Set new size of terrain cells (metres). This must be a divisor of the current terrain cell size (e.g. for OFP, which has 50m cells, use 25, 12.5, 6.25 or 3.125) |
| -b | --terrain-bumpiness N | Float | Maximum amount of vertical distortion of new grid points added by terrain-cell-size (metres). Value is ignored unless terrain-cell-size is used. Defaults to 0 (no bumpiness) |
| -r | --raise-sea-level N | Float | Move sea level up by this distance (move sea level down if negative). Done before edge-height is set |
| -e | --edge-height N | Float | Sets the height of all terrain points around the edge to a specific value. This is applied after cell, bumpiness and sea-level changes. |
| -m | --satellite-mask [FILE] | String (optional) | Export a satellite mask PNG image (FILE defaults to 'WRPFILE_mask.png') |
| -C | --satellite-cell-size N | Float | Size of satellite cells, i.e. pixels, in metres (defaults to 2 metres if this option is omitted) |
| -O | --objects [FILE] | String (optional) | Export BIS objects file (FILE defaults to 'WRPFILE_objects.txt') |
| -u | --unique-objects [FILE] | String (optional) | Export a list of objects used in the WRP (FILE defaults to 'WRPFILE_unique_objects.txt') |
| -w | --wrp [FILE] | String (optional) | Export WRP file in 8WVR format, regardless of which format it was imported as (FILE defaults to 'WRPFILE_export.wrp') |
| -x | --xyz [FILE] | String (optional) | Export XYZ file (FILE defaults to 'WRPFILE.xyz') |
| -f | --force-overwrite | Forces overwriting of existing output files (defaults to requesting user confirmation of overwrites) |
Visitor 3
The conversion process is very simple and only takes a few minutes. The goal is to have as much as possible automated, so that only these tasks remain:
1) Read the 4WVR/8WVR WRP with Roller and set the correct params for Roller. Normally you at least need :
-x -O -u
2) Get the XYZ file (elevation data). Get the objects file (all objects of the map). X, Y, Z position and orientation are exported for each object. Unfortunately v3 cannot import object scale. Also the object orientation is 2d only (N/E/S/W. No 3rd dimension: pitch).
This fact does not really hurt though. Both are normally only applied on vegetation and you can easily recreate a similar look via v3 random object scale and pitch functions.
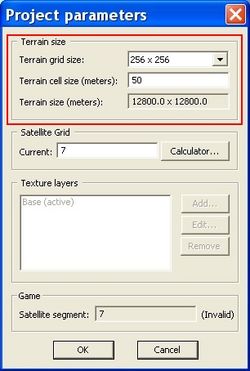
3) Create a new project in v3 with the right dimensions and cell size (OFP default 50 meters). For more details or information about SAT settings consult the Visitor 3 Manual.
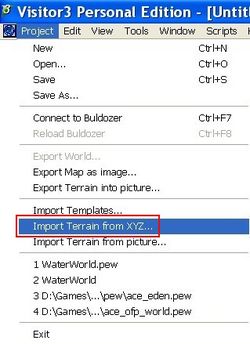
4) Import the XYZ file to get the actual terrain.
5) Import one ore more object definition template PEWs (ODT). To be able to import objects from object definition template files v3 needs to know the model and its path. Fortunately the information about models is saved in a PEW and you can import that definition in your PEW from another PEW.
You can download object definition template PEWs that includes all OFP, ArmA objects, as well as some ACE island pack objects. More details on object definition templates in general and the ACEIP objects below.
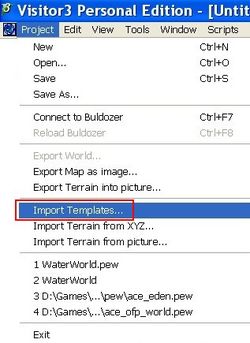
6) Import the object definition template(s).
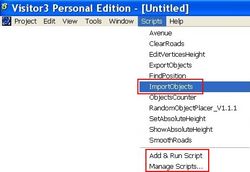
7) Import the island objects from the objects file generate by Roller. If not done already, you need to add the ImportObjects.vis script to visitor 3 first. You will find the file in the .\visitor 3\scripts folder.
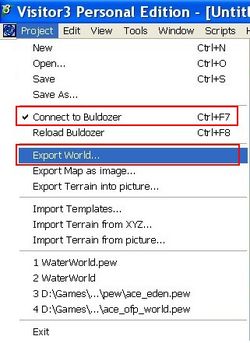
8) Load the terrain with buldozer and export the island to 8WVR WRP. You need to have buldozer loaded, switch back to v3 and select export world.
Done. This course of action takes only a couple of minutes.
Details
Objects
The island most likely has OFP object addons. These do not exist in ArmA. We have to differentiate between OFP and Resistance objects, that came with the game, and community made objects. There are a few different options how to the handle the objects.
Object replacement
Roller has the option to replace objects with the param --replace-objects. The mapping is defined in a so called YAML file. It is a standard text file.
--replace-objects ofp_objects_to_aceip_objects.yaml,ofp_objects_to_arma_objects.yaml
You need to supply the param with at least one YAML file. If you attach multiple YAML files, they will be processed sequentially one after another.
An object replacement YAML mapping file looks like this:
data3d\afbarabizna.p3d:
 -
   :name: ca\buildings\afbarabizna.p3d
   :offset: [0, 0, 0]

data3d\afdum_mesto2.p3d:
 -
   :name: ca\buildings\afdum_mesto2.p3d
   :offset: [0, 0, 0]
# pathToFile\nameOfFile.p3d:
#  -
#    :name: pathToReplacementFile\subfolder\nameOfReplacementFile.p3d
#    :offset: [X, Y, Z]
Via the offset you can move the object in meters in any direction you want to.
The YAML file needs to be located in the same location as TODO.
For an 1:n replacement define the object mapping in the YAML like this:
data3d\oliva.p3d:
 -
   :name: ace_vegetation_obj\m\tree\ace_akat02.p3d
   :offset: [0, 0, 0]
 -
   :name: ace_vegetation_obj\m\tree\ace_javor01.p3d
   :offset: [0, 0, 0]
An n:1 mapping is replacing any object with one and the same of course.
n:1 means make object X, Y and Z to object A.
1:n means make object X to either object A or B.
Object mapping - OFP to ArmA YAML file
Roller already has a mapping for OFP and Resistance (NOT community addons, only for core game files) integrated. The name is ofp_objects_to_arma_objects.yaml. Roller will find the file automatically, if you there is no YAML file called the same way in the TODO location.
You can download the ofp_objects_to_arma_objects.yaml file here.
Unfortunately there is no (working replacement) for each OFP/Resistance objects. You can either define your own mapping or use the OFP to ACE mapping. More details in the next paragraph.
Object mapping - OFP to ACE YAML file
This is again a mapping integrated into Roller. Same details apply for it how to run it as for the ofp_objects_to_arma_objects.yaml file.
You can download the ofp_objects_to_aceip_objects.yaml file here.
The-f made a mapping from OFP to ArmA objects for the objects where a suitable replacement was available. The remaining objects, that have no (working) replacement in ArmA, have been converted to ArmA and are part of the ACEIP.
You can either define your own mapping or use the objects from the ACEIP. Beware that this makes your islands dependent on the addons part of the ACEIP.
Community made OFP objects
For custom community made OFP objects you need to define your own replacement. You can either get the permission for the object(s), convert them to ArmA format or replace them with any (suitable) object available in ArmA.
If you do not define a mapping, v3 will simply not be able to import the object. So you can just drop objects that way.
Note that it is recommended to replace the object with dummy object instead to preserve the object ID numbering of the source WRP.
Another option is to replace them with the a very tiny object from ArmA like a flower (TODO: add pathToFile). Note that you will loose the information about the source type of the given object this way.
It is better to create a new addon with dummy models in there. Each file has the same path and file naming as the missing object. Instead of the original model you put flower.p3d in there and rename it to the needed p3d name.
This way you keep the information about the correct object type. Once the object will be available in ArmA, you can replace your dummy addon / model with the correct file.
It is recommended to name the PBO in a proper way (your own tag and descriptive name) and use the PBOPREFIX to define the original path needed.
ACEIP_P_CWC
TAG TYPE p3d NAME

$PBOPREFIX$ data3d
Types:
f function
m mission
p p3d
s sound
t texture
w world
Finally the ACEIP already contains a good number of converted OFP community object addons.
If you make your islands based on the ACEIP, you may not have to do anything at all but to load the OFP 3rdParty objects ODT (object definition template) in v3 before you import the objects.
OFP community addons converted by the ACEIP:
- TODO add addon names
OFP community addons replaced by a dummy addon by the ACEIP:
- TODO add addon names
Vegetation
Forest block objects
OFP used so called forest block objects for forests. It was one model that consisted of several trees and bushes.
It is recommended to replace these for an ArmA WRP for performance reasons and forest blocks with partially fly at slopes as fit to ground cannot be applied in ArmA to the forest block object.
Roller offers a great feature to replace the forest block objects with single vegetation objects with the param --replace-blocks. The mapping is defined in a so called YAML file. It is a standard text file.
--replace-forests ofp_forest_blocks_to_aceip_single_object_forest.yaml,ofp_forest_blocks_to_arma_single_object_forest.yaml
You need to supply the param with at least one YAML file. If you attach multiple YAML files, they will be processed sequentially one after another.
A YAML mappings look like this:
data3d\les ctverec pruchozi_t1.p3d:
    :sectors: [:N, :E]
    :min: 15
    :max: 30
    :models:
        ca\plants\smrk_velky.p3d: 0.3
        ca\plants\les_singlestrom.p3d: 10
        ca\plants\smrk_siroky.p3d: 0.5
        ca\plants\dd_bush01.p3d: 0.8
# pathToFile\nameOfFile.p3d:
#  -
#    :name: pathToReplacementFile\subfolder\nameOfReplacementFile.p3d
#    :sectors: [:orientation, :orientation]
#    :min: minmumNumberOfObjects
#    :max: maximumNumberOfObjects
#    :models:
#        pathToReplacementFile\subfolder\nameOfReplacementFile.p3d: relativeDistribution
Sectors defines the orientation of the forest block object. Most forest block objects have a triangular shape. So the orientation defines with sectors of the quadrangle is covered by the forest block object. For a square forest block object all forest possible orientations are listed in the sectors definition.
Min and max define the minimum and maximum number of objects Roller should generate in the area.
The models section defines which objects should be placed in the area by Roller. The integer value after each object is added up for the one replacement and is the relative distribution compared to the other objects listed in the models section.
The YAML file needs to be located in the same location as TODO.
Roller has three forest block object replacement templates integrated. Roller will find the file automatically, if you there is no YAML file called the same way in the TODO location.
ofp_forest_blocks_to_arma_single_object_forest.yaml (download link) is to replace the OFP forest block objects with ArmA vegetation.
ofp_forest_blocks_to_aceip_single_object_forest.yaml (download link) is to replace the OFP forest block objects with OFP Resistance vegetation converted as part of the ACEIP.
ofp_forest_blocks_to_ofp_single_object_forest.yaml (download link) is to replace the OFP forest block objects with somewhat same type of OFP CWC and Resistance vegetation converted as part of the ACEIP.
Object export
Now that we have defined any possible modifications on objects we can export them to a text file to be able import them in visitor 3 again.
The param --objects exports all objects to a file. If you do not define the name it will default to the name WRPFILE_objects.txt.
Split object export file
Visitor 3 can only import up to 200 to 250 thousand objects in one go. For more objects visitor will freeze.
Therefore Roller also contains the helper tool called split.exe. It can split the objects export file to multiple smaller ones. You can then import them one after another. By default the files will split into 100 thousand lines each. You can define the number of lines yourself as optional parameter after the specification of the file that you want to split.
split.exe WRPFILE_objects.txt 200000

Usage: split.exe FILE [MAX_LINES]
Unique objects list
It is very useful to know what kind of objects are present in a WRP. From the list you can make the replacement YAML and identify custom community made objects.
The param --unique-objects generates a list of unique objects present in the given WRP. If you do not define the name it will default to the name WRPFILE_unique_objects.txt.
Special objects
TODO: bridges, port walls, objects positioned on top of another object.
Additional information
FAQ
Possible future changes
- Mask: Show the image being built up in real-time as it is generated (this is actually implemented, but disabled because it doesn't work!).
Known issues
- General: All objects on the map (except bridges and ports) are forced to 0 AGL.
- Forest block replacement: Trees and bushes generated to replace forest blocks are placed entirely randomly within the area covered by the forest, so they can overlap each other [Not sure this will be very noticeable for players or that any fix won't cause other problems, but if an issue, then it will have to be dealt with].
- UI: Progress bar is only shown for mask generation (no reason it shouldn't be shown for all processing stages).
- Mask: When using height-based settings, the transitions from one level to the other are rather ragged and don't look too good.
- Mask: The urban texture added under roads is often too long for the road section. However, there should be no road that doesn't have the correct urban texture, rather there will be non-road sections, near roads, that are also given the clear texture.
- Mask: Can't use a specified mask.yaml file. It always runs config/mask.yaml.
Related references
Changelog
2008-12-31
- ToDo
