Mondkalb's Terrain Tutorial
THIS PAGE IS CURRENTLY IN DEVELOPMENT, contents may change over the next few days.
Guide to creating a terrain
This guide will not explain every single mouseclick that you need to do, it will however guide you completely through the entire process of making a terrain by providing instruction on each step, with a dedicated segment on correctly exporting .emf files and creating satellite imagery used in a terrain. When Possible, this tutorial will provide links to more detailed tutorials about certain aspects. For example there will be links to a dedicated tutorial for creating heightmaps and setting up P:\ drive. You can return to this guide once you finished working through a detailed tutorial and follow the "red line" in creating a Terrin to the next tutorial with more details about how to make intro scene missions.
Think of this tutorial as the chewing gum that is used to make everything hold together.
Having an idea
This is one of the most important parts during the process of making a map: Having an idea all planned out.
Before you start creating a terrain, you should think about the purpose of your soon-to-be terrain, what it should look like and whether you would enjoy making it. Then decide on a size.
For beginners, that is in my opinion people that have never made a terrain ever before, I recommend starting quite small: A terrain of roughly 2km x 2km size. This is a manageable size. Forget about 10km x 10km, 20km x 20km or 100km x 100km for now. You will never finish those and then give up map making in despair. A small 2km² terrain however will let you learn everything you need to know to complete bigger projects. The key to those is to have successfully managed at least one terrain before you start work on a Terrain that you intend to announce and release.
Setting up the tools
- Download and install BI Tools 2.5 (Or whatever is the most recent version)
- Additionally you will need IrfanView: http://www.irfanview.com/
- Also you will need L3DT to create and export a heightmap.
When the BI-Tools have finished installing, you should find yourself with a new drive P:\ on your computer. This is a fake partition that is needed for the BI tools to work fine. No worries, nothing is being destroyed or deleted by this. But also you don't have magically gained new HDD space. It is just a folder that pretends to be a partition.
Go to P:\ and create a new folder. Name this folder TUT_IslandName. TUT being your addon maker's nametag Nametag, what is this? IslandName being obviously your island's name. So, if your addontag would be ABC, and you decided to name your terrain "Roundland", this folder you're about to create should be namend "ABC_Roundland".
Then read through Micro Terrain Tutorial to correctly fill up P:\ with all needed CA content.
Creating a Heightmap
There are many ways of acquiring a heightmap. using real life digital elevation data, imagined terrain or simply something random generated using L3DT. We will focus on the latter in this tutorial, since it is the easiest. If you feel confident enough using other tools, you might skip this step if you already have a heightmap that is 8bit greyscale, though keeping on reading wouldn't hurt.
Terrain size
Now we actually decide for a terrain size. If you want to make a terrain that is 2048m x 2048m large, you can use different heightmaps that allow you to have different terrain cell sizes. A terrain cell is basically a piece of a net. If your terrain cell size is 10m, every 10m on the X and Y axis a point will be modifiable. If you have a 4m cell size, you will be able to modify a terrain node every 4 meters, allowing you to have ditches in terrains, though the overall performance of this terrain might drop drastically if you go insane on the terrain cell size.
Your best choices now are:
- 256 x 256 px @ 8m terrain cell size
- 512 x 512 px @ 4m terrain cell size
which will result in a 2048m x 2048m terrain. (I highly recommend this, as all figures are based on a power of 2, which is always good)
Alternatively, your choices now also are:
- 256 x 256px heightmap @ 10m terrain cell size
- 512 x 512px heightmap @ 5m terrain cell size
which will both result in a 2560m x 2560m terrain.
For now all we care about is the amount of pixels our heightmap will have.
Using L3DT
So now on to create the heightmap:
Start L3DT.
Click on the "Create a new Project"-button ![]() and follow the Wizard.
and follow the Wizard.
You will want to have the following selected during the wizard:
- Designable map
- Width & Height = 256 and Horiz. scale = 10
- HF/DM Ratio = 64 (4x4px)
- Play around whith these values to influence the heightmap (self-explanatory)
- Tick "Design Map" and "Heightfield"
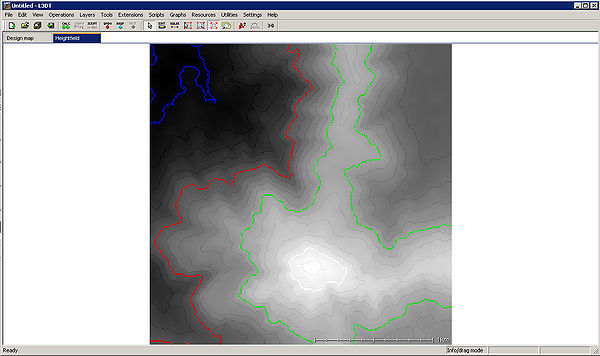
Depending on the parameters you provided, you will now be the proud owner of a randomly generated Heightmap. Hooray!
Now, save this project as TUT_IslandName_Heightmap.proj.
Saving
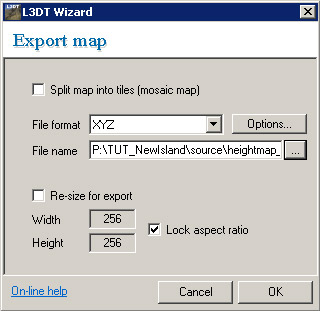
Now go to "File -> Export -> Export active map layer" Select "XYZ" as File format, and save this to P:\TUT_IslandName\source as "heightmap_001.xyz".
Done!
Setting up a terrain in Visitor 3
Start Visitor 3.
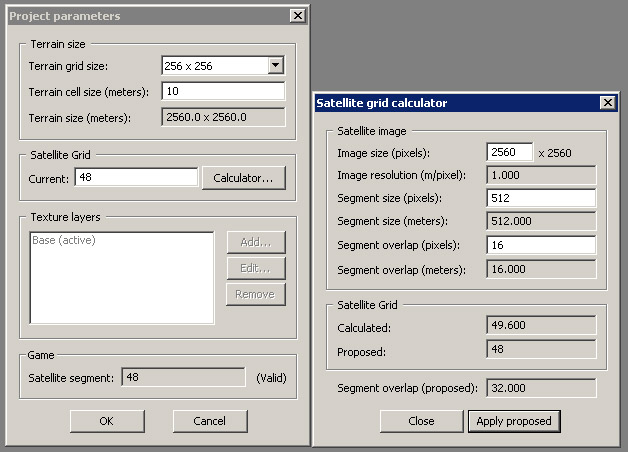
Go to "Project -> New" Set the terrain grid size to "256 x 256" and the Terrain cell size to 10.
Then hit the "Calculator..." button. This is really important! This will set up everything for our terrain satmap.
Ideally you will have a 1:1 ratio for terrain (m) to satmap (px). So we'll go with a 2560x2560px satmap for a 2560x2560m terrain.
Click "Apply proposed". Then "OK".
Visior 3 configuration
Now your screen should show a blue background. But before we continue we need to setup more stuff, so back to the settings.
Go to "Tools -> System Preferences" and paste this into the second field:
"p:\buldozer.exe" -window -buldozer -exThreads=0 -cpuCount=2 -noPause
This will make your buldozer work as smooth as possible.
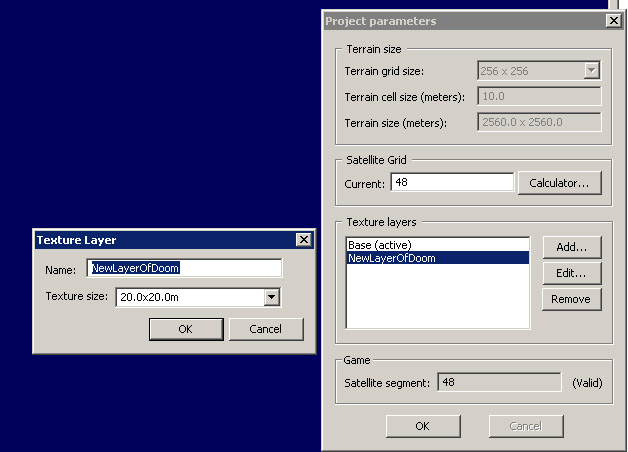
Now go to "Tools -> Project Parameters...". You wills see that the terrain grid size is locked, but the Texture layers is now unlocked. At this point, you can no longer alter a map's size.
Click "Add..." and create a new texture layer. Name it whatever you want, and select 20.0x20.0m. The Texture size should always be the double of your terrain-cell-size (In this tutorial 10.0m).
Go to your P:\ drive and create a new folder named "TUT_IslandName_data".
Visior 3 Project configuration
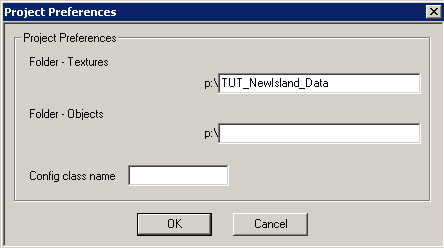
Back in Visitor navigate to "Tools -> Project Preferences...", then enter the name of the newly created folder into the "Folder - Textures" field. Leave "Folder - Objects" blank.
Now we're good to go.
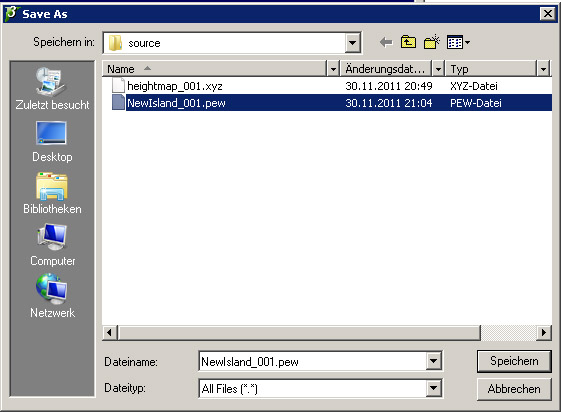
Save this project as "IslandName_001.pew" to "P:\TUT_IslandName\source"
Every time you save the island, save it with a new number. (i.e. _002, _003). This way, in case V3 messes up a .pew file, not everything is lost, and you've got a backup to start from.
Importing the heightmap into Visitor
Go to "Project -> Import Terrain from XYZ". Select Islandname_heightmap.xyz and see the result instantly. As opposed to importing a greyscale terrain with a .pbl file, the xyz file contains all necessary data and imports almost instantly, no matter how many objects the .pew already contains.
Save as IslandName_002.pew
- RMB will pan the map.
- Ctrl + Mousewheel will zoom in and our
- LMB will select objects.
- Hold Ctrl and LMB-Drag will rotate objects
Placing objects on the island
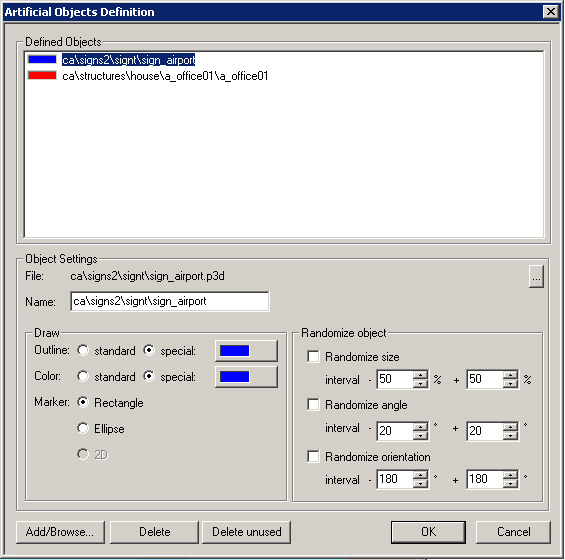
This is fairly simple. Go to "Tools -> Artificial objects...", click the Add/Browse... button and go scavenging in P:\CA\ for all the content A2 and OA offer. When adding new objects, be aware that you can only import 6 objects at a time. It is a good idea to have only buildings having the standard color scheme. Walls, signs and other small stuff should have both the fill and the stroke color set to pure blue [0,0,255]. Later on, when we export the map as picture, this will help us hide certain elements.
Click "OK" to leave this screen. Now let's place some objects. Select "Artifical objects" from the "Panel of objects". If there is no such window, go to "View -> Panel of object" to bring it up again. Then select the items in that list and left-click into the terrain.
Placing trees on the island
Go back again to "Tools -> Nature objects..." and add trees and rocks. While trees and bushes are good to have on the exported picture, give the all-blue paint to the rocks to hide them later on from the satmap.
Create forests by grouping large amounts of trees and bushes.
Make sure to tick the randomizer options like "Randomize size" and "Randomize orientation" for plants. "Randomize angle" makes the trees and bushes be leant over to a side, which looks bad unless it's a dead tree.
Initial preview satmap
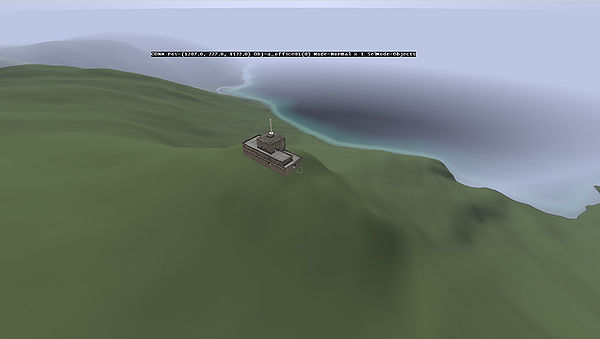
Time to start the 3D viewer to adjust your objects. Do so by pressing the exclamation mark button. ![]() This will start Buldozer, but then it may immediately crash! No worries, is this because the island does not have a satmap, yet.
This will start Buldozer, but then it may immediately crash! No worries, is this because the island does not have a satmap, yet.
Time to create a temporary satmap. Start your favourite image editing software. I am stuck with using Photoshop over the years, so please bear with me.
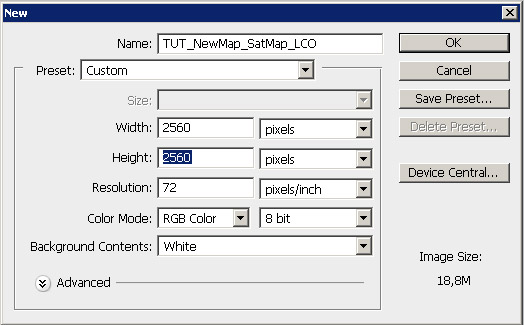
Create a new image with the dimensions of "2560px x 2560px".
Then fill this image with dark green as a placeholder for now. RGB: 77-88-60 should be OK. Save it as "TUT_NewMap_SatMap_LCO" to P:\TUT_NewIsland\source. Now fill the image with black color and save it as "TUT_NewMap_LayerMask_LCO" to P:\TUT_NewIsland\source.
Both files should be saved in their native format (i.e. .psd if you use Photoshop and as .png for Visitor 3 to work with it).
Now navigate to P:\TUT_NewIsland\source and create a new file. Rename it to "Layers.cfg". This file will be the link between the two pictures and Visitor3. Open this new .cfg file and fill it with this:
class layers
{
	// make sure all the paths and files are lowercased, this is important for the clutter to work correctly later on without any major problems.
	class grass
	{
		texture = "tut_islandname_data\tut_islandname_grass_co.paa";
		material= "tut_islandname_data\tut_islandname_grass.rvmat";
	};
};
class legend
{
	picture="TUT_IslandName\source\SurfaceMapLegend.png";
	class colors
	{
		grass[]		= {{ 0 ,	255,	 0 }};
	}
};
You can get grass_co grass_nopx (needed for the parallax ground texture effect) files by unpacking utes.pbo or takistan_data.pbo. Or create them yourself. There are plenty tutorials for that out there. [links?] Search for "trava" or "travajih", it is Czech for grass. I recommend using these for this tutorial:
- ut_trava_detail_co.paa
- ut_trava_detail_nohq.paa
Save this file as your SurfaceMapLegend.png:
But we will be needing an .rvmat to go with this. Use this template here and save it as tut_islandname_data\tut_islandname_grass.rvmat.
ambient[]={0.89999998,0.89999998,0.89999998,1};
diffuse[]={0.89999998,0.89999998,0.89999998,1};
forcedDiffuse[]={0.02,0.02,0.02,1};
emmisive[]={0,0,0,0};
specular[]={0,0,0,0};
specularPower=1;
PixelShaderID="NormalMapDiffuse";
VertexShaderID="NormalMapDiffuseAlpha";
class Stage1
{
	texture="tut_islandname_data\tut_islandname_grass_nopx.paa";
	uvSource="tex";
	class uvTransform
	{
		aside[]={10,0,0};
		up[]={0,10,0};
		dir[]={0,0,10};
		pos[]={0,0,0};
	};
};
class Stage2
{
	texture="tut_islandname_data\tut_islandname_grass_co.paa";
	uvSource="tex";
	class uvTransform
	{
		aside[]={10,0,0};
		up[]={0,10,0};
		dir[]={0,0,10};
		pos[]={0,0,0};
	};
};
Go to P:\TUT_IslandName_data and paste the grass detail texture you just stole, made, bought or found. Rename them to match the format in the layers.cfg. Lowercase will prevent case-sensitivity errors that might happen when trying to add clutter. Same goes for the .rvmat.
Ideally, your contents of P:\TUT_IslandName_data should look like this:
Now all is ready to import the first but temporary satmap:
- go to "Tools -> Import Satellite + Mask..." in Visitor3
- select the layers.cfg from your source folder. Select "Text" when asked
- select the TUT_NewMap_SatMap_LCO.png
- select the TUT_NewMap_LayerMask_LCO.png
- wait for the loading bar to finish.
Then save the project again. Remember to increment the number.
Now press the Buldozer button again. ![]()
A small DOS window will appear which is converting all the small .png files that the previous loading bar created to .paa, which the game will need. This is one of the slowest parts. You might as well grab a sandwich when doing this with 25600px x 25600px Satmap.
When it's done, enjoy! You've made it through the most crucial part there is.
Within Buldozer you are able to move, rotate and shift the objects. You can customize the controls in Arma2:OA -> Controls -> Buldozer, or by pressing F1 in Buldozer, but you might get some errors if your content is not unpacked correctly.
Placing roads on the island
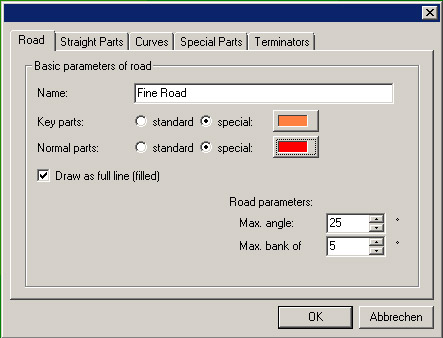
"Tools -> Roads..." Click "Add...", then give this new road-preset a name: "Fine road". Avoid the color blue. I like to give roads an organe color.
Then go through all the categories like "Straight parts", "Curves", etc and add new roads. Once a category is selected, click on "Browse..", navigate to "P:\ca\roads2" and select asf1_6.
Here a list of what road extensions mean what:
Straight parts:
- _6
- _12
- _25
Curves:
- _10 25
- _10 50
- _10 75
- _10 100
Ends:
- _konec
Once you've filled an entire roadset with appropriate segments it is time to save again.
Select "Road Networks" from the panel of objects, double-click somewhere. Then select "Straight-Part", select a road object to begin with and confirm. Now press "Enter" and start building your road. The interface is pretty intuitive.
Buldozer has the habit of crashing if new content is added to the Panel of Objects, so make sure to set up all the object you want to use before starting buldozer on big island projects where loading the terrain in Buldozer takes 5-10 minutes.
Now add some stuff like roads, buildings, bushes to the terrain. Use Buldozer to fine-tune.
