Level Of Detail – Arma Reforger
Basics
Level Of Detail (LOD) in words one LOD or more LODs (LOD0, LOD1 - LODn) are versions of a model with specific triangle and shader complexity. The lower the LOD number is the better the quality/higher complexity is. LOD0 stands for the nicest and most performance heavy one. Then the higher the number, the less complex and often also worse looking the model is.
These performance cheaper model variants (all but LOD0) are to be rendered generally at higher distances in order to save performance on GPU (graphic card). The closer the LODs are rendered, the more GPU performance it saves. User, who will set lower quality in Settings/Video/Model geometric detail in running game will get closer switching to worse LODs to save more performance.
How to set which model part will be part of which LOD is described elsewhere (FBX import), but generally put the _LODn suffix into object name inside FBX.
Preview
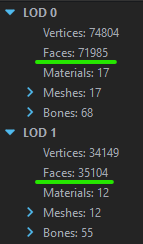
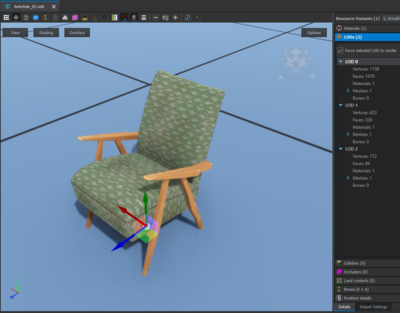
How each LOD is looking, what materials they have and how much triangles or vertices they have can be directly checked in Workbench. Just find desired XOB model in the Resource Browser and double-click on it. Then check Details tab on right part of the viewport and open sub-tab LODs. Then, if "Force selected LOD to render" is checked, it is possible to scroll through the LODs and actually see them.
Debug
There is a diagnostic tool, which tells which LOD is currently visible on any visible entity instance in a map in World editor. Turn it on with the Diag Menu by pressing: Alt + ⊞ Win → Scene/Colorize objects LODs. Now each LOD except for LOD0 will have color overlay. If no other than LOD0 is present for the object, then it will constantly switch all colors.
| no color overlay | ... | ||||||
| LOD0 | LOD1 | LOD2 | LOD3 | LOD4 | LOD5 | LOD6 | ... |
Automatic System
Why automatic system, when other engines offer manual control of LOD behaviour? Automatic system is much less prone to human error and always ensure LOD functionality, even though it might not be always ideal. For these "not ideal" cases there are manual overrides which will be presented later.
LOD0 - LOD1
When the model switches from LOD0 to LOD1 (generally begins to switch LODs) depends on several parameters:
- Spherical size of the object - the larger the object is, the further away it starts to switch to worse LODs

- Triangle count of LOD0 - the more triangles the closer it starts to switch to LOD1

- Field of View (FOV) - the larger FOV the closer it starts to switch to worse LODs

- Graphic settings - "Model geometric detail" on Ultra results in switching to worse LODs further away, Lowest vice-versa

There is a formula, which takes all these aspects into account and result is model with LODs switching in a certain way. Understanding this formula will help to deliver better optimised and better looking model.
LOD1 - LOD2 - LOD3+
When model starts to switch from LOD1 to LOD2, LOD2 to LOD3 and so on depends on 2 things:
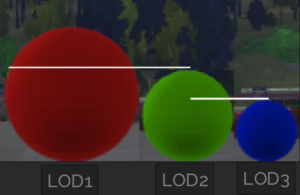
- when spherical surface size of current loaded LOD on monitor screen reached half size againts the original screen surface size when the current LOD appeared on the screen, then +- at that moment it switches to next LOD and so on. +- because it also depends also on the second thing
- the second thing is relative triangle count between LODs. When each LOD have exactly half triangle count of the previous one, then the first rule based on surface size apply exactly. When the relative triangle count is not done more or less by half, then it might switch a lot sooner than later.

Sometimes the LODs are not switching exactly ideally and to fix or adjust it there are manual overrides.
Manual Override
The "triangle count" parameter, which heavily influence how fast or slowly prefab is LODing, can be overridden with "LOD Factors".
Yet it multiplies it only for the LOD switching behavior and it is not really increasing/decreasing number of triangles in the model so keep calm. By setting it, it just forces the specific LOD to remain in the scene for shorter (more triangles) or longer (less triangles) distance from the camera until it switches to the next LOD.
The parameter can be found in Entity/Mesh object component/LOD Factors.
There needs to have as many "LOD Factors" as there are LODs in XOB model, which are inserted in Mesh object component, in order to influence all the LODs. The good news is that the number of factor fills in automatically based on the number of LODs in the inserted XOB model. Each factor corresponds with respective LOD, so factor 3 influence LOD3 and so on. When there is less factors than there is LODs in a model, then these LODs, which don't have their factors assigned are simply not affected at all....or they simply behave like if the factors for them were set to 1. As multiplying by 1 means no change.
An important note is that LOD Factors are inherited from parent prefabs to children prefabs as all the other mesh object component parameters. So it is possible to have some factors setup for the "base" or "core" prefab, which fits most of the prefabs inheriting from it. Yet there is always the possibility to not inherit and to change the factors for any specific prefab/entity in the prefab hierarchy.
Save Process
Saving of the LOD Factors is done the same way as any other parameters are saved on entity components. Anyway here is a guide for the saving process just in case:
The LOD factors for specific prefab can be saved by:
- changing the factor values on "Entity instance" placed in map, applying them to specific inherited prefab by "Apply to prefab" button and then save the world... which saves also all changes in prefabs. Just be aware that this applies all the parameter that you changed on the mesh object component so be sure have not touched anything else on the Entity instance.
- selecting specific inherited prefab first (on the Entity instance placed in map), then changing the factors values and saving the world.

