Terrain Tutorial – Arma 2
Jump to navigation
Jump to search
Introduction
This simple tutorial will explain the basic process of creating a Island in ArmA2.
What the tutorial will deal with:
- Setup Editing Tools 2
- Preparing the Working Foldier
- Setup Visitor 3
- Binarizing your world properly.
- Proper Samplemap to work with.
Setup Editing Tools 2
- It´s pretty important to choose a proper place to install the BI Editing tools 2 before starting with anythings else (a clean empty partition is highly recommended).
- In this tutorial we will use Partition O:\
- 1: Download the BI Editing Tools 2
- 2: Create a foldier called BIS TOOLS 2 in your designated Partition (O:\BIS TOOLS 2\ in our example)
- 3: Open or extract the dowloaded zip file and start the BI_Editing_Tools_2_Setup.exe
- 4: The installer is basically self explanatory, the actual important process is to change the directory for each tool.
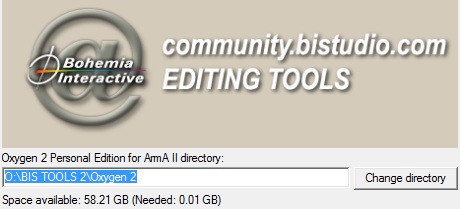
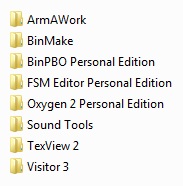
- Make sure to define the respective path for each tool (e.g.: O:\BIS TOOLS 2\Oxygen 2, O:\BIS TOOLS 2\Visitor 3 .....and so on).
- 5: All tools should be installed now in respective directory (O:\BIS TOOLS 2\). Every Tool is stored in its own folder.
Preparing the Working Foldier
- A virtual drive (P:) will be emulated automatically while installtion process of the tools.
- This is actually just a association of the O:\BI TOOLS 2\ArmAWork\ folder in our example.
- One should think about which objects one would like to use on the map. For basic understanding we keep the amount of used objects pretty low, to avoiding loosing the overlook.
- Drive P: already contains the ca folder which contains a couple unpacked pbo files and a further folder called Roads2.
Setup
- 1: In this P:\CA\ create a new folder called plants2.
- 2: Browse to your ArmA2 main directory/Addons folder and unpack the plants2_bush, plants2_clutter, plants2_misc, plants2_tree .pbo's
- How to Extract Pbos
- Dowload the latest Versions of ExtractPbo and DePbo by Mikero at DevHeaven
- Extract them for example to our Tutorial partition O:\ComTools\ExtractPbo.....
- Move the DePbo.dll from the dowloaded DePbo into the ..Windows\System32 folder (as explained in the readme.DePbo.txt)
- Rightclick on a *.pbo and choose Open with, then point to the ExtractPbo\ExtractPbo.exe and set the hook to open this filetype always with ExtractPbo.exe.
- You should be able to extract each *.pbo with a doubble click and you got a clean unpacked foldier with *.p3ds, config.cpp and all other stuff from the pbo.
- There are sure alot of other ways to extract pbos and unrap config.bin's this is a very conformable one.
- 3: Rename thos extracted foldiers by removing the "plants2_"
- 4: Cut&Paste the bush, clutter, misc and tree foldier to the new created P:\CA\plants2\ foldier.
- 5: Do the same with the building2.pbo but without the need to rename anything.
- 6: Now extract the Ca.pbo but only Cut&Paste the stuff inside the extracted Ca.pbo to P:\CA\
- You can do this with all other pbos but for this tutorial we are only using building2&plants2.
- 7: Your P:\CA\ should look like in the picture when you done.
Your Project Foldier
- 1: Now you can create an own Project Foldier in yor P:\ drive. Optimal would be P:\TAG\ name or an other short identification\Namespace.
- In this Tutorial we will use as our Namespace P:\TUT
- 2: Now comes the important part for example that we can use working animations/ladders on our Terrain. For that we need the respective config files from the Optjects we used on our Terrain.
- 3: To do that we can easy create a small bat or use the windows command line: Navigate to the P:\ca folder and
- 4: Run the following dos command: xcopy *.cpp P:\<YourNamespace>\ca\ /S /Y Or manually move the cpps with correct foldier structur to your namespace
- This command creates a duplicate set of '\ca' folders under your namespace and copies only the config.cpp files to each subfolder.
- Read more about that in Synides Great Tutorial ArmA_Build_Environment_Setup
Setup Visitor
This Part of the Tutorial is Work in Progress
- 1: Dowload the Tutorial Sample Map and extract it to our P:\TUT\ Foldier so it will look like P:\TUT\TUT_SampleMap
- 2: Run the O:\BI TOOLS 2\Visitor 3\Visitor3.exe
- 3: Open Tools -> SystemPreferences and fill in your correct path.
Start with our Project
- 1: Open Project -> New (or press Ctrl+N)
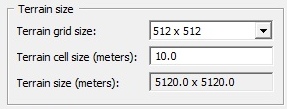
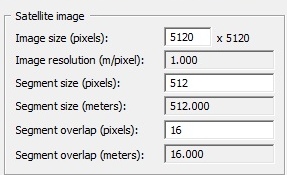
- 2: In the next Project parameters window choose this values and press Ok
- detailed informations about the Project Parameters can be read in the Visitor 3 Manual
- 3: Goto Tools -> Project parameters and open the Calculator and put in Image Size (Pixels): 5120. Hit apply and close only the Calculator
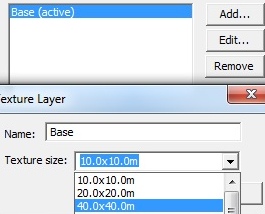
- 4: In the Project parameters window click on Base (active) and press the Edit Button. Choose 40x40m Texture Size. Apply and close the Porject parameters window
- 5: Open Tools -> ProjectPreferences and fill in Foldier-Textures path: P:\TUT\TUT_SampleMap\Data\. Hint ok an close.
Import Terrain
- 1: Goto Open -> Import Terrain from Picture and point to P:\TUT\TUT_SampleMap\Source\terrain\terrain.pbl
Import Satelite&Mask
- 1: Goto Tools -> Import Satellite + Mask.. and point to P:\TUT\TUT_SampleMap\Source\layer.cfg
To be continued.......
