Spectrum Device – Arma 3
mNo edit summary |
m (Consistency and formatting) |
||
| Line 1: | Line 1: | ||
The | [[Category:Arma 3: Editing|Spectrum Device]] | ||
{{Cfg ref|abc}} | |||
{{SideTOC}} | |||
The Spectrum Device is a tool / feature introduced in [[Arma 3 Contact]]. It's ''fully'' integrated only in the optionally loaded expansion data, relying on systems that cannot exist outside of Contact. | |||
The default Arma 3 version contains a light version of the device, which has a basic API for usage in scripts. | |||
{{GVI|arma3|1.96|category}} | |||
{{Important|This is documentation for the Spectrum Device in the vanilla game's sandbox. It will not work as described when the spin-off Arma 3 Contact expansion is loaded into the game.}} | |||
{{Important|Keep in mind that players need to own Arma 3 Contact in order to pick up the device and use it without restrictions (it can still be added by script, but DLC purchase notifications will be shown).}} | |||
== Features == | == Features == | ||
| Line 10: | Line 17: | ||
* Horizontal compass | * Horizontal compass | ||
* Spectrum line animation (i.e., noise) | * Spectrum line animation (i.e., noise) | ||
* Player-controlled frequency selection (mouse wheel by default while in | * Player-controlled frequency selection (mouse wheel by default while in the 'sights' view) | ||
All other features have to be controlled by user-made | All other features have to be controlled by user-made scripting, notably: | ||
* Setting signal values (e.g., stronger signal when pointing towards its source) | * Setting signal values (e.g., a stronger signal when pointing towards its source) | ||
* Playing sounds | * Playing sounds | ||
* Transmitting | * Transmitting signals | ||
Certain aspects are not supported at all: | Certain aspects are not supported at all: | ||
* Signal labels (frequency and signal name above the peak) | * Signal labels (frequency and signal name above the peak) | ||
* Selected signal to transmit (shown below the compass in Contact) | * Selected signal to transmit (shown below the compass in Contact) | ||
== Spectrum Device== | == Spectrum Device== | ||
The device can be configured using global variables. Since the device is calculated locally, it's possible to set different values on each client in multiplayer. | The device can be configured using global variables. Since the device is calculated locally, it's possible to set different values on each client in multiplayer. | ||
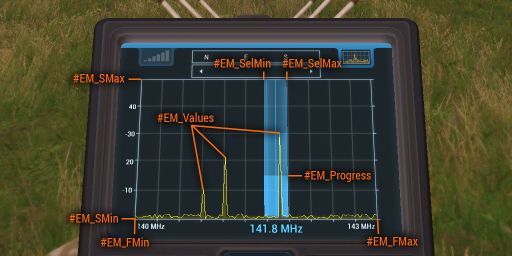
[[File:contact spectrumAnalyzer.jpg|512px]] [[File:contact spectrumAnalyzerTransmit.jpg|512px]]<br /> | [[File:contact spectrumAnalyzer.jpg|512px]] [[File:contact spectrumAnalyzerTransmit.jpg|512px]]<br /> | ||
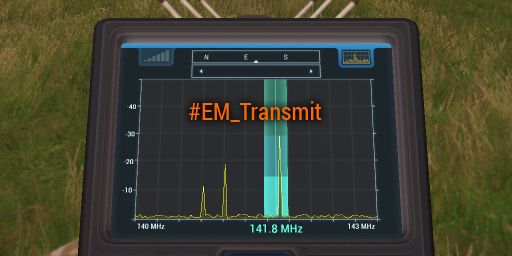
<small style="color:grey;">The images display values set by following code examples.</small> | <small style="color:grey;">The images display values set by the following code examples.</small> | ||
=== Frequency === | === Frequency === | ||
Frequency range in which the analyzer operates. | Frequency range in which the analyzer operates. The values are in [https://en.wikipedia.org/wiki/Megahertz MHz]. | ||
[[missionNamespace]] [[setVariable]] ["<span style="color:#ff6600;">#EM_FMin</span>", 140]; | [[missionNamespace]] [[setVariable]] ["<span style="color:#ff6600;">#EM_FMin</span>", 140]; | ||
[[missionNamespace]] [[setVariable]] ["<span style="color:#ff6600;">#EM_FMax</span>", 143]; | [[missionNamespace]] [[setVariable]] ["<span style="color:#ff6600;">#EM_FMax</span>", 143]; | ||
=== Sensitivity === | === Sensitivity === | ||
Sensitivity of signals the analyzer is able to detect. | Sensitivity of signals the analyzer is able to detect. The values are in [https://en.wikipedia.org/wiki/Decibel dBm]. | ||
[[missionNamespace]] [[setVariable]] ["<span style="color:#ff6600;">#EM_SMin</span>", -60]; | [[missionNamespace]] [[setVariable]] ["<span style="color:#ff6600;">#EM_SMin</span>", -60]; | ||
[[missionNamespace]] [[setVariable]] ["<span style="color:#ff6600;">#EM_SMax</span>", -10]; | [[missionNamespace]] [[setVariable]] ["<span style="color:#ff6600;">#EM_SMax</span>", -10]; | ||
=== Selected Frequency === | === Selected Frequency === | ||
Currently selected frequency. Must be within the frequency range, otherwise it | Currently selected frequency. Must be within the frequency range, otherwise it will not be shown. The values are in MHz. | ||
[[missionNamespace]] [[setVariable]] ["<span style="color:#ff6600;">#EM_SelMin</span>", 141.6]; | [[missionNamespace]] [[setVariable]] ["<span style="color:#ff6600;">#EM_SelMin</span>", 141.6]; | ||
[[missionNamespace]] [[setVariable]] ["<span style="color:#ff6600;">#EM_SelMax</span>", 141.9]; | [[missionNamespace]] [[setVariable]] ["<span style="color:#ff6600;">#EM_SelMax</span>", 141.9]; | ||
| Line 43: | Line 52: | ||
=== Scanning Progress === | === Scanning Progress === | ||
When a signal is selected, it's possible to progress scanning bar by setting the following variable. | When a signal is selected, it's possible to progress the scanning bar by setting the following variable. The value is in a range from 0 to 1. | ||
[[missionNamespace]] [[setVariable]] ["<span style="color:#ff6600;">#EM_Progress</span>", 0.5]; | [[missionNamespace]] [[setVariable]] ["<span style="color:#ff6600;">#EM_Progress</span>", 0.5]; | ||
| Line 53: | Line 62: | ||
List of displayed signal values. The array is in format ''[frequency1, strength1, frequency2, strength2, ... frequencyN, strengthN]''. | List of displayed signal values. The array is in format ''[frequency1, strength1, frequency2, strength2, ... frequencyN, strengthN]''. | ||
[[missionNamespace]] [[setVariable]] ["<span style="color:#ff6600;">#EM_Values</span>", [141.8,-30, 140.85,-50, 141.12,-40]]; | [[missionNamespace]] [[setVariable]] ["<span style="color:#ff6600;">#EM_Values</span>", [141.8,-30, 140.85,-50, 141.12,-40]]; | ||
Revision as of 14:44, 13 January 2020
Template:Cfg ref Template:SideTOC
The Spectrum Device is a tool / feature introduced in Arma 3 Contact. It's fully integrated only in the optionally loaded expansion data, relying on systems that cannot exist outside of Contact.
The default Arma 3 version contains a light version of the device, which has a basic API for usage in scripts.
Features
On its own, the simplified system handles these features:
- Horizontal compass
- Spectrum line animation (i.e., noise)
- Player-controlled frequency selection (mouse wheel by default while in the 'sights' view)
All other features have to be controlled by user-made scripting, notably:
- Setting signal values (e.g., a stronger signal when pointing towards its source)
- Playing sounds
- Transmitting signals
Certain aspects are not supported at all:
- Signal labels (frequency and signal name above the peak)
- Selected signal to transmit (shown below the compass in Contact)
Spectrum Device
The device can be configured using global variables. Since the device is calculated locally, it's possible to set different values on each client in multiplayer.


The images display values set by the following code examples.
Frequency
Frequency range in which the analyzer operates. The values are in MHz.
missionNamespace setVariable ["#EM_FMin", 140];
missionNamespace setVariable ["#EM_FMax", 143];
Sensitivity
Sensitivity of signals the analyzer is able to detect. The values are in dBm.
missionNamespace setVariable ["#EM_SMin", -60];
missionNamespace setVariable ["#EM_SMax", -10];
Selected Frequency
Currently selected frequency. Must be within the frequency range, otherwise it will not be shown. The values are in MHz.
missionNamespace setVariable ["#EM_SelMin", 141.6];
missionNamespace setVariable ["#EM_SelMax", 141.9];
Since the player can change the selection, it's possible to use getVariable to get the current value.
Scanning Progress
When a signal is selected, it's possible to progress the scanning bar by setting the following variable. The value is in a range from 0 to 1.
missionNamespace setVariable ["#EM_Progress", 0.5];
Transmission
To visualize transmitting, set the following variable to true.
missionNamespace setVariable ["#EM_Transmit", true];
Spectrum Signals
List of displayed signal values. The array is in format [frequency1, strength1, frequency2, strength2, ... frequencyN, strengthN].
missionNamespace setVariable ["#EM_Values", [141.8,-30, 140.85,-50, 141.12,-40]];