Roller: Difference between revisions
m (→Visitor 3) |
m (→Visitor 3) |
||
| Line 218: | Line 218: | ||
<br clear="all" /> | <br clear="all" /> | ||
'''7)''' Import the island objects from the objects file generate by Roller. If not done already, you need to add the ''ImportObjects.vis'' script to visitor 3 first. You will find the file in the ''.\visitor\scripts'' folder. | '''7)''' Import the island objects from the objects file generate by Roller. If not done already, you need to add the ''ImportObjects.vis'' script to visitor 3 first. You will find the file in the ''.\visitor 3\scripts'' folder. | ||
<br clear="all" /> | <br clear="all" /> | ||
Revision as of 14:21, 7 January 2009
by the Roller Dev Team
Project Summary
Roller is a community made software developed by Spooner to convert and process OFP and ArmA island files.
It can read:
- 4WVR WRP (OFP unbinarized)
- 8WVR WRP (ArmA unbinarized)
It can write:
- 8WVR WRP (ArmA unbinarized)
- XYZ height data (text file)
- Object data list (text file)
- Mask texture (PNG)
Additional features
- Generate Mask texture (customizable coloring based on terrain point height, definition of forest and urban areas, customizable texture size)
- Replace forest block with customizable single objects (type, densitity, relative frequency)
- Replace single objects with optional offset (1:n and n:1)
- Reduce cell size for more height data points (smooth terrain shape)
- Make terrain bumpy
- Rise/lower sea level
- Generate list of unique objects present in source file
- Replace textures (1:n and n:1)
- Set terrain point height at the edges (to avoid endless repeated terrain)
- Processing summary
Preface
You need be able to use the command line or at least able to edit a batch file to tell the app what to do. There is no GUI available to access the app. The app can be called sequentially to perform a batch operation to process multiple files easily.
Installation
Requirments
- Download and install Visitor 3 as well as buldozer.
- This means to have a P:\ partition with all ArmA source files available.
- Install BI Tools first.
- Use unBuildArmA by MadDogX to mass unpack all ArmA pbos to P:\ or use cpbo by Kegetys to do it one by one yourself.
- Download and unpack the BI Sample Models to P:\. Overwrite existing files.
- No requirements for Roller. Its a self-contained application.
Download
Enduser version
Open source version
For the source you need at least Ruby 1.8.6 installed, along with FXRuby (this is included in the Ruby installer for Windows, but is easily available as a gem if it is not included in your distribution). Recommended development IDE is NetBeans IDE 'Ruby' version.
Additional helpers
- Object definition template
- Sample PEW files (TODO) for OFP standard island files (128, 256, 512, 1024 terrain size and 50m cell size) with object definition templates already imported.
- Sample batch file to execute Roller with given parameter defined in the batch file:
- Copy the given text in a new file called Roller.bat (for windows systems).
- Check the following Roller Instructions section below to understand how to configure the batch file.
- Adapt the path to the Roller application and the path to the source data (wrp files) in the first section of the file.
- Run the batch file.
RunRoller.bat
rem 'Adapt to your local settings':

set FILE_SOURCE=X:\Roller\sourceFiles
set PARTITION_OF_ROLLER=X:
set PATH_TO_ROLLER=X:\Roller


rem 'DO NOT TOUCH'

%PARTITION_OF_ROLLER%
cd %PATH_TO_ROLLER%

rem 'DO NOT TOUCH'

rem 'Example: Only XYZ export from WRP with logfile'.
rem ruby %PATH_TO_ROLLER%\Main.rb %FILE_SOURCE%\EXAMPLE.wrp --xyz %FILE_SOURCE%\EXAMPLE.xyz -f > %FILE_SOURCE%\EXAMPLE_log.txt

rem 'Example: Almost all params (apart from mask generation)'.
rem ruby %PATH_TO_ROLLER%\Main.rb %FILE_SOURCE%\EXAMPLE.wrp --replace-blocks ofp_ace_forest_blocks.yaml --replace-objects ofp_ace_objects.yaml,ofp_arma_objects.yaml --terrain-cell-size 3.125 --terrain-bumpiness 0.5 --object-template EXAMPLE_export_obj_t.txt --unique-objects EXAMPLE_unique_objects.txt --xyz EXAMPLE_export.xyz -f

rem 'Example: Show all available params.'
rem ruby %PATH_TO_ROLLER%\Main.rb -?


rem 'Adapt param list':

ruby %PATH_TO_ROLLER%\Main.rb -?
Instructions
Roller
| short param | paramater | type | description |
|---|---|---|---|
| -F | --replace-forests A,B,C | Comma-separated list of filenames | Replace OFP forest block objects with individual trees and bushes, according to comma-separated list of YAML files (occurs after object replacement) |
| -o | --replace-objects A,B,C | Comma-separated list of filenames | Replace objects according to comma-separated list of YAML files (occurs before forest replacement) |
| -t | --replace-textures A,B,C | Comma-separated list of filenames | Replace textures according to comma-separated list of YAML files |
| -c | --terrain-cell-size N | Float | Set new size of terrain cells (metres). This must be a divisor of the current terrain cell size (e.g. for OFP, which has 50m cells, use 25, 12.5, 6.25 or 3.125) |
| -b | --terrain-bumpiness N | Float | Maximum amount of vertical distortion of new grid points added by terrain-cell-size (metres). Value is ignored unless terrain-cell-size is used. Defaults to 0 (no bumpiness) |
| -r | --raise-sea-level N | Float | Move sea level up by this distance (move sea level down if negative). Done before edge-height is set |
| -e | --edge-height N | Float | Sets the height of all terrain points around the edge to a specific value. This is applied after cell, bumpiness and sea-level changes. |
| -m | --satellite-mask [FILE] | String (optional) | Export a satellite mask PNG image (FILE defaults to 'WRPFILE_mask.png') |
| -C | --satellite-cell-size N | Float | Size of satellite cells, i.e. pixels, in metres (defaults to 2 metres if this option is omitted) |
| -O | --objects [FILE] | String (optional) | Export BIS objects file (FILE defaults to 'WRPFILE_objects.txt') |
| -u | --unique-objects [FILE] | String (optional) | Export a list of objects used in the WRP (FILE defaults to 'WRPFILE_unique_objects.txt') |
| -w | --wrp [FILE] | String (optional) | Export WRP file in 8WVR format, regardless of which format it was imported as (FILE defaults to 'WRPFILE_export.wrp') |
| -x | --xyz [FILE] | String (optional) | Export XYZ file (FILE defaults to 'WRPFILE.xyz') |
| -f | --force-overwrite | Forces overwriting of existing output files (defaults to requesting user confirmation of overwrites) |
Visitor 3
The conversion process is very simple and only takes a few minutes. The goal is to have as much as possible automated, so that only these tasks remain:
1) Read the 4WVR/8WVR WRP with Roller and set the correct params for Roller. Normally you at least need "-x -O -u".
2) Get the XYZ file (elevation data). Get the objects file (all objects of the map). X, Y, Z position and orientation are exported for each object. Unfortunately v3 cannot import object scale. Also the object orientation is 2d only (N/E/S/W. No 3rd dimension: pitch).
This fact does not really hurt though. Both are normally only applied on vegetation and you can easily recreate a similar look via v3 random object scale and pitch functions.
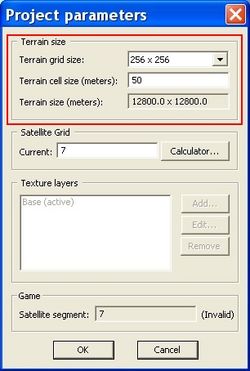
3) Create a new project in v3 with the right dimensions and cell size (OFP default 50 meters). For more details or information about SAT settings consult the Visitor 3 Manual.
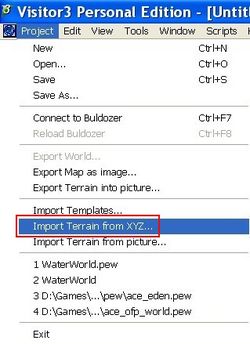
4) Import the XYZ file to get the actual terrain.
5) Import one ore more object template PEWs. To be able to import objects from object template files v3 needs to know the model and its path. Fortunately the information about models is saved in a PEW and you can import that definition in your PEW from another PEW.
You can download object list template PEW that includes all OFP, ArmA objects, as well as some ACE island pack objects. More details on object template definition in general and the ACEIP objects below.
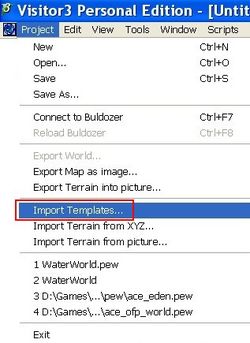
6) Import the object template(s).
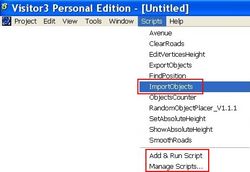
7) Import the island objects from the objects file generate by Roller. If not done already, you need to add the ImportObjects.vis script to visitor 3 first. You will find the file in the .\visitor 3\scripts folder.
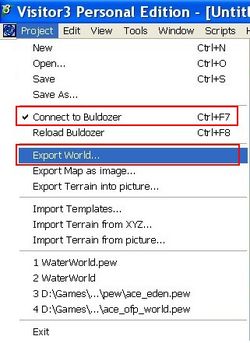
8) Load the terrain with buldozer and export the island to 8WVR WRP. You need to have buldozer loaded, switch back to v3 and select export world.
Done. This course of action takes only a couple of minutes.
Details
Additional information
FAQ
Possible future changes
Changelog
2008-12-31
- ToDo
object template => objectDataList add source name to default file name lower sea level?
