squad.xml: Difference between revisions
JerryHopper (talk | contribs) |
Lou Montana (talk | contribs) m (Some wiki formatting) |
||
| (69 intermediate revisions by 26 users not shown) | |||
| Line 1: | Line 1: | ||
= | {{TOC|side}} | ||
{| class="valign-top" | |||
| [[File:Squadxml_logo_2.jpg|thumb|left|Example of a logo, provided by "squad.xml"]] | |||
| To support the multiplayer community in their effort to play as teams, like many Arma clans and squads are trying to, it is possible to create a common information file - the "squad.xml" -, which is stored on a personal webspace or on an FTP server and loaded by the Arma game server, if a member of this team is playing on it. | |||
Beside detailed information about the single player and its team which can be gained by pressing "P" ingame, the feature supports also a common logo, which will be displayed on vehicles, if such team has boarded it. | |||
|} | |||
== Preliminaries == | == Preliminaries == | ||
If you feel unfamiliar with the XML file format itself and/or have questions about basic XML markup, you are advised to consult literature, documentation | If you feel unfamiliar with the XML file format itself and/or have questions about basic XML markup, you are advised to consult literature, documentation (http://www.w3.org/XML) or tutorials (http://www.w3schools.com/xml/default.asp) as fundamental questions about the XML technology itself will not be covered here. There are multiple resources on in the World Wide Web that can help you learning XML. | ||
== Squad.xml File Content == | |||
The file consist of three main parts: | The file consist of three main parts: | ||
=== Head === | |||
This part defines the doctype. Just leave it as it is! | |||
< | <syntaxhighlight lang="xml"> | ||
< | <?xml version="1.0"?> | ||
<!DOCTYPE squad SYSTEM "squad.dtd"> | |||
</ | <?xml-stylesheet href="squad.xsl" type="text/xsl"?> | ||
</syntaxhighlight> | |||
=== Squad properties === | |||
<syntaxhighlight lang="xml"><squad nick="ESN"> | |||
<name>Example Squad Name</name> | |||
<email>email@example.com</email> | |||
<web>www.example.com</web> | |||
<picture>logo.paa</picture> | |||
<title>Use this e.g. for your squads name or your squads URL</title> | |||
</syntaxhighlight> | |||
{| class="wikitable sortable" | |||
! Property | |||
! Max-Length | |||
! class="unsortable"| Description | |||
|- | |||
| '''nick''' | |||
| 64 | |||
| The clan-tag, is displayed together with players nickname. Attention: Don't use reserved XML tags -> Link | |||
|- | |||
| '''name''' | |||
|The clan-tag, is displayed together with players nickname. Attention: Don't use reserved XML tags -> Link | | 64 | ||
| Squad name | |||
|- | |- | ||
| '''email''' | |||
| | | 64 | ||
| Your contact email | |||
|- | |- | ||
| '''web''' | |||
|Your | | 64 | ||
| Your Website Address | |||
|- | |- | ||
| '''picture''' | |||
|Your logo (optional), it has to in the same folder as the "squad.xml" file | | 64 | ||
| Your logo (optional), it has to in the same folder as the "squad.xml" file | |||
|- | |- | ||
| '''title''' | |||
|Squad name, displayed on vehicles manned by squad members | | 64 | ||
| Squad name, displayed on vehicles manned by squad members | |||
|} | |} | ||
''' | {{Feature|important| | ||
Do '''not''' use any characters beside A-Z, a-z, 0-9 and space in the '''nick''' attribute inside the '''squad''' element of your [[squad.xml]]. | |||
This may lead to strange behaviour e.g. the information from your '''member''' block is displayed but the information from the '''squad''' block is not. | |||
So, if your Tag is like "{{=}}[TAG]{{=}}", put the value like "TAG" into the '''nick''' attribute of the '''squad''' element. | |||
}} | |||
=== Member list === | |||
<syntaxhighlight lang="xml"> | |||
<member id="123456" nick="=[TAG]= John"> | |||
<name>John Doe</name> | |||
<email>john.doe@example.com</email> | |||
<icq>N/A</icq> | |||
<remark>Mostly harmless</remark> | |||
</member> | |||
</squad><!-- closing squad --> | |||
</syntaxhighlight> | |||
{| class="wikitable sortable" | |||
! Property | |||
! Max-Length | |||
! class="unsortable"| Description | |||
|- | |||
| '''id''' | |||
| {{n/a}} | |||
| your Player-UID, always the same and irrespective of your selected character | |||
|your | |||
|- | |- | ||
| '''nick''' | |||
|your nick, the same as used with your selected character | | 64 | ||
| your nick, the same as used with your selected character | |||
|- | |- | ||
| '''name''' | |||
|your "real" name... | | 64 | ||
| your "real" name... | |||
|- | |- | ||
| '''email''' | |||
|your personal email | | 64 | ||
| your personal email | |||
|- | |- | ||
| '''icq''' | |||
|your personal | | 64 | ||
| your personal ICQ number | |||
|- | |- | ||
| '''remark''' | |||
|as the name says it... | | 128 | ||
| as the name says it... | |||
|} | |} | ||
{{Feature|important| | |||
* The value in the ''nick'' | * The value in the '''nick''' attribute of the '''member''' element must represent the exact name of your player's profile name. | ||
* Note that personal details are completely '''optional''' and do '''not''' | |||
}} | |||
{{Feature | Informative | | |||
* You can leave any field blank, but it | * You can leave any field blank, but it is recommended to fill it with a "N/A" instead. | ||
* Extend the members list by adding another XML-"Member" block | * Extend the members list by adding another XML-"Member" block. | ||
}} | |||
== How to get your Player-UID == | |||
<gallery> | |||
|} | Image:Squadxml uid 1.jpg|thumb|Start ArmA and select the player edit-menu | ||
Image:Squadxml uid 2.jpg|thumb|In the bottom-right corner you will find your 6-digit UID | |||
Image:Arma2_player_profile.jpg|thumb|{{arma2}} player profile | |||
Image:Arma2OA_player_profile.jpg|thumb|{{arma2oa}} player profile | |||
Image:Arma3_player_profile.jpg|thumb|Arma 3 player profile | |||
</gallery> | |||
== Logo Creation == | |||
To create a logo for the use with "squad.xml" you'll need: | To create a logo for the use with "squad.xml" you'll need: | ||
* a bitmap manipulating software (aka "Paintprogram") which is able to handle bitmaps in TGA or JPG format. | * a bitmap manipulating software (aka "Paintprogram") which is able to handle bitmaps in TGA or JPG format. | ||
* [ | * [[TexView 2]] or the {{Link|http://www.kegetys.fi/arma-tools/|PAA plugin}} for the use with Adobe Photoshop | ||
For a logo without transparency you can use an ordinary JPG without further treatment. To get transparency you'll have to convert a TGA to [[PAA]] format. It is recommended to alwayd use PAA and to avoid alpha blending. | |||
=== Create the TGA === | |||
In this tutorial we'll use {{Link|http://www.gimp.org|GIMP}} - a open source tool - to create our sample-logo. | |||
In this tutorial we'll use | |||
{{Feature | important | All logos must a have resolution of 2^x / 2^y (e.g. 16 / 16, 32 / 32, 64 / 64, 256 /256)}} | |||
<gallery> | |||
Image:Squadxml gimp new 1.jpg|thumb|Step 1: Create a new file | |||
Image:Squadxml gimp new 2.jpg|thumb|Step 2: Select the appropriate size of image and set background color to transparency | |||
set background color to transparency | Image:Squadxml gimp new 3.jpg|thumb|Step 3: Draw your logo and save as TGA, uncheck RLE compression checkbox... | ||
Image:Squadxml gimp new 4.jpg|thumb|Step 4: after selecting TGA this window appears... | |||
</gallery> | |||
As this description only covers ' | As this description only covers 'Gimp', {{Link|http://block2000.horror-fans.com/tutorials/tut_logo.php|here}} is an old tutorial made for Flashpoint, using Photoshop 6 and explaining how to get an alphachannel working within the TGA-Picture (Note: If you're using Photoshop 7, you'll need to [http://www.adobe.com/support/downloads/detail.jsp?ftpID{{=}}1544 download patch from adobe], since it does not save alphachannel in targa files). You can stick with 'Texview I' as long as those new tools need time to get published. The whole thing is working the same way like it did in Flashpoint, till now. The linked tutorial was part of newsreports by ofp.info. | ||
=== Convert TGA to PAA === | === Convert TGA to PAA === | ||
[[ | |||
[[File:Mylogo.jpg|frame|Your logo should be something like this]] | |||
# Start TexView | # Start TexView | ||
# Open your "logo.tga" | # Open your "logo.tga" | ||
# Save it as "logo.paa" (replace *.tga with *.paa in the "save as"-dialog) | # Save it as "logo.paa" (replace *.tga with *.paa in the "save as"-dialog) | ||
{{Feature | Informative | Your are absolutely free to name your logo as you like. The filename "logo.tga" etc. is just an example.}} | |||
== Publish your Squad data == | |||
To use the "squad.xml" you'll have to upload the following files to a webspace: | To use the "squad.xml" you'll have to upload the following files to a webspace: | ||
* '''squad.xml''' (mandatory) | * '''squad.xml''' (mandatory) | ||
* '''squad.dtd''' (mandatory) | * '''squad.dtd''' (mandatory) | ||
* '''squad.xsl''' (optional), needed to show the "squad.xml" in a webbrowser, but isn't needed by the | * '''squad.xsl''' (optional), needed to show the "squad.xml" in a webbrowser, but isn't needed by the Arma gameserver | ||
* ''' | * '''logo.paa''' (optional) | ||
All files will have to be in the same directory! | All files will have to be in the same directory! | ||
{{Feature | important | .PAA files will not load on IIS 6.0+ without manually adding a custom paa MIME type in the IIS Manager: 'application/octet-stream'<br> | |||
See Microsoft Support: {{Link|http://support.microsoft.com/kb/326965|IIS 6.0 does not serve unknown MIME types}}.}} | |||
== How to use it as a team-member == | == How to use it as a team-member == | ||
* You have to have your own member-block in the "squad.xml" file | * You have to have your own member-block in the "squad.xml" file | ||
* Additionally you have to put the URL of the "squad.xml" of your team into the "Clanpage" field in the player edit-menu. As reference see the picture [[:Image:Squadxml uid 2.jpg|" | * Additionally you have to put the '''full''' URL of the "squad.xml" of your team into the "Clanpage" field in the player edit-menu (e.g {{hl|https://<nowiki/>www.example.com/squad.xml}}). As reference see the picture [[:Image:Squadxml uid 2.jpg|"Arma UID 2"]] in section '''How to get your Player-UID'''. | ||
== Files == | |||
=== Download === | |||
* {{Link|http://www.airpressuretendency.net/gfx/arma_xml_squad_reviewed_for_arma2.zip|arma_xml_squad_reviewed_for_arma2.zip}} | |||
=== Source code === | |||
==== squad.xml ==== | |||
<spoiler> | |||
<syntaxhighlight lang="xml"> | |||
<?xml version="1.0"?> | |||
<!DOCTYPE squad SYSTEM "squad.dtd"> | |||
<?xml-stylesheet href="squad.xsl" type="text/xsl"?> | |||
<squad nick=""> | |||
<name></name> | |||
<email></email> | |||
<web></web> | |||
<picture></picture> | |||
<title></title> | |||
<member id="" nick=""> | |||
<name></name> | |||
<email></email> | |||
<icq></icq> | |||
<remark></remark> | |||
</member> | |||
</squad> | |||
</syntaxhighlight> | |||
</spoiler> | |||
==== squad.dtd ==== | |||
<spoiler> | |||
<syntaxhighlight lang="xml"> | |||
<!ELEMENT squad (name, email, web?, picture?, title?, member+)> | |||
<!ATTLIST squad nick CDATA #REQUIRED> | |||
<!ELEMENT member (name, email, icq?, remark?)> | |||
<!ATTLIST member id CDATA #REQUIRED nick CDATA #REQUIRED> | |||
<!ELEMENT name (#PCDATA)> | |||
<!ELEMENT email (#PCDATA)> | |||
<!ELEMENT icq (#PCDATA)> | |||
<!ELEMENT web (#PCDATA)> | |||
<!ELEMENT picture (#PCDATA)> | |||
<!ELEMENT title (#PCDATA)> | |||
<!ELEMENT remark (#PCDATA)> | |||
</syntaxhighlight> | |||
</spoiler> | |||
< | ==== squad.xsl ==== | ||
http://www. | <spoiler> | ||
http://www. | <syntaxhighlight lang="xml"> | ||
</ | <?xml version="1.0" encoding="ISO-8859-1"?> | ||
<xsl:stylesheet | |||
version="1.0" xmlns:xsl="http://www.w3.org/1999/XSL/Transform"> | |||
<xsl:template match="text()"> | |||
<xsl:value-of select="."/> | |||
</xsl:template> | |||
<xsl:template match="*"> | |||
<xsl:apply-templates/> | |||
</xsl:template> | |||
<xsl:template match="/"> | |||
<HTML> | |||
<HEAD> | |||
<TITLE><xsl:value-of select="/squad/name"/></TITLE> | |||
<LINK REL="stylesheet" TYPE="text/css" HREF="squad.css"></LINK> | |||
</HEAD> | |||
<!-- | |||
XSL template for "squad.xml", used in "Armed Assault" (Ref: "http://www.armedassault.com") | |||
and "{{arma2}}" (Ref: "http://www.arma2.com") | |||
See also the Arma-Wiki page: "http://community.bistudio.com/wiki/squad.xml" | |||
Created by TomNedry, 26.Jan07 | |||
Reviewed by TomNedry, 15.Jul09 | |||
License: Creative Common (http://creativecommons.org/licenses/by-nc-sa/2.5/deed.de) | |||
To have a squad logo in the HTML output, just put a "sqd_logo.png" in the same folder... | |||
--> | |||
<BODY> | |||
<!--Main TABLE --> | |||
<TABLE class="main"> | |||
<TR> | |||
<TD class="left_row" valign="top"> | |||
<!-- Squad Info Table --> | |||
<TABLE class="sqd_info"> | |||
<TR height="30"> | |||
<TD class="one"> | |||
<DIV class="sqd_name"> | |||
<xsl:value-of select="/squad/name"/> | |||
</DIV> | |||
</TD> | |||
</TR> | |||
<TR height="30"> | |||
<TD class="two"> | |||
<DIV class="sqd_title"> | |||
<xsl:value-of select="/squad/title"/> | |||
</DIV> | |||
</TD> | |||
</TR> | |||
<TR height="100%"> | |||
<TD width="100%" height="100%" valign="top"> | |||
<DIV class="sqd_logo"> | |||
<TR height="100%"> | |||
<TD width="100%" height="100%" valign="top"> | |||
<DIV class="sqd_logo"> | |||
<img alt="Picture: Squad Logo"> | |||
<xsl:attribute name="src"> | |||
<xsl:value-of select="concat(substring-before(/squad/picture,'.paa'),'.png')"/> | |||
</xsl:attribute> | |||
</img> | |||
</DIV> | |||
</TD> | |||
</TR> | |||
</DIV> | |||
</TD> | |||
</TR> | |||
<TR height="10"> | |||
<TD class="sqd_website"> | |||
Web site: | |||
<A> | |||
<xsl:attribute name="href"> | |||
http://<xsl:value-of select="/squad/web"/> | |||
</xsl:attribute> | |||
<xsl:value-of select="/squad/web"/> | |||
</A> | |||
</TD> | |||
</TR> | |||
<TR> | |||
<TD class="sqd_email"> | |||
e-mail: | |||
<A> | |||
<xsl:attribute name="href"> | |||
mailto:<xsl:value-of select="/squad/email"/> | |||
</xsl:attribute> | |||
<xsl:value-of select="/squad/email"/> | |||
</A> | |||
</TD> | |||
</TR> | |||
</TABLE> | |||
<!-- Squad Info Table --> | |||
</TD> | |||
<TD class="right_row" valign="top"> | |||
<!-- Member-Info Table --> | |||
<TABLE class="member_info"> | |||
<Tr> | |||
<Th>Members</Th> | |||
<Th>e-mail</Th> | |||
<Th>ICQ</Th> | |||
</Tr> | |||
<xsl:for-each select="/squad/member"> | |||
<TR> | |||
<xsl:attribute name="class"> | |||
<xsl:choose> | |||
<xsl:when test="position() mod 2 = 0">one</xsl:when> | |||
<xsl:otherwise>two</xsl:otherwise> | |||
</xsl:choose> | |||
</xsl:attribute> | |||
<TD class="member_name" rowspan="2"> | |||
<xsl:value-of select="name"/> | |||
</TD> | |||
<TD class="member_email"> | |||
<A> | |||
<xsl:attribute name="href"> | |||
mailto:<xsl:value-of select="email"/> | |||
</xsl:attribute> | |||
<xsl:value-of select="email"/> | |||
</A> | |||
</TD> | |||
<TD class="member_icq"> | |||
<xsl:value-of select="icq"/> | |||
</TD> | |||
</TR> | |||
<TR> | |||
<xsl:attribute name="class"> | |||
<xsl:choose> | |||
<xsl:when test="position() mod 2 = 0">one</xsl:when> | |||
<xsl:otherwise>two</xsl:otherwise> | |||
</xsl:choose> | |||
</xsl:attribute> | |||
<TD class="member_remark" colspan="2" valign="top"> | |||
<xsl:value-of select="remark"/> | |||
</TD> | |||
</TR> | |||
</xsl:for-each> | |||
</TABLE> | |||
<!-- Member Info Table --> | |||
<!--Main TABLE --> | |||
</TD> | |||
</TR> | |||
</TABLE> | |||
<p style="font-family:verdana;font-size:7pt;color:darkgrey;text-align: center;padding: 10px;"> | |||
"squad.xsl" by <strong>TomNedry</strong>, last change: 15.Jul09 | |||
</p> | |||
</BODY> | |||
</HTML> | |||
</xsl:template> | |||
</xsl:stylesheet> | |||
</syntaxhighlight> | |||
</spoiler> | |||
== | ==== squad.css ==== | ||
<spoiler> | |||
<syntaxhighlight lang="css"> | |||
/* | |||
CSS template for "squad.xml", used in "Armed Assault" (Ref: "http://www.armedassault.com") | |||
and "Arma 2" (Ref: "http://www.arma2.com") | |||
See also the Arma-Wiki page: "http://community.bistudio.com/wiki/squad.xml" | |||
Created by TomNedry, 26.Jan07 | |||
Reviewed by TomNedry, 15.Jul09 | |||
License: Creative Common (http://creativecommons.org/licenses/by-nc-sa/2.5/deed.de) | |||
*/ | |||
body | |||
{ | |||
font-family: Arial, sans-serif; | |||
background-color: #EAECE5; | |||
margin: 0; | |||
} | |||
a:link | |||
{ | |||
text-decoration: none; | |||
color: #800000; | |||
} | |||
a:visited | |||
{ | |||
text-decoration: none; | |||
color: #800000; | |||
} | |||
a:hover | |||
{ | |||
text-decoration: none; | |||
color: #FFF; | |||
} | |||
a:active | |||
{ | |||
text-decoration: none; | |||
} | |||
a:focus | |||
{ | |||
text-decoration: none; | |||
} | |||
th | |||
{ | |||
background-color: #AEB399; | |||
font-family: Arial, sans-serif; | |||
font-size: 10pt; | |||
font-weight: bold; | |||
padding: 4px; | |||
} | |||
tr.one | |||
{ | |||
background-color: #DDE4C3; | |||
width: 100%; | |||
padding: 4px; | |||
} | |||
tr.two | |||
{ | |||
background-color: #D2D9B8; | |||
width: 100%; | |||
padding: 4px; | |||
} | |||
td.one | |||
{ | |||
background-color: #AEB399; | |||
width: 100%; | |||
} | |||
td.two | |||
{ | |||
background-color: #E2E9C7; | |||
width: 100%; | |||
} | |||
.main | |||
{ | |||
text-align: center; | |||
width: 100%; | |||
border: none; | |||
} | |||
div.sqd_name | |||
{ | |||
text-align: center; | |||
font-family: Arial, sans-serif; | |||
font-size: 12pt; | |||
font-weight: bold; | |||
} | |||
div.sqd_title | |||
{ | |||
text-align: center; | |||
font-family: Arial, sans-serif; | |||
font-size: 10pt; | |||
} | |||
div.sqd_logo | |||
{ | |||
text-align: center; | |||
font-size: 8pt; | |||
padding: 5px; | |||
} | |||
.sqd_info | |||
{ | |||
border: 1px dotted darkgrey; | |||
width: 100%; | |||
padding: 0; | |||
border-spacing: 0; | |||
} | |||
.sqd_website | |||
{ | |||
font-family: Arial, sans-serif; | |||
font-size: 10pt; | |||
text-align: center; | |||
background-color: #AEB399; | |||
width: 100%; | |||
padding: 4px; | |||
border-spacing: 0; | |||
} | |||
.sqd_email | |||
{ | |||
font-family: Arial, sans-serif; | |||
font-size: 10pt; | |||
text-align: center; | |||
background-color: #AEB399; | |||
width: 100%; | |||
padding: 4px; | |||
border-spacing: 0; | |||
} | |||
.left-row | |||
{ | |||
vertical-align: top; | |||
height: 100%; | |||
} | |||
.right-row | |||
{ | |||
vertical-align: top; | |||
height: 100%; | |||
} | |||
.member_info | |||
{ | |||
border: 1px dotted darkgrey; | |||
width: 100%; | |||
padding: 0; | |||
border-spacing: 0; | |||
} | |||
.member_name | |||
{ | |||
font-family: Arial, sans-serif; | |||
color: #000; | |||
font-size: 10pt; | |||
padding: 4px; | |||
} | |||
.member_email | |||
{ | |||
font-family: Arial, sans-serif; | |||
color: #000; | |||
font-size: 8pt; | |||
padding: 4px; | |||
} | |||
.member_icq | |||
{ | |||
font-family: Arial, sans-serif; | |||
color: #000; | |||
font-size: 8pt; | |||
padding: 4px; | |||
} | |||
.member_remark | |||
{ | |||
font-family: Arial, sans-serif; | |||
color: #000; | |||
font-size: 8pt; | |||
text-align: center; | |||
} | |||
</syntaxhighlight> | |||
</spoiler> | |||
== See Also == | |||
* [[TexView]] ({{ofp}}) | |||
* [[TexView 2]] ({{arma1}}, {{arma2}}, {{arma3}}) | |||
== Tools/Programs == | |||
* {{Link|link= http://forums.bistudio.com/showthread.php?144710-Squad-XML-manager|text= Squad XML manager}} for use on the Desktop by laxentis [application/exe] | |||
* {{Link|link= http://forums.bistudio.com/showthread.php?117080-Squad-xml-Editor-Open-source-webtool|text= Squad.xml Editor - Open source webtool}} by TomNedry [source/php] | |||
* {{Link|link= http://forums.bistudio.com/showthread.php?145852-Squad-xml-Editor-2-Manage-multiple-squads-via-a-browser|text= Squad.xml Editor 2 - Manage multiple squads via a browser }} by TomNedry [source/php] | |||
* {{Link|link= http://forums.bistudio.com/showthread.php?145650-MyBB-Squad-XML-managment-plugin|text= MyBB Squad.XML managment plugin}} by Jsmuk [source/php] | |||
== Online Arma XML Hoster/Editors == | |||
These hosters allow you to create and edit {{arma3}} squad.xml files directly online and you will be provided with a unique link to your squad.xml to put into your game profile. | |||
* | * {{Link|http://armasquads.com/|Arma Squads XML Hoster/Editor}} Support all image formats and online image to PAA conversion for transparent squad logos | ||
[[Category: | [[Category:BIS File Formats]] | ||
{{GameCategory|arma1|File Formats}} | |||
{{GameCategory|arma1|Community}} | |||
{{GameCategory|arma1|Multiplayer}} | |||
{{GameCategory|arma2|Multiplayer}} | |||
{{GameCategory|arma3|Multiplayer}} | |||
Latest revision as of 03:46, 12 February 2024
| To support the multiplayer community in their effort to play as teams, like many Arma clans and squads are trying to, it is possible to create a common information file - the "squad.xml" -, which is stored on a personal webspace or on an FTP server and loaded by the Arma game server, if a member of this team is playing on it.
Beside detailed information about the single player and its team which can be gained by pressing "P" ingame, the feature supports also a common logo, which will be displayed on vehicles, if such team has boarded it. |
Preliminaries
If you feel unfamiliar with the XML file format itself and/or have questions about basic XML markup, you are advised to consult literature, documentation (http://www.w3.org/XML) or tutorials (http://www.w3schools.com/xml/default.asp) as fundamental questions about the XML technology itself will not be covered here. There are multiple resources on in the World Wide Web that can help you learning XML.
Squad.xml File Content
The file consist of three main parts:
Head
This part defines the doctype. Just leave it as it is!
<?xml version="1.0"?>
<!DOCTYPE squad SYSTEM "squad.dtd">
<?xml-stylesheet href="squad.xsl" type="text/xsl"?>
Squad properties
<squad nick="ESN">
	<name>Example Squad Name</name>
	<email>email@example.com</email>
	<web>www.example.com</web>
	<picture>logo.paa</picture>
	<title>Use this e.g. for your squads name or your squads URL</title>
| Property | Max-Length | Description |
|---|---|---|
| nick | 64 | The clan-tag, is displayed together with players nickname. Attention: Don't use reserved XML tags -> Link |
| name | 64 | Squad name |
| 64 | Your contact email | |
| web | 64 | Your Website Address |
| picture | 64 | Your logo (optional), it has to in the same folder as the "squad.xml" file |
| title | 64 | Squad name, displayed on vehicles manned by squad members |
Member list
	<member id="123456" nick="=[TAG]= John">
		<name>John Doe</name>
		<email>john.doe@example.com</email>
		<icq>N/A</icq>
		<remark>Mostly harmless</remark>
	</member>
</squad><!-- closing squad -->
| Property | Max-Length | Description |
|---|---|---|
| id | N/A | your Player-UID, always the same and irrespective of your selected character |
| nick | 64 | your nick, the same as used with your selected character |
| name | 64 | your "real" name... |
| 64 | your personal email | |
| icq | 64 | your personal ICQ number |
| remark | 128 | as the name says it... |
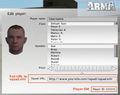
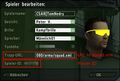
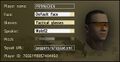
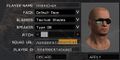
How to get your Player-UID
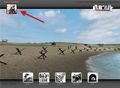
Start ArmA and select the player edit-menu
In the bottom-right corner you will find your 6-digit UID
Arma 2 player profile
Arma 2: Operation Arrowhead player profile
Arma 3 player profile


Logo Creation
To create a logo for the use with "squad.xml" you'll need:
- a bitmap manipulating software (aka "Paintprogram") which is able to handle bitmaps in TGA or JPG format.
- TexView 2 or the PAA plugin for the use with Adobe Photoshop
For a logo without transparency you can use an ordinary JPG without further treatment. To get transparency you'll have to convert a TGA to PAA format. It is recommended to alwayd use PAA and to avoid alpha blending.
Create the TGA
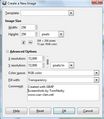
In this tutorial we'll use GIMP - a open source tool - to create our sample-logo.

Step 1: Create a new file
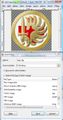
Step 2: Select the appropriate size of image and set background color to transparency
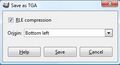
Step 3: Draw your logo and save as TGA, uncheck RLE compression checkbox...
Step 4: after selecting TGA this window appears...


As this description only covers 'Gimp', here is an old tutorial made for Flashpoint, using Photoshop 6 and explaining how to get an alphachannel working within the TGA-Picture (Note: If you're using Photoshop 7, you'll need to download patch from adobe, since it does not save alphachannel in targa files). You can stick with 'Texview I' as long as those new tools need time to get published. The whole thing is working the same way like it did in Flashpoint, till now. The linked tutorial was part of newsreports by ofp.info.
Convert TGA to PAA

- Start TexView
- Open your "logo.tga"
- Save it as "logo.paa" (replace *.tga with *.paa in the "save as"-dialog)
Publish your Squad data
To use the "squad.xml" you'll have to upload the following files to a webspace:
- squad.xml (mandatory)
- squad.dtd (mandatory)
- squad.xsl (optional), needed to show the "squad.xml" in a webbrowser, but isn't needed by the Arma gameserver
- logo.paa (optional)
All files will have to be in the same directory!
How to use it as a team-member
- You have to have your own member-block in the "squad.xml" file
- Additionally you have to put the full URL of the "squad.xml" of your team into the "Clanpage" field in the player edit-menu (e.g https://www.example.com/squad.xml). As reference see the picture "Arma UID 2" in section How to get your Player-UID.
Files
Download
Source code
squad.xml
<?xml version="1.0"?>
<!DOCTYPE squad SYSTEM "squad.dtd">
<?xml-stylesheet href="squad.xsl" type="text/xsl"?>
<squad nick="">
	<name></name>
	<email></email>
	<web></web>
	<picture></picture>
	<title></title>
	<member id="" nick="">
		<name></name>
		<email></email>
		<icq></icq>
		<remark></remark>
	</member>
</squad>
squad.dtd
<!ELEMENT squad (name, email, web?, picture?, title?, member+)>
<!ATTLIST squad nick CDATA #REQUIRED>
<!ELEMENT member (name, email, icq?, remark?)>
<!ATTLIST member id CDATA #REQUIRED nick CDATA #REQUIRED>
<!ELEMENT name (#PCDATA)>
<!ELEMENT email (#PCDATA)>
<!ELEMENT icq (#PCDATA)>
<!ELEMENT web (#PCDATA)>
<!ELEMENT picture (#PCDATA)>
<!ELEMENT title (#PCDATA)>
<!ELEMENT remark (#PCDATA)>
squad.xsl
<?xml version="1.0" encoding="ISO-8859-1"?>
<xsl:stylesheet
	version="1.0" xmlns:xsl="http://www.w3.org/1999/XSL/Transform">
<xsl:template match="text()">
	<xsl:value-of select="."/>
</xsl:template>
<xsl:template match="*">
	<xsl:apply-templates/>
</xsl:template>
<xsl:template match="/">
	<HTML>
	<HEAD>
		<TITLE><xsl:value-of select="/squad/name"/></TITLE>
		<LINK REL="stylesheet" TYPE="text/css" HREF="squad.css"></LINK>
	</HEAD>
	<!--
	XSL template for "squad.xml", used in "Armed Assault" (Ref: "http://www.armedassault.com")
		and "{{arma2}}" (Ref: "http://www.arma2.com")
	See also the Arma-Wiki page: "http://community.bistudio.com/wiki/squad.xml"
	Created by TomNedry, 26.Jan07
		Reviewed by TomNedry, 15.Jul09
	License: Creative Common (http://creativecommons.org/licenses/by-nc-sa/2.5/deed.de)
	To have a squad logo in the HTML output, just put a "sqd_logo.png" in the same folder...
	-->
	<BODY>
	<!--Main TABLE -->
	<TABLE class="main">
		<TR>
			<TD class="left_row" valign="top">
		<!-- Squad Info Table -->
				<TABLE class="sqd_info">
					<TR height="30">
						<TD class="one">
							<DIV class="sqd_name">
								<xsl:value-of select="/squad/name"/>
							</DIV>
						</TD>
					</TR>
					<TR height="30">
						<TD class="two">
							<DIV class="sqd_title">
								<xsl:value-of select="/squad/title"/>
							</DIV>
						</TD>
					</TR>
					<TR height="100%">
						<TD width="100%" height="100%" valign="top">
							<DIV class="sqd_logo">
								<TR height="100%">
									<TD width="100%" height="100%" valign="top">
										<DIV class="sqd_logo">
											<img alt="Picture: Squad Logo">
												<xsl:attribute name="src">
													<xsl:value-of select="concat(substring-before(/squad/picture,'.paa'),'.png')"/>
												</xsl:attribute>
											</img>
										</DIV>
									</TD>
								</TR>
							</DIV>
						</TD>
					</TR>
					<TR height="10">
						<TD class="sqd_website">
							Web site:
							<A>
								<xsl:attribute name="href">
								http://<xsl:value-of select="/squad/web"/>
								</xsl:attribute>
								<xsl:value-of select="/squad/web"/>
							</A>
						</TD>
					</TR>
					<TR>
						<TD class="sqd_email">
							e-mail:
							<A>
								<xsl:attribute name="href">
								mailto:<xsl:value-of select="/squad/email"/>
								</xsl:attribute>
								<xsl:value-of select="/squad/email"/>
							</A>
						</TD>
					</TR>
				</TABLE>
		<!-- Squad Info Table -->
			</TD>
			<TD class="right_row" valign="top">
		<!-- Member-Info Table -->
				<TABLE class="member_info">
					<Tr>
						<Th>Members</Th>
						<Th>e-mail</Th>
						<Th>ICQ</Th>
					</Tr>
					<xsl:for-each select="/squad/member">
					<TR>
						<xsl:attribute name="class">
							<xsl:choose>
								<xsl:when test="position() mod 2 = 0">one</xsl:when>
								<xsl:otherwise>two</xsl:otherwise>
							</xsl:choose>
						</xsl:attribute>
						<TD class="member_name" rowspan="2">
							<xsl:value-of select="name"/>
						</TD>
						<TD class="member_email">
							<A>
								<xsl:attribute name="href">
									mailto:<xsl:value-of select="email"/>
								</xsl:attribute>
								<xsl:value-of select="email"/>
							</A>
						</TD>
						<TD class="member_icq">
							<xsl:value-of select="icq"/>
						</TD>
					</TR>
					<TR>
						<xsl:attribute name="class">
							<xsl:choose>
								<xsl:when test="position() mod 2 = 0">one</xsl:when>
								<xsl:otherwise>two</xsl:otherwise>
							</xsl:choose>
						</xsl:attribute>
						<TD class="member_remark" colspan="2" valign="top">
							<xsl:value-of select="remark"/>
						</TD>
					</TR>
					</xsl:for-each>
				</TABLE>
		<!-- Member Info Table -->
		<!--Main TABLE -->
			</TD>
		</TR>
	</TABLE>
	<p style="font-family:verdana;font-size:7pt;color:darkgrey;text-align: center;padding: 10px;">
	"squad.xsl" by <strong>TomNedry</strong>, last change: 15.Jul09
	</p>
	</BODY>
	</HTML>
</xsl:template>
</xsl:stylesheet>
squad.css
/*
	CSS template for "squad.xml", used in "Armed Assault" (Ref: "http://www.armedassault.com")
	and "Arma 2" (Ref: "http://www.arma2.com")
	See also the Arma-Wiki page: "http://community.bistudio.com/wiki/squad.xml"
	Created by TomNedry, 26.Jan07
	Reviewed by TomNedry, 15.Jul09
	License: Creative Common (http://creativecommons.org/licenses/by-nc-sa/2.5/deed.de)
*/

body
{
	font-family: Arial, sans-serif;
	background-color: #EAECE5;
	margin: 0;
}

a:link
{
	text-decoration: none;
	color: #800000;
}
a:visited
{
	text-decoration: none;
	color: #800000;
}
a:hover
{
	text-decoration: none;
	color: #FFF;
}
a:active
{
	text-decoration: none;
}
a:focus
{
	text-decoration: none;
}

th
{
	background-color: #AEB399;
	font-family: Arial, sans-serif;
	font-size: 10pt;
	font-weight: bold;
	padding: 4px;
}

tr.one
{
	background-color: #DDE4C3;
	width: 100%;
	padding: 4px;
}
tr.two
{
	background-color: #D2D9B8;
	width: 100%;
	padding: 4px;
}
td.one
{
	background-color: #AEB399;
	width: 100%;
}
td.two
{
	background-color: #E2E9C7;
	width: 100%;
}
.main
{
	text-align: center;
	width: 100%;
	border: none;
}
div.sqd_name
{
	text-align: center;
	font-family: Arial, sans-serif;
	font-size: 12pt;
	font-weight: bold;
}
div.sqd_title
{
	text-align: center;
	font-family: Arial, sans-serif;
	font-size: 10pt;
}
div.sqd_logo
{
	text-align: center;
	font-size: 8pt;
	padding: 5px;
}
.sqd_info
{
	border: 1px dotted darkgrey;
	width: 100%;
	padding: 0;
	border-spacing: 0;
}
.sqd_website
{
	font-family: Arial, sans-serif;
	font-size: 10pt;
	text-align: center;
	background-color: #AEB399;
	width: 100%;
	padding: 4px;
	border-spacing: 0;
}
.sqd_email
{
	font-family: Arial, sans-serif;
	font-size: 10pt;
	text-align: center;
	background-color: #AEB399;
	width: 100%;
	padding: 4px;
	border-spacing: 0;
}
.left-row
{
	vertical-align: top;
	height: 100%;
}
.right-row
{
	vertical-align: top;
	height: 100%;
}
.member_info
{
	border: 1px dotted darkgrey;
	width: 100%;
	padding: 0;
	border-spacing: 0;
}
.member_name
{
	font-family: Arial, sans-serif;
	color: #000;
	font-size: 10pt;
	padding: 4px;
}
.member_email
{
	font-family: Arial, sans-serif;
	color: #000;
	font-size: 8pt;
	padding: 4px;
}
.member_icq
{
	font-family: Arial, sans-serif;
	color: #000;
	font-size: 8pt;
	padding: 4px;
}
.member_remark
{
	font-family: Arial, sans-serif;
	color: #000;
	font-size: 8pt;
	text-align: center;
}
See Also
Tools/Programs
- Squad XML manager for use on the Desktop by laxentis [application/exe]
- Squad.xml Editor - Open source webtool by TomNedry [source/php]
- Squad.xml Editor 2 - Manage multiple squads via a browser by TomNedry [source/php]
- MyBB Squad.XML managment plugin by Jsmuk [source/php]
Online Arma XML Hoster/Editors
These hosters allow you to create and edit Arma 3 squad.xml files directly online and you will be provided with a unique link to your squad.xml to put into your game profile.
- Arma Squads XML Hoster/Editor Support all image formats and online image to PAA conversion for transparent squad logos