
Character Gear Creation/Vest/Asset Preparation – Arma Reforger
Mesh Preparation
General
Vest creation is not so much different from headgear, so there is quite a lot of overlap. There are of course some differences nevertheless it is recommended to read Headgear tutorial before proceeding any further.
Similar to headgear, you can use one of the existing models to position your character.
There is one important thing to keep in mind - vests are able to influence model of the jacket and switch it to deflated version of the mesh. Right now, those deflated variants of the jackets are created by hand and they are made in a way, which simulates a jacket when vest is worn on top of it.
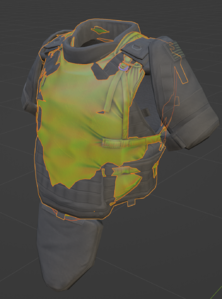
In Jacket_Deflated_Template.fbx, there is voxelised model of M88 jacket which you can use to adjust your mesh, so it fits nicely the character. Armored Vests in Reforger are by default without any pouches and it is possible to wear on top of it any available in game harness. If you want to keep your vest compatible with other harnesses available in game, it might be necessary to adjust how close is vest to the body. In Blender, you can for instance use Sculpt Mode.
Pay attention especially to rear parts of the body and ensure that jacket is not clipping through the vest. After few iterations, you should have model ready for skinning like on pic below.

Rigging
Once vest is properly oriented and placed, it is possible to move towards the next step, which is rigging of the model. Unlike Sample Helmet, skinning of Arma 3 models will be way different around chest area so utilizing weights from A3 is not an option. Fortunately, weight transfer gives usually a good results and then only manual tweaks are necessary.
Importing skeleton

Similar to Sample Helmet, first step will be copying skeleton from Character_Weights_Template.blend to Blender instance containing vest. Exact steps are same on Sample Helmet tutorial and if everything went fine, you should end up with something like this.

Again, it is important that model contains only Armature and empty objects from the template!
- In total, 163 bones/empty objects (156 bones and 6 dummy objects) should be present when model is imported into Workbench - see note in Importing model section
Skinning asset
After skeleton was successfully added to the scene, next step will be skinning of the asset. Main differences compared to skinning of Sample Helmet are:
- Vests are influenced by dozens of bones so initial transfer weight is a must unless you want to spend significant amount of time making your own skinning from scratch
- After transferring weights, some manual adjustments are usually required
- Weights for the vest can be transferred from either Character_Weights_Template.blend (for non blender users, there is Character_Template.fbx, which still needs to be rotated) or from other vests, like... Vest_SampleVest_01
- Using Sample Vest as base should yield better results in most cases - especially areas around armpits should look better
Of course, when Sample Vest was prepared, weights were transferred from another vest - namely 6B2 - therefore don't be surprised to see pictures of it in this tutorial.
Transfer weights
Once reference mesh is in, you can follow instruction for transferring weights which are mentioned in Headgear tutorial.
As an example, 6B2 was used as base for Transfer Weights functions. Since 6B2 vests doesn't have neither arm or groin protection, those parts were moved to separate object called Addon_LOD0 in the sample blend file.
Following instructions listed on Sample Headgear page, you should get quite good skinning on central part of the vest.
When it comes to mesh located in Addon_LOD0, you can use Character_Weights_Template.blend to rest of the weights
Transferring weights to Object_LOD0 using 6B2 as source
Transferring weights to Addon_LOD0 parts using Character_Weights_Template.blend file


Tweaking skinning

In both cases, it will be still required to tweak skinning in some areas and in Weight Paint mode but since applying animation to vest in Blender is rather problematic thing (especially after rotation), it might be worth to go back to this stage once model is imported in game.
Armature modifier
After doing initial skinning there is one more thing to do in order to link vertex groups with skeleton and thus achieve animated asset:
In Modifiers tab, add new Armature modifier via Add Modifier (1) button
- In Object property, select Armature as object to deform with
After that, you could quickly verify if asset is skinned by selecting Armature and switching to Pose Mode. In this mode you can try to move bones and see if mesh is following them.
Colliders
Vests in Arma Reforger, similar to helmets, are using actual colliders for protection of the character so its quite important to set it correctly.
There is one major difference though - on vests areas protected by kevlar (soft protection in general) are not using colliders. This is caused by the fact, that colliders can be only skinned to one bone, which in case of more flexible parts makes it quite hard to create mesh which is properly going to protect you against incoming bullets. In such cases, general damage modifiers are used which are applied to certain hitzones on the parent character and they have their own disadvantages, since this protection is omnidirectional - more about that will be mentioned in Prefab Configuration part.
For now, it is assumed that colliders will be necessary for following parts:
- Front & rear armor plate
- Side armor plates
- Groin protection
Creating colliders
First step towards creating proper collider will be making of a new object, which should receive one of the colliders prefixes (in this case UTM_ prefix was used). In case of vests, in most cases it will be better to use:
- Simple single sided faces
- Game Material with predefined thickness
While in theory it would be possible to create realistic plates with thickness and shape of real life objects, end result would probably clip through character and hit detection could also not work correctly if those colliders would be too close to character body.
Plates setup

Depending on what kind of vests are you doing, it is possible to do some experimentation about setup of colliders although it is worth to keep in mind limitation of collider animation - every collider object can be only attached to single bone.
In case of 6B2, each row of plates is attached to different Spine bone. Such solution has its pros & cons:
- ❌ Requires multiple colliders
- ✅ Follows character more closely which somewhat simulate multiple tiny plate setup of 6B2
- ❌ There are gaps or overlaps in fire geometry in some character poses


Other option for colliders setup might be using single bone (& object) for plates located on the chest. Such setup is somehow more realistic for single rigid armored plates which can be placed in modern plate carriers.
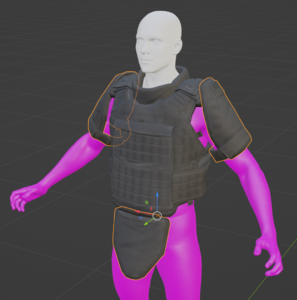
Sample Vest is an example of a vest which use single bone - Spine5 - for all chest mounted plates. Groin protection plate is connected to Spine1.
On picture below, you can observe that there are no visible gaps when character is looking upwards and that colliders are also not clipping with the character.


Even though Sample Vest colliders are using single bone for most of the panels, they are still split into multiple objects. This was done on purpose to let you experiment with different bone setups. In final models though, it is worth to merge such objects and keep amount of colliders as low as possible.
Creating material
Material Research
Next step in mesh preparation will be doing some research about what material are used on vest that you are making.
In this case, Sample Vest is supposed to have protection level equal to ESAPI rev. G plate.
Material type
Once we have established what we are looking for, it is time to commence search for type of material used in such plate. In case of Sample Vest, finding general information about ESAPI plate (we are not aiming here for any specific model) was quite easy, since most of SAPI ballistic plates are made out of boron carbide.
Material density
After finding type of the material, it is time to obtain density data. From boron carbide Wiki page, you can obtain information about density of this material which is equal to 2.50 g/cm3.
Material thickness
Next on the list will be finding of thickness of the plate. If its not possible to find a solid numbers on such material, try to use values from similar types of plates. In case of Sample Vest, thickness listed on https://pgd-bodyarmor.com/shop/ballistic-plate-pgd-esapi-iv-sa/ page - 24.9mm - was used.
Material kinetic protection
With all that data, it is is possible to create material with protection similar to desired level. In this case, Sample Vest is aiming at NIJ Level IV protection, which is kind of equivalent of 16mm of RHA armor.
Using following spreadsheet it is possible to estimate KE coef for such game material.

Game Material creation
Once you have data, you can commence with creation of the material by performing following steps:
- Create new inherited material - usage of one of the existing materials is recommended or duplicate some existing material which inherits from one of the core materials. In case of Sample Vest hard_aramid_7.3mm.gamemat was duplicated
- Name that new material in a way, which represents its thickness (i.e. Plate_SampleVest_01.gamemat )
- This way, you will inherit for instance correct particle effects, sounds and decals
- In vanilla game those visual & sound effects are still being worked on (0.9.9)
- Change Density, Thickness & Kinetic Resistance
Materials & Layer Preset
Next step will be assigning of material and layer preset to the collider itself. You can do it via Enfusion Blender Tools Object Tools or manually (in case you are using different 3D software). Once you know how to change material and layer preset, do following things:
- Set collider Layer Preset to FireGeo
- Assign game material - either one of the existing vanilla ones or the one you have created in previous step
Splitting model
In case of Sample Vest, model separated in two parts - one containing main vest and the other one contains additional arm and groin protection. This way, you can have two variants of the vest quite easily.
To keep this thing sort of manageable, it is possible to use in Blender collection linking & Batch FBX Export function which is part of Enfusion Blender Tools. Collection linking allows you to have same object in multiple collections and that means you don't have to create duplicates when making some tweaks to i.e. some common parts which exist in both two models you want to export.
Setting collection

Let's begin with creating new collection and then linking objects to them. To do so, perform following actions:
- In Outliner, create new Collection called for example Export - this collection is purely for organizational purposes
- Create a new sub collection for variants of the vests you want to export. 🟥 Name of this collection determines name of the exported FBX! 🟥
- In case of Sample Vest, two new collection were created - Vest_SampleVest_01 & Vest_SampleVest_01_addon
- Create a new sub collection for variants of the vests you want to export. 🟥 Name of this collection determines name of the exported FBX! 🟥
- Select Armature & all empty objects in Memory Points collection in Outliner
- Either:
- Open Menu Search ( ↹ Tab using Industry Compatible Keymap ) and search for Link to Collection
- If you want to link multiple objects (like multiple memory points + armature) then select object.link_to_collection ➡Link to Collection. (note it is also possible to link this way single objects too!)
- It is possible to also use object.collection_link ➡ Link to Collection but this one will only let you link single object
- Use Link to Collection shortcut ( Ctrl + Shift + M or Ctrl + Shift + G using Industry Compatible Keymap)
- Open Menu Search ( ↹ Tab using Industry Compatible Keymap ) and search for Link to Collection
- In a pop-up window, select the collection to which you want to link the object
- In this case it will be Export➡Vest_SampleVest_01
- Repeat above steps and link armature and memory points to Export➡Vest_SampleVest_01_addon collection
Same principle applies to LODs & Colliders, once you are through this procedure for rest of the objects, you should end up with something like this:

You can see that objects that have set relations, such as colliders or memory points, are linked under the parent object (in this case, the Armature). Objects that are not linked to the collection, like UTM_Armor_Addon in Vest_SampleVest_01 collection, will be shown grayed out and without controls for visibility
Batch FBX Export
Once you have set all collections, you can select folder where to export FBX files in Settings tab of Enfusion Tools. After that, it is possible to select collections which you want to export (in this case Vest_SampleVest_01 & Vest_SampleVest_01_addon), click on it with ![]() and then select Batch Export FBX option from the context menu.
and then select Batch Export FBX option from the context menu.

After that you should spot new FBX models in location that you have set.
Creating Item variant
One of the final steps in equipment preparation is creating a special item variant of the model. Similar to the Headgear tutorial, you can create such item variant by modifying regular mesh and moving it around. Depending how the mesh was prepared (Marvelous Designer) it might be worth investigating if such folded variant can be done using simulation. In case of this vest, model was prepared by flattening mesh in one axis a little bit and if you don't pursue perfection, then such setup should be sufficient for most of the use cases.

Importing model
Last step in asset preparation is importing of model. Detailed procedure for importing mesh into Workbench can be found on FBX Import page and - if you want some practical example - also in Weapon Creation tutorial.
In any case, here is quick instruction how to do it - select both of the FBX files in Workbench and then click with ![]() on one of them. From the context menu, select Register & Import option and then select as Model option when asked how do you want to process given file.
on one of them. From the context menu, select Register & Import option and then select as Model option when asked how do you want to process given file.
- Make sure that Export skinning option is checked and reimport the model via Reimport resource button
- Make sure that you have 🟥 230 bones in total 🟥 and there is at least one skinned bone - i.e. 1 + 229
- In Details tab, you can find current amount of bones and dummies in Bones section. First number represents amount of bones and second, number of dummies. By default, bones which are not affecting any mesh (there is no Vertex Group representing it)
