Workbench Plugin Tutorial – Arma Reforger

From Bohemia Interactive Community
Jump to navigation Jump to search

Workbench allows to extend its functionality to certain degree. With help of scripts, you can create plugins for Resource Manager, Script Editor, String Editor & World Editor. Furthermore, you can also create additional tools for World Editor.

In general, you can use both plugins & tools for various types of automation like:

  • Batch processing files
  • Automatic testing of assets
  • Generating databases
  • Performing automation task on action
Plugins can be invoked from the Plugins menu, by shortcut or can be triggered on some action like saving file or registering new resource. It is also possible to use CLI parameters to launch Workbench with specific plugin & parameters which is especially useful when you consider using some automation pipeline.
For more general information about Workbench Script API & plugins, see Workbench Plugin.


Editor Plugins

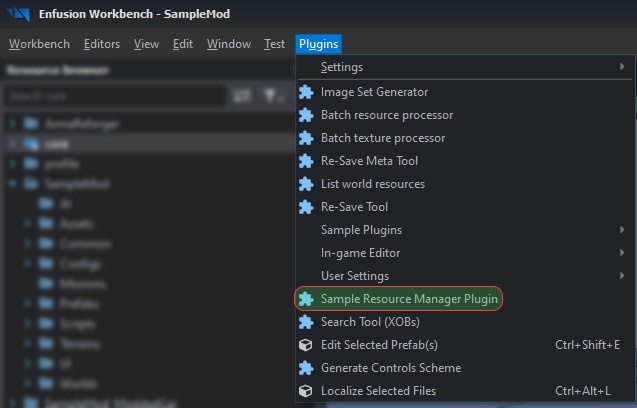
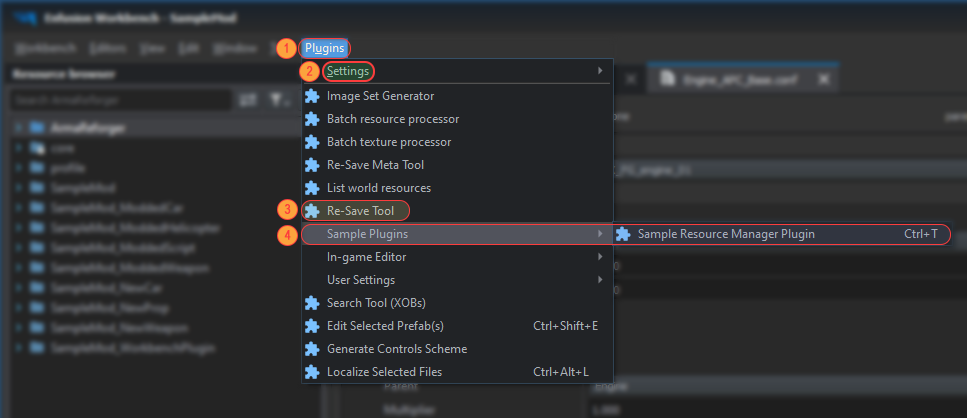
Plugin can be located in top toolbar in "Plugins" section (1). From there, you can either select one of the already existing plugins (3) or change their settings in Settings sub menu (2). Plugins can be also organised in submenus (4), so you can conveniently gather multiple plugins.

armareforger-workbench-plugin-category-usage.png

It is worth noting that each editor has its own API. Some of the functionalities available in World Editor's API (like the ability to modify prefabs) might not be available in Resource Manager and vice versa.


World Editor Tools

By default, World Editor Tools can be found right above the preview window of World Editor.

armareforger-workbench-plugin-world-editor-tools.png

Some of those tools are part of the engine and some of them are scripted. Once some tool is selected, you can change its properties.

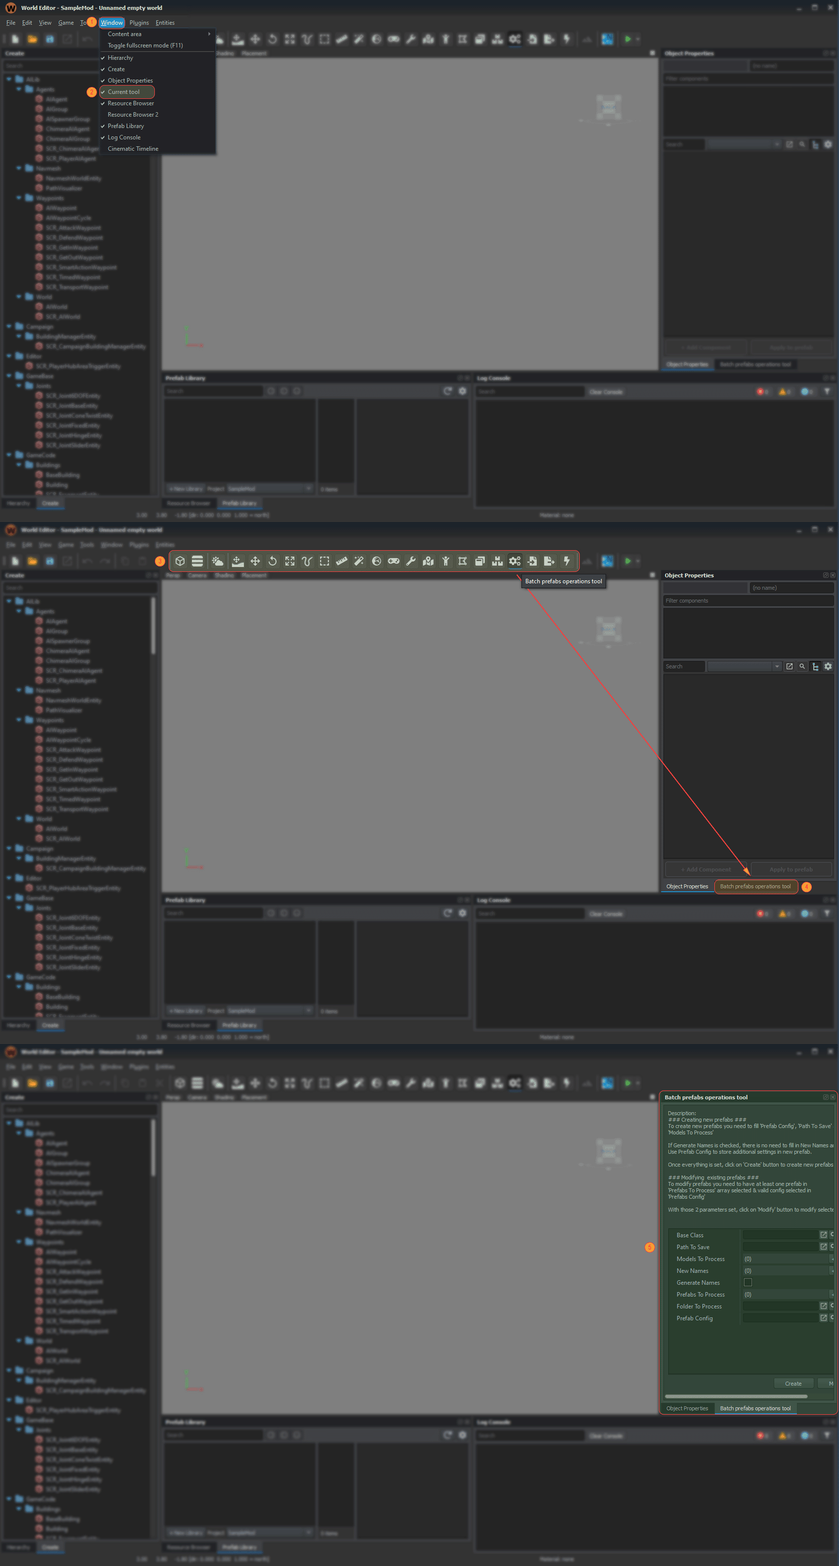
To start using World Editor Tools, make sure that you have enabled Current Tool (2)' window in Windows tab (1). Once you have that completed, you can pick one of the Tools either from the tool bar (3) or from Tools category'. After that, you can go to the Current Tool tab (4) and change parameters of currently selected tool (5).

armareforger-workbench-plugin-world-tools-steps.gif

World Editor Tools are often used to assist with prefab management (like spawning assets) but they can be also used for autotests due to ability to switch to game mode.

It is also possible to drag & drop resources (like prefabs) into current tool properties, which is especially useful when you want to change multiple hand picked prefabs.

Preparing Data Structure

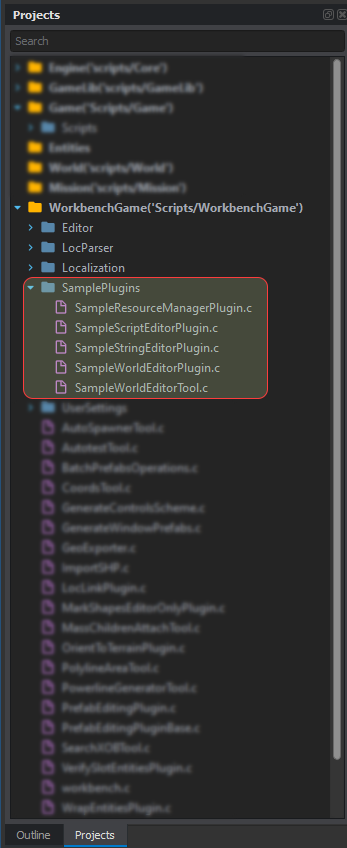
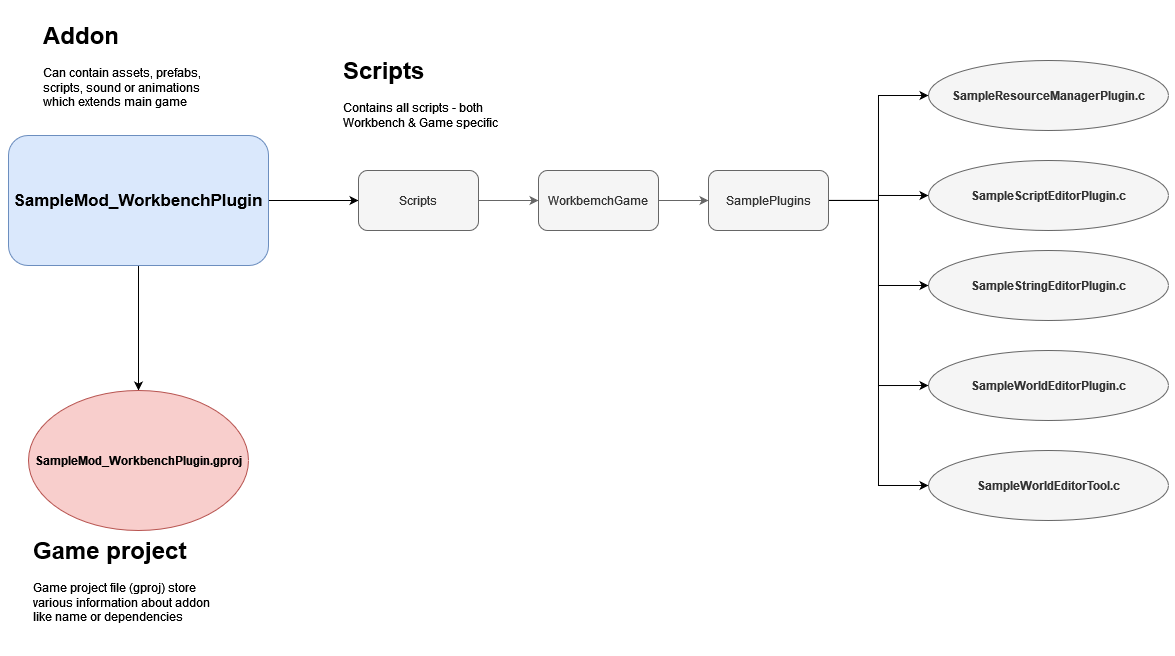
All your new plugins and tools should be located in Scripts/WorkbenchGame folder. It is possible to have them in some sub folder to keep structure bit more clear and in this tutorial SamplePlugins subfolder will collect all new scripts.

armareforger-workbench-plugin-structure.png

In SamplePlugin folder, we will create in total 5 new scripts:

  • SampleResourceManagerPlugin.c - containing Resource Manager plugin code
  • SampleScriptEditorPlugin.c - containing Script Editor plugin code
  • SampleStringEditorPlugin.c - containing String Editor plugin code
  • SampleWorldEditorPlugin.c - containing World Editor plugin code
  • SampleWorldEditor.c - containing World Editor Tool code

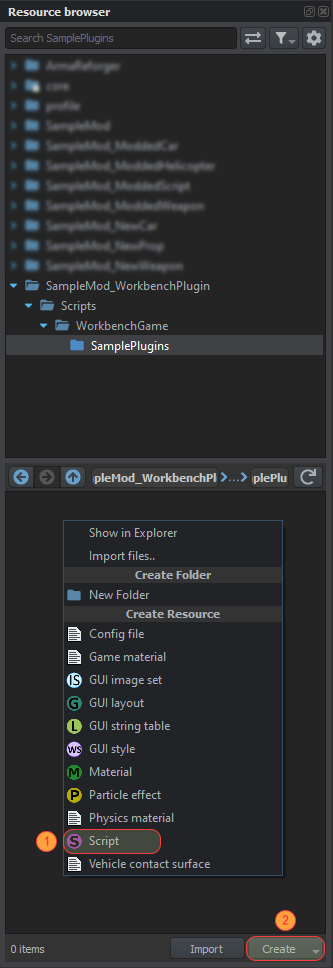
Assuming that you have already created folders in way described above (either through system file explorer or through Workbench context menu available in Resource Browser), you can start creating empty script file by clicking on Resource Browse field (1) with Right Mouse Button which will invoke context menu. From there, you can select option to create a new empty script file with name of your choice. Alternatively, you can click on Create button (2) which will show you same context menu as previous method.

Creating script file Resulting file structure
armareforger-workbench-plugin-creating-script.png armareforger-workbench-plugin-script-structure.png


Resource Manager Plugin

Basic structure

At minimum, new plugin needs to inherit from WorkbenchPlugin class. This class offers you ability to define behaviour of the plugin when it's launched (either by clicking on it or by CLI parameter) or when its settings are being changed.

There are also few more specialised variants of WorkbenchPlugin class, which exposes additional API, like:

  • ResourceManagerPlugin
  • WorldEditorPlugin
  • LocalizationEditorPlugin

Let's start with SampleResourceManagerPlugin.c and try to create some minimum code for new Workbench plugin which is visible in Resource Manager plugins tab.

One of the requirements was already listed above but let's summarize all ingredients necessary to create a new plugin:

  • New plugin class needs to inherit from WorkbenchPlugin or its derivatives
  • Needs WorkbenchPluginAttribute correctly defined
  • Needs some code in Run() method
If you do not have any code in the Run() method, your plugin will not be visible in Plugins tab. This is done on purpose so CLI plugins are not cluttering the interface!

[WorkbenchPluginAttribute(name: "Sample Resource Manager Plugin", wbModules: { "ResourceManager" })] class SampleResourceManagerPlugin : WorkbenchPlugin { override void Run() { Print("I'm here!"); } }

The above code should result in a new entry in the Resource Manager plugins tab.

armareforger-workbench-plugin-rm-plugin.jpg

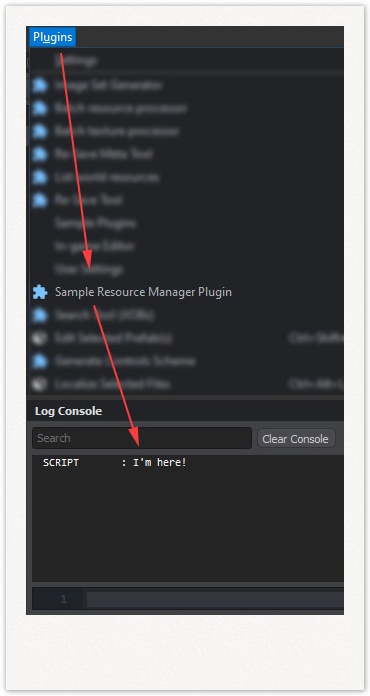
Now it is time to test the plugin in action! Clicking on Sample Resource Manager Plugin in the Plugins tab should result in "I'm here!" being printed in the Log Console.

armareforger-workbench-plugin-rm-plugin-console.jpg

Workbench Attribute

WorkbenchPluginAttribute defines how & where the plugin is going to be visible. We already have display name defined via name attribute & wbModules parameter to show this plugin only in Resource Manager. There are few more attributes which are quite handy when developing plugins.

WorkbenchPluginAttribute parameters:
void WorkbenchPluginAttribute(string name, string description = "", string shortcut = "", string icon = "", array<string> wbModules = null, string category = "", int awesomeFontCode = 0)
Attributes
Parameter Name Description
name
Name of the plugin/tool
description
Description of tool visible in Current Tool panel (only relevant to World Editor Tools)
shortcut
Keyboard shortcut in text format - "Ctrl+G" means that plugin will be activated after pressing Ctrl + G on the keyboard.
icon
Plugin custom PNG icon - it's recommended to use awesomeFontCode instead!
wbModules
List of strings representing Workbench modules where this tool should be avalaible (e.g. {"ResourceManager", "ScriptEditor"}). Leave null or empty array for any module
category
Category of the plugin ( see #4 ) - (not relevant to World Editor Tools)
awesomeFontCode
Hexadecimal code for Awesome icon.


https://fontawesome.com/cheatsheet codes from that page need the 0x prefix!

Adding category parameter

Adding a new category is fairly simple as typing category: "Sample Plugins" into WorkbenchPluginAttribute is enough to add your plugin to "Sample Plugins" sub menu in the Plugins tab. Multiple plugins can be collected in one category if they all use same "category" parameter

Adding custom icon

First of all, it's recommended to use awesomeFontCode instead of icon parameter and that's why this paragraph only focus on usage of awesome font.

On https://fontawesome.com/cheatsheet webpage you can try to find suitable icon for you. Let's say you are interested in copy icon. On the right you can see code for that icon - in this case it is F0C5

armareforger-workbench-plugin-awesome-font.png

To use that icon in Workbench, add awesomeFontCode parameter to WorkbenchPluginAttribute with following data - 0xF0C5. 0x is a prefix required by the Workbench.

Custom icon

awesomeFontCode: 0xF0C5

As result, you should get following thing in Workbench

1 - category, 2 - icon
Full WorkbenchPluginAttribute code

[WorkbenchPluginAttribute(name: "Sample Resource Manager Plugin", category: "Sample Plugins", wbModules: {"ResourceManager"}, awesomeFontCode: 0xF0C5)]

Expanding plugin functionality

It's time to expand plugin functionality!

In this chapter the Resource Manager plugin will be expanded with following options:

  • Getting array of currently selected files in Resource Browser
  • Printing array of selected files to Console Log
  • Copying content of that array to the clipboard

[WorkbenchPluginAttribute(name: "Sample Resource Manager Plugin", category: "Sample Plugins", shortcut: "", wbModules: {"ResourceManager"})] class SampleResourceManagerPlugin: WorkbenchPlugin { //---------------------------------------------------------------------------------------------- override void Run() { } }

Settings

If the Configure() method is not empty, plugins settings can be accessed by selecting appropriate entry in Plugins → Settings tab (see #2).

Usually, you are going to use following code to invoke UI window to change plugin settings:

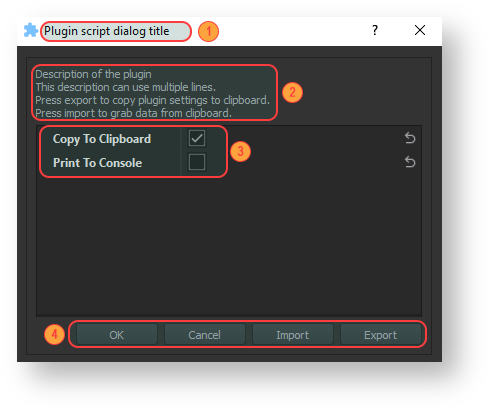
Workbench.ScriptDialog("Plugin script dialog title", "Description of the plugin\nThis description can use multiple lines.", this);

armareforger-workbench-plugin-script-dialog.png

ScriptDialog has 3 parameters which lets you change:

  • Title (1) - Title of the UI
  • Text (2) - Text that is inside of UI dialog - it's useful to fill there i.e. usage instruction or general description of the plugin
  • Data (3) - Data (parameters) that are passed to dialog. All members of the method with [Attribute] are exposed to this script dialog if "this" is used as last parameter.
Variables which are following the camel-case convention are parsed to a more pleasant format.

The following rules are applied:

  • m_ & s_ prefix is stripped
  • Single letter indicating type of variable (i.e. int iNumber) is removed
  • Space is added after each capital letter
m_bCopyToClipboard will then be displayed as Copy To Clipboard.

Furthermore, dialog can be expanded with additional buttons (4), which can execute any code you want. All you have to do is to add [ButtonAttribute()] above the method.

ButtonAttribute(string label = "ScriptButton", bool focused = false)

This attribute has two parameters:

  • label - string which is used as a display name in UI
  • focused - boolean which controls if given button is by default focused. (default: false)

[ButtonAttribute("OK")] void OkButton() {}

The above code will show simple "OK" button which doesn't do anything.

Below is a bit more advanced example which lets import/export current settings from/to clipboard.

// Plugins settings - those can be changed in Plugins -> Settings section [Attribute("0", UIWidgets.CheckBox, "Check this option to print output to clipboard.")] bool m_bCopyToClipboard; [Attribute("0", UIWidgets.CheckBox, "Check this option to print output array to the console log.")] bool m_bPrintToConsole; // Simple ButtonAttributes which shows OK in dialog - no extra functonality [ButtonAttribute("OK")] void OkButton() {} // Cancel button [ButtonAttribute("Cancel")] bool CancelButton() { return false; } // Button responsible for importing plugin parameters from clipboard [ButtonAttribute("Import")] void ImportButton() { // Get content of user clipboard string input = System.ImportFromClipboard(); // Verify input if (input.IsEmpty()) return; // Parse input array<string> parsedText = {}; input.Split(" ", parsedText, false); // Verify parse input int parsedTextCount = parsedText.Count(); if (parsedTextCount != 2) { PrintFormat("Invalid parameter count, typed %1 parameters while 2 were expected", parsedTextCount); return; } // Update variables states according to clipboard data m_bCopyToClipboard = parsedText[0].ToInt() != 0; m_bPrintToConsole = parsedText[1].ToInt() != 0; } // Button responsible for exporting plugin parameters to clipboard [ButtonAttribute("Export")] void ExportButton() { string export = string.Format("%1 %2", m_bCopyToClipboard, m_bPrintToConsole); System.ExportToClipboard(export); } // Code which is executed when settings are accesed override void Configure() { Workbench.ScriptDialog("Plugin script dialog title", "Description of the plugin\nThis description can use multiple lines.\nPress export to copy plugin settings to clipboard.\nPress import to grab data from clipboard.", this); }

↑ Back to spoiler's top

You can also, above the line of code in the Run() method, invoke the settings window every time plugin is used.

Below is full example which you can test yourself in Resource Manager. Try changing either Copy To Clipboard or Print To Console parameter and check how it behaves in Workbench.

[WorkbenchPluginAttribute(name: "Sample Resource Manager Plugin", category: "Sample Plugins", shortcut: "Ctrl+T", wbModules: { "ResourceManager" }, awesomeFontCode: 0xf0c5)] class SampleResourceManagerPlugin : ResourceManagerPlugin { // Plugins settings - those can be changed in Plugins -> Settings section [Attribute(desc: "Check this option to print output to clipboard.")] bool m_bCopyToClipboard; [Attribute(desc: "Check this option to print output array to the console log.")] bool m_bPrintToConsole; // ButtonAttributes [ButtonAttribute("OK")] void OkButton() { } // Cancel button [ButtonAttribute("Cancel")] bool CancelButton() { return false; } // Button responsible for importing plugin parameters from clipboard [ButtonAttribute("Import")] void ImportButton() { // Get content of user clipboard string input = System.ImportFromClipboard(); // Verify input if (input.IsEmpty()) return; // Parse input array<string> parsedText = {}; input.Split(" ", parsedText, false); // Verify parse input int parsedTextCount = parsedText.Count(); if (parsedTextCount != 2) { PrintFormat("Invalid parameter count, typed %1 parameters while 2 were expected", parsedTextCount); return; } // Update variables states according to clipboard data m_bCopyToClipboard = parsedText[0].ToInt() != 0; m_bPrintToConsole = parsedText[1].ToInt() != 0; } // Button responsible for exporting plugin parameters to clipboard [ButtonAttribute("Export")] void ExportButton() { string export = string.Format("%1 %2", m_bCopyToClipboard, m_bPrintToConsole); System.ExportToClipboard(export); } // Code which is executed when settings are accesed override void Configure() { Workbench.ScriptDialog("Plugin script dialog title", "Description of the plugin\nThis description can use multiple lines.\nPress export to copy plugin settings to clipboard.\nPress import to grab data from clipboard.", this); } // This code is executed when plugin is executed either by clicking on it in Plugins list or when shortcut is used override void Run() { // Grab reference to ResourceManager ResourceManager resourceManager = Workbench.GetModule(ResourceManager); if (!resourceManager) return; // Get list of currently selected resources array<ResourceName> selection = {}; resourceManager.GetResourceBrowserSelection(selection .Insert, true); // Verify if something is selected - if no, exit method & print error message if (selection.IsEmpty()) { Print("No elements are selected in Resource Browser"); return; } if (m_bPrintToConsole) { // Print ResourceManager selection directly to the console Print(selection); } if (m_bCopyToClipboard) { // Copy file name to clipboard - each element will be written on new line string export; foreach (string element : selection) { export = export + "element: " + element + "\n"; } System.ExportToClipboard(export); } } }

↑ Back to spoiler's top

After the plugin dialog is closed, all attributes are saved in Windows registry - making them persistent.

Key shortcuts

Shortcuts can be easily added by changing shortcut parameter in WorkbenchPluginAttribute of plugin.

[WorkbenchPluginAttribute(name: "Sample Resource Manager Plugin", category: "Sample Plugins", shortcut: "Ctrl+T", wbModules: { "ResourceManager" })]

In this case, adding shortcut: "Ctrl+T" to the attribute will result in the selected keybind to be displayed next to the plugin name.

armareforger-workbench-plugin-shortcut.png

Running through CLI parameter

Beside launching plugin from the Workbench itself, it is also possible to launch selected plugins through CLI parameter on Workbench shortcut, which is really useful when creating some automation systems.

To do so, first specify in wbModule name of the module which plugin relays on (in this case its ResourceManager) and then type name of the plugin in -plugin parameter.

O:\PathToReforger\ArmaReforgerWorkbenchSteam.exe -wbmodule=ResourceManager -plugin=SampleResourceManagerPlugin

Furthermore, you can also read custom command line parameters which are passed to the Workbench via GetCmdLine method! To do so, add additional parameter in your shortcut after -plugin=SampleResourceManagerPlugin (see Startup Parameters).

O:\PathToReforger\ArmaReforgerWorkbenchSteam.exe -wbmodule=ResourceManager -plugin=SampleResourceManagerPlugin -myParameter="$ArmaReforger:Prefabs\Vehicles"

After that, you can fetch myParameter from the script via the GetCmdLine() method.

override void RunCommandline() { ResourceManager resourceManager = Workbench.GetModule(ResourceManager); string param; resourceManager.GetCmdLine("-myParameter", param); }

Below is bit more advanced example which you can use in SampleResourceManagerPlugin. This code will copy to clipboard total amount of prefabs in selected location. By default code is working without any extra parameters and is looking for prefabs in "$ArmaReforger:". You can change search location through myParameter - example -myParameter="$ArmaReforger:Prefabs\Vehicles"

Optionally, you can also use -autoclose=1 parameter to automatically close Workbench once search for prefabs was completed.

override void RunCommandline() { ResourceManager resourceManager = Workbench.GetModule(ResourceManager); // Default values string param = "$ArmaReforger:"; string autoclose = "0"; // First parameter called myParameter resourceManager.GetCmdLine("-myParameter", param); resourceManager.GetCmdLine("-autoclose", autoclose); // Print parameters in console PrintFormat("CLI parameters -myParameter= %1 -autoClose=%2", param, autoclose); // Find any .et (prefab) files in selected location array<string> files = {}; System.FindFiles(files.Insert, param, ".et"); int numberOfFiles = files.Count(); // Print number of all files to Log Console Print(numberOfFiles); // Export to clipboard result of the search System.ExportToClipboard("Number of all .et files in " + param + " = " + numberOfFiles); // Close workbench if autoclose parameter is set to 1 if (autoclose == "1") Workbench.Exit(0); }

Running plugin on event

Some of the Workbench editors supports additional actions which are executed when some event is triggered. As per info in this paragraph, you can check workbench.c file and look for classes which inherits from WorkbenchPlugin.

In below example, we are going to use OnRegisterResource method located in ResourceManagerPlugin. This method is called every time some resource is registered in Workbench. Whenever it happens, OnRegisterResource is called and you can use two parameters that are exposed there:

  • absFileName - which is absolute path + name of newly registered file
  • metaFile - link to meta file which was created during that process

// This method is executed every time some new resource is registered override void OnRegisterResource(string absFileName, BaseContainer metaFile) { // Print directly to the Log Console absolute path & file name of newly registered resource Print(absFileName); }

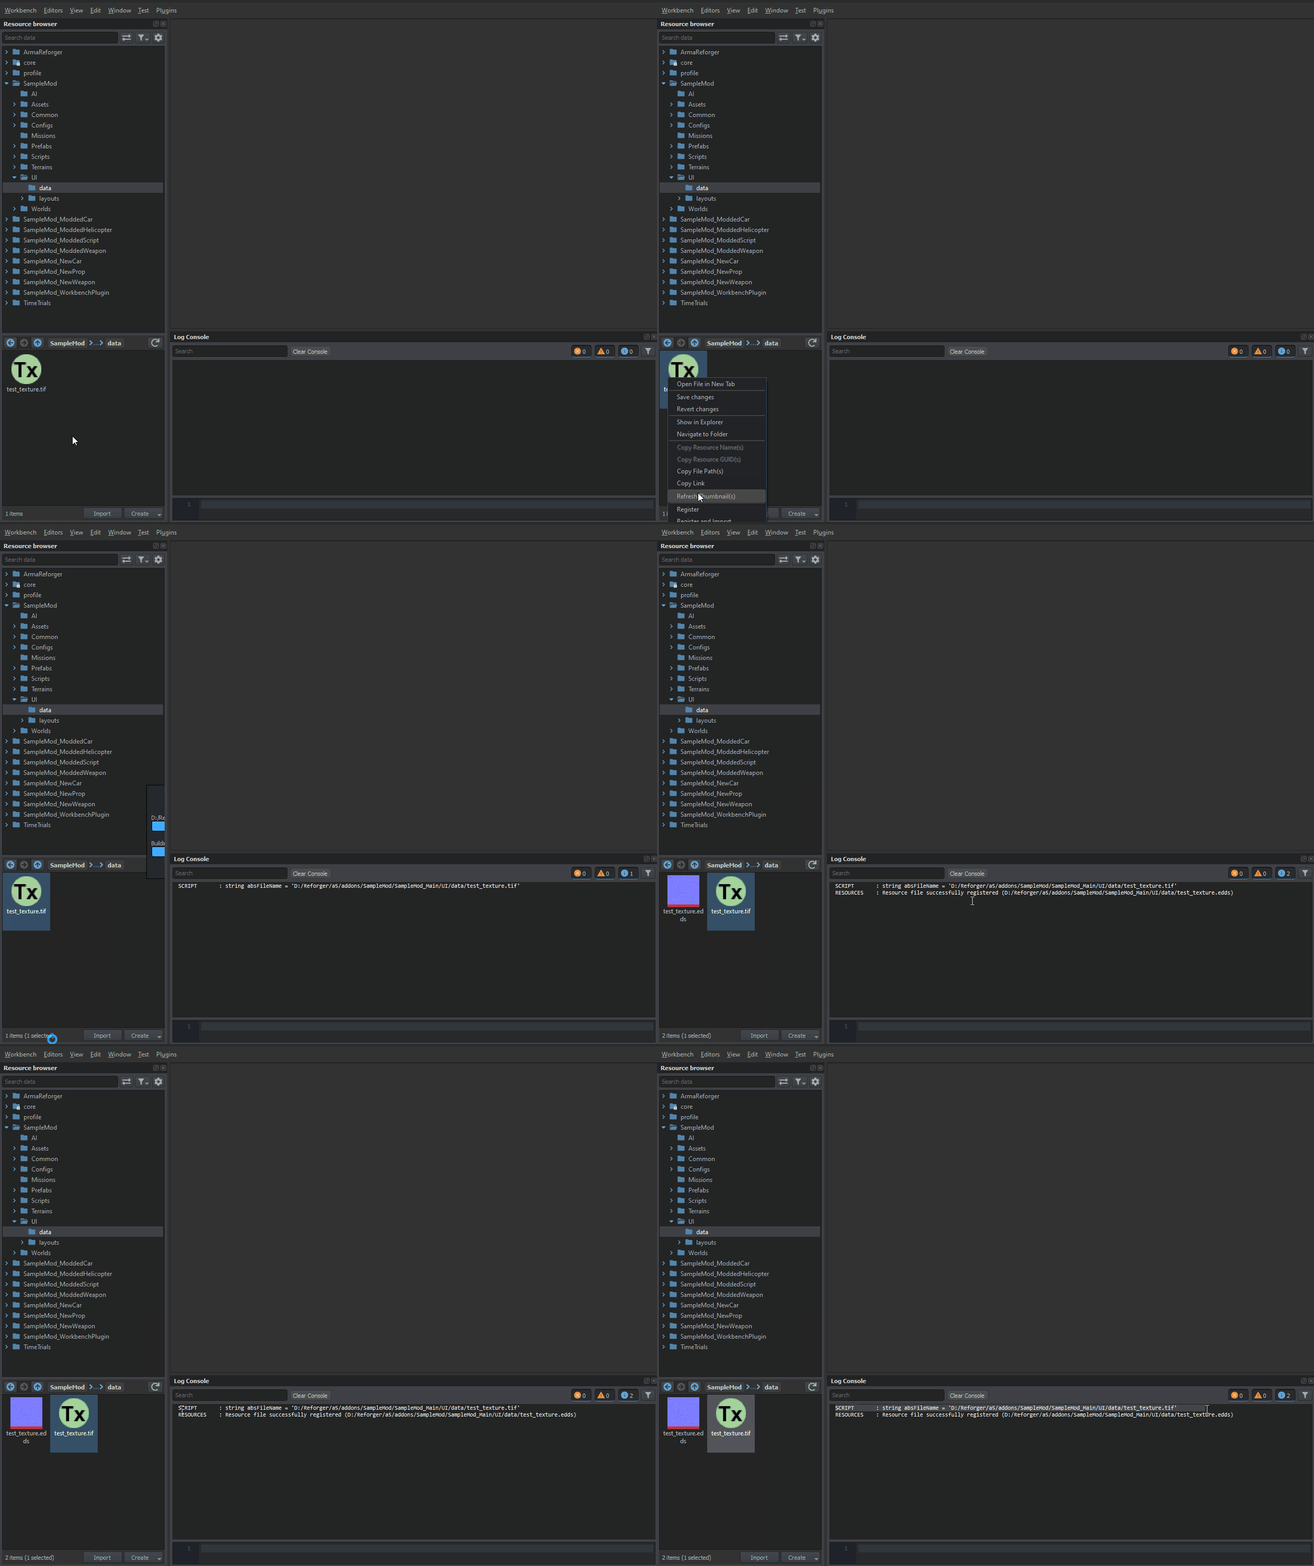
You can add that code to SampleResourceManagerPlugin class and try to register a new resource in Workbench. If everything is done correctly, you should see name of newly registered resource in Log Console.

armareforger-workbench-plugin-on-import.gif

Calling Run command & external executables

Workbench provides API for running Run command & executing external executables. This achieved by two Workbench methods

Method Description Parameters Return
int RunCmd(string command, bool wait = false); Run command - https://en.wikipedia.org/wiki/Run_command string command - command to run

bool wait - tells whether Workbench should wait till command is completed

If wait is used, exit code represented as integer is returned. Otherwise 0 is returned
ProcessHandle RunProcess(string command); Executes selected proccess string command - process to run Returns handle to process which can be used to i.e. check if application was launched or to kill it later

RunCmd allows to execute any Run command available on operating system.

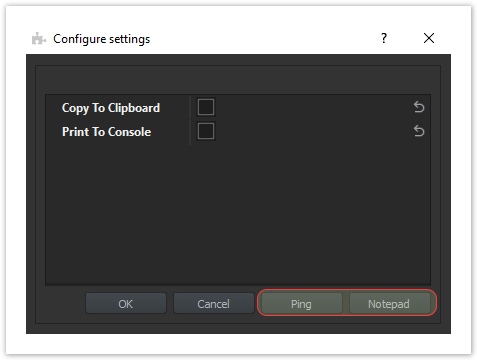
In below example, a new button Ping is added to the plugin settings, which executes RunCmd & pings bohemia.net page. Once pinging is completed, Cmd.exe window will be closed.

[ButtonAttribute("Ping")] void PingBohemia() { // Ping bohemia.net page Workbench.RunCmd("ping bohemia.net"); }

RunProcess can be used to any executable on PC. This method returns also handle to the process so you can check whether process was executed successfully or terminate it once some condition is reached.

In this example, Windows notepad is launched after pressing Notepad button in UI. If process was launched sucesfully, notepad will be closed after two seconds.

void KillProcess(ProcessHandle handle) { // Sleep is in milliseconds Sleep(2000); // Kill process passed to this method Workbench.KillProcess(handle); } [ButtonAttribute("Notepad")] void OpenNotepad() { // Open notepad ProcessHandle handle = Workbench.RunProcess("notepad"); if (!handle) { Print("Couldn't start the notepad.", LogLevel.ERROR); return; } // Run separate thread where notepad will be killed after 2000 miliseconds thread KillProcess(handle); }

armareforger-workbench-plugin-settings-buttons.png

Below is example code for SampleResourceManagerPluginSettings plugin which inherits from SampleResourceManagerPlugin. Import & Export buttons were removed and instead of them, there is Ping & Notepad button.

// Variant of the plugin which opens settings UI on each run - inherits from basic SampleResourceManagerPlugin [WorkbenchPluginAttribute(name: "Sample Resource Manager Plugin (Settings)", category: "Sample Plugins", shortcut: "Ctrl+R", wbModules: { "ResourceManager" }, awesomeFontCode: 0xf085)] class SampleResourceManagerPluginSettings : SampleResourceManagerPlugin { // We don't want import & export buttons anymore. Overriding without providing ButtonAttribute above it is enough to stop it from showing override void ImportButton() {} override void ExportButton() {} void KillProcess(ProcessHandle handle) { // Sleep is in milliseconds Sleep(2000); // Kill process passed to this method Workbench.KillProcess(handle); } [ButtonAttribute("Ping")] void PingBohemia() { // Ping bohemia.net page Workbench.RunCmd("ping bohemia.net"); } [ButtonAttribute("Notepad")] void OpenNotepad() { // Open notepad ProcessHandle handle = Workbench.RunProcess("notepad"); if (!handle) { Print("Couldn't start the notepad.", LogLevel.ERROR); return; } // Run separate thread where notepad will be killed after 2000 miliseconds thread KillProcess(handle); } override void Configure() { Workbench.ScriptDialog("Configure settings", "", this); } override void Run() { Workbench.ScriptDialog("Configure settings", "", this); super.Run(); } }

↑ Back to spoiler's top


Script Editor Plugin

This simple plugin is going to print name of currently selected script & currently selected line in Script Editor. In principle, most of the plugin functionality was already above so this plugin is mainly to showcase possibilities lying in the API that various editors have.

Plugin can be activated either by selecting it in Plugins → Sample Plugins → Sample Script Editor Plugin or through the Ctrl + T shortcut.

[WorkbenchPluginAttribute(name: "Sample Script Editor Plugin", category: "Sample Plugins", shortcut: "Ctrl+T", wbModules: { "ScriptEditor" })] class SampleScriptEditorPlugin : WorkbenchPlugin { override void Run() { ScriptEditor scriptEditor = Workbench.GetModule(ScriptEditor); if (!scriptEditor) return; // Try to get currently selected file string file; if (!scriptEditor.GetCurrentFile(file)) { Print("No file is currently selected!"); return; } // Try to get absolute path to currently selected file string absPath; if (!Workbench.GetAbsolutePath(file, absPath)) { Print("Workbench was unable to get absolute path of selected file!"); return; } // Print local & absolute path of currently opened file Print(file); Print(absPath); // Print current Line string currentLine; scriptEditor.GetLineText(currentLine, -1); Print(currentLine); // Copy file name to clipboard System.ExportToClipboard(file); } }


String Editor plugin

This String Editor example plugin prints to the Log Console currently opened file & selected rows in this editor. Additionally, the name of the currently selected file is also copied to the user clipboard. This example plugin has no options available.

String Editor is internally referenced as LocalizationEditor.

[WorkbenchPluginAttribute(name: "Sample String Editor Plugin", category: "Sample Plugins", shortcut: "Ctrl+T", wbModules: {"LocalizationEditor"}, awesomeFontCode: 0xf02d)] class SampleStringEditorPlugin: LocalizationEditorPlugin { override void Run() { LocalizationEditor localizationEditor = Workbench.GetModule(LocalizationEditor); if (!localizationEditor) return; array<int> selectedIndexes = {}; localizationEditor.GetSelectedRows(selectedIndexes); Print(selectedIndexes); } }


Creating World Editor Extensions

Compared to all other editors, World Editor is exposing to user much more functions than any other Workbench module. Beside World Editor API in workbench.c file, there is another in worldEditor.c file inside of WorldEditorAPI.

Among things that are possible to do in World Editor:

  • Terrain manipulation
  • Game mode creation assistance
  • Loading scenarios and performing autotests
  • Making edits to prefabs or configs


World Editor Plugin

This simple plugin is showing amount of currently selected entities in World Editor. You can invoke it by pressing Ctrl + T or by selecting it from the Plugins tab.

[WorkbenchPluginAttribute(name: "Sample World Editor Plugin", category: "Sample Plugins", shortcut: "Ctrl+T", wbModules: {"WorldEditor"})] class SampleWorldEditorPlugin : WorldEditorPlugin { override void Run() { // Get World Editor module WorldEditor worldEditor = Workbench.GetModule(WorldEditor); // Get World Editor API WorldEditorAPI api = worldEditor.GetApi(); int selectedEntitiesCount = api.GetSelectedEntitiesCount(); // Print result to the Log Console Print(selectedEntitiesCount); } }


World Editor Tool

Setting up new Tool

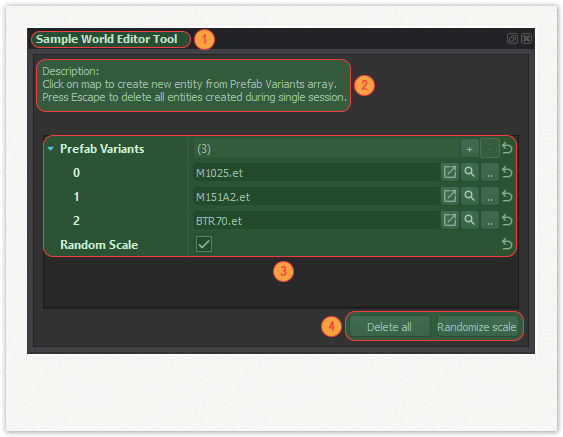
As indicated before, World Editor Tools has quite impressive API which can be used in many different ways. There are few subtle differences between World Editor Tools and plugins which are worth to note like:

  • Usage of WorkbenchToolAttribute (which shares available parameters with plugin - see Workbench Attribute) to expose it to World Editor
  • Inheritance from WorldEditorTool class, which has different pool of methods available compared to plugins
  • They cannot be launched via CLI parameter
  • They can use description parameter (2)
  • They are not grouped in categories like plugins, therefore category parameter is not relevant for them

Beside that, they can have name (1), parameters (3) and buttons (4) as plugin.

armareforger-workbench-plugin-world-editor-toool-window.png

Below is the minimal code required to create a new World Editor Tool.

[WorkbenchToolAttribute(name: "Sample World Editor Plugin", description: "Description of plugin.\nSupports multiple lines.", wbModules: { "WorldEditor" }, awesomeFontCode: 0xF074)] class SampleWorldEditorTool : WorldEditorTool { }

Using World Editor API

When performing any operations to entities, you need to call BeginEntityAction, which marks start of logical edit actions. Use m_API.EndEntityAction(); to mark end of edit actions. All transformations between BeginEntityAction & EndEntityAction are used by World Editor history stack - such actions can be reverted by user either via Undo last action button or shortcut (Ctrl + Z).

In below example code is creating a new entity and applies random scale to it.

m_API.BeginEntityAction("Processing entity"); // Create entity using one of the selected random prefabs IEntity entity = m_API.CreateEntity(m_aPrefabVariants.GetRandomElement(), "", m_API.GetCurrentEntityLayerId(), null, traceEnd, vector.Zero); m_aEntities.Insert(entity); m_API.ModifyEntityKey(entity, "scale", Math.RandomFloat(0.5, 2).ToString()); m_API.EndEntityAction();

WorldEditorTool class has m_API variable which you can use to easily access WorldEditorAPI. This means that you do not have to write WorldEditorAPI api = worldEditor.GetApi(); like in WorldEditorPlugin.

Example World Editor Tool code

armareforger-workbench-plugin-tool-test.gif

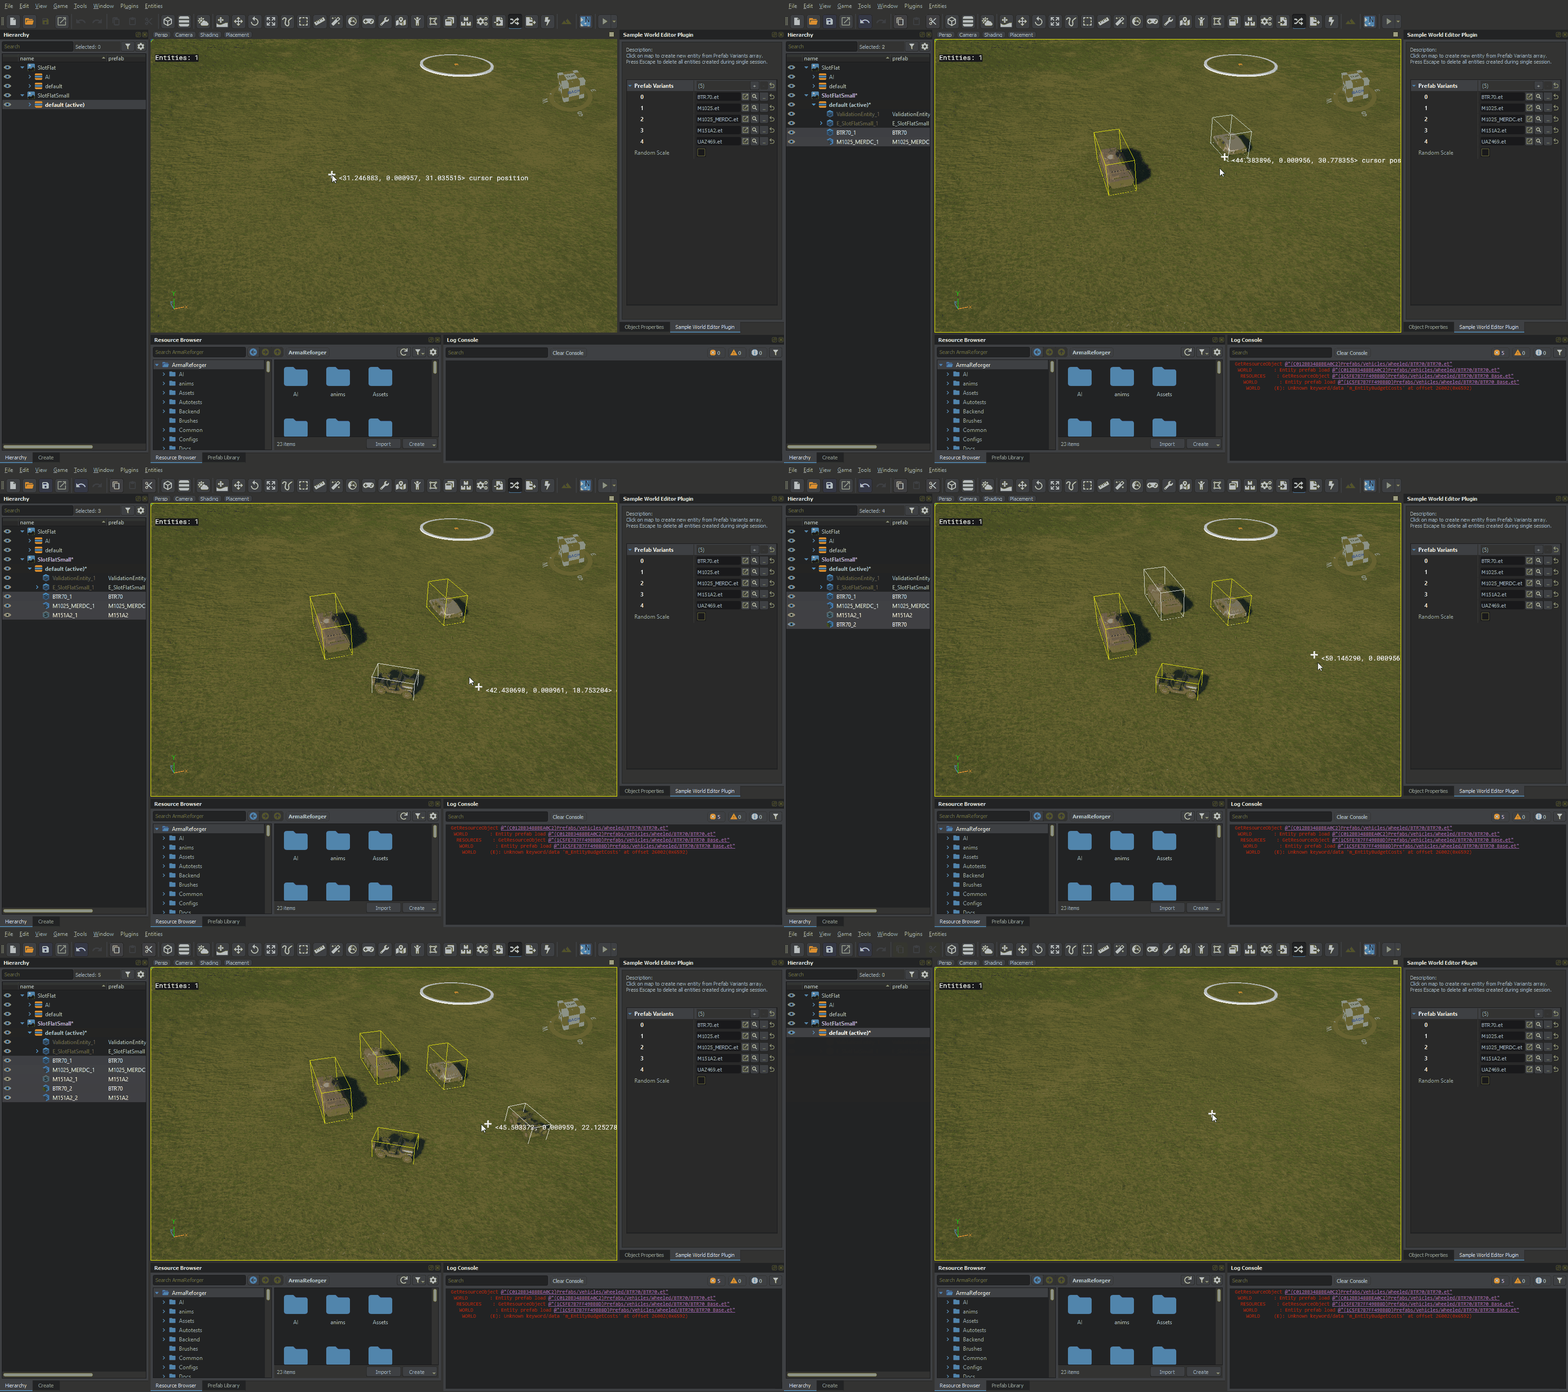
Below is full World Editor Tool example which utilizes some of the World Editor API. Tool will try to create a random prefab at cursor position from pool of Prefab Variants provided by user (tip: you can drag and drop multiple prefabs there!) and then randomize scale of that new entity.

Entity creation happens on left mouse button Left Mouse Button press and after that, tool will try to rotate that new entity in direction where mouse button was located when button was released.

All entities created by that tool can be deleted by pressing Escape key or by clicking on Delete all button in Current Tool tab. Additionally you can also use Randomize scale button to randomize scale of all entities created with this tool.

[WorkbenchToolAttribute(name: "Sample World Editor Tool", description: "Click on map to create new entity from Prefab Variants array.\nPress Escape to delete all entities created during single session.", wbModules: { "WorldEditor" }, awesomeFontCode: 0xF074)] class SampleWorldEditorTool : WorldEditorTool { [Attribute(desc: "Pool of prefabs for placement randomizer", params: "et")] protected ref array<ResourceName> m_aPrefabVariants; [Attribute(desc: "Randomize scale of placed objects")] protected bool m_bRandomScale; protected ref DebugTextScreenSpace m_Text; protected ref DebugTextScreenSpace m_Crosshair; protected ref array<IEntity> m_aEntities; protected vector m_vPreviousTraceEnd; [ButtonAttribute("Delete all")] void DeleteAll() { // Do nothing if array is empty if (!m_aEntities || m_aEntities.IsEmpty()) return; // Delete all entities created by this tool m_API.BeginEntityAction("Deleting entities"); m_API.DeleteEntities(m_aEntities); m_API.EndEntityAction(); m_aEntities = null; } // Randomize scale button [ButtonAttribute("Randomize scale")] void RandomizeScale() { // Do nothing if array is empty if (!m_aEntities || m_aEntities.IsEmpty()) return; // Delete all entities created by this tool m_API.BeginEntityAction("Changing scale of entities"); foreach (IEntity entity : m_aEntities) { m_API.ModifyEntityKey(entity, "scale", Math.RandomFloat(0.5, 2).ToString()); } m_API.EndEntityAction(); } // Method called on mouse movement override void OnMouseMoveEvent(float x, float y) { vector traceStart; vector traceEnd; vector traceDir; m_Crosshair.SetTextColor(ARGBF(1, 1.0, 1.0, 1.0)); m_Text.SetTextColor(ARGBF(1, 1.0, 1.0, 1.0)); m_Crosshair.SetPosition(x - 9, y - 16); m_Crosshair.SetText("+"); m_Text.SetPosition(x + 15, y); if (m_API.TraceWorldPos(x, y, TraceFlags.WORLD, traceStart, traceEnd, traceDir)) m_Text.SetText((traceEnd).ToString() + " cursor position"); else m_Crosshair.SetText(""); } // Method called on mouse key press override void OnMousePressEvent(float x, float y, WETMouseButtonFlag buttons) { vector traceStart; vector traceEnd; vector traceDir; if (!m_aPrefabVariants || m_aPrefabVariants.IsEmpty()) return; if (m_API.TraceWorldPos(x, y, TraceFlags.WORLD, traceStart, traceEnd, traceDir)) { m_vPreviousTraceEnd = traceEnd; m_API.BeginEntityAction("Processing " + traceEnd); // Create entity using one of the selected random prefabs IEntity entity = m_API.CreateEntity(m_aPrefabVariants.GetRandomElement(), "", m_API.GetCurrentEntityLayerId(), null, traceEnd, vector.Zero); if (!m_aEntities) m_aEntities = {}; m_aEntities.Insert(entity); if (m_bRandomScale) m_API.ModifyEntityKey(entity, "scale", Math.RandomFloat(0.5, 2).ToString()); m_API.EndEntityAction(); } } // Method called on mouse key release override void OnMouseReleaseEvent (float x, float y, WETMouseButtonFlag buttons) { vector traceStart; vector traceEnd; vector traceDir; if (!m_aEntities || m_aEntities.IsEmpty()) return; // Get last modified entity IEntity entity = m_aEntities.Get(m_aEntities.Count() - 1); // Exit if it was i.e. already deleted if (!entity) return; if (m_API.TraceWorldPos(x, y, TraceFlags.WORLD, traceStart, traceEnd, traceDir)) { m_API.BeginEntityAction("Processing " + traceEnd); vector rotationVector; rotationVector = vector.Direction(m_vPreviousTraceEnd, traceEnd); rotationVector = rotationVector.VectorToAngles(); // Modify angleY m_API.ModifyEntityKey(entity, "angleY", rotationVector[0].ToString()); m_API.EndEntityAction(); } } // Method called on keyboard key press override void OnKeyPressEvent(KeyCode key, bool isAutoRepeat) { // Remove all previously created entities if (key == KeyCode.KC_ESCAPE && !isAutoRepeat) { // Remove text m_Text.SetText(""); DeleteAll(); } if (key == KeyCode.KC_C && !isAutoRepeat) { m_bRandomScale = !m_bRandomScale; Print(m_bRandomScale); } } override void OnActivate() { m_Text = DebugTextScreenSpace.Create(m_API.GetWorld(), "", 0, 100, 100, 14, ARGBF(1, 1, 1, 1), 0x00000000); m_Crosshair = DebugTextScreenSpace.Create(m_API.GetWorld(), "", 0, 0, 0, 30, ARGBF(1, 1, 1, 1), 0x00000000); m_aEntities = {}; } override void OnDeActivate() { m_Text = null; m_Crosshair = null; m_aEntities = null; } }

↑ Back to spoiler's top