Global Mobilization Insignia (Vehicles): Difference between revisions
Lou Montana (talk | contribs) m (Text replacement - " (={2,})([^ = ])(.*)([^ = ])(={2,}) * " to " $1 $2$3$4 $5 ") |
mNo edit summary |
||
| (3 intermediate revisions by one other user not shown) | |||
| Line 8: | Line 8: | ||
[[image:insignia reference reduced.png]] | [[image:insignia reference reduced.png]] | ||
=Insignia= | = Insignia = | ||
Following insignia slots are available for vehicles in GM. Please note that not all vehicles have access to all slots. | Following insignia slots are available for vehicles in GM. Please note that not all vehicles have access to all slots. | ||
All insignia can be modified via the editor on a per vehicle case. If you leave the values untouched, a sensible but randomized default selection is applied. | All insignia can be modified via the editor on a per vehicle case. If you leave the values untouched, a sensible but randomized default selection is applied. | ||
Every slot can be disabled through the attribute editor if desired. | Every slot can be disabled through the attribute editor if desired. | ||
<code>All slots can also be directly accessed via the [[setObjectTexture]] commands. Find the specific indices for each insignia slot below:</code> | <code style="display: block">All slots can also be directly accessed via the [[setObjectTexture]] commands. Find the specific indices for each insignia slot below:</code> | ||
== a.) Crest == | == a.) Crest == | ||
| Line 19: | Line 19: | ||
The crest insignia is used to display the unit's coat of arms. On civilian vehicles this slot is used to display nationality-stickers. | The crest insignia is used to display the unit's coat of arms. On civilian vehicles this slot is used to display nationality-stickers. | ||
<code>Hidden selection index: 28</code> | <code style="display: block">Hidden selection index: 28</code> | ||
== b.) Mission (Large) == | == b.) Mission (Large) == | ||
[[image:gm hfor 01 blk ca.png|100px|thumb|Mission symbol example]] | [[image:gm hfor 01 blk ca.png|100px|thumb|Mission symbol example]] | ||
| Line 25: | Line 25: | ||
You can easily use a symbol instead of a letter-stencil here. | You can easily use a symbol instead of a letter-stencil here. | ||
<code>Hidden selection index: 26</code> | <code style="display: block">Hidden selection index: 26</code> | ||
== c.) Company == | == c.) Company == | ||
This insignia slot is used for some mascot of the unit or even some specific art the vehicle crew created. Could also be used for a vehicle's nickname. | This insignia slot is used for some mascot of the unit or even some specific art the vehicle crew created. Could also be used for a vehicle's nickname. | ||
<code>Hidden selection index: 29</code> | <code style="display: block">Hidden selection index: 29</code> | ||
== d.) Marking == | == d.) Marking == | ||
[[image:gm octagon 17 org ca.png|100px|thumb|Marking example]] | [[image:gm octagon 17 org ca.png|100px|thumb|Marking example]] | ||
The Marking insignia slot is used for force identification, like the famous chevrons of Desert Storm. In this example markings were applied that are similar to those found during the big REFORGER exercises. | The Marking insignia slot is used for force identification, like the famous chevrons of Desert Storm. In this example markings were applied that are similar to those found during the big REFORGER exercises. | ||
<code>Hidden selection index: 30</code> | <code style="display: block">Hidden selection index: 30</code> | ||
== e.) License Plate == | == e.) License Plate == | ||
The License Plate is found on vehicles that are road legal. You can type in any combination of letters and numbers here. | The License Plate is found on vehicles that are road legal. You can type in any combination of letters and numbers here. | ||
| Line 50: | Line 50: | ||
National emblem. The designated symbol or coat of arms of a given military power. | National emblem. The designated symbol or coat of arms of a given military power. | ||
<code>Hidden selection index: 32 and 33</code> | <code style="display: block">Hidden selection index: 32 and 33</code> | ||
== j.) Mission == | == j.) Mission == | ||
Mission insignia. This place can be used for logos or coat of arms that a specific military mission has (I.e KFOR) or as in this case a cross made with colored tape to indicate this vehicle belonging to opposing forces during a military exercise. | Mission insignia. This place can be used for logos or coat of arms that a specific military mission has (I.e KFOR) or as in this case a cross made with colored tape to indicate this vehicle belonging to opposing forces during a military exercise. | ||
<code>Hidden selection index: 25</code> | <code style="display: block">Hidden selection index: 25</code> | ||
== k.) Tactical Number == | == k.) Tactical Number == | ||
The tactical number can be up to four digits that uniquely identify the vehicle within a given battalion. Via the attribute editor you can change the type of font used for this item. | The tactical number can be up to four digits that uniquely identify the vehicle within a given battalion. Via the attribute editor you can change the type of font used for this item. | ||
| Line 62: | Line 62: | ||
The Formation symbol is usually used on a platoon or company level to provide additional designation of specific vehicles belonging to individual squads. | The Formation symbol is usually used on a platoon or company level to provide additional designation of specific vehicles belonging to individual squads. | ||
<code>Hidden selection index: 27</code> | <code style="display: block">Hidden selection index: 27</code> | ||
=Modding= | = Modding = | ||
Global Mobilization is highly modular and allows you to safely and quickly expand many aspects of the asset configuration without much hassle. Insignia are a prime example for this. | Global Mobilization is highly modular and allows you to safely and quickly expand many aspects of the asset configuration without much hassle. Insignia are a prime example for this. | ||
| Line 76: | Line 76: | ||
To configure a new nation symbol, use the following config for reference: | To configure a new nation symbol, use the following config for reference: | ||
<code> | <code style="display: block">class gm_VehicleInsignias_base; // declare base class | ||
class gm_VehicleInsignias_base; // declare base class | |||
class gm_VehicleInsignias_Nations : gm_VehicleInsignias_base // declare class you wish to patch with a new entry, carry over correct inheritance from base class | class gm_VehicleInsignias_Nations : gm_VehicleInsignias_base // declare class you wish to patch with a new entry, carry over correct inheritance from base class | ||
{ | { | ||
| Line 93: | Line 92: | ||
[[image:insignia menu.png|thumb|350px]] | [[image:insignia menu.png|thumb|350px]] | ||
Template configuration: | Template configuration: | ||
<code> | <code style="display: block"> class myMOD_insignia_symbol_01 // class name of your new entry. MUST be unique name | ||
{ | { | ||
name = "AAF"; // Name displayed in the editor for this item in the drop-down. | name = "AAF"; // Name displayed in the editor for this item in the drop-down. | ||
| Line 107: | Line 105: | ||
==== Mission Insignia ==== | ==== Mission Insignia ==== | ||
To make a specific insignia available under the "Mission Insignia" category, place the template configuration into the following config class: | To make a specific insignia available under the "Mission Insignia" category, place the template configuration into the following config class: | ||
<code>gm_VehicleInsignias_MissionSmall : gm_VehicleInsignias_base // make sure to declare this baseclass somewhere | <code style="display: block">gm_VehicleInsignias_MissionSmall : gm_VehicleInsignias_base // make sure to declare this baseclass somewhere | ||
{ | { | ||
class myMOD_insignia_symbol_01 | class myMOD_insignia_symbol_01 | ||
| Line 117: | Line 115: | ||
==== Mission Insignia (Large) ==== | ==== Mission Insignia (Large) ==== | ||
To make a specific insignia available under the "Mission Insignia (Large)" category, place the template configuration into the following config class: | To make a specific insignia available under the "Mission Insignia (Large)" category, place the template configuration into the following config class: | ||
<code>gm_VehicleInsignias_MissionLarge : gm_VehicleInsignias_base // make sure to declare this baseclass somewhere | <code style="display: block">gm_VehicleInsignias_MissionLarge : gm_VehicleInsignias_base // make sure to declare this baseclass somewhere | ||
{ | { | ||
[...] | [...] | ||
| Line 125: | Line 123: | ||
[[image:gm insignia car.png|thumbnail|400px|A civilian P601 marked up.]] | [[image:gm insignia car.png|thumbnail|400px|A civilian P601 marked up.]] | ||
To make a specific insignia available under the "Marking" category, place the template configuration into the following config class: | To make a specific insignia available under the "Marking" category, place the template configuration into the following config class: | ||
<code>gm_VehicleInsignias_Recon : gm_VehicleInsignias_base // make sure to declare this baseclass somewhere | <code style="display: block">gm_VehicleInsignias_Recon : gm_VehicleInsignias_base // make sure to declare this baseclass somewhere | ||
{ | { | ||
[...] | [...] | ||
| Line 132: | Line 130: | ||
==== Crest ==== | ==== Crest ==== | ||
To make a specific insignia available under the "Crest" category, place the template configuration into the following config class: | To make a specific insignia available under the "Crest" category, place the template configuration into the following config class: | ||
<code>gm_VehicleInsignias_Unit : gm_VehicleInsignias_base // make sure to declare this baseclass somewhere | <code style="display: block">gm_VehicleInsignias_Unit : gm_VehicleInsignias_base // make sure to declare this baseclass somewhere | ||
{ | { | ||
[...] | [...] | ||
| Line 139: | Line 137: | ||
==== Company ==== | ==== Company ==== | ||
To make a specific insignia available under the "Company" category, place the template configuration into the following config class: | To make a specific insignia available under the "Company" category, place the template configuration into the following config class: | ||
<code>gm_VehicleInsignias_Company : gm_VehicleInsignias_base // make sure to declare this baseclass somewhere | <code style="display: block">gm_VehicleInsignias_Company : gm_VehicleInsignias_base // make sure to declare this baseclass somewhere | ||
{ | { | ||
[...] | [...] | ||
| Line 146: | Line 144: | ||
==== Formation ==== | ==== Formation ==== | ||
To make a specific insignia available under the "Formation" category, place the template configuration into the following config class: | To make a specific insignia available under the "Formation" category, place the template configuration into the following config class: | ||
<code>gm_VehicleInsignias_Formation : gm_VehicleInsignias_base // make sure to declare this baseclass somewhere | <code style="display: block">gm_VehicleInsignias_Formation : gm_VehicleInsignias_base // make sure to declare this baseclass somewhere | ||
{ | { | ||
[...] | [...] | ||
| Line 154: | Line 152: | ||
[[image:gm tacticalSigns nato airborneInfantry ca.png|thumb|200px|Template image for custom NATO tactical signs.]] | [[image:gm tacticalSigns nato airborneInfantry ca.png|thumb|200px|Template image for custom NATO tactical signs.]] | ||
Tactical signs follow exactly the same template configuration as insignia, but are categorized under class gm_tacticalSigns: | Tactical signs follow exactly the same template configuration as insignia, but are categorized under class gm_tacticalSigns: | ||
<code>gm_tacticalSigns // root class | <code style="display: block">gm_tacticalSigns // root class | ||
{ | { | ||
class myMOD_tactical_sign_01 | class myMOD_tactical_sign_01 | ||
| Line 175: | Line 173: | ||
You can then define a new font in the following way: | You can then define a new font in the following way: | ||
<code>gm_VehicleInsignias_Fonts // root class | <code style="display: block">gm_VehicleInsignias_Fonts // root class | ||
{ | { | ||
class myMOD_myCustomFont_01 | class myMOD_myCustomFont_01 | ||
| Line 193: | Line 191: | ||
Some vehicles require a more squarer type of license plate, so please take this license plate mask as a template for your own styles. | Some vehicles require a more squarer type of license plate, so please take this license plate mask as a template for your own styles. | ||
<code>class gm_licenseplates | <code style="display: block">class gm_licenseplates | ||
{ | { | ||
class myMod_myTypeOfLicensePlate_01 // can be named whatever | class myMod_myTypeOfLicensePlate_01 // can be named whatever | ||
| Line 206: | Line 204: | ||
[[image:gm ge army blk ca.png|thumbnail|200px|Template for custom license plate background.]] | [[image:gm ge army blk ca.png|thumbnail|200px|Template for custom license plate background.]] | ||
== Config Parameters for default insignia== | |||
Use any of these parameters to have a given insignia appear by default on your custom vehicle: | |||
The following config parameters allow you to have default insignia applied to vehicles. | |||
<syntaxhighlight lang="cpp"> | |||
gm_TacticalSignsDefaultPreIcon | |||
gm_TacticalSignsFontPreIcon | |||
gm_TacticalSignsDefaultIcon | |||
gm_TacticalSignsDefaultPostIcon | |||
gm_TacticalSignsFontPostIcon | |||
gm_TacticalNumbersDefaultNumber | |||
gm_TacticalNumbersFontNumbers | |||
gm_InsigniasDefaultMissionSmall | |||
gm_InsigniasDefaultMissionLarge | |||
gm_InsigniasDefaultRecon | |||
gm_InsigniasDefaultUnit | |||
gm_InsigniasDefaultCompany | |||
gm_InsigniasDefaultFormation | |||
gm_InsigniasDefaultHazardSign | |||
gm_InsigniasDefaultNation | |||
</syntaxhighlight> | |||
Example: | |||
<syntaxhighlight lang="cpp" inline>gm_InsigniasDefaultNation = myMOD_insignia_aaf_01;</syntaxhighlight> | |||
This will cause the given vehicle to be created by default with the <syntaxhighlight lang="cpp" inline>myMOD_insignia_aaf_01</syntaxhighlight> insignia type. | |||
[[Category:Global Mobilization]] | [[Category:Global Mobilization]] | ||
Latest revision as of 21:20, 8 March 2023
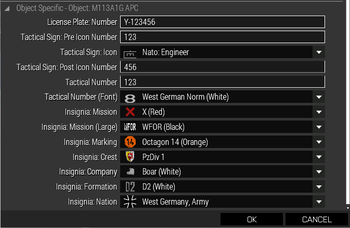
The vehicles added in Global Mobilization offer a great amount of customization through the editor.
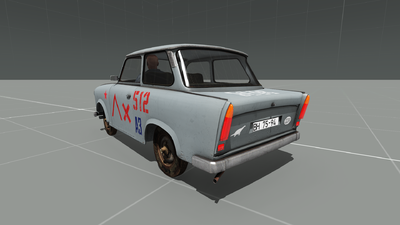
Apart from the ability to change their vehicle color and camo, they are also able to have a detailed selection of insignia applied.
This page will provide an overview of the available insignia types and also guide you with some documentation through how to add your own custom insignia to be used within the modular system.
Insignia
Following insignia slots are available for vehicles in GM. Please note that not all vehicles have access to all slots. All insignia can be modified via the editor on a per vehicle case. If you leave the values untouched, a sensible but randomized default selection is applied. Every slot can be disabled through the attribute editor if desired.
All slots can also be directly accessed via the setObjectTexture commands. Find the specific indices for each insignia slot below:
a.) Crest
The crest insignia is used to display the unit's coat of arms. On civilian vehicles this slot is used to display nationality-stickers.
Hidden selection index: 28
b.) Mission (Large)
The Mission (Large) symbol is used to display the current operation's symbol. This could be used for real life missions such as SFOR or KFOR, or as in this demo case for WFOR - Weferlingen Force. You can easily use a symbol instead of a letter-stencil here.
Hidden selection index: 26
c.) Company
This insignia slot is used for some mascot of the unit or even some specific art the vehicle crew created. Could also be used for a vehicle's nickname.
Hidden selection index: 29
d.) Marking
The Marking insignia slot is used for force identification, like the famous chevrons of Desert Storm. In this example markings were applied that are similar to those found during the big REFORGER exercises.
Hidden selection index: 30
e.) License Plate
The License Plate is found on vehicles that are road legal. You can type in any combination of letters and numbers here.
f.) Tactical Sign - Pre Number
NATO tactical sign. The Pre Number indicates the digit of the company within the given hierarchy. Supports only single digits.
g.) Tactical Sign
NATO tactical sign. This symbol indicates the military branch the vehicle belongs to.
h.) Tactical Sign - Post Number
NATO tactical sign. The Post Number indicates the digits of the battalion within the given hierarchy. Supports up to three digits.
i.) Nation
National emblem. The designated symbol or coat of arms of a given military power.
Hidden selection index: 32 and 33
j.) Mission
Mission insignia. This place can be used for logos or coat of arms that a specific military mission has (I.e KFOR) or as in this case a cross made with colored tape to indicate this vehicle belonging to opposing forces during a military exercise.
Hidden selection index: 25
k.) Tactical Number
The tactical number can be up to four digits that uniquely identify the vehicle within a given battalion. Via the attribute editor you can change the type of font used for this item.
l.) Formation
The Formation symbol is usually used on a platoon or company level to provide additional designation of specific vehicles belonging to individual squads.
Hidden selection index: 27
Modding
Global Mobilization is highly modular and allows you to safely and quickly expand many aspects of the asset configuration without much hassle. Insignia are a prime example for this.
Insignia are controlled through config classes that you can easily expand through config addons.
The following insignia types exist within the config structure:
National Emblem
National emblems are slightly different from regular insignia, as these allow for mirrored symbols for the other side of the vehicle.
To configure a new nation symbol, use the following config for reference:
class gm_VehicleInsignias_base; // declare base class
class gm_VehicleInsignias_Nations : gm_VehicleInsignias_base // declare class you wish to patch with a new entry, carry over correct inheritance from base class
{
	class myMOD_insignia_aaf_01 // class name of your new entry. MUST be unique name
	{
		name     = "AAF";                                              // Name displayed in the editor for this item in the drop-down.
		texture  = "myMOD\path\to\data\insignias\myMod_aaf_01_ca.paa"; // Path to the texture used on the vehicle
		picture  = "myMOD\path\to\data\insignias\myMod_aaf_01_ca.paa"; // Path to the preview picture used in the drop down. Can be the same as used in "texture".
		value    = "myMOD_insignia_aaf_01";                            // identical to the classname of this item.
	};
};
Insignia
Template configuration:
	class myMOD_insignia_symbol_01 // class name of your new entry. MUST be unique name
	{
		name     = "AAF";                                                 // Name displayed in the editor for this item in the drop-down.
		texture  = "myMOD\path\to\data\insignias\myMod_symbol_01_ca.paa"; // Path to the texture used on the vehicle
		picture  = "myMOD\path\to\data\insignias\myMod_symbol_01_ca.paa"; // Path to the preview picture used in the drop down. Can be the same as used in "texture".
		value    = "myMOD_insignia_symbol_01";                            // identical to the classname of this item.
	};
Insignia Subtypes
All types of symbol insignia follow the same configuration template. They are restricted to certain slots by configuring them within a specific container.
Mission Insignia
To make a specific insignia available under the "Mission Insignia" category, place the template configuration into the following config class:
gm_VehicleInsignias_MissionSmall : gm_VehicleInsignias_base // make sure to declare this baseclass somewhere
{
	class myMOD_insignia_symbol_01
	{
		[...]
	};
};
Mission Insignia (Large)
To make a specific insignia available under the "Mission Insignia (Large)" category, place the template configuration into the following config class:
gm_VehicleInsignias_MissionLarge : gm_VehicleInsignias_base // make sure to declare this baseclass somewhere
{
	[...]
};
Marking
To make a specific insignia available under the "Marking" category, place the template configuration into the following config class:
gm_VehicleInsignias_Recon : gm_VehicleInsignias_base // make sure to declare this baseclass somewhere
{
	[...]
};
Crest
To make a specific insignia available under the "Crest" category, place the template configuration into the following config class:
gm_VehicleInsignias_Unit : gm_VehicleInsignias_base // make sure to declare this baseclass somewhere
{
	[...]
};
Company
To make a specific insignia available under the "Company" category, place the template configuration into the following config class:
gm_VehicleInsignias_Company : gm_VehicleInsignias_base // make sure to declare this baseclass somewhere
{
	[...]
};
Formation
To make a specific insignia available under the "Formation" category, place the template configuration into the following config class:
gm_VehicleInsignias_Formation : gm_VehicleInsignias_base // make sure to declare this baseclass somewhere
{
	[...]
};
Tactical Sign
Tactical signs follow exactly the same template configuration as insignia, but are categorized under class gm_tacticalSigns:
gm_tacticalSigns // root class
{
	class myMOD_tactical_sign_01
	{
		[...]
	};
	class myMOD_tactical_sign_02 {[...]};
	[...]
};
Fonts
Fonts used by the GM insignia system are somewhat more complex to configure:
A font requires a set of individual letter textures present in a folder where each file is named like the symbol it is liked to. For example if you wish to provide your custom font with the letter "8", you'll have to place an image of your font's 8 letter in a specific folder and save it as "8_ca.paa"
(We know, not ideal. An alternative font-definition exists for character nametags that already makes use of ascii code to link letters, allowing differentiation between lower and upper case as well as special characters.)
You can then define a new font in the following way:
gm_VehicleInsignias_Fonts // root class
{
	class myMOD_myCustomFont_01
	{
		name    = "My Custom Font 01";               // name displayed in the editor
		picture = "myMod\path\to\fonts\myFont\8_ca"; // Preview texture
		path    = "myMod\path\to\fonts\myFont";      // Path to folder containing all available files of the letters
		value   = "myMOD_myCustomFont_01";           // Same as this item's classname
		letters = true;                              // Does this set allow setting of text letters
		numbers = true;                              // Does this set allow setting of numeral letters?
	};
};
License Plate Style
Vehicles can also have their license plates customized.
However, this is not available to be selected in the editor and can only be influenced via the config of a vehicle.
Some vehicles require a more squarer type of license plate, so please take this license plate mask as a template for your own styles.
class gm_licenseplates
{
	class myMod_myTypeOfLicensePlate_01 // can be named whatever
	{
		name          = "My Type Of License Plate";                        // name of license plate in editor, not actually displayed anywhere currently.
		value         = "myMod_myTypeOfLicensePlate_01";                   // same as this item's classname
		Texture       = "myMOD\path\to\some\mymod_licenseplate_01_ca.paa"; // Path to the license image plate template
		FontDigits    = "myMOD_myCustomFont_01";                           // classname of the type of font this license plate style should use. See above for configuring custom fonts.
		DefaultDigits = "$$ ##-##";                                        // Default mask for license plates. Use $ as a placeholder for letters, # as placeholder for numbers, * as placeholder for letter/numbers.
	};
};
Config Parameters for default insignia
Use any of these parameters to have a given insignia appear by default on your custom vehicle: The following config parameters allow you to have default insignia applied to vehicles.
gm_TacticalSignsDefaultPreIcon
gm_TacticalSignsFontPreIcon
gm_TacticalSignsDefaultIcon
gm_TacticalSignsDefaultPostIcon
gm_TacticalSignsFontPostIcon
gm_TacticalNumbersDefaultNumber
gm_TacticalNumbersFontNumbers
gm_InsigniasDefaultMissionSmall
gm_InsigniasDefaultMissionLarge
gm_InsigniasDefaultRecon
gm_InsigniasDefaultUnit
gm_InsigniasDefaultCompany
gm_InsigniasDefaultFormation
gm_InsigniasDefaultHazardSign
gm_InsigniasDefaultNation
Example:
gm_InsigniasDefaultNation = myMOD_insignia_aaf_01;
This will cause the given vehicle to be created by default with the myMOD_insignia_aaf_01 insignia type.


