Reyhard/Sandbox/Character Gear Creation/Headgear/Asset Preparation – User
| Line 151: | Line 151: | ||
===== Game Material creation ===== | ===== Game Material creation ===== | ||
Once you have data, you can commence with creation of the material by performing following steps: | Once you have data, you can commence with creation of the material by performing following steps: | ||
* Create new inherited material - usage of one of the existing materials is recommended or duplicate some existing material which inherits from one of the core materials. In case of Sample Helmet | * Create new inherited material - usage of one of the existing materials is recommended or duplicate some existing material which inherits from one of the core materials. In case of Sample Helmet {{Link|enfusion://ResourceManager/~ArmaReforger:Common/Materials/Game/PersonalProtection/hard_aramid_7.3mm.gamemat|hard_aramid_7.3mm.gamemat}} was duplicated | ||
** Name that new material in a way, which represents its thickness (''i.e. hard_aramid_10mm.gamemat )'' | ** Name that new material in a way, which represents its thickness (''i.e. hard_aramid_10mm.gamemat )'' | ||
** This way, you will inherit for instance correct particle effects, sounds and decals | ** This way, you will inherit for instance correct particle effects, sounds and decals | ||
** In vanilla game those visual & sound effects are still being worked on (0.9.9) | ** In vanilla game those visual & sound effects are still being worked on (0.9.9) | ||
* Change '''Density, Thickness & Kinetic Resistance''' | * Change '''Density, Thickness & Kinetic Resistance''' | ||
=== Materials & Layer Preset === | === Materials & Layer Preset === | ||
Revision as of 14:42, 2 August 2023
Mesh Preparation
General
When it comes to character gear, you might notice that default rotation of character is different compared to other assets. This is caused by the fact, that in game animations are created using motion capture & Motion Builder software, which expects different orientation that the game.
Positioning of helmet without any reference points is quite tricky and that's why it might be handy to load some reference model. To do so, perform following steps:
- Import HeadSize_Template.fbx into scene with your model
- This special contains all vanilla heads available molded into one entity - with this you can ensure that there will be no clipping with any of the existing models
- Adjust position of the helmet and straps so it fit that universal head
If everything went fine, you should end up with something like this:

Once you verified that helmet model doesn't need more adjustments, delete HeadSize_Template mesh from the scene since it will be no longer necessary.
Rigging
After properly positioning model, it is time for getting skeleton in and then rigging the asset. Sample Helmet is an asset imported from A3, so it already has some skinning on it, which in case of helmets will be fully usable but if you have some fresh asset, you can consider two options, which are described below.
In any case, first step on to do list will be importing of skeleton and empty bones from template file.
Importing skeleton

Importing skeleton into scene where you have your helmet can be done in few simple steps:
- Keep your Blender instance with helmet open
- Download & then open Character_Weights_Template.blend file in 2nd instance of Blender
- Switch to Object Mode
- Unhide Memory Points collection and select all empty objects over there (there should be six of them in total)
- Tip: You can select multiple empty objects Left Shift modifier
- Copy all those objects with Ctrl + C combination
- Switch over to Blender instance containing your helmet and paste objects into Blender with Ctrl + V shortcut
After that, verify that in primary instance of the Blender (the one with helmet model) following things are true:
- Make sure that you also imported empty objects (from Memory Points collections)
- Armature object is called Armature - keep it this way!
- It is important that model contains only Armature and empty objects from the template!
- In total, 163 bones/empty objects (156 bones and 6 dummy objects) should be present when model is imported into Workbench - see note in Importing model section

Skinning asset
Once skeleton is present in the scene, it is possible to start process of skinning mesh to the bones. This can be using one of tw
Transfer weights
Currently, only Basebody_Male_Head_01.xob has its face skinned and there are no facial animations yet it in-game, so it's rather tricky to verify if weights are working correctly. In any case, weights transfer is
In any case, weights transfer can be done in following steps:
- Copy reference mesh (f.e. Character_Weights_Template.blend can be used) to the scene with helmet
- Select Helmet mesh with

- You might want to separate chin strap to separate object and keep helmet hard shell assigned to Head vertex group
- Select reference mesh
- Switch to Weight Paint mode
- From the menu in top left corner, select Weights -> Transfer Weights option
- In top left corner of the viewport, there should be now Transfer Mesh Data menu which you can expand
- Change Source Layers Selection to By Name
- Click with somewhere in the viewport to confirm the transfer
Manual skinning

If you don't want to use transfer weight tool or you quickly want to test if helmet is working in game, then you can skin the helmet manually. To do so, perform following actions:
- Select helmet model (in this case Object_LOD0) and switch to Object Mode
- Navigate to Data tab in Properties window and locate Vertex Group section
- Add appropriate Vertex Groups for your helmet via + button (1)
- Once vertex group is added, you can change its name by double clicking on it with
- Once vertex group is added, you can change its name by double clicking on it with
Now, depending whether you want to simply assign everything to one bone (for instance when you are doing a hat or you don't want to skin chin strap to chin yet), you can either chose one of the options:
Simple skinning
As title suggest, this skinning is very simple - whole mesh will be basically skinned to single bone - Head. To do
- Add just one Head vertex group via + button (1) located at the right side
- Switch to Edit Mode while having Object_LOD0 selected and select all faces with i.e. Ctrl + A shortcut
- Click on Head vertex group and then click on Assign button
Weight Painting
Using weight paint allows you to skin influences between maximum 4 bones. In order to achieve that, perform following actions:
- Switch to Weight Paint mode
- Create vertex groups for things you want to skin - in case of helmet with chin strap, FacialJaw & Head bone would be sufficient
- Select one of the vertex groups and starts painting weights with


Armature modifier
Once asset is skinned with one of the above methods, there is one more thing to do in order to link vertex groups with skeleton and thus achieve animated asset:
- In Modifiers tab, add new Armature modifier via Add Modifier (1) button
- In Object property, select Armature as object to deform with

After that, you could quickly verify if asset is skinned by selecting Armature and switching to Pose Mode. In this mode you can try to move bones and see if mesh is following them.
Colliders
Helmets in Arma Reforger are using actual colliders for protection of the character so its quite important to set it correctly.
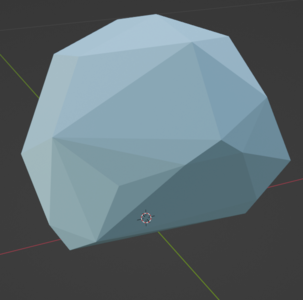
Creating colliders
First step towards creating proper collider will be making of a new object, which should receive one of the colliders prefixes (in this case UTM_ prefix was used). For instance, sometimes it is feasible to create nice collider out of regular mesh by removing all unnecessary elements and then decimating it below ~150 faces. Other option is to create mesh from scratch which shouldn't be that big task in case of helmet but it might be bit more time consuming so choice is up to creator.

In both cases, here are few things to consider:
- Shape should fit the helmet
- Should be fairly simple
- It is not recommended to use exact thickness of the helmet - instead it is enough to use material with predefined thickness
- UTM (Trimeshes) colliders can be used
Once collider is done, it will be necessary to connect it to one of the existing colliders. Due to nature of colliders, they don't support skinning and they have to be parented to bone via Relations
Setting relations: Using Make Parent
Any object can be quite easily parented via Make Parent action. To do so, perform following steps:
- Select collider object
- Select Armature as second object with Left ⇧ Shift + combo
- Switch to Pose Mode with both objects selected
- Select Head bone
- Tip: you can turn on bone names for easier navigation!
- Open Menu Search ( ↹ Tab using Industry Compatible Keymap )
- Search for Make Parent & select it
- Select Bone in Set Parent To menu
- In Make Parent menu in bottom left corner select Keep Transform option

Setting relations: Using Relations tab
- Create a new object and in Relations tab set relation to Head
- Reposition collider to correct location
- If collider is suddenly very small, make sure that scale of the armature is correct

Creating material
Material Research
Before creation of material, it is good to perform some research about ballistic properties and material used on the item that you are making. Game wise, there are two properties that matter:
- Density
- Thickness
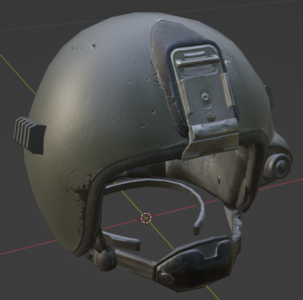
In case of Sample Helmet, which is ported A3 Avenger helmet, ZSh-1-2M was used a reference which is known outer shell is made of alloy and inner is made out of Aramid. Since you can't effectively make game material consisting out of multiple materials, aramid based material - hard_aramid_7.3mm.gamemat - was used as base.
hard_aramid_7.3mm.gamemat material is used on PASGT helmet, which is rated at Threat Level IIIA in NIJ classifications . In most case, density of the material can be found by searching for "name_of_material density". In case of PASGT, it is known that helmet is using Kevlar 29 aramid material. By looking for this material, you can find i.e. such result - Kevlar_Technical_Guide_0319.pdf . Over there, it is mentioned that density of Kevlar 29 material is 1.44 g/cm3. In case of game, different source was used, which used 1.65 g/cm3 as value.
Quite often you might also find out that thickness of the helmet is not listed anywhere so you have to go bit creative there. In this case, you might need to be bit creative.
In this case, it can be done in two way - either by changing thickness value or by changing Kinetic Resistance of the material.
In this case thickness increase was used and set at 10mm.
- Fill in those values to that new material and then adjust Kinetic Resistance so it matches desired protection level
- You can use following spreadsheet for those calculations
Game Material creation
Once you have data, you can commence with creation of the material by performing following steps:
- Create new inherited material - usage of one of the existing materials is recommended or duplicate some existing material which inherits from one of the core materials. In case of Sample Helmet hard_aramid_7.3mm.gamemat was duplicated
- Name that new material in a way, which represents its thickness (i.e. hard_aramid_10mm.gamemat )
- This way, you will inherit for instance correct particle effects, sounds and decals
- In vanilla game those visual & sound effects are still being worked on (0.9.9)
- Change Density, Thickness & Kinetic Resistance
Materials & Layer Preset
Next step will be assigning of material and layer preset to the collider itself. You can do it via Enfusion Blender Tools Object Tools or manually (in case you are using different 3D software). Once you know how to change material and layer preset, do following things:
- Set collider Layer Preset to FireGeo
- Assign game material - either one of the existing vanilla ones or the one you have created in previous step
Creating Item variant
One of the final steps in equipment preparation is creating a special item variant of the model. Such model is visible when i.e. given piece of equipment is placed on the ground. This can be done in few steps listed below:
- Make copy of your helmet (FBX/Blend) and open it
- Remove skeleton and all empty objects
- Modify model of helmet so it appears like lying on flat surface
- For instance, straps can be deformed so they are resting on surface
- No skeleton is needed
- Collider can be even simpler shape, but it is also possible to reuse previously created one
- Layer Preset is changed from FireGeo to ItemFireView
- UCX or simple shapes are recommended
- Mesh -> Convex Hull action can be used to create some convex mesh
Visual mesh - notice how chin strap was placed
Firegeometry


Importing model
Last step in asset preparation is importing of model. Detailed procedure for importing mesh into Workbench can be found on FBX Import page and - if you want some practical example - also in Weapon Creation tutorial.
In any case, here is quick instruction how to do it - select both of the FBX files in Workbench and then click with ![]() on one of them. From the context menu, select Register & Import option and then select as Model option when asked how do you want to process given file.
on one of them. From the context menu, select Register & Import option and then select as Model option when asked how do you want to process given file.
- Make sure that Export skinning option is checked and reimport the model via Reimport resource button
- Make sure that you have 163 bones in total and there is at least one skinned bone - i.e. 1 + 162
- In Details tab, you can find current amount of bones and dummies in Bones section. First number represents amount of bones and second, number of dummies. By default, bones which are not affecting any mesh (there is no Vertex Group representing it)
