Capture & Hold Setup – Arma Reforger
Poslovitch (talk | contribs) |
|||
| (37 intermediate revisions by 4 users not shown) | |||
| Line 1: | Line 1: | ||
{{TOC|side}} | {{TOC|side}} | ||
Setting up a new '''Capture & Hold''' scenario based | Setting up a new '''Capture & Hold''' scenario based is easy, thanks to the Prefab system and already existing '''base world''' available as part of the Capture & Hold mod. | ||
== Prerequisites == | == Prerequisites == | ||
Before you start Arma Reforger Tools, you need to get the "'''Capture & Hold"''' Mod subscription: | |||
* {{armaR}}' | * Start {{armaR}}. | ||
* | * Enter the workshop. | ||
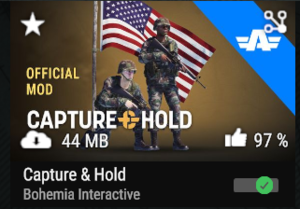
* Subscribe to the official mod "Capture & Hold" by Bohemia Interactive: [[File:Screenshot of the official mod Capture & Hold.png|none|thumb]] | |||
* Close {{armaR}} when the download is finished. | |||
* Open Arma Reforger Tools. | |||
* Click on "Add Existing" to add the mod that you just downloaded. | |||
* Add ''addon.gproj'' from the {{hl|%userprofile%\Documents\My Games\ArmaReforger\addons\CaptureAMPHold_591AF5BDA9F7CE8B}} directory | |||
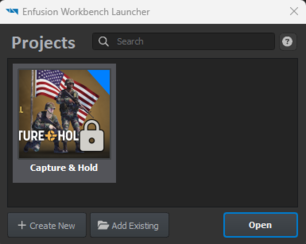
* If everything was done correctly your Enfusion Workbench Launcher should now contain the mod and look like this: [[File:Enfusion Workbench Launcher with Capture & Hold.png|none|thumb|306x306px]] | |||
== Creation Steps == | |||
* Open Arma Reforger Tools. If this is not visible in your Steam Library, activate "tools" in the filter. | |||
* Click on "Create New" | |||
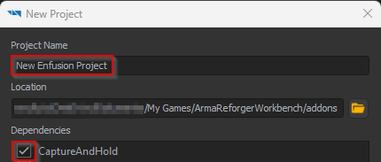
* Give a good Project Name like "CAH The Cowshed by xyz" so that people can search for it and also directly understand what this is about. | |||
* Important: Don't forget to activate the "CaptureAndHold" in Dependencies. [[File:Create CAH in Enfusion Workbench.png|none|thumb|381x381px]] | |||
=== Initial Setup === | === Initial Setup === | ||
| Line 19: | Line 27: | ||
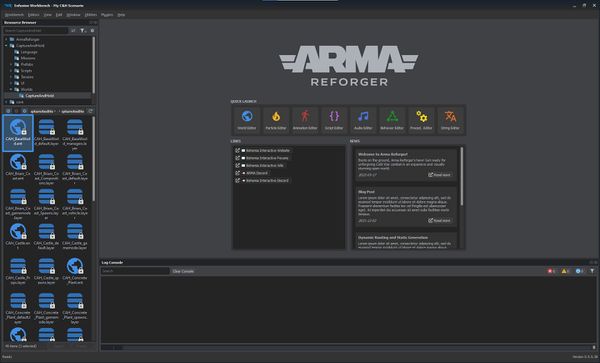
Start by opening the mod in Workbench and launch the World Editor from either the Quick Launch screen or Editors context menu. | Start by opening the mod in Workbench and launch the World Editor from either the Quick Launch screen or Editors context menu. | ||
<gallery | <gallery widths="600" heights="400" perrow="1"> | ||
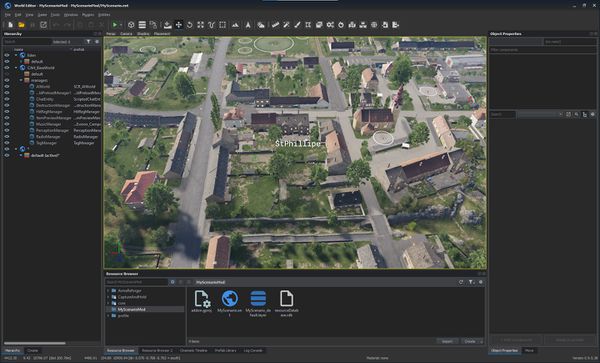
File:armareforger- | File:armareforger-cah 01 baseworld.jpg|'''1.''' Navigate to {{hl|CaptureAndHold/Worlds/CaptureAndHold}} and open one of the following world files (world icon): the '''CAH_BaseWorld.ent''' for Everon or '''CAH_BaseWorld_Arland.ent''' for Arland. | ||
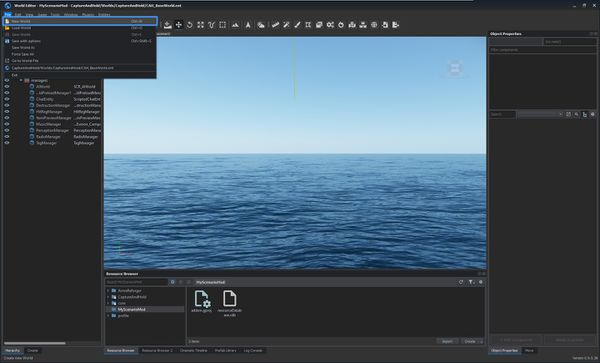
File:armareforger- | File:armareforger-cah 02 newworld.jpg|'''2.''' In the '''File''' context menu, select the '''New World''' option. | ||
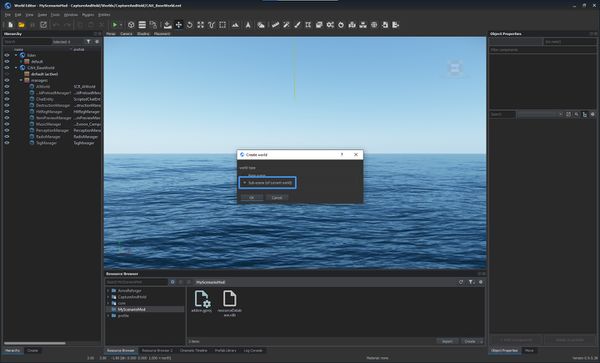
File:armareforger- | File:armareforger-cah 03 subscene.jpg|'''3.''' Make sure that the '''Sub-scene (of current world)''' option is selected in the dialog. | ||
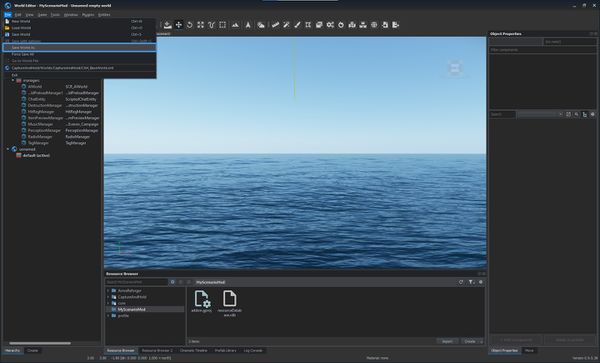
File:armareforger- | File:armareforger-cah 04 saveas.jpg|'''4.''' In the '''File''' context menu select the '''Save World As''' option and pick the scenario's save destination. | ||
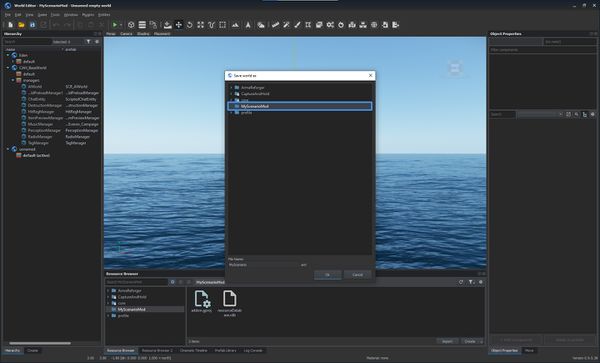
File:armareforger- | File:armareforger-cah 05 save dir.jpg|'''4bis.''' In our case, we select the root directory. '''TODO Add info that need to create folder Worlds and save file .ent in that folder''' | ||
File:armareforger- | File:armareforger-cah 06 location.jpg|'''5.''' Find a suitable scenario location. In our example, we chose St Philippe. | ||
</gallery> | </gallery> | ||
=== Scenario Setup === | === Scenario Setup === | ||
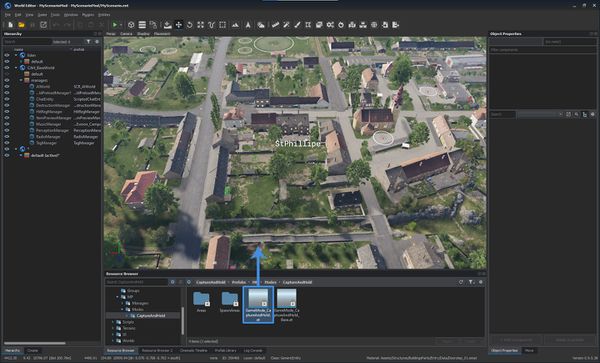
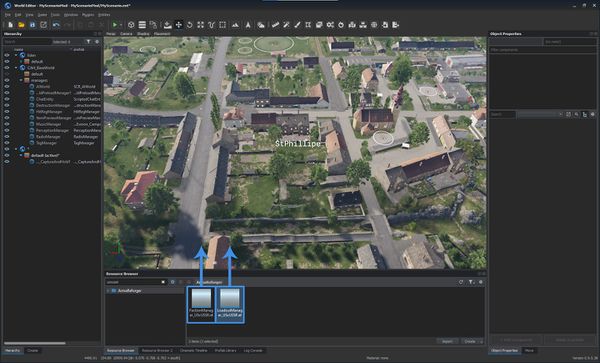
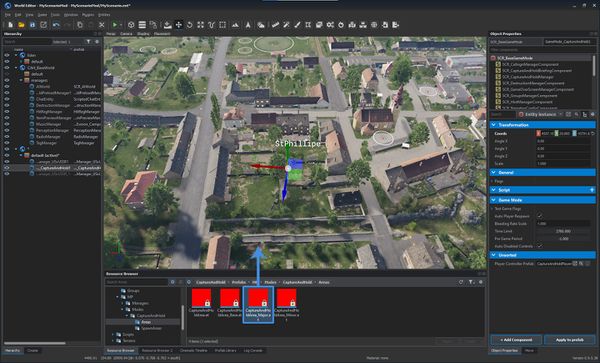
Drag and drop the following elements from the Resource Browser into the world:<gallery widths="600" heights="400" perrow="1"> | |||
File:armareforger-cah 07 gamemode.jpg|'''1.''' From {{hl|CaptureAndHold/Prefabs/MP/Modes/CaptureAndHold}} drag {{hl|GameMode_CaptureAndHold.et}} | |||
File:armareforger-cah 08 managers.jpg|'''2.''' From {{hl|ArmaReforger/Prefabs/MP/Managers/Factions}} drag the {{hl|FactionManager_USxUSSR.et}} and from {{hl|ArmaReforger/Prefabs/MP/Managers/Loadouts}} drag the {{hl|LoadoutManager_USxUSSR.et}} | |||
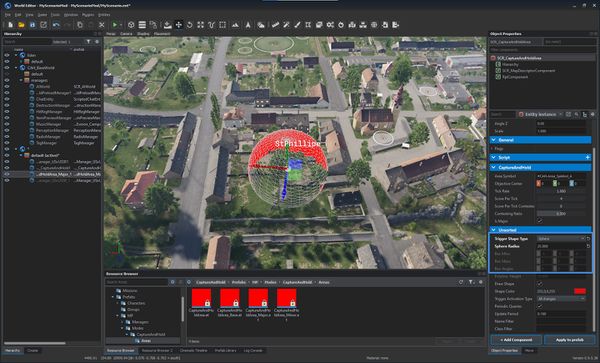
File:armareforger-cah 09 area.jpg|'''3.''' From {{hl|CaptureAndHold/Prefabs/MP/Modes/CaptureAndHold/Areas}} drag {{hl|CaptureAndHoldArea_Major.et}} | |||
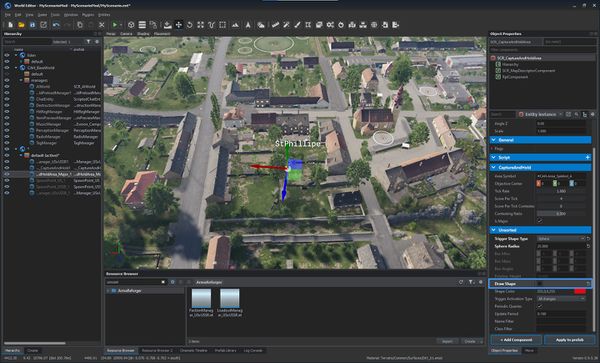
File:armareforger-cah 10 area setup.jpg|'''4.''' While the '''SCR_CaptureAndHoldArea''' entity is still selected, adjust the shape as desired. | |||
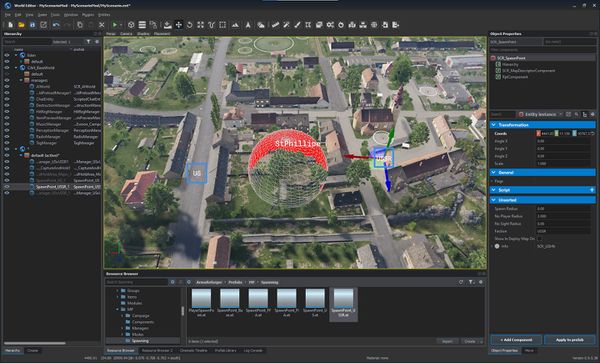
File:armareforger-cah 11 spawns.jpg|'''5.''' From {{hl|ArmaReforger/Prefabs/MP/Spawning}} drag {{hl|SpawnPoint_US.et}} and {{hl|SpawnPoint_USSR.et}} <br>'' | |||
</gallery> | |||
'''Note:''' The GarbageManager is not necessary anymore. | |||
Now '''save''' the scenario and proceed. | |||
=== System Test === | |||
<gallery mode="traditional" widths="600px" heights="400px" perrow="1"> | |||
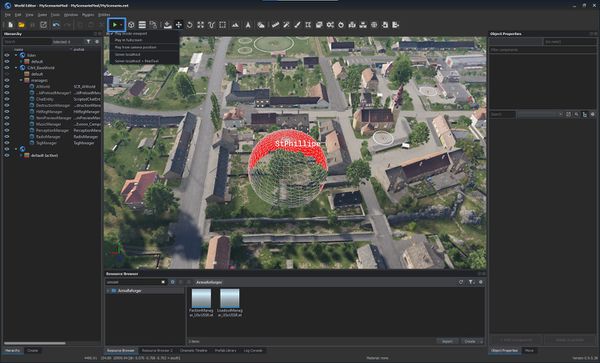
File:armareforger-cah_12_play.jpg|'''1.''' Make sure that the '''Play from camera position''' option is disabled and press the '''Play''' button. | |||
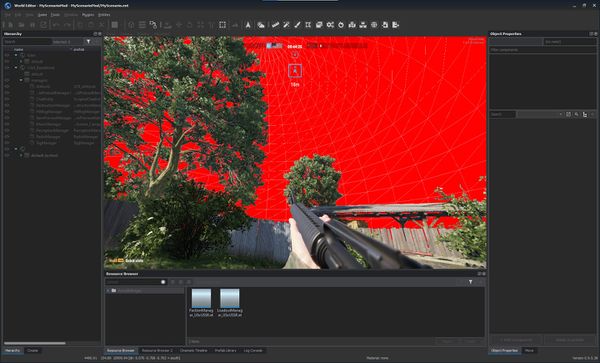
File:armareforger-cah_13_test.jpg|'''2.''' Verify that the scenario is working as intended - capture points, respawn, etc. Drawing of the area trigger can help visualising its coverage. | |||
File:armareforger-cah_14_disable_drawing.jpg|'''3.''' Press Escape to return to the Edit mode. Select the '''SCR_CaptureAndHoldArea''' entity and uncheck '''Draw Shape'''. | |||
</gallery> | |||
Once done, save your changes once more and close the World Editor. | |||
{{Feature|informative|It is highly recommended to use {{Name|bi}}-prepared scenarios for inspiration and usage examples of individual features and components available in {{armaR}} and the '''Capture & Hold''' mod.}} | |||
=== Scenario Header === | |||
To launch the scenario in-game a Scenario header (named {{hl|MissionHeader}}) config must be created. | |||
Exit the World Editor and return to the Resource Browser. | |||
In the Resource Browser | In the Resource Browser find your mod root directory and create a "Missions" directory inside. | ||
<gallery mode="traditional" widths="600px" heights="400px" perrow="1"> | |||
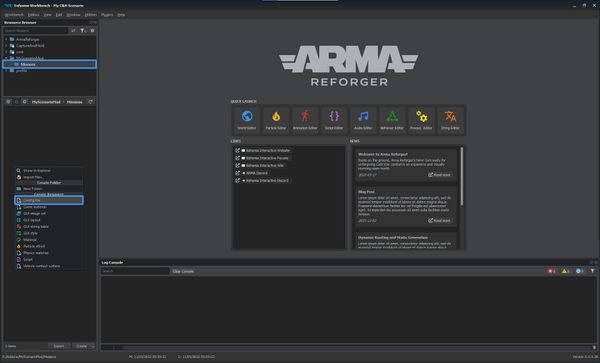
File:armareforger-cah_15_new_missionheader.jpg|'''1.''' {{Controls|RMB}} in your directory and select Create Resource → Config File in the context menu. | |||
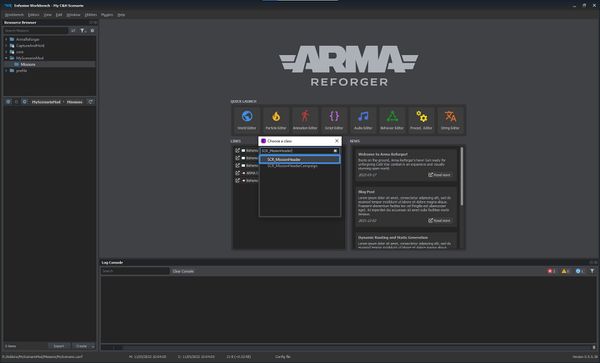
File:armareforger-cah_16_missionheader_class.jpg|'''2.''' Pick a name for your Mission Header and then select the {{hl|SCR_MissionHeader}} class from the list. | |||
</gallery> | |||
Open the newly created Mission Header config. | |||
In the '''World''' field, navigate to and select the world file. In our example it is the {{hl|MyScenario.ent}} in the mod's root directory. | |||
<gallery mode="traditional" widths="600px" heights="400px" perrow="1"> | |||
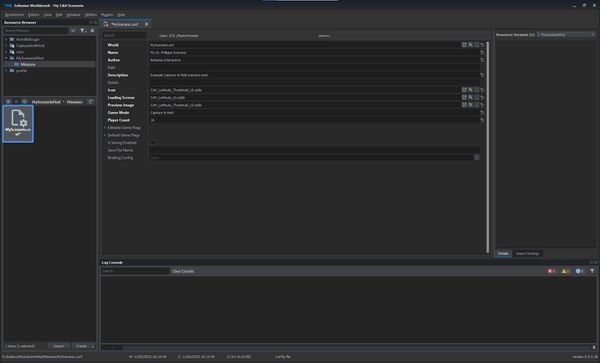
File:armareforger-cah_17_missionheader_edit.jpg|'''1.''' Fill in remaining fields as desired then save the file. | |||
</gallery> | |||
=== | |||
=== In-Game Test === | === In-Game Test === | ||
Launching {{armaR}} with this newly created mod enabled should allow you to see the and launch the scenario directly: | Launching {{armaR}} with this newly created mod enabled should allow you to see the and launch the scenario directly: | ||
<gallery mode="traditional" widths="600px" heights="400px" perrow="1"> | |||
=== | File:armareforger-cah_18_scenarios.jpg|'''1.''' Navigate to '''Scenarios'''. | ||
File:armareforger-cah_19_result.jpg|'''2.''' Verify that your scenario is working as intended. | |||
</gallery> | |||
=== Publish it to the Workshop === | |||
Now that the scenario can be launched from the game, only a few things remain. | Now that the scenario can be launched from the game, only a few things remain. | ||
Testing the scenario '''in multiplayer''' is important, making sure that there are enough spawn points and other gameplay details. | Testing the scenario '''in multiplayer''' is important, making sure that there are enough spawn points and other gameplay details. | ||
{{Feature|informative| | {{Feature|informative|For detailed information look at [[Arma Reforger:Multiplayer Scripting|Multiplayer Scripting]].}} | ||
Last, but not least is to '''publish''' the mod in the Bohemia Interactive Workshop for other people to see and play! | Last, but not least is to '''publish''' the mod in the Bohemia Interactive Workshop for other people to see and play! | ||
Important: Until your master peace has not been tested, you should use Visibility: "Private" (only for you) or "Test" (Test mod category that can be enabled in the Workbench filter). | |||
{{Feature|informative|See {{Link|Arma Reforger:Mod Publishing Process}}.}} | |||
=== Additional Settings Information === | |||
This is added as additional information so that you get up and running with a simple version first and then start worrying about the details. | |||
==== Score Ending ==== | |||
* Hierarchy Window: Select the object "GameMode_CaptureAndHold" | |||
* Object Properties: Select "SCR_ScoringSystemComponent" | |||
* In the settings for "Scoring:Actions" change the Score Limit [[File:CAH Score.png|none|thumb|Set the score to end the CAH game.]] | |||
==== Time Ending ==== | |||
* Hierarchy Window: Select the object "GameMode_CaptureAndHold" | |||
* Object Properties: Select "SCR_CaptureAndHoldManager" | |||
* In the settings for "End Game Duration" change the value which is given in seconds | |||
[[File:CAH Duration.png|none|thumb]] | |||
==== Scoring: Multipliers ==== | |||
You can adjust several actions so that they will have a bigger impact on the game / scoring. | |||
[[File:CAH Score Multipliers.png|none|thumb]] | |||
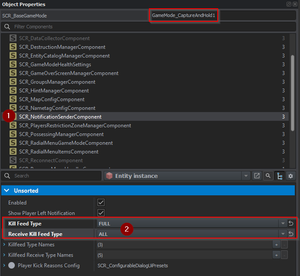
==== Kill Feed ==== | |||
It can be thrilling to leave the default values for this but for some communities the fun starts when they get more details in the "Kill Feed". | |||
With this setting there will be no secrets about who was eliminated by whom. | |||
[[File:CAH Kill Feed.png|none|thumb]] | |||
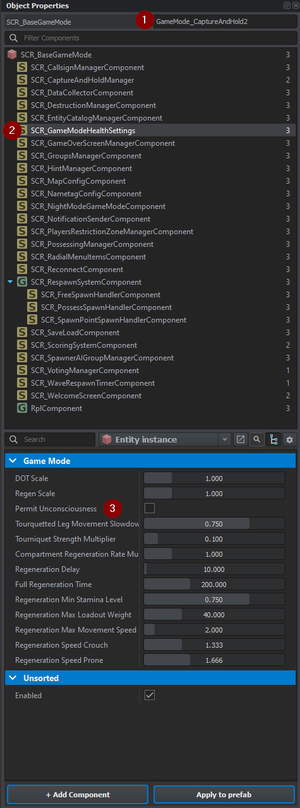
==== Activate Unconsciousness ==== | |||
If you want to use it, you must activate it in the GameMode_CaptureAndHold. By default it is deactivated: | |||
[[File:capture-and-hold unconsciousness.png|none|thumb]] | |||
==== GarbageManager - Delete bodies from map ==== | |||
2024-03 This got disabled for now and is not available - might come back so this documentation stays. | |||
If you are annoyed of too many bodies in your CAH areas, you need to make these adjustments: | |||
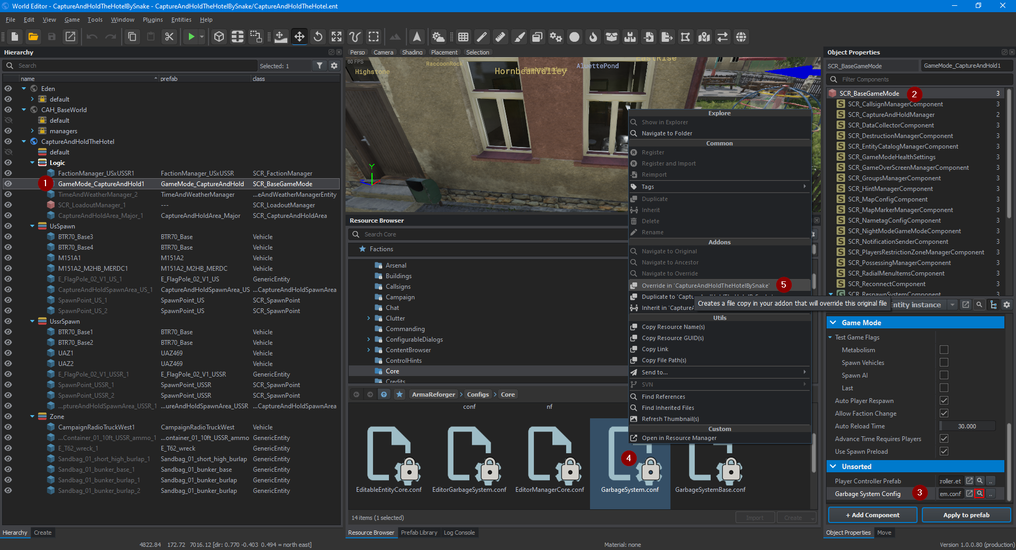
[[File:ReforgerGarbageConfigCAH.png|none|thumb|1016x1016px]] | |||
# Select your instance of CAH GameMode | |||
# Select SCR_BaseGameMode | |||
# Scroll down and select "Garbage System Config" and click on the search icon | |||
# Select "Override" in the right mouse button menu for GarbageSystem.conf | |||
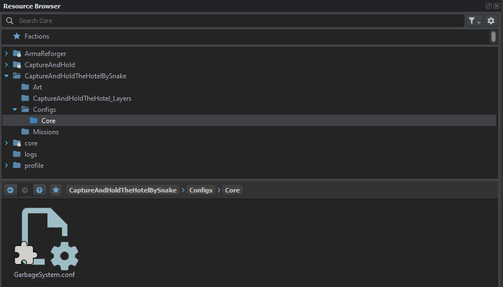
This will create a copy of the locked file into your scenario folder so that you are able to edit it. | |||
The system will automatically open the new folder: | |||
[[File:reforger-garbage-config-2.png|none|thumb|503x503px]] | |||
Open the file and edit it. | |||
{{Feature|important|Only the classes which are defined will be deleted.}} | |||
This example shows how dead bodies are deleted after 180 seconds when player are further away than 3 meters. | |||
[[File:reforger-garbage-config-3.png|none|thumb|798x798px]] | |||
# Add a new class filter | |||
# Select "only destroyed" | |||
# Define Lifetime and the distance a living player has to have when the class is deleted. | |||
==== Can't initialize the game (World Editor won't start) ==== | |||
"World Editor and some other game depended features will not be available. But rest of workbench will be functional." | |||
[[File:world-editor-does-not-start.jpg|none|thumb|485x485px]] | |||
'''Solution:''' Delete the official CAH from "... \My Games\ArmaReforger\addons". If the error remains, delete all addons. | |||
==== Opening an existing project but world file is not shown ==== | |||
You want to continue working on a project, opened it but cannot find your world file? | |||
'''Solution:''' Is the official CAH from Bohemia in your overview of projects? Probably not. Add it again like described at the beginning of this page. | |||
==== Editor crashes when using the garbage collector ==== | |||
'''Solution:''' Don't use it. A developer stated said that it is not needed anymore. | |||
==== Repair your C&H scenario after version 1 of Arma Reforger ==== | |||
Sadly, with version 1 of Arma Reforger all Capture And Hold Scenarios have to be repaired and re-published. | |||
* Open your scenario. | |||
* Accept this message with "Yes".[[File:cah-repair-message2023-12-26 15 07 30-Window.png|none|thumb]]Place a new CaptureAndHold area as described above since it was removed while validating. Do not worry about the Garbage Collector: It is gone for good. | |||
{{GameCategory|armaR|Modding|Tutorials|Scenario}} | {{GameCategory|armaR|Modding|Tutorials|Scenario}} | ||
Latest revision as of 16:03, 22 November 2024
Setting up a new Capture & Hold scenario based is easy, thanks to the Prefab system and already existing base world available as part of the Capture & Hold mod.
Prerequisites
Before you start Arma Reforger Tools, you need to get the "Capture & Hold" Mod subscription:
- Start Arma Reforger.
- Enter the workshop.
- Subscribe to the official mod "Capture & Hold" by Bohemia Interactive:
- Close Arma Reforger when the download is finished.
- Open Arma Reforger Tools.
- Click on "Add Existing" to add the mod that you just downloaded.
- Add addon.gproj from the %userprofile%
\Documents \My Games \ArmaReforger \addons \CaptureAMPHold_591AF5BDA9F7CE8B directory - If everything was done correctly your Enfusion Workbench Launcher should now contain the mod and look like this:
Creation Steps
- Open Arma Reforger Tools. If this is not visible in your Steam Library, activate "tools" in the filter.
- Click on "Create New"
- Give a good Project Name like "CAH The Cowshed by xyz" so that people can search for it and also directly understand what this is about.
- Important: Don't forget to activate the "CaptureAndHold" in Dependencies.
Initial Setup
Start by opening the mod in Workbench and launch the World Editor from either the Quick Launch screen or Editors context menu.
Scenario Setup
Drag and drop the following elements from the Resource Browser into the world:
Note: The GarbageManager is not necessary anymore.
Now save the scenario and proceed.
System Test
Once done, save your changes once more and close the World Editor.
Scenario Header
To launch the scenario in-game a Scenario header (named MissionHeader) config must be created.
Exit the World Editor and return to the Resource Browser.
In the Resource Browser find your mod root directory and create a "Missions" directory inside.
Open the newly created Mission Header config.
In the World field, navigate to and select the world file. In our example it is the MyScenario.ent in the mod's root directory.
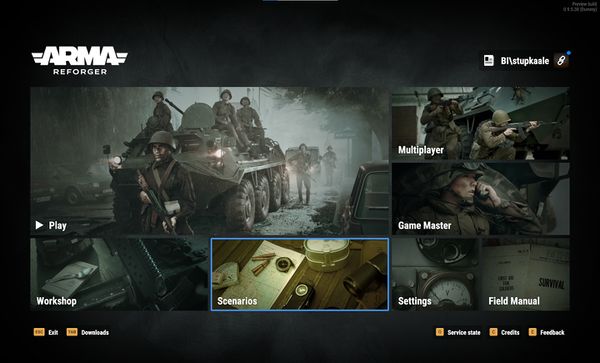
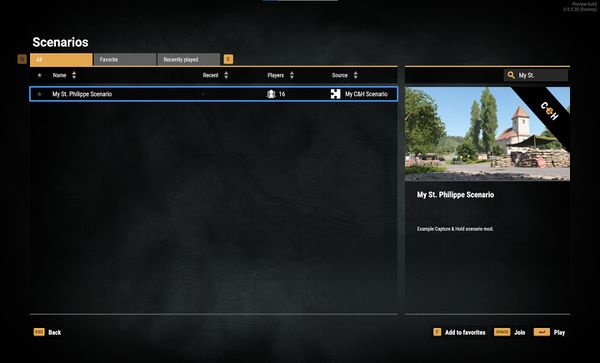
In-Game Test
Launching Arma Reforger with this newly created mod enabled should allow you to see the and launch the scenario directly:
Publish it to the Workshop
Now that the scenario can be launched from the game, only a few things remain. Testing the scenario in multiplayer is important, making sure that there are enough spawn points and other gameplay details.
Last, but not least is to publish the mod in the Bohemia Interactive Workshop for other people to see and play!
Important: Until your master peace has not been tested, you should use Visibility: "Private" (only for you) or "Test" (Test mod category that can be enabled in the Workbench filter).
Additional Settings Information
This is added as additional information so that you get up and running with a simple version first and then start worrying about the details.
Score Ending
- Hierarchy Window: Select the object "GameMode_CaptureAndHold"
- Object Properties: Select "SCR_ScoringSystemComponent"
- In the settings for "Scoring:Actions" change the Score Limit
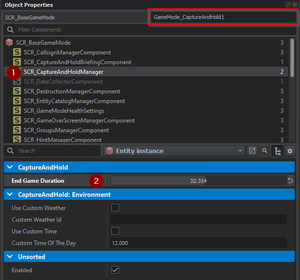
Time Ending
- Hierarchy Window: Select the object "GameMode_CaptureAndHold"
- Object Properties: Select "SCR_CaptureAndHoldManager"
- In the settings for "End Game Duration" change the value which is given in seconds
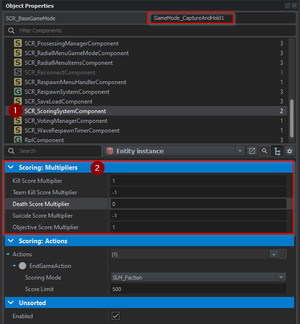
Scoring: Multipliers
You can adjust several actions so that they will have a bigger impact on the game / scoring.
Kill Feed
It can be thrilling to leave the default values for this but for some communities the fun starts when they get more details in the "Kill Feed".
With this setting there will be no secrets about who was eliminated by whom.
Activate Unconsciousness
If you want to use it, you must activate it in the GameMode_CaptureAndHold. By default it is deactivated:
GarbageManager - Delete bodies from map
2024-03 This got disabled for now and is not available - might come back so this documentation stays. If you are annoyed of too many bodies in your CAH areas, you need to make these adjustments:
- Select your instance of CAH GameMode
- Select SCR_BaseGameMode
- Scroll down and select "Garbage System Config" and click on the search icon
- Select "Override" in the right mouse button menu for GarbageSystem.conf
This will create a copy of the locked file into your scenario folder so that you are able to edit it.
The system will automatically open the new folder:
Open the file and edit it.
This example shows how dead bodies are deleted after 180 seconds when player are further away than 3 meters.
- Add a new class filter
- Select "only destroyed"
- Define Lifetime and the distance a living player has to have when the class is deleted.
Can't initialize the game (World Editor won't start)
"World Editor and some other game depended features will not be available. But rest of workbench will be functional."
Solution: Delete the official CAH from "... \My Games\ArmaReforger\addons". If the error remains, delete all addons.
Opening an existing project but world file is not shown
You want to continue working on a project, opened it but cannot find your world file?
Solution: Is the official CAH from Bohemia in your overview of projects? Probably not. Add it again like described at the beginning of this page.
Editor crashes when using the garbage collector
Solution: Don't use it. A developer stated said that it is not needed anymore.
Repair your C&H scenario after version 1 of Arma Reforger
Sadly, with version 1 of Arma Reforger all Capture And Hold Scenarios have to be repaired and re-published.
- Open your scenario.
- Accept this message with "Yes".Place a new CaptureAndHold area as described above since it was removed while validating. Do not worry about the Garbage Collector: It is gone for good.
