Asset Browser Mod Integration – Arma Reforger
Lou Montana (talk | contribs) m (Text replacement - "ized" to "ised") |
|||
| (10 intermediate revisions by 2 users not shown) | |||
| Line 1: | Line 1: | ||
{{TOC|side}} | {{TOC|side}} | ||
Basic rules for adding assets are explained on following page - [[Arma_Reforger:Game_Master:_Editable_Entities_Configuration|'''Editable Entities Configuration''']] which covers most of the basic information. Due to that, this tutorial focuses more on creating new register and adding to list used by in game Editor and it is assumed that you have properly configured prefabs in first place (with editable components present and [[Arma_Reforger:Game_Master:_Image_Generation_Tutorial|preview images]] already generated). | |||
Basic rules for adding assets | |||
= Preparing structure = | = Preparing structure = | ||
At minimum, to add new asset to in game editor you need to create a '''new register''' & ''' | At minimum, to add new asset to in game editor you need to create a '''new register''' & '''override {{Link|enfusion://ResourceManager/~ArmaReforger:Prefabs/Editor/Modes/EditorModeEdit.et}}''' prefab. Folder wise, only structure for new config needs to be prepared since '''[[Arma_Reforger:Data_Modding_Basics#Using_.22Override_in....22_function|Override in]]''' function is taking care of it | ||
[[ | [[File:armareforger-editor-adding-assets-file-structure.png|1200px]] | ||
=== Creating new register file === | === Creating new register file === | ||
| Line 14: | Line 12: | ||
==== Creating new config ==== | ==== Creating new config ==== | ||
[[ | [[File:armareforger-editor-adding-assets-creating-config.png|200px|thumb||left]] | ||
[[ | [[File:armareforger-editor-adding-assets-creating-config-class.png|200px|right]] | ||
New register can be easily created by new config file. Procedure for it same as for any other configs: | New register can be easily created by new config file. Procedure for it same as for any other configs: | ||
* In Resource Browser menu either click with ''Right Mouse Button'' | * In Resource Browser menu either click with ''Right Mouse Button'' on empty '''Resource Browser''' field '''(1a)''' or use '''Create button (2)''' in bottom right section of Resource Browser. | ||
* From the context menu, select '''Config file''' option | * From the context menu, select '''Config file''' option | ||
* Type in new config name, i.e. ''SampleMod_NewCar_Vehicles.conf'' | * Type in new config name, i.e. ''SampleMod_NewCar_Vehicles.conf'' | ||
| Line 25: | Line 23: | ||
==== Duplicating existing config ==== | ==== Duplicating existing config ==== | ||
Alternative method involves duplicating one of the existing register configs located in ''Configs\Editor\PlaceableEntities.'' To do so, click on i.e. Vehicle.conf with ''Right Mouse Button'' and select option ''' | Alternative method involves duplicating one of the existing register configs located in ''Configs\Editor\PlaceableEntities.'' To do so, click on i.e. Vehicle.conf with ''Right Mouse Button'' and select option '''[[Arma_Reforger:Data_Modding_Basics#Using_.22Duplicate_to....22_function|Duplicate to "''name of addon''"]]''' from context menu that appeared. After typing in new name and confirming it, new config file will be created in target addon, keeping structure of original file. | ||
=== Adding new register file to Editor === | === Adding new register file to Editor === | ||
Once register file is created, it's time to actually link it with in game editor. To do so, '''EditorModeEdit''' prefab has to be modified and '''Registries''' array in '''SCR_PlacingEditorComponent''' needs to be expanded. | Once register file is created, it's time to actually link it with in game editor. To do so, '''{{Link|enfusion://ResourceManager/~ArmaReforger:Prefabs/Editor/Modes/EditorModeEdit.et}}''' prefab has to be modified and '''Registries''' array in '''SCR_PlacingEditorComponent''' needs to be expanded. | ||
==== Using Override in functionality ==== | ==== Using Override in functionality ==== | ||
[[ | [[File:armareforger-editor-adding-assets-override-in.gif|right]] | ||
First step, will be creating modified copy of '''EditorModeEdit''' prefab. This can be easily accomplished using '''Override in''' functionality available in '''Resource Browser''' context menu. In principle, this operation is performed in two steps: | First step, will be creating modified copy of '''{{Link|enfusion://ResourceManager/~ArmaReforger:Prefabs/Editor/Modes/EditorModeEdit.et}}''' prefab. This can be easily accomplished using '''[[Arma_Reforger:Data_Modding_Basics#Using_.22Override_in....22_function|Override in]]''' functionality available in '''Resource Browser''' context menu. In principle, this operation is performed in two steps: | ||
* Navigate to ''Prefabs/Editor/Modes'' folder and locate '''EditorModeEdit''' prefab | * Navigate to ''Prefabs/Editor/Modes'' folder and locate '''{{Link|enfusion://ResourceManager/~ArmaReforger:Prefabs/Editor/Modes/EditorModeEdit.et}}''' prefab | ||
* Click with ''Right Mouse Button'' on that prefab and select | * Click with ''Right Mouse Button'' on that prefab and select '''Override in "''name of addon''"''' option | ||
Workbench will recreate structure of original file with only difference being file system - that means that | Workbench will recreate structure of original file with only difference being file system - that means that | ||
| Line 46: | Line 44: | ||
* ''$NameOfAddon:Prefabs/Editor/Modes/EditorModeEdit.et'' | * ''$NameOfAddon:Prefabs/Editor/Modes/EditorModeEdit.et'' | ||
This new prefab will have exactly same GUID and will override existing prefab. | |||
{{Clear}} | {{Clear}} | ||
{{Feature|informative| | {{Feature|informative| | ||
[[ | [[File:armareforger-editor_adding_assets_overridden_file.png|left]] Override in function creates overridden version of {{Link|enfusion://ResourceManager/~ArmaReforger:Prefabs/Editor/Modes/EditorModeEdit.et EditorModeEdit.et}} prefab. This mean that prefab in target addon contains only changes - like adding new elements or overriding existing ones - made in addon.}} | ||
{{Clear}} | {{Clear}} | ||
| Line 59: | Line 58: | ||
With '''EditorModeEdit ''' prefab being present in addon, it is time to make modification to it. Goal is to add new element to '''Registeries''' array located in '''SCR_PlacingEditorComponent.''' | With '''EditorModeEdit ''' prefab being present in addon, it is time to make modification to it. Goal is to add new element to '''Registeries''' array located in '''SCR_PlacingEditorComponent.''' | ||
'''EditorModeEdit ''' prefab located in the addon can be edited in a same way as any other addon - it is possible to either place it directly in World Editor and then start editing parameters or '''Edit prefab''' | '''EditorModeEdit ''' prefab located in the addon can be edited in a same way as any other addon - it is possible to either place it directly in World Editor and then start editing parameters or '''Edit prefab''' can be used in Resource Manager. | ||
To use '''Edit prefab''' option, double click with ''Left Mouse Button'' on '''EditorModeEdit.et''' file located in addon. This should open t.hat prefab as a new tab in '''Resource Manger'''. Now only thing left to do is to click on '''Edit prefab''' button on the right side of the '''Resource Manager -''' this will open World Editor in special, prefab editing mode which slightly differs from regular worlds created by that editor. | To use '''Edit prefab''' option, double click with ''Left Mouse Button'' on '''EditorModeEdit.et''' file located in addon. This should open t.hat prefab as a new tab in '''Resource Manger'''. Now only thing left to do is to click on '''Edit prefab''' button on the right side of the '''Resource Manager -''' this will open World Editor in special, prefab editing mode which slightly differs from regular worlds created by that editor. | ||
| Line 65: | Line 64: | ||
Main difference is fact that when you try to save "world", it doesn't create any new world files - it just saves changes in prefabs. | Main difference is fact that when you try to save "world", it doesn't create any new world files - it just saves changes in prefabs. | ||
[[ | [[File:armareforger-editor-adding-assets-edit-prefab.gif]] | ||
To add new config to '''Registries''' array simple drag and drop config file from '''Resource Browser''' on top of '''Registries''' property. A new element will be added on the bottom of the array with link to config file located in ''Configs→ Editor → PlaceableEntities.'' | To add new config to '''Registries''' array located in '''SCR_PlacingEditorComponent,''' simple drag and drop config file from '''Resource Browser''' on top of '''Registries''' property. A new element will be added on the bottom of the array with link to config file located in ''Configs→ Editor → PlaceableEntities.'' | ||
[[ | [[File:armareforger-editor-adding-assets-adding-register.gif]] | ||
Now only remaining thing to do is saving those changes to the prefab - to do so, either click on '''Save Button''' or press ''Left Ctrl + S'' shortcut. | Now only remaining thing to do is saving those changes to the prefab - to do so, either click on '''Save Button''' or press ''Left Ctrl + S'' shortcut. | ||
| Line 81: | Line 80: | ||
Open config file containing register (in this case its ''SampleMod_NewCar_Vehicles.conf'') as a new tab and then navigate in Resource Browser to a location where are placeable prefabs which you want to expose. Then, only thing left to do is simply drag & dropping those prefabs on '''Prefabs''' array. | Open config file containing register (in this case its ''SampleMod_NewCar_Vehicles.conf'') as a new tab and then navigate in Resource Browser to a location where are placeable prefabs which you want to expose. Then, only thing left to do is simply drag & dropping those prefabs on '''Prefabs''' array. | ||
[[ | [[File:armareforger-editor-adding-assets-adding-asset-manual.gif]] | ||
Of course, elements in that array can also be manually added or removed via plus & minus signs on the right side of the '''Prefabs''' array | Of course, elements in that array can also be manually added or removed via plus & minus signs on the right side of the '''Prefabs''' array | ||
| Line 87: | Line 86: | ||
=== Using plugin === | === Using plugin === | ||
[[ | [[File:armareforger-editor-adding-assets-adding-plugin.png|left]] | ||
Basics of using '''Register Placeable Entities''' can be found on following page - Editor: Editable Entities: Configuration - RegisterPlaceablePrefabs. | Basics of using '''Register Placeable Entities''' can be found on following page - Editor: Editable Entities: Configuration - RegisterPlaceablePrefabs. | ||
| Line 95: | Line 94: | ||
=== Adding modded label === | === Adding modded label === | ||
[[ | [[File:armareforger-editor-adding-assets-adding-label.gif|right]] | ||
To be able filter modded content from vanilla, it might be necessary to add '''CONTENT_MODDED''' label to '''Authored Labels''' array in '''Editable Component''' of asset (''depending on asset type, it can be SCR_EditableVehicleComponent, SCR_EditableEntityComponent, SCR_EditableCharacterComponent or SCR_EditableGroupComponent''). | To be able filter modded content from vanilla, it might be necessary to add '''CONTENT_MODDED''' label to '''Authored Labels''' array in '''Editable Component''' of asset (''depending on asset type, it can be SCR_EditableVehicleComponent, SCR_EditableEntityComponent, SCR_EditableCharacterComponent or SCR_EditableGroupComponent''). | ||
| Line 104: | Line 103: | ||
== Testing result in-game == | == Testing result in-game == | ||
If everything went good, then all assets added to new register file should be visible in game | If everything went good, then all assets added to new register file should be visible in game{{Feature|warning|Keep in mind that only '''localised''' strings are '''searchable by name in Asset Browser'''. Information about string localization can be found on [[Arma_Reforger:Mod_Localisation|'''Mod Localisation''']] page}}[[File:armareforger-editor-adding-assets-result.png|left]] | ||
{{GameCategory|armaR|Modding|Tutorials}} | {{GameCategory|armaR|Modding|Tutorials|Game Master}} | ||
Latest revision as of 21:07, 24 May 2024
Basic rules for adding assets are explained on following page - Editable Entities Configuration which covers most of the basic information. Due to that, this tutorial focuses more on creating new register and adding to list used by in game Editor and it is assumed that you have properly configured prefabs in first place (with editable components present and preview images already generated).
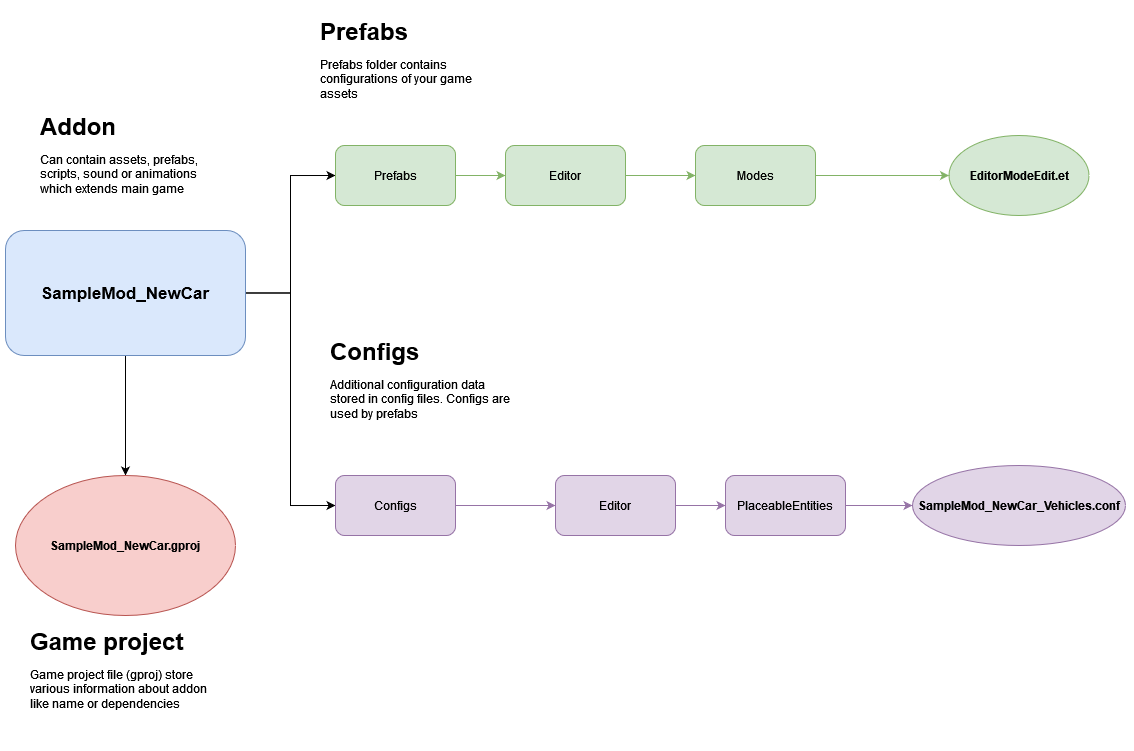
Preparing structure
At minimum, to add new asset to in game editor you need to create a new register & override EditorModeEdit.et prefab. Folder wise, only structure for new config needs to be prepared since Override in function is taking care of it
Creating new register file
Assuming that structure was already prepared, there are two ways how to create a new register config and both of them are described below
Creating new config
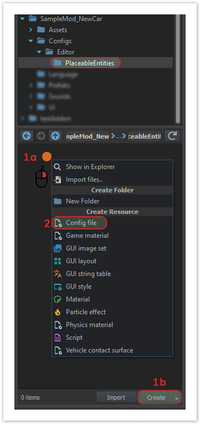
New register can be easily created by new config file. Procedure for it same as for any other configs:
- In Resource Browser menu either click with Right Mouse Button on empty Resource Browser field (1a) or use Create button (2) in bottom right section of Resource Browser.
- From the context menu, select Config file option
- Type in new config name, i.e. SampleMod_NewCar_Vehicles.conf
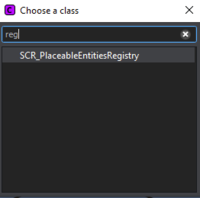
- From Choose a class window, select SCR_PlaceableEntitiesRegistry option.
Duplicating existing config
Alternative method involves duplicating one of the existing register configs located in Configs\Editor\PlaceableEntities. To do so, click on i.e. Vehicle.conf with Right Mouse Button and select option Duplicate to "name of addon" from context menu that appeared. After typing in new name and confirming it, new config file will be created in target addon, keeping structure of original file.
Adding new register file to Editor
Once register file is created, it's time to actually link it with in game editor. To do so, EditorModeEdit.et prefab has to be modified and Registries array in SCR_PlacingEditorComponent needs to be expanded.
Using Override in functionality
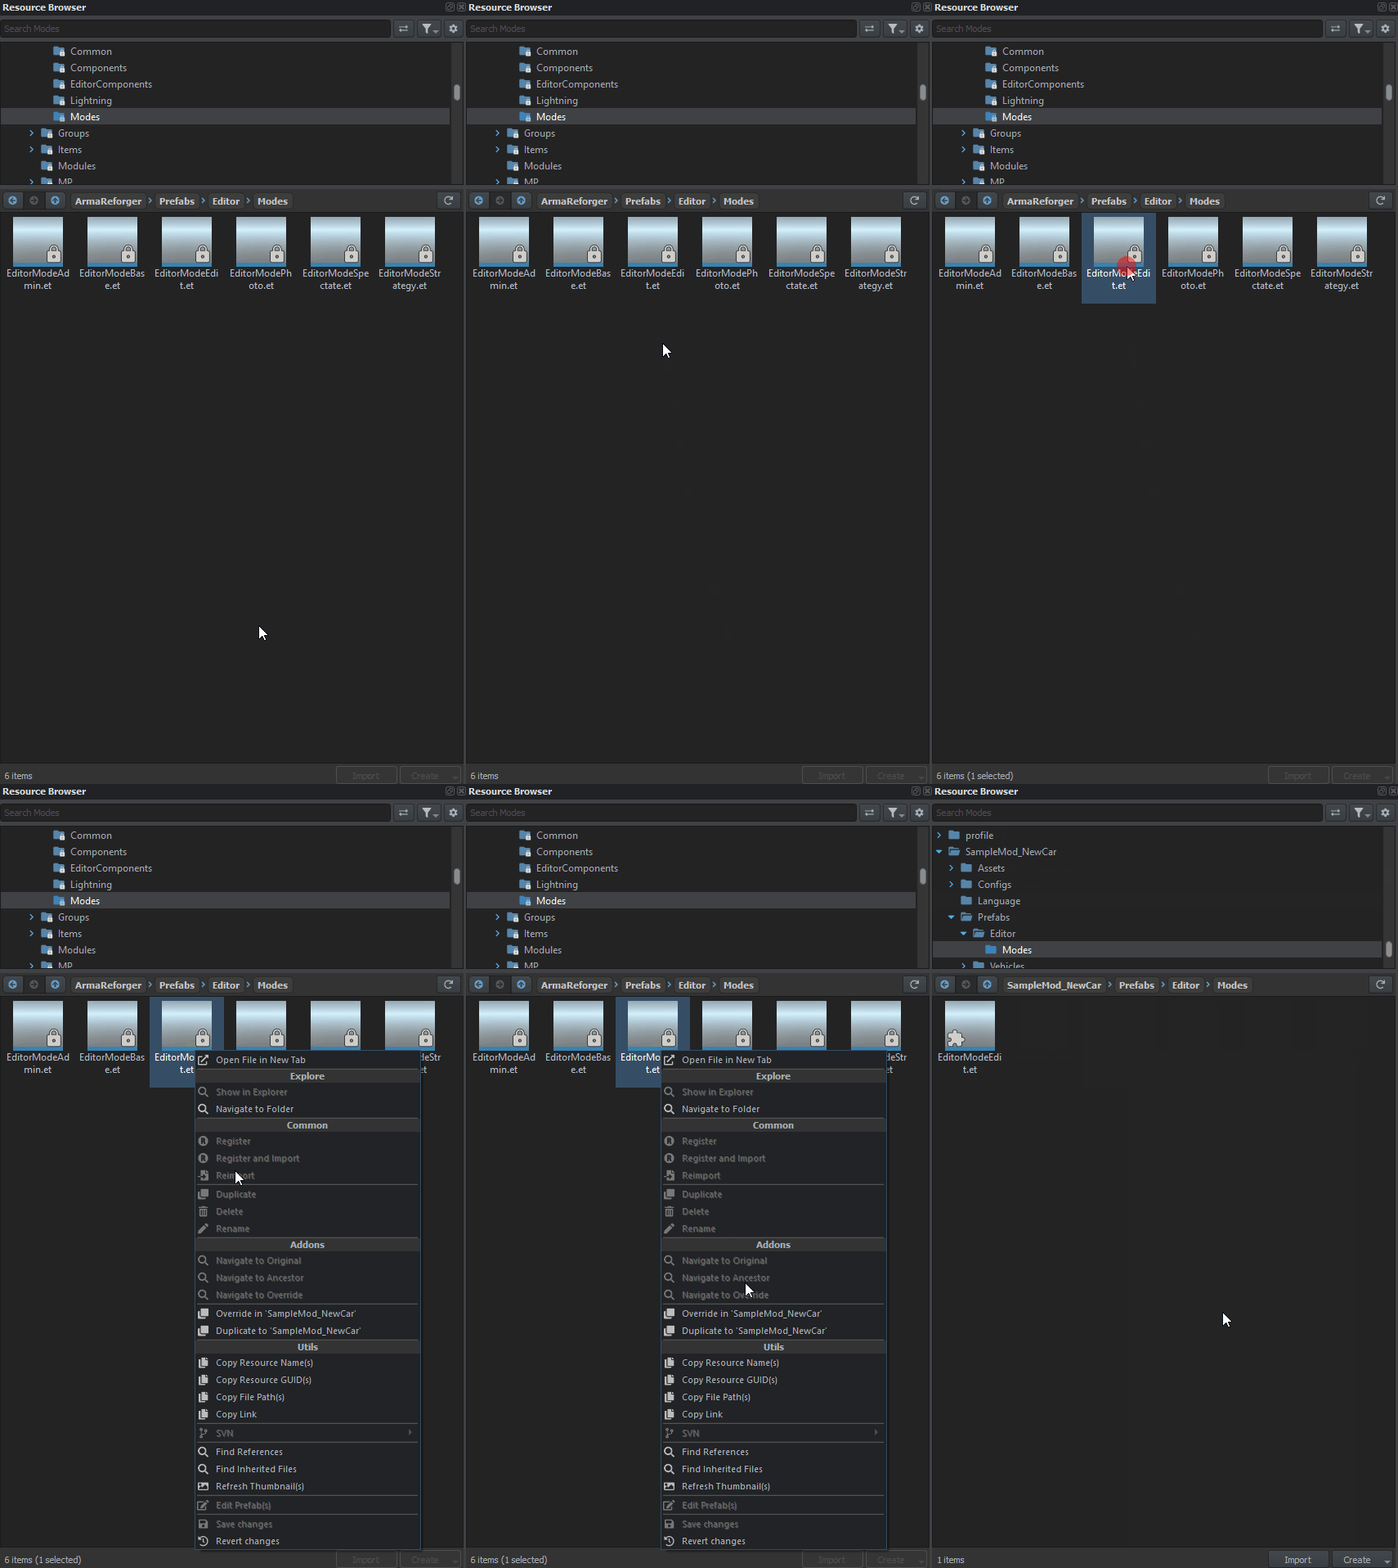
First step, will be creating modified copy of EditorModeEdit.et prefab. This can be easily accomplished using Override in functionality available in Resource Browser context menu. In principle, this operation is performed in two steps:
- Navigate to Prefabs/Editor/Modes folder and locate EditorModeEdit.et prefab
- Click with Right Mouse Button on that prefab and select Override in "name of addon" option
Workbench will recreate structure of original file with only difference being file system - that means that
- $ArmaReforger:Prefabs/Editor/Modes/EditorModeEdit.et
will be copied to
- $NameOfAddon:Prefabs/Editor/Modes/EditorModeEdit.et
This new prefab will have exactly same GUID and will override existing prefab.
Overridden assets can be easily distinguished by puzzle icon visible in Resource Browser.
Expanding Registries array
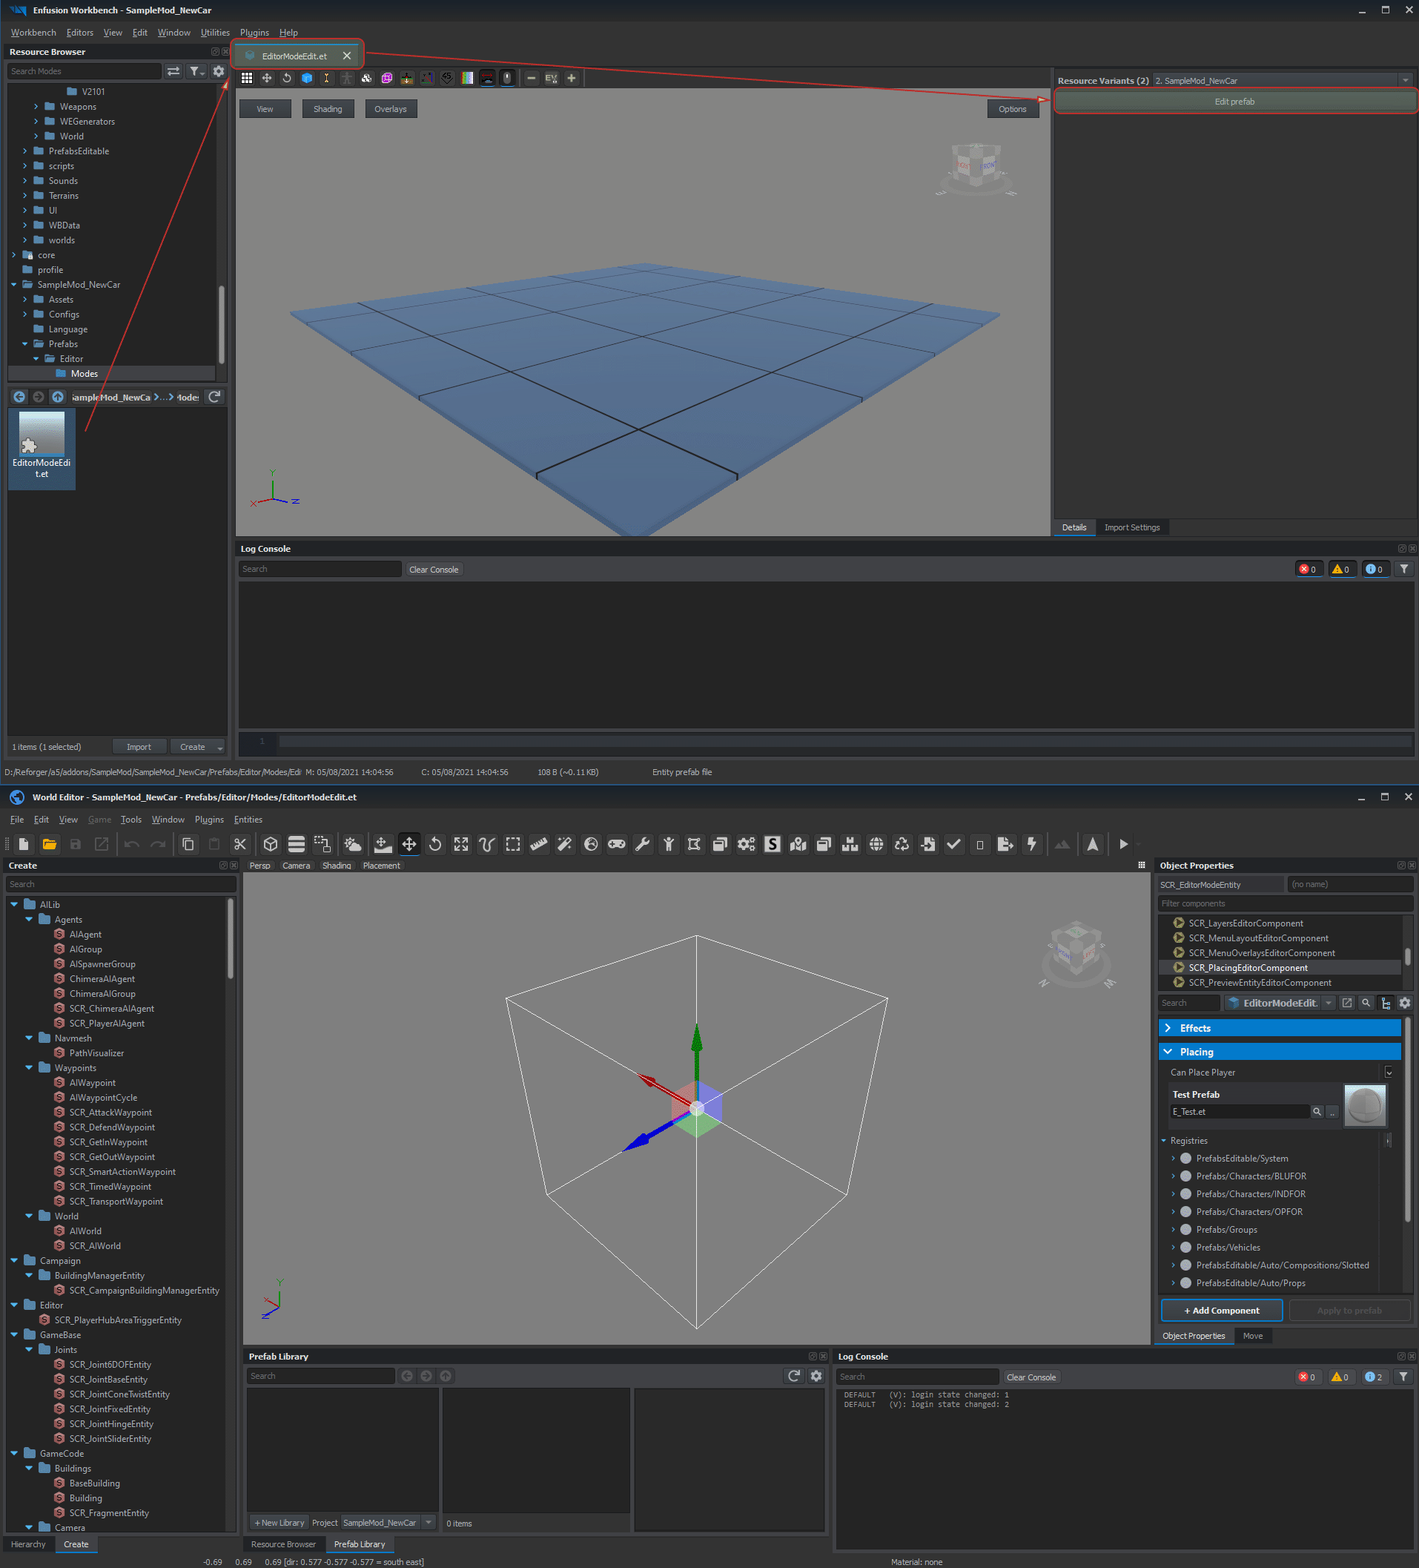
With EditorModeEdit prefab being present in addon, it is time to make modification to it. Goal is to add new element to Registeries array located in SCR_PlacingEditorComponent.
EditorModeEdit prefab located in the addon can be edited in a same way as any other addon - it is possible to either place it directly in World Editor and then start editing parameters or Edit prefab can be used in Resource Manager.
To use Edit prefab option, double click with Left Mouse Button on EditorModeEdit.et file located in addon. This should open t.hat prefab as a new tab in Resource Manger. Now only thing left to do is to click on Edit prefab button on the right side of the Resource Manager - this will open World Editor in special, prefab editing mode which slightly differs from regular worlds created by that editor.
Main difference is fact that when you try to save "world", it doesn't create any new world files - it just saves changes in prefabs.
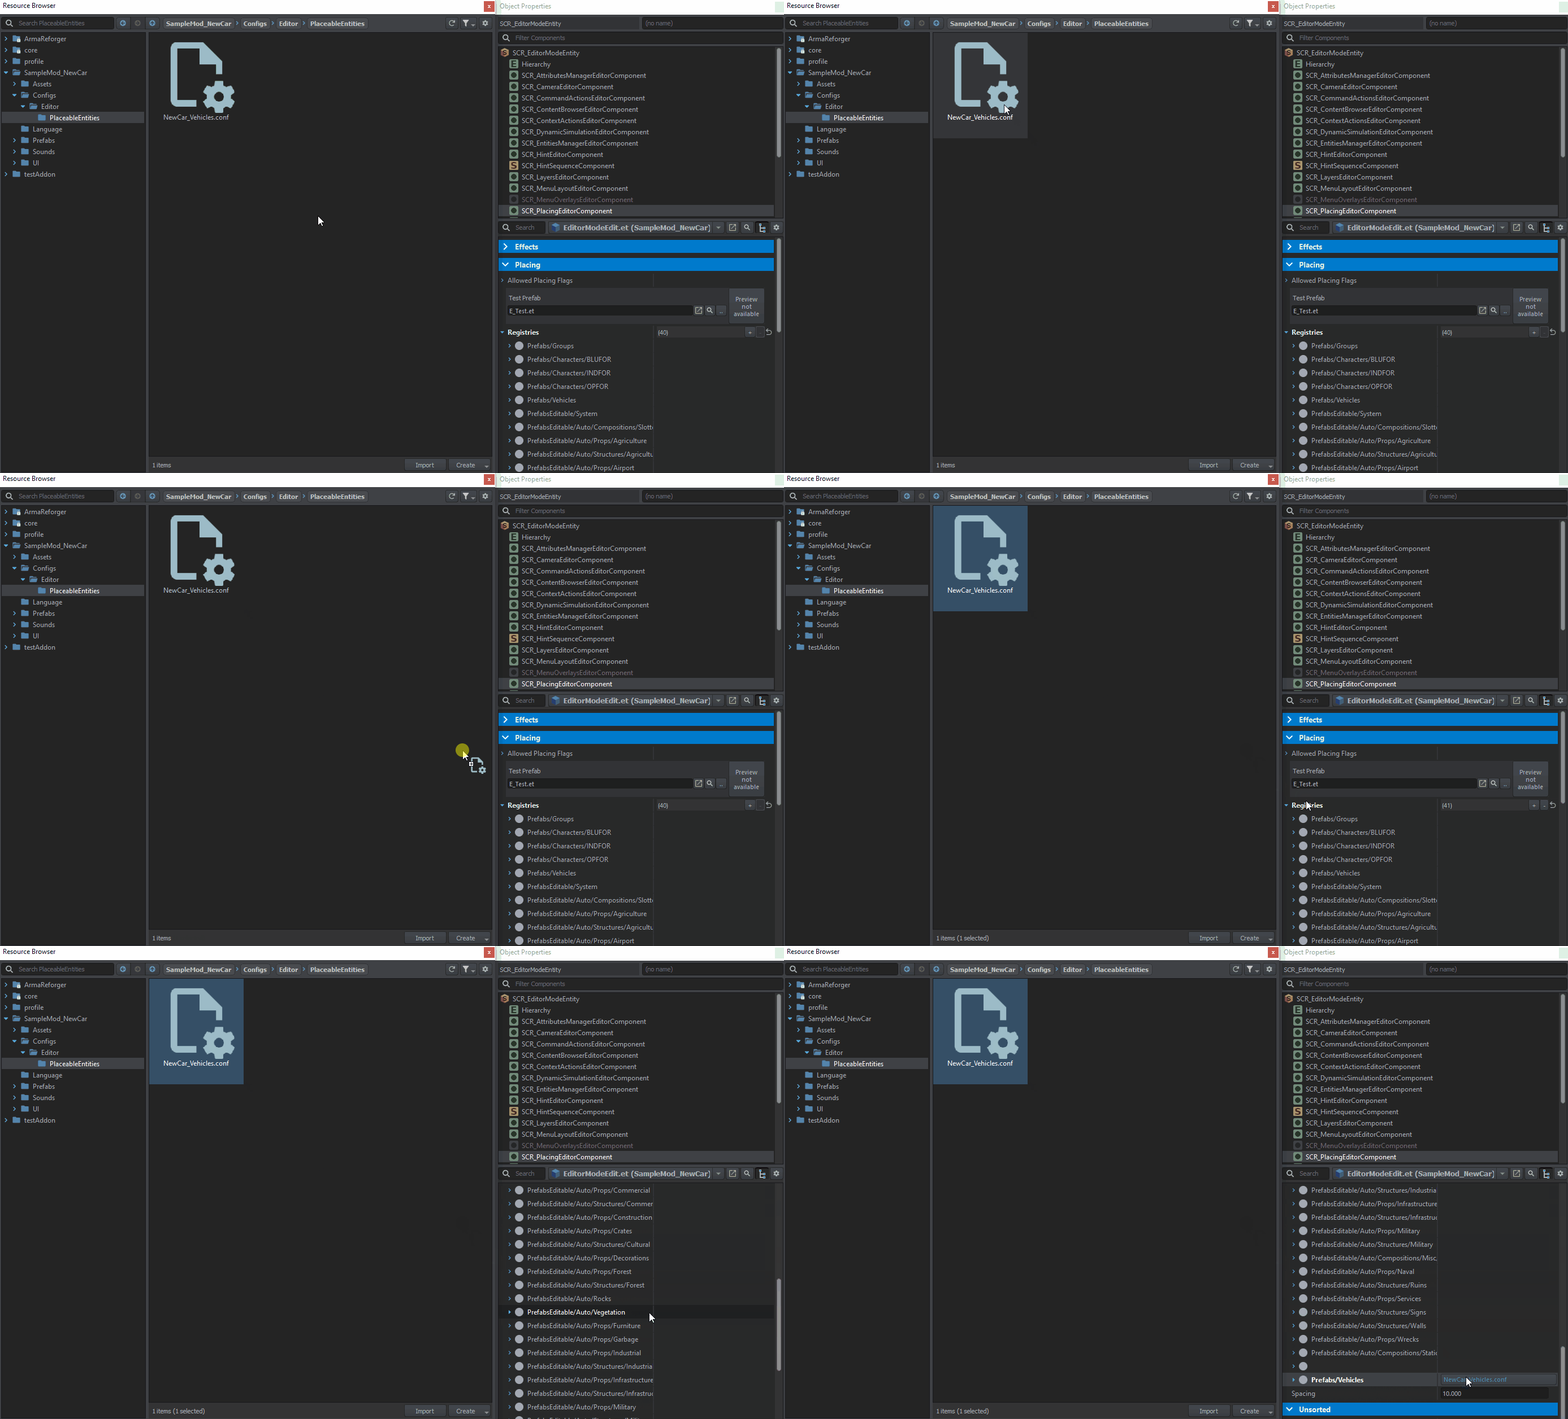
To add new config to Registries array located in SCR_PlacingEditorComponent, simple drag and drop config file from Resource Browser on top of Registries property. A new element will be added on the bottom of the array with link to config file located in Configs→ Editor → PlaceableEntities.
Now only remaining thing to do is saving those changes to the prefab - to do so, either click on Save Button or press Left Ctrl + S shortcut.
Registering assets
New register can be populated with new assets in two ways - manually by adding placeable prefabs to Prefabs array or via Register Placeable Entities plugin. First method might is easier to use, especially if addon doesn't have that many placeable entities. However, when dealing with larger amounts of prefabs (or larger projects in general) it is recommended to use plugin instead.
Manual method
Adding placeable entities to register by hand is quite simple.
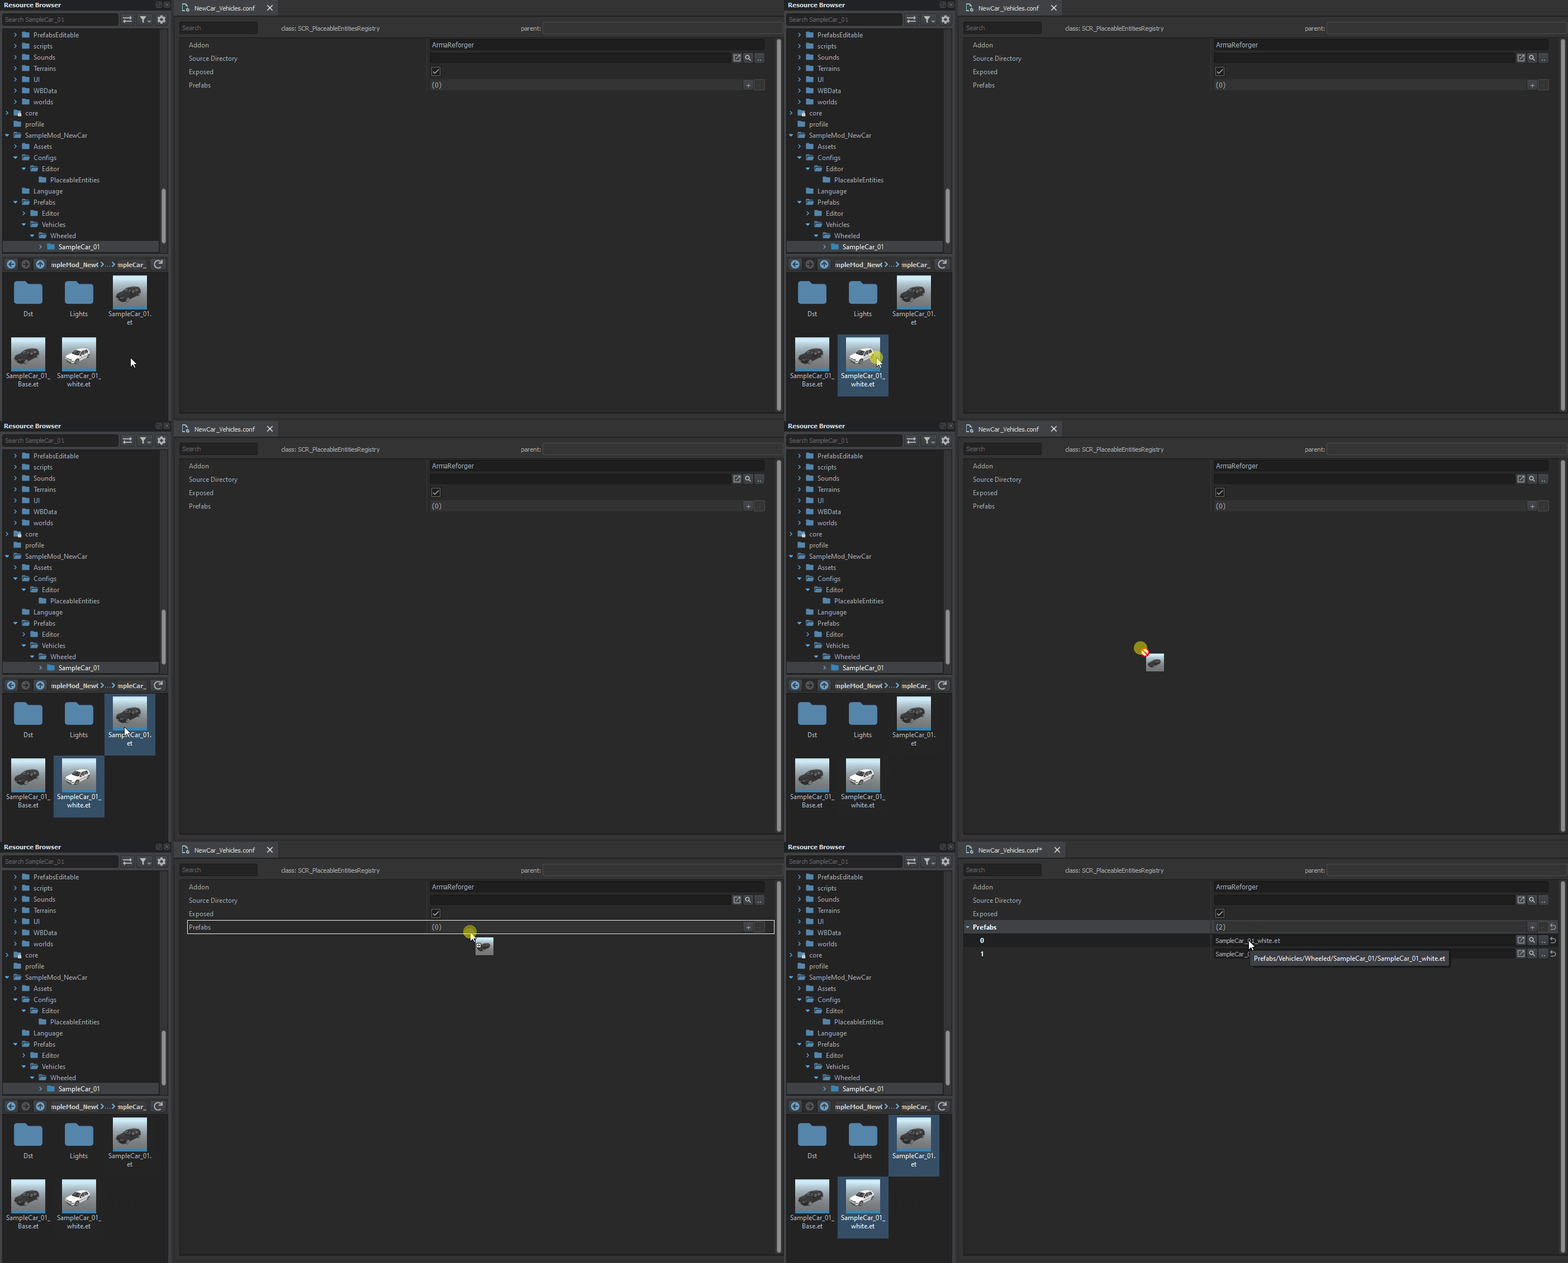
Open config file containing register (in this case its SampleMod_NewCar_Vehicles.conf) as a new tab and then navigate in Resource Browser to a location where are placeable prefabs which you want to expose. Then, only thing left to do is simply drag & dropping those prefabs on Prefabs array.
Of course, elements in that array can also be manually added or removed via plus & minus signs on the right side of the Prefabs array
Using plugin
Basics of using Register Placeable Entities can be found on following page - Editor: Editable Entities: Configuration - RegisterPlaceablePrefabs.
When dealing with addons, it is mandatory to change Addon parameter so it matches addon ID you are working on - in this example it is SampleMod_NewCar. Below you can take a look at fully filled register config.
Adding modded label
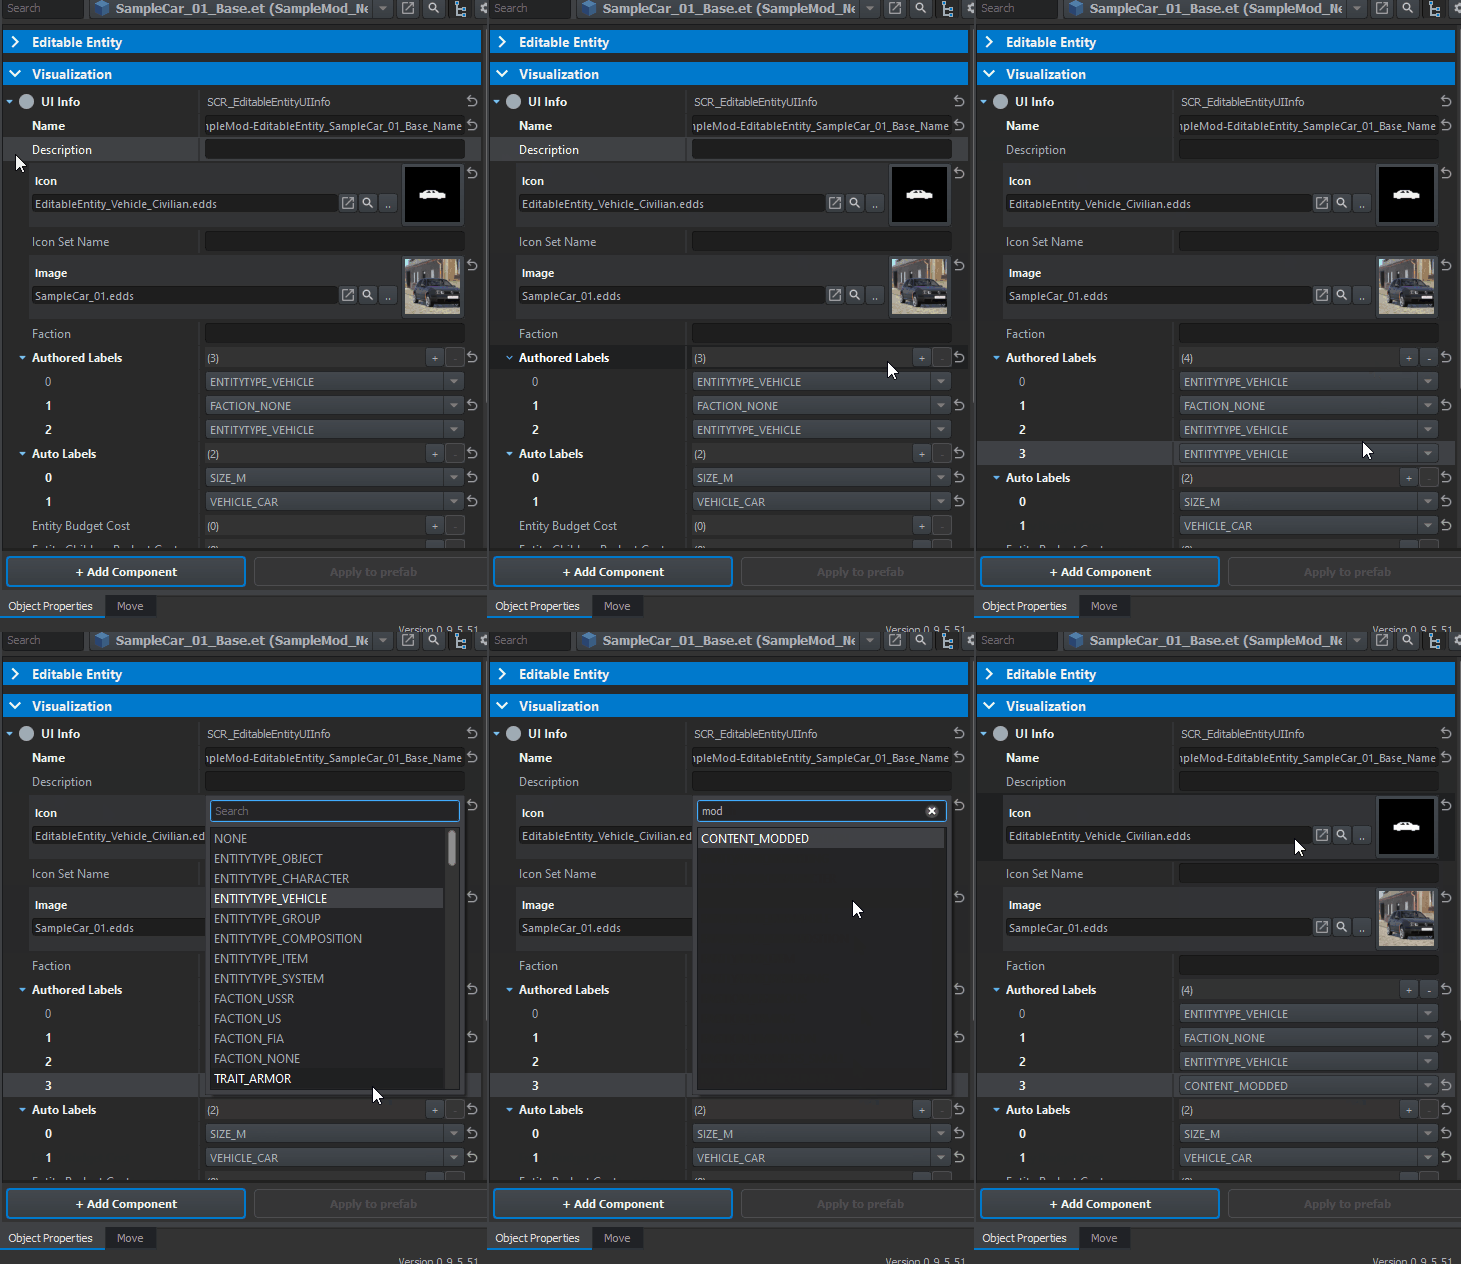
To be able filter modded content from vanilla, it might be necessary to add CONTENT_MODDED label to Authored Labels array in Editable Component of asset (depending on asset type, it can be SCR_EditableVehicleComponent, SCR_EditableEntityComponent, SCR_EditableCharacterComponent or SCR_EditableGroupComponent).
To do so, navigate to that component and click on plus sign to the right of Authored Labels array. Next step will be changing of type of newly added label - to do so, click on that new element and select from the drop down menu CONTENT_MODDED parameter.
Testing result in-game
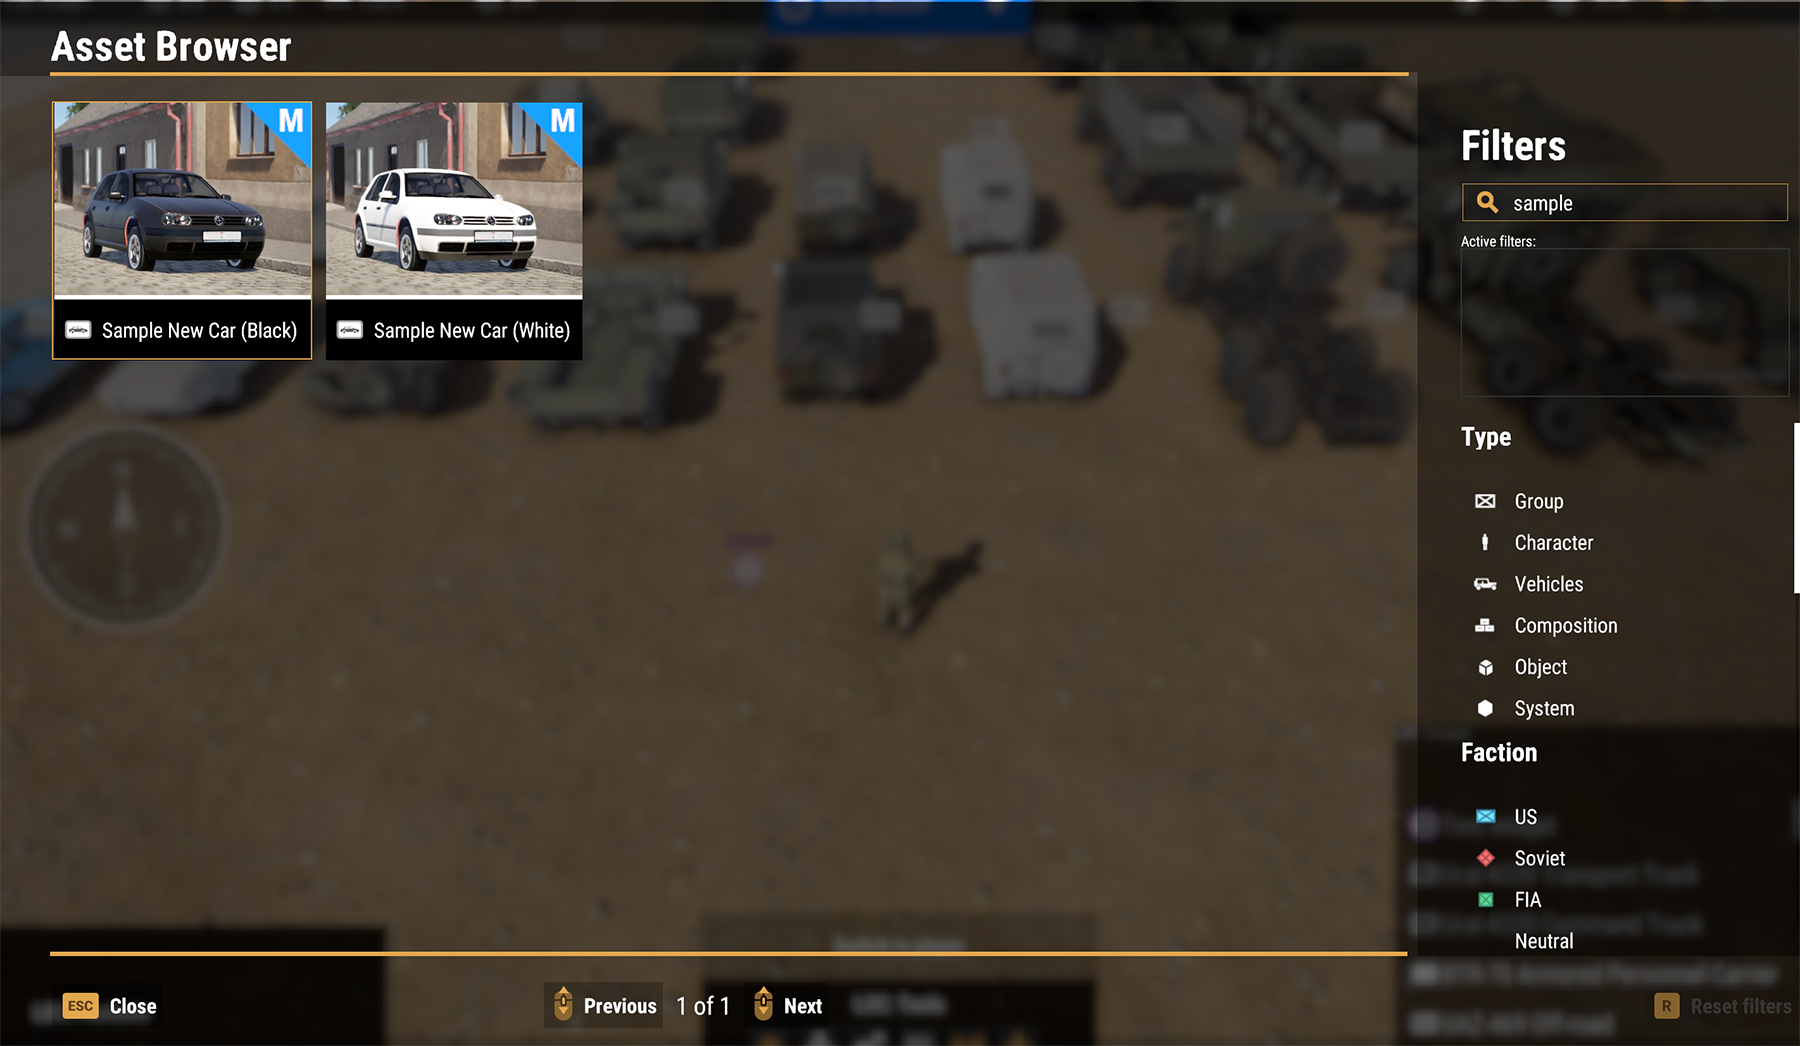
If everything went good, then all assets added to new register file should be visible in game
