Game Master: Editable Entities Configuration – Arma Reforger
Step-by-step guide to how to create an editable prefab variant recognised by Game Master; either manually, or using automated process.
To make an entity editable in Game Master, several components have to be added to it and the entity needs to be replicated. Because this affects performance, we don't want to add such functionality on all prefabs - having every tree or rock configured this way would be a big hit.
Instead, we will create inherited prefab of each entity which we want editable. Doing this manually would be too time-consuming, so there are automated Workbench plugins which can take care of that.
Create Placeable Prefabs
Existing Prefab
Prefabs which exist even without their use in the editor, e.g., soldiers, vehicles, props, houses, etc, can be parsed using Create/Update Selected Editable Prefabs plugin. Behaviour of this plugin is controlled by EditablePrefabsConfig.conf config, which can be modified in plugin's settings (Plugins > Settings > Create/Update Selected Editable Prefabs).
Preparation
Before using this plugin, it is necessary to modify one property in EditablePrefabsConfig.conf - Image Placeholder. To do so, use Override in addon functionality on that file and then open it in Resource Manager. By default, this config is using a texture which is in packed state and plugin requires that source file (png picture) exist. Since packed data is missing source files, this property have to point to some registered resource which is using PNG as source.
Alternatively, it is also possible to use editorPreviewTemplate.png from this page and place it in UI/Textures/EditorPreviews/System folder inside the addon you are working on and register it. After that, plugin should be able to use that texture and generate placeholder preview images for you.
Select
In Resource Browser, select prefab files (*.et) of entities you want to process. Default EditablePrefabsConfig.conf ignores prefabs with _base, _Base, _dst, _Dst or _DST suffixes.
Check editable entity types to see which prefabs should be marked as editable.
Create
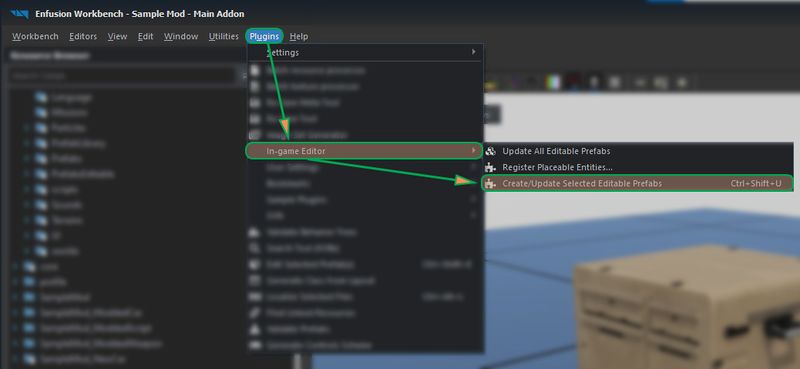
With files selected, activate Plugins > In-game Editor > Create/Update Selected Editable Prefabs
After the operation is done, please check the log, it will list all processed prefabs. They can end up with one of the following states:
- Created / Updated - successful processed
- Failed - unable to generate the prefab, most commonly due to presence of child entity with RplComponent
- Non-editable - some child entities which don't have editable prefab variant were detected. Please revise them and consider if some of them could be made editable as well.
If prefab creation succeeded, following things will happen:
- New files, with E_ prefix, will be made in PrefabsEditable/Auto (except vehicles and characters - this is controlled by EditablePrefabsConfig.conf) as well as UI/Textures/EditorPreviews/Auto folders.
- Display name, which is visible in for instance in-game editor Asset Browser, will be adjusted according to rules stored in EditablePrefabsConfig.conf. By default Name property will use following scheme #AR-EditableEntity_%1_Name where %1 is prefab filename. Such localised string can be later added to String Tables
- Editable prefabs will get proper Editable Component, appropriate to to its type - (either SCR_EditableEntityComponent, SCR_EditableCharacterComponent, SCR_EditableVehicleComponent or SCR_EditableGroupComponent)
- Some of the labels will be automatically assigned to prefab depending on their type. Rules for assigning labels are defined in EditablePrefabsConfig.conf
Once editable variants are generated, it possible to generate proper Preview Images by following instructions from Arma_Reforger:Game_Master:_Image_Generation_Tutorial page.
Maintain
Editable prefabs needs to be regenerated every time the source prefab changes. This can be achieved by several ways:
- Activate Plugins > In-game Editor > Update All Editable Prefabs
- This will update all auto-generated editable prefabs.
- It will also handle renamed / moved / deleted source prefabs (enable Only File Changes attribute to perform this operation only).
- Select an editable or a source prefab and activate Plugins > In-game Editor > Create/Update Selected Editable Prefabs
Custom Prefab
Prefabs created specifically for the editor, e.g., slots, comments, etc.
Configure
When setting-up the entity in World Editor, add following component prefabs to make it editable:
Choose Directory
Before turning the entity into prefab, select a directory where to create it.
All prefabs must be placed in PrefabsEditable folder in data root.
Inside, pick a folder which suits the entity the best. Do not create anything in Auto folder manually, it would get removed during the next auto-generation process!
Create Prefab
Create a new prefab by dragging the entity from World Editor into desired directory.
When asked for file name, include E_ prefix, e.g., E_MyEntity.et.
The prefix helps to distinguish editable prefabs from non-editable ones.
Register Placeable Prefabs
Editable entities must be registered in order to appear in content browser.
Create Registry Config
In Configs/Editor/PlaceableEntities, create a config of type SCR_PlaceableEntitiesRegistry.
Set Source Directory to folder where editable entity prefabs are placed. To make versioning easier, use more specialised registries (e.g., Vehicles, Props, etc.) rather than a few ones.
Add the Registry to Edit Mode
Open EditorModeEdit.et in Prefab editing mode (e.g, RMB > Edit Prefab), select SCR_PlacingEditorComponent and drag the registry config to Registries array.
Register Entities
In Resource Manager, activate Plugins > In-game Editor > Register Placeable Entities...
Choose the registry config and confirm. The plugin will register every editable entity prefab flagged as PLACEABLE inside the folder.
Repeat this step every time some prefabs in the folder are added, removed or renamed.

