Diag Menu – Arma Reforger
| (17 intermediate revisions by 2 users not shown) | |||
| Line 1: | Line 1: | ||
= General Use = | |||
<!-- | <!-- | ||
Wiki editors: do not forget to update miniTOC when | Wiki editors: | ||
- this page is tool-generated: | |||
- do NOT remove IDs in HTML comments! | |||
- your manual changes may be lost on the next update! | |||
- do not forget to update miniTOC when an H2 title is added! | |||
--><div style="display: flex"><!-- flex start --> | --><div style="display: flex"><!-- flex start --> | ||
<div style="flex-grow: 1"><!-- scrolling div start --> | <div style="flex-grow: 1"><!-- scrolling div start --> | ||
The Diag Menu is a menu listing many options used to debug game scripting and assets. It is available in | The Diag Menu is a menu listing many options used to debug game scripting and assets. It is available in {{GameCategory|armaR|Modding|Official Tools|text= Workbench}} in any 3D viewport (e.g world or model preview). | ||
<div style="border: 0.5em solid #000; border-radius: 0.25em; display: inline-block">[[File:armareforger_debugmenu-main.png]]</div><!-- I'm fancy like that --> | <div style="border: 0.5em solid #000; border-radius: 0.25em; display: inline-block">[[File:armareforger_debugmenu-main.png]]</div><!-- I'm fancy like that --> | ||
{{Feature|informative| | {{Feature|informative| | ||
{{{!}} class{{=}}"valign-top" style{{=}}"width: 100%; max-width: 100%" | |||
{{!}} | |||
; Usage | ; Usage | ||
* To open the Diag Menu, press {{Controls|Win|Alt}} | * To open the Diag Menu, press {{Controls|Win|Alt}} in any 3D viewport | ||
** The {{Controls|Ctrl|Win}} shortcut conflicts with Windows 11's shortcut | |||
* To enter a sub-menu, press {{Controls|right}} | * To enter a sub-menu, press {{Controls|right}} | ||
* To leave a sub-menu, press {{Controls|backspace}} | * To leave a sub-menu, press {{Controls|backspace}} | ||
* To change a value, use {{Controls|left}} and {{Controls|right}}. | * To change a value, use {{Controls|left}} and {{Controls|right}}. | ||
{{!}} | |||
; Hints | |||
* {{Controls|Home}} - jump to root menu | |||
* {{Controls|Insert}} - reset to default just for options in actual menu | |||
* {{Controls|Delete}} - reset to default for all options | |||
* {{Controls|Shift|Up}} / {{Controls|Down}} - faster movement through the menu | |||
* {{Controls|F1}} - save current options to user profile | |||
* {{Controls|F2}} - load options from user profile | |||
{{!}}} | |||
It is possible to read & save Diagnostic Menu options from different location via [[Arma_Reforger:Startup_Parameters#diagMenu|diagMenu]] startup parameter. | |||
}} | }} | ||
== Hotkeys List == | |||
{| class="wikitable" | |||
|+ List of all diag hotkeys | |||
! Header !! Hotkey | |||
|- | |||
| [[#Disable_player_damage|Disable player damage]] || {{Controls|lctrl|lalt|f1}} | |||
|- | |||
| [[#Teleport|Teleport]] || {{Controls|lctrl|lalt|f2}} | |||
|- | |||
| [[#Infinite_ammo|Infinite ammo]] || {{Controls|lctrl|lalt|f3}} | |||
|- | |||
| [[#Infinite_bullets|Infinite bullets]] || {{Controls|lctrl|lalt|f4}} | |||
|- | |||
| [[#Commit_suicide|Commit suicide]] || {{Controls|lctrl|lalt|f5}} | |||
|- | |||
| [[#Execute_characters_in_front|Execute characters in front]] || {{Controls|lctrl|lalt|f6}} | |||
|- | |||
| [[#Debug_manual_camera|Debug manual camera]] || {{Controls|lctrl|lalt|c}} | |||
|- | |||
| [[#Reset_vehicle|Reset vehicle]] || {{Controls|lctrl|lalt|r}} | |||
|- | |||
| [[#Teleport_up|Teleport up]] || {{Controls|lctrl|lalt|t}} | |||
|- | |||
| [[#FPS|FPS]] || {{Controls|lctrl|num1}} | |||
|- | |||
| [[#General|General]] || {{Controls|lctrl|num2}} | |||
|- | |||
| [[#Counters|Counters]] || {{Controls|lctrl|num3}} | |||
|- | |||
| [[#Reload_shaders|Reload shaders]] || {{Controls|lctrl|f12}} | |||
|- | |||
| [[#Postprocess|Postprocess]] || {{Controls|lctrl|lalt|p}} | |||
|- | |||
| [[#Layers_diag_mode|Layers diag mode]] || {{Controls|lctrl|lalt|l}} | |||
|- | |||
| [[#Detail_texture|Detail texture]] || {{Controls|lctrl|lalt|s}} | |||
|- | |||
| [[#Render_debug_mode|Render debug mode]] || {{Controls|rctrl|ralt|w}} | |||
|- | |||
| [[#Show_AABB|Show AABB]] || {{Controls|lalt|num5}} | |||
|- | |||
| [[#Show_wind_emitters|Show wind emitters]] || {{Controls|lctrl|num8}} | |||
|- | |||
| [[#Disable_wind|Disable wind]] || {{Controls|lctrl|num9}} | |||
|- | |||
| [[#Show_bodies|Show bodies]] || {{Controls|lalt|num6}} | |||
|- | |||
| [[#Simulation|Simulation]] || {{Controls|lctrl|num7}} | |||
|- | |||
| [[#Superscreenshot_to_file|Superscreenshot to file]] || {{Controls|lctrl|lshift|f7}} | |||
|- | |||
| [[#Screenshot_to_clipboard|Screenshot to clipboard]] || {{Controls|lshift|f7}} | |||
|- | |||
| [[#Screenshot_to_file|Screenshot to file]] || {{Controls|lctrl|f7}} | |||
|- | |||
| [[#Copy_view_link|Copy view link]] || {{Controls|lctrl|lshift|l}} | |||
|- | |||
| [[#Make_a_step_of_AStar|Make a step of AStar]] || {{Controls|lctrl|lalt|v}} | |||
|- | |||
| [[#Road_network|Road network]] || {{Controls|lctrl|lalt|n}} | |||
|- | |||
| [[#Show_Road_Width|Show Road Width]] || {{Controls|lctrl|lalt|w}} | |||
|- | |||
| [[#Road_Id|Road Id]] || {{Controls|lctrl|lalt|i}} | |||
|- | |||
| [[#Previous_agent|Previous agent]] || {{Controls|rctrl|rshift|9}} | |||
|- | |||
| [[#Next_agent|Next agent]] || {{Controls|rctrl|rshift|0}} | |||
|- | |||
| [[#Set_start_position|Set start position]] || {{Controls|lctrl|lalt|num0}} | |||
|- | |||
| [[#Set_end_position|Set end position]] || {{Controls|lctrl|lalt|num1}} | |||
|- | |||
| [[#Run_pathfinder|Run pathfinder]] || {{Controls|lctrl|lalt|num3}} | |||
|- | |||
| [[#Generate_Graph|Generate Graph]] || {{Controls|lctrl|lalt|num2}} | |||
|- | |||
| [[#Disable_AI_actions|Disable AI actions]] || {{Controls|lctrl|lalt|f9}} | |||
|- | |||
| [[#Paste_view_link|Paste view link]] || {{Controls|lshift|lalt|l}} | |||
|} | |||
== Modding == | == Modding == | ||
| Line 51: | Line 154: | ||
} | } | ||
</enforce> | </enforce> | ||
= GameCode = | |||
== Damage == | |||
=== Hit Zones === | |||
==== Show hit zone memory ==== | |||
<!-- ID: DM_HITZONE_MEMORY --> | |||
Enable/disable showing of hit zone memory. | |||
'''Available Options''': false, true | |||
==== Show hit zones ==== | |||
<!-- ID: GAME_DIAG_SHOW_HITZONES --> | |||
Enable/disable showing of hit zones. | |||
[[File:armareforger-diag-menu-show-hitzones-1.jpg|600x600px]] | |||
When a zone is damaged, underlying fire geometry is also drawn | |||
[[File:armareforger-diag-menu-hitzones-2.jpg|713x713px]] | |||
'''Available Options''': false, true | |||
==== Log damage on hit zones ==== | |||
<!-- ID: GAME_DIAG_LOG_HITZONES --> | |||
Enable/disable logging of damage on hit zones. | |||
'''Available Options''': false, true | |||
==== Log Rpl registration ==== | |||
<!-- ID: GAME_DIAG_RPLNODES_LOGGING --> | |||
Enable/disable logging of Rpl registration. | |||
'''Available Options''': false, true | |||
=== Destruction === | |||
==== Damage all on init ==== | |||
<!-- ID: GAME_DIAG_DAMAGE_ALL_ON_INIT --> | |||
Enable/disable damage all on init. | |||
'''Available Options''': false, true | |||
==== Enable Logging ==== | |||
<!-- ID: GAME_DIAG_LOG_DESTRUCTION --> | |||
Enable/disable logging of destruction. | |||
'''Available Options''': false, true | |||
==== Enable layout logging ==== | |||
<!-- ID: GAME_DIAG_LOG_DESTRUCTION_LAYOUT --> | |||
Enable/disable logging of destruction layout. | |||
'''Available Options''': false, true | |||
==== Rotate permanent debris 90deg ==== | |||
<!-- ID: GD_DESTRUCTION_ROTATE_DEBRIS --> | |||
Enable/disable rotating permanent debris. | |||
'''Available Options''': false, true | |||
==== Snap to ground (debris) ==== | |||
<!-- ID: GD_DESTRUCTION_ENABLE_SNAP_TO_GROUND --> | |||
Enable/disable snapping of debris to ground. | |||
'''Available Options''': false, true | |||
==== Allow broken prefabs spawning ==== | |||
<!-- ID: GD_SPAWN_BROKEN_PREFABS --> | |||
Enable/disable spawning of broken prefabs. | |||
'''Available Options''': false, true | |||
==== Enable destruction diag ==== | |||
<!-- ID: SCR_DebugMenuID.DEBUGUI_DESTRUCTION_ENABLE_DIAG --> | |||
Enable/disable destruction diagnostics. | |||
'''Available Options''': false, true | |||
=== Type of damage info === | |||
<!-- ID: GAME_DIAG_DAMAGE_INFO_TYPE --> | |||
Set type of damage info. When activated, small windows appears showing HP (current and maximum) of all individual HitZones | |||
* off - debug is disabled | |||
* trace - displays info for what are you looking at | |||
* self - displays info for controlled character | |||
* both - acts as trace if looking at something, otherwise acts as self | |||
'''Available Options''': off, trace, self, both | |||
=== DamageEffect info === | |||
<!-- ID: GAME_DIAG_DAMAGE_EFFECTS_INFO_TYPE --> | |||
Set damage effect info type. Information about states like Bleeding, Tourniquets, Saline bags, Morphine, and Health/Resilience/Blood is listed in this diag | |||
'''Available Options''': off, Persistent, Damage History, both | |||
=== Visualize weapon blast === | |||
<!-- ID: SCR_DebugMenuID.DEBUGUI_WEAPONS_BLAST --> | |||
Set weapon blast visualization mode. | |||
'''Available Options''': disabled, hit, all, posDebug, onlyMainBlast, onlyRicochet | |||
== Achievements == | |||
=== Achievements display === | |||
<!-- ID: GAME_DIAG_ACHIEVEMENTS_DISPLAY --> | |||
Enable/disable achievements display. | |||
'''Available Options''': false, true | |||
=== Dump achievement memory data === | |||
<!-- ID: GAME_DIAG_ACHIEVEMENTS_GET --> | |||
Enable/disable dumping of achievement memory data. | |||
'''Available Options''': false, true | |||
=== Request achievement platform data === | |||
<!-- ID: GAME_DIAG_ACHIEVEMENTS_REQUEST --> | |||
Enable/disable request for platform achievement data. | |||
'''Available Options''': false, true | |||
=== Unlock ACH_COMBAT_HYGIENE === | |||
<!-- ID: GAME_DIAG_UNLOCK_ACHIEVEMENT_0 --> | |||
Unlock ACH_COMBAT_HYGIENE. | |||
'''Available Options''': false, true | |||
=== +50 STAT_ENEMIES_NEUTRALIZED === | |||
<!-- ID: GAME_DIAG_INCR_STAT_1 --> | |||
Increase STAT_ENEMIES_NEUTRALIZED by 50. | |||
'''Available Options''': false, true | |||
== Particle == | |||
=== Particles manager === | |||
<!-- ID: GAME_DIAG_PARTICLES --> | |||
Enable/disable particles manager debug. | |||
'''Available Options''': false, true | |||
=== Distance particle effect === | |||
<!-- ID: GAME_DIAG_PARTICLES_DISTANCE_SYSTEM --> | |||
Enable/disable distance particle effect. | |||
'''Available Options''': enabled, disabled | |||
== Signals == | |||
=== Show current SignalsManagerComponent === | |||
<!-- ID: GAME_DIAG_SIGNALS_CURR --> | |||
Show or hide current SignalsManagerComponent. | |||
'''Available Options''': false, true | |||
=== Log received === | |||
<!-- ID: GAME_DIAG_SIGNALS_RECV --> | |||
Enable/disable logging of received signals. | |||
'''Available Options''': false, true | |||
=== Log sent === | |||
<!-- ID: GAME_DIAG_SIGNALS_SENT --> | |||
Enable/disable logging of sent signals. | |||
'''Available Options''': false, true | |||
=== Log signal changes === | |||
<!-- ID: GAME_DIAG_SIGNALS_CHANGES --> | |||
Set logging mode for signal changes. | |||
'''Available Options''': off, all, 0.5, 1, 10, 100 | |||
=== Signals to dump === | |||
<!-- ID: GAME_DIAG_SIGNALS_TO_DUMP --> | |||
Set signals to dump. | |||
'''Available Options''': SP, MP, all | |||
=== Dump signals === | |||
<!-- ID: GAME_DIAG_SIGNALS_DUMP --> | |||
Enable/disable dumping of signals. | |||
'''Available Options''': false, true | |||
== Game materials == | |||
=== Cursor === | |||
<!-- ID: GAME_DIAG_MATERIALS_CURSOR --> | |||
Shows information about materials being used on collider which is under the cursor. It shows also thickness of the collider. By default it using all [[Arma Reforger:Collision Layer#InteractionMatrixRow Setup|Collision Layers]]. | |||
'''Available Options''': false, true | |||
=== Projectile === | |||
<!-- ID: GAME_DIAG_MATERIALS_PROJECTILE --> | |||
Restricts game materials check to [[Arma Reforger:Collision Layer#InteractionMatrixRow Setup|Projectile]] layer. Can be used to check fire geometry | |||
'''Available Options''': false, true | |||
== Weapons == | |||
=== Deployment === | |||
==== Debug deploying ==== | |||
<!-- ID: GAME_DIAG_WEAPONS_DEPLOYMENT_DEBUG --> | |||
Enable/disable debugging of weapon deployment. | |||
'''Available Options''': false, true | |||
==== IK diag ==== | |||
<!-- ID: GAME_DIAG_WEAPONS_DEPLOYMENT_IK --> | |||
Enable/disable IK diagnostics for weapon deployment. | |||
'''Available Options''': false, true | |||
==== Aim speed diag ==== | |||
<!-- ID: GAME_DIAG_WEAPONS_DEPLOYMENT_AIM_SPEED --> | |||
Enable/disable aim speed diagnostics for weapon deployment. | |||
'''Available Options''': false, true | |||
==== Animation diag ==== | |||
<!-- ID: GAME_DIAG_WEAPONS_DEPLOYMENT_ANIM --> | |||
Enable/disable animation diagnostics for weapon deployment. | |||
'''Available Options''': false, true | |||
==== Weapon collision diag ==== | |||
<!-- ID: GAME_DIAG_WEAPONS_DEPLOYMENT_WEAPON_COLLISION --> | |||
Enable/disable weapon collision diagnostics for deployment. | |||
'''Available Options''': false, true | |||
==== Disable Prone deployment ==== | |||
<!-- ID: GAME_DIAG_WEAPONS_DEPLOYMENT_DISABLE_PRONE --> | |||
Enable/disable prone deployment for weapons. | |||
'''Available Options''': false, true | |||
==== Disable post-phys hand pose ==== | |||
<!-- ID: GAME_DIAG_WEAPONS_DEPLOYMENT_DISABLE_POSTPHYS_IK --> | |||
Enable/disable post physics hand pose for weapon. | |||
'''Available Options''': false, true | |||
==== ADS limits diag ==== | |||
<!-- ID: GAME_DIAG_WEAPONS_DEPLOYMENT_ADS_LIMITS --> | |||
Enable/disable ADS limits debug. | |||
'''Available Options''': false, true | |||
==== Deploying height ==== | |||
<!-- ID: GAME_DIAG_WEAPONS_DEPLOYMENT_DEPLOY_HEIGHT --> | |||
Set deploying height. | |||
'''Range Settings''': | |||
* Min: 0 | |||
* Max: 1 | |||
* Current Value: 0.3 | |||
* Step: 0.01 | |||
==== Max dist wpn-shoulder ==== | |||
<!-- ID: GAME_DIAG_WEAPONS_DEPLOYMENT_DISTANCE_OFFSET_FROM_SHOULDER --> | |||
Set max distance between weapon and shoulder. | |||
'''Range Settings''': | |||
* Min: 0 | |||
* Max: 90 | |||
* Current Value: 15 | |||
* Step: 0.05 | |||
==== Disable prone movement ==== | |||
<!-- ID: GAME_DIAG_WEAPONS_DEPLOYMENT_PRONE_DISABLE_MOVEMENT --> | |||
Enable/disable movement while prone deployment. | |||
'''Available Options''': true, false | |||
==== Prone deployment heigh limit ==== | |||
<!-- ID: GAME_DIAG_WEAPONS_DEPLOYMENT_PRONE_DEPLOY_HEIGHT_LIMIT --> | |||
Set prone deployment height limit. | |||
'''Range Settings''': | |||
* Min: 0 | |||
* Max: 1 | |||
* Current Value: 0.15 | |||
* Step: 0.01 | |||
=== Show sights points === | |||
<!-- ID: GAME_DIAG_WEAPONS_SHOW_SIGHTS_POINTS --> | |||
Enable/disable showing of weapon sight points. | |||
'''Available Options''': false, true | |||
=== Disable aim modifiers === | |||
<!-- ID: GAME_DIAG_WEAPONS_DISABLE_AIM_MODIFIERS --> | |||
Enable/disable aim modifiers for weapons. | |||
'''Available Options''': false, true | |||
=== Disable character aim modifiers === | |||
<!-- ID: GAME_DIAG_WEAPONS_DISABLE_CHARACTER_AIM_MODIFIERS --> | |||
Enable/disable character aim modifiers for weapons. | |||
'''Available Options''': false, true | |||
=== Disable weapon offset === | |||
<!-- ID: GAME_DIAG_WEAPONS_DISABLE_WEAPON_OFFSET --> | |||
Enable/disable weapon offset. | |||
'''Available Options''': false, true | |||
=== Enable sway diagnostics === | |||
<!-- ID: GAME_DIAG_WEAPONS_SHOW_SWAY_DIAG --> | |||
Enable/disable sway diagnostics. | |||
'''Available Options''': false, true | |||
=== Disable movement based sway === | |||
<!-- ID: GAME_DIAG_WEAPONS_DISABLE_MOVEMENT_SWAY --> | |||
Enable/disable movement based sway. | |||
'''Available Options''': false, true | |||
===Weapon obstruction=== | |||
<!-- ID: GAME_DIAG_WEAPONS_OBSTRUCTION --> | |||
Enable/disable weapon obstruction debug. Diag shows various data related to obstruction like i.e. current obstruction status of controlled character. | |||
It is also possible to change '''Weapon Move back offset''' with this diag. | |||
When debug is activated additional spheres will be rendered with following color coding: | |||
• Green → Starting or unobstructed points. | |||
• Red → Obstructed or fully blocked locations | |||
• Orange → Static reference points for offset calculations. | |||
[[File:armareforger-diag-menu-weapon-obstruction.gif]] | |||
When character is moving, either pink or red orbs are visible - those are obstruction predictions orbs. When no obstruction is predicted their color is pink. | |||
[[File:armareforger-diag-menu-weapon-obstruction-prediction.gif]] | |||
{{Feature|important|To prevent flashing behavior of debug windows it is necessary to '''[[#Limit_FPS|Limit FPS]] below 20 frames'''}} | |||
'''Available Options''': false, true | |||
=== Weapon handling === | |||
<!-- ID: GAME_DIAG_WEAPONS_HANDLING --> | |||
Enable/disable weapon handling debug. | |||
'''Available Options''': false, true | |||
=== Weapon IK === | |||
<!-- ID: GAME_DIAG_WEAPONS_IK --> | |||
Enable/disable weapon IK debug. | |||
'''Available Options''': false, true | |||
=== Enable casing endpoints === | |||
<!-- ID: GAME_DIAG_WEAPONS_ENABLE_CASING_ENDPOINTS --> | |||
Enable/disable casing endpoints debug. | |||
'''Available Options''': false, true | |||
=== Disable partial lower === | |||
<!-- ID: GAME_DIAG_WEAPONS_FORCE_DISABLE_PARTIAL_LOWER --> | |||
Enable/disable partial lower disable. | |||
'''Available Options''': false, true | |||
=== Force zeroing anim value === | |||
<!-- ID: GAME_DIAG_WEAPONS_FORCE_ZEROING_ANIM_VALUE --> | |||
Set force zeroing animation value. | |||
'''Range Settings''': | |||
* Min: -0.001 | |||
* Max: 1 | |||
* Current Value: -0.001 | |||
* Step: 0.001 | |||
=== Force Recoil Type === | |||
<!-- ID: GAME_DIAG_WEAPONS_FILTER_RECOIL_TYPE --> | |||
Set force recoil type. | |||
'''Range Settings''': | |||
* Min: 0 | |||
* Max: 3 | |||
* Current Value: 0 | |||
* Step: 1 | |||
=== Roll comp. weight === | |||
<!-- ID: GAME_DIAG_WEAPONS_ROLL_COMPENSATION_WEIGHT --> | |||
Set roll compensation weight. | |||
'''Range Settings''': | |||
* Min: 0 | |||
* Max: 1 | |||
* Current Value: 0 | |||
* Step: 0.01 | |||
=== Roll comp. gizmo diag === | |||
<!-- ID: GAME_DIAG_WEAPONS_ROLL_COMPENSATION_GIZMOS --> | |||
Enable/disable roll compensation gizmo debug. | |||
'''Available Options''': false, true | |||
=== Correct zeroing data by ZeroGenerator === | |||
<!-- ID: GAME_DIAG_WEAPONS_ADJUST_ZERO --> | |||
Enable/disable zeroing data correction. | |||
'''Available Options''': false, true | |||
=== Adjustable magnification input scaling info === | |||
<!-- ID: GAME_DIAG_WEAPONS_ADJUSTABLE_MAG_INPUT_INFO --> | |||
Enable/disable adjustable magnification scaling info. | |||
'''Available Options''': false, true | |||
=== Adjustable magnification input scaling value === | |||
<!-- ID: GAME_DIAG_WEAPONS_ADJUSTABLE_MAG_INPUT_SCALE --> | |||
Set adjustable magnification input scaling value. | |||
'''Range Settings''': | |||
* Min: -1.0 | |||
* Max: 1.0 | |||
* Current Value: 0.0 | |||
* Step: 0.01 | |||
=== Show Collimator Debug === | |||
<!-- ID: GAME_MENU_WEAPON_COLLIMATOR_SIGHT --> | |||
Enable/disable collimator debug. | |||
'''Available Options''': false, true | |||
=== Show Attachment Debug === | |||
<!-- ID: GAME_MENU_WEAPON_ATTACHMENTS --> | |||
Enable/disable attachment debug. | |||
'''Available Options''': false, true | |||
=== TestAimModifier === | |||
==== Reset aim mod ==== | |||
<!-- ID: SCR_DebugMenuID.DEBUGUI_AIMMODIFIER_RESET --> | |||
Reset aim modifier. | |||
'''Available Options''': false, true | |||
=== Toggle 2D optics === | |||
<!-- ID: SCR_DebugMenuID.DEBUGUI_WEAPONS_OPTICS_USE_2D --> | |||
Toggle 2D optics usage. | |||
'''Available Options''': false, true | |||
=== Show optics diag === | |||
<!-- ID: SCR_DebugMenuID.DEBUGUI_WEAPONS_OPTICS --> | |||
Show or hide optics diagnostics. | |||
'''Available Options''': false, true | |||
=== Show PIP settings diag === | |||
<!-- ID: SCR_DebugMenuID.DEBUGUI_WEAPONS_PIP_SIGHTS --> | |||
Show or hide PIP settings diagnostics. | |||
'''Available Options''': false, true | |||
== User Actions == | |||
=== Log actions === | |||
<!-- ID: GAME_DIAG_USER_ACTION_LOG --> | |||
Enable/disable logging of user actions. | |||
'''Available Options''': false, true | |||
=== Context position === | |||
<!-- ID: GAME_DIAG_USER_ACTION_CONTEXT_POSITION --> | |||
Enable/disable context position debug. | |||
'''Available Options''': false, true | |||
=== Context visibility angle === | |||
<!-- ID: GAME_DIAG_USER_ACTION_CONTEXT_VISIBILITY_ANGLE --> | |||
Enable/disable context visibility angle debug. | |||
'''Available Options''': false, true | |||
=== Draw diags for select ent only === | |||
<!-- ID: GAME_DIAG_USER_ACTION_CONTEXT_DRAWDIAG_SELECTONLY --> | |||
Enable/disable drawing of diags for selected entity only. | |||
'''Available Options''': false, true | |||
=== Context gizmo scale === | |||
<!-- ID: GAME_DIAG_USER_ACTION_CONTEXT_GIZMO_SIZE --> | |||
Set context gizmo scale. | |||
'''Range Settings''': | |||
* Min: 0 | |||
* Max: 5 | |||
* Current Value: 0.3 | |||
* Step: 0.05 | |||
=== Context name scale === | |||
<!-- ID: GAME_DIAG_USER_ACTION_CONTEXT_NAME_SIZE --> | |||
Set context name scale. | |||
'''Range Settings''': | |||
* Min: 0 | |||
* Max: 50 | |||
* Current Value: 10 | |||
* Step: 1 | |||
=== Show context radius gizmo === | |||
<!-- ID: GAME_DIAG_USER_ACTION_CONTEXT_RADIUS_GIZMO --> | |||
Enable/disable showing of context radius gizmo. | |||
'''Available Options''': false, true | |||
=== Enable handler diag === | |||
<!-- ID: GAME_DIAG_USER_ACTION_INTERACTION_HANDLER_DIAG --> | |||
Enable/disable user action handler diagnostics. | |||
'''Available Options''': false, true | |||
=== Forcedisable Interactions === | |||
<!-- ID: GAME_DIAG_USER_ACTION_INTERACTION_HANDLER_FORCEDISABLE --> | |||
Enable/disable forcing of interactions. | |||
'''Available Options''': false, true | |||
=== Enable adv. handler diag === | |||
<!-- ID: GAME_DIAG_USER_ACTION_INTERACTION_HANDLER_DIAG_ADVANCED --> | |||
Enable/disable advanced user action handler diagnostics. | |||
'''Available Options''': false, true | |||
=== Use distance to line === | |||
<!-- ID: GAME_DIAG_USER_ACTION_INTERACTION_HANDLER_USE_LINE_DISTANCE --> | |||
Enable/disable using distance to line for interaction. | |||
'''Available Options''': false, true | |||
=== Fix square distance === | |||
<!-- ID: GAME_DIAG_USER_ACTION_INTERACTION_HANDLER_FIX_SQUARE_DISTANCE --> | |||
Enable/disable fixing of square distance. | |||
'''Available Options''': false, true | |||
=== Use predicate cache === | |||
<!-- ID: GAME_DIAG_USER_ACTION_PREDICATE_CACHE --> | |||
Enable/disable predicate cache usage. | |||
'''Available Options''': true, false | |||
=== Script listeners === | |||
<!-- ID: GAME_DIAG_USER_ACTION_SCRIPT_LISTENER --> | |||
Enable/disable script listeners. | |||
'''Available Options''': true, false | |||
=== SetActionEnabled_S ON === | |||
<!-- ID: GAME_DIAG_USER_ACTION_SETACTIONENABLED_S --> | |||
Enable/disable setting of action enable on client. | |||
'''Available Options''': true, false | |||
=== New interaction method === | |||
<!-- ID: GAME_DIAG_USER_ACTION_NEW_INTERACTION_METHOD --> | |||
Enable/disable new interaction method. | |||
'''Available Options''': true, false | |||
=== Skip action duration === | |||
<!-- ID: SCR_DebugMenuID.DEBUGUI_INTERACTION_SKIP_DURATION --> | |||
Enable/disable skipping of interaction duration. | |||
'''Available Options''': false, true | |||
== Gamepad == | |||
=== Show active effects === | |||
<!-- ID: GAME_DIAG_GAMEPAD_ACTIVE_EFFECTS --> | |||
Enable/disable showing of active gamepad effects. | |||
'''Available Options''': false, true | |||
=== Gyro Speed Sensitivity Yaw === | |||
<!-- ID: GAME_DIAG_GAMEPAD_GYRO_SENSITIVITY_YAW --> | |||
Set gyro speed sensitivity yaw. | |||
'''Range Settings''': | |||
* Min: -100.0 | |||
* Max: 100.0 | |||
* Current Value: 0.0 | |||
* Step: 0.01 | |||
=== Gyro Speed Sensitivity Pitch === | |||
<!-- ID: GAME_DIAG_GAMEPAD_GYRO_SENSITIVITY_PITCH --> | |||
Set gyro speed sensitivity pitch. | |||
'''Range Settings''': | |||
* Min: -20.0 | |||
* Max: 20.0 | |||
* Current Value: 0.0 | |||
* Step: 0.01 | |||
=== Gyro Speed Sensitivity Roll === | |||
<!-- ID: GAME_DIAG_GAMEPAD_GYRO_SENSITIVITY_ROLL --> | |||
Set gyro speed sensitivity roll. | |||
'''Range Settings''': | |||
* Min: -20.0 | |||
* Max: 20.0 | |||
* Current Value: 0.0 | |||
* Step: 0.01 | |||
== Track-IR == | |||
=== Enable TrackIR freelook === | |||
<!-- ID: GAME_DIAG_TRACKIR_ENABLE --> | |||
Enable/disable TrackIR freelook. | |||
'''Available Options''': true, false | |||
=== Enable TrackIR leaning === | |||
<!-- ID: GAME_DIAG_TRACKIR_ENABLE_LEANING --> | |||
Enable/disable TrackIR leaning. | |||
'''Available Options''': true, false | |||
== Radio == | |||
=== Transmissions diag === | |||
<!-- ID: GAME_DIAG_RADIO_TRANSMISSIONS --> | |||
Enable/disable radio transmissions diagnostics. | |||
'''Available Options''': false, true | |||
=== Show radio ranges === | |||
<!-- ID: GAME_DIAG_RADIO_RANGE --> | |||
Enable/disable showing of radio ranges. | |||
'''Available Options''': false, true | |||
=== Force transmit === | |||
<!-- ID: GAME_DIAG_RADIO_VON_TRANSMIT --> | |||
Enable/disable forcing of VON transmission. | |||
'''Available Options''': false, true | |||
=== Disable audio filters === | |||
<!-- ID: GAME_DIAG_RADIO_VON_RAW --> | |||
Enable/disable audio filters for VON. | |||
'''Available Options''': false, true | |||
== Chat == | |||
=== Log client chat messages === | |||
<!-- ID: GAME_DIAG_LOG_CHAT --> | |||
Enable/disable logging of client chat messages. | |||
'''Available Options''': false, true | |||
=== Show chat diag === | |||
<!-- ID: GAME_DIAG_CHAT --> | |||
Show or hide chat diagnostics. | |||
'''Available Options''': false, true | |||
=== Disable chat === | |||
<!-- ID: GAME_DIAG_DISABLE_CHAT --> | |||
Enable/disable chat. | |||
'''Available Options''': false, true | |||
== Time == | |||
=== Pause world time === | |||
<!-- ID: GAME_DIAG_TIME_PAUSE_TIME --> | |||
Enable/disable pausing of world time. | |||
'''Available Options''': false, true | |||
== Electricity == | |||
=== Set state (SP & MP) === | |||
<!-- ID: GAME_DIAG_ELECTRICITY_SET_STATE_FALSE --> | |||
Enable/disable setting of electricity state. | |||
'''Available Options''': false, true | |||
=== Delete nearest pole (SP ONLY) === | |||
<!-- ID: GAME_DIAG_ELECTRICITY_DELETE_NEAREST_POLE --> | |||
Enable/disable deleting of nearest electricity pole. | |||
'''Available Options''': false, true | |||
=== Disable nearest pole edges (SP ONLY) === | |||
<!-- ID: GAME_DIAG_ELECTRICITY_DISABLE_NEAREST_POLE_EDGES --> | |||
Enable/disable disabling of nearest electricity pole edges. | |||
'''Available Options''': false, true | |||
=== Switch connection of nearest poles (SP ONLY) === | |||
<!-- ID: GAME_DIAG_ELECTRICITY_SWITCH_CONNECTION_OF_NEAREST_POLES --> | |||
Enable/disable switching of nearest electricity poles connection. | |||
'''Available Options''': false, true | |||
== Inventory == | |||
=== Dump storages content === | |||
<!-- ID: GAME_DIAG_INVENTORY_DUMP_STORAGE_CONTENT --> | |||
Enable/disable dumping of inventory storage content. | |||
'''Available Options''': false, true | |||
=== Show inventory items === | |||
<!-- ID: GAME_DIAG_INVENTORY_SHOW_ITEMS --> | |||
Enable/disable showing of inventory items. | |||
'''Available Options''': false, true | |||
=== Log inventory changes === | |||
<!-- ID: GAME_DIAG_INVENTORY_LOG_CHANGE --> | |||
Enable/disable logging of inventory changes. | |||
'''Available Options''': false, true | |||
=== Log visibility changes === | |||
<!-- ID: GAME_DIAG_INVENTORY_LOG_VISIBILITY --> | |||
Enable/disable logging of inventory visibility changes. | |||
'''Available Options''': false, true | |||
=== Show volume info === | |||
<!-- ID: GAME_DIAG_INVENTORY_SHOW_VOLUME_INFO --> | |||
Enable/disable showing of inventory volume info. | |||
'''Available Options''': false, true | |||
=== Debug vicinity === | |||
<!-- ID: GAME_DIAG_INVENTORY_VICINITY_DEBUG --> | |||
Enable/disable vicinity debug. | |||
'''Available Options''': false, true | |||
=== Show attributes debug === | |||
<!-- ID: GAME_DIAG_INVENTORY_ATTRIBUTES_DEBUG --> | |||
Enable/disable showing of inventory attributes debug. | |||
'''Available Options''': false, true | |||
=== Enable item placement in WB === | |||
<!-- ID: GAME_DIAG_INVENTORY_ITEM_PLACEMENT --> | |||
Enable/disable item placement in workbench. | |||
'''Available Options''': false, true | |||
=== Enable hand slot === | |||
<!-- ID: GAME_DIAG_INVENTORY_HAND_SLOT --> | |||
Enable/disable hand slot. | |||
'''Available Options''': false, true | |||
== Loadout == | |||
=== Show clothes === | |||
<!-- ID: GAME_DIAG_LOADOUT_SHOW_CLOTHES --> | |||
Enable/disable showing of loadout clothes. | |||
'''Available Options''': false, true | |||
=== Show slots === | |||
<!-- ID: GAME_DIAG_LOADOUT_SHOW_SLOTS --> | |||
Enable/disable showing of loadout slots. | |||
'''Available Options''': false, true | |||
=== Unwear all === | |||
<!-- ID: GAME_DIAG_LOADOUT_UNWEAR_ALL --> | |||
Unwear all loadout items. | |||
'''Available Options''': false, true | |||
=== Show only me === | |||
<!-- ID: GAME_DIAG_LOADOUT_PLAYER_ONLY --> | |||
Enable/disable showing of only player loadout. | |||
'''Available Options''': false, true | |||
=== Show only lines without text === | |||
<!-- ID: GAME_DIAG_LOADOUT_LINES_ONLY --> | |||
Enable/disable showing of only lines without text. | |||
'''Available Options''': false, true | |||
== Lights == | |||
=== Light positions === | |||
<!-- ID: GAME_DIAG_LIGHT_POSITION --> | |||
Enable/disable showing of light positions. | |||
'''Available Options''': false, true | |||
== Camera == | |||
=== Show camera position === | |||
<!-- ID: GAME_DIAG_CAMERA_POSITION --> | |||
Enable/disable showing of camera position. | |||
'''Available Options''': false, true | |||
== Animations == | |||
=== Show animated items bones === | |||
<!-- ID: GAME_DIAG_ANIM_ITEM_BONES --> | |||
Enable/disable showing of animated items bones. | |||
'''Available Options''': false, true | |||
== Network == | |||
=== Network Movement === | |||
==== Movement ==== | |||
<!-- ID: GAME_DIAG_NETWORK_MOVEMENT --> | |||
Set network movement debug mode. | |||
'''Available Options''': none, in, out | |||
==== Movement simulation ==== | |||
<!-- ID: GAME_DIAG_NETWORK_MOVEMENT_SIM --> | |||
Enable/disable network movement simulation debug. | |||
'''Available Options''': false, true | |||
==== Display Selection ==== | |||
<!-- ID: GAME_DIAG_NETWORK_DISPLAY_SELECTION --> | |||
Enable/disable network movement display selection. | |||
'''Available Options''': false, true | |||
==== NwkMovement Selection ==== | |||
<!-- ID: GAME_DIAG_NETWORK_SELECTION --> | |||
Set network movement selection. | |||
'''Range Settings''': | |||
* Min: 0 | |||
* Max: 512 | |||
* Current Value: 0 | |||
* Step: 1 | |||
==== Display buffer state ==== | |||
<!-- ID: GAME_DIAG_NETWORK_DISPLAY_BUFFER --> | |||
Enable/disable network movement display buffer state. | |||
'''Available Options''': false, true | |||
==== Execution mode ==== | |||
<!-- ID: GAME_DIAG_NETWORK_EXECUTION --> | |||
Enable/disable network movement execution mode. | |||
'''Available Options''': false, true | |||
==== Phys Simulation ==== | |||
<!-- ID: GAME_DIAG_NETWORK_SIMULATION --> | |||
Enable/disable network movement physics simulation. | |||
'''Available Options''': false, true | |||
==== Nwk Updates ==== | |||
<!-- ID: GAME_DIAG_NETWORK_NWK_UPDATE --> | |||
Enable/disable network movement network updates. | |||
'''Available Options''': false, true | |||
=== Network Streaming === | |||
==== Override Distance ==== | |||
<!-- ID: GAME_DIAG_NETWORK_STREAMING_DISTANCE_OVERRIDE --> | |||
Enable/disable overriding of streaming distance. | |||
'''Available Options''': false, true | |||
==== Stream In Grid Distance [#] ==== | |||
<!-- ID: GAME_DIAG_NETWORK_STREAMING_DISTANCE_GRID_STREAMIN --> | |||
Set stream in grid distance. | |||
'''Range Settings''': | |||
* Min: 1 | |||
* Max: 10 | |||
* Current Value: 4 | |||
* Step: 1 | |||
==== Vehicle Grid Distance [#] ==== | |||
<!-- ID: GAME_DIAG_NETWORK_STREAMING_DISTANCE_VEHICLES --> | |||
Set vehicle grid distance. | |||
'''Range Settings''': | |||
* Min: 1 | |||
* Max: 10 | |||
* Current Value: 2 | |||
* Step: 1 | |||
==== Character Grid Distance [#] ==== | |||
<!-- ID: GAME_DIAG_NETWORK_STREAMING_DISTANCE_CHARACTER --> | |||
Set character grid distance. | |||
'''Range Settings''': | |||
* Min: 1 | |||
* Max: 10 | |||
* Current Value: 3 | |||
* Step: 1 | |||
=== RPL scheduler === | |||
==== Server side RPL scheduler ==== | |||
===== Items ===== | |||
<!-- ID: GAME_DIAG_RPLSCHEDULER_BASIC --> | |||
Enable/disable basic RPL scheduler debug. | |||
'''Available Options''': false, true | |||
===== Item Hierarchy Moves ===== | |||
<!-- ID: GAME_DIAG_RPLSCHEDULER_ITEM_MOVES --> | |||
Enable/disable RPL scheduler item hierarchy moves debug. | |||
'''Available Options''': false, true | |||
===== Items Streamed In ===== | |||
<!-- ID: GAME_DIAG_RPLSCHEDULER_CONNECTIONS_STREAMIN --> | |||
Enable/disable RPL scheduler streamed in debug. | |||
'''Available Options''': false, true | |||
===== Items Streamed Out ===== | |||
<!-- ID: GAME_DIAG_RPLSCHEDULER_CONNECTIONS_STREAMOUT --> | |||
Enable/disable RPL scheduler streamed out debug. | |||
'''Available Options''': false, true | |||
===== Items bumpped ===== | |||
<!-- ID: GAME_DIAG_RPLSCHEDULER_CONNECTIONS_BUMP --> | |||
Enable/disable RPL scheduler bumpped items debug. | |||
'''Available Options''': false, true | |||
===== Spatial map ===== | |||
<!-- ID: GAME_DIAG_RPLSCHEDULER_SPATIAL_MAP --> | |||
Enable/disable RPL scheduler spatial map debug. | |||
'''Available Options''': false, true | |||
===== Moving list ===== | |||
<!-- ID: GAME_DIAG_RPLSCHEDULER_MOVING_LIST --> | |||
Enable/disable RPL scheduler moving list debug. | |||
'''Available Options''': false, true | |||
===== Disabled ref count ===== | |||
<!-- ID: GAME_DIAG_RPLSCHEDULER_DISABLED_REF_COUNT --> | |||
Enable/disable RPL scheduler disabled reference count debug. | |||
'''Available Options''': false, true | |||
===== Observers ===== | |||
<!-- ID: GAME_DIAG_RPLSCHEDULER_OBSERVERS --> | |||
Enable/disable RPL scheduler observers debug. | |||
'''Available Options''': false, true | |||
===== Budgeting ===== | |||
<!-- ID: GAME_DIAG_RPLSCHEDULER_BUDGETING --> | |||
Enable/disable RPL scheduler budgeting debug. | |||
'''Available Options''': false, true | |||
===== Ownership ===== | |||
<!-- ID: GAME_DIAG_RPLSCHEDULER_OWNERSHIP --> | |||
Enable/disable RPL scheduler ownership debug. | |||
'''Available Options''': false, true | |||
==== Display Observers ==== | |||
<!-- ID: GAME_DIAG_DISPLAY_OBSERVERS --> | |||
Enable/disable display of observers. | |||
'''Available Options''': false, true | |||
==== Virtual Player Id ==== | |||
<!-- ID: GAME_DIAG_VIRTUAL_SELECTION_VALUE --> | |||
Enable/disable virtual player ID debug. | |||
'''Available Options''': false, true | |||
==== Spatial Map of Player Id ==== | |||
<!-- ID: GAME_DIAG_PLAYER_SELECTION_VALUE --> | |||
Set spatial map of player ID. | |||
'''Range Settings''': | |||
* Min: 0 | |||
* Max: 192 | |||
* Current Value: -1 | |||
* Step: 1 | |||
==== Virtual Player X pos ==== | |||
<!-- ID: GAME_DIAG_VIRTUAL_POS_X_VALUE --> | |||
Set virtual player X position. | |||
'''Range Settings''': | |||
* Min: 0 | |||
* Max: 13000 | |||
* Current Value: 0 | |||
* Step: 100 | |||
==== Virtual Player Y pos ==== | |||
<!-- ID: GAME_DIAG_VIRTUAL_POS_Y_VALUE --> | |||
Set virtual player Y position. | |||
'''Range Settings''': | |||
* Min: 0 | |||
* Max: 13000 | |||
* Current Value: 0 | |||
* Step: 100 | |||
==== Spatial layer ==== | |||
<!-- ID: GAME_DIAG_SPATIAL_LAYER_VALUE --> | |||
Set spatial layer. | |||
'''Available Options''': statics, dynamics, char+veh | |||
==== Spatial type ==== | |||
<!-- ID: GAME_DIAG_SPATIAL_TYPE_VALUE --> | |||
Set spatial type. | |||
'''Available Options''': stationary+moving, stationary, moving | |||
==== Network range ==== | |||
<!-- ID: GAME_DIAG_NDS_VALUE --> | |||
Set network range. | |||
'''Range Settings''': | |||
* Min: 1 | |||
* Max: 50 | |||
* Current Value: 2 | |||
* Step: 1 | |||
==== Global streaming budget ==== | |||
<!-- ID: GAME_DIAG_STREAMING_BUDGET --> | |||
Set global streaming budget. | |||
'''Range Settings''': | |||
* Min: 100 | |||
* Max: 50000 | |||
* Current Value: 500 | |||
* Step: 50 | |||
==== Staggering budget ==== | |||
<!-- ID: GAME_DIAG_STAGGERING_BUDGET --> | |||
Set staggering budget. | |||
'''Range Settings''': | |||
* Min: 1 | |||
* Max: 10201 | |||
* Current Value: 1 | |||
* Step: 1 | |||
==== Open streams delta ==== | |||
<!-- ID: GAME_DIAG_OPEN_STREAMS_DELTA --> | |||
Set open streams delta. | |||
'''Range Settings''': | |||
* Min: 1 | |||
* Max: 1000 | |||
* Current Value: 1 | |||
* Step: 1 | |||
==== Trouble causer ==== | |||
<!-- ID: GAME_DIAG_TROUBLE_CAUSER --> | |||
Enable/disable trouble causer debug. | |||
'''Available Options''': false, true | |||
==== Streaming trouble causer rate ==== | |||
<!-- ID: GAME_DIAG_TROUBLE_CAUSER_VALUE --> | |||
Set streaming trouble causer rate. | |||
'''Range Settings''': | |||
* Min: 1 | |||
* Max: 60 | |||
* Current Value: 0 | |||
* Step: 1 | |||
=== Server FPS === | |||
<!-- ID: GAME_DIAG_NETWORK_SERVERFPS --> | |||
Enable/disable network server FPS display. | |||
'''Available Options''': false, true | |||
=== Damage synchronization === | |||
<!-- ID: GAME_DIAG_NETWORK_DAMAGE --> | |||
Enable/disable network damage synchronization debug. | |||
'''Available Options''': false, true | |||
=== Lobby diagnostics === | |||
<!-- ID: GAME_DIAG_NETWORK_LOBBY --> | |||
Enable/disable network lobby diagnostics. | |||
'''Available Options''': false, true | |||
=== Connection diag === | |||
<!-- ID: GAME_DIAG_CONNECTION_DIAG --> | |||
Enable/disable network connection diagnostics. | |||
'''Available Options''': false, true | |||
=== Log ownership changes === | |||
<!-- ID: GAME_DIAG_NETWORK_OWNERSHIP_CHANGES --> | |||
Enable/disable logging of network ownership changes. | |||
'''Available Options''': false, true | |||
=== Validate loaded prefabs === | |||
<!-- ID: GAME_DIAG_NETWORK_VALIDATE_PREFABS --> | |||
Enable/disable validation of loaded prefabs. | |||
'''Available Options''': false, true | |||
=== Server admin === | |||
<!-- ID: GAME_DIAG_SERVER_ADMIN --> | |||
Enable/disable server admin mode. | |||
'''Available Options''': disabled, enabled | |||
=== RPC MT jobs === | |||
<!-- ID: GAME_DIAG_RPC_JOBS --> | |||
Enable/disable RPC multithreaded jobs. | |||
'''Available Options''': true, false | |||
=== Loading prefabs === | |||
<!-- ID: GAME_DIAG_LOADING_PREFABS --> | |||
Enable/disable prefabs loading debug. | |||
'''Available Options''': false, true | |||
== Social Component == | |||
=== Show === | |||
<!-- ID: GAME_DIAG_CLIENT_SOCIAL_COMPONENT_SHOW --> | |||
Enable/disable client social component debug. | |||
'''Available Options''': false, true | |||
=== Restrictions override === | |||
<!-- ID: GAME_DIAG_CLIENT_SOCIAL_COMPONENT_OVERRIDE --> | |||
Set restriction override mode for social component. | |||
'''Available Options''': None, Force-Restriction, Force-Unrestricted | |||
=== Player to restrict === | |||
<!-- ID: GAME_DIAG_CLIENT_SOCIAL_COMPONENT_PLAYER --> | |||
Set player to restrict. | |||
'''Available Options''': First-Found, Last-Found | |||
=== Send update === | |||
<!-- ID: GAME_DIAG_CLIENT_SOCIAL_COMPONENT_UPDATE --> | |||
Enable/disable sending of social component update. | |||
'''Available Options''': false, true | |||
=== Block Me === | |||
<!-- ID: GAME_DIAG_CLIENT_SOCIAL_COMPONENT_BLOCKME --> | |||
Enable/disable blocking of current player. | |||
'''Available Options''': false, true | |||
=== Unblock Me === | |||
<!-- ID: GAME_DIAG_CLIENT_SOCIAL_COMPONENT_UNBLOCKME --> | |||
Enable/disable unblocking of current player. | |||
'''Available Options''': false, true | |||
=== Update block list === | |||
<!-- ID: GAME_DIAG_CLIENT_SOCIAL_COMPONENT_BLOCKLIST_UPDATE --> | |||
Enable/disable updating of block list. | |||
'''Available Options''': false, true | |||
== Turrets == | |||
=== Turret armory === | |||
<!-- ID: GAME_DIAG_TURRET_ARMORY --> | |||
Enable/disable turret armory debug. | |||
'''Available Options''': false, true | |||
=== Disable turret modifiers === | |||
<!-- ID: GAME_DIAG_TURRETS_DISABLE_AIM_MODIFIERS --> | |||
Enable/disable aim modifiers for turrets. | |||
'''Available Options''': false, true | |||
== HitReg == | |||
=== Draw Compensated Shots === | |||
<!-- ID: DM_HITREG_DRAW_COMPENSATED_SHOTS --> | |||
Set draw mode for compensated shots. | |||
'''Available Options''': none, missed, all | |||
=== Drawn Shots === | |||
<!-- ID: DM_HITREG_COMPENSATED_SHOTS_COUNT --> | |||
Set amount of drawn shots. | |||
'''Range Settings''': | |||
* Min: 1 | |||
* Max: 20 | |||
* Current Value: 5 | |||
* Step: 1 | |||
=== Draw Trajectories === | |||
<!-- ID: DM_HITREG_COMPENSATED_DRAW_TRAJECTORIES --> | |||
Enable/disable drawing of trajectories. | |||
'''Available Options''': false, true | |||
=== Draw Collider Histories === | |||
<!-- ID: DM_COLLIDER_HISTORY_DRAW_SHAPES --> | |||
Set drawing mode for collider histories. | |||
'''Available Options''': none, all, included, excluded | |||
=== Use RTT (Old Method) === | |||
<!-- ID: DM_HITREG_USE_RPL_RTT --> | |||
Enable/disable using old RTT method. | |||
'''Available Options''': false, true | |||
=== Show Graphs === | |||
<!-- ID: DM_HITREG_GRAPHS --> | |||
Enable/disable showing of hit registration graphs. | |||
'''Available Options''': false, true | |||
== Projectiles == | |||
=== Proj. override === | |||
==== Mass ==== | |||
<!-- ID: DM_PROJ_SHELL_OVERRIDE_MASS --> | |||
Projectile mass override | |||
'''Available Options''': default, 0.0001, 0.0005, 0.001, 0.005, 0.01, 0.05, 0.1, 0.5, 1 | |||
==== Muzzle velocity ==== | |||
<!-- ID: DM_PROJ_SHELL_OVERRIDE_MUZZLE_VELOCITY --> | |||
Projectile muzzle velocity override | |||
'''Available Options''': default, 100, 200, 300, 400, 500, 600, 700, 800, 900, 1000 | |||
==== Air drag coef ==== | |||
<!-- ID: DM_PROJ_SHELL_OVERRIDE_AIR_DRAG_COEF --> | |||
Projectile air drag coefficient override | |||
'''Available Options''': default, 0.001, 0.0005, 0.0001, 0.00005, 0.00001, 0.000005, 0.000001, 0.0000005, 0.0000001, 0.00000005, 0.00000001 | |||
=== Proj. test === | |||
==== Run ==== | |||
<!-- ID: DM_PROJ_SHELL_TEST_RUN --> | |||
Projectile test run | |||
'''Available Options''': disabled, enabled | |||
==== Type ==== | |||
<!-- ID: DM_PROJ_SHELL_TEST_TYPE --> | |||
Projectile test type | |||
'''Available Options''': camera, general, firefight, pen-test | |||
==== Repeat ==== | |||
<!-- ID: DM_PROJ_SHELL_TEST_REPEAT --> | |||
Projectile test repeat mode | |||
'''Available Options''': once, counter, unlimited | |||
==== Repeat count ==== | |||
<!-- ID: DM_PROJ_SHELL_TEST_REPEAT_COUNT --> | |||
Set projectile test repeat count. | |||
'''Range Settings''': | |||
Min: 5 | |||
Max: 100 | |||
Current Value: 5 | |||
Step: 5 | |||
==== Repeat freq. ==== | |||
<!-- ID: DM_PROJ_SHELL_TEST_REPEAT_FREQ --> | |||
Projectile test repeat frequency | |||
'''Available Options''': 1, 2, 5, 10, 30, 60 | |||
==== Proj. count ==== | |||
<!-- ID: DM_PROJ_SHELL_TEST_SHOT_COUNT --> | |||
Set projectile test shot count. | |||
'''Range Settings''': | |||
Min: 10 | |||
Max: 100 | |||
Current Value: 10 | |||
Step: 10 | |||
==== Pen. type ==== | |||
<!-- ID: DM_PROJ_SHELL_TEST_PEN_TYPE --> | |||
Projectile penetration test type | |||
'''Available Options''': disc, sphere, box | |||
==== Matrix type ==== | |||
<!-- ID: DM_PROJ_SHELL_TEST_MAT_TYPE --> | |||
Projectile test matrix type | |||
'''Available Options''': actual, saved | |||
==== Matrix save ==== | |||
<!-- ID: DM_PROJ_SHELL_TEST_MAT_SAVE --> | |||
Projectile test matrix save | |||
'''Available Options''': disabled, enabled | |||
==== Projectile ==== | |||
<!-- ID: DM_PROJ_SHELL_TEST_PROJECTILE --> | |||
Projectile test projectile type | |||
'''Available Options''': bullet, rpg | |||
==== Kill timer ==== | |||
<!-- ID: DM_PROJ_SHELL_TEST_KILL_TIMER --> | |||
Projectile test kill timer | |||
'''Available Options''': 0, 1, 2, 5 | |||
==== Kill ==== | |||
<!-- ID: DM_PROJ_SHELL_TEST_KILL --> | |||
Projectile test kill switch | |||
'''Available Options''': disabled, enabled | |||
=== Proj. tests === | |||
==== Show plot ==== | |||
<!-- ID: DM_PROJ_SHELL_SHOW_PLOT --> | |||
Projectile test show plot | |||
'''Available Options''': disabled, enabled | |||
==== Plot type ==== | |||
<!-- ID: DM_PROJ_SHELL_PLOT_TYPE --> | |||
Projectile test plot type | |||
'''Available Options''': 1dscatter, 2dscatter, 1dhistogram, 2dhistogram, defl_scatter, defl_hist | |||
==== Gauss param ==== | |||
<!-- ID: DM_PROJ_SHELL_GAUSS_PARAM --> | |||
Set projectile test gauss parameter. | |||
'''Range Settings''': | |||
Min: 0 | |||
Max: 5 | |||
Current Value: 0 | |||
Step: 0.1 | |||
=== Proj. settings === | |||
==== Max concurrent debug lines ==== | |||
<!-- ID: DM_PROJ_SHELL_CAPACITY --> | |||
Maximum amount of trajectories that are shown at once | |||
'''Defalut value: 16''' (''can be changed to up 1024 trajectories'') | |||
'''Available Options''': 128, 8, 16, 32, 64, 256, 512, 1024 | |||
== | ==== Version ==== | ||
<!-- ID: DM_PROJ_SHELL_VERSION --> | |||
Projectile version | |||
'''Available Options''': default, experimental | |||
==== Show shell trajectory === | === Proj. ballistics === | ||
==== Print Hit Info ==== | |||
<!-- ID: DM_PROJ_BALLISTICS_PRINT_HIT_INFO --> | |||
Projectile print hit info | |||
'''Available Options''': false, true | |||
=== Show shell trajectory === | |||
<!-- ID: DM_PROJ_SHELL_TRAJECTORY --> | |||
Show '''projectile trajectory in 3D space''', '''name of the flying prefab''', '''impact points''' and also '''additional projectile data''' in top left corner (including projectile speed, data from prefab and impact data) | Show '''projectile trajectory in 3D space''', '''name of the flying prefab''', '''impact points''' and also '''additional projectile data''' in top left corner (including projectile speed, data from prefab and impact data) | ||
| Line 103: | Line 1,799: | ||
[[File:armareforger-diag-menu-projectile-shell-trajectory.png|frameless]] | [[File:armareforger-diag-menu-projectile-shell-trajectory.png|frameless]] | ||
'''Available Options''': false, true | |||
=== Show stats === | |||
<!-- ID: DM_PROJ_SHELL_STATS --> | |||
Shows statistics regarding current, largest & total amount of different type of projectiles: '''Shells, Missiles & Grenades''' | Shows statistics regarding current, largest & total amount of different type of projectiles: '''Shells, Missiles & Grenades''' | ||
[[File:armareforger-diag-menu-projectile-show-stats.png | [[File:armareforger-diag-menu-projectile-show-stats.png]] | ||
'''Available Options''': false, true | |||
=== Show predicted shell trajectory === | |||
<!-- ID: DM_PROJ_SHELL_TRAJECTORY_PREDICTED --> | |||
Show prediction of projectile trajectory. You can still follow bullet path by observing where textbox with prefab name is located. | Show prediction of projectile trajectory. You can still follow bullet path by observing where textbox with prefab name is located. | ||
[[File:armareforger-diag-menu-projectile-predicted-trajectory.png|frameless|688x688px]] | [[File:armareforger-diag-menu-projectile-predicted-trajectory.png|frameless|688x688px]] | ||
'''Available Options''': false, true | |||
=== Shell name === | |||
<!-- ID: DM_PROJ_SHELL_SHOW_NAME --> | |||
Controls whether shell name is visible next to projectile prefab. | Controls whether shell name is visible next to projectile prefab. | ||
[[File:armareforger-diag-menu-projectile-shell-name.png|frameless|700x700px]] | [[File:armareforger-diag-menu-projectile-shell-name.png|frameless|700x700px]] | ||
''' | '''Available Options''': true, false | ||
=== Player shell only === | |||
<!-- ID: DM_PROJ_SHELL_PLAYER_ONLY --> | |||
Controls if projectile diag should be applied to only player fired projectiles | Controls if projectile diag should be applied to only player fired projectiles | ||
''' | '''Available Options''': false, true | ||
=== Visibility === | |||
<!-- ID: DM_PROJ_SHELL_VISIBILITY --> | |||
How many projectiles should be visible | How many projectiles should be visible | ||
''' | '''Available Options''': all, 128, 64, 32, 16, 8, 4, 2, 1 | ||
=== Persistence === | |||
<!-- ID: DM_PROJ_SHELL_PERSISTENCE --> | |||
Controls how long '''trajectory''' is visible after projectile destruction. By default it is set to '''15 seconds''' | Controls how long '''trajectory''' is visible after projectile destruction. By default it is set to '''15 seconds''' | ||
'''Available Options''': 15s, 30s, 60s, 120s, permanent, 0s, 5s | |||
=== Clear trajectories === | |||
<!-- ID: DM_PROJ_SHELL_CLEAR --> | |||
Works as a toggle. | Works as a toggle. | ||
When activated, it clears world from all debug trajectories | When activated, it clears world from all debug trajectories | ||
'''Available Options''': disabled, enabled | |||
==== Info persistence === | === Info visible === | ||
<!-- ID: DM_PROJ_SHELL_INFO_VISIBLE --> | |||
Controls infobox visibility | |||
'''Available Options''': true, false | |||
=== Info persistence === | |||
<!-- ID: DM_PROJ_SHELL_INFO_PERSISTENCE --> | |||
Controls how long '''infobox''' in top left corner is visible after projectile destruction. By default it is set to '''0 seconds''' | Controls how long '''infobox''' in top left corner is visible after projectile destruction. By default it is set to '''0 seconds''' | ||
'''Available Options''': 0s, 5s, 15s, permanent | |||
=== Info segment length === | |||
<!-- ID: DM_PROJ_SHELL_INFO_SEGMENT_LENGTH --> | |||
Interval at which speed data in infobox is measured and persisted.<gallery mode="nolines" widths="250" heights="255"> | Interval at which speed data in infobox is measured and persisted.<gallery mode="nolines" widths="250" heights="255"> | ||
File:armareforger-diag-menu-projectile-interval-500.png|500m interval | File:armareforger-diag-menu-projectile-interval-500.png|500m interval | ||
| Line 151: | Line 1,881: | ||
</gallery> | </gallery> | ||
''' | '''Available Options''': 100, 200, 500, 25, 50 | ||
=== Hide info === | |||
<!-- ID: DM_PROJ_SHELL_INFO_HIDE --> | |||
Projectile hide info box | |||
'''Available Options''': disabled, enabled | |||
=== Dump data === | |||
<!-- ID: DM_PROJ_SHELL_DUMP --> | |||
''Doesn't work in retail version of the game'' | ''Doesn't work in retail version of the game'' | ||
==== | '''Available Options''': disabled, enabled | ||
=== Special case === | |||
<!-- ID: DM_PROJ_SHELL_SPECIAL_CASE --> | |||
Projectile special case | |||
'''Available Options''': none, north, up, down, drop | |||
=== Deflection === | |||
<!-- ID: DM_PROJ_SHELL_DEFLECTION --> | |||
Controls whether projectiles have a chance to deflect from surface. | |||
'''Available Options''': true, false | |||
=== Penetration === | |||
<!-- ID: DM_PROJ_SHELL_PENETRATION --> | |||
Controls whether projectiles is able to penetrate other objects. | |||
'''Available Options''': true, false | |||
=== Deviation === | |||
<!-- ID: DM_PROJ_SHELL_DEVIATION --> | |||
Controls whether projectiles | Controls whether projectiles randomly deviates after penetration. | ||
'''Available Options''': true, false | |||
==== | === Gravity === | ||
<!-- ID: DM_PROJ_SHELL_GRAVITY --> | |||
Controls whether projectiles is affected by gravity. | |||
'''Available Options''': true, false | |||
=== Decals === | |||
<!-- ID: DM_PROJ_SHELL_DECALS --> | |||
Controls whether projectiles are leaving impact decals | Controls whether projectiles are leaving impact decals | ||
'''Available Options''': true, false | |||
=== Decals advanced === | |||
<!-- ID: DM_PROJ_SHELL_DECALS_ADVANCED --> | |||
Projectile advanced decals | |||
'''Available Options''': true, false | |||
=== Decals use diameter === | |||
<!-- ID: DM_PROJ_SHELL_DECALS_USE_DIAMETER --> | |||
Projectile decals use diameter | |||
'''Available Options''': false, true | |||
=== Override material === | |||
<!-- ID: DM_PROJ_SHELL_OVERRIDE_MATERIAL --> | |||
Projectile material override | |||
'''Available Options''': true, false | |||
=== Bullet time === | |||
<!-- ID: DM_PROJ_SHELL_BULLETTIME --> | |||
Reduces speed to 0.01 when projectile is fired. Time doesn't restore to normal speed unless [[User:Reyhard/Sandbox/Diag Menu#DTime multiplier|DTime Multiplier]] in Cheats is turned off manually. | |||
'''Available Options''': false, true | |||
=== Grenade simulation === | |||
<!-- ID: DM_PROJ_GREN_SIMULATION --> | |||
Grenade simulation mode | |||
'''Available Options''': true, false | |||
== Show actions states == | |||
<!-- ID: GAME_DIAG_ACTIONS --> | |||
Enable/disable showing of actions states. | |||
'''Available Options''': false, true | |||
== Gridmap diags == | |||
<!-- ID: GAME_DIAG_GRIDMAP --> | |||
Enable/disable gridmap diagnostics. | |||
'''Available Options''': false, true | |||
== Show explosion debug == | |||
<!-- ID: GAME_DIAG_EXPLOSIONDBG --> | |||
Enable/disable showing of explosion debug. | |||
[[File:armareforger-diag-menu-explosive-damage.jpg|600x600px]] | |||
When an explosion occurs, "traces" (singular: "trace") are visual lines that represent the paths to each hitzone. These traces provide diagnostic feedback about whether damage was dealt or blocked. Here's how the trace system works | |||
*'''Red Sphere''' : | |||
**Represents the explosion's '''current damage radius''' . | |||
**The '''transparency''' of the sphere changes based on the explosion's size: | |||
***'''Less transparent (solid)''' : Indicates larger, more impactful explosions. | |||
***'''More transparent (faded)''' : Indicates smaller, less significant explosions. | |||
*Red: Normal explosion | |||
* '''Yellow Sphere''': | |||
** Impulse explosion | |||
* '''Dark Yellow Sphere''' | |||
** Fragmentation explosion | |||
**Helps distinguish explosions of varying magnitudes and reduces visual clutter in overlapping scenarios. | |||
*'''Blue Lines''' : | |||
**Represent '''unblocked traces''' , indicating successful paths from the explosion’s origin where damage was applied to targets. | |||
*'''Red Lines''' : | |||
**Not visible in this image but would represent '''blocked traces''' , showing paths where damage was obstructed (e.g., by terrain or obstacles). | |||
* Additionally, each hitzone (a specific area of the target) is represented by a '''sphere''' at its location: | |||
** '''Blue Sphere''' : Indicates a hitzone that successfully took damage (unblocked). | |||
** '''Red Sphere''' : Indicates a hitzone where damage was ''blocked'' and not applied. | |||
'''Available Options''': false, true | |||
== Show player events == | |||
<!-- ID: GAME_DIAG_CURRENT_COMPONENT_EVENTS --> | |||
Enable/disable showing of player events. | |||
'''Available Options''': false, true | |||
== Show target events == | |||
<!-- ID: GAME_DIAG_TARGET_COMPONENT_EVENTS --> | |||
Enable/disable showing of target events. | |||
'''Available Options''': false, true | |||
== Show aim directions == | |||
<!-- ID: GAME_DIAG_AIM_COMPONENTS --> | |||
Enable/disable showing of aim directions. | |||
'''Available Options''': false, true | |||
== Factions == | |||
<!-- ID: GAME_DIAG_FACTIONS --> | |||
Enable/disable showing of factions debug. | |||
'''Available Options''': false, true | |||
== Contacts == | |||
<!-- ID: GAME_DIAG_CONTACT --> | |||
Enable/disable showing of contacts debug. | |||
'''Available Options''': false, true | |||
== Smooth steering in vehicle == | |||
<!-- ID: GAME_DIAG_SMOOTH_STEERING_VEHICLE --> | |||
Enable/disable smooth steering for vehicles. | |||
'''Available Options''': false, true | |||
== Character acceleration in vehicle == | |||
<!-- ID: GAME_DIAG_CHARACTER_ACCEL_VEHICLE --> | |||
Set character acceleration debug in vehicle. | |||
'''Available Options''': acceleration, gforce | |||
== FOV override == | |||
<!-- ID: GAME_DIAG_FOV_OVERRIDE --> | |||
Set field of view override. | |||
'''Range Settings''': | |||
Min: 0.0 | |||
Max: 89.9 | |||
Current Value: 0.0 | |||
Step: 0.1 | |||
== Time and Weather Diag == | |||
<!-- ID: GAME_DIAG_TIMEANDWEATHER --> | |||
Enable/disable time and weather diagnostics. | |||
'''Available Options''': false, true | |||
== Enable better interpolation == | |||
<!-- ID: GAME_DIAG_INTERPOLATION --> | |||
Enable/disable better interpolation. | |||
'''Available Options''': true, false | |||
== Log GameEntity events == | |||
<!-- ID: GAME_DIAG_GAMEENTITY_EVENTS --> | |||
Enable/disable logging of GameEntity events. | |||
'''Available Options''': false, true | |||
== Log GameEntity events (simple) == | |||
<!-- ID: GAME_DIAG_GAMEENTITY_EVENTS_SIMPLE --> | |||
Enable/disable logging of GameEntity events (simple). | |||
'''Available Options''': false, true | |||
== Log shooting queues == | |||
<!-- ID: GAME_DIAG_SHOOTING_QUEUE --> | |||
Enable/disable logging of shooting queues. | |||
'''Available Options''': false, true | |||
== Log SlotInfo == | |||
<!-- ID: GAME_DIAG_ENTITYSLOTINFO --> | |||
Set SlotInfo logging mode. | |||
'''Available Options''': off, attached, detached, both | |||
== Door ColTest == | |||
<!-- ID: GAME_DIAG_DOOR_COLTEST --> | |||
Enable/disable door collision test. | |||
'''Available Options''': false, true | |||
== Use traces for possible volume data == | |||
<!-- ID: GAME_DIAG_USE_TRACES_FOR_VOLUMES --> | |||
Enable/disable traces for volume data. | |||
'''Available Options''': false, true | |||
== Show world volumes collection == | |||
<!-- ID: GAME_DIAG_SHOW_VOLUMES_COLLECTION --> | |||
Enable/disable showing of world volumes collection. | |||
'''Available Options''': false, true | |||
== Enable Decal Slots == | |||
<!-- ID: GAME_DIAG_DECAL_SLOTS_ENABLED --> | |||
Enable/disable decal slots. | |||
'''Available Options''': false, true | |||
== Game state diag == | |||
<!-- ID: GAME_DIAG_GAMESTATE --> | |||
Enable/disable game state diagnostics. | |||
'''Available Options''': false, true | |||
== Force fog at camera == | |||
<!-- ID: ENF_DIAG_FOG_HEIGHT_CAMERA --> | |||
Force fog at camera. | |||
'''Available Options''': false, true | |||
== Override fog == | |||
<!-- ID: ENF_DIAG_FOG_OVERRIDE --> | |||
Override fog. | |||
'''Available Options''': false, true | |||
== Height bias == | |||
<!-- ID: ENF_DIAG_FOG_HEIGHT_BIAS --> | |||
Set height bias. | |||
'''Range Settings''': | |||
Min: -500 | |||
Max: 500 | |||
Current Value: 0 | |||
Step: 5 | |||
== Groups == | |||
=== Enable groups diag === | |||
<!-- ID: SCR_DebugMenuID.DEBUGUI_GROUPS_ENABLE_DIAG --> | |||
Enable/disable groups diagnostics. | |||
'''Available Options''': false, true | |||
== Show input manager == | |||
<!-- ID: SCR_DebugMenuID.DEBUGUI_INPUT_MANAGER --> | |||
Set input manager debug mode. | |||
'''Available Options''': disabled, active, all | |||
== Log player damage == | |||
<!-- ID: SCR_DebugMenuID.DEBUGUI_CHARACTER_LOG_PLAYER_DAMAGE --> | |||
Enable/disable logging of player damage. | |||
'''Available Options''': false, true | |||
= Cheats = | |||
== Disable player damage == | |||
<!-- ID: GAME_DIAG_CHEATS_DISABLE_DAMAGE --> | |||
Enables god mod. Has an instant effect on a currently controlled character that persists on that character even after switching to GM or a different character | |||
'''Hotkey''': {{Controls|lctrl|lalt|f1}} | |||
'''Available Options''': Cheat disabled, Force invulnerable, Force vulnerable | |||
== Teleport == | |||
<!-- ID: GAME_DIAG_CHEATS_TELEPORT --> | |||
Teleport player. | |||
'''Hotkey''': {{Controls|lctrl|lalt|f2}} | |||
'''Available Options''': false, true | |||
== Infinite ammo == | |||
<!-- ID: GAME_DIAG_CHEATS_INFINITE_AMMO --> | |||
Enable/disable infinite ammo (magazines). Doesn't work in 1.2.1 | |||
'''Hotkey''': {{Controls|lctrl|lalt|f3}} | |||
'''Available Options''': false, true | |||
== Infinite bullets == | |||
<!-- ID: GAME_DIAG_CHEATS_INFINITE_BULLETS --> | |||
Enable/disable infinite bullets. The bullet in the chamber is never consumed, which means only first bullet in magazine array will be only used (cannot be used for testing mixed mags for instance) | |||
'''Hotkey''': {{Controls|lctrl|lalt|f4}} | |||
'''Available Options''': false, true | |||
== Commit suicide == | |||
<!-- ID: GAME_DIAG_CHEATS_SUICIDE --> | |||
Commit suicide. | |||
'''Hotkey''': {{Controls|lctrl|lalt|f5}} | |||
'''Available Options''': false, true | |||
== Execute characters in front == | |||
<!-- ID: GAME_DIAG_CHEATS_EXECUTE --> | |||
Execute characters in front. | |||
'''Hotkey''': {{Controls|lctrl|lalt|f6}} | |||
'''Available Options''': false, true | |||
== DTime multiplier == | |||
<!-- ID: GAME_DIAG_CHEATS_TIME_DILATATION --> | |||
Toggles time progression multiplication by '''Dtime multiplier value ''' (DTime stands for ''dilatation time'', also known as time slice in Enfusion) | |||
'''Available Options''': false, true | |||
== DTime multiplier value == | |||
<!-- ID: GAME_DIAG_CHEATS_TIME_DILATATION_VALUE --> | |||
Set delta time multiplier value. | |||
'''Range Settings''': | |||
Min: 0.01 | |||
Max: 20 | |||
Current Value: 1.0 | |||
Step: 0.01 | |||
== Debug manual camera == | |||
<!-- ID: SCR_DebugMenuID.DEBUGUI_MANUAL_CAMERA_FREE --> | |||
Enable/disable free manual camera. While the "Debug camera" (aka "Free camera" or "Freecam") is active, you can use the '''spacebar''' to teleport your character under the cursor | |||
'''Hotkey''': {{Controls|lctrl|lalt|c}} | |||
'''Available Options''': false, true | |||
= ECS = | |||
== ECS archetypes == | |||
<!-- ID: DM_ECS_ARCHETYPES --> | |||
Enable/disable ECS archetypes debug. | |||
'''Available Options''': false, true | |||
== ECS registered types == | |||
<!-- ID: DM_ECS_REGISTERED_TYPES --> | |||
Enable/disable ECS registered types debug. | |||
'''Available Options''': false, true | |||
== ECS type matching == | |||
<!-- ID: DM_ECS_TYPE_MATCHING --> | |||
Enable/disable ECS type matching debug. | |||
'''Available Options''': false, true | |||
== ECS deleted entities == | |||
<!-- ID: DM_ECS_DELETED_ENTITIES --> | |||
Enable/disable ECS deleted entities debug. | |||
'''Available Options''': false, true | |||
= Character = | |||
== Character physics == | |||
=== Prequery === | |||
<!-- ID: GAME_DIAG_CHARACTER_PHYSICS_PREQUERY --> | |||
Enable/disable character physics prequery. | |||
'''Available Options''': enabled, disabled | |||
=== Use idle character optimization === | |||
<!-- ID: GAME_DIAG_CHARACTER_PHYSICS_IDLE_OPTIMIZATION --> | |||
Enable/disable idle character physics optimization. | |||
'''Available Options''': enabled, disabled | |||
=== Show charcter info === | |||
<!-- ID: GAME_DIAG_CHARACTER_PHYSICS_CHARACTER_COLLISION_INFO --> | |||
Enable/disable showing of character collision info. | |||
'''Available Options''': disabled, enabled | |||
=== Always apply collision === | |||
<!-- ID: GAME_DIAG_CHARACTER_PHYSICS_APPLY_COLLISION --> | |||
Enable/disable always applying character collision. | |||
'''Available Options''': disabled, enabled | |||
=== Ground offset diag === | |||
<!-- ID: GAME_DIAG_CHARACTER_PHYSICS_GROUND_OFFSET --> | |||
Enable/disable showing of ground offset. | |||
'''Available Options''': disabled, enabled | |||
=== Draw character mode === | |||
<!-- ID: GAME_DIAG_CHARACTER_PHYSICS_DRAW_CHARACTER --> | |||
Set draw mode for character physics debug. | |||
'''Available Options''': None, Everything, Collision, Movement Path, Surface, Prequery | |||
== Enable desync detection == | |||
<!-- ID: GAME_DIAG_DESYNC_DETECTION --> | |||
Enable/disable desync detection. | |||
'''Available Options''': false, true | |||
== Show desync detection window == | |||
<!-- ID: GAME_DIAG_DESYNC_DETECTION_WINDOW --> | |||
Enable/disable desync detection window. | |||
'''Available Options''': false, true | |||
== Interpolation enabled == | |||
<!-- ID: GAME_DIAG_CHARACTER_INTERPOLATION --> | |||
Enable/disable character interpolation. | |||
'''Available Options''': true, false | |||
== Animation LOD == | |||
<!-- ID: GAME_DIAG_CHARACTER_ANIM_LOD --> | |||
Set animation LOD. | |||
'''Range Settings''': | |||
Min: -1 | |||
Max: 3 | |||
Current Value: -1 | |||
Step: 1 | |||
== Aiming direction == | |||
<!-- ID: GAME_DIAG_CHARACTER_AIMING --> | |||
Enable/disable showing of aiming direction. | |||
'''Available Options''': false, true | |||
== Head aiming direction == | |||
<!-- ID: GAME_DIAG_CHARACTER_HEAD_AIMING --> | |||
Enable/disable showing of head aiming direction. | |||
'''Available Options''': false, true | |||
== Heading angle == | |||
<!-- ID: GAME_DIAG_CHARACTER_HEADING_ANGLE --> | |||
Enable/disable showing of heading angle. | |||
'''Available Options''': false, true | |||
== Surface slope == | |||
<!-- ID: GAME_DIAG_CHARACTER_SLOPE --> | |||
Enable/disable showing of surface slope. | |||
'''Available Options''': false, true | |||
== Entity transform == | |||
<!-- ID: GAME_DIAG_CHARACTER_TRANSFORM --> | |||
Enable/disable showing of entity transform. | |||
'''Available Options''': false, true | |||
== AnimPhysAgent transform == | |||
<!-- ID: GAME_DIAG_CHARACTER_PHYS_TRANSFORM --> | |||
Enable/disable showing of animation physics agent transform. | |||
'''Available Options''': false, true | |||
== Foot down anim event == | |||
<!-- ID: GAME_DIAG_CHARACTER_FOOT_DOWN_EVENT --> | |||
Enable/disable showing of foot down animation event. | |||
'''Available Options''': false, true | |||
== Animation events == | |||
<!-- ID: GAME_DIAG_CHARACTER_ANIM_EVENTS --> | |||
Enable/disable showing of animation events. | |||
'''Available Options''': false, true | |||
== Animation tags == | |||
<!-- ID: GAME_DIAG_CHARACTER_ANIM_TAGS --> | |||
Enable/disable showing of animation tags. | |||
'''Available Options''': false, true | |||
== Climb command physics test == | |||
<!-- ID: GAME_DIAG_CHARACTER_CLIMB_PHX_TEST --> | |||
Enable/disable climb command physics test. | |||
'''Available Options''': false, true | |||
== Show current ladder == | |||
<!-- ID: GAME_DIAG_CHARACTER_LADDERS --> | |||
Enable/disable showing of current ladder. | |||
'''Available Options''': false, true | |||
== Input actions == | |||
<!-- ID: GAME_DIAG_CHARACTER_INPUT_ACTIONS --> | |||
Enable/disable showing of input actions. | |||
'''Available Options''': false, true | |||
== Lock view horizontal == | |||
<!-- ID: GAME_DIAG_CHARACTER_LOCK_VIEW_HORIZONTAL --> | |||
Enable/disable locking of view horizontal. | |||
'''Available Options''': false, true | |||
== Lock view vertical == | |||
<!-- ID: GAME_DIAG_CHARACTER_LOCK_VIEW_VERTICAL --> | |||
Enable/disable locking of view vertical. | |||
'''Available Options''': false, true | |||
== Disable Inertia == | |||
<!-- ID: GAME_DIAG_DISABLE_CHARACTER_INERTIA --> | |||
Enable/disable character inertia. | |||
'''Available Options''': false, true | |||
== Disable Inertia exponential == | |||
<!-- ID: GAME_DIAG_DISABLE_CHARACTER_INERTIA_EXPO --> | |||
Enable/disable character exponential inertia. | |||
'''Available Options''': false, true | |||
== Show additive handler tasks == | |||
<!-- ID: GAME_DIAG_ACTIVE_ADDITIVE_TASKS --> | |||
Enable/disable showing of active additive tasks. | |||
'''Available Options''': false, true | |||
== Stamina == | |||
<!-- ID: GAME_DIAG_CHARACTER_STAMINA --> | |||
Enable/disable showing of character stamina. | |||
'''Available Options''': false, true | |||
== Disable animation from velocity == | |||
<!-- ID: GAME_DIAG_DISABLE_CHARACTER_ANIMTOVELOCITY --> | |||
Enable/disable animation from velocity. | |||
'''Available Options''': false, true | |||
== Enable new passive weapon mode (sling) == | |||
<!-- ID: GAME_DIAG_CHARACTER_WEAPON_PASSIVE_STATE --> | |||
Enable/disable new passive weapon mode (sling). | |||
'''Available Options''': false, true | |||
== Disable anim driven icremental turns == | |||
<!-- ID: GAME_DIAG_CHARACTER_ANIM_INCREMENTAL_TURNS --> | |||
Enable/disable anim driven incremental turns. | |||
'''Available Options''': false, true | |||
== Disable hit reaction == | |||
<!-- ID: GAME_DIAG_CHARACTER_DISABLE_HIT_REACTION --> | |||
Enable/disable hit reaction. | |||
'''Available Options''': false, true | |||
== Enable ragdoll debug (melee attack to toggle) == | |||
<!-- ID: GAME_DIAG_CHARACTER_RAGDOLL_DEBUG --> | |||
Enable/disable ragdoll debug (melee attack to toggle). | |||
'''Available Options''': false, true | |||
== Enable feet IK == | |||
<!-- ID: GAME_DIAG_CHARACTER_ENABLE_FEET_IK --> | |||
Enable/disable feet IK. | |||
'''Available Options''': false, true | |||
== Show player identity == | |||
<!-- ID: GAME_DIAG_CHARACTER_IDENTITY --> | |||
Enable/disable showing of player identity. | |||
'''Available Options''': false, true | |||
== Show inspection diag == | |||
<!-- ID: GAME_DIAG_CHARACTER_INSPECTION --> | |||
Enable/disable showing of inspection debug. | |||
'''Available Options''': false, true | |||
== Show drowning / water level diag == | |||
<!-- ID: GAME_DIAG_WATER_LEVEL --> | |||
Enable/disable showing of drowning/water level debug. | |||
'''Available Options''': false, true | |||
== Inspection keeps orientation == | |||
<!-- ID: GAME_DIAG_CHARACTER_INSPECTION_KEEP_ORIENTATION --> | |||
Enable/disable keeping orientation during inspection. | |||
'''Available Options''': false, true | |||
== Prone root motion transl == | |||
<!-- ID: GAME_DIAG_CHARACTER_PRONE_TURNS_ALLOW_ROOT_MOTION_TRANSL --> | |||
Enable/disable root motion translation for prone turns. | |||
'''Available Options''': false, true | |||
== Toggle unconsciousness == | |||
<!-- ID: GAME_DIAG_CHARACTER_TOGGLE_UNCONSCIOUSNESS --> | |||
Enable/disable toggling of character unconsciousness. | |||
'''Available Options''': false, true | |||
== Forced unconsciousness pose == | |||
<!-- ID: GAME_DIAG_CHARACTER_UNCONSCIOUSNESS_POSE --> | |||
Set forced unconsciousness pose. | |||
'''Range Settings''': | |||
Min: -1 | |||
Max: 5 | |||
Current Value: -1 | |||
Step: 1 | |||
== Show Frustum == | |||
<!-- ID: GAME_DIAG_CHARACTER_FRUSTUM --> | |||
Enable/disable showing of frustum. | |||
'''Available Options''': false, true | |||
== Disable velocity DTime == | |||
<!-- ID: GAME_DIAG_CHARACTER_VELOCITY_DT_OFF --> | |||
Enable/disable velocity delta time. | |||
'''Available Options''': false, true | |||
== Enable turret overriding logging == | |||
<!-- ID: GAME_DIAG_CHARACTER_OVERRIDE_LOGGING --> | |||
Enable/disable turret overriding logging. | |||
'''Available Options''': false, true | |||
== Skip simulation points prequery == | |||
<!-- ID: DM_SKIP_PREQUERY_SIMULATION_POINTS --> | |||
Enable/disable skip simulation points prequery. | |||
'''Available Options''': false, true | |||
== Show simulation points == | |||
<!-- ID: DM_CHARACTER_SHOW_SIMULATION_POINTS --> | |||
Enable/disable showing of simulation points. | |||
'''Available Options''': false, true | |||
== Cycle Debug View == | |||
<!-- ID: SCR_DebugMenuID.DEBUGUI_CHARACTER_DEBUG_VIEW --> | |||
Set character debug view cycle. | |||
'''Range Settings''': | |||
Min: 0 | |||
Max: 8 | |||
Current Value: 0 | |||
Step: 1 | |||
== Draw Camera Collision Solver == | |||
<!-- ID: SCR_DebugMenuID.DEBUGUI_DRAW_CAMERA_COLLISION_SOLVER --> | |||
Enable/disable drawing of camera collision solver. | |||
'''Available Options''': false, true | |||
== Enable Debug UI == | |||
<!-- ID: SCR_DebugMenuID.DEBUGUI_CHARACTER_MENU --> | |||
Enable/disable character debug UI. | |||
'''Available Options''': false, true | |||
== Disable Banking == | |||
<!-- ID: SCR_DebugMenuID.DEBUGUI_CHARACTER_NOBANKING --> | |||
Enable/disable character banking. | |||
'''Available Options''': false, true | |||
== Enable transform info == | |||
<!-- ID: SCR_DebugMenuID.DEBUGUI_CHARACTER_TRANSFORMATION --> | |||
Enable/disable character transformation info. | |||
'''Available Options''': false, true | |||
== Disable recoil cam shake == | |||
<!-- ID: SCR_DebugMenuID.DEBUGUI_CHARACTER_RECOIL_CAMERASHAKE_DISABLE --> | |||
Enable/disable recoil camera shake. | |||
'''Available Options''': false, true | |||
== Disable additional cam shake == | |||
<!-- ID: SCR_DebugMenuID.DEBUGUI_CHARACTER_ADDITIONAL_CAMERASHAKE_DISABLE --> | |||
Enable/disable additional camera shake. | |||
'''Available Options''': false, true | |||
== Show shake diag == | |||
<!-- ID: SCR_DebugMenuID.DEBUGUI_CHARACTER_CAMERASHAKE_TEST_WINDOW --> | |||
Enable/disable showing of camera shake test window. | |||
'''Available Options''': false, true | |||
== Inspection LookAt == | |||
<!-- ID: SCR_DebugMenuID.DEBUGUI_WEAPONS_ALLOW_INSPECTION_LOOKAT --> | |||
Enable/disable inspection look at. | |||
'''Available Options''': false, true | |||
== ADS Camera == | |||
<!-- ID: SCR_DebugMenuID.DEBUGUI_CHARACTER_ADS_CAMERA --> | |||
Set ADS camera mode. | |||
'''Range Settings''': | |||
Min: 0 | |||
Max: 3 | |||
Current Value: 0 | |||
Step: 1 | |||
== Deal damage debug == | |||
<!-- ID: SCR_DebugMenuID.DEBUGUI_CHARACTER_DAMAGE --> | |||
Enable/disable damage debug for character. | |||
'''Available Options''': false, true | |||
== Show Perceived Faction == | |||
<!-- ID: SCR_DebugMenuID.DEBUGUI_CHARACTER_SHOW_FACTION_OUTFIT --> | |||
Enable/disable showing of perceived faction. | |||
'''Available Options''': false, true | |||
== AimModifier Debug == | |||
<!-- ID: SCR_DebugMenuID.DEBUGUI_CHARACTER_HITREACTION_AIMMODIFIER --> | |||
Enable/disable aim modifier debug. | |||
'''Available Options''': false, true | |||
= Vehicles = | |||
== Helicopter == | |||
=== Draw trajectory === | |||
<!-- ID: DM_HELICOPTER_DRAW_TRAJECTORY --> | |||
Enable/disable drawing of helicopter trajectory. | |||
'''Available Options''': false, true | |||
=== Draw velocity === | |||
<!-- ID: DM_HELICOPTER_DRAW_VELOCITY --> | |||
Set helicopter velocity visualization mode. | |||
'''Available Options''': none, resultant, res+local, res+world | |||
=== Draw HUD === | |||
<!-- ID: DM_HELICOPTER_DRAW_HUD --> | |||
Enable/disable helicopter HUD debug. | |||
'''Available Options''': false, true | |||
=== Toggle autohover === | |||
<!-- ID: DM_HELICOPTER_AUTOHOVER --> | |||
Enable/disable helicopter autohover. | |||
'''Available Options''': disabled, enabled | |||
=== Collective === | |||
<!-- ID: DM_HELICOPTER_COLLECTIVE --> | |||
Set helicopter collective debug mode. | |||
'''Available Options''': localYOffset, default, localY, worldY, direct | |||
=== Flight limits === | |||
<!-- ID: DM_HELICOPTER_FLIGHT_LIMITS --> | |||
Enable/disable helicopter flight limits debug. | |||
'''Available Options''': false, true | |||
=== Yaw/Roll === | |||
<!-- ID: DM_HELICOPTER_STICK_MODE --> | |||
Set helicopter stick mode. | |||
'''Available Options''': LS/RS, RS/LS | |||
== Tracked == | |||
=== TrackSim === | |||
<!-- ID: DM_TRACK_SIM --> | |||
Enable/disable Track simulation. | |||
'''Available Options''': true, false | |||
=== Draw tracks === | |||
<!-- ID: DM_TRACKED_DRAW_TRACKS --> | |||
Enable/disable drawing of tracks. | |||
'''Available Options''': false, true | |||
=== Track dynamic === | |||
<!-- ID: VEHICLE_DYNAMIC --> | |||
Enable/disable track dynamic. | |||
'''Available Options''': true, false | |||
=== Track gravity === | |||
<!-- ID: VEHICLE_GRAVITY --> | |||
Enable/disable track gravity. | |||
'''Available Options''': true, false | |||
=== Reset tracks === | |||
<!-- ID: VEHICLE_TRACKS_RESET --> | |||
Enable/disable resetting of tracks. | |||
'''Available Options''': disabled, enabled | |||
== Vehicle Networking and Reconciliation == | |||
=== Determinism testing === | |||
==== Record Moves ==== | |||
<!-- ID: GAME_DIAG_VEHICLES_NETWORKING_MOVE_RECORDING --> | |||
Enable/disable recording of vehicle moves. | |||
'''Available Options''': false, true | |||
==== Clear Record ==== | |||
<!-- ID: GAME_DIAG_VEHICLES_NETWORKING_CLEAR_RECORDING --> | |||
Clear recorded vehicle moves. | |||
'''Available Options''': false, true | |||
==== (F)Replay Full ==== | |||
<!-- ID: GAME_DIAG_VEHICLES_NETWORKING_REPLAY_FULL_MOVE_FROM_FULL --> | |||
Enable/disable full replay of vehicle moves from full state. | |||
'''Available Options''': false, true | |||
==== (I)Replay Full ==== | |||
<!-- ID: GAME_DIAG_VEHICLES_NETWORKING_REPLAY_FULL_MOVE_FROM_INIT --> | |||
Enable/disable full replay of vehicle moves from init state. | |||
'''Available Options''': false, true | |||
==== (F)Replay Unconstrained ==== | |||
<!-- ID: GAME_DIAG_VEHICLES_NETWORKING_REPLAY_UNCONSTRAINED_MOVE_FROM_FULL --> | |||
Enable/disable unconstrained replay of vehicle moves from full state. | |||
'''Available Options''': false, true | |||
==== (I)Replay Unconstrained ==== | |||
<!-- ID: GAME_DIAG_VEHICLES_NETWORKING_REPLAY_UNCONSTRAINED_MOVE_FROM_INIT --> | |||
Enable/disable unconstrained replay of vehicle moves from init state. | |||
'''Available Options''': false, true | |||
==== (U)Replay until Move ==== | |||
<!-- ID: GAME_DIAG_VEHICLES_NETWORKING_UNCONSTRAINED_COUNT --> | |||
Set number of unconstrained replays. | |||
'''Range Settings''': | |||
Min: 0 | |||
Max: 4096 | |||
Current Value: 0 | |||
Step: 1 | |||
==== Num of Instances ==== | |||
<!-- ID: GAME_DIAG_VEHICLES_NETWORKING_INSTANCES --> | |||
Set number of vehicle instances. | |||
'''Range Settings''': | |||
Min: 1 | |||
Max: 100 | |||
Current Value: 1 | |||
Step: 1 | |||
==== X axis spread ==== | |||
<!-- ID: GAME_DIAG_VEHICLES_NETWORKING_X_SPREAD --> | |||
Set X axis spread for vehicle instances. | |||
'''Range Settings''': | |||
Min: 0 | |||
Max: 100 | |||
Current Value: 0 | |||
Step: 1 | |||
==== Z axis spread ==== | |||
<!-- ID: GAME_DIAG_VEHICLES_NETWORKING_Z_SPREAD --> | |||
Set Z axis spread for vehicle instances. | |||
'''Range Settings''': | |||
Min: 0 | |||
Max: 100 | |||
Current Value: 0 | |||
Step: 1 | |||
==== Num of Columns(X) ==== | |||
<!-- ID: GAME_DIAG_VEHICLES_NETWORKING_X_COLUMNS --> | |||
Set number of columns for vehicle instances. | |||
'''Range Settings''': | |||
Min: 0 | |||
Max: 100 | |||
Current Value: 0 | |||
Step: 1 | |||
==== Draw recorded paths ==== | |||
<!-- ID: GAME_DIAG_VEHICLES_NETWORKING_DRAW_RECORDED_PATHS --> | |||
Set draw mode for recorded vehicle paths. | |||
'''Available Options''': Off, Client, Server, FullSim(W), FullSim(I), Uncon(W), Uncon(I), All | |||
==== SimState to CSV ==== | |||
<!-- ID: GAME_DIAG_VEHICLES_NETWORKING_RECORD_STATE_TO_CSV --> | |||
Export simulation state to CSV. | |||
'''Available Options''': false, true | |||
==== WS of (U) to CSV ==== | |||
<!-- ID: GAME_DIAG_VEHICLES_NETWORKING_RECORD_STATE_OF_UNCONSTRAINED_TO_CSV --> | |||
Export unconstrained simulation state to CSV. | |||
'''Available Options''': false, true | |||
==== InitState to CSV ==== | |||
<!-- ID: GAME_DIAG_VEHICLES_NETWORKING_RECORD_INIT_TO_CSV --> | |||
Export initialization state to CSV. | |||
'''Available Options''': false, true | |||
=== Prediction options === | |||
==== C: Disable Correction ==== | |||
<!-- ID: GAME_DIAG_VEHICLES_NETWORKING_CLIENT_DISABLE_CORRECTION --> | |||
Enable/disable client side vehicle correction. | |||
'''Available Options''': false, true | |||
==== C: Disable Prediction ==== | |||
<!-- ID: GAME_DIAG_VEHICLES_NETWORKING_CLIENT_DISABLE_PREDICTION --> | |||
Enable/disable client side vehicle prediction. | |||
'''Available Options''': false, true | |||
==== C: (T)Prediction Allowance ==== | |||
<!-- ID: GAME_DIAG_VEHICLES_NETWORKING_CLIENT_PREDICTION_DISTANCE --> | |||
Set client side vehicle prediction distance allowance. | |||
'''Range Settings''': | |||
Min: 0 | |||
Max: 1000 | |||
Current Value: 25 | |||
Step: 1 | |||
==== C: (T)Prediction offset ==== | |||
<!-- ID: GAME_DIAG_VEHICLES_NETWORKING_CLIENT_PREDICTION_UP --> | |||
Set client side vehicle prediction offset. | |||
'''Range Settings''': | |||
Min: 0 | |||
Max: 1000 | |||
Current Value: 150 | |||
Step: 1 | |||
=== C: Lerping options === | |||
==== C: Debug Lerping ==== | |||
<!-- ID: GAME_DIAG_VEHICLES_NETWORKING_LERPING_DEBUG --> | |||
Enable/disable client side vehicle lerping debug. | |||
'''Available Options''': false, true | |||
==== C: Lerping Allowance ==== | |||
<!-- ID: GAME_DIAG_VEHICLES_NETWORKING_CLIENT_LERPING_ALLOWANCE --> | |||
Set client side vehicle lerping allowance. | |||
'''Range Settings''': | |||
Min: 0 | |||
Max: 1000 | |||
Current Value: 1000 | |||
Step: 1 | |||
==== C: Lerping Distance Percentage ==== | |||
<!-- ID: GAME_DIAG_VEHICLES_NETWORKING_CLIENT_DISTANCE_LERPING_PERCENTAGE --> | |||
Set client side vehicle distance lerping percentage. | |||
'''Range Settings''': | |||
Min: 0 | |||
Max: 100 | |||
Current Value: 35 | |||
Step: 1 | |||
==== C: Lerping Angle Percentage ==== | |||
<!-- ID: GAME_DIAG_VEHICLES_NETWORKING_CLIENT_ANGLE_LERPING_PERCENTAGE --> | |||
Set client side vehicle angle lerping percentage. | |||
'''Range Settings''': | |||
Min: 0 | |||
Max: 100 | |||
Current Value: 50 | |||
Step: 1 | |||
=== C: Allowance options === | |||
==== S: Enable allowance ==== | |||
<!-- ID: GAME_DIAG_VEHICLES_NETWORKING_ENABLE_ALLOWANCE --> | |||
Enable/disable server side vehicle allowance. | |||
'''Available Options''': false, true | |||
==== S: Speed Scaled Allowance ==== | |||
<!-- ID: GAME_DIAG_VEHICLES_NETWORKING_SPEED_SCALING --> | |||
Enable/disable speed scaling for server side vehicle allowance. | |||
'''Available Options''': true, false | |||
==== S: Distance Allowance ==== | |||
<!-- ID: GAME_DIAG_VEHICLES_NETWORKING_SERVER_DISTANCE --> | |||
Set server side vehicle distance allowance. | |||
'''Range Settings''': | |||
Min: 0 | |||
Max: 1000 | |||
Current Value: 300 | |||
Step: 1 | |||
==== S: Angle Allowance ==== | |||
<!-- ID: GAME_DIAG_VEHICLES_NETWORKING_SERVER_ANGLE --> | |||
Set server side vehicle angle allowance. | |||
'''Range Settings''': | |||
Min: 0 | |||
Max: 1000 | |||
Current Value: 3 | |||
Step: 1 | |||
==== S: Angular Velocity Allowance ==== | |||
<!-- ID: GAME_DIAG_VEHICLES_NETWORKING_SERVER_ANGULAR --> | |||
Set server side vehicle angular velocity allowance. | |||
'''Range Settings''': | |||
Min: 0 | |||
Max: 1000 | |||
Current Value: 25 | |||
Step: 1 | |||
==== S: Linear Velocity Allowance ==== | |||
<!-- ID: GAME_DIAG_VEHICLES_NETWORKING_SERVER_LINEAR --> | |||
Set server side vehicle linear velocity allowance. | |||
'''Range Settings''': | |||
Min: 0 | |||
Max: 1000 | |||
Current Value: 30 | |||
Step: 1 | |||
=== Server Car Overrides === | |||
==== S: Override KMH ==== | |||
<!-- ID: GAME_DIAG_VEHICLES_NETWORKING_OVERRIDE_KMH --> | |||
Enable/disable server side KMH override. | |||
'''Available Options''': false, true | |||
==== S: -||- close to 0 ==== | |||
<!-- ID: GAME_DIAG_VEHICLES_NETWORKING_OVERRIDE_KMH_AT_ZERO --> | |||
Enable/disable server side KMH override close to zero. | |||
'''Available Options''': false, true | |||
==== S: Override STEERING ==== | |||
<!-- ID: GAME_DIAG_VEHICLES_NETWORKING_OVERRIDE_STEERING --> | |||
Enable/disable server side steering override. | |||
'''Available Options''': false, true | |||
==== S: Override THROTTLE ==== | |||
<!-- ID: GAME_DIAG_VEHICLES_NETWORKING_OVERRIDE_THROTTLE --> | |||
Enable/disable server side throttle override. | |||
'''Available Options''': false, true | |||
==== S: Override BRAKE ==== | |||
<!-- ID: GAME_DIAG_VEHICLES_NETWORKING_OVERRIDE_BRAKE --> | |||
Enable/disable server side brake override. | |||
'''Available Options''': false, true | |||
==== S: Override GEAR ==== | |||
<!-- ID: GAME_DIAG_VEHICLES_NETWORKING_OVERRIDE_GEAR --> | |||
Enable/disable server side gear override. | |||
'''Available Options''': false, true | |||
==== S: Override CLUTCH ==== | |||
<!-- ID: GAME_DIAG_VEHICLES_NETWORKING_OVERRIDE_CLUTCH --> | |||
Enable/disable server side clutch override. | |||
'''Available Options''': false, true | |||
=== Vehicle type === | |||
<!-- ID: GAME_DIAG_VEHICLES_NETWORKING_TYPE_SELECTION --> | |||
Set vehicle type. | |||
'''Available Options''': Wheeled, Helicopter | |||
=== Heli prefab selection === | |||
<!-- ID: GAME_DIAG_VEHICLES_NETWORKING_HELI_PREFAB_SELECTION --> | |||
Select helicopter prefab. | |||
'''Available Options''': Mi8, UH1 | |||
=== Show vehicle id === | |||
<!-- ID: GAME_DIAG_VEHICLES_NETWORKING_ID_DISPLAY --> | |||
Enable/disable showing of vehicle ID. | |||
'''Available Options''': false, true | |||
=== Vehicle selection === | |||
<!-- ID: GAME_DIAG_VEHICLES_NETWORKING_SELECTION --> | |||
Set vehicle selection. | |||
'''Range Settings''': | |||
Min: 0 | |||
Max: 512 | |||
Current Value: 0 | |||
Step: 1 | |||
=== S: Input/Output Diags === | |||
<!-- ID: GAME_DIAG_VEHICLES_NETWORKING_DIAGS --> | |||
Set input/output diagnostic mode. | |||
'''Available Options''': Off, Sim Out, Sim In, Controller, All | |||
=== Debug path correction === | |||
<!-- ID: GAME_DIAG_VEHICLES_NETWORKING_PATHS_DEBUG --> | |||
Enable/disable path correction debug. | |||
'''Available Options''': false, true | |||
=== Debug history === | |||
<!-- ID: GAME_DIAG_VEHICLES_NETWORKING_HISTORY_DEBUG --> | |||
Enable/disable network history debug. | |||
'''Available Options''': false, true | |||
=== Debug engine flags === | |||
<!-- ID: GAME_DIAG_VEHICLES_NETWORKING_ENGINE_INPUTS_DEBUG --> | |||
Enable/disable engine inputs debug. | |||
'''Available Options''': false, true | |||
=== Draw Phys Comp Debug === | |||
<!-- ID: GAME_DIAG_VEHICLES_NETWORKING_PHYS_COMP_DEBUG --> | |||
Enable/disable drawing of physics component debug. | |||
'''Available Options''': false, true | |||
=== C: Resend rate === | |||
<!-- ID: GAME_DIAG_VEHICLES_NETWORKING_CLIENT_RESEND --> | |||
Set client side vehicle resend rate. | |||
'''Range Settings''': | |||
Min: 1 | |||
Max: 5 | |||
Current Value: 2 | |||
Step: 1 | |||
=== S: Replay delay === | |||
<!-- ID: GAME_DIAG_VEHICLES_NETWORKING_HISTORY_SIZE --> | |||
Set server side vehicle replay delay. | |||
'''Range Settings''': | |||
Min: 0 | |||
Max: 300 | |||
Current Value: 2 | |||
Step: 1 | |||
=== S: Max Rtt allowed === | |||
<!-- ID: GAME_DIAG_VEHICLES_NETWORKING_SERVER_RTT --> | |||
Set server side vehicle max RTT allowed. | |||
'''Range Settings''': | |||
Min: 0 | |||
Max: 300 | |||
Current Value: 60 | |||
Step: 1 | |||
== Compartments == | |||
=== Compartment positions === | |||
<!-- ID: GAME_DIAG_COMPARTMENT_POSITION --> | |||
Enable/disable showing of compartment positions. | |||
'''Available Options''': false, true | |||
=== Show entry points === | |||
<!-- ID: GAME_DIAG_COMPARTMENT_ENTRY_POINT --> | |||
Enable/disable showing of compartment entry points. | |||
'''Available Options''': false, true | |||
=== Show accessibility === | |||
<!-- ID: GAME_DIAG_COMPARTMENT_ACCESSIBILITY --> | |||
Enable/disable showing of compartment accessibility. | |||
'''Available Options''': false, true | |||
=== Show get out prediction === | |||
<!-- ID: GAME_DIAG_COMPARTMENT_GETOUT_PREDICTION --> | |||
Enable/disable showing of get out prediction. | |||
'''Available Options''': false, true | |||
=== Show character obstruction trace during get out === | |||
<!-- ID: GAME_DIAG_COMPARTMENT_GETOUT_CHARACTER_OBSTRUCTION_TRACE --> | |||
Enable/disable showing of character obstruction trace during get out. | |||
'''Available Options''': false, true | |||
== MT simulation == | |||
<!-- ID: GAME_DIAG_VEHICLES_MT_SIMULATION --> | |||
Enable/disable multithreaded vehicle simulation. | |||
'''Available Options''': true, false | |||
== Show Controller Diags == | |||
<!-- ID: GAME_DIAG_VEHICLES_CONTROLLER_DIAGS --> | |||
Enable/disable showing of vehicle controller diagnostics. | |||
'''Available Options''': false, true | |||
== Show Compartment Events Diags == | |||
<!-- ID: GAME_DIAG_VEHICLES_COMPARTMENT_DIAGS --> | |||
Enable/disable showing of vehicle compartment events diagnostics. | |||
'''Available Options''': false, true | |||
== Show stats == | |||
<!-- ID: DM_VEHICLES_STATS --> | |||
Enable/disable showing of vehicle statistics. | |||
'''Available Options''': false, true | |||
== Show vehicle debug == | |||
<!-- ID: DM_VEHICLES_DRAW_DEBUG --> | |||
Enable/disable showing of vehicle debug. | |||
'''Available Options''': false, true | |||
== Player vehicle only == | |||
<!-- ID: DM_VEHICLES_DRAW_PLAYER_VEHICLE_ONLY --> | |||
Enable/disable showing of player vehicle only. | |||
'''Available Options''': true, false | |||
== Show CoM == | |||
<!-- ID: DM_VEHICLES_DRAW_COM --> | |||
Enable/disable showing of vehicle center of mass. | |||
'''Available Options''': false, true | |||
== Show inertia == | |||
<!-- ID: DM_VEHICLES_DRAW_INERTIA --> | |||
Enable/disable showing of vehicle inertia. | |||
'''Available Options''': false, true | |||
== Show forces == | |||
<!-- ID: DM_VEHICLES_DRAW_FORCES --> | |||
Enable/disable showing of vehicle forces. | |||
'''Available Options''': false, true | |||
== Show engine == | |||
<!-- ID: DM_VEHICLES_DRAW_ENGINE --> | |||
Enable/disable showing of vehicle engine. | |||
'''Available Options''': false, true | |||
== Show contacts == | |||
<!-- ID: DM_VEHICLES_DRAW_CONTACTS --> | |||
Enable/disable showing of vehicle contacts. | |||
'''Available Options''': false, true | |||
== Show raycast == | |||
<!-- ID: DM_VEHICLES_DRAW_RAYCAST --> | |||
Enable/disable showing of vehicle raycast. | |||
'''Available Options''': false, true | |||
== Show suspension == | |||
<!-- ID: DM_VEHICLES_DRAW_SUSPENSION --> | |||
Enable/disable showing of vehicle suspension. | |||
'''Available Options''': false, true | |||
== Show swaybar == | |||
<!-- ID: DM_VEHICLES_DRAW_SWAYBAR --> | |||
Enable/disable showing of vehicle swaybar. | |||
'''Available Options''': false, true | |||
== Show wheels == | |||
<!-- ID: DM_VEHICLES_DRAW_WHEELS --> | |||
Enable/disable showing of vehicle wheels. | |||
'''Available Options''': false, true | |||
== Show bones == | |||
<!-- ID: DM_VEHICLES_DRAW_BONES --> | |||
Enable/disable showing of vehicle bones. | |||
'''Available Options''': false, true | |||
== Show slope == | |||
<!-- ID: DM_VEHICLES_DRAW_SLOPE --> | |||
Enable/disable showing of vehicle slope. | |||
'''Available Options''': false, true | |||
== Test raycast == | |||
<!-- ID: DM_VEHICLES_DRAW_TEST_RAYCAST --> | |||
Enable/disable testing of raycast. | |||
'''Available Options''': false, true | |||
== Reset vehicle == | |||
<!-- ID: DM_VEHICLES_RESET --> | |||
Reset vehicle. | |||
'''Hotkey''': {{Controls|lctrl|lalt|r}} | |||
'''Available Options''': disabled, enabled | |||
== Teleport up == | |||
<!-- ID: DM_VEHICLES_TELEPORT_UP --> | |||
Teleport vehicle up. | |||
'''Hotkey''': {{Controls|lctrl|lalt|t}} | |||
'''Available Options''': disabled, enabled | |||
== Wheel drag set == | |||
<!-- ID: DM_VEHICLES_WHEEL_DRAG_OVERRIDE --> | |||
Enable/disable overriding of wheel drag. | |||
'''Available Options''': false, true | |||
== Wheel drag value == | |||
<!-- ID: DM_VEHICLES_WHEEL_DRAG_VALUE --> | |||
Set wheel drag value. | |||
'''Range Settings''': | |||
Min: 0 | |||
Max: 1 | |||
Current Value: 0 | |||
Step: 0.05 | |||
== Disable freelook == | |||
<!-- ID: DM_VEHICLES_DISABLE_FREELOOK --> | |||
Enable/disable freelook for vehicles. | |||
'''Available Options''': false, true | |||
== Enable debugger trace == | |||
<!-- ID: DM_VEHICLES_DEBUGGER_TRACE --> | |||
Enable/disable debugger trace for vehicles. | |||
'''Available Options''': false, true | |||
== wheel drag set == | |||
<!-- ID: DM_VEHICLES_WHEEL_DRAG_OVERRIDE --> | |||
Enable/disable overriding of wheel drag (duplicate). | |||
'''Available Options''': false, true | |||
== Fuel consumption == | |||
<!-- ID: SCR_DebugMenuID.DEBUGUI_VEHICLES_FUEL_CONSUMPTION --> | |||
Enable/disable fuel consumption debug. | |||
'''Available Options''': false, true | |||
== Visualize push force == | |||
<!-- ID: SCR_DebugMenuID.DEBUGUI_VEHICLES_UNFLIP --> | |||
Enable/disable visualization of push force. | |||
'''Available Options''': false, true | |||
== Show dust materials == | |||
<!-- ID: SCR_DebugMenuID.DEBUGUI_PARTICLES_VEHICLE_DUST --> | |||
Enable/disable showing of vehicle dust materials. | |||
'''Available Options''': false, true | |||
= Statistics = | |||
== FPS == | |||
<!-- ID: DM_STATS_FPS --> | |||
Display FPS statistics. | |||
'''Hotkey''': {{Controls|lctrl|num1}} | |||
'''Available Options''': none, basic, detailed, average | |||
== General == | |||
<!-- ID: DM_STATS_STATS --> | |||
Display general statistics. | |||
'''Hotkey''': {{Controls|lctrl|num2}} | |||
'''Available Options''': disable, basic, detailed, all | |||
== Shape stats == | |||
<!-- ID: DM_SHAPE_STATS --> | |||
Enable/disable shape statistics. | |||
'''Available Options''': disabled, enabled | |||
== MeshObject stats == | |||
<!-- ID: DM_REND_STAT --> | |||
Display mesh object statistics. | |||
'''Available Options''': none, count, mesh, faces, verts | |||
== Decal stats == | |||
<!-- ID: DM_REND_DECAL_STAT --> | |||
Display decal statistics. | |||
'''Available Options''': none, all | |||
== Resource memory stats == | |||
<!-- ID: DM_RES_MEMORY --> | |||
Display resource memory statistics. | |||
'''Available Options''': none, memory, age | |||
== Texture memory stats == | |||
<!-- ID: DM_TEX_MEMORY --> | |||
Display texture memory statistics. | |||
'''Available Options''': none, memory, age | |||
== Slow script == | |||
<!-- ID: DM_STATS_SLOWSCRIPT --> | |||
Set threshold for slow scripts log. | |||
'''Available Options''': off, 1ms, 2ms, 5ms, 10ms | |||
== Verbose script Print == | |||
<!-- ID: DM_STATS_VERBOSESCRIPTPRINTS --> | |||
Enable/disable verbose script prints. | |||
'''Available Options''': false, true | |||
== Script profiler == | |||
<!-- ID: DM_STATS_SCRIPTPROFILER --> | |||
Enable/disable script profiler. | |||
'''Available Options''': off, frame, average | |||
== Script prof. external == | |||
<!-- ID: DM_STATS_SCRIPTPROFILER_EXT --> | |||
Enable/disable external script profiler. | |||
'''Available Options''': false, true | |||
== Test mem-stress == | |||
<!-- ID: DM_STATS_STRESSMEM --> | |||
Enable/disable memory stress testing. | |||
'''Available Options''': off, once, periodic | |||
== Flush memory == | |||
<!-- ID: DM_STATS_FLUSHMEM --> | |||
Enable/disable memory flushing. | |||
'''Available Options''': disabled, enabled | |||
== Flush audio == | |||
<!-- ID: DM_STATS_FLUSHAUDIO --> | |||
Enable/disable audio flushing. | |||
'''Available Options''': disabled, enabled | |||
== Memory validation == | |||
<!-- ID: DM_MEMORY_VALIDATION --> | |||
Enable/disable memory validation. | |||
'''Available Options''': none, on, off | |||
== Dump render resources == | |||
<!-- ID: DM_DUMP_RENDERRESOURCES --> | |||
Enable/disable dumping of render resources. | |||
'''Available Options''': disabled, enabled | |||
== Counters == | |||
<!-- ID: DM_STATS_COUNTER --> | |||
Enable/disable performance counters. | |||
'''Hotkey''': {{Controls|lctrl|num3}} | |||
'''Available Options''': disabled, enabled | |||
== Slow down == | |||
<!-- ID: DM_STATS_SLOWDOWN --> | |||
Slow down the game. | |||
'''Available Options''': off, 1ms, 5ms, 10ms, 20ms, 50ms, 100ms | |||
== Limit FPS == | |||
<!-- ID: DM_STATS_LIMITFPS --> | |||
Limit the game's FPS. | |||
'''Available Options''': off, 120, 60, 40, 30, 20, 10, 5, 2 | |||
== Widget statistics == | |||
<!-- ID: DM_STATS_WIDGET_STATS --> | |||
Enable/disable widget statistics. | |||
'''Available Options''': false, true | |||
== Widget hierarchy to log == | |||
<!-- ID: DM_STATS_WIDGET_HIERARCHY_TO_LOG --> | |||
Log widget hierarchy. | |||
'''Available Options''': off, once | |||
== Widget update to log == | |||
<!-- ID: DM_STATS_WIDGET_UPDATE_TO_LOG --> | |||
Log widget updates. | |||
'''Available Options''': none, hierarchy, time | |||
== Loaded particle FX == | |||
<!-- ID: DM_STATS_PARTICLES --> | |||
Enable/disable loaded particle FX statistics. | |||
'''Available Options''': false, true | |||
== Resource category stats == | |||
<!-- ID: DM_RES_CAT --> | |||
Enable/disable resource category statistics. | |||
'''Available Options''': disabled, enabled | |||
== Dump resources == | |||
<!-- ID: DM_DUMP_RESOURCES --> | |||
Toggle. Dumps all resources. | |||
'''Available Options''': disabled, enabled | |||
== Log prefab spawn == | |||
<!-- ID: DM_LOG_PREFAB_SPAWN --> | |||
Log prefab spawning. | |||
'''Available Options''': off, non-instant, all | |||
== Data Collection == | |||
=== Enable debug menu === | |||
<!-- ID: SCR_DebugMenuID.DEBUGUI_DATA_COLLECTION_ENABLE_DIAG --> | |||
Enable/disable data collection debug menu. | |||
'''Available Options''': false, true | |||
= Render = | |||
== RT == | |||
=== Main RT format === | |||
<!-- ID: DM_REND_MAIN_RT_FORMAT --> | |||
Override main render target format. | |||
'''Available Options''': no override, R8G8B8A8_SRGB, R8G8B8A8, R10G10B10A2, R11G11B10F, R16G16B16A16F | |||
=== Main RT MSAA === | |||
<!-- ID: DM_REND_MAIN_RT_MSAA --> | |||
Override main render target MSAA settings. | |||
'''Available Options''': no override, none, 2x, 4x, 8x | |||
=== Force custom resolve === | |||
<!-- ID: DM_REND_FORCE_CUSTOM_RESOLVE --> | |||
Force custom resolve for render target. | |||
'''Available Options''': false, true | |||
=== Use resolved RT for PPs === | |||
<!-- ID: DM_REND_USE_RESOLVED_PP --> | |||
Control post-processing RT usage. | |||
'''Available Options''': default, disabled, enabled | |||
== Various == | |||
=== Reload shaders === | |||
<!-- ID: DM_REND_RELOADSHADERS --> | |||
Enable/disable shader reloading. | |||
'''Hotkey''': {{Controls|lctrl|f12}} | |||
'''Available Options''': disabled, enabled | |||
=== Offline shaders === | |||
<!-- ID: DM_REND_OFFLINESHADERS --> | |||
Enable/disable offline shaders. | |||
'''Available Options''': disabled, enabled | |||
=== Scene prep. mode === | |||
<!-- ID: DM_REND_MT_SCENE_PREP --> | |||
Set scene preparation mode. | |||
'''Available Options''': Multithreaded, Singlethreaded | |||
=== Cmd list mode === | |||
<!-- ID: DM_REND_CMD_LIST_MODE --> | |||
Set command list mode. | |||
'''Available Options''': Multithreaded, Singlethreaded | |||
=== Log GPU perf diags === | |||
<!-- ID: DM_REND_TXT_DIAG_LOG --> | |||
Log GPU performance diagnostics. | |||
'''Available Options''': off, once, permanent | |||
=== Log CMD lists === | |||
<!-- ID: DM_REND_LOG_CMD_LISTS --> | |||
Log command lists. | |||
'''Available Options''': off, once, permament | |||
=== Over-sync barriers (PS5) === | |||
<!-- ID: DM_REND_BARRIERS --> | |||
Set over-sync barriers. | |||
'''Available Options''': none, all, RenderTarget, DepthSurface, StencilSurface, RoTexture, RoBuffer, RwTexture, RwBuffer | |||
=== Clear RT with === | |||
<!-- ID: DM_REND_CLEARRT --> | |||
Clear render target with color. | |||
'''Available Options''': none, black, white, red, green, blue | |||
=== Clear temporal RTs to === | |||
<!-- ID: DM_REND_CLEAR_TEMPORAL_RT --> | |||
Clear temporal render targets. | |||
'''Available Options''': none, black, NaN | |||
=== GBuffer === | |||
<!-- ID: DM_REND_GBUFFER --> | |||
Set G-Buffer mode. | |||
'''Available Options''': default, AmbientDepthNear, AmbientNear, AmbientDepthFull, AmbientFull | |||
=== GBuffer decals === | |||
<!-- ID: DM_REND_GBUFFER_DECALS --> | |||
Enable/disable G-Buffer decals. | |||
'''Available Options''': false, true | |||
=== Decals === | |||
<!-- ID: DM_REND_DECALS --> | |||
Enable/disable decals. | |||
'''Available Options''': true, false | |||
=== Disable HTILE (PS4&PS5) === | |||
<!-- ID: DM_REND_HTILE_DISABLED --> | |||
Enable/disable HTILE. | |||
'''Available Options''': false, true | |||
=== Check GPU commands (PS5) === | |||
<!-- ID: DM_REND_CHECK_GPU_COMMANDS --> | |||
Enable/disable checking of GPU commands. | |||
'''Available Options''': false, true | |||
=== VSync imm.treshold === | |||
<!-- ID: DM_REND_VSYNC_TRESHOLD --> | |||
Set VSync immediate threshold. | |||
'''Available Options''': 0, 10, 20, 30, 40, 50 | |||
=== VSync limit === | |||
<!-- ID: DM_REND_VSYNC_LIMIT --> | |||
Set VSync limit. | |||
'''Available Options''': default, 20, 30, 40, 60 | |||
=== DX12: log trans. barriers === | |||
<!-- ID: DM_REND_LOG_TRANS_BARRIERS --> | |||
Enable/disable logging of DX12 transition barriers. | |||
'''Available Options''': false, true | |||
=== DX12: log state commit === | |||
<!-- ID: DM_REND_LOG_STATE_COMMIT --> | |||
Enable/disable logging of DX12 state commits. | |||
'''Available Options''': false, true | |||
=== CopyHWDepth use depth === | |||
<!-- ID: DM_REND_COPYHWDEPTH_DEPTH --> | |||
Control if CopyHWDepth should use depth. | |||
'''Available Options''': true, false | |||
=== CopyHWDepth filter === | |||
<!-- ID: DM_REND_COPYHWDEPTH_FILTER --> | |||
Set filter mode for CopyHWDepth. | |||
'''Available Options''': default, firstSample, min, max | |||
=== CB draw calls min limit === | |||
<!-- ID: DM_REND_PIPELINE_LIMIT_MIN_DCALLS --> | |||
Enable/disable command buffer draw calls minimum limit. | |||
'''Available Options''': true, false | |||
=== Validate Input (DP) === | |||
<!-- ID: DM_REND_VALIDATE_DP --> | |||
Enable/disable validation of input. | |||
'''Available Options''': false, true | |||
== System textures == | |||
=== IBL === | |||
==== log messages ==== | |||
<!-- ID: DM_REND_IBL_LOG --> | |||
Enable/disable IBL logging. | |||
'''Available Options''': false, true | |||
==== Env map num ==== | |||
<!-- ID: DM_REND_IBL_NUM --> | |||
Select which environment map to display. | |||
'''Available Options''': none, GlobalSky, GlobalPlaced, 1, 2, 3, 4, 5, 6, 7, 8, 9, 10, 11, 12, 13, 14, 15, 16 | |||
==== Refresh ==== | |||
<!-- ID: DM_REND_IBL_REFRESH --> | |||
Set refresh mode for IBL. | |||
'''Available Options''': no, yes, always, disable | |||
==== Apply HDRmul ==== | |||
<!-- ID: DM_REND_IBL_APPLY_HDR --> | |||
Apply or disable HDR multiplier for IBL. | |||
'''Available Options''': true, false | |||
==== DFG specular ==== | |||
<!-- ID: DM_REND_IBL_DFG_SPEC --> | |||
Enable/disable DFG specular for IBL. | |||
'''Available Options''': false, true | |||
==== DFG diffuse ==== | |||
<!-- ID: DM_REND_IBL_DFG_DIFF --> | |||
Enable/disable DFG diffuse for IBL. | |||
'''Available Options''': false, true | |||
==== Environment ==== | |||
<!-- ID: DM_REND_IBL_ENV --> | |||
Enable/disable environment for IBL. | |||
'''Available Options''': false, true | |||
==== LD specular ==== | |||
<!-- ID: DM_REND_IBL_LD --> | |||
Enable/disable LD specular for IBL. | |||
'''Available Options''': true, false | |||
==== LD diffuse ==== | |||
<!-- ID: DM_REND_IBL_LDDIFF --> | |||
Enable/disable LD diffuse for IBL. | |||
'''Available Options''': false, true | |||
=== Maximize size === | |||
<!-- ID: DM_REND_DT_FULL --> | |||
Enable/disable Dynamic Texture size maximization. | |||
'''Available Options''': false, true | |||
=== Show shadowmap === | |||
<!-- ID: DM_REND_SHOWSHADOWMAP --> | |||
Display shadowmap. | |||
'''Available Options''': disable, full smask, R-smask NdotL, G-smask, B-AO, A-wetAdd | |||
=== Show combined rainmask === | |||
<!-- ID: DM_REND_SHOW_COMBINED_RAINMASK --> | |||
Display combined rainmask. | |||
'''Available Options''': disable, full smask, R-wetness, G-c.wetness, B-rain, A-underwate | |||
=== Show light shadowmap === | |||
<!-- ID: DM_REND_SHOWLIGHTSHADOWMAP --> | |||
Set light shadowmap to show. | |||
'''Range Settings''': | |||
* Min: 0 | |||
* Max: 36 | |||
* Current Value: 0 | |||
* Step: 1 | |||
=== Show cascades === | |||
<!-- ID: DM_REND_SHOWSHADOWMAP_CASCADE --> | |||
Show shadow cascades. | |||
'''Available Options''': disable, cascade 1, cascade 2, cascade 3, cascade 4 | |||
=== Show rain mask === | |||
<!-- ID: DM_REND_SHOWSHADOWMAP_RAIN --> | |||
Show rain mask. | |||
'''Available Options''': disable, cascade 1, cascade 2, cascade 3, cascade 4 | |||
=== Show wetness mask === | |||
<!-- ID: DM_REND_SHOWSHADOWMAP_WETNESS --> | |||
Show wetness mask. | |||
'''Available Options''': disable, cascade 1, cascade 2, cascade 3, cascade 4 | |||
=== Show custom wetness mask === | |||
<!-- ID: DM_REND_SHOWSHADOWMAP_CUSTOM_WETNESS --> | |||
Show custom wetness mask. | |||
'''Available Options''': disable, cascade 1, cascade 2, cascade 3, cascade 4 | |||
=== Show wetness add mask === | |||
<!-- ID: DM_REND_SHOWSHADOWMAP_WETNESS_ADD --> | |||
Show wetness add mask. | |||
'''Available Options''': disable, cascade 1, cascade 2, cascade 3, cascade 4 | |||
=== Show depthmap === | |||
<!-- ID: DM_REND_SHOWDEPTHMAP --> | |||
Enable/disable depthmap visualization. | |||
'''Available Options''': disabled, enabled | |||
=== Show HW depthmap === | |||
<!-- ID: DM_REND_SHOWHWDEPTHMAP --> | |||
Enable/disable HW depthmap visualization. | |||
'''Available Options''': disabled, enabled | |||
=== Terrain shadow map === | |||
<!-- ID: DM_REND_SHOWTERRSHADOWMAP --> | |||
Show terrain shadow maps. | |||
'''Available Options''': none, terrain shadow, shadow raw, shadow volume high, shadow volume low | |||
=== Disable SPD === | |||
<!-- ID: DM_REND_DISABLESPD --> | |||
Disable Screen-Space Particle Depth. | |||
'''Available Options''': false, true | |||
=== Show GBuffer === | |||
<!-- ID: DM_REND_SHOWGBUFFER --> | |||
Show G-Buffer channels (normals, roughness, metalness, albedo, AO). | |||
'''Available Options''': none, normals, roughness, metalness, albedo, AO | |||
=== Show GBuffer === | |||
<!-- ID: DM_REND_SHOWGBUFFER --> | |||
Show G-Buffer channels (normals, roughness, metalness). | |||
'''Available Options''': none, normals, roughness, metalness | |||
=== Show volumetric light rays === | |||
<!-- ID: DM_REND_SHOWVOLUMETRICRAYS --> | |||
Enable/disable volumetric light ray visualization. | |||
'''Available Options''': disabled, enabled | |||
=== Show reflections === | |||
<!-- ID: DM_REND_SHOWREFL --> | |||
Enable/disable reflection visualization. | |||
'''Available Options''': disabled, enabled | |||
=== Show user textures === | |||
<!-- ID: DM_REND_SHOWUTIL --> | |||
Enable/disable user texture visualization. | |||
'''Available Options''': disabled | |||
=== Show virtual lights RT === | |||
<!-- ID: DM_REND_SHOW_VIRTUAL_LIGHTS_RT --> | |||
Enable/disable virtual lights RT visualization. | |||
'''Available Options''': disabled, enabled | |||
== Textures == | |||
=== Mipmap bias === | |||
<!-- ID: DM_REND_MIPMAPBIAS --> | |||
Set mipmap bias. | |||
'''Available Options''': 0, 1, 2, 3, 4, 5, 6, 7, 8, 9, 10, 11, 12, -1, -0.75, 0.5, -0.25 | |||
=== Max mipmap === | |||
<!-- ID: DM_REND_MAXMIPMAP --> | |||
Set maximum mipmap level. | |||
'''Available Options''': 0, 1, 2, 3, 4, 5, 6, 7, 8, 9, 10, 11, 12 | |||
=== Defrag === | |||
<!-- ID: DM_REND_FLUSH_DEFRAG --> | |||
Enable/disable defragmentation of texture resources. | |||
'''Available Options''': true, false | |||
=== Mode === | |||
<!-- ID: DM_REND_FLUSH_DEFRAG_MODE --> | |||
Set mode of defrag. | |||
'''Available Options''': auto, once, continuous | |||
=== Defrag heap === | |||
<!-- ID: DM_REND_FLUSH_DEFRAG_TYPE --> | |||
Set heap for defrag. | |||
'''Available Options''': MA heaps, manTextures, manBuffers | |||
==== | === Defrag alg === | ||
<!-- ID: DM_REND_FLUSH_DEFRAG_ALG --> | |||
Set algorithm of defrag. | |||
'''Available Options''': fast, balanced, full | |||
== | == Scene lighting == | ||
=== | === Force PBR light === | ||
<!-- ID: DM_REND_PBR_DEF_LIGHT --> | |||
Force or disable PBR light. | |||
'''Available Options''': false, true | |||
=== | === Ambient lighting === | ||
<!-- ID: DM_REND_AMB --> | |||
Enable/disable ambient lighting. | |||
'''Available Options''': true, false | |||
=== | === Directional lighting === | ||
<!-- ID: DM_REND_DIR --> | |||
Enable/disable directional lighting. | |||
'''Available Options''': true, false | |||
=== | === Diffuse lighting === | ||
<!-- ID: DM_REND_DIFF --> | |||
Enable/disable diffuse lighting. | |||
'''Available Options''': true, false | |||
=== | === Specular lighting === | ||
<!-- ID: DM_REND_SPEC --> | |||
Enable/disable specular lighting. | |||
'''Available Options''': true, false | |||
=== | === Emission lighting === | ||
===== | <!-- ID: DM_REND_EMISSION --> | ||
Enable/disable emission lighting. | |||
'''Available Options''': true, false | |||
=== Desaturate Atmosphere (cubemap) === | |||
<!-- ID: DM_REND_DESATURATE_SKY --> | |||
Set desaturation of atmosphere (cubemap). | |||
'''Range Settings''': | |||
* Min: 0 | |||
* Max: 1 | |||
* Current Value: 0 | |||
* Step: 0.01 | |||
=== Remove interiors fog === | |||
<!-- ID: DM_REND_REMOVE_FOG_INTERIORS --> | |||
Remove fog in interiors. | |||
'''Available Options''': true, false | |||
=== Capture with glob.probe === | |||
<!-- ID: DM_REND_PROBE_GLOBALCAPTURE --> | |||
Enable/disable capturing with global probe. | |||
'''Available Options''': false, true | |||
=== Negative probe ambient === | |||
<!-- ID: DM_REND_PROBE_NEGAMBIENT --> | |||
Enable/disable negative probe ambient. | |||
'''Available Options''': false, true | |||
=== | === IBL reflection/roughness === | ||
<!-- ID: DM_REND_IBL_REFL_POWER --> | |||
Set IBL reflection/roughness power. | |||
'''Range Settings''': | |||
* Min: 0 | |||
* Max: 1 | |||
* Current Value: 0 | |||
* Step: 0.01 | |||
=== IBL multiscattering === | |||
<!-- ID: DM_REND_IBL_MULTI --> | |||
Enable/disable IBL multiscattering. | |||
'''Available Options''': true, false | |||
== | === Probe lighting mode === | ||
<!-- ID: DM_REND_PROBE_MODE --> | |||
Enable/disable probe lighting mode. | |||
'''Available Options''': false, true | |||
== | === Object probe LV === | ||
<!-- ID: DM_REND_PROBE_OBJECT_LV --> | |||
Set object probe luminance value. | |||
'''Range Settings''': | |||
Min: -4 | |||
Max: 4 | |||
Current Value: 0 | |||
Step: 0.01 | |||
== | === Show scene LV === | ||
<!-- ID: DM_REND_SHOW_SCENE_LV --> | |||
Show scene luminance. | |||
'''Available Options''': none, pure, NaN, luminance, max.lum, perc.lum, luminanceHM, maxHM, log2HM | |||
=== LV auto === | |||
<!-- ID: DM_REND_SHOW_SCENE_LV_AUTO --> | |||
Enable/disable automatic adjustment of scene LV. | |||
'''Available Options''': true, false | |||
=== manual LV middle === | |||
<!-- ID: DM_REND_SHOW_SCENE_LV_MIDDLE --> | |||
Set manual luminance value. | |||
Options: -10 20 5 0.01 | |||
=== LV +-Range === | |||
<!-- ID: DM_REND_SHOW_SCENE_LV_RANGE --> | |||
Set luminance range. | |||
'''Range Settings''': | |||
* Min: 1 | |||
* Max: 20 | |||
* Current Value: 5 | |||
* Step: 0.01 | |||
=== LV watcher === | |||
<!-- ID: DM_REND_SHOW_SCENE_LV_WATCH --> | |||
Set luminance watcher. | |||
'''Range Settings''': | |||
* Min: 0 | |||
* Max: 1 | |||
* Current Value: 0.5 | |||
* Step: 0.001 | |||
=== LV watcher size === | |||
<!-- ID: DM_REND_SHOW_SCENE_LV_WATCHSIZE --> | |||
Set luminance watcher size. | |||
'''Range Settings''': | |||
* Min: 0 | |||
* Max: 0.2 | |||
* Current Value: 0.025 | |||
* Step: 0.001 | |||
== Shadows == | |||
=== Shadows === | === Shadows === | ||
=== PP effects === | |||
=== Terrain menu === | <!-- ID: DM_REND_SHADOWS --> | ||
=== Grass/Clutter/Obstacles === | Enable/disable shadows. | ||
=== Roads menu === | |||
'''Available Options''': true, false | |||
=== Shadows OOF === | |||
<!-- ID: DM_REND_SHADOWS_OOF --> | |||
Enable/disable out of frustum shadows. | |||
'''Available Options''': true, false | |||
=== Shadows multileaf === | |||
<!-- ID: DM_REND_MLEAF_SHADOWS --> | |||
Enable/disable multileaf shadows. | |||
'''Available Options''': true, false | |||
=== Particle shadows === | |||
<!-- ID: DM_REND_SHADOWS_PARTICLES --> | |||
Set particle shadows. | |||
'''Available Options''': default, per pixel, per vertex, disabled | |||
=== Particle cascades === | |||
<!-- ID: DM_REND_SHADOW_PARTICLE_CASCADES --> | |||
Set particle shadow cascades. | |||
'''Available Options''': default, 1, 2, 3, 4 | |||
== PP effects == | |||
=== DOF Advanced === | |||
==== Enabled ==== | |||
<!-- ID: DM_REND_PP_DOFADVANCED_ENABLED --> | |||
Enable/disable advanced depth of field. | |||
'''Available Options''': true, false | |||
==== Format ==== | |||
<!-- ID: DM_REND_PP_DOFADVANCED_FORMAT --> | |||
Set the format for advanced depth of field. | |||
'''Available Options''': default, R11G11B10F, R16G16B16A16F | |||
==== Quality ==== | |||
<!-- ID: DM_REND_PP_DOFADVANCED_QUALITY --> | |||
Set the quality level for advanced depth of field. | |||
'''Available Options''': default, 0, 1, 2, 3 | |||
==== Rings ==== | |||
<!-- ID: DM_REND_PP_DOFADVANCED_RINGS --> | |||
Set the number of rings for advanced depth of field. | |||
'''Available Options''': default, 3, 4, 5 | |||
==== Combine FS Blur ==== | |||
<!-- ID: DM_REND_PP_DOFADVANCED_COMBINE_FS_BLUR --> | |||
Set mode to combine full screen blur for advanced depth of field. | |||
'''Available Options''': default, enabled, disabled | |||
==== Gather quality ==== | |||
<!-- ID: DM_REND_PP_DOFADVANCED_GATHER_QUALITY --> | |||
Set gather quality for advanced depth of field. | |||
'''Available Options''': default, low, high | |||
==== Force dilate rad. ==== | |||
<!-- ID: DM_REND_PP_DOFADVANCED_FORCE_DILATE_RADIUS --> | |||
Set force dilate radius for advanced depth of field. | |||
'''Range Settings''': | |||
* Min: 0 | |||
* Max: 16 | |||
* Current Value: 0 | |||
* Step: 1 | |||
==== Debug vis ==== | |||
<!-- ID: DM_REND_PP_DOFADVANCED_DEBUG_VIS --> | |||
Set debug visualization mode for advanced depth of field. | |||
'''Available Options''': disabled, fields, gather, combine, bg col, bg alpha, fg col, fg alpha, fill col, fill alpha | |||
==== Override near blur ==== | |||
<!-- ID: DM_REND_PP_DOFADVANCED_OVERRIDE_NEAR_BLUR --> | |||
Enable/disable overriding the near blur value for advanced depth of field. | |||
'''Available Options''': false, true | |||
==== near blur ==== | |||
<!-- ID: DM_REND_PP_DOFADVANCED_NEAR_BLUR --> | |||
Set near blur value for advanced depth of field. | |||
Options: -0.0001 0.04 0.02 0.001 | |||
==== Override far blur ==== | |||
<!-- ID: DM_REND_PP_DOFADVANCED_OVERRIDE_FAR_BLUR --> | |||
Enable/disable overriding the far blur value for advanced depth of field. | |||
'''Available Options''': false, true | |||
==== far blur ==== | |||
<!-- ID: DM_REND_PP_DOFADVANCED_FAR_BLUR --> | |||
Set far blur value for advanced depth of field. | |||
Options: -0.0001 0.04 0.02 0.001 | |||
==== Override FStop ==== | |||
<!-- ID: DM_REND_PP_DOFADVANCED_OVERRIDE_FSTOP --> | |||
Enable/disable overriding the FStop value for advanced depth of field. | |||
'''Available Options''': false, true | |||
==== FStop ==== | |||
<!-- ID: DM_REND_PP_DOFADVANCED_FSTOP --> | |||
Set FStop value for advanced depth of field. | |||
'''Range Settings''': | |||
* Min: 0.1 | |||
* Max: 32 | |||
* Current Value: 2.0 | |||
* Step: 0.1 | |||
==== Override focus dist ==== | |||
<!-- ID: DM_REND_PP_DOFADVANCED_OVERRIDE_FOCUS_DISTANCE --> | |||
Enable/disable overriding the focus distance for advanced depth of field. | |||
'''Available Options''': false, true | |||
==== focus dist ==== | |||
<!-- ID: DM_REND_PP_DOFADVANCED_FOCUS_DISTANCE --> | |||
Set focus distance for advanced depth of field. | |||
'''Range Settings''': | |||
* Min: 0.0 | |||
* Max: 100 | |||
* Current Value: 2.0 | |||
* Step: 0.1 | |||
==== Override focal length ==== | |||
<!-- ID: DM_REND_PP_DOFADVANCED_OVERRIDE_FOCAL_LENGTH --> | |||
Enable/disable overriding the focal length for advanced depth of field. | |||
'''Available Options''': false, true | |||
==== focal length ==== | |||
<!-- ID: DM_REND_PP_DOFADVANCED_FOCAL_LENGTH --> | |||
Set focal length for advanced depth of field. | |||
'''Range Settings''': | |||
* Min: 0.01 | |||
* Max: 1 | |||
* Current Value: 0.05 | |||
* Step: 0.01 | |||
=== Postprocess === | |||
<!-- ID: DM_REND_POSTPROCESS --> | |||
Enable/disable all postprocessing effects. | |||
'''Hotkey''': {{Controls|lctrl|lalt|p}} | |||
'''Available Options''': enabled, disabled | |||
=== Rain === | |||
<!-- ID: DM_REND_PP_RAIN --> | |||
Enable/disable rain postprocessing effect. | |||
'''Available Options''': enabled, disabled | |||
=== Snow === | |||
<!-- ID: DM_REND_PP_SNOW --> | |||
Enable/disable snow postprocessing effect. | |||
'''Available Options''': enabled, disabled | |||
=== Chrom aber === | |||
<!-- ID: DM_REND_PP_CHROMABER --> | |||
Enable/disable chromatic aberration postprocessing effect. | |||
'''Available Options''': enabled, disabled | |||
=== Color grading === | |||
<!-- ID: DM_REND_PP_COLORGRADING --> | |||
Enable/disable color grading postprocessing effect. | |||
'''Available Options''': disabled, enabled | |||
=== Colors === | |||
<!-- ID: DM_REND_PP_COLORS --> | |||
Enable/disable color correction postprocessing effect. | |||
'''Available Options''': enabled, disabled | |||
=== Depth of field === | |||
<!-- ID: DM_REND_PP_DEPTHOFFIELD --> | |||
Enable/disable standard depth of field postprocessing effect. | |||
'''Available Options''': enabled, disabled | |||
=== Physical Depth of field === | |||
<!-- ID: DM_REND_PP_DEPTHOFFIELD_BOKEH --> | |||
Enable/disable physical bokeh depth of field postprocessing effect. | |||
'''Available Options''': enabled, disabled | |||
=== Force Quality === | |||
<!-- ID: DM_REND_PP_DEPTHOFFIELD_BOKEH_QUALITY --> | |||
Set the quality for physical bokeh depth of field. | |||
'''Available Options''': default, low, middle, high | |||
=== Physical fast Depth of field === | |||
<!-- ID: DM_REND_PP_DEPTHOFFIELD_FAST_BOKEH --> | |||
Enable/disable fast physical bokeh depth of field postprocessing effect. | |||
'''Available Options''': enabled, disabled | |||
=== Force Quality === | |||
<!-- ID: DM_REND_PP_DEPTHOFFIELD_FAST_BOKEH_QUALITY --> | |||
Set the quality for fast physical bokeh depth of field. | |||
'''Available Options''': default, low, middle, high | |||
=== Dynamic blur === | |||
<!-- ID: DM_REND_PP_DYNAMICBLUR --> | |||
Enable/disable dynamic blur postprocessing effect. | |||
'''Available Options''': disabled, enabled | |||
=== Film grain === | |||
<!-- ID: DM_REND_PP_FILMGRAIN --> | |||
Enable/disable film grain postprocessing effect. | |||
'''Available Options''': enabled, disabled | |||
=== FXAA === | |||
<!-- ID: DM_REND_PP_FXAA --> | |||
Enable/disable FXAA postprocessing effect. | |||
'''Available Options''': enabled, disabled | |||
=== God rays === | |||
<!-- ID: DM_REND_PP_GODRAYS --> | |||
Enable/disable god rays postprocessing effect. | |||
'''Available Options''': enabled, disabled | |||
=== HBAO === | |||
<!-- ID: DM_REND_PP_HBAO --> | |||
Enable/disable HBAO postprocessing effect. | |||
'''Available Options''': enabled, disabled | |||
=== Debug === | |||
<!-- ID: DM_REND_PP_HBAO_DEBUG --> | |||
Enable/disable HBAO debugging visualization. | |||
'''Available Options''': disabled, enabled | |||
=== DebugFullScreen === | |||
<!-- ID: DM_REND_PP_HBAO_DEBUG_FULLSCREEN --> | |||
Enable/disable HBAO fullscreen debugging visualization. | |||
'''Available Options''': disabled, enabled | |||
=== NumSteps === | |||
<!-- ID: DM_REND_PP_HBAO_NUM_STEPS --> | |||
Set the number of HBAO steps. | |||
'''Available Options''': default, 1, 2, 3, 4, 5, 6, 7, 8 | |||
=== NumDirections === | |||
<!-- ID: DM_REND_PP_HBAO_NUM_DIRECTIONS --> | |||
Set the number of HBAO directions. | |||
'''Available Options''': default, 1, 2, 3, 4, 5, 6, 7, 8 | |||
=== HDR === | |||
<!-- ID: DM_REND_PP_HDR --> | |||
Enable/disable HDR postprocessing effect. | |||
'''Available Options''': enabled, disabled | |||
=== Debug === | |||
<!-- ID: DM_REND_PP_HDR_DEBUG --> | |||
Set HDR debug visualization. | |||
'''Available Options''': none, mask, LVBlend | |||
=== Bloom === | |||
<!-- ID: DM_REND_PP_HDR_BLOOM --> | |||
Enable/disable bloom effect for HDR. | |||
'''Available Options''': enabled, blured, disabled | |||
=== Bloom CS === | |||
<!-- ID: DM_REND_PP_HDR_BLOOM_COMPUTE --> | |||
Enable/disable bloom compute shader for HDR. | |||
'''Available Options''': false, true | |||
=== Bloom Upsample === | |||
<!-- ID: DM_REND_PP_HDR_BLOOM_UPSAMPLE_METHOD --> | |||
Select bloom upsample method for HDR. | |||
'''Available Options''': before tonemap, in tonemap | |||
=== EV === | |||
<!-- ID: DM_REND_PP_HDR_USER_EV --> | |||
Set HDR exposure value. | |||
'''Range Settings''': | |||
Min: -10.0 | |||
Max: 10.0 | |||
Current Value: 0.0 | |||
Step: 0.1 | |||
=== Show curves === | |||
<!-- ID: DM_REND_PP_HDR_SHOW_HISTOGRAM --> | |||
Show HDR curves. | |||
'''Available Options''': disabled, histogram, <0..2>lin filmic, <-6..0>LV filmic, <0.01..10>log filmic | |||
=== Disable autoExp === | |||
<!-- ID: DM_REND_PP_HDR_AUTO --> | |||
Disable auto exposure for HDR. | |||
'''Available Options''': false, true | |||
=== New LV adaptation === | |||
<!-- ID: DM_REND_PP_HDR_NEWLV --> | |||
Enable/disable new luminance adaptation for HDR. | |||
'''Available Options''': false, true | |||
=== HaightmapAO === | |||
<!-- ID: DM_REND_PP_HEIGHTMAP_AO --> | |||
Enable/disable heightmap based AO postprocessing effect. | |||
'''Available Options''': enabled, disabled | |||
=== Gauss filter === | |||
<!-- ID: DM_REND_PP_GAUSSFILTER --> | |||
Enable/disable gaussian blur postprocessing effect. | |||
'''Available Options''': enabled, disabled | |||
=== Outlines === | |||
<!-- ID: DM_REND_PP_OUTLINE --> | |||
Enable/disable outline postprocessing effect. | |||
'''Available Options''': enabled, disabled | |||
=== Radial blur === | |||
<!-- ID: DM_REND_PP_RADIALBLUR --> | |||
Enable/disable radial blur postprocessing effect. | |||
'''Available Options''': enabled, disabled | |||
=== Rot blur === | |||
<!-- ID: DM_REND_PP_ROTBLUR --> | |||
Enable/disable rotation blur postprocessing effect. | |||
'''Available Options''': enabled, disabled | |||
=== SMAA === | |||
<!-- ID: DM_REND_PP_SMAA --> | |||
Enable/disable SMAA postprocessing effect. | |||
'''Available Options''': enabled, disabled | |||
=== Edge detection method override === | |||
<!-- ID: DM_REND_PP_SMAA_METHOD --> | |||
Set the edge detection method override for SMAA. | |||
'''Available Options''': Disabled, Color, Depth, Luma | |||
=== Show debug textures === | |||
<!-- ID: DM_REND_PP_SMAA_PASSES --> | |||
Display SMAA debug textures. | |||
'''Available Options''': Disabled, SMAAEdgeDetection, SMAABlendingWeightCalculation | |||
=== SSAO === | |||
<!-- ID: DM_REND_PP_SSAO --> | |||
Enable/disable SSAO postprocessing effect. | |||
'''Available Options''': enabled, disabled | |||
=== Method === | |||
<!-- ID: DM_REND_PP_SSAO_METHOD --> | |||
Set SSAO method. | |||
'''Available Options''': non-linear, linear, mask non-linear, mask linear | |||
=== BlurSteps === | |||
<!-- ID: DM_REND_PP_SSAO_BLUR_STEPS --> | |||
Set blur steps for SSAO. | |||
'''Available Options''': default, 0, 1, 2, 3, 4, 5, 6, 7 | |||
=== SSDO === | |||
<!-- ID: DM_REND_PP_SSDO --> | |||
Enable/disable SSDO postprocessing effect. | |||
'''Available Options''': enabled, disabled | |||
=== Debug === | |||
<!-- ID: DM_REND_PP_SSDO_DEBUG --> | |||
Enable/disable SSDO debugging visualization. | |||
'''Available Options''': disabled, enabled | |||
=== DebugFullScreen === | |||
<!-- ID: DM_REND_PP_SSDO_DEBUG_FULLSCREEN --> | |||
Enable/disable SSDO fullscreen debugging visualization. | |||
'''Available Options''': disabled, enabled | |||
=== SSR (global) === | |||
<!-- ID: DM_REND_PP_SSR --> | |||
Enable/disable global SSR postprocessing effect. | |||
'''Available Options''': enabled, disabled | |||
=== SSR (objects only) === | |||
<!-- ID: DM_REND_PP_SSR_OBJECTS --> | |||
Enable/disable object only SSR postprocessing effect. | |||
'''Available Options''': enabled, disabled | |||
=== Use FFX SSR === | |||
<!-- ID: DM_REND_PP_SSR_FFX_SSR --> | |||
Enable/disable FFX Screen Space Reflection. | |||
'''Available Options''': enabled, disabled | |||
=== Temporal filtering === | |||
<!-- ID: DM_REND_PP_SSR_TEMPORAL --> | |||
Enable/disable temporal filtering for SSR. | |||
'''Available Options''': enabled, disabled | |||
=== Min fade distance === | |||
<!-- ID: DM_REND_PP_SSR_FADE_MIN --> | |||
Set minimum fade distance for SSR. | |||
'''Range Settings''': | |||
* Min: 0 | |||
* Max: 100 | |||
* Current Value: 0.5 | |||
* Step: 0.01 | |||
=== Max fade distance === | |||
<!-- ID: DM_REND_PP_SSR_FADE_MAX --> | |||
Set maximum fade distance for SSR. | |||
'''Range Settings''': | |||
* Min: 0 | |||
* Max: 100 | |||
* Current Value: 2 | |||
* Step: 0.01 | |||
=== Behind ambient === | |||
<!-- ID: DM_REND_PP_SSR_CORRECT_RN --> | |||
Correct reflection with ambient. | |||
'''Available Options''': disabled, enabled | |||
=== UnderWater === | |||
<!-- ID: DM_REND_PP_UW --> | |||
Enable/disable underwater postprocessing effect. | |||
'''Available Options''': enabled, disabled | |||
=== Wet distort === | |||
<!-- ID: DM_REND_PP_WETDISTORT --> | |||
Enable/disable wet distortion postprocessing effect. | |||
'''Available Options''': enabled, disabled | |||
== Terrain menu == | |||
=== Terrain === | |||
<!-- ID: DM_TERR_TERRAIN --> | |||
Enable/disable terrain rendering. | |||
'''Available Options''': enabled, disabled | |||
=== LOD mode === | |||
<!-- ID: DM_TERR_FORCE_LOD_MODE --> | |||
Set terrain LOD mode. | |||
'''Available Options''': auto, exact lod, frac only | |||
=== Force exact LOD === | |||
<!-- ID: DM_TERR_FORCE_LOD --> | |||
Set force exact LOD. | |||
'''Range Settings''': | |||
* Min: 1 | |||
* Max: 5 | |||
* Current Value: 5 | |||
* Step: 0.01 | |||
=== Layers diag mode === | |||
<!-- ID: DM_TERR_LAYERS --> | |||
Set terrain layers diagnostic mode. | |||
'''Hotkey''': {{Controls|lctrl|lalt|l}} | |||
'''Available Options''': disabled, layers, projection | |||
=== Show tiles error === | |||
<!-- ID: DM_TERR_SHOW_TILE_ERRORS --> | |||
Enable/disable showing of terrain tile errors. | |||
'''Available Options''': false, true | |||
=== Tile error modif === | |||
<!-- ID: DM_TERR_TILES_ERROR --> | |||
Set terrain tile error modification. | |||
Options: -10 10 0 0.01 | |||
=== Blocks' bounding boxes === | |||
<!-- ID: DM_TERR_BBOX --> | |||
Enable/disable bounding boxes for terrain blocks. | |||
'''Available Options''': disabled, enabled | |||
=== MaxLOD blocks' AABB === | |||
<!-- ID: DM_TERR_BBOX_MAXLOD --> | |||
Enable/disable AABBs for max LOD terrain blocks. | |||
'''Available Options''': disabled, enabled | |||
=== Biased blocks' AABB === | |||
<!-- ID: DM_TERR_BBOX_BIAS --> | |||
Enable/disable AABBs for biased terrain blocks. | |||
'''Available Options''': disabled, enabled | |||
=== Tiles' bounding boxes === | |||
<!-- ID: DM_TERR_BBOXTILE --> | |||
Enable/disable bounding boxes for terrain tiles. | |||
'''Available Options''': disabled, enabled | |||
=== Detail texture === | |||
<!-- ID: DM_TERR_STEXTURE --> | |||
Enable/disable terrain detail texture. | |||
'''Hotkey''': {{Controls|lctrl|lalt|s}} | |||
'''Available Options''': enabled, disabled | |||
=== Water LOD bias === | |||
<!-- ID: DM_TERR_WATER_LOD_BIAS --> | |||
Set water LOD bias. | |||
'''Range Settings''': | |||
* Min: 0 | |||
* Max: 1 | |||
* Current Value: 0 | |||
* Step: 0.001 | |||
=== Detail texture detail === | |||
<!-- ID: DM_TERR_TEXDETAIL --> | |||
Set terrain detail texture level. | |||
'''Available Options''': normal, -10, -9, -8, -7, -6, -5, -4, -3, -2, -1, 0, 1, 2, 3, 4, 5, 6, 7, 8, 9, 10 | |||
=== Reload only curr. shaders === | |||
<!-- ID: DM_TERR_RELOAD_ONLY_CURRENT_SHADERS --> | |||
Enable/disable reloading of only current terrain shaders. | |||
'''Available Options''': false, true | |||
=== Use layer cache === | |||
<!-- ID: DM_TERR_LAYERCACHE --> | |||
Enable/disable terrain layer cache. | |||
'''Available Options''': true, false | |||
=== Terrain render info === | |||
<!-- ID: DM_TERR_INFO --> | |||
Enable/disable terrain render information. | |||
'''Available Options''': false, true | |||
=== Holes debug vis === | |||
<!-- ID: DM_TERR_HOLES_VIS --> | |||
Enable/disable terrain holes debug visualization. | |||
'''Available Options''': false, true | |||
=== Disabled block debug vis === | |||
<!-- ID: DM_TERR_DISABLED_BLOCK_VIS --> | |||
Enable/disable visualization of disabled terrain blocks. | |||
'''Available Options''': false, true | |||
== Grass/Clutter/Obstacles == | |||
=== Render clutter === | |||
<!-- ID: DM_TERR_CLUTTER_RENDER --> | |||
Set clutter render mode. | |||
'''Available Options''': full, prepare only, disabled | |||
=== Show clutter stats === | |||
<!-- ID: DM_TERR_CLUTTER_STATS --> | |||
Set clutter statistics. | |||
'''Available Options''': none, general, detailed | |||
=== Reload clutter configs === | |||
<!-- ID: DM_TERR_CLUTTER_RELOAD --> | |||
Enable/disable reloading of clutter configurations. | |||
'''Available Options''': disabled, enabled | |||
=== 3D clutter AABB === | |||
<!-- ID: DM_TERR_CLUTTER_BOX --> | |||
Enable/disable 3D AABBs for clutter. | |||
'''Available Options''': disabled, enabled | |||
=== Clutter LOD debug === | |||
<!-- ID: DM_TERR_CLUTTER_LOD_DBG --> | |||
Enable/disable clutter LOD debugging. | |||
'''Available Options''': disabled, enabled | |||
=== Clutter LOD blend size === | |||
<!-- ID: DM_TERR_CLUTTER_LOD_BLEND --> | |||
Set clutter LOD blend size. | |||
'''Range Settings''': | |||
* Min: 0.0 | |||
* Max: 5.0 | |||
* Current Value: 1.5 | |||
* Step: 0.1 | |||
=== Thinning slope === | |||
<!-- ID: DM_TERR_CLUTTER_THINNING_SLOPE --> | |||
Set clutter thinning slope. | |||
'''Range Settings''': | |||
* Min: 0.01 | |||
* Max: 1.0 | |||
* Current Value: 0.25 | |||
* Step: 0.01 | |||
=== Clutter fadeout size === | |||
<!-- ID: DM_TERR_CLUTTER_FADEOUT_REGION --> | |||
Set clutter fadeout size. | |||
'''Range Settings''': | |||
* Min: 0 | |||
* Max: 30 | |||
* Current Value: 15 | |||
* Step: 0.1 | |||
=== Shadow casting === | |||
<!-- ID: DM_TERR_CLUTTER_SHADOWS --> | |||
Enable/disable shadow casting for clutter. | |||
'''Available Options''': enabled, disabled | |||
=== Clutter position jitter === | |||
<!-- ID: DM_TERR_CLUTTER_JITTER --> | |||
Set clutter position jitter. | |||
'''Range Settings''': | |||
* Min: 0.0 | |||
* Max: 1.0 | |||
* Current Value: 0.5 | |||
* Step: 0.01 | |||
=== Enable obstacles === | |||
<!-- ID: DM_TERR_GRASSOBSTACLES --> | |||
Enable/disable obstacles on terrain. | |||
'''Available Options''': true, false | |||
=== Enable clutter mask === | |||
<!-- ID: DM_TERR_CLUTTER_MASK --> | |||
Enable/disable clutter masking. | |||
'''Available Options''': true, false | |||
=== Show clutter occldrs === | |||
<!-- ID: DM_TERR_CLUTTER_MASK_SHOW_OBJS --> | |||
Enable/disable showing of clutter occluders. | |||
'''Available Options''': false, true | |||
=== Show obst.map === | |||
<!-- ID: DM_TERR_GRASSOBSTACLES_SHOW --> | |||
Set obstacle map visualization. | |||
'''Available Options''': none, runtime, perm. depth, perm. mask | |||
=== Force params: === | |||
<!-- ID: DM_TERR_GRASSOBSTACLES_FORCE --> | |||
Enable/disable forcing of obstacle parameters. | |||
'''Available Options''': false, true | |||
=== RadiusX === | |||
<!-- ID: DM_TERR_GRASSOBSTACLES_RADIUSX --> | |||
Set obstacle radius X. | |||
'''Range Settings''': | |||
* Min: 0.5 | |||
* Max: 5 | |||
* Current Value: 1 | |||
* Step: 0.1 | |||
=== RadiusZ === | |||
<!-- ID: DM_TERR_GRASSOBSTACLES_RADIUSY --> | |||
Set obstacle radius Z. | |||
'''Range Settings''': | |||
* Min: 0.5 | |||
* Max: 5 | |||
* Current Value: 1 | |||
* Step: 0.1 | |||
=== Offset === | |||
<!-- ID: DM_TERR_GRASSOBSTACLES_OFFSET --> | |||
Set obstacle offset. | |||
Options: -1.0 1.0 0 0.01 | |||
=== Render grass === | |||
<!-- ID: DM_TERR_GRASS --> | |||
Enable/disable grass rendering. | |||
'''Available Options''': enabled, disabled | |||
=== Grass log === | |||
<!-- ID: DM_TERR_GRASS_LOG --> | |||
Enable/disable grass logging. | |||
'''Available Options''': false, true | |||
=== Basic cluster size (10) mul === | |||
<!-- ID: DM_TERR_GRASSCLUSTERSIZE --> | |||
Set grass cluster size multiplier. | |||
'''Range Settings''': | |||
* Min: 1.5 | |||
* Max: 10 | |||
* Current Value: 10 | |||
* Step: 0.01 | |||
=== Grass distance <50..150> === | |||
<!-- ID: DM_TERR_GRASSDETAIL --> | |||
Set grass detail distance. | |||
Options: -1 1 0 0.1 | |||
=== Freeze grass pos === | |||
<!-- ID: DM_TERR_GRASSFREEZE --> | |||
Enable/disable freezing of grass positions. | |||
'''Available Options''': disabled, enabled | |||
=== Grass clusters' boxes === | |||
<!-- ID: DM_TERR_GRASSBBOX --> | |||
Enable/disable visualization of grass cluster boxes. | |||
'''Available Options''': disabled, enabled | |||
=== Force grass lod === | |||
<!-- ID: DM_TERR_GRASSLOD --> | |||
Set grass LOD level. | |||
'''Available Options''': default, 0, 1, 2, 3 | |||
=== Force grass blend === | |||
<!-- ID: DM_TERR_GRASS_FORCE_BLEND --> | |||
Set grass blend mode. | |||
'''Available Options''': default, alphatest, edges, ATOC(if msaa) | |||
=== Grass sort === | |||
<!-- ID: DM_TERR_GRASS_SORT --> | |||
Enable/disable sorting of grass. | |||
'''Available Options''': true, false | |||
=== MT rendering === | |||
<!-- ID: DM_TERR_GRASS_MT --> | |||
Enable/disable multi-threaded grass rendering. | |||
'''Available Options''': true, false | |||
=== MT caching === | |||
<!-- ID: DM_TERR_GRASS_MT_CACHE --> | |||
Enable/disable multi-threaded grass caching. | |||
'''Available Options''': true, false | |||
=== Grass terrain blend === | |||
<!-- ID: DM_TERR_GRASS_LERP --> | |||
Enable/disable grass terrain blending. | |||
'''Available Options''': false, true | |||
=== start dist === | |||
<!-- ID: DM_TERR_GRASS_LERP_START --> | |||
Set grass terrain blend start distance. | |||
'''Range Settings''': | |||
Min: -100 | |||
Max: 150 | |||
Current Value: 0 | |||
Step: 0.1 | |||
=== end dist === | |||
<!-- ID: DM_TERR_GRASS_LERP_END --> | |||
Set grass terrain blend end distance. | |||
'''Range Settings''': | |||
Min: -100 | |||
Max: 150 | |||
Current Value: 0 | |||
Step: 0.1 | |||
== Roads menu == | |||
=== Enable roads === | |||
<!-- ID: DM_ROADS_ENABLE --> | |||
Enable/disable road rendering. | |||
'''Available Options''': enabled, disabled | |||
== Materials settings == | |||
=== Grass/Tree wind === | |||
==== Wind override ==== | |||
<!-- ID: DM_TERR_GRASS_WINDDEBUG --> | |||
Enable/disable wind override for grass and trees. | |||
'''Available Options''': false, true | |||
==== Grass/tree par override ==== | |||
<!-- ID: DM_TERR_GRASS_WINDDEBUG_PAR --> | |||
Enable/disable override of parameters for grass and trees. | |||
'''Available Options''': false, true | |||
=== Enable MultiMat det.mask === | |||
<!-- ID: DM_REND_MAT_MULTIMAT --> | |||
Enable/disable use of multi-material detection mask. | |||
'''Available Options''': false, true | |||
=== Tree colorization === | |||
<!-- ID: DM_REND_MAT_DISABLE_TREECOL --> | |||
Set tree colorization mode. | |||
'''Available Options''': full, color only, disable | |||
=== Tree volume fake === | |||
<!-- ID: DM_REND_MAT_TREE_VOLSHADOWFAKE --> | |||
Set tree volume fake mode. | |||
'''Available Options''': both, geomOcclElipsoid, elipsoidAO, none | |||
=== Tree volume shadow === | |||
<!-- ID: DM_REND_MAT_TREE_VOLSHADOW --> | |||
Set tree volume shadow mode. | |||
'''Available Options''': none, geomOcclElipsoid, geomOccl, elipsoidAO | |||
=== Override geomOccl distance === | |||
<!-- ID: DM_REND_MAT_TREE_VOLGEOMAO --> | |||
Enable/disable overriding of geometric occlusion distance. | |||
'''Available Options''': false, true | |||
=== Max distance === | |||
<!-- ID: DM_REND_MAT_TREE_VOLGEOMAO_MAX_DIST --> | |||
Set max distance for geometric occlusion. | |||
'''Range Settings''': | |||
* Min: 0 | |||
* Max: 250 | |||
* Current Value: 100 | |||
* Step: 1 | |||
== Sky == | |||
=== Sky === | === Sky === | ||
=== | |||
=== | <!-- ID: DM_REND_SKY --> | ||
=== | Enable/disable sky rendering. | ||
=== | |||
=== | '''Available Options''': enabled, disabled | ||
=== Subsurface Scattering === | |||
=== | === Fog === | ||
=== | |||
=== | <!-- ID: DM_REND_SKY_FOG --> | ||
=== | Enable/disable fog rendering. | ||
=== Deferred Decals === | |||
=== | '''Available Options''': enabled, disabled | ||
=== Fog in env. map === | |||
<!-- ID: DM_REND_SKY_FOG_ENV_MAP --> | |||
Enable/disable fog in environment map. | |||
'''Available Options''': enabled, disabled | |||
=== Lens Flares === | |||
<!-- ID: DM_REND_LENS --> | |||
Enable/disable lens flares. | |||
'''Available Options''': enabled, disabled | |||
=== Godrays === | |||
<!-- ID: DM_REND_GODRAYS --> | |||
Enable/disable god rays. | |||
'''Available Options''': enabled, disabled | |||
=== Show planets === | |||
<!-- ID: DM_REND_SKY_PLANETS --> | |||
Enable/disable rendering of planets. | |||
'''Available Options''': enabled, disabled | |||
=== Show stars === | |||
<!-- ID: DM_REND_SKY_STARS --> | |||
Enable/disable rendering of stars. | |||
'''Available Options''': enabled, disabled | |||
=== Show real stars constellations === | |||
<!-- ID: DM_REND_SKY_STARS_DEBUG --> | |||
Enable/disable rendering of real star constellations. | |||
'''Available Options''': enabled, disabled | |||
=== Show far layer === | |||
<!-- ID: DM_REND_SKY_FARLAYER --> | |||
Enable/disable rendering of far sky layer. | |||
'''Available Options''': enabled, disabled | |||
=== Show dynamic layer === | |||
<!-- ID: DM_REND_SKY_DYNLAYER --> | |||
Enable/disable rendering of dynamic sky layer. | |||
'''Available Options''': enabled, disabled | |||
== Rivers == | |||
=== Central flow func === | |||
<!-- ID: DM_CENTRAL_FLOW_FUNC --> | |||
Set the central flow function for rivers. | |||
'''Available Options''': sine, polynomial | |||
=== Debug output === | |||
<!-- ID: DM_RIVER_DEBUG --> | |||
Display debug information of river flow. | |||
'''Available Options''': no debug, flow map, flow map x, flow map y, flow noise, flow noise - LF part, flow noise - HF part, phase noise, flow mod map | |||
== LightSourcVis == | |||
=== Blend === | |||
<!-- ID: DM_REND_LIGHTSOURCE_BLEND --> | |||
Set blend mode for light sources. | |||
'''Available Options''': default, additive, alphablend, max | |||
== Subsurface Scattering == | |||
=== SSSSS override params === | |||
<!-- ID: DM_REND_SSSSS_OVERRIDE --> | |||
Enable/disable overriding of SSSSS parameters. | |||
'''Available Options''': false, true | |||
=== Enabled === | |||
<!-- ID: DM_REND_SSSSS_ENABLED --> | |||
Enable/disable subsurface scattering. | |||
'''Available Options''': false, true | |||
=== Scale === | |||
<!-- ID: DM_REND_SSSSS_SCALE --> | |||
Set subsurface scattering scale. | |||
'''Range Settings''': | |||
* Min: 0 | |||
* Max: 4 | |||
* Current Value: 1 | |||
* Step: 0.01 | |||
=== Random rotation === | |||
<!-- ID: DM_REND_SSSSS_USE_ROTATION --> | |||
Enable/disable random rotation for subsurface scattering. | |||
'''Available Options''': false, true | |||
=== Log kernel === | |||
<!-- ID: DM_REND_SSSSS_LOG_KERNEL --> | |||
Enable/disable logging of subsurface scattering kernel. | |||
'''Available Options''': false, true | |||
=== Use stencil === | |||
<!-- ID: DM_REND_SSSSS_USE_STENCIL --> | |||
Enable/disable stencil buffer for subsurface scattering. | |||
'''Available Options''': true, false | |||
=== Profile resolve === | |||
<!-- ID: DM_REND_SSSSS_PROFILE_RESOLVE --> | |||
Set profile resolve mode for subsurface scattering. | |||
'''Available Options''': default, first, min, max, avg | |||
=== SSSSS quality === | |||
<!-- ID: DM_REND_SSSSS_QUALITY --> | |||
Set quality for subsurface scattering. | |||
'''Available Options''': default, low, medium, high | |||
== Analytic lights == | |||
=== Disable far lights === | |||
<!-- ID: DM_REND_FARLIGHTS_DISABLE --> | |||
Disable or enable far analytic lights. | |||
'''Available Options''': false, true | |||
=== Show far lights === | |||
<!-- ID: DM_REND_FARLIGHTS_SHOW --> | |||
Show or hide far analytic lights. | |||
'''Available Options''': disabled, show, no clip | |||
=== Invert geometry === | |||
<!-- ID: DM_REND_FARLIGHTS_INVERT --> | |||
Enable/disable inverting of geometry. | |||
'''Available Options''': false, true | |||
=== Enable vol lights === | |||
<!-- ID: DM_REND_VOLLIGHTS_ENABLE --> | |||
Enable/disable volumetric lights. | |||
'''Available Options''': enabled, no blend, disabled | |||
=== Show log === | |||
<!-- ID: DM_REND_FARLIGHTS_LOG --> | |||
Enable/disable logging of far lights. | |||
'''Available Options''': false, true | |||
=== Farlight intensity === | |||
<!-- ID: DM_REND_FARLIGHTS_INTENSITY --> | |||
Set far light intensity. | |||
Options: -3 20 0 0.1 | |||
=== Analytic lights === | |||
<!-- ID: DM_REND_LIGHTS --> | |||
Enable/disable analytic lights. | |||
'''Available Options''': true, false | |||
=== Lights shadows === | |||
<!-- ID: DM_REND_LIGHTS_SHADOWS --> | |||
Enable/disable analytic lights shadows. | |||
'''Available Options''': true, false | |||
=== Override limits === | |||
<!-- ID: DM_REND_LIGHTS_SHADOWS_OVERRIDE --> | |||
Enable/disable overriding of light shadow limits. | |||
'''Available Options''': false, true | |||
=== Memory budget === | |||
<!-- ID: DM_REND_LIGHTS_SHADOWS_LIMMEMORY --> | |||
Set memory budget for light shadows. | |||
'''Range Settings''': | |||
* Min: 10 | |||
* Max: 100 | |||
* Current Value: 40 | |||
* Step: 2 | |||
=== Max shadows count === | |||
<!-- ID: DM_REND_LIGHTS_SHADOWS_LIMSHADOWS --> | |||
Set max shadow count for lights. | |||
'''Range Settings''': | |||
* Min: 4 | |||
* Max: 64 | |||
* Current Value: 16 | |||
* Step: 1 | |||
=== Basic tex size === | |||
<!-- ID: DM_REND_LIGHTS_SHADOWS_TEXSIZE --> | |||
Set basic texture size for lights shadows. | |||
'''Available Options''': 64, 256, 512, 768, 1024, 1536, 2048, 2560, 3072, 3584, 4096 | |||
=== Aggr. particle lights === | |||
<!-- ID: DM_REND_PARTICLE_LIGHT_AGGR --> | |||
Enable/disable aggregation of particle lights. | |||
'''Available Options''': true, false | |||
=== Autoshrink part. lights === | |||
<!-- ID: DM_REND_PARTICLE_LIGHT_SHRINK --> | |||
Enable/disable auto shrinking of particle lights. | |||
'''Available Options''': true, false | |||
== Occlusion Queries == | |||
=== Benchmark === | |||
<!-- ID: DM_REND_OCCQUERIES_BENCHMARK --> | |||
Enable/disable occlusion queries benchmark. | |||
'''Available Options''': false, true | |||
=== TestSun === | |||
<!-- ID: DM_REND_OCCQUERIES_TEST_SUN --> | |||
Enable/disable occlusion queries test sun. | |||
'''Available Options''': false, true | |||
== Snow == | |||
=== Quantize speed === | |||
<!-- ID: DM_REND_SNOW_QUANTIZE_SPEED --> | |||
Enable/disable quantization of snow speed. | |||
'''Available Options''': true, false | |||
=== Quantize dir === | |||
<!-- ID: DM_REND_SNOW_QUANTIZE_DIR --> | |||
Enable/disable quantization of snow direction. | |||
'''Available Options''': true, false | |||
=== Fix dir === | |||
<!-- ID: DM_REND_SNOW_FIX_WIND_DIR --> | |||
Enable/disable fixing of snow wind direction. | |||
'''Available Options''': false, true | |||
=== Enable logs === | |||
<!-- ID: DM_REND_SNOW_ENABLE_LOGS --> | |||
Enable/disable snow logs. | |||
'''Available Options''': false, true | |||
=== Use underwater mask === | |||
<!-- ID: DM_REND_SNOW_USE_UNDERWATER_MASK --> | |||
Enable/disable underwater mask for snow. | |||
'''Available Options''': true, false | |||
=== Macro mask debug === | |||
<!-- ID: DM_REND_SNOW_MACRO_MASK_DEBUG --> | |||
Show macro mask debug for snow. | |||
'''Available Options''': disabled, layer 1, layer 2, layer 3 | |||
=== Override snow === | |||
<!-- ID: DM_REND_SNOW_OVERRIDE --> | |||
Enable/disable overriding snow. | |||
'''Available Options''': false, true | |||
=== Density === | |||
<!-- ID: DM_REND_SNOW_DENSITY --> | |||
Set snow density. | |||
'''Range Settings''': | |||
* Min: 0.0 | |||
* Max: 1.0 | |||
* Current Value: 1.0 | |||
* Step: 0.01 | |||
=== Time coef === | |||
<!-- ID: DM_REND_SNOW_TIME_COEF --> | |||
Set snow time coefficient. | |||
'''Range Settings''': | |||
* Min: 0.0 | |||
* Max: 10.0 | |||
* Current Value: 1.0 | |||
* Step: 0.01 | |||
== Deferred Decals == | |||
=== Render === | |||
<!-- ID: DM_REND_DEFDECALS_RENDER --> | |||
Enable/disable rendering of deferred decals. | |||
'''Available Options''': true, false | |||
=== HW depth === | |||
<!-- ID: DM_REND_DEFDECALS_DEPTHBUF --> | |||
Enable/disable HW depth usage for deferred decals. | |||
'''Available Options''': true, false | |||
=== Debug visualization === | |||
<!-- ID: DM_REND_DEFDECALS_DEBUGVIS --> | |||
Enable/disable debugging visualization of deferred decals. | |||
'''Available Options''': true, false | |||
== Light portals == | |||
=== Enable light portals === | |||
<!-- ID: DM_VLIGHTS_ENABLE --> | |||
Enable/disable light portals. | |||
'''Available Options''': enabled, disabled | |||
=== Probe blending mode === | |||
<!-- ID: DM_VLIGHTS_ENHANCED_PROBE_BLEND --> | |||
Set probe blending mode for light portals. | |||
'''Available Options''': directional, diffuse, disabled | |||
=== Specular proj. tex. === | |||
<!-- ID: DM_VLIGHTS_PROJ_TEX_SPEC --> | |||
Enable/disable specular projection texture. | |||
'''Available Options''': disabled, enabled | |||
=== Proj. tex. offset fix === | |||
<!-- ID: DM_VLIGHTS_PROJ_TEX_OFFST_FIX --> | |||
Enable/disable projection texture offset fix. | |||
'''Available Options''': disabled, enabled | |||
=== Portal light mode === | |||
<!-- ID: DM_VLIGHTS_LIGHT_MODE --> | |||
Set light mode for light portals. | |||
'''Available Options''': none, diffuse+specular, diffuse, specular | |||
=== Normalize L by area === | |||
<!-- ID: DM_VLIGHTS_NORMALIZE_AREA_INTENSITY --> | |||
Enable/disable normalization of light by area. | |||
'''Available Options''': disabled, enabled | |||
=== Direct light contrib. === | |||
<!-- ID: DM_VLIGHTS_DIRECT_CONTRIBUTION --> | |||
Enable/disable direct light contribution. | |||
'''Available Options''': disabled, enabled | |||
=== Light volume lerp (m) === | |||
<!-- ID: DM_VLIGHTS_LIGHT_VOLUME_LERP --> | |||
Set light volume lerp. | |||
'''Available Options''': 0.00001, 0.0001, 0.001, 0.01, 0.05, 0.1, 0.15, 0.2, 0.25, 0.3, 0.5, 0.75, 1.0 | |||
=== Disable light volumes === | |||
<!-- ID: DM_VLIGHTS_LIGHT_DISABLE_LIGHT_VOLUMES --> | |||
Disable light volumes. | |||
'''Available Options''': false, true | |||
=== Show active subscene === | |||
<!-- ID: DM_VLIGHTS_SHOW_ACTIVE_SUBSCENE --> | |||
Show or hide active subscene. | |||
'''Available Options''': disabled, enabled | |||
=== Show area rectangles === | |||
<!-- ID: DM_VLIGHTS_DEBUG_AREA_RECT --> | |||
Show or hide area rectangles. | |||
'''Available Options''': disabled, enabled | |||
=== Show portal rectangles === | |||
<!-- ID: DM_VLIGHTS_DEBUG_PORTAL_RECT --> | |||
Show or hide portal rectangles. | |||
'''Available Options''': disabled, enabled | |||
=== Show light rectangles === | |||
<!-- ID: DM_VLIGHTS_DEBUG_LIGHT_RECT --> | |||
Show or hide light rectangles. | |||
'''Available Options''': disabled, enabled | |||
=== Show debug info === | |||
<!-- ID: DM_VLIGHTS_DEBUG_INFO --> | |||
Show light portals debug info. | |||
'''Available Options''': none, portals, areas, all | |||
=== Virtual light range === | |||
<!-- ID: DM_VLIGHTS_VIRTUAL_LIGHTS_RANGE --> | |||
Set virtual light range. | |||
'''Range Settings''': | |||
* Min: 5 | |||
* Max: 50 | |||
* Current Value: 25 | |||
* Step: 0.1 | |||
=== BSP diag === | |||
<!-- ID: DM_VLIGHTS_BSP_DIAG --> | |||
Enable/disable BSP diagnostics. | |||
'''Available Options''': disabled, enabled | |||
=== Hide mesh === | |||
<!-- ID: DM_VLIGHTS_HIDE_MESH --> | |||
Hide light portal mesh. | |||
'''Available Options''': disabled, enabled | |||
=== Show src. geometry === | |||
<!-- ID: DM_VLIGHTS_SHOW_BSP_SOURCE_GEOMETRY --> | |||
Show source geometry for light portals. | |||
'''Available Options''': disabled, opaque, transparent | |||
=== Show occupancy grid === | |||
<!-- ID: DM_VLIGHTS_SHOW_BSP_GRID --> | |||
Show occupancy grid for light portals. | |||
'''Available Options''': disabled, enabled | |||
=== Freeze camera === | |||
<!-- ID: DM_VLIGHTS_FREEZE_CAMERA --> | |||
Enable/disable freezing of camera for light portals. | |||
'''Available Options''': disabled, enabled | |||
=== Show BSP tree === | |||
<!-- ID: DM_VLIGHTS_SHOW_BSP --> | |||
Show BSP tree for light portals. | |||
'''Available Options''': none, AABB, planes, convex | |||
=== Leaf mode === | |||
<!-- ID: DM_VLIGHTS_BSP_LEAF_MODE --> | |||
Set leaf mode for BSP tree debug. | |||
'''Available Options''': all, opaque, non-opaque | |||
=== BSP disp. mode === | |||
<!-- ID: DM_VLIGHTS_BSP_MODE --> | |||
Set display mode for BSP debug. | |||
'''Available Options''': normal, at depth, active, connectivity | |||
=== Wanted depth === | |||
<!-- ID: DM_VLIGHTS_BSP_DEPTH --> | |||
Set wanted depth for BSP debug. | |||
'''Range Settings''': | |||
* Min: 0 | |||
* Max: 64 | |||
* Current Value: 0 | |||
* Step: 1 | |||
=== Show leaf split plane === | |||
<!-- ID: DM_VLIGHTS_BSP_LEAF_SPLIT --> | |||
Show leaf split plane. | |||
'''Available Options''': disabled, enabled | |||
=== Show areas === | |||
<!-- ID: DM_VLIGHTS_SHOW_BSP_AREAS --> | |||
Show light portal areas. | |||
'''Available Options''': none, AABB, convex | |||
=== Area disp. mode === | |||
<!-- ID: DM_VLIGHTS_BSP_AREAS_MODE --> | |||
Set display mode for light portal areas. | |||
'''Available Options''': all (excl. out), all, single, active | |||
=== Area ID === | |||
<!-- ID: DM_VLIGHTS_BSP_AREA --> | |||
Set area ID for light portals. | |||
'''Range Settings''': | |||
* Min: 0 | |||
* Max: 128 | |||
* Current Value: 0 | |||
* Step: 1 | |||
=== Show portals === | |||
<!-- ID: DM_VLIGHTS_SHOW_BSP_PORTALS --> | |||
Show light portals. | |||
'''Available Options''': none, all, single, per area, active | |||
=== Portal ID === | |||
<!-- ID: DM_VLIGHTS_BSP_PORTAL --> | |||
Set portal ID for light portals. | |||
'''Range Settings''': | |||
* Min: 0 | |||
* Max: 512 | |||
* Current Value: 0 | |||
* Step: 1 | |||
=== Portal disp. mode === | |||
<!-- ID: DM_VLIGHTS_BSP_PORTALS_MODE --> | |||
Set display mode for light portals. | |||
'''Available Options''': rect, AABB, rect no clip, AABB no clip | |||
=== Show portal volumes === | |||
<!-- ID: DM_VLIGHTS_SHOW_BSP_VOLUMES --> | |||
Show light portal volumes. | |||
'''Available Options''': disabled, enabled | |||
=== Show virtual lights === | |||
<!-- ID: DM_VLIGHTS_SHOW --> | |||
Show virtual lights. | |||
'''Available Options''': disabled, active all, active single | |||
=== Light disp. mode === | |||
<!-- ID: DM_VLIGHTS_MODE --> | |||
Set display mode for virtual lights. | |||
'''Available Options''': rect, rect+cone, rect no clip, rect+cone no clip | |||
== Terrain shadows == | |||
=== Shadow cascades === | |||
==== Terrain num cascades ==== | |||
<!-- ID: DM_TERR_SHADOWS_CASC_TERR_NUM --> | |||
Set number of terrain shadow cascades. | |||
'''Available Options''': default, 0, 1, 2 | |||
==== Terrain near type ==== | |||
<!-- ID: DM_TERR_SHADOWS_CASC_TERR_NEAR --> | |||
Set near cascade type for terrain. | |||
'''Available Options''': default, movable, static | |||
==== Terrain near m/px ==== | |||
<!-- ID: DM_TERR_SHADOWS_CASC_TERR_NEAR_MPP --> | |||
Set near cascade meters per pixel for terrain. | |||
'''Available Options''': default, 0.5, 1, 1.5, 2, 3, 4, 5, 6, 7, 8 | |||
==== Terrain far type ==== | |||
<!-- ID: DM_TERR_SHADOWS_CASC_TERR_FAR --> | |||
Set far cascade type for terrain. | |||
'''Available Options''': default, movable, static | |||
==== Terrain far m/px ==== | |||
<!-- ID: DM_TERR_SHADOWS_CASC_TERR_FAR_MPP --> | |||
Set far cascade meters per pixel for terrain. | |||
'''Available Options''': default, 0.5, 1, 1.5, 2, 3, 4, 5, 6, 7, 8 | |||
==== Objects num cascades ==== | |||
<!-- ID: DM_TERR_SHADOWS_CASC_OBJ_NUM --> | |||
Set number of object shadow cascades. | |||
'''Available Options''': default, 0, 1, 2 | |||
==== Objects near type ==== | |||
<!-- ID: DM_TERR_SHADOWS_CASC_OBJ_NEAR --> | |||
Set near cascade type for objects. | |||
'''Available Options''': default, movable, static | |||
==== Objects near m/px ==== | |||
<!-- ID: DM_TERR_SHADOWS_CASC_OBJ_NEAR_MPP --> | |||
Set near cascade meters per pixel for objects. | |||
'''Available Options''': default, 0.5, 1, 1.5, 2, 3, 4, 5, 6, 7, 8 | |||
==== Objects far type ==== | |||
<!-- ID: DM_TERR_SHADOWS_CASC_OBJ_FAR --> | |||
Set far cascade type for objects. | |||
'''Available Options''': default, movable, static | |||
==== Objects far m/px ==== | |||
<!-- ID: DM_TERR_SHADOWS_CASC_OBJ_FAR_MPP --> | |||
Set far cascade meters per pixel for objects. | |||
'''Available Options''': default, 0.5, 1, 1.5, 2, 3, 4, 5, 6, 7, 8 | |||
==== AO num cascades ==== | |||
<!-- ID: DM_TERR_SHADOWS_CASC_AO_NUM --> | |||
Set number of AO shadow cascades. | |||
'''Available Options''': default, 0, 1, 2 | |||
==== AO near type ==== | |||
<!-- ID: DM_TERR_SHADOWS_CASC_AO_NEAR --> | |||
Set near cascade type for AO. | |||
'''Available Options''': default, movable, static | |||
==== AO near m/px ==== | |||
<!-- ID: DM_TERR_SHADOWS_CASC_AO_NEAR_MPP --> | |||
Set near cascade meters per pixel for AO. | |||
'''Available Options''': default, 0.5, 1, 1.5, 2, 3, 4, 5, 6, 7, 8 | |||
==== AO far type ==== | |||
<!-- ID: DM_TERR_SHADOWS_CASC_AO_FAR --> | |||
Set far cascade type for AO. | |||
'''Available Options''': default, movable, static | |||
==== AO far m/px ==== | |||
<!-- ID: DM_TERR_SHADOWS_CASC_AO_FAR_MPP --> | |||
Set far cascade meters per pixel for AO. | |||
'''Available Options''': default, 0.5, 1, 1.5, 2, 3, 4, 5, 6, 7, 8 | |||
=== Objects heightmap === | |||
==== Obj. heightmap movable ==== | |||
<!-- ID: DM_TERR_SHADOWS_OBJ_HEIGHTMAP_MOVABILITY --> | |||
Set object heightmap movability. | |||
'''Available Options''': movable, static | |||
==== Draw volumetric info ==== | |||
<!-- ID: DM_TERR_SHADOWS_DEBUG_VOLUMETRIC --> | |||
Draw volumetric debug info. | |||
'''Available Options''': false, true | |||
==== Draw object heightmap ==== | |||
<!-- ID: DM_TERR_SHADOWS_DEBUG_VIS_OBJ_HEIGHT --> | |||
Draw object heightmap. | |||
'''Available Options''': disabled, set regions, set bits, all bits | |||
==== Obj.height.full upd ==== | |||
<!-- ID: DM_TERR_SHADOWS_OBJ_HEIGHTMAP_FULL --> | |||
Enable/disable full object heightmap update. | |||
'''Available Options''': false, true | |||
==== Obj.height. dbg region ==== | |||
<!-- ID: DM_TERR_SHADOWS_OBJ_HEIGHTMAP_DEBUG_REGION --> | |||
Enable/disable object heightmap region debug. | |||
'''Available Options''': false, true | |||
==== Obj.height.reset ==== | |||
<!-- ID: DM_TERR_SHADOWS_OBJ_HEIGHTMAP_RESET --> | |||
Reset object heightmap. | |||
'''Available Options''': false, true | |||
==== Obj.height.reset stats ==== | |||
<!-- ID: DM_TERR_SHADOWS_OBJ_HEIGHTMAP_RESET_STATS --> | |||
Reset object heightmap statistics. | |||
'''Available Options''': false, true | |||
==== Obj.height.print stats ==== | |||
<!-- ID: DM_TERR_SHADOWS_OBJ_HEIGHTMAP_PRINT_STATS --> | |||
Print object heightmap statistics. | |||
'''Available Options''': false, true | |||
==== Obj.height.use prepare ==== | |||
<!-- ID: DM_TERR_SHADOWS_OBJ_HEIGHTMAP_USE_PREPARE --> | |||
Enable/disable prepare for object heightmap. | |||
'''Available Options''': true, false | |||
==== Obj.height.use CB ==== | |||
<!-- ID: DM_TERR_SHADOWS_OBJ_HEIGHTMAP_USE_CB --> | |||
Enable/disable command buffer for object heightmap. | |||
'''Available Options''': false, true | |||
==== Obj.height.max merge ==== | |||
<!-- ID: DM_TERR_SHADOWS_OBJ_HEIGHTMAP_MAX_MERGE --> | |||
Set maximum merge for object heightmap. | |||
'''Available Options''': unlimited, 1, 4, 8, 16 | |||
==== Obj.height. subdiv ==== | |||
<!-- ID: DM_TERR_SHADOWS_OBJ_HEIGHTMAP_SUBDIV --> | |||
Enable/disable object heightmap subdivision. | |||
'''Available Options''': false, true | |||
==== Obj.height. sync draw ==== | |||
<!-- ID: DM_TERR_SHADOWS_OBJ_HEIGHTMAP_SYNC_DRAWCALLS --> | |||
Set object heightmap draw call synchronization. | |||
'''Available Options''': default, sync, no sync | |||
==== Obj. heightmap tex size ==== | |||
<!-- ID: DM_TERR_SHADOWS_OBJ_HEIGHTMAP_TEX_SIZE --> | |||
Set object heightmap texture size. | |||
'''Available Options''': no override, 1024, 2048, 4096, 8192 | |||
==== Obj. heightmap m/pixel ==== | |||
<!-- ID: DM_TERR_SHADOWS_OBJ_HEIGHTMAP_METERS_PER_PIXEL --> | |||
Set object heightmap meters per pixel. | |||
'''Available Options''': default, 0.5, 1, 1.5, 2, 3, 4, 5, 6, 7, 8 | |||
==== Min entities per frame ==== | |||
<!-- ID: DM_TERR_SHADOWS_OBJ_HEIGHTMAP_MIN_ENTITIES --> | |||
Set min entities per frame for heightmap. | |||
'''Available Options''': default, 512, 1K, 2K, 4K, 8K, 16K, 32K, 64K, 128K, unlimited | |||
==== Max entities per frame ==== | |||
<!-- ID: DM_TERR_SHADOWS_OBJ_HEIGHTMAP_MAX_ENTITIES --> | |||
Set max entities per frame for heightmap. | |||
'''Available Options''': default, 512, 1K, 2K, 4K, 8K, 16K, 32K, 64K, 128K, unlimited | |||
=== Terrain shadows === | === Terrain shadows === | ||
<!-- ID: DM_TERR_SHADOWS_TERRAIN --> | |||
Set terrain shadows mode. | |||
'''Available Options''': default, on (slice), on (full), no update, disabled | |||
=== Freeze update === | |||
<!-- ID: DM_TERR_SHADOWS_TERRAIN_FREEZE --> | |||
Freeze terrain shadow update. | |||
'''Available Options''': false, true | |||
=== Quality profile override === | |||
<!-- ID: DM_TERR_SHADOWS_TERRAIN_QUALITY --> | |||
Override terrain shadow quality profile. | |||
'''Available Options''': no override, disabled, low, medium, high | |||
=== Diag messages === | |||
<!-- ID: DM_TERR_SHADOWS_DEBUG_MSG --> | |||
Enable/disable terrain shadows debug messages. | |||
'''Available Options''': false, true | |||
=== Texture size === | |||
<!-- ID: DM_TERR_SHADOWS_TEX_SIZE --> | |||
Override terrain shadow texture size. | |||
'''Available Options''': no override, 1024, 2048, 4096, 8192 | |||
=== Blur override === | |||
<!-- ID: DM_TERR_SHADOWS_BLUR --> | |||
Override terrain shadow blur. | |||
'''Available Options''': no override, 0, 3, 5, 7, 9 | |||
=== Hierarchical raytrace === | |||
<!-- ID: DM_TERR_SHADOWS_HIERARCHICAL --> | |||
Enable/disable hierarchical raytrace for terrain shadows. | |||
'''Available Options''': true, false | |||
=== Force mipmap rebuild === | |||
<!-- ID: DM_TERR_SHADOWS_MIP_REBUILD --> | |||
Enable/disable forcing of mipmap rebuild for terrain shadows. | |||
'''Available Options''': false, true | |||
=== Herarchical mip1 === | |||
<!-- ID: DM_TERR_SHADOWS_HIER_MIP1 --> | |||
Set hierarchical mip 1 level. | |||
'''Available Options''': default, none, 0, 1, 2, 3, 4, 5, 6 | |||
=== Herarchical mip2 === | |||
<!-- ID: DM_TERR_SHADOWS_HIER_MIP2 --> | |||
Set hierarchical mip 2 level. | |||
'''Available Options''': default, none, 0, 1, 2, 3, 4, 5, 6 | |||
=== Herarchical mip3 === | |||
<!-- ID: DM_TERR_SHADOWS_HIER_MIP3 --> | |||
Set hierarchical mip 3 level. | |||
'''Available Options''': default, none, 0, 1, 2, 3, 4, 5, 6 | |||
=== Herarchical mip4 === | |||
<!-- ID: DM_TERR_SHADOWS_HIER_MIP4 --> | |||
Set hierarchical mip 4 level. | |||
'''Available Options''': default, none, 0, 1, 2, 3, 4, 5, 6 | |||
=== Override Angle bias === | |||
<!-- ID: DM_TERR_SHADOWS_ANGLE_BIAS_OVERRIDE --> | |||
Enable/disable overriding of angle bias. | |||
'''Available Options''': false, true | |||
=== Angle bias (deg) === | |||
<!-- ID: DM_TERR_SHADOWS_ANGLE_BIAS --> | |||
Set angle bias for terrain shadows. | |||
'''Range Settings''': | |||
Min: -10 | |||
Max: 10 | |||
Current Value: -0.5 | |||
Step: 0.1 | |||
=== Override Height bias === | |||
<!-- ID: DM_TERR_SHADOWS_HEIGHT_BIAS_OVERRIDE --> | |||
Enable/disable overriding of height bias. | |||
'''Available Options''': false, true | |||
=== Height bias (m) === | |||
<!-- ID: DM_TERR_SHADOWS_HEIGHT_BIAS --> | |||
Set height bias for terrain shadows. | |||
'''Range Settings''': | |||
Min: 0 | |||
Max: 10 | |||
Current Value: 0.5 | |||
Step: 0.1 | |||
=== Override Trace bias === | |||
<!-- ID: DM_TERR_SHADOWS_TRACE_BIAS_OVERRIDE --> | |||
Enable/disable overriding of trace bias. | |||
'''Available Options''': false, true | |||
=== Trace bias === | |||
<!-- ID: DM_TERR_SHADOWS_TRACE_BIAS --> | |||
Set trace bias for terrain shadows. | |||
'''Range Settings''': | |||
Min: 0 | |||
Max: 10 | |||
Current Value: 0.0 | |||
Step: 0.1 | |||
=== Override Trace bias obj === | |||
<!-- ID: DM_TERR_SHADOWS_TRACE_BIAS_OBJ_OVERRIDE --> | |||
Enable/disable overriding of object trace bias. | |||
'''Available Options''': false, true | |||
=== Trace bias obj min === | |||
<!-- ID: DM_TERR_SHADOWS_TRACE_BIAS_OBJ_MIN --> | |||
Set object trace bias minimum. | |||
'''Range Settings''': | |||
Min: 0 | |||
Max: 10 | |||
Current Value: 0.1 | |||
Step: 0.1 | |||
=== Trace bias obj max === | |||
<!-- ID: DM_TERR_SHADOWS_TRACE_BIAS_OBJ_MAX --> | |||
Set object trace bias maximum. | |||
'''Range Settings''': | |||
Min: 0 | |||
Max: 10 | |||
Current Value: 1.5 | |||
Step: 0.1 | |||
=== Object shadows === | |||
<!-- ID: DM_TERR_SHADOWS_OBJECTS --> | |||
Set object shadows mode. | |||
'''Available Options''': default, force off, force on | |||
=== Object shadow type === | |||
<!-- ID: DM_TERR_SHADOWS_OBJECTS_SHADOW_TYPE --> | |||
Set object shadow type. | |||
'''Available Options''': no override, Physics, Physics+AAB, AAB, AABScaled, Volume | |||
=== Occ grid runtime === | |||
<!-- ID: DM_TERR_SHADOWS_OBJ_HEIGHTMAP_OCC_GRID_RUNTIME_CREATION --> | |||
Enable/disable runtime creation of occupation grid. | |||
'''Available Options''': false, true | |||
=== Blend mode === | |||
<!-- ID: DM_TERR_SHADOWS_BLEND --> | |||
Set blend mode for terrain shadows. | |||
'''Available Options''': blend, min | |||
=== Border size === | |||
<!-- ID: DM_TERR_SHADOWS_BORDER_SIZE --> | |||
Set border size for terrain shadows. | |||
'''Available Options''': default, 0, 0.05, 0.1, 0.15, 0.2, 0.3, 0.4, 0.5 | |||
=== Sun move test === | |||
<!-- ID: DM_TERR_SHADOWS_TEST_SUN --> | |||
Set sun move test mode. | |||
'''Available Options''': off, fwd slow, fwd medium, bwd fast, bwd slow, bwd medium, bwd fast | |||
=== Min pixels per frame === | |||
<!-- ID: DM_TERR_SHADOWS_MIN_PIX_PER_FRAME --> | |||
Set min pixels per frame for terrain shadows. | |||
'''Available Options''': default, 16K, 32K, 64K, 128K, 256K, 512K, unlimited | |||
=== Max pixels per frame === | |||
<!-- ID: DM_TERR_SHADOWS_MAX_PIX_PER_FRAME --> | |||
Set max pixels per frame for terrain shadows. | |||
'''Available Options''': default, 16K, 32K, 64K, 128K, 256K, 512K, unlimited | |||
=== Obj shadow blend dist(m) === | |||
<!-- ID: DM_TERR_SHADOWS_OBJ_SHADOW_BLEND_DIST --> | |||
Set object shadow blend distance. | |||
'''Range Settings''': | |||
Min: 0 | |||
Max: 20 | |||
Current Value: 10.0 | |||
Step: 0.1 | |||
=== Terrain shadow blend dist(m) === | |||
<!-- ID: DM_TERR_SHADOWS_TER_SHADOW_BLEND_DIST --> | |||
Set terrain shadow blend distance. | |||
'''Range Settings''': | |||
Min: 0 | |||
Max: 20 | |||
Current Value: 3.0 | |||
Step: 0.1 | |||
=== AO mode override === | |||
<!-- ID: DM_TERR_SHADOWS_AO_MODE --> | |||
Set AO mode override for terrain shadows. | |||
'''Available Options''': no override, disabled, PP half, PP mixed, PP full, force precomputed, presomputed+runtime, force runtime | |||
=== Override AO coef === | |||
<!-- ID: DM_TERR_SHADOWS_OVERRIDE_AO_COEF --> | |||
Enable/disable overriding of AO coefficient. | |||
'''Available Options''': false, true | |||
=== AO coef === | |||
<!-- ID: DM_TERR_SHADOWS_AO_COEF --> | |||
Set AO coefficient. | |||
'''Range Settings''': | |||
* Min: 0 | |||
* Max: 1.0 | |||
* Current Value: 0.3 | |||
* Step: 0.02 | |||
=== AO radius === | |||
<!-- ID: DM_TERR_SHADOWS_AO_RADIUS --> | |||
Set AO radius. | |||
'''Range Settings''': | |||
* Min: 0 | |||
* Max: 10.0 | |||
* Current Value: 3.0 | |||
* Step: 0.2 | |||
=== AO blend distance === | |||
<!-- ID: DM_TERR_SHADOWS_AO_BLEND_DIST --> | |||
Set AO blend distance. | |||
'''Range Settings''': | |||
* Min: 0 | |||
* Max: 10.0 | |||
* Current Value: 5.0 | |||
* Step: 0.2 | |||
=== AO PP mode === | |||
<!-- ID: DM_TERR_SHADOWS_AO_PP_MODE --> | |||
Set AO post-processing mode. | |||
'''Available Options''': default, full res, half res, half res + reconst | |||
=== Terr. light angle limit === | |||
<!-- ID: DM_TERR_SHADOWS_LIGHT_LIMIT_ANGLE --> | |||
Set light angle limit for terrain shadows. | |||
'''Available Options''': default, user | |||
=== Limit angle === | |||
<!-- ID: DM_TERR_SHADOWS_LIGHT_LIMIT_ANGLE_VAL --> | |||
Set light limit angle. | |||
'''Range Settings''': | |||
* Min: 1 | |||
* Max: 60 | |||
* Current Value: 15 | |||
* Step: 0.1 | |||
== FSR == | |||
=== Resolution scale === | |||
<!-- ID: DM_REND_FSR_RES_SCALE --> | |||
Set resolution scale for FSR. | |||
'''Available Options''': default, manual, 100%, FSR Ultra (77%), FSR Quality (67%), FSR Balanced (59%), FSR Perf (50%) | |||
=== Manual scale === | |||
<!-- ID: DM_REND_FSR_RES_SCALE_VAL --> | |||
Set manual scale for FSR. | |||
'''Range Settings''': | |||
* Min: 0.1 | |||
* Max: 2.0 | |||
* Current Value: 1.0 | |||
* Step: 0.01 | |||
=== Use pixel shader === | |||
<!-- ID: DM_REND_FSR_USEPS --> | |||
Enable/disable pixel shader for FSR. | |||
'''Available Options''': false, true | |||
=== Override FSR settings === | |||
<!-- ID: DM_REND_FSR_OVERRIDE --> | |||
Enable/disable overriding of FSR settings. | |||
'''Available Options''': false, true | |||
=== FSR enabled === | |||
<!-- ID: DM_REND_FSR_ENABLED --> | |||
Enable/disable FSR. | |||
'''Available Options''': false, true | |||
=== FSR sharpen === | |||
<!-- ID: DM_REND_FSR_SHARPEN_ENABLE --> | |||
Enable/disable FSR sharpening. | |||
'''Available Options''': true, false | |||
=== FSR sharpen att. === | |||
<!-- ID: DM_REND_FSR_SHARPEN_ATT --> | |||
Set FSR sharpen amount. | |||
'''Range Settings''': | |||
* Min: 0.0 | |||
* Max: 2.0 | |||
* Current Value: 0.5 | |||
* Step: 0.01 | |||
=== FSR dither === | |||
<!-- ID: DM_REND_FSR_DITHER_AMOUNT --> | |||
Set FSR dither amount. | |||
'''Range Settings''': | |||
* Min: 0.0 | |||
* Max: 1.0 | |||
* Current Value: 1.0 | |||
* Step: 0.01 | |||
=== FSR RT format === | |||
<!-- ID: DM_REND_FSR_RT_FORMAT --> | |||
Set render target format for FSR. | |||
'''Available Options''': default, R8G8B8A8, R10G10B10A2, R11G11B10F, R16G16B16A16F | |||
=== FSR mip bias === | |||
<!-- ID: DM_REND_FSR_MIP_BIAS --> | |||
Set mip bias for FSR. | |||
'''Available Options''': disabled, automatic, manual | |||
=== manual mip bias === | |||
<!-- ID: DM_REND_FSR_MIP_BIAS_VAL --> | |||
Set manual mip bias for FSR. | |||
Options: -4.0 0.0 0.0 0.01 | |||
== CAS == | |||
=== Shader === | |||
<!-- ID: DM_REND_CAS_SHADER --> | |||
Set shader type for CAS. | |||
'''Available Options''': default, force PS, force CS | |||
=== Override CAS settings === | |||
<!-- ID: DM_REND_CAS_OVERRIDE --> | |||
Enable/disable overriding of CAS settings. | |||
'''Available Options''': false, true | |||
=== enabled === | |||
<!-- ID: DM_REND_CAS_ENABLEDEnable/disable CAS. --> | |||
'''Available Options''': false, true | |||
=== sharpness === | |||
<!-- ID: DM_REND_CAS_SHARPNESS --> | |||
Set CAS sharpness. | |||
'''Range Settings''': | |||
* Min: 0.0 | |||
* Max: 1.0 | |||
* Current Value: 0.8 | |||
* Step: 0.01 | |||
== Rain == | |||
=== Wetness === | |||
==== Override wetness ==== | |||
<!-- ID: DM_REND_RAIN_OVERRIDE_WETNESS --> | |||
Enable/disable overriding of rain wetness. | |||
'''Available Options''': false, true | |||
==== Wetness ==== | |||
<!-- ID: DM_REND_RAIN_WETNESS --> | |||
Set rain wetness. | |||
'''Range Settings''': | |||
* Min: 0.0 | |||
* Max: 1.0 | |||
* Current Value: 0.0 | |||
* Step: 0.01 | |||
==== Flood cracks ==== | |||
<!-- ID: DM_REND_RAIN_FLOOD_LEVEL_CRACKS --> | |||
Set rain flood level for cracks. | |||
'''Range Settings''': | |||
* Min: 0.0 | |||
* Max: 1.0 | |||
* Current Value: 0.0 | |||
* Step: 0.01 | |||
==== Flood puddles ==== | |||
<!-- ID: DM_REND_RAIN_FLOOD_LEVEL_PUDDLES --> | |||
Set rain flood level for puddles. | |||
'''Range Settings''': | |||
* Min: 0.0 | |||
* Max: 1.0 | |||
* Current Value: 0.0 | |||
* Step: 0.01 | |||
==== Tree scale ==== | |||
<!-- ID: DM_REND_RAIN_TREE_SCALE --> | |||
Set rain tree scale. | |||
'''Range Settings''': | |||
* Min: 0.0 | |||
* Max: 1.0 | |||
* Current Value: 0.0 | |||
* Step: 0.01 | |||
==== Wetness simulation ==== | |||
<!-- ID: DM_REND_RAIN_WETNESS_SIMULATION --> | |||
Enable/disable wetness simulation. | |||
'''Available Options''': false, true | |||
==== Simulation value ==== | |||
<!-- ID: DM_REND_RAIN_WETSIM_VALUE --> | |||
Set wetness simulation value. | |||
'''Range Settings''': | |||
* Min: 0.0 | |||
* Max: 1.0 | |||
* Current Value: 0.0 | |||
* Step: 0.002 | |||
==== Override wetness render params ==== | |||
<!-- ID: DM_REND_RAIN_WETNESS_OVERRIDE_RENDER --> | |||
Enable/disable overriding of wetness render params. | |||
'''Available Options''': false, true | |||
=== Wind === | |||
==== Override rain wind ==== | |||
<!-- ID: DM_REND_RAIN_OVERRIDE_WIND --> | |||
Enable/disable overriding of rain wind. | |||
'''Available Options''': false, true | |||
==== Mask operator ==== | |||
<!-- ID: DM_REND_RAIN_WIND_MASK_OPERATOR --> | |||
Set mask operator for rain wind. | |||
'''Available Options''': add, mul | |||
==== Override splash wind ==== | |||
<!-- ID: DM_REND_RAIN_SPLASHES_OVERRIDE_WIND --> | |||
Enable/disable overriding of splash wind. | |||
'''Available Options''': false, true | |||
==== Mask operator ==== | |||
<!-- ID: DM_REND_RAIN_SPLASHES_WIND_MASK_OPERATOR --> | |||
Set mask operator for splash wind. | |||
'''Available Options''': add, mul | |||
=== Downsample === | |||
<!-- ID: DM_REND_RAIN_COLOR_DOWNSAMPLE --> | |||
Set rain color downsample method. | |||
'''Available Options''': default, simple, blur, none | |||
=== Blend method === | |||
<!-- ID: DM_REND_RAIN_BLEND_METHOD --> | |||
Set rain blend method. | |||
'''Available Options''': default, standard, noRefraction | |||
=== Diag refr. tex === | |||
<!-- ID: DM_REND_RAIN_DIAG_REFRACTION_TEX --> | |||
Enable/disable rain refraction texture diagnostic. | |||
'''Available Options''': false, true | |||
=== Stop time === | |||
<!-- ID: DM_REND_RAIN_STOP_TIME --> | |||
Enable/disable stopping of rain simulation time. | |||
'''Available Options''': false, true | |||
=== Use underwater mask === | |||
<!-- ID: DM_REND_RAIN_USE_UNDERWATER_MASK --> | |||
Enable/disable underwater mask for rain. | |||
'''Available Options''': true, false | |||
=== Override rain density === | |||
<!-- ID: DM_REND_RAIN_OVERRIDE_DENSITY --> | |||
Enable/disable overriding of rain density. | |||
'''Available Options''': false, true | |||
=== Rain density === | |||
<!-- ID: DM_REND_RAIN_OVERRIDE_DENSITY_VAL --> | |||
Set rain density. | |||
'''Range Settings''': | |||
* Min: 0.0 | |||
* Max: 1.0 | |||
* Current Value: 0.0 | |||
* Step: 0.02 | |||
=== Override direction === | |||
<!-- ID: DM_REND_RAIN_OVERRIDE_DIR --> | |||
Enable/disable overriding of rain direction. | |||
'''Available Options''': false, true | |||
=== Override dirX === | |||
<!-- ID: DM_REND_RAIN_OVERRIDE_DIRX --> | |||
Set rain direction X. | |||
Options: -1.0 1.0 0.0 0.05 | |||
=== Override dirY === | |||
<!-- ID: DM_REND_RAIN_OVERRIDE_DIRY --> | |||
Set rain direction Y. | |||
Options: -1.0 1.0 -1.0 0.05 | |||
=== Override dirZ === | |||
<!-- ID: DM_REND_RAIN_OVERRIDE_DIRZ --> | |||
Set rain direction Z. | |||
Options: -1.0 1.0 0.0 0.05 | |||
=== Distant noise mask debug === | |||
<!-- ID: DM_REND_RAIN_DISTANT_NOISE_MASK_DEBUG --> | |||
Enable/disable rain distant noise mask debug. | |||
'''Available Options''': false, true | |||
=== Override ripple tex size === | |||
<!-- ID: DM_REND_RAIN_OVERRIDE_RIPPLES_TEX_SIZE --> | |||
Override rain ripple texture size. | |||
'''Available Options''': default, 128, 256, 512, 1024 | |||
=== Sliding drops obj space === | |||
<!-- ID: DM_REND_RAIN_SLIDING_DROPS_USE_OBJ_SPACE --> | |||
Enable/disable sliding drops object space. | |||
'''Available Options''': false, true | |||
=== Override ripples === | |||
<!-- ID: DM_REND_RAIN_OVERRIDE_RIPPLES --> | |||
Enable/disable overriding of rain ripples. | |||
'''Available Options''': false, true | |||
=== Ripples count min === | |||
<!-- ID: DM_REND_RAIN_RIPPLES_COUNT_MIN --> | |||
Set rain ripples count minimum. | |||
'''Range Settings''': | |||
* Min: 1.0 | |||
* Max: 100.0 | |||
* Current Value: 10.0 | |||
* Step: 1.0 | |||
=== Ripples count max === | |||
<!-- ID: DM_REND_RAIN_RIPPLES_COUNT_MAX --> | |||
Set rain ripples count maximum. | |||
'''Range Settings''': | |||
* Min: 1.0 | |||
* Max: 100.0 | |||
* Current Value: 50.0 | |||
* Step: 1.0 | |||
=== Ripples size min === | |||
<!-- ID: DM_REND_RAIN_RIPPLES_SIZE_MIN --> | |||
Set rain ripples size minimum. | |||
'''Range Settings''': | |||
* Min: 1.0 | |||
* Max: 20.0 | |||
* Current Value: 1.0 | |||
* Step: 1.0 | |||
=== Ripples size max === | |||
<!-- ID: DM_REND_RAIN_RIPPLES_SIZE_MAX --> | |||
Set rain ripples size maximum. | |||
'''Range Settings''': | |||
* Min: 1.0 | |||
* Max: 20.0 | |||
* Current Value: 5.0 | |||
* Step: 1.0 | |||
=== Ripples height min === | |||
<!-- ID: DM_REND_RAIN_RIPPLES_HEIGHT_MIN --> | |||
Set rain ripples height minimum. | |||
'''Range Settings''': | |||
* Min: 0.0 | |||
* Max: 1.0 | |||
* Current Value: 0.5 | |||
* Step: 0.01 | |||
=== Ripples height max === | |||
<!-- ID: DM_REND_RAIN_RIPPLES_HEIGHT_MAX --> | |||
Set rain ripples height maximum. | |||
'''Range Settings''': | |||
* Min: 0.0 | |||
* Max: 1.0 | |||
* Current Value: 1.0 | |||
* Step: 0.01 | |||
=== Ripples speed === | |||
<!-- ID: DM_REND_RAIN_RIPPLES_SPEED --> | |||
Set rain ripples speed. | |||
'''Range Settings''': | |||
* Min: 1.0 | |||
* Max: 2000.0 | |||
* Current Value: 500.0 | |||
* Step: 10.0 | |||
=== Ripples damping === | |||
<!-- ID: DM_REND_RAIN_RIPPLES_DAMPING --> | |||
Set rain ripples damping. | |||
'''Range Settings''': | |||
* Min: 0.01 | |||
* Max: 1.0 | |||
* Current Value: 0.04 | |||
* Step: 0.01 | |||
=== Ripples normal strength === | |||
<!-- ID: DM_REND_RAIN_RIPPLES_NORMAL_STRENGTH --> | |||
Set rain ripples normal strength. | |||
'''Range Settings''': | |||
* Min: 0.1 | |||
* Max: 20.0 | |||
* Current Value: 8.0 | |||
* Step: 0.1 | |||
=== Ripples reset === | |||
<!-- ID: DM_REND_RAIN_RIPPLES_RESET --> | |||
Enable/disable resetting of rain ripples. | |||
'''Available Options''': false, true | |||
== Shore Wetness == | |||
=== Shore wetness enabled === | |||
<!-- ID: DM_REND_SHORE_WETNESS_ENABLED --> | |||
Enable/disable shore wetness. | |||
'''Available Options''': default, enable, disable | |||
=== Shore wetness override === | |||
<!-- ID: DM_REND_SHORE_WETNESS_OVERRIDE --> | |||
Enable/disable overriding of shore wetness. | |||
'''Available Options''': false, true | |||
=== Shore wet height above === | |||
<!-- ID: DM_REND_SHORE_WETNESS_HEIGHT_ABOVE --> | |||
Set shore wet height above. | |||
'''Range Settings''': | |||
Min: 0.0 | |||
Max: 10.0 | |||
Current Value: 0.5 | |||
Step: 0.01 | |||
=== Shore wet fade above === | |||
<!-- ID: DM_REND_SHORE_WETNESS_FADE_ABOVE --> | |||
Set shore wet fade above. | |||
'''Range Settings''': | |||
Min: 0.0 | |||
Max: 10.0 | |||
Current Value: 0.5 | |||
Step: 0.01 | |||
=== Shore wet height below === | |||
<!-- ID: DM_REND_SHORE_WETNESS_HEIGHT_BELOW --> | |||
Set shore wet height below. | |||
'''Range Settings''': | |||
Min: 0.0 | |||
Max: 10.0 | |||
Current Value: 0.5 | |||
Step: 0.01 | |||
=== Shore wet fade below === | |||
<!-- ID: DM_REND_SHORE_WETNESS_FADE_BELOW --> | |||
Set shore wet fade below. | |||
'''Range Settings''': | |||
Min: 0.0 | |||
Max: 10.0 | |||
Current Value: 0.5 | |||
Step: 0.01 | |||
=== Shore wet fade coef === | |||
<!-- ID: DM_REND_SHORE_WETNESS_FADE_COEF --> | |||
Set shore wet fade coefficient. | |||
'''Range Settings''': | |||
Min: 0.001 | |||
Max: 10.0 | |||
Current Value: 1.0 | |||
Step: 0.01 | |||
=== Shore wet rough fade start === | |||
<!-- ID: DM_REND_SHORE_WETNESS_ROUGH_UNDER_FADE_START --> | |||
Set shore wet rough fade start. | |||
'''Range Settings''': | |||
Min: 0.0 | |||
Max: 10.0 | |||
Current Value: 0.0 | |||
Step: 0.01 | |||
=== Shore wet rough fade size === | |||
<!-- ID: DM_REND_SHORE_WETNESS_ROUGH_UNDER_FADE_SIZE --> | |||
Set shore wet rough fade size. | |||
'''Range Settings''': | |||
Min: 0.001 | |||
Max: 10.0 | |||
Current Value: 1.0 | |||
Step: 0.01 | |||
=== Shore wet rough coef === | |||
<!-- ID: DM_REND_SHORE_WETNESS_ROUGH_COEF --> | |||
Set shore wet rough coefficient. | |||
'''Range Settings''': | |||
Min: 0.001 | |||
Max: 10.0 | |||
Current Value: 1.0 | |||
Step: 0.01 | |||
=== River wetness enabled === | |||
<!-- ID: DM_REND_RIVER_WETNESS_ENABLED --> | |||
Enable/disable river wetness. | |||
'''Available Options''': default, enable, disable | |||
=== River wetness override === | |||
<!-- ID: DM_REND_RIVER_WETNESS_OVERRIDE --> | |||
Enable/disable overriding of river wetness. | |||
'''Available Options''': false, true | |||
=== River wet height above === | |||
<!-- ID: DM_REND_RIVER_WETNESS_HEIGHT_ABOVE --> | |||
Set river wet height above. | |||
'''Range Settings''': | |||
Min: 0.0 | |||
Max: 10.0 | |||
Current Value: 0.5 | |||
Step: 0.01 | |||
=== River wet fade above === | |||
<!-- ID: DM_REND_RIVER_WETNESS_FADE_ABOVE --> | |||
Set river wet fade above. | |||
'''Range Settings''': | |||
Min: 0.0 | |||
Max: 10.0 | |||
Current Value: 0.5 | |||
Step: 0.01 | |||
=== River wet height below === | |||
<!-- ID: DM_REND_RIVER_WETNESS_HEIGHT_BELOW --> | |||
Set river wet height below. | |||
'''Range Settings''': | |||
Min: 0.0 | |||
Max: 10.0 | |||
Current Value: 0.5 | |||
Step: 0.01 | |||
=== River wet fade below === | |||
<!-- ID: DM_REND_RIVER_WETNESS_FADE_BELOW --> | |||
Set river wet fade below. | |||
'''Range Settings''': | |||
Min: 0.0 | |||
Max: 10.0 | |||
Current Value: 0.5 | |||
Step: 0.01 | |||
=== River wet fade coef === | |||
<!-- ID: DM_REND_RIVER_WETNESS_FADE_COEF --> | |||
Set river wet fade coefficient. | |||
'''Range Settings''': | |||
Min: 0.001 | |||
Max: 10.0 | |||
Current Value: 1.0 | |||
Step: 0.01 | |||
=== River wet rough coef === | |||
<!-- ID: DM_REND_RIVER_WETNESS_ROUGH_COEF --> | |||
Set river wet rough coefficient. | |||
'''Range Settings''': | |||
Min: 0.001 | |||
Max: 10.0 | |||
Current Value: 1.0 | |||
Step: 0.01 | |||
== LensFlares == | |||
=== Debug render === | |||
<!-- ID: DM_REND_LENSFLARE_DEBUG_RENDER --> | |||
Enable/disable lens flare debug rendering. | |||
'''Available Options''': false, true | |||
=== HalfRes render === | |||
<!-- ID: DM_REND_LENSFLARE_HALF_RES --> | |||
Set half resolution render for lens flares. | |||
'''Available Options''': no override, false, true | |||
=== Force flare dirlight === | |||
<!-- ID: DM_REND_LENSFLARE_OVERRIDE_DIRLIGHT --> | |||
Set force flare dirlight. | |||
Options: -1 100 -1 1 | |||
=== Force flare pointlight === | |||
<!-- ID: DM_REND_LENSFLARE_OVERRIDE_POINTLIGHT --> | |||
Set force flare pointlight. | |||
Options: -1 100 -1 1 | |||
=== Force flare spotlight === | |||
<!-- ID: DM_REND_LENSFLARE_OVERRIDE_SPOTLIGHT --> | |||
Set force flare spotlight. | |||
Options: -1 100 -1 1 | |||
=== Override flare set === | |||
<!-- ID: DM_REND_LENSFLARE_OVERRIDE_FLARE_SET --> | |||
Override lens flare set. | |||
'''Available Options''': no override, none, 1st person, 3rd person | |||
=== Override offset spot === | |||
<!-- ID: DM_REND_LENSFLARE_OVERRIDE_FLARE_OFFSET_SPOT --> | |||
Enable/disable overriding of offset spot for lens flares. | |||
'''Available Options''': false, true | |||
=== Offset spot === | |||
<!-- ID: DM_REND_LENSFLARE_OVERRIDE_FLARE_OFFSET_SPOT_VAL --> | |||
Set offset spot for lens flares. | |||
Options: -2 2 0 0.01 | |||
=== Override offset point === | |||
<!-- ID: DM_REND_LENSFLARE_OVERRIDE_FLARE_OFFSET_POINT --> | |||
Enable/disable overriding of offset point for lens flares. | |||
'''Available Options''': false, true | |||
=== Offset point === | |||
<!-- ID: DM_REND_LENSFLARE_OVERRIDE_FLARE_OFFSET_POINT_VAL --> | |||
Set offset point for lens flares. | |||
Options: -2 2 0 0.01 | |||
=== Use new occl.system === | |||
<!-- ID: DM_REND_LENSFLARE_OVERRIDE_OCCLUSION_SYSTEM --> | |||
Set new occlusion system for lens flares. | |||
'''Available Options''': no override, false, true | |||
=== Use intens.occ.for all === | |||
<!-- ID: DM_REND_LENSFLARE_OVERRIDE_USE_INTENSITY_OCCLUSION_FOR_ALL --> | |||
Enable/disable intensity occlusion for all lens flares. | |||
'''Available Options''': no override, false, true | |||
== Ocean & Water == | |||
=== Shore === | |||
==== Shore enabled ==== | |||
<!-- ID: DM_OCEAN_SHORE_ENABLED --> | |||
Enable/disable shore rendering. | |||
'''Available Options''': true, false | |||
==== Debug visualize ==== | |||
<!-- ID: DM_OCEAN_SHORE_DEBUG_VIS --> | |||
Show debug visualization of shore. | |||
'''Available Options''': disabled, waves, DF distance, DF direction, DF near, peaks tex, noise onShore, noise foam start, noise foam, damp wave, damp peak, damp depth, on shore coef, custom foam, mask | |||
==== Debug displacement ==== | |||
<!-- ID: DM_OCEAN_SHORE_DEBUG_DISPLACEMENT --> | |||
Enable/disable shore displacement debugging. | |||
'''Available Options''': false, true | |||
==== Debug height ==== | |||
<!-- ID: DM_OCEAN_SHORE_DEBUG_HEIGHT --> | |||
Show shore height debug. | |||
'''Available Options''': none, final, shore, final+shore | |||
==== Use height lerp ==== | |||
<!-- ID: DM_OCEAN_SHORE_HEIGHT_LERP --> | |||
Enable/disable height lerp for shore. | |||
'''Available Options''': false, true | |||
==== Force live preview each frame ==== | |||
<!-- ID: DM_OCEAN_SHORE_FORCE_LIVE_PREVIEW --> | |||
Enable/disable forcing live preview for shore. | |||
'''Available Options''': false, true | |||
=== WaterErase === | |||
==== Water erase enabled ==== | |||
<!-- ID: DM_REND_WATER_ERASE_ENABLED --> | |||
Enable/disable water erase. | |||
'''Available Options''': true, false | |||
==== Debug visualize ==== | |||
<!-- ID: DM_REND_WATER_ERASE_DEBUG_VIS --> | |||
Show water erase debug visualization. | |||
'''Available Options''': disabled, front faces, back faces, front & back | |||
=== Ocean render === | |||
<!-- ID: DM_REND_OCEAN --> | |||
Set ocean render mode. | |||
'''Available Options''': enabled, disable simulation, disabled | |||
=== Show ocean tex === | |||
<!-- ID: DM_REND_OCEAN_SHOWTEX --> | |||
Display ocean texture. | |||
'''Available Options''': disable, height, displaceX, displaceZ, normal, foam, UW topdown, UW topdown depth, UW geom depth | |||
=== Tex size === | |||
<!-- ID: DM_REND_OCEAN_SHOWTEX_SIZE --> | |||
Set ocean debug texture size. | |||
'''Available Options''': 1, 2, 3, 4, 0.25, 0.33, 0.5 | |||
=== Water bodies === | |||
<!-- ID: DM_REND_WATERBODIES --> | |||
Show water bodies. | |||
'''Available Options''': invisible, camera, all | |||
=== Ocean foam === | |||
<!-- ID: DM_REND_OCEAN_FOAM --> | |||
Set ocean foam mode. | |||
'''Available Options''': enabled, mask, foam | |||
== Atmosphere == | |||
=== Show Sky LUTs === | |||
<!-- ID: DM_REND_ATMOSPHERE_SHOW_SKYLUTS --> | |||
Enable/disable showing of sky LUTs. | |||
'''Available Options''': false, true | |||
=== Show CameraVolume === | |||
<!-- ID: DM_REND_ATMOSPHERE_SHOW_CAMERAVOLUME --> | |||
Enable/disable showing of CameraVolume. | |||
'''Available Options''': false, true | |||
=== FullScreen === | |||
<!-- ID: DM_REND_ATMOSPHERE_SHOW_CAMERAVOLUME_FULLSCREEN --> | |||
Enable/disable fullscreen view for CameraVolume. | |||
'''Available Options''': false, true | |||
=== Haze source === | |||
<!-- ID: DM_REND_ATMOSPHERE_HAZE_MODE --> | |||
Set haze source for atmosphere. | |||
'''Available Options''': User(CloudsCycle), Atmosphere, GlobalProbe | |||
=== Enable a.fog shadows === | |||
<!-- ID: DM_REND_ATMOSPHERE_SHADOWS_ANALYTICAL_FOG --> | |||
Enable/disable analytical fog shadows. | |||
'''Available Options''': false, true | |||
=== Use SkyAmbient tex. === | |||
<!-- ID: DM_REND_ATMOSPHERE_USE_SKY_AMBIENT_TEX --> | |||
Enable/disable use of sky ambient texture. | |||
'''Available Options''': true, false | |||
=== Probe fake === | |||
<!-- ID: DM_REND_ATMOSPHERE_USE_SKY_PROBEAMBIENT_TEX --> | |||
Set probe ambient for atmosphere. | |||
'''Available Options''': probe lut, sky lut, original | |||
=== Overcast fix. === | |||
<!-- ID: DM_REND_ATMOSPHERE_OVERCAST_FIX --> | |||
Set overcast fix mode for atmosphere. | |||
'''Available Options''': enabled, disabled | |||
=== Original lighting === | |||
<!-- ID: DM_REND_ATMOSPHERE_ORIGINAL --> | |||
Set original lighting mode for atmosphere. | |||
'''Available Options''': enabled, disabled | |||
=== Final output brightness mod. === | |||
<!-- ID: DM_REND_ATMOSPHERE_OUTPUT_MOD --> | |||
Enable/disable final brightness modification for atmosphere. | |||
'''Available Options''': disabled, enabled | |||
=== Show Fog Debug. === | |||
<!-- ID: DM_REND_ATMOSPHERE_SHOW_FOG_DEBUG --> | |||
Enable/disable fog debugging visualization. | |||
'''Available Options''': disabled, enabled | |||
=== Show constellations === | |||
<!-- ID: DM_REND_ATMOSPHERE_SHOW_CONSTELLATIONS --> | |||
Enable/disable rendering of constellations. | |||
'''Available Options''': false, true | |||
== Volumetric Clouds == | |||
=== Use New === | |||
<!-- ID: DM_REND_CLOUDS_USE_NEW --> | |||
Use the new volumetric cloud system. | |||
'''Available Options''': false, true | |||
=== Render clouds === | |||
<!-- ID: DM_REND_CLOUDS --> | |||
Enable/disable volumetric cloud rendering. | |||
'''Available Options''': enabled, disabled | |||
=== Render Mode === | |||
<!-- ID: DM_REND_CLOUDS_RENDER_MODE --> | |||
Set volumetric cloud render mode. | |||
'''Available Options''': Quarter, Full, Experimental | |||
=== Output Optimization === | |||
<!-- ID: DM_REND_CLOUDS_OUTPUT_OPTIMIZATION --> | |||
Set volumetric cloud output optimization. | |||
'''Available Options''': default, none, vertexShader, CPU | |||
=== Show Output Optim Diag === | |||
<!-- ID: DM_REND_CLOUDS_SHOW_OUTPUT_OPTIM_DIAG --> | |||
Show output optimization diagnostic for clouds. | |||
'''Available Options''': false, true | |||
=== Apply cycle values === | |||
<!-- ID: DM_WEATHER_APPLY_CLOUD_VALUES --> | |||
Apply cycle values for clouds. | |||
'''Available Options''': true, false | |||
=== Sky light mode === | |||
<!-- ID: DM_REND_CLOUDS_AMBIENT_TYPE --> | |||
Set sky light mode for clouds. | |||
'''Available Options''': Default(Artistic), New(Probe+Atmo), Gray, PBR(OriginalTechnique) | |||
=== Disable direct light === | |||
<!-- ID: DM_REND_CLOUDS_DISABLE_DIRECT_LIGHT --> | |||
Disable direct light for clouds. | |||
'''Available Options''': false, true | |||
=== Enable occlusion map === | |||
<!-- ID: DM_REND_CLOUDS_OCCL_MAP --> | |||
Enable/disable occlusion map for clouds. | |||
'''Available Options''': enabled, disabled | |||
=== Disable wind === | |||
<!-- ID: DM_REND_CLOUDS_DISABLE_WIND --> | |||
Enable/disable wind for clouds. | |||
'''Available Options''': false, true | |||
=== Stop wind === | |||
<!-- ID: DM_REND_CLOUDS_STOP_WIND --> | |||
Stop wind for clouds. | |||
'''Available Options''': false, true | |||
=== Show cloud lighting === | |||
<!-- ID: DM_REND_CLOUDS_SHOW_CLOUD_LIGHTING --> | |||
Show or hide cloud lighting visualization. | |||
'''Available Options''': disabled, enabled | |||
=== Force noise recompute === | |||
<!-- ID: DM_REND_CLOUDS_FORCE_NOISE_RECOMPUTE --> | |||
Force recomputation of cloud noise. | |||
'''Available Options''': disabled, enabled | |||
=== Show detail noise === | |||
<!-- ID: DM_REND_CLOUDS_SHOW_DETAIL_NOISE --> | |||
Enable/disable detail noise visualization for clouds. | |||
'''Available Options''': disabled, enabled | |||
=== Show noise tiling === | |||
<!-- ID: DM_REND_CLOUDS_SHOW_NOISE_TILING --> | |||
Set noise tiling visualization for clouds. | |||
'''Available Options''': disabled, base, middle, detail, newBase_R, newBase_G, newBase_B, newBase_A, newDetail_R, newDetail_G, newDetail_B, newDetail_A | |||
=== Show noise tiling === | |||
<!-- ID: DM_REND_CLOUDS_SHOW_NOISE_TILING --> | |||
Set noise tiling visualization for clouds (base, middle, detail). | |||
'''Available Options''': disabled, base, middle, detail | |||
=== Show height detail noise === | |||
<!-- ID: DM_REND_CLOUDS_SHOW_HEIGHT_DETAIL_TEX --> | |||
Enable/disable height detail noise texture visualization. | |||
'''Available Options''': disabled, enabled | |||
=== Detail noise resolution === | |||
<!-- ID: DM_REND_CLOUDS_DETAIL_NOISE_RESOLUTION --> | |||
Set resolution of detail noise for clouds. | |||
'''Available Options''': default, 16, 32, 64, 128, 256, 512 | |||
=== Weather map resolution === | |||
<!-- ID: DM_REND_CLOUDS_WEATHER_MAP_RESOLUTION --> | |||
Set weather map resolution for clouds. | |||
'''Available Options''': default, 256, 512, 1024, 2048 | |||
=== Temporal multiplier === | |||
<!-- ID: DM_REND_CLOUDS_TEMPORAL_MULTIPLIER --> | |||
Set temporal multiplier for clouds. | |||
'''Range Settings''': | |||
Min: 0 | |||
Max: 5 | |||
Current Value: 0.0 | |||
Step: 0.01 | |||
=== Max. Num. samples === | |||
<!-- ID: DM_REND_CLOUDS_NUM_SAMPLES --> | |||
Set max number of samples for clouds. | |||
'''Range Settings''': | |||
Min: 0 | |||
Max: 256 | |||
Current Value: 0.0 | |||
Step: 1.0 | |||
=== HeightMin === | |||
<!-- ID: DM_REND_CLOUDS_HEIGHT_MIN --> | |||
Set minimum height for clouds. | |||
'''Range Settings''': | |||
Min: 0 | |||
Max: 20000 | |||
Current Value: 0.0 | |||
Step: 10.0 | |||
=== Show shadowmap === | |||
<!-- ID: DM_REND_CLOUDS_SHOW_SHADOWMAP --> | |||
Enable/disable showing of shadow map for clouds. | |||
'''Available Options''': disabled, enabled | |||
=== Shadowmap resolution === | |||
<!-- ID: DM_REND_CLOUDS_SHADOWMAP_RESOLUTION --> | |||
Set shadow map resolution for clouds. | |||
'''Range Settings''': | |||
Min: 0 | |||
Max: 256 | |||
Current Value: 0 | |||
Step: 1 | |||
=== Shadowmap dispatches p. frame === | |||
<!-- ID: DM_REND_CLOUDS_SHADOWMAP_DISPATCHES_PER_FRAME --> | |||
Set shadow map dispatches per frame for clouds. | |||
'''Range Settings''': | |||
Min: 0 | |||
Max: 4 | |||
Current Value: 0 | |||
Step: 1 | |||
=== Debug shape === | |||
<!-- ID: DM_REND_CLOUDS_DEBUG_SHAPE --> | |||
Set debug shape visualization for clouds. | |||
'''Available Options''': none, cylinders, spheres | |||
=== haze value === | |||
<!-- ID: DM_REND_CLOUDS_HAZE_VALUE --> | |||
Set haze value for clouds. | |||
'''Range Settings''': | |||
Min: 0.0001 | |||
Max: 0.1 | |||
Current Value: 0.018 | |||
Step: 0.001 | |||
=== Enable dist. fog === | |||
<!-- ID: DM_REND_CLOUDS_ENABLE_DIST_FOG --> | |||
Enable/disable distance fog for clouds. | |||
'''Available Options''': enabled, disabled | |||
=== dist. fog range === | |||
<!-- ID: DM_REND_CLOUDS_DIST_FOG_RANGE --> | |||
Set distance fog range for clouds. | |||
'''Range Settings''': | |||
Min: 0 | |||
Max: 400000 | |||
Current Value: 65000 | |||
Step: 1000 | |||
=== debug detail noise weights === | |||
<!-- ID: DM_REND_CLOUDS_DEBUG_MAIN_SHAPE_NOISE_WEIGHT --> | |||
Enable/disable main shape noise weights debug. | |||
'''Available Options''': false, true | |||
=== disable noise(middle,micro) === | |||
<!-- ID: DM_REND_CLOUDS_DISABLE_NOISE --> | |||
Enable/disable noise (middle, micro) for clouds. | |||
'''Available Options''': false, true | |||
=== offet X === | |||
<!-- ID: DM_REND_CLOUDS_OFFSET_X --> | |||
Set offset X for clouds. | |||
'''Range Settings''': | |||
Min: 0 | |||
Max: 1000000 | |||
Current Value: 0 | |||
Step: 10 | |||
=== offet Z === | |||
<!-- ID: DM_REND_CLOUDS_OFFSET_Z --> | |||
Set offset Z for clouds. | |||
'''Range Settings''': | |||
Min: 0 | |||
Max: 1000000 | |||
Current Value: 0 | |||
Step: 10 | |||
== No render == | |||
<!-- ID: DM_REND_NORENDER --> | |||
Disable rendering. | |||
'''Available Options''': false, true | |||
== Shape instancing == | |||
<!-- ID: DM_REND_SHAPE_INSTANCING --> | |||
Enable/disable shape instancing. | |||
'''Available Options''': enabled, disabled | |||
== Render debug mode == | |||
<!-- ID: DM_REND_SPECIAL_MODE --> | |||
Set render debug mode. | |||
'''Hotkey''': {{Controls|rctrl|ralt|w}} | |||
'''Available Options''': none, wire, wire only, ovedraw, overdrawZ, albedo, world norm, roughness, rough.scene, metalness, mask, ao, vert.color, sss, detail light, diffuse, iblDiffuse, reflection, iblReflection, full diffuse, full reflection, emissive, albedo lin, wetness, porosity, vertex norms, vfx, global layer | |||
== Widgets == | |||
<!-- ID: DM_REND_WIDGETS --> | |||
Set widget rendering mode. | |||
'''Available Options''': on, onlyRT, off | |||
== Active GPU wait == | |||
<!-- ID: DM_REND_ACTIVE_GPU_WAIT --> | |||
Enable/disable active GPU wait. | |||
'''Available Options''': false, true | |||
== Allocator stats == | |||
<!-- ID: DM_REND_ALLOCATOR_STAT --> | |||
Set allocator statistics display. | |||
'''Available Options''': none, show, dump | |||
== Show VRAM resources == | |||
<!-- ID: DM_REND_RESOURCES --> | |||
Enable/disable showing of VRAM resources. | |||
'''Available Options''': false, true | |||
= Scene = | |||
== Filter == | |||
=== MeshObject === | |||
<!-- ID: DM_SCENE_FILTER_MESH --> | |||
Enable/disable MeshObject filter. | |||
'''Available Options''': enabled, disabled | |||
=== Particle === | |||
<!-- ID: DM_SCENE_FILTER_PARTICLE --> | |||
Enable/disable Particle filter. | |||
'''Available Options''': enabled, disabled | |||
== Occluders == | |||
=== Occluders === | === Occluders === | ||
<!-- ID: DM_SCENE_OCCLUDERS --> | |||
Enable/disable occluders. | |||
'''Available Options''': true, false | |||
=== Occlude entities === | |||
<!-- ID: DM_SCENE_OCCLUDERS_ENTS --> | |||
Enable/disable occluding of entities. | |||
'''Available Options''': true, false | |||
=== Show active occluders === | |||
<!-- ID: DM_SCENE_OCCLUDERS_ACTIVE --> | |||
Show or hide active occluders. | |||
'''Available Options''': false, true | |||
=== Show occluded === | |||
<!-- ID: DM_SCENE_OCCLUDERS_OCCLUDED --> | |||
Show or hide occluded objects. | |||
'''Available Options''': false, true | |||
=== Show occluder volumes === | |||
<!-- ID: DM_SCENE_OCCLUDERS_VOL --> | |||
Show or hide occluder volumes. | |||
'''Available Options''': false, true | |||
== Terrain Occlusion == | |||
=== Terrain occlusion culling === | |||
<!-- ID: DM_TERR_OCCLUSION_CULLING --> | |||
Enable/disable terrain occlusion culling. | |||
'''Available Options''': true, false | |||
=== Occlusion mode === | |||
<!-- ID: DM_TERR_OCCLUSION_MODE --> | |||
Set terrain occlusion mode. | |||
'''Available Options''': Voxelization, Hybridvoxel | |||
=== Cull dynamic objects === | |||
<!-- ID: DM_TERR_OCCLUSION_CULL_DYNAMIC --> | |||
Enable/disable culling of dynamic objects. | |||
'''Available Options''': true, false | |||
=== Cull individual objects === | |||
<!-- ID: DM_TERR_OCCLUSION_CULL_INDIVIDUAL_OBJECTS --> | |||
Enable/disable culling of individual objects. | |||
'''Available Options''': true, false | |||
=== Cull entity lists === | |||
<!-- ID: DM_TERR_OCCLUSION_CULL_ENTLIST --> | |||
Enable/disable culling of entity lists. | |||
'''Available Options''': true, false | |||
=== Cull kd-tree leafs === | |||
<!-- ID: DM_TERR_OCCLUSION_CULL_LEAF --> | |||
Enable/disable culling of kd-tree leafs. | |||
'''Available Options''': false, true | |||
=== Cull terrain === | |||
<!-- ID: DM_TERR_OCCLUSION_CULL_TERRAIN --> | |||
Enable/disable culling of terrain. | |||
'''Available Options''': false, true | |||
=== Cull kd-tree nodes === | |||
<!-- ID: DM_TERR_OCCLUSION_CULL_NODE --> | |||
Enable/disable culling of kd-tree nodes. | |||
'''Available Options''': true, false | |||
=== # voxel render jobs === | |||
<!-- ID: DM_TERR_VOXELDEPTH_NR_REND_JOBS --> | |||
Set number of voxel render jobs. | |||
'''Range Settings''': | |||
* Min: 1 | |||
* Max: 8 | |||
* Current Value: 8 | |||
* Step: 1 | |||
=== Show depth texture === | |||
<!-- ID: DM_TERR_VOXELDEPTH_REND_TEXTURE --> | |||
Enable/disable depth texture visualization. | |||
'''Available Options''': false, true | |||
=== Show FOV deb shapes === | |||
<!-- ID: DM_TERR_VOXELDEPTH_REND_FOV_DEBUGSHAPES --> | |||
Enable/disable showing of FOV debug shapes. | |||
'''Available Options''': false, true | |||
=== Voxel height scale === | |||
<!-- ID: DM_TERR_VOXELDEPTH_HEIGHT_SCALE --> | |||
Set voxel height scale. | |||
'''Range Settings''': | |||
* Min: 0.25 | |||
* Max: 32 | |||
* Current Value: 1 | |||
* Step: 0.01 | |||
=== Voxel depth LOD step === | |||
<!-- ID: DM_TERR_VOXELDEPTH_LOD --> | |||
Set voxel depth LOD step. | |||
'''Range Settings''': | |||
* Min: 0.01 | |||
* Max: 10 | |||
* Current Value: 0.25 | |||
* Step: 0.01 | |||
=== Depth buffer fraction === | |||
<!-- ID: DM_TERR_VOXELDEPTH_BUFFER_FRACTION --> | |||
Set depth buffer fraction. | |||
'''Range Settings''': | |||
* Min: 1 | |||
* Max: 100 | |||
* Current Value: 16 | |||
* Step: 1 | |||
=== Voxel near plane === | |||
<!-- ID: DM_TERR_VOXELDEPTH_NEAR_PLANE --> | |||
Set voxel near plane. | |||
'''Range Settings''': | |||
* Min: 1 | |||
* Max: 100 | |||
* Current Value: 20 | |||
* Step: 1 | |||
=== Override far plane === | |||
<!-- ID: DM_TERR_VOXELDEPTH_OVERRIDE_FAR_PLANE --> | |||
Enable/disable overriding of far plane. | |||
'''Available Options''': false, true | |||
=== Voxel far plane === | |||
<!-- ID: DM_TERR_VOXELDEPTH_FAR_PLANE --> | |||
Set voxel far plane. | |||
'''Range Settings''': | |||
* Min: 1 | |||
* Max: 5000 | |||
* Current Value: 2000 | |||
* Step: 50 | |||
=== Show AAB of occluded === | |||
<!-- ID: DM_TERR_VOXELDEPTH_REND_BB --> | |||
Show AAB of occluded objects. | |||
'''Available Options''': None, Occluded, Visible, All | |||
=== Voxel occlusion check === | |||
<!-- ID: DM_TERR_VOXELDEPTH_OCC_CHECK_METHOD --> | |||
Set voxel occlusion check method. | |||
'''Available Options''': Hi-Z, Full-Z raster | |||
=== Rasterize AABB === | |||
<!-- ID: DM_TERR_VOXELDEPTH_OCC_RASTER_AABB --> | |||
Enable/disable rasterization of AABBs. | |||
'''Available Options''': false, true | |||
=== Show rasterized AABB === | |||
<!-- ID: DM_TERR_VOXELDEPTH_OCC_RASTER_TEXTURE --> | |||
Enable/disable showing of rasterized AABBs. | |||
'''Available Options''': false, true | |||
=== Draw silhouette edges === | |||
<!-- ID: DM_TERR_VOXELDEPTH_OCC_DRAW_SILHOUETTE_EDGES --> | |||
Enable/disable drawing of silhouette edges. | |||
'''Available Options''': false, true | |||
=== Cull beyond frustum edges === | |||
<!-- ID: DM_TERR_VOXELDEPTH_CULL_BEYOND_FRUSTUM_EDGES --> | |||
Enable/disable culling beyond frustum edges. | |||
'''Available Options''': false, true | |||
=== # frames reuse voxel buffer === | |||
<!-- ID: DM_TERR_VOXELDEPTH_REUSE_BUFFER_FRAMES --> | |||
Set number of frames to reuse voxel buffer. | |||
'''Range Settings''': | |||
* Min: 0 | |||
* Max: 60 | |||
* Current Value: 0 | |||
* Step: 1 | |||
=== Raster size threshold === | |||
<!-- ID: DM_TERR_HYBRID_OCC_AABB_SIZE_THRESHOLD --> | |||
Set raster size threshold. | |||
'''Range Settings''': | |||
* Min: 0 | |||
* Max: 1024 | |||
* Current Value: 64 | |||
* Step: 2 | |||
== Render world == | |||
<!-- ID: DM_RENDER_WORLD --> | |||
Enable/disable world rendering. | |||
'''Available Options''': enabled, disabled | |||
== Force vertical FOV == | |||
<!-- ID: DM_SCENE_FOV --> | |||
Force vertical field of view. | |||
'''Available Options''': default, 65, 70, 75, 80, 85, 90, 95, 100, 105, 110, 120, 2.5f, 5, 10, 15, 20, 25, 30, 35, 40, 45, 50, 55 | |||
== Render world env == | |||
<!-- ID: DM_RENDER_WORLD_ENVMAP --> | |||
Enable/disable rendering of world environment. | |||
'''Available Options''': enabled, disabled | |||
== Show clips == | |||
<!-- ID: DM_SCENE_SHOW_CLIPS --> | |||
Show or hide scene clips. | |||
'''Available Options''': disabled, enabled | |||
== LOD multiplier == | |||
<!-- ID: DM_SCENE_LOD_MUL --> | |||
Set LOD multiplier. | |||
'''Available Options''': 1, 1.5, 2, 3, 4, 5, 10, 0.001, 0.01, 0.1, 0.25, 0.5 | |||
== Size multiplier == | |||
<!-- ID: DM_SCENE_SIZE_MUL --> | |||
Set size multiplier. | |||
'''Available Options''': 1, 1.5, 2, 3, 4, 5, 10, 0.001, 0.01, 0.1, 0.25, 0.5 | |||
== Override object far plane == | |||
<!-- ID: DM_SCENE_OBJECTSFARPLANE --> | |||
Set object far plane override. | |||
'''Range Settings''': | |||
* Min: 0 | |||
* Max: 50000 | |||
* Current Value: 0 | |||
* Step: 100 | |||
== Force clear visent == | |||
<!-- ID: DM_SCENE_CLEAR_VISIBLE --> | |||
Force clear of visible entities. | |||
'''Available Options''': false, true | |||
== Render world ents == | |||
<!-- ID: DM_RENDER_WORLD_ENT --> | |||
Enable/disable rendering of world entities. | |||
'''Available Options''': enabled, disabled | |||
== Render world leafs == | |||
<!-- ID: DM_RENDER_WORLD_LEAF --> | |||
Enable/disable rendering of world leafs. | |||
'''Available Options''': enabled, disabled | |||
== RenderEnts == | |||
<!-- ID: REND_ENTS --> | |||
Enable/disable entities rendering. | |||
'''Available Options''': enabled, disabled | |||
== Fast way == | |||
<!-- ID: DM_REND_FASTWAY --> | |||
Enable/disable fast rendering path. | |||
'''Available Options''': false, true | |||
== Show light == | |||
<!-- ID: DM_SCENE_SHOW_GLOBAL_LIGHT --> | |||
Set global light to show. | |||
Options: -1 32 -1 1 | |||
== Show active PPs == | |||
<!-- ID: DM_SCENE_SHOW_PPs --> | |||
Show or hide active post processes. | |||
'''Available Options''': false, true | |||
== Cube map size == | |||
<!-- ID: DM_SCENE_CAPTURE_CUBEMAP_SIZE --> | |||
Set cubemap size. | |||
'''Available Options''': 32, 16, 32, 64, 128, 256, 512, 1024 | |||
== Capture cube map == | |||
<!-- ID: DM_SCENE_CAPTURE_CUBEMAP --> | |||
Capture cube map. | |||
'''Available Options''': no, capture, capture&insert | |||
== Override far plane == | |||
<!-- ID: DM_SCENE_FARPLANE --> | |||
Set far plane override. | |||
'''Range Settings''': | |||
* Min: 0 | |||
* Max: 50000 | |||
* Current Value: 0 | |||
* Step: 100 | |||
== Force linear depth == | |||
<!-- ID: DM_SCENE_OVERRIDE_LINDEPTH --> | |||
Enable/disable forcing of linear depth. | |||
'''Available Options''': false, true | |||
== Linear depth == | |||
<!-- ID: DM_SCENE_LINDEPTH --> | |||
Set linear depth. | |||
'''Range Settings''': | |||
* Min: 50 | |||
* Max: 5000 | |||
* Current Value: 250 | |||
* Step: 10 | |||
== Visualize groups == | |||
<!-- ID: VISUALIZE_GROUPS --> | |||
Enable/disable group visualization. | |||
'''Available Options''': false, true | |||
== Colorize objects LODs == | |||
<!-- ID: DM_OBJECTS_LODS --> | |||
Colorize objects by LOD. | |||
'''Available Options''': disabled, colorize, LOD0 only, +LOD1, +LOD2, +LOD3, +LOD4, +LOD5, +LOD6, +LOD7 | |||
= World = | |||
== Animation == | == Animation == | ||
<!-- ID: ANIM_DISABLE_APPLYPOSE --> | |||
Enable/disable apply pose in animation. | |||
'''Available Options''': true, false | |||
== Streaming == | |||
<!-- ID: DM_PROCESS_STREAMING --> | |||
Enable/disable world streaming. | |||
'''Available Options''': true, false | |||
== Trace stresstest == | |||
<!-- ID: DM_TRACE_STRESSTEST --> | |||
Set trace stress test mode. | |||
'''Available Options''': none, nearest, any, all, nearestVis, anyVis, allVis | |||
== Query stresstest == | |||
<!-- ID: DM_QUERY_STRESSTEST --> | |||
Enable/disable query stress test. | |||
'''Available Options''': disabled, enabled | |||
== Update stresstest == | |||
<!-- ID: DM_UPDATE_STRESSTEST --> | |||
Enable/disable update stress test. | |||
'''Available Options''': disabled, enabled | |||
== Update MT stresstest == | |||
<!-- ID: DM_UPDATE_MT_STRESSTEST --> | |||
Enable/disable multithreaded update stress test. | |||
'''Available Options''': disabled, enabled | |||
== Show scene tree == | |||
<!-- ID: DM_SHOW_TREE --> | |||
Show scene tree. | |||
'''Available Options''': None, KDTree, QuadTree | |||
== Show entity bounds == | |||
<!-- ID: DM_SHOW_ENT_BOUNDS --> | |||
Show or hide entity bounds. | |||
'''Available Options''': disabled, enabled | |||
== Async traces == | |||
<!-- ID: DM_ASYNC_TRACE --> | |||
Enable/disable asynchronous traces. | |||
'''Available Options''': enabled, disabled | |||
== Async queries == | |||
<!-- ID: DM_ASYNC_QUERY --> | |||
Enable/disable asynchronous queries. | |||
'''Available Options''': enabled, disabled | |||
== Use quadtree == | |||
<!-- ID: DM_USE_TREE --> | |||
Enable/disable quadtree usage. | |||
'''Available Options''': enabled, disabled | |||
== Show AABB == | |||
<!-- ID: DM_SHOW_AABB --> | |||
Show AABB. | |||
'''Hotkey''': {{Controls|lalt|num5}} | |||
'''Available Options''': disabled, real, quantized, rendered | |||
== Show multileaf ents. == | |||
<!-- ID: DM_SHOW_MULTILEAF --> | |||
Show or hide multileaf entities. | |||
'''Available Options''': disabled, all, single, multi | |||
== Show active == | |||
<!-- ID: DM_SHOW_ACTIVE --> | |||
Show or hide active entities. | |||
'''Available Options''': enabled, disabled | |||
== Show bones == | |||
<!-- ID: DM_SHOW_BONES --> | |||
Show or hide bones. | |||
'''Available Options''': disabled, enabled | |||
== Show wind emitters == | |||
<!-- ID: DM_SHOW_WIND --> | |||
Show or hide wind emitters. | |||
'''Hotkey''': {{Controls|lctrl|num8}} | |||
'''Available Options''': disabled, enabled | |||
== Disable wind == | |||
<!-- ID: DM_DISABLE_WIND --> | |||
Disable wind. | |||
'''Hotkey''': {{Controls|lctrl|num9}} | |||
'''Available Options''': disabled, enabled | |||
== Game update == | |||
<!-- ID: DM_GAMEUPDATE --> | |||
Enable/disable game update. | |||
'''Available Options''': enabled, disabled | |||
== MT entity sim == | |||
<!-- ID: DM_MT_UPDATE --> | |||
Enable/disable multithreaded entity simulation. | |||
'''Available Options''': enabled, disabled | |||
== MT entity update == | |||
<!-- ID: DM_MT_ENT_UPDATE --> | |||
Enable/disable multithreaded entity update. | |||
'''Available Options''': enabled, disabled | |||
== Entity diag == | |||
<!-- ID: DM_WORLD_ENTITY_DIAG --> | |||
Enable/disable entity diagnostics. | |||
'''Available Options''': false, true | |||
== Entity hierarchy changes == | |||
<!-- ID: DM_ENTITY_HIERACHYCHANGE_DIAG --> | |||
Enable/disable entity hierarchy change diagnostics. | |||
'''Available Options''': false, true | |||
== Debug prefabs == | |||
<!-- ID: DM_DEBUG_PREFABS --> | |||
Enable/disable debug prefabs. | |||
'''Available Options''': disabled, enabled | |||
== New skeleton == | |||
<!-- ID: NEW_SKELETON --> | |||
Enable/disable new skeleton. | |||
'''Available Options''': false, true | |||
== JobManager Callstack == | |||
<!-- ID: DM_DIAG_JOBMANAGER --> | |||
Set JobManager callstack logging mode. | |||
'''Available Options''': off, ext, all | |||
== JobManager Print CS == | |||
<!-- ID: DM_DIAG_JOBMANAGER_PRINT --> | |||
Set JobManager print callstack mode. | |||
'''Available Options''': off, once, always | |||
== Ambient Life == | |||
<!-- ID: SCR_DebugMenuID.DEBUGUI_AMBIENT_LIFE --> | |||
Enable/disable ambient life. | |||
'''Available Options''': false, true | |||
= Animation = | |||
== Enable debugger == | |||
<!-- ID: ENF_DIAG_ANIMSYS_ENABLEDEBUGGER --> | |||
Enable/disable animation debugger. | |||
'''Available Options''': disabled, enabled | |||
== Root motion always enabled == | |||
<!-- ID: ENF_DIAG_ANIMSYS_ROOTMOTION_ALWAYS --> | |||
Enable/disable root motion always enabled. | |||
'''Available Options''': false, true | |||
== Force animation LOD == | |||
<!-- ID: ENF_DIAG_ANIMSYS_FORCE_LOD --> | |||
Set force animation LOD. | |||
Options: -1 4 -1 1 | |||
== Show transforms before IK == | |||
<!-- ID: ENF_DIAG_ANIMSYS_SHOW_TRANSFORMS_BEFORE_IK --> | |||
Enable/disable showing of transforms before IK. | |||
'''Available Options''': false, true | |||
== Show transforms after IK == | |||
<!-- ID: ENF_DIAG_ANIMSYS_SHOW_TRANSFORMS_AFTER_IK --> | |||
Enable/disable showing of transforms after IK. | |||
'''Available Options''': false, true | |||
== Show IK offsets == | |||
<!-- ID: ENF_DIAG_ANIMSYS_SHOW_IK_OFFSETS --> | |||
Enable/disable showing of IK offsets. | |||
'''Available Options''': false, true | |||
== Show IK solver details == | |||
<!-- ID: ENF_DIAG_ANIMSYS_SHOW_IK_SOLVER_DETAILS --> | |||
Enable/disable showing of IK solver details. | |||
'''Available Options''': false, true | |||
== Show procedural solver details == | |||
<!-- ID: ENF_DIAG_ANIMSYS_SHOW_PROCEDURAL --> | |||
Enable/disable showing of procedural solver details. | |||
'''Available Options''': false, true | |||
== Show cached MS transforms == | |||
<!-- ID: ENF_DIAG_ANIMSYS_SHOW_MODEL_SPACE_CACHE --> | |||
Enable/disable showing of model space cache. | |||
'''Available Options''': false, true | |||
== Show RBF details == | |||
<!-- ID: ENF_DIAG_ANIMSYS_SHOW_RBF_DETAILS --> | |||
Enable/disable showing of RBF details. | |||
'''Available Options''': false, true | |||
== Record animations == | |||
<!-- ID: ENF_DIAG_ANIMSYS_ENABLE_ANIMATION_RECORDING --> | |||
Enable/disable animation recording. | |||
'''Available Options''': false, true | |||
== Record local player == | |||
<!-- ID: ENF_DIAG_ANIMSYS_ENABLE_ANIMATION_RECORDING_ENTITIES --> | |||
Set animation recording entities mode. | |||
'''Available Options''': Only characters, All entities | |||
== Animation traffic == | |||
<!-- ID: ENF_DIAG_ANIMSYS_TRAFFIC --> | |||
Enable/disable animation traffic logging. | |||
'''Available Options''': false, true | |||
== Min IK blend time == | |||
<!-- ID: ENF_DIAG_MIN_IK_BLEND_TIME --> | |||
Set minimum IK blend time. | |||
'''Range Settings''': | |||
* Min: 0.01 | |||
* Max: 1 | |||
* Current Value: 0.01 | |||
* Step: 0.01 | |||
= Physics = | |||
== Settings == | |||
=== Update rate === | |||
<!-- ID: DM_PHYSICS_UPDATE_RATE --> | |||
Set physics update rate. | |||
'''Range Settings''': | |||
Min: 20 | |||
Max: 1000 | |||
Current Value: 60 | |||
Step: 10 | |||
=== Max fixed steps === | |||
<!-- ID: DM_PHYSICS_MAX_STEPS --> | |||
Set maximum fixed steps for physics. | |||
'''Range Settings''': | |||
Min: 1 | |||
Max: 60 | |||
Current Value: 10 | |||
Step: 1 | |||
=== Apply === | |||
<!-- ID: DM_PHYSICS_CHANGE_SETTINGS --> | |||
Enable/disable physics settings apply. | |||
'''Available Options''': disabled, enabled | |||
== Bullet == | |||
=== Max. Collider Distance === | |||
<!-- ID: DM_BULLET_COLLIDER_RANGE --> | |||
Set maximum distance for Bullet collider. | |||
'''Available Options''': 0, 1, 2, 5, 10, 20, 50, 100, 200, 500 | |||
=== Draw Bullet shape === | |||
<!-- ID: DM_BULLET_DRAW_SHAPE --> | |||
Enable/disable drawing of Bullet shape. | |||
'''Available Options''': enabled, disabled | |||
=== Draw Bullet wireframe === | |||
<!-- ID: DM_BULLET_DRAW_SHAPE_WIREFRAME --> | |||
Enable/disable drawing of Bullet shape wireframe. | |||
'''Available Options''': enabled, disabled | |||
== | === Draw Bullet shape AABB === | ||
<!-- ID: DM_BULLET_DRAW_AABB --> | |||
Enable/disable drawing of Bullet shape AABB. | |||
'''Available Options''': disabled, enabled | |||
== | === Draw obj center of mass === | ||
<!-- ID: DM_BULLET_DRAW_COM --> | |||
Enable/disable drawing of object center of mass. | |||
'''Available Options''': disabled, enabled | |||
=== Draw Bullet contacts === | |||
<!-- ID: DM_BULLET_DRAW_CONTACT --> | |||
Enable/disable drawing of Bullet contacts. | |||
* | '''Available Options''': enabled, disabled | ||
* | |||
* | === Force sleep Bullet === | ||
* | |||
* | <!-- ID: DM_BULLET_FORCE_SLEEP --> | ||
* | Enable/disable forcing of Bullet to sleep. | ||
* | |||
* | '''Available Options''': disabled, enabled | ||
=== Profile Bullet === | |||
* -------------------------------- | |||
* > {{ | <!-- ID: DM_BULLET_PROFILE --> | ||
Set threshold for Bullet profiling. | |||
'''Available Options''': disabled, >1ms, >5ms, >10ms, >20ms, >50ms | |||
=== Bullet MT === | |||
<!-- ID: DM_BULLET_MT --> | |||
Enable/disable multithreaded Bullet simulation. | |||
'''Available Options''': true, false | |||
== Dump contacts on server == | |||
<!-- ID: GAME_PHYSICS_DUMP_CONTACTS --> | |||
Enable/disable server side physics contacts dump. | |||
'''Available Options''': false, true | |||
== Show bodies == | |||
<!-- ID: DM_PHYSICS_SHOW_BODIES --> | |||
Show or hide physics bodies. Visible colliders can be controlled with Show layer | |||
'''Hotkey''': {{Controls|lalt|num6}} | |||
'''Available Options''': disabled, flat-mesh, transp-mesh, flat+mesh, transp+mesh | |||
== Show layer == | |||
<!-- ID: DM_PHYSICS_SHOW_LAYER --> | |||
Show physics bodies by layer. Example layers available: | |||
* '''Filtered''' - default mode, shows all the most important layers, most of the time there is no need to switch away from it | |||
* '''Fire geometry''' - "realistic" resolution colliders used for hit detection | |||
[[File:armareforger-diag-menu-show-layers-firegeo.jpg|600x600px]] | |||
* '''View geometry''' - used by AIs, acts as solid wall | |||
[[File:armareforger-diag-menu-show-layers-viewgeo.jpg|600x600px]] | |||
* '''Foliage''' - used by AIs, slows down detection time (tree crowns, bushes) | |||
[[File:armareforger-diag-menu-show-layers-foliage.jpg|600x600px]] | |||
* '''Interaction layer''' - used by UserAction together with fire geometry, when fire geometry is not enough for pleasant user action experience (used on stuff like wire fence doors) | |||
[[File:armareforger-diag-menu-show-layers-interaction-1.jpg|300x300px]][[File:armareforger-diag-menu-show-layers-interaction-2.jpg|300x300px]] | |||
* '''Mine layer''' - mines and objects that are meant to collide with mines, such as wheels of vehicles | |||
[[File:armareforger-diag-menu-show-layers-mine.jpg|597x597px]] | |||
* '''Char collider''' - used for collision between character and terrain | |||
[[File:armareforger-diag-menu-show-layers-character.jpg|600x600px]] | |||
* '''Vehicle simple''' - used for collision between body of the car and non-characters | |||
[[File:armareforger-diag-menu-show-layers-vehicle-simple.jpg|600x600px]] | |||
'''Available Options''': [[Arma Reforger:Collision Layer#Layers Setup|''See Collision Layer page for all options'']] | |||
== Show collider type == | |||
<!-- ID: DM_PHYSICS_SHOW_COLLIDER_TYPE --> | |||
Show physics bodies by collider type. See c[[Arma Reforger:FBX Import#Collider%20shape|ollider shape]] pargraph on FBX Import page | |||
'''Available Options''': all, sphere, box, capsule, cylinder, convex, trimesh | |||
== Show simulation state == | |||
<!-- ID: DM_PHYSICS_SHOW_SIMULATION_STATE --> | |||
Show physics bodies by simulation state. | |||
'''Available Options''': col+sim, none, collision, simulation, all | |||
== Show body type == | |||
<!-- ID: DM_PHYSICS_SHOW_BODY_TYPE --> | |||
Show physics bodies by body type. | |||
'''Available Options''': all, static, dynamic, kinematic | |||
== Color by == | |||
<!-- ID: DM_PHYSICS_COLOR_MODE --> | |||
Set physics bodies color mode. | |||
'''Available Options''': collider type, activation state, body type, by entity | |||
== Show COM == | |||
<!-- ID: DM_PHYSICS_SHOW_COM --> | |||
Show or hide physics center of mass. | |||
'''Available Options''': false, true | |||
== Simulation == | |||
<!-- ID: DM_PHYSICS_SIMULATION --> | |||
Enable/disable physics simulation. | |||
'''Hotkey''': {{Controls|lctrl|num7}} | |||
'''Available Options''': enabled, disabled | |||
== Dump non-static bodies == | |||
<!-- ID: DM_PHYSICS_DUMP_ACTIVE_BODIES --> | |||
Enable/disable dumping of non-static physics bodies. | |||
'''Available Options''': disabled, enabled | |||
== Dump contacts == | |||
<!-- ID: DM_PHYSICS_DUMP_CONTACTS --> | |||
Enable/disable dumping of physics contacts. | |||
'''Available Options''': false, true | |||
== Show stats == | |||
<!-- ID: DM_PHYSICS_STATS --> | |||
Set physics statistics display mode. | |||
'''Available Options''': disabled, basic, detailed, all | |||
== Show Bullet == | |||
<!-- ID: DM_PHYSICS_SHOW_BULLET --> | |||
Enable/disable showing of Bullet physics debug. | |||
'''Available Options''': disabled, enabled | |||
== Scripts == | |||
=== Show interior bounding box === | |||
<!-- ID: SCR_DebugMenuID.DEBUGUI_SHOW_INTERIOR_BOUNDING_BOX --> | |||
Show or hide interior bounding box. | |||
'''Available Options''': false, true | |||
=== Show helper trace === | |||
<!-- ID: SCR_DebugMenuID.DEBUGUI_SHOW_PHYSICS_HELPER_TRACE --> | |||
Show or hide physics helper trace. | |||
'''Available Options''': false, true | |||
= Game = | |||
== Weather == | |||
=== Force weather update (WB edit mode) === | |||
<!-- ID: DM_WEATHER_DIAG_FORCE --> | |||
Enable/disable forcing of weather update. | |||
'''Available Options''': false, true | |||
=== Debug time === | |||
<!-- ID: DM_WEATHER_DEBUG_TIME --> | |||
Enable/disable weather debug time. | |||
'''Available Options''': disabled, enabled | |||
=== time === | |||
<!-- ID: DM_WEATHER_DEBUG_TIME_VALUE --> | |||
Set weather debug time. | |||
'''Range Settings''': | |||
Min: 0 | |||
Max: 1 | |||
Current Value: 0.0 | |||
Step: 0.0001 | |||
=== Show diag. === | |||
<!-- ID: DM_WEATHER_DIAG --> | |||
Show or hide weather diagnostics. | |||
'''Available Options''': false, true | |||
=== Show diag. values === | |||
<!-- ID: DM_WEATHER_DIAG_VALUES --> | |||
Show or hide weather diagnostic values. | |||
'''Available Options''': false, true | |||
=== Override wet speeds === | |||
<!-- ID: DM_WEATHER_OVERRIDE_WETNESS_SPEEDS --> | |||
Enable/disable overriding wetness speeds. | |||
'''Available Options''': false, true | |||
=== - Wetting speed === | |||
<!-- ID: DM_WEATHER_CURRENT_WETTING_SPEED --> | |||
Set current wetting speed. | |||
'''Range Settings''': | |||
* Min: 0 | |||
* Max: 100 | |||
* Current Value: 1.0 | |||
* Step: 0.1 | |||
=== - Drying speed === | |||
<!-- ID: DM_WEATHER_CURRENT_DRYING_SPEED --> | |||
Set current drying speed. | |||
'''Range Settings''': | |||
* Min: 0 | |||
* Max: 100 | |||
* Current Value: 1.0 | |||
* Step: 0.1 | |||
=== Override states === | |||
<!-- ID: DM_WEATHER_OVERRIDE_STATES --> | |||
Enable/disable overriding weather states. | |||
'''Available Options''': false, true | |||
=== - State source === | |||
<!-- ID: DM_WEATHER_CURRENT_STATE_SOURCE --> | |||
Set current weather state source. | |||
'''Range Settings''': | |||
* Min: 0 | |||
* Max: 10 | |||
* Current Value: 0 | |||
* Step: 1 | |||
=== - State destination === | |||
<!-- ID: DM_WEATHER_CURRENT_STATE_DEST --> | |||
Set current weather state destination. | |||
'''Range Settings''': | |||
* Min: 0 | |||
* Max: 10 | |||
* Current Value: 0 | |||
* Step: 1 | |||
=== Override variants === | |||
<!-- ID: DM_WEATHER_OVERRIDE_VARIANTS --> | |||
Enable/disable overriding weather variants. | |||
'''Available Options''': false, true | |||
=== - Variant source === | |||
<!-- ID: DM_WEATHER_CURRENT_VARIANT_SOURCE --> | |||
Set current weather variant source. | |||
'''Range Settings''': | |||
* Min: 0 | |||
* Max: 10 | |||
* Current Value: 0 | |||
* Step: 1 | |||
=== - Variant destination === | |||
<!-- ID: DM_WEATHER_CURRENT_VARIANT_DEST --> | |||
Set current weather variant destination. | |||
'''Range Settings''': | |||
* Min: 0 | |||
* Max: 10 | |||
* Current Value: 0 | |||
* Step: 1 | |||
== Dialogue == | |||
=== Demo === | |||
<!-- ID: DIALOG_DIAG_DEMO --> | |||
Enable/disable dialogue demo mode. | |||
'''Available Options''': false, true | |||
== Superscreenshot to file == | |||
<!-- ID: DM_STATS_SCREENSHOT_SUPERFILE --> | |||
Save super screenshot to file. | |||
'''Hotkey''': {{Controls|lctrl|lshift|f7}} | |||
'''Available Options''': false, true | |||
== Screenshot to clipboard == | |||
<!-- ID: DM_STATS_SCREENSHOT_CLIPBOARD --> | |||
Save screenshot to clipboard. | |||
'''Hotkey''': {{Controls|lshift|f7}} | |||
'''Available Options''': false, true | |||
== Screenshot to file == | |||
<!-- ID: DM_STATS_SCREENSHOT_FILE --> | |||
Save screenshot to file. | |||
'''Hotkey''': {{Controls|lctrl|f7}} | |||
'''Available Options''': false, true | |||
== Deployable SpawnPoints == | |||
=== Show Exclusion Zones === | |||
<!-- ID: SCR_DebugMenuID.DEBUGUI_DEPLOYABLE_SPAWNPOINTS_ENABLE_DIAG --> | |||
Show or hide deployable spawn points exclusion zones. | |||
'''Available Options''': false, true | |||
== Voting == | |||
=== Enable All Vote Types === | |||
<!-- ID: SCR_DebugMenuID.DEBUGUI_VOTING_ENABLE_ALL --> | |||
Enable/disable all vote types. | |||
'''Available Options''': false, true | |||
== Show bounds overlap target info == | |||
<!-- ID: SCR_DebugMenuID.DEBUGUI_GAME_BOUNDS_OVERLAP_PREFAB --> | |||
Show or hide bounds overlap target info. | |||
'''Available Options''': false, true | |||
== Show cursor target info == | |||
<!-- ID: SCR_DebugMenuID.DEBUGUI_GAME_CURSOR_TARGET_PREFAB --> | |||
Show or hide cursor target info containing information about prefab you are looking at and its full path to find it in the Workbench | |||
[[File:armareforger-diag-menu-show-layers-cursor-target-info.jpg|600x600px]] | |||
'''Available Options''': false, true | |||
== Copy view link == | |||
<!-- ID: SCR_DebugMenuID.DEBUGUI_GAME_COPY_ENF_VIEW_LINK --> | |||
Create [[Arma Reforger:Workbench Links#World Editor|World Editor view link]] using hotkey (lctrl+lshift+l). | |||
'''Hotkey''': {{Controls|lctrl|lshift|l}} | |||
'''Available Options''': false, true | |||
= Sounds = | |||
== Audio Debug Context == | |||
=== Template Debug Context === | |||
<!-- ID: DM_TEMPLATE_DEBUG_CONTEXT --> | |||
Select audio debug context. | |||
'''Available Options''': | |||
=== Signal info === | |||
<!-- ID: DM_TEMPLATE_CTX_SIGNALS --> | |||
Enable/disable showing of signal info. | |||
'''Available Options''': false, true | |||
=== Samples === | |||
<!-- ID: DM_TEMPLATE_CTX_SAMPLES --> | |||
Enable/disable showing of audio samples. | |||
'''Available Options''': false, true | |||
== VON == | |||
=== Play recorder VON === | |||
<!-- ID: DM_VON_DIRECT_PLAY --> | |||
Enable/disable playing of recorded VON. | |||
'''Available Options''': false, true | |||
=== Replace VON with 440Hz === | |||
<!-- ID: DM_VON_TONE_PLAY --> | |||
Enable/disable replacement of VON with 440Hz tone. | |||
'''Available Options''': false, true | |||
=== Bypass loudness === | |||
<!-- ID: DM_VON_LOUDNESS --> | |||
Enable/disable loudness bypass for VON. | |||
'''Available Options''': false, true | |||
=== Log starving === | |||
<!-- ID: DM_VON_LOG_STARVING --> | |||
Enable/disable logging of VON starving. | |||
'''Available Options''': false, true | |||
== Sound World == | |||
=== Sound map === | |||
<!-- ID: DM_SW_SOUND_MAP_TYPE --> | |||
Set sound map type. | |||
'''Available Options''': none, terrain, water | |||
=== Sound map range === | |||
<!-- ID: DM_SW_SOUND_MAP_RANGE --> | |||
Set sound map range. | |||
'''Range Settings''': | |||
Min: 25 | |||
Max: 250 | |||
Current Value: 50 | |||
Step: 25 | |||
=== Sound map create === | |||
<!-- ID: DM_SW_SOUND_MAP_CREATE --> | |||
Set sound map creation mode. | |||
'''Available Options''': none, create, create+save | |||
== Sound Geometry == | |||
=== Sound Geometry Map === | |||
==== Shadowed ==== | |||
<!-- ID: DM_SNDGEO_SHADOWED --> | |||
Enable/disable showing of shadowed areas. | |||
'''Available Options''': false, true | |||
==== Visible ==== | |||
<!-- ID: DM_SNDGEO_VISIBLE --> | |||
Enable/disable showing of visible areas. | |||
'''Available Options''': false, true | |||
==== Obstacle ==== | |||
<!-- ID: DM_SNDGEO_OBSTICLE --> | |||
Enable/disable showing of obstacles. | |||
'''Available Options''': false, true | |||
==== Edge ==== | |||
<!-- ID: DM_SNDGEO_EDGE --> | |||
Enable/disable showing of edges. | |||
'''Available Options''': false, true | |||
==== Diffract ==== | |||
<!-- ID: DM_SNDGEO_DIFFRACT --> | |||
Enable/disable showing of diffraction. | |||
'''Available Options''': false, true | |||
==== Tile Type ==== | |||
<!-- ID: DM_SNDGEO_TILETYPE --> | |||
Set tile type display for sound geometry. | |||
'''Available Options''': Square, Value | |||
==== Sample Visibility ==== | |||
<!-- ID: DM_SNDGEO_SAMPLE --> | |||
Enable/disable showing of sound sample visibility. | |||
'''Available Options''': false, true | |||
==== Set Sample Pos ==== | |||
<!-- ID: DM_SNDGEO_SAMPLE_POS --> | |||
Enable/disable setting of sound sample position. | |||
'''Available Options''': false, true | |||
=== Enable Diag === | |||
<!-- ID: DM_SNDGEO_ENABLE --> | |||
Enable/disable sound geometry diagnostics. | |||
'''Available Options''': disabled, enabled | |||
=== System Info === | |||
<!-- ID: DM_SNDGEO_SYSTEM_INFO --> | |||
Enable/disable showing of sound geometry system info. | |||
'''Available Options''': disabled, enabled | |||
=== Interior Cache Info === | |||
<!-- ID: DM_SNDGEO_INTERIOR_CACHE --> | |||
Enable/disable showing of sound geometry interior cache info. | |||
'''Available Options''': disabled, enabled | |||
=== Show Update Range === | |||
<!-- ID: DM_SNDGEO_UPDATE_RANGE --> | |||
Enable/disable showing of sound geometry update range. | |||
'''Available Options''': disabled, enabled | |||
=== Object Info === | |||
<!-- ID: DM_SNDGEO_OBJS --> | |||
Enable/disable showing of sound geometry object info. | |||
'''Available Options''': disabled, enabled | |||
=== Show Building Portals === | |||
<!-- ID: DM_SNDGEO_PORTALS --> | |||
Show building portals. | |||
'''Available Options''': none, all, single, per area, active | |||
=== Show Buildings Rect === | |||
<!-- ID: DM_SNDGEO_BUILDINGS --> | |||
Show or hide buildings rectangles. | |||
'''Available Options''': disabled, enabled | |||
=== Hide Building Mesh === | |||
<!-- ID: DM_SNDGEO_HIDE_MESH --> | |||
Hide building mesh. | |||
'''Available Options''': disabled, enabled | |||
=== Obstruction Pos === | |||
<!-- ID: DM_SNDGEO_OBS_POS --> | |||
Enable/disable obstruction position debug. | |||
'''Available Options''': disabled, enabled | |||
=== Freeze Positions === | |||
<!-- ID: DM_SNDGEO_FREEZE_POSITIONS --> | |||
Enable/disable freezing of positions for sound geometry. | |||
'''Available Options''': disabled, enabled | |||
== Interior Handler == | |||
=== InteriorHandler === | |||
<!-- ID: DM_INTERIOR --> | |||
Select interior handler debug. | |||
'''Available Options''': | |||
=== Old interior detection === | |||
<!-- ID: GAME_DIAG_USE_INTERIOR_TRACES --> | |||
Enable/disable old interior detection. | |||
'''Available Options''': false, true | |||
=== Enable Debug === | |||
<!-- ID: GAME_DIAG_INTERIOR_HANDLER --> | |||
Enable/disable interior handler debug. | |||
'''Available Options''': false, true | |||
=== Queries === | |||
<!-- ID: GAME_DIAG_INTERIOR_QUERY --> | |||
Enable/disable interior queries debug. | |||
'''Available Options''': false, true | |||
== SoundMap == | |||
=== SoundMap === | === SoundMap === | ||
== | <!-- ID: DM_SOUNDMAP --> | ||
Select sound map debug. | |||
'''Available Options''': | |||
=== Show values === | |||
<!-- ID: DM_SHOW_VALUES --> | |||
Enable/disable showing of sound map values. | |||
'''Available Options''': false, true | |||
=== Draw Regions === | |||
<!-- ID: DM_DRAW_SOUNDMAP --> | |||
Enable/disable drawing of sound map regions. | |||
'''Available Options''': false, true | |||
=== Layer to draw === | |||
<!-- ID: DM_SMAP_LAYER_DRAW --> | |||
Select sound map layer to draw. | |||
'''Available Options''': Terrain, Coast, Freshwater | |||
=== Show memory allocated === | |||
<!-- ID: DM_SOUNDMAP_MEMORY --> | |||
Enable/disable showing of sound map memory allocated. | |||
'''Available Options''': false, true | |||
=== Force generation === | |||
<!-- ID: DM_FORCE_SOUNDMAP_GENERATION --> | |||
Enable/disable forcing of sound map generation. | |||
'''Available Options''': false, true | |||
=== Force default SoundMap === | |||
<!-- ID: DM_FORCE_DEFAULT_SOUNDMAP --> | |||
Enable/disable forcing of default sound map. | |||
'''Available Options''': false, true | |||
== Chimera Sounds == | |||
=== Signals Debug === | |||
<!-- ID: GAME_DIAG_SS_SIGNALS --> | |||
Enable/disable chimera sound signals debug. | |||
'''Available Options''': false, true | |||
=== Signals Debug by Entity === | |||
<!-- ID: GAME_DIAG_SS_SIGNALSBYENTITY --> | |||
Enable/disable chimera sound signals debug by entity. | |||
'''Available Options''': false, true | |||
== Ambients == | |||
<!-- ID: GAME_DIAG_AMBIENTS --> | |||
Set ambients debug mode. | |||
'''Available Options''': None, River, Coast, Lake | |||
== Freeze cam position == | |||
<!-- ID: GAME_DIAG_AMBIENTS_FREEZE --> | |||
Enable/disable freezing of camera position for ambients debug. | |||
'''Available Options''': false, true | |||
== Debug Com.Sound == | |||
<!-- ID: GAME_DIAG_COMMUNICATION_DEBUG --> | |||
Enable/disable communication sound debug. | |||
'''Available Options''': false, true | |||
== MM - debug info == | |||
<!-- ID: DM_MUSIC_MANAGER_DEBUGINFO --> | |||
Enable/disable music manager debug info. | |||
'''Available Options''': false, true | |||
== Debug RadioBroadcast == | |||
<!-- ID: GAME_DIAG_RADIO_BROADCAST --> | |||
Enable/disable radio broadcast debug. | |||
'''Available Options''': false, true | |||
== Show invalid event == | |||
<!-- ID: GAME_DIAG_UNKNOWN_EVENT --> | |||
Enable/disable showing of invalid sound events. | |||
'''Available Options''': false, true | |||
== Show system info == | |||
<!-- ID: DM_SOUND_SYSTEM_INFO --> | |||
Set sound system info display. | |||
'''Available Options''': none, generic, cmds, alloc | |||
== Resources == | |||
<!-- ID: DM_SOUND_RESOURCES --> | |||
Set sound resources display. | |||
'''Available Options''': none, all, events | |||
== Show categories == | |||
<!-- ID: DM_SOUND_SHOW_CATEGORIES --> | |||
Enable/disable showing of sound categories. | |||
'''Available Options''': false, true | |||
== Show sounds == | |||
<!-- ID: DM_SOUND_SHOW_PLAYING --> | |||
Enable/disable showing of playing sounds. | |||
'''Available Options''': false, true | |||
== Show sounds 3D == | |||
<!-- ID: DM_SOUND_SHOW_PLAYING_3D --> | |||
Set 3D sound visualization. | |||
'''Available Options''': none, all, waiting, playing, fading | |||
== Log source info == | |||
<!-- ID: DM_SOUND_SOURCE_INFO --> | |||
Enable/disable logging of sound source info. | |||
'''Available Options''': false, true | |||
== Com debug == | |||
<!-- ID: DM_SOUND_DEBUG_COM --> | |||
Enable/disable communication debug. | |||
'''Available Options''': false, true | |||
== Enable ITD == | |||
<!-- ID: DM_SOUND_ITD --> | |||
Enable/disable ITD. | |||
'''Available Options''': true, false | |||
== Play recorded VON == | |||
<!-- ID: DM_SOUND_VON_DIRECT_PLAY --> | |||
Enable/disable playing of recorded VON. | |||
'''Available Options''': false, true | |||
== Print Melee Surface == | |||
<!-- ID: SCR_DebugMenuID.DEBUGUI_SOUNDS_PRINT_MELEESURFACE --> | |||
Enable/disable printing of melee surface. | |||
'''Available Options''': false, true | |||
== Reload AmbientSounds Conf == | |||
<!-- ID: SCR_DebugMenuID.DEBUGUI_SOUNDS_RELOAD_AMBIENT_SOUNDS_CONFIGS --> | |||
Enable/disable reloading of ambient sound configurations. | |||
'''Available Options''': false, true | |||
== Random Ambient Sounds == | |||
<!-- ID: SCR_DebugMenuID.DEBUGUI_SOUNDS_RANDOM_POSITIONAL_SOUNDS --> | |||
Enable/disable random positional ambient sounds. | |||
'''Available Options''': false, true | |||
== Show MPD Impulse Values == | |||
<!-- ID: SCR_DebugMenuID.DEBUGUI_SOUNDS_MPDESTRUCTION_SHOW_IMPULSEVALUES --> | |||
Enable/disable showing of MPD impulse values. | |||
'''Available Options''': false, true | |||
== Sound Manager == | |||
<!-- ID: SCR_DebugMenuID.DEBUGUI_SOUNDS_SOUND_MANAGER --> | |||
Enable/disable sound manager debug. | |||
'''Available Options''': false, true | |||
== Global Variables == | |||
<!-- ID: SCR_DebugMenuID.DEBUGUI_SOUNDS_GLOBAL_VARIABLES --> | |||
Enable/disable sound global variables debug. | |||
'''Available Options''': false, true | |||
= Particles = | |||
== Disable particle render == | |||
<!-- ID: DM_PARTICLE_DISABLE_RENDER --> | |||
Enable/disable particle rendering. | |||
'''Available Options''': false, true | |||
== Disable particle update == | |||
<!-- ID: DM_PARTICLE_DISABLE_UPDATE --> | |||
Enable/disable particle update. | |||
'''Available Options''': false, true | |||
== Show particle FX LOD == | |||
<!-- ID: DM_PARTICLE_SHOW_LOD --> | |||
Enable/disable showing of particle FX LOD. | |||
'''Available Options''': disabled, enabled | |||
== Show 3D rotation spaces == | |||
<!-- ID: DM_PARTICLE_SHOW_ROT_SPACE --> | |||
Set scale for showing of particle rotation spaces. | |||
'''Available Options''': off, 0.5, 1.0, 1.5, 2.0, 2.5, 3.0, 3.5, 4.0 | |||
== Overdraw optimization == | |||
<!-- ID: DM_PARTICLE_OPTIM --> | |||
Set overdraw optimization mode. | |||
'''Available Options''': off, overhead (prerender), overhead (complete), on | |||
== Render == | |||
<!-- ID: DM_PARTICLE_OPTIM_BG --> | |||
Set particle render mode. | |||
'''Available Options''': full, background only, no background | |||
== Depth write mode == | |||
<!-- ID: DM_PARTICLE_OPTIM_DEPTH_WRITE --> | |||
Set particle depth write mode. | |||
'''Available Options''': full-screen tri, particle draw | |||
== Prerender mask == | |||
<!-- ID: DM_PARTICLE_OPTIM_MASK --> | |||
Set particle prerender mask mode. | |||
'''Available Options''': on, off, overhead | |||
== Copy from main RT == | |||
<!-- ID: DM_PARTICLE_MASK_FROM_MAIN_RT --> | |||
Enable/disable copying frommain render target. | |||
'''Available Options''': enabled, disabled | |||
== Show internal texture == | |||
<!-- ID: DM_PARTICLE_OPTIM_TEX --> | |||
Show particle internal texture. | |||
'''Available Options''': none, depth ranges, alpha pre, alpha full | |||
== Show Particle Contacts == | |||
<!-- ID: SCR_DebugMenuID.DEBUGUI_PARTICLES_CONTACT_COMPONENT --> | |||
Enable/disable showing of particle contacts. | |||
'''Available Options''': false, true | |||
= Input = | |||
== Sink Input == | |||
<!-- ID: ENF_DIAG_SINK_INPUT --> | |||
Enable/disable sink input. | |||
'''Available Options''': false, true | |||
== Debug Contexts == | |||
<!-- ID: ENF_DIAG_DEBUG_INPUT_CONTEXTS --> | |||
Set input context debug mode. | |||
'''Available Options''': disabled, active, all | |||
== Show Cursor == | |||
<!-- ID: ENF_DIAG_INPUT_SHOW_CURSOR --> | |||
Enable/disable showing of input cursor. | |||
'''Available Options''': false, true | |||
= UI = | |||
== Disable Loc == | |||
<!-- ID: ENF_DIAG_DISABLE_LOCALIZATION --> | |||
Enable/disable localization. | |||
'''Available Options''': false, true | |||
== Show UI Diag == | |||
<!-- ID: ENF_UI_DIAG --> | |||
Enable/disable UI diagnostics. | |||
'''Available Options''': false, true | |||
== Log Construction == | |||
<!-- ID: ENF_DIAG_LOG_CONSTRUCTION --> | |||
Enable/disable logging of UI construction. | |||
'''Available Options''': false, true | |||
== refactored == | |||
=== Override config === | |||
<!-- ID: SCR_DebugMenuID.DEBUGUI_RADIALMENU_CONFIG_DEBUG --> | |||
Override radial menu config. | |||
'''Available Options''': true")", false, true | |||
=== Close on open === | |||
<!-- ID: SCR_DebugMenuID.DEBUGUI_RADIALMENU_CLOSE_ON_RELEASE_OPEN --> | |||
Close radial menu on open. | |||
'''Available Options''': true")", false, true | |||
=== Perform on close === | |||
<!-- ID: SCR_DebugMenuID.DEBUGUI_RADIALMENU_PERFORM_ON_CLOSE --> | |||
Perform action on radial menu close. | |||
'''Available Options''': true")", false, true | |||
=== Close on perform === | |||
<!-- ID: SCR_DebugMenuID.DEBUGUI_RADIALMENU_CLOSE_ON_PERFORM --> | |||
Close radial menu on perform. | |||
'''Available Options''': true")", false, true | |||
=== Delect in center === | |||
<!-- ID: SCR_DebugMenuID.DEBUGUI_RADIALMENU_DESELECT_IN_CENTER --> | |||
Deselect radial menu in center. | |||
'''Available Options''': true")", false, true | |||
=== Large size === | |||
<!-- ID: SCR_DebugMenuID.DEBUGUI_RADIALMENU_USE_LARGE_SIZE --> | |||
Use large size for radial menu. | |||
'''Available Options''': true")", false, true | |||
=== Override size === | |||
<!-- ID: SCR_DebugMenuID.DEBUGUI_RADIALMENU_CUSTOM_SIZE_ENABLE --> | |||
Override radial menu custom size. | |||
'''Available Options''': true")", false, true | |||
=== Sustom size === | |||
<!-- ID: SCR_DebugMenuID.DEBUGUI_RADIALMENU_CUSTOM_SIZE --> | |||
Set custom radial menu size. | |||
'''Range Settings''': | |||
Min: 100 | |||
Max: 1000 | |||
Current Value: 100 | |||
Step: 1 | |||
=== Entries setup === | |||
<!-- ID: SCR_DebugMenuID.DEBUGUI_RADIALMENU_ENTRY_COUNT_ENABLE --> | |||
Enable/disable custom entry count for radial menu. | |||
'''Available Options''': true")", false, true | |||
=== Entries === | |||
<!-- ID: SCR_DebugMenuID.DEBUGUI_RADIALMENU_ENTRY_COUNT --> | |||
Set custom entry count for radial menu. | |||
'''Range Settings''': | |||
Min: 2 | |||
Max: 32 | |||
Current Value: 2 | |||
Step: 1 | |||
== Close All Menus == | |||
<!-- ID: SCR_DebugMenuID.DEBUGUI_UI_CLOSE_ALL_MENUS --> | |||
Close all menus. | |||
'''Available Options''': false, true | |||
== Open Main Menu == | |||
<!-- ID: SCR_DebugMenuID.DEBUGUI_UI_OPEN_MAIN_MENU --> | |||
Open main menu. | |||
'''Available Options''': false, true | |||
== Log widgets under cursor == | |||
<!-- ID: SCR_DebugMenuID.DEBUGUI_UI_LOG_UNDER_CURSOR --> | |||
Enable/disable logging of widgets under cursor. | |||
'''Available Options''': false, true | |||
== Ignore hint persistency == | |||
<!-- ID: SCR_DebugMenuID.DEBUGUI_HINT_IGNORE_SHOWN --> | |||
Enable/disable ignoring of hint persistency. | |||
'''Available Options''': false, true | |||
== Enable map debug menu == | |||
<!-- ID: SCR_DebugMenuID.DEBUGUI_UI_MAP_DEBUG_OPTIONS --> | |||
Enable/disable map debug menu. | |||
'''Available Options''': false, true | |||
== Show all settings == | |||
<!-- ID: SCR_DebugMenuID.DEBUGUI_UI_SHOW_ALL_SETTINGS --> | |||
Enable/disable showing of all UI settings. | |||
'''Available Options''': false, true | |||
= AI = | |||
== Performance == | |||
=== Show IsAIActivated === | |||
<!-- ID: AI_DIAG_ACTIVE_AI --> | |||
Enable/disable showing of IsAIActivated flag. | |||
'''Available Options''': false, true | |||
=== AILib counters === | |||
<!-- ID: ailib::AILIB_DIAG_AI_COUNTERS --> | |||
Enable/disable AI library counters. | |||
'''Available Options''': false, true | |||
=== Load balancing === | |||
<!-- ID: ailib::AILIB_LOAD_BALANCING --> | |||
Enable/disable AI load balancing. | |||
'''Available Options''': true, false | |||
=== Forced AI simulation LOD === | |||
<!-- ID: ailib::AILIB_FORCED_LOD --> | |||
Set forced AI simulation LOD. | |||
'''Range Settings''': | |||
Min: -1 | |||
Max: 10 | |||
Current Value: -1 | |||
Step: 1 | |||
=== BT holder === | |||
<!-- ID: ailib::AILIB_DIAG_BT_HOLDER --> | |||
Enable/disable BT holder debug. | |||
'''Available Options''': false, true | |||
=== AI Limits === | |||
<!-- ID: ailib::AILIB_DIAG_LIMITS --> | |||
Enable/disable AI limits debug. | |||
'''Available Options''': false, true | |||
== Navmesh == | |||
=== Show NavMesh === | |||
<!-- ID: DM_NM --> | |||
Enable/disable showing of NavMesh. | |||
'''Available Options''': false, true | |||
=== Generate without navlinks === | |||
<!-- ID: DM_GENERATE_NAVMESH_WITH_NAVLINKS --> | |||
Enable/disable generation of NavMesh without navlinks. | |||
'''Available Options''': true, false | |||
=== Show links between polygons === | |||
<!-- ID: DM_POLY_LINKS --> | |||
Enable/disable showing of links between polygons. | |||
'''Available Options''': false, true | |||
=== Navlinks Validation === | |||
<!-- ID: DM_NAVLINKS --> | |||
Enable/disable Navlinks validation. | |||
'''Available Options''': false, true | |||
=== Navlink Active Direction === | |||
<!-- ID: DM_NAVLINKS_ACTIVE_DIRECTION --> | |||
Enable/disable showing of Navlink active direction. | |||
'''Available Options''': false, true | |||
=== Show Navmesh Project Index === | |||
<!-- ID: DM_NAVMESH_FILE_TO_SHOW --> | |||
Set Navmesh project index to show. | |||
'''Range Settings''': | |||
* Min: 0 | |||
* Max: 1000 | |||
* Current Value: 0 | |||
* Step: 1 | |||
=== Ignore area costs === | |||
<!-- ID: DM_EQUAL_PATH_WEIGHTS --> | |||
Enable/disable ignoring of area costs for pathfinding. | |||
'''Available Options''': false, true | |||
=== Path smoothing (on/off) === | |||
<!-- ID: DM_PATH_SMOOTHING --> | |||
Set path smoothing mode. | |||
'''Available Options''': default, on, off | |||
== Movement == | |||
=== Path === | |||
<!-- ID: ailib::AILIB_DIAG_MOVEMENT_PATH --> | |||
Enable/disable path debug. | |||
'''Available Options''': false, true | |||
=== Path index === | |||
<!-- ID: ailib::AILIB_DIAG_MOVEMENT_CURRENTPATHINDEX --> | |||
Enable/disable showing of current path index. | |||
'''Available Options''': false, true | |||
=== Obstacle Avoidance diag === | |||
<!-- ID: ailib::AILIB_DIAG_OBSTACLE_AVOIDANCE --> | |||
Enable/disable obstacle avoidance debug. | |||
'''Available Options''': false, true | |||
=== Current Navlink === | |||
<!-- ID: ailib::AILIB_DIAG_MOVEMENT_NAVLINK --> | |||
Enable/disable showing of current Navlink. | |||
'''Available Options''': false, true | |||
=== Request parameters === | |||
<!-- ID: ailib::AILIB_DIAG_MOVEMENT_REQUESTPARAMS --> | |||
Enable/disable showing of request parameters. | |||
'''Available Options''': false, true | |||
=== Movement parameters === | |||
<!-- ID: ailib::AILIB_DIAG_MOVEMENT_MOVEPARAMS --> | |||
Enable/disable showing of movement parameters. | |||
'''Available Options''': false, true | |||
=== Request Target === | |||
<!-- ID: ailib::AILIB_DIAG_MOVEMENT_FINALPOSITION --> | |||
Enable/disable showing of request target. | |||
'''Available Options''': false, true | |||
=== Movement Target === | |||
<!-- ID: ailib::AILIB_DIAG_MOVEMENT_POS --> | |||
Enable/disable showing of movement target. | |||
'''Available Options''': false, true | |||
=== Orientation Target === | |||
<!-- ID: ailib::AILIB_DIAG_MOVEMENT_ORIENT --> | |||
Enable/disable showing of orientation target. | |||
'''Available Options''': false, true | |||
=== Formation offsets === | |||
<!-- ID: ailib::AILIB_DIAG_GROUP_FORMATION --> | |||
Set formation offsets debug mode. | |||
'''Available Options''': off, projected, default, both | |||
=== Formation Center === | |||
<!-- ID: ailib::AILIB_DIAG_GROUP_FORMATION_CENTER --> | |||
Enable/disable showing of formation center. | |||
'''Available Options''': false, true | |||
=== Move Handlers === | |||
<!-- ID: ailib::AILIB_DIAG_GROUP_HANDLERS --> | |||
Enable/disable showing of move handlers. | |||
'''Available Options''': false, true | |||
=== Stuck Teleport === | |||
<!-- ID: ailib::AILIB_DIAG_MOVEMENT_TELEPORT_IF_STUCK --> | |||
Enable/disable teleport if stuck. | |||
'''Available Options''': false, true | |||
=== Out of Navmesh Teleport === | |||
<!-- ID: ailib::AILIB_DIAG_MOVEMENT_TELEPORT_IF_OUT_OF_NAVMESH --> | |||
Enable/disable teleport if out of NavMesh. | |||
'''Available Options''': false, true | |||
=== Memory === | |||
<!-- ID: ailib::AILIB_DIAG_MOVEMENT_MEMORY --> | |||
Enable/disable showing of movement memory. | |||
'''Available Options''': false, true | |||
== Pathfinding == | |||
=== Debug of AStar === | |||
<!-- ID: ailib::AILIB_DIAG_ASTAR_DEBUG --> | |||
Enable/disable AStar debug. | |||
'''Available Options''': false, true | |||
== | === Make a step of AStar === | ||
<!-- ID: ailib::AILIB_DIAG_ASTAR_STEP --> | |||
Step AStar pathfinding. | |||
'''Hotkey''': {{Controls|lctrl|lalt|v}} | |||
== | '''Available Options''': false, true | ||
=== Pathfinding component === | |||
<!-- ID: ailib::AILIB_DIAG_PATHFINDING_COMPONENT --> | |||
Enable/disable pathfinding component debug. | |||
'''Available Options''': false, true | |||
=== Road network === | |||
<!-- ID: ailib::AILIB_DIAG_ROAD_NETWORK --> | |||
Set road network debug mode. | |||
'''Hotkey''': {{Controls|lctrl|lalt|n}} | |||
'''Available Options''': off, active, roads, children, bridges, offRoad, links, all | |||
=== Show Road Width === | |||
<!-- ID: ailib::AILIB_DIAG_ROAD_WIDTHS --> | |||
Enable/disable showing of road widths. | |||
'''Hotkey''': {{Controls|lctrl|lalt|w}} | |||
'''Available Options''': false, true | |||
=== Road network component === | |||
<!-- ID: ailib::AILIB_DIAG_ROAD_NETWORK_SINGLE_COMPONENT --> | |||
Set road network component debug. | |||
'''Range Settings''': | |||
Min: -1 | |||
Max: 300 | |||
Current Value: -1 | |||
Step: 1 | |||
=== Road Id === | |||
<!-- ID: ailib::AILIB_DIAG_ROAD_ID --> | |||
Enable/disable showing of road IDs. | |||
'''Hotkey''': {{Controls|lctrl|lalt|i}} | |||
'''Available Options''': false, true | |||
=== RoadPart Min Max Id === | |||
<!-- ID: ailib::AILIB_DIAG_ROADPART_MINMAX --> | |||
Enable/disable showing of road part min max ids. | |||
'''Available Options''': false, true | |||
=== Pathfinding errors === | |||
<!-- ID: ailib::AILIB_DIAG_ENABLE_PATHFINDING_ERRORS --> | |||
Enable/disable reporting of pathfinding errors. | |||
'''Available Options''': false, true | |||
=== Link on bridge Id === | |||
<!-- ID: ailib::AILIB_DIAG_LINK_ON_BRIDGE --> | |||
Set link on bridge ID. | |||
'''Range Settings''': | |||
Min: 0 | |||
Max: 1000 | |||
Current Value: 0 | |||
Step: 1 | |||
== Aiming == | |||
=== Aiming component === | |||
<!-- ID: ailib::AILIB_DIAG_AIMING_COMPONENT --> | |||
Enable/disable aiming component debug. | |||
'''Available Options''': false, true | |||
=== Aiming component PID === | |||
<!-- ID: ailib::AILIB_DIAG_AIMING_COMPONENT_PID --> | |||
Enable/disable aiming component PID debug. | |||
'''Available Options''': false, true | |||
=== Head aiming component === | |||
<!-- ID: ailib::AILIB_DIAG_HEAD_AIMING_COMPONENT --> | |||
Enable/disable head aiming component debug. | |||
'''Available Options''': false, true | |||
=== Use aim at version of ai aiming === | |||
<!-- ID: ailib::AILIB_DIAG_AIMING_COMPONENT_AIM_AT --> | |||
Enable/disable usage of aim at version of AI aiming. | |||
'''Available Options''': false, true | |||
=== Show target aimpoint === | |||
<!-- ID: SCR_DebugMenuID.DEBUGUI_AI_SHOW_TARGET_AIMPOINT --> | |||
Show or hide target aimpoint. | |||
'''Available Options''': false, true | |||
=== Show target projected size === | |||
<!-- ID: SCR_DebugMenuID.DEBUGUI_AI_SHOW_TARGET_PROJECTED_SIZE --> | |||
Show or hide projected target size. | |||
'''Available Options''': false, true | |||
== AI Navigator == | |||
=== Enabled === | |||
<!-- ID: ailib::AILIB_DIAG_AI_NAVIGATOR_SHOW --> | |||
Enable/disable AI navigator debug. | |||
'''Available Options''': false, true | |||
=== Previous agent === | |||
<!-- ID: ailib::AILIB_DIAG_AI_NAVIGATOR_PREV --> | |||
Select previous AI navigator agent. | |||
'''Hotkey''': {{Controls|rctrl|rshift|9}} | |||
'''Available Options''': false, true | |||
=== Next agent === | |||
<!-- ID: ailib::AILIB_DIAG_AI_NAVIGATOR_NEXT --> | |||
Select next AI navigator agent. | |||
'''Hotkey''': {{Controls|rctrl|rshift|0}} | |||
'''Available Options''': false, true | |||
== Driving == | |||
=== Show character detection === | |||
<!-- ID: AI_DIAG_MOVEMENT_CHARACTER_DETECTION --> | |||
Enable/disable character detection debug. | |||
'''Available Options''': false, true | |||
=== Vehicle driving diag === | |||
<!-- ID: ailib::AILIB_DIAG_MOVEMENT_VEHICLE --> | |||
Enable/disable vehicle driving diagnostics. | |||
'''Available Options''': false, true | |||
=== AI Forbid Reversing === | |||
<!-- ID: ailib::AILIB_DIAG_AI_NO_REVERSING --> | |||
Enable/disable AI reversing. | |||
'''Available Options''': false, true | |||
=== AI No Steer Adjustments === | |||
<!-- ID: ailib::AILIB_DIAG_AI_NO_REVERSING_ADJUSTMENTS --> | |||
Enable/disable AI steering adjustments. | |||
'''Available Options''': false, true | |||
=== Curve Circumference === | |||
<!-- ID: ailib::AILIB_DIAG_MOVEMENT_VEHICLE_CURVE --> | |||
Enable/disable curve circumference debug. | |||
'''Available Options''': false, true | |||
=== PID Display === | |||
<!-- ID: ailib::AILIB_DIAG_MOVEMENT_PID_DISPLAY --> | |||
Enable/disable PID debug. | |||
'''Available Options''': false, true | |||
=== Show avoidance === | |||
<!-- ID: ailib::AILIB_DIAG_MOVEMENT_VEHICLE_AVOIDANCE --> | |||
Enable/disable vehicle avoidance debug. | |||
'''Available Options''': false, true | |||
== Perception == | |||
=== Perception targets === | |||
<!-- ID: AI_DIAG_PERCEPTION_TARGETS --> | |||
Enable/disable perception targets debug. | |||
'''Available Options''': false, true | |||
=== Perception sensors eyes === | |||
<!-- ID: AI_DIAG_PERCEPTION_SENSORS_VISUAL --> | |||
Enable/disable perception sensors eyes debug. | |||
'''Available Options''': false, true | |||
=== Perception sensors ears === | |||
<!-- ID: AI_DIAG_PERCEPTION_SENSORS_SOUND --> | |||
Enable/disable perception sensors ears debug. | |||
'''Available Options''': false, true | |||
=== Perception recognition === | |||
<!-- ID: AI_DIAG_PERCEPTION_RECOGNITION_FACTORS --> | |||
Enable/disable perception recognition factors debug. | |||
'''Available Options''': false, true | |||
=== Cached perceiveble positions === | |||
<!-- ID: AI_DIAG_PERCEPTION_CACHED_AIM_POINT_POS --> | |||
Enable/disable showing of cached perceived positions. | |||
'''Available Options''': false, true | |||
== Animals == | |||
=== Show animals debug info === | |||
<!-- ID: AI_DIAG_ANIMALS_DEBUG_ON --> | |||
Enable/disable animals debug. | |||
'''Available Options''': false, true | |||
=== Manager to debug === | |||
<!-- ID: AI_DIAG_ANIMAL_MANAGER_SELECTOR --> | |||
Select animal manager to debug. | |||
'''Available Options''': None, Birds | |||
=== Show current Animal positions === | |||
<!-- ID: AI_DIAG_ANIMAL_MANAGER_SHOW_ANIMAL_POSITIONS --> | |||
Enable/disable showing of current animal positions. | |||
'''Available Options''': false, true | |||
=== Draw tile boundaries === | |||
<!-- ID: AI_DIAG_ANIMAL_MANAGER_DRAW_TILE_BOUNDARIES --> | |||
Enable/disable drawing of animal tile boundaries. | |||
'''Available Options''': false, true | |||
=== Draw Animal despawn range === | |||
<!-- ID: AI_DIAG_ANIMAL_MANAGER_DRAW_ANIMAL_LIMITS --> | |||
Enable/disable drawing of animal despawn range. | |||
'''Available Options''': false, true | |||
=== Draw Animal to Animal minimum spawn range === | |||
<!-- ID: AI_DIAG_ANIMAL_MANAGER_DRAW_ANIMAL_TO_ANIMAL_LIMITS --> | |||
Enable/disable drawing of animal to animal minimum spawn range. | |||
'''Available Options''': false, true | |||
=== Turn correction debug === | |||
<!-- ID: AI_DIAG_ANIMALS_TURN_CORRECTION_DEBUG --> | |||
Enable/disable turn correction debug. | |||
'''Available Options''': false, true | |||
== POV Pathfinder == | |||
=== Extend of querry box === | |||
<!-- ID: POV_DIAG_EXTEND --> | |||
Set extend of query box. | |||
'''Range Settings''': | |||
Min: 1 | |||
Max: 20 | |||
Current Value: 10 | |||
Step: 1 | |||
=== Number of iterations === | |||
<!-- ID: POV_DIAG_ITERATIONS --> | |||
Set number of iterations. | |||
'''Range Settings''': | |||
Min: 1 | |||
Max: 10 | |||
Current Value: 5 | |||
Step: 1 | |||
=== Fail on hitting origin === | |||
<!-- ID: POV_DIAG_FAIL_ON_HIT_POS --> | |||
Enable/disable pathfinding failure on hitting origin. | |||
'''Available Options''': false, true | |||
=== Set start position === | |||
<!-- ID: POV_DIAG_PATH_START_POS --> | |||
Set pathfinder start position. | |||
'''Hotkey''': {{Controls|lctrl|lalt|num0}} | |||
'''Available Options''': false, true | |||
=== Set end position === | |||
<!-- ID: POV_DIAG_PATH_END_POS --> | |||
Set pathfinder end position. | |||
'''Hotkey''': {{Controls|lctrl|lalt|num1}} | |||
'''Available Options''': false, true | |||
=== Run pathfinder === | |||
<!-- ID: POV_DIAG_PATH_RUN --> | |||
Run pathfinder. | |||
'''Hotkey''': {{Controls|lctrl|lalt|num3}} | |||
'''Available Options''': false, true | |||
=== Generate Graph === | |||
<!-- ID: POV_DIAG_PATH_GENERATE --> | |||
Generate pathfinder graph. | |||
'''Hotkey''': {{Controls|lctrl|lalt|num2}} | |||
'''Available Options''': false, true | |||
== Show Cover Query == | |||
<!-- ID: AI_DIAG_COVER_QUERY --> | |||
Enable/disable showing of cover query. | |||
'''Available Options''': false, true | |||
== Disable AI damage == | |||
<!-- ID: ailib::AILIB_DIAG_CHEAT_DISABLE_AI_DAMAGE --> | |||
Set AI damage mode. | |||
'''Available Options''': Cheat disabled, Force invulnerable, Force vulnerable | |||
== Disable AI actions == | |||
<!-- ID: ailib::AILIB_DIAG_DISABLE_PROCESSING_ACTIONS --> | |||
Enable/disable AI action processing. | |||
'''Hotkey''': {{Controls|lctrl|lalt|f9}} | |||
'''Available Options''': false, true | |||
== Smart actions usage == | |||
<!-- ID: ailib::AILIB_DIAG_SMART_ACTIONS --> | |||
Enable/disable smart actions debug. | |||
'''Available Options''': false, true | |||
== Group members == | |||
<!-- ID: ailib::AILIB_DIAG_GROUP --> | |||
Enable/disable showing of AI group members. | |||
'''Available Options''': false, true | |||
== Waypoints == | |||
<!-- ID: ailib::AILIB_DIAG_WAYPOINTS --> | |||
Set waypoint visualization. | |||
'''Available Options''': off, cylinder, sphere | |||
== AI Units == | |||
<!-- ID: ailib::AILIB_DIAG_UNITS --> | |||
Enable/disable AI units debug. | |||
'''Available Options''': false, true | |||
== Messages == | |||
<!-- ID: ailib::AILIB_DIAG_MESSAGES --> | |||
Enable/disable AI messages debug. | |||
'''Available Options''': false, true | |||
== Show target AI context == | |||
<!-- ID: ailib::AILIB_DIAG_SHOW_AI_CONTEXT --> | |||
Enable/disable showing of target AI context. | |||
'''Available Options''': false, true | |||
== AIScript == | |||
=== AI Debug Category === | |||
<!-- ID: SCR_DebugMenuID.DEBUGUI_AI_DEBUG_CATEGORY --> | |||
Set AI debug category. | |||
'''Available Options''': MISSING CATALOGS! | |||
=== Set BT Breakpoint === | |||
<!-- ID: SCR_DebugMenuID.DEBUGUI_AI_SET_BT_BREAKPOINT --> | |||
Enable/disable BT breakpoint. | |||
'''Available Options''': false, true | |||
=== Print debug from BTs === | |||
<!-- ID: SCR_DebugMenuID.DEBUGUI_AI_PRINT_DEBUG --> | |||
Enable/disable printing of debug from BTs. | |||
'''Available Options''': false, true | |||
=== Print init of groups === | |||
<!-- ID: SCR_DebugMenuID.DEBUGUI_AI_PRINT_GROUP_INFO --> | |||
Enable/disable printing of group init info. | |||
'''Available Options''': false, true | |||
=== Show fireteams === | |||
<!-- ID: SCR_DebugMenuID.DEBUGUI_AI_FIRETEAMS --> | |||
Enable/disable showing of fireteams. | |||
'''Available Options''': false, true | |||
=== Show subgroups === | |||
<!-- ID: SCR_DebugMenuID.DEBUGUI_AI_SUBGROUPS --> | |||
Enable/disable showing of subgroups. | |||
'''Available Options''': false, true | |||
=== Show target clusters === | |||
<!-- ID: SCR_DebugMenuID.DEBUGUI_AI_TARGET_CLUSTERS --> | |||
Enable/disable showing of target clusters. | |||
'''Available Options''': false, true | |||
=== Print stats for aiming === | |||
<!-- ID: SCR_DebugMenuID.DEBUGUI_AI_PRINT_SHOT_STATISTICS --> | |||
Enable/disable printing of aiming statistics. | |||
'''Available Options''': false, true | |||
=== Print new activity === | |||
<!-- ID: SCR_DebugMenuID.DEBUGUI_AI_PRINT_ACTIVITY --> | |||
Enable/disable printing of new AI activity. | |||
'''Available Options''': false, true | |||
=== Show debug shapes from BTs === | |||
<!-- ID: SCR_DebugMenuID.DEBUGUI_AI_SHOW_DEBUG_SHAPES --> | |||
Enable/disable showing of debug shapes from BTs. | |||
'''Available Options''': false, true | |||
=== Show fiendly in aim === | |||
<!-- ID: SCR_DebugMenuID.DEBUGUI_AI_SHOW_FRIENDLY_IN_AIM --> | |||
Enable/disable showing of friendly units in aim. | |||
'''Available Options''': false, true | |||
=== Show target last seen === | |||
<!-- ID: SCR_DebugMenuID.DEBUGUI_AI_SHOW_TARGET_LASTSEEN --> | |||
Enable/disable showing of target last seen position. | |||
'''Available Options''': false, true | |||
=== Select fixed AIAgent === | |||
<!-- ID: SCR_DebugMenuID.DEBUGUI_AI_SELECT_FIXED_AGENT --> | |||
Enable/disable selection of fixed AI agent. | |||
'''Available Options''': false, true | |||
=== Debug cover search === | |||
<!-- ID: SCR_DebugMenuID.DEBUGUI_AI_DEBUG_COVERS --> | |||
Enable/disable cover search debug. | |||
'''Available Options''': false, true | |||
=== Show Comms Handlers === | |||
<!-- ID: SCR_DebugMenuID.DEBUGUI_AI_COMMS_HANDLERS --> | |||
Enable/disable showing of comms handlers. | |||
'''Available Options''': false, true | |||
=== Show perception panel === | |||
<!-- ID: SCR_DebugMenuID.DEBUGUI_AI_SHOW_PERCEPTION_PANEL --> | |||
Enable/disable showing of perception panel. | |||
'''Available Options''': false, true | |||
=== Show grenade positions === | |||
<!-- ID: SCR_DebugMenuID.DEBUGUI_AI_SHOW_GRENADE_POSITIONS --> | |||
Enable/disable showing of grenade positions. | |||
'''Available Options''': false, true | |||
=== Show suppression debug === | |||
<!-- ID: SCR_DebugMenuID.DEBUGUI_AI_SHOW_SUPPRESS_DEBUG --> | |||
Enable/disable showing of suppression debug. | |||
'''Available Options''': false, true | |||
=== Show illum flares positions === | |||
<!-- ID: SCR_DebugMenuID.DEBUGUI_AI_SHOW_ILLUM_FLARES_POSITIONS --> | |||
Enable/disable showing of illum flares positions. | |||
'''Available Options''': false, true | |||
=== Show aim leading debug === | |||
<!-- ID: SCR_DebugMenuID.DEBUGUI_AI_SHOW_AIM_LEAD_DEBUG --> | |||
Enable/disable showing of aim leading debug. | |||
'''Available Options''': false, true | |||
=== Show sector threat filter === | |||
<!-- ID: SCR_DebugMenuID.DEBUGUI_AI_SHOW_SECTOR_THREAT_FILTER --> | |||
Enable/disable showing of sector threat filter. | |||
'''Available Options''': false, true | |||
=== Show search and destroy points of interest === | |||
<!-- ID: SCR_DebugMenuID.DEBUGUI_AI_SHOW_SEARCH_AND_DESTROY --> | |||
Enable/disable showing of search and destroy points of interest. | |||
'''Available Options''': false, true | |||
=== Show Send Message Menu === | |||
<!-- ID: SCR_DebugMenuID.DEBUGUI_AI_SEND_MESSAGE --> | |||
Enable/disable showing of send message menu. | |||
'''Available Options''': false, true | |||
=== Open Debug Panel === | |||
<!-- ID: SCR_DebugMenuID.DEBUGUI_AI_OPEN_DEBUG_PANEL --> | |||
Enable/disable opening of AI debug panel. | |||
'''Available Options''': false, true | |||
=== Show Grenade Trace === | |||
<!-- ID: SCR_DebugMenuID.DEBUGUI_AI_SHOW_GRENADE_TRACE --> | |||
Enable/disable showing of grenade trace. | |||
'''Available Options''': false, true | |||
= Systems = | |||
== DynSim Distance Diag == | |||
<!-- ID: GAME_SYSTEMS_DYNSIM_DISTANCE --> | |||
Enable/disable Dynamic Simulation distance diagnostics. | |||
'''Available Options''': false, true | |||
== DynSim Visibility Diag == | |||
<!-- ID: GAME_SYSTEMS_DYNSIM_VISIBILIITY --> | |||
Enable/disable Dynamic Simulation visibility diagnostics. | |||
'''Available Options''': false, true | |||
== ProcAnim Registration Diag == | |||
<!-- ID: GAME_SYSTEMS_PROCANIM_REGISTRATION --> | |||
Enable/disable procedural animation registration diagnostics. | |||
'''Available Options''': false, true | |||
== HandleControls Registration Diag == | |||
<!-- ID: GAME_SYSTEMS_HANDLECONTROLS_REGISTRATION --> | |||
Enable/disable handle controls registration diagnostics. | |||
'''Available Options''': false, true | |||
== NwkMovement Registration Diag == | |||
<!-- ID: GAME_SYSTEMS_NWKMOVEMENT_REGISTRATION --> | |||
Enable/disable network movement registration diagnostics. | |||
'''Available Options''': false, true | |||
== Sound Registration Diag == | |||
<!-- ID: GAME_SYSTEMS_SOUND_REGISTRATION --> | |||
Enable/disable sound registration diagnostics. | |||
'''Available Options''': false, true | |||
== Backend Diag == | |||
<!-- ID: GAME_SYSTEMS_BACKEND --> | |||
Enable/disable backend diagnostics. | |||
'''Available Options''': false, true | |||
== AnimKeyFrame Fake Time == | |||
<!-- ID: GAME_SYSTEMS_CHARANIM_KEYFRAME_LOAD --> | |||
Set animation keyframe fake time. | |||
'''Range Settings''': | |||
Min: 0 | |||
Max: 1.0 | |||
Current Value: 0.0 | |||
Step: 0.05 | |||
== Systems diag == | |||
<!-- ID: DM_SYSTEMS_DIAG --> | |||
Set systems diagnostics display. | |||
'''Available Options''': none, basic, full | |||
== Show diag system stats == | |||
<!-- ID: DM_SYSTEMS_DIAG_SYSTEM --> | |||
Enable/disable showing of system statistics. | |||
'''Available Options''': false, true | |||
= Platform = | |||
== PlayStation Network matches == | |||
=== Show match status === | |||
<!-- ID: DIAG_MATCH_STATUS --> | |||
Enable/disable showing of match status. | |||
'''Available Options''': false, true | |||
=== Create dummy match === | |||
<!-- ID: DIAG_MATCH_CREATE --> | |||
Enable/disable creation of dummy match. | |||
'''Available Options''': false, true | |||
=== Start match === | |||
<!-- ID: DIAG_MATCH_START --> | |||
Enable/disable start of match. | |||
'''Available Options''': false, true | |||
=== Cancel match === | |||
<!-- ID: DIAG_MATCH_CANCEL --> | |||
Enable/disable cancelation of match. | |||
'''Available Options''': false, true | |||
=== Finish match (submit result) === | |||
<!-- ID: DIAG_MATCH_FINISH --> | |||
Enable/disable finishing of match (submit result). | |||
'''Available Options''': false, true | |||
=== *Join match (dummy player) === | |||
<!-- ID: DIAG_MATCH_JOIN --> | |||
Enable/disable joining of match (dummy player). | |||
'''Available Options''': false, true | |||
=== *Leave match (dummy player) === | |||
<!-- ID: DIAG_MATCH_LEAVE --> | |||
Enable/disable leaving of match (dummy player). | |||
'''Available Options''': false, true | |||
=== Add player via update (dummy player) === | |||
<!-- ID: DIAG_MATCH_UPDATE --> | |||
Enable/disable adding of player via update (dummy player). | |||
'''Available Options''': false, true | |||
== Pick user == | |||
<!-- ID: DIAG_PICK_USER --> | |||
Enable/disable picking of user. | |||
'''Available Options''': false, true | |||
== Simulate Sign-out == | |||
<!-- ID: DIAG_USER_SIGNOUT --> | |||
Simulate user sign out. | |||
'''Available Options''': false, true | |||
== Obtain save data == | |||
<!-- ID: PLATFORM_SAVE_DATA_OBTAIN --> | |||
Obtain save data. | |||
'''Available Options''': false, true | |||
== Commit save data == | |||
<!-- ID: PLATFORM_SAVE_DATA_COMMIT --> | |||
Commit save data. | |||
'''Available Options''': false, true | |||
== Open URL == | |||
<!-- ID: PLATFORM_OPEN_BROWSER --> | |||
Open URL in browser. | |||
'''Available Options''': false, true | |||
== Change user name == | |||
<!-- ID: PLATFORM_CHANGE_NAME --> | |||
Change user name. | |||
'''Available Options''': false, true | |||
== Show local player profile == | |||
<!-- ID: PLATFORM_SHOW_USER_PROFILE --> | |||
Show local player profile. | |||
'''Available Options''': false, true | |||
== Request & log privileges == | |||
<!-- ID: PLATFORM_LOG_PRIVILEGES_BATCH --> | |||
Request and log privileges. | |||
'''Available Options''': false, true | |||
== Revoke privilege: Text comm == | |||
<!-- ID: PLATFORM_REVOKE_PRIVILEGE_TEXT --> | |||
Revoke text communication privilege. | |||
'''Available Options''': false, true | |||
== Revoke privilege: Voice comm == | |||
<!-- ID: PLATFORM_REVOKE_PRIVILEGE_VOICE --> | |||
Revoke voice communication privilege. | |||
'''Available Options''': false, true | |||
== Revoke privilege: Multiplayer == | |||
<!-- ID: PLATFORM_REVOKE_PRIVILEGE_MP --> | |||
Revoke multiplayer privilege. | |||
'''Available Options''': false, true | |||
== Revoke privilege: Lobby == | |||
<!-- ID: PLATFORM_REVOKE_PRIVILEGE_LOBBY --> | |||
Revoke lobby privilege. | |||
'''Available Options''': false, true | |||
== Revoke privilege: UGC == | |||
<!-- ID: PLATFORM_REVOKE_PRIVILEGE_UGC --> | |||
Revoke UGC privilege. | |||
'''Available Options''': false, true | |||
== Revoke privilege: Shared sessions == | |||
<!-- ID: PLATFORM_REVOKE_PRIVILEGE_SESSIONS --> | |||
Revoke shared sessions privilege. | |||
'''Available Options''': false, true | |||
== Revoke privilege: Social network sharing == | |||
<!-- ID: PLATFORM_REVOKE_PRIVILEGE_SOCIAL_SHARING --> | |||
Revoke social network sharing privilege. | |||
'''Available Options''': false, true | |||
== Accept dummy invitation == | |||
<!-- ID: PLATFORM_DUMMY_INVITE_TEST --> | |||
Accept dummy invitation. | |||
'''Available Options''': false, true | |||
== Invite using platform GUI == | |||
<!-- ID: PLATFORM_INVOKE_INVITE --> | |||
Invite using platform GUI. | |||
'''Available Options''': false, true | |||
== Log list of achievements == | |||
<!-- ID: PLATFORM_ACHIEVEMENTS_LIST --> | |||
Log list of achievements. | |||
'''Available Options''': false, true | |||
= Serialization = | |||
== Enable log reports == | |||
<!-- ID: DIAG_SERIALIZATION_LOGS --> | |||
Enable/disable serialization log reports. | |||
'''Available Options''': none, errors, all | |||
= Manual Camera = | |||
== Show debug menu == | |||
<!-- ID: SCR_DebugMenuID.DEBUGUI_MANUAL_CAMERA_DEBUG --> | |||
Enable/disable manual camera debug menu. | |||
'''Available Options''': false, true | |||
== Control player == | |||
<!-- ID: SCR_DebugMenuID.DEBUGUI_MANUAL_CAMERA_CONTROL_PLAYER --> | |||
Enable/disable control player using manual camera. Option is only available when [[#Debug_manual_camera|Debug Manual Camera]] is enabled | |||
'''Available Options''': false, true | |||
== Speed boost up debug == | |||
<!-- ID: SCR_DebugMenuID.DEBUGUI_MANUAL_CAMERA_SPEED_BOOST_UP --> | |||
Enable/disable manual camera speed boost debug. | |||
'''Available Options''': false, true | |||
== Paste view link == | |||
<!-- ID: SCR_DebugMenuID.DEBUGUI_MANUAL_CAMERA_VIEW_LINK --> | |||
Paste view link using hotkey (lshift+lalt+l). | |||
'''Hotkey''': {{Controls|lshift|lalt|l}} | |||
'''Available Options''': false, true | |||
== Unlimited Movement == | |||
<!-- ID: SCR_DebugMenuID.DEBUGUI_MANUAL_CAMERA_UNLIMITED --> | |||
Enable/disable unlimited manual camera movement. | |||
'''Available Options''': false, true | |||
= Editor = | |||
== Is Opened == | |||
<!-- ID: SCR_DebugMenuID.DEBUGUI_EDITOR_IS_OPENED --> | |||
Enable/disable editor opened flag debug. | |||
'''Available Options''': false, true | |||
== Can Open == | |||
<!-- ID: SCR_DebugMenuID.DEBUGUI_EDITOR_CAN_OPEN --> | |||
Enable/disable editor can open flag debug. | |||
'''Available Options''': false, true | |||
== Can Close == | |||
<!-- ID: SCR_DebugMenuID.DEBUGUI_EDITOR_CAN_CLOSE --> | |||
Enable/disable editor can close flag debug. | |||
'''Available Options''': false, true | |||
== Show Debug == | |||
<!-- ID: SCR_DebugMenuID.DEBUGUI_EDITOR_SHOW_DEBUG --> | |||
Enable/disable editor debug. | |||
'''Available Options''': false, true | |||
== Force Limited == | |||
<!-- ID: SCR_DebugMenuID.DEBUGUI_EDITOR_FORCE_LIMITED --> | |||
Enable/disable forcing of limited editor. | |||
'''Available Options''': false, true | |||
== Log Async Load == | |||
<!-- ID: SCR_DebugMenuID.DEBUGUI_EDITOR_ASYNC_LOAD_DEBUG --> | |||
Enable/disable logging of async loading for editor. | |||
'''Available Options''': false, true | |||
== Show Screenshot == | |||
<!-- ID: SCR_DebugMenuID.DEBUGUI_EDITOR_SAVE_PHOTO_SCREENSHOT_SHOW --> | |||
Enable/disable showing of screenshot for editor. | |||
'''Available Options''': false, true | |||
== Simulated Network Delay == | |||
<!-- ID: SCR_DebugMenuID.DEBUGUI_EDITOR_NETWORK_DELAY --> | |||
Set simulated network delay. | |||
'''Range Settings''': | |||
* Min: 0 | |||
* Max: 1000 | |||
* Current Value: 0 | |||
* Step: 100 | |||
= GameMode = | |||
== Game Mode == | |||
<!-- ID: SCR_DebugMenuID.DEBUGUI_GAME_MODE --> | |||
Enable/disable showing of game mode debug. | |||
'''Available Options''': false, true | |||
== Show kill log == | |||
<!-- ID: SCR_DebugMenuID.DEBUGUI_CHARACTER_KILLED_LOG --> | |||
Enable/disable showing of kill log. | |||
'''Available Options''': false, true | |||
== Respawn Component == | |||
<!-- ID: SCR_DebugMenuID.DEBUGUI_RESPAWN_COMPONENT_DIAG --> | |||
Enable/disable respawn component debug. | |||
'''Available Options''': false, true | |||
== Respawn Time Measures == | |||
<!-- ID: SCR_DebugMenuID.DEBUGUI_RESPAWN_COMPONENT_TIME --> | |||
Enable/disable respawn time measurement debug. | |||
'''Available Options''': false, true | |||
== Respawn Timer == | |||
<!-- ID: SCR_DebugMenuID.DEBUGUI_RESPAWN_TIMER_COMPONENT --> | |||
Enable/disable respawn timer component debug. | |||
'''Available Options''': false, true | |||
== Scoring System == | |||
<!-- ID: SCR_DebugMenuID.DEBUGUI_SCORING_SYSTEM --> | |||
Enable/disable showing of scoring system debug. | |||
'''Available Options''': false, true | |||
== Player Factions == | |||
<!-- ID: SCR_DebugMenuID.DEBUGUI_RESPAWN_PLAYER_FACTION_DIAG --> | |||
Enable/disable showing of player factions debug. | |||
'''Available Options''': false, true | |||
== Player Loadouts == | |||
<!-- ID: SCR_DebugMenuID.DEBUGUI_RESPAWN_PLAYER_LOADOUT_DIAG --> | |||
Enable/disable showing of player loadouts debug. | |||
'''Available Options''': false, true | |||
= Conflict = | |||
== Instant composition spawning == | |||
<!-- ID: SCR_DebugMenuID.DEBUGUI_CAMPAIGN_INSTANT_BUILDING --> | |||
Enable/disable instant composition spawning. | |||
'''Available Options''': false, true | |||
== Promotion == | |||
<!-- ID: SCR_DebugMenuID.DEBUGUI_CAMPAIGN_RANK_UP --> | |||
Promotes player to higher rank. | |||
'''Available Options''': false, true | |||
== Demotion == | |||
<!-- ID: SCR_DebugMenuID.DEBUGUI_CAMPAIGN_RANK_DOWN --> | |||
Demotes player to higher rank. | |||
'''Available Options''': false, true | |||
= Singleplayer = | |||
== Disable Game Over == | |||
<!-- ID: SCR_DebugMenuID.DEBUGUI_SINGLEPLAYER_DISABLE_GAMEOVER --> | |||
Enable/disable game over. | |||
'''Available Options''': false, true | |||
= Tutorial = | |||
== Course locations == | |||
=== OBSTACLE COURSE === | |||
<!-- ID: SCR_DebugMenuID.DEBUGUI_NEWTUTORIAL_COURSE_LOCATION_OBSTACLE --> | |||
Enable obstacle course location. | |||
'''Available Options''': false, true | |||
=== FIRING RANGE === | |||
<!-- ID: SCR_DebugMenuID.DEBUGUI_NEWTUTORIAL_COURSE_LOCATION_FIRING --> | |||
Enable firing range location. | |||
'''Available Options''': false, true | |||
=== COMBAT ENGINEERING === | |||
<!-- ID: SCR_DebugMenuID.DEBUGUI_NEWTUTORIAL_COURSE_LOCATION_ENGINEERING --> | |||
Enable combat engineering location. | |||
'''Available Options''': false, true | |||
=== SEIZING === | |||
<!-- ID: SCR_DebugMenuID.DEBUGUI_NEWTUTORIAL_COURSE_LOCATION_SEIZING --> | |||
Enable seizing location. | |||
'''Available Options''': false, true | |||
=== FIRST AID === | |||
<!-- ID: SCR_DebugMenuID.DEBUGUI_NEWTUTORIAL_COURSE_LOCATION_AID --> | |||
Enable first aid location. | |||
'''Available Options''': false, true | |||
=== DRIVING === | |||
<!-- ID: SCR_DebugMenuID.DEBUGUI_NEWTUTORIAL_COURSE_LOCATION_DRIVING --> | |||
Enable driving location. | |||
'''Available Options''': false, true | |||
=== NAVIGATION === | |||
<!-- ID: SCR_DebugMenuID.DEBUGUI_NEWTUTORIAL_COURSE_LOCATION_NAVIGATION --> | |||
Enable navigation location. | |||
'''Available Options''': false, true | |||
=== HELICOPTER PILOTING === | |||
<!-- ID: SCR_DebugMenuID.DEBUGUI_NEWTUTORIAL_COURSE_LOCATION_HELICOPTERS --> | |||
Enable helicopter piloting location. | |||
'''Available Options''': false, true | |||
=== SPECIAL WEAPONS === | |||
<!-- ID: SCR_DebugMenuID.DEBUGUI_NEWTUTORIAL_COURSE_LOCATION_SPECIAL --> | |||
Enable special weapons location. | |||
'''Available Options''': false, true | |||
=== LONG-DISTANCE SHOOTING === | |||
<!-- ID: SCR_DebugMenuID.DEBUGUI_NEWTUTORIAL_COURSE_LOCATION_LONGRANGE --> | |||
Enable long range shooting location. | |||
'''Available Options''': false, true | |||
=== FIRE SUPPORT COURSE === | |||
<!-- ID: SCR_DebugMenuID.DEBUGUI_NEWTUTORIAL_COURSE_LOCATION_FIRESUPPORT --> | |||
Enable fire support course location. | |||
'''Available Options''': false, true | |||
=== SQUAD LEADERSHIP === | |||
<!-- ID: SCR_DebugMenuID.DEBUGUI_NEWTUTORIAL_COURSE_LOCATION_LEADERSHIP --> | |||
Enable squad leadership location. | |||
'''Available Options''': false, true | |||
=== VEHICLE MAINTENANCE === | |||
<!-- ID: SCR_DebugMenuID.DEBUGUI_NEWTUTORIAL_COURSE_LOCATION_MAINTENANCE --> | |||
Enable vehicle maintenance location. | |||
'''Available Options''': false, true | |||
== Disable course reqs == | |||
<!-- ID: SCR_DebugMenuID.DEBUGUI_NEWTUTORIAL_DISABLE_COURSE_REQUIREMENTS --> | |||
Enable/disable tutorial course requirements. | |||
'''Available Options''': false, true | |||
== Skip intro sequence == | |||
<!-- ID: SCR_DebugMenuID.DEBUGUI_NEWTUTORIAL_SKIP_INTRO --> | |||
Enable/disable skip intro sequence. | |||
'''Available Options''': false, true | |||
== Regenerate course tasks == | |||
<!-- ID: SCR_DebugMenuID.DEBUGUI_NEWTUTORIAL_REGENERATE_TASKS --> | |||
Enable/disable regeneration of course tasks. | |||
'''Available Options''': false, true | |||
== Skip AI Driving == | |||
<!-- ID: SCR_DebugMenuID.DEBUGUI_NEWTUTORIAL_COURSE_SKIP_AI_DRIVING --> | |||
Enable/disable skipping AI driving. | |||
'''Available Options''': false, true | |||
== Finish current stage == | |||
<!-- ID: SCR_DebugMenuID.DEBUGUI_NEWTUTORIAL_COURSE_FINISH_STAGE --> | |||
Enable/disable finishing of current stage. | |||
'''Available Options''': false, true | |||
== Move to waypoint == | |||
<!-- ID: SCR_DebugMenuID.DEBUGUI_NEWTUTORIAL_COURSE_MOVE_TO_WP --> | |||
Enable/disable moving to waypoint. | |||
'''Available Options''': false, true | |||
== Set evening time == | |||
<!-- ID: SCR_DebugMenuID.DEBUGUI_NEWTUTORIAL_SET_EVENING_TIME --> | |||
Enable/disable setting evening time. | |||
'''Available Options''': false, true | |||
== Dump stages into log == | |||
<!-- ID: SCR_DebugMenuID.DEBUGUI_NEWTUTORIAL_DUMP_STAGES_INTO_LOG --> | |||
Enable/disable dumping of stages into log. | |||
'''Available Options''': false, true | |||
== Finish all courses == | |||
<!-- ID: SCR_DebugMenuID.DEBUGUI_NEWTUTORIAL_FINISH_EVERYTHING --> | |||
Enable/disable finishing of all courses. | |||
'''Available Options''': false, true | |||
== Draw Area Restrictions == | |||
<!-- ID: SCR_DebugMenuID.DEBUGUI_NEWTUTORIAL_DRAW_AREA_RESTRICTIONS --> | |||
Enable/disable drawing of area restrictions. | |||
'''Available Options''': false, true | |||
= ScenarioFramework = | |||
== Tasks == | |||
<!-- ID: SCR_DebugMenuID.DEBUGUI_SCENARIO_FRAMEWORK_TASKS --> | |||
Enable/disable scenario framework tasks debug. | |||
'''Available Options''': false, true | |||
== Registered Areas == | |||
<!-- ID: SCR_DebugMenuID.DEBUGUI_SCENARIO_FRAMEWORK_REGISTERED_AREAS --> | |||
Enable/disable scenario framework registered areas debug. | |||
'''Available Options''': false, true | |||
== Debug Areas == | |||
<!-- ID: SCR_DebugMenuID.DEBUGUI_SCENARIO_FRAMEWORK_DEBUG_AREAS --> | |||
Enable/disable scenario framework debug areas. | |||
'''Available Options''': false, true | |||
== Layer Inspector == | |||
<!-- ID: SCR_DebugMenuID.DEBUGUI_SCENARIO_FRAMEWORK_LAYER_INSPECTOR --> | |||
Enable/disable scenario framework layer inspector. | |||
'''Available Options''': false, true | |||
== Action Inspector == | |||
<!-- ID: SCR_DebugMenuID.DEBUGUI_SCENARIO_FRAMEWORK_ACTION_INSPECTOR --> | |||
Enable/disable scenario framework action inspector. | |||
'''Available Options''': false, true | |||
== Logic Inspector == | |||
<!-- ID: SCR_DebugMenuID.DEBUGUI_SCENARIO_FRAMEWORK_LOGIC_INSPECTOR --> | |||
Enable/disable scenario framework logic inspector. | |||
'''Available Options''': false, true | |||
== Plugin Inspector == | |||
<!-- ID: SCR_DebugMenuID.DEBUGUI_SCENARIO_FRAMEWORK_PLUGIN_INSPECTOR --> | |||
Enable/disable scenario framework plugin inspector. | |||
'''Available Options''': false, true | |||
== Condition Inspector == | |||
<!-- ID: SCR_DebugMenuID.DEBUGUI_SCENARIO_FRAMEWORK_CONDITION_INSPECTOR --> | |||
Enable/disable scenario framework condition inspector. | |||
'''Available Options''': false, true | |||
= Tasks = | |||
== Execute tasks == | |||
<!-- ID: SCR_DebugMenuID.DEBUGUI_EXECUTE_TASKS --> | |||
Enable/disable execution of tasks. | |||
'''Available Options''': true, false | |||
== Print all tasks == | |||
<!-- ID: SCR_DebugMenuID.DEBUGUI_SHOW_ALL_TASKS --> | |||
Enable/disable printing of all tasks. | |||
'''Available Options''': false, true | |||
= Radial Menu = | |||
== Enable diagnostics == | |||
<!-- ID: SCR_DebugMenuID.DEBUGUI_RADIALMENU_DIAGNOSTICS --> | |||
Enable/disable radial menu diagnostics. | |||
'''Available Options''': false, true | |||
== Enable logging == | |||
<!-- ID: SCR_DebugMenuID.DEBUGUI_RADIALMENU_LOGGING --> | |||
Enable/disable radial menu logging. | |||
'''Available Options''': false, true | |||
</div><!-- scrolling div end --> | </div><!-- scrolling div end --> | ||
<div> | <div> | ||
<div style="position: sticky; top: 2em"> | <div style="position: sticky; top: 2em"> | ||
{{TabView | {{TabView | ||
|title1= Full TOC | | title1= Full TOC | ||
|title2= Mini TOC | | title2= Mini TOC | ||
|content1= <div style="overflow: auto; max-height: 80vh; min-width: | | content1= <div style="overflow: auto; max-height: 80vh; min-width: 30em">{{TOC}}</div> | ||
|content2= | | content2= | ||
<div style="min-width: 12em"> | <div style="min-width: 12em"> | ||
{{TOC|subtoc|content= | {{TOC|subtoc|content= | ||
* 1 {{Link|#Modding}} | * 1 {{Link|#Modding}} | ||
* 2 {{Link|#GameCode}} | * 2 {{Link|#GameCode}} | ||
* 3 {{Link|# | * 3 {{Link|#Cheats}} | ||
* 4 {{Link|# | * 4 {{Link|#ECS}} | ||
* 5 {{Link|# | * 5 {{Link|#Character}} | ||
* 6 {{Link|# | * 6 {{Link|#Vehicles}} | ||
* 7 {{Link|# | * 7 {{Link|#Statistics}} | ||
* 8 {{Link|# | * 8 {{Link|#Render}} | ||
* 9 {{Link|# | * 9 {{Link|#Scene}} | ||
* 10 {{Link|# | * 10 {{Link|#World}} | ||
* 11 {{Link|# | * 11 {{Link|#Animation}} | ||
* 12 {{Link|# | * 12 {{Link|#Physics}} | ||
* 13 {{Link|# | * 13 {{Link|#Game}} | ||
* 14 {{Link|# | * 14 {{Link|#Sounds}} | ||
* 15 {{Link|# | * 15 {{Link|#Particles}} | ||
* 16 {{Link|# | * 16 {{Link|#System}} | ||
* 17 {{Link|# | * 17 {{Link|#Input}} | ||
* 18 {{Link|# | * 18 {{Link|#UI}} | ||
* 19 {{Link|# | * 19 {{Link|#AI}} | ||
* 20 {{Link|# | * 20 {{Link|#Systems}} | ||
* 21 {{Link|# | * 21 {{Link|#Platform}} | ||
* 22 {{Link|#Serialization}} | |||
* 23 {{Link|#Manual Camera}} | |||
* 24 {{Link|#Editor}} | |||
* 25 {{Link|#GameMode}} | |||
* 26 {{Link|#Conflict}} | |||
* 27 {{Link|#Singleplayer}} | |||
* 28 {{Link|#Tutorial}} | |||
* 29 {{Link|#ScenarioFramework}} | |||
* 30 {{Link|#Tasks}} | |||
* 31 {{Link|#Radial Menu}} | |||
}} | }} | ||
Latest revision as of 12:11, 22 January 2025
General Use
The Diag Menu is a menu listing many options used to debug game scripting and assets. It is available in Workbench in any 3D viewport (e.g world or model preview).

Hotkeys List
| Header | Hotkey |
|---|---|
| Disable player damage | Ctrl + Alt + F1 |
| Teleport | Ctrl + Alt + F2 |
| Infinite ammo | Ctrl + Alt + F3 |
| Infinite bullets | Ctrl + Alt + F4 |
| Commit suicide | Ctrl + Alt + F5 |
| Execute characters in front | Ctrl + Alt + F6 |
| Debug manual camera | Ctrl + Alt + C |
| Reset vehicle | Ctrl + Alt + R |
| Teleport up | Ctrl + Alt + T |
| FPS | Ctrl + NUM 1 |
| General | Ctrl + NUM 2 |
| Counters | Ctrl + NUM 3 |
| Reload shaders | Ctrl + F12 |
| Postprocess | Ctrl + Alt + P |
| Layers diag mode | Ctrl + Alt + L |
| Detail texture | Ctrl + Alt + S |
| Render debug mode | RCtrl + AltGr + W |
| Show AABB | Alt + NUM 5 |
| Show wind emitters | Ctrl + NUM 8 |
| Disable wind | Ctrl + NUM 9 |
| Show bodies | Alt + NUM 6 |
| Simulation | Ctrl + NUM 7 |
| Superscreenshot to file | Ctrl + ⇧ Shift + F7 |
| Screenshot to clipboard | ⇧ Shift + F7 |
| Screenshot to file | Ctrl + F7 |
| Copy view link | Ctrl + ⇧ Shift + L |
| Make a step of AStar | Ctrl + Alt + V |
| Road network | Ctrl + Alt + N |
| Show Road Width | Ctrl + Alt + W |
| Road Id | Ctrl + Alt + I |
| Previous agent | RCtrl + RShift ⇧ + 9 |
| Next agent | RCtrl + RShift ⇧ + 0 |
| Set start position | Ctrl + Alt + NUM 0 |
| Set end position | Ctrl + Alt + NUM 1 |
| Run pathfinder | Ctrl + Alt + NUM 3 |
| Generate Graph | Ctrl + Alt + NUM 2 |
| Disable AI actions | Ctrl + Alt + F9 |
| Paste view link | ⇧ Shift + Alt + L |
Modding
GameCode
Damage
Hit Zones
Show hit zone memory
Enable/disable showing of hit zone memory.
Available Options: false, true
Show hit zones
Enable/disable showing of hit zones.

When a zone is damaged, underlying fire geometry is also drawn

Available Options: false, true
Log damage on hit zones
Enable/disable logging of damage on hit zones.
Available Options: false, true
Log Rpl registration
Enable/disable logging of Rpl registration.
Available Options: false, true
Destruction
Damage all on init
Enable/disable damage all on init.
Available Options: false, true
Enable Logging
Enable/disable logging of destruction.
Available Options: false, true
Enable layout logging
Enable/disable logging of destruction layout.
Available Options: false, true
Rotate permanent debris 90deg
Enable/disable rotating permanent debris.
Available Options: false, true
Snap to ground (debris)
Enable/disable snapping of debris to ground.
Available Options: false, true
Allow broken prefabs spawning
Enable/disable spawning of broken prefabs.
Available Options: false, true
Enable destruction diag
Enable/disable destruction diagnostics.
Available Options: false, true
Type of damage info
Set type of damage info. When activated, small windows appears showing HP (current and maximum) of all individual HitZones
- off - debug is disabled
- trace - displays info for what are you looking at
- self - displays info for controlled character
- both - acts as trace if looking at something, otherwise acts as self
Available Options: off, trace, self, both
DamageEffect info
Set damage effect info type. Information about states like Bleeding, Tourniquets, Saline bags, Morphine, and Health/Resilience/Blood is listed in this diag
Available Options: off, Persistent, Damage History, both
Visualize weapon blast
Set weapon blast visualization mode.
Available Options: disabled, hit, all, posDebug, onlyMainBlast, onlyRicochet
Achievements
Achievements display
Enable/disable achievements display.
Available Options: false, true
Dump achievement memory data
Enable/disable dumping of achievement memory data.
Available Options: false, true
Request achievement platform data
Enable/disable request for platform achievement data.
Available Options: false, true
Unlock ACH_COMBAT_HYGIENE
Unlock ACH_COMBAT_HYGIENE.
Available Options: false, true
+50 STAT_ENEMIES_NEUTRALIZED
Increase STAT_ENEMIES_NEUTRALIZED by 50.
Available Options: false, true
Particle
Particles manager
Enable/disable particles manager debug.
Available Options: false, true
Distance particle effect
Enable/disable distance particle effect.
Available Options: enabled, disabled
Signals
Show current SignalsManagerComponent
Show or hide current SignalsManagerComponent.
Available Options: false, true
Log received
Enable/disable logging of received signals.
Available Options: false, true
Log sent
Enable/disable logging of sent signals.
Available Options: false, true
Log signal changes
Set logging mode for signal changes.
Available Options: off, all, 0.5, 1, 10, 100
Signals to dump
Set signals to dump.
Available Options: SP, MP, all
Dump signals
Enable/disable dumping of signals.
Available Options: false, true
Game materials
Cursor
Shows information about materials being used on collider which is under the cursor. It shows also thickness of the collider. By default it using all Collision Layers.
Available Options: false, true
Projectile
Restricts game materials check to Projectile layer. Can be used to check fire geometry
Available Options: false, true
Weapons
Deployment
Debug deploying
Enable/disable debugging of weapon deployment.
Available Options: false, true
IK diag
Enable/disable IK diagnostics for weapon deployment.
Available Options: false, true
Aim speed diag
Enable/disable aim speed diagnostics for weapon deployment.
Available Options: false, true
Animation diag
Enable/disable animation diagnostics for weapon deployment.
Available Options: false, true
Weapon collision diag
Enable/disable weapon collision diagnostics for deployment.
Available Options: false, true
Disable Prone deployment
Enable/disable prone deployment for weapons.
Available Options: false, true
Disable post-phys hand pose
Enable/disable post physics hand pose for weapon.
Available Options: false, true
ADS limits diag
Enable/disable ADS limits debug.
Available Options: false, true
Deploying height
Set deploying height.
Range Settings:
- Min: 0
- Max: 1
- Current Value: 0.3
- Step: 0.01
Max dist wpn-shoulder
Set max distance between weapon and shoulder.
Range Settings:
- Min: 0
- Max: 90
- Current Value: 15
- Step: 0.05
Disable prone movement
Enable/disable movement while prone deployment.
Available Options: true, false
Prone deployment heigh limit
Set prone deployment height limit.
Range Settings:
- Min: 0
- Max: 1
- Current Value: 0.15
- Step: 0.01
Show sights points
Enable/disable showing of weapon sight points.
Available Options: false, true
Disable aim modifiers
Enable/disable aim modifiers for weapons.
Available Options: false, true
Disable character aim modifiers
Enable/disable character aim modifiers for weapons.
Available Options: false, true
Disable weapon offset
Enable/disable weapon offset.
Available Options: false, true
Enable sway diagnostics
Enable/disable sway diagnostics.
Available Options: false, true
Disable movement based sway
Enable/disable movement based sway.
Available Options: false, true
Weapon obstruction
Enable/disable weapon obstruction debug. Diag shows various data related to obstruction like i.e. current obstruction status of controlled character.
It is also possible to change Weapon Move back offset with this diag.
When debug is activated additional spheres will be rendered with following color coding:
• Green → Starting or unobstructed points.
• Red → Obstructed or fully blocked locations
• Orange → Static reference points for offset calculations.

When character is moving, either pink or red orbs are visible - those are obstruction predictions orbs. When no obstruction is predicted their color is pink.

Available Options: false, true
Weapon handling
Enable/disable weapon handling debug.
Available Options: false, true
Weapon IK
Enable/disable weapon IK debug.
Available Options: false, true
Enable casing endpoints
Enable/disable casing endpoints debug.
Available Options: false, true
Disable partial lower
Enable/disable partial lower disable.
Available Options: false, true
Force zeroing anim value
Set force zeroing animation value.
Range Settings:
- Min: -0.001
- Max: 1
- Current Value: -0.001
- Step: 0.001
Force Recoil Type
Set force recoil type.
Range Settings:
- Min: 0
- Max: 3
- Current Value: 0
- Step: 1
Roll comp. weight
Set roll compensation weight.
Range Settings:
- Min: 0
- Max: 1
- Current Value: 0
- Step: 0.01
Roll comp. gizmo diag
Enable/disable roll compensation gizmo debug.
Available Options: false, true
Correct zeroing data by ZeroGenerator
Enable/disable zeroing data correction.
Available Options: false, true
Adjustable magnification input scaling info
Enable/disable adjustable magnification scaling info.
Available Options: false, true
Adjustable magnification input scaling value
Set adjustable magnification input scaling value.
Range Settings:
- Min: -1.0
- Max: 1.0
- Current Value: 0.0
- Step: 0.01
Show Collimator Debug
Enable/disable collimator debug.
Available Options: false, true
Show Attachment Debug
Enable/disable attachment debug.
Available Options: false, true
TestAimModifier
Reset aim mod
Reset aim modifier.
Available Options: false, true
Toggle 2D optics
Toggle 2D optics usage.
Available Options: false, true
Show optics diag
Show or hide optics diagnostics.
Available Options: false, true
Show PIP settings diag
Show or hide PIP settings diagnostics.
Available Options: false, true
User Actions
Log actions
Enable/disable logging of user actions.
Available Options: false, true
Context position
Enable/disable context position debug.
Available Options: false, true
Context visibility angle
Enable/disable context visibility angle debug.
Available Options: false, true
Draw diags for select ent only
Enable/disable drawing of diags for selected entity only.
Available Options: false, true
Context gizmo scale
Set context gizmo scale.
Range Settings:
- Min: 0
- Max: 5
- Current Value: 0.3
- Step: 0.05
Context name scale
Set context name scale.
Range Settings:
- Min: 0
- Max: 50
- Current Value: 10
- Step: 1
Show context radius gizmo
Enable/disable showing of context radius gizmo.
Available Options: false, true
Enable handler diag
Enable/disable user action handler diagnostics.
Available Options: false, true
Forcedisable Interactions
Enable/disable forcing of interactions.
Available Options: false, true
Enable adv. handler diag
Enable/disable advanced user action handler diagnostics.
Available Options: false, true
Use distance to line
Enable/disable using distance to line for interaction.
Available Options: false, true
Fix square distance
Enable/disable fixing of square distance.
Available Options: false, true
Use predicate cache
Enable/disable predicate cache usage.
Available Options: true, false
Script listeners
Enable/disable script listeners.
Available Options: true, false
SetActionEnabled_S ON
Enable/disable setting of action enable on client.
Available Options: true, false
New interaction method
Enable/disable new interaction method.
Available Options: true, false
Skip action duration
Enable/disable skipping of interaction duration.
Available Options: false, true
Gamepad
Show active effects
Enable/disable showing of active gamepad effects.
Available Options: false, true
Gyro Speed Sensitivity Yaw
Set gyro speed sensitivity yaw.
Range Settings:
- Min: -100.0
- Max: 100.0
- Current Value: 0.0
- Step: 0.01
Gyro Speed Sensitivity Pitch
Set gyro speed sensitivity pitch.
Range Settings:
- Min: -20.0
- Max: 20.0
- Current Value: 0.0
- Step: 0.01
Gyro Speed Sensitivity Roll
Set gyro speed sensitivity roll.
Range Settings:
- Min: -20.0
- Max: 20.0
- Current Value: 0.0
- Step: 0.01
Track-IR
Enable TrackIR freelook
Enable/disable TrackIR freelook.
Available Options: true, false
Enable TrackIR leaning
Enable/disable TrackIR leaning.
Available Options: true, false
Radio
Transmissions diag
Enable/disable radio transmissions diagnostics.
Available Options: false, true
Show radio ranges
Enable/disable showing of radio ranges.
Available Options: false, true
Force transmit
Enable/disable forcing of VON transmission.
Available Options: false, true
Disable audio filters
Enable/disable audio filters for VON.
Available Options: false, true
Chat
Log client chat messages
Enable/disable logging of client chat messages.
Available Options: false, true
Show chat diag
Show or hide chat diagnostics.
Available Options: false, true
Disable chat
Enable/disable chat.
Available Options: false, true
Time
Pause world time
Enable/disable pausing of world time.
Available Options: false, true
Electricity
Set state (SP & MP)
Enable/disable setting of electricity state.
Available Options: false, true
Delete nearest pole (SP ONLY)
Enable/disable deleting of nearest electricity pole.
Available Options: false, true
Disable nearest pole edges (SP ONLY)
Enable/disable disabling of nearest electricity pole edges.
Available Options: false, true
Switch connection of nearest poles (SP ONLY)
Enable/disable switching of nearest electricity poles connection.
Available Options: false, true
Inventory
Dump storages content
Enable/disable dumping of inventory storage content.
Available Options: false, true
Show inventory items
Enable/disable showing of inventory items.
Available Options: false, true
Log inventory changes
Enable/disable logging of inventory changes.
Available Options: false, true
Log visibility changes
Enable/disable logging of inventory visibility changes.
Available Options: false, true
Show volume info
Enable/disable showing of inventory volume info.
Available Options: false, true
Debug vicinity
Enable/disable vicinity debug.
Available Options: false, true
Show attributes debug
Enable/disable showing of inventory attributes debug.
Available Options: false, true
Enable item placement in WB
Enable/disable item placement in workbench.
Available Options: false, true
Enable hand slot
Enable/disable hand slot.
Available Options: false, true
Loadout
Show clothes
Enable/disable showing of loadout clothes.
Available Options: false, true
Show slots
Enable/disable showing of loadout slots.
Available Options: false, true
Unwear all
Unwear all loadout items.
Available Options: false, true
Show only me
Enable/disable showing of only player loadout.
Available Options: false, true
Show only lines without text
Enable/disable showing of only lines without text.
Available Options: false, true
Lights
Light positions
Enable/disable showing of light positions.
Available Options: false, true
Camera
Show camera position
Enable/disable showing of camera position.
Available Options: false, true
Animations
Show animated items bones
Enable/disable showing of animated items bones.
Available Options: false, true
Network
Network Movement
Movement
Set network movement debug mode.
Available Options: none, in, out
Movement simulation
Enable/disable network movement simulation debug.
Available Options: false, true
Display Selection
Enable/disable network movement display selection.
Available Options: false, true
NwkMovement Selection
Set network movement selection.
Range Settings:
- Min: 0
- Max: 512
- Current Value: 0
- Step: 1
Display buffer state
Enable/disable network movement display buffer state.
Available Options: false, true
Execution mode
Enable/disable network movement execution mode.
Available Options: false, true
Phys Simulation
Enable/disable network movement physics simulation.
Available Options: false, true
Nwk Updates
Enable/disable network movement network updates.
Available Options: false, true
Network Streaming
Override Distance
Enable/disable overriding of streaming distance.
Available Options: false, true
Stream In Grid Distance [#]
Set stream in grid distance.
Range Settings:
- Min: 1
- Max: 10
- Current Value: 4
- Step: 1
Vehicle Grid Distance [#]
Set vehicle grid distance.
Range Settings:
- Min: 1
- Max: 10
- Current Value: 2
- Step: 1
Character Grid Distance [#]
Set character grid distance.
Range Settings:
- Min: 1
- Max: 10
- Current Value: 3
- Step: 1
RPL scheduler
Server side RPL scheduler
Items
Enable/disable basic RPL scheduler debug.
Available Options: false, true
Item Hierarchy Moves
Enable/disable RPL scheduler item hierarchy moves debug.
Available Options: false, true
Items Streamed In
Enable/disable RPL scheduler streamed in debug.
Available Options: false, true
Items Streamed Out
Enable/disable RPL scheduler streamed out debug.
Available Options: false, true
Items bumpped
Enable/disable RPL scheduler bumpped items debug.
Available Options: false, true
Spatial map
Enable/disable RPL scheduler spatial map debug.
Available Options: false, true
Moving list
Enable/disable RPL scheduler moving list debug.
Available Options: false, true
Disabled ref count
Enable/disable RPL scheduler disabled reference count debug.
Available Options: false, true
Observers
Enable/disable RPL scheduler observers debug.
Available Options: false, true
Budgeting
Enable/disable RPL scheduler budgeting debug.
Available Options: false, true
Ownership
Enable/disable RPL scheduler ownership debug.
Available Options: false, true
Display Observers
Enable/disable display of observers.
Available Options: false, true
Virtual Player Id
Enable/disable virtual player ID debug.
Available Options: false, true
Spatial Map of Player Id
Set spatial map of player ID.
Range Settings:
- Min: 0
- Max: 192
- Current Value: -1
- Step: 1
Virtual Player X pos
Set virtual player X position.
Range Settings:
- Min: 0
- Max: 13000
- Current Value: 0
- Step: 100
Virtual Player Y pos
Set virtual player Y position.
Range Settings:
- Min: 0
- Max: 13000
- Current Value: 0
- Step: 100
Spatial layer
Set spatial layer.
Available Options: statics, dynamics, char+veh
Spatial type
Set spatial type.
Available Options: stationary+moving, stationary, moving
Network range
Set network range.
Range Settings:
- Min: 1
- Max: 50
- Current Value: 2
- Step: 1
Global streaming budget
Set global streaming budget.
Range Settings:
- Min: 100
- Max: 50000
- Current Value: 500
- Step: 50
Staggering budget
Set staggering budget.
Range Settings:
- Min: 1
- Max: 10201
- Current Value: 1
- Step: 1
Open streams delta
Set open streams delta.
Range Settings:
- Min: 1
- Max: 1000
- Current Value: 1
- Step: 1
Trouble causer
Enable/disable trouble causer debug.
Available Options: false, true
Streaming trouble causer rate
Set streaming trouble causer rate.
Range Settings:
- Min: 1
- Max: 60
- Current Value: 0
- Step: 1
Server FPS
Enable/disable network server FPS display.
Available Options: false, true
Damage synchronization
Enable/disable network damage synchronization debug.
Available Options: false, true
Lobby diagnostics
Enable/disable network lobby diagnostics.
Available Options: false, true
Connection diag
Enable/disable network connection diagnostics.
Available Options: false, true
Log ownership changes
Enable/disable logging of network ownership changes.
Available Options: false, true
Validate loaded prefabs
Enable/disable validation of loaded prefabs.
Available Options: false, true
Server admin
Enable/disable server admin mode.
Available Options: disabled, enabled
RPC MT jobs
Enable/disable RPC multithreaded jobs.
Available Options: true, false
Loading prefabs
Enable/disable prefabs loading debug.
Available Options: false, true
Social Component
Show
Enable/disable client social component debug.
Available Options: false, true
Restrictions override
Set restriction override mode for social component.
Available Options: None, Force-Restriction, Force-Unrestricted
Player to restrict
Set player to restrict.
Available Options: First-Found, Last-Found
Send update
Enable/disable sending of social component update.
Available Options: false, true
Block Me
Enable/disable blocking of current player.
Available Options: false, true
Unblock Me
Enable/disable unblocking of current player.
Available Options: false, true
Update block list
Enable/disable updating of block list.
Available Options: false, true
Turrets
Turret armory
Enable/disable turret armory debug.
Available Options: false, true
Disable turret modifiers
Enable/disable aim modifiers for turrets.
Available Options: false, true
HitReg
Draw Compensated Shots
Set draw mode for compensated shots.
Available Options: none, missed, all
Drawn Shots
Set amount of drawn shots.
Range Settings:
- Min: 1
- Max: 20
- Current Value: 5
- Step: 1
Draw Trajectories
Enable/disable drawing of trajectories.
Available Options: false, true
Draw Collider Histories
Set drawing mode for collider histories.
Available Options: none, all, included, excluded
Use RTT (Old Method)
Enable/disable using old RTT method.
Available Options: false, true
Show Graphs
Enable/disable showing of hit registration graphs.
Available Options: false, true
Projectiles
Proj. override
Mass
Projectile mass override
Available Options: default, 0.0001, 0.0005, 0.001, 0.005, 0.01, 0.05, 0.1, 0.5, 1
Muzzle velocity
Projectile muzzle velocity override
Available Options: default, 100, 200, 300, 400, 500, 600, 700, 800, 900, 1000
Air drag coef
Projectile air drag coefficient override
Available Options: default, 0.001, 0.0005, 0.0001, 0.00005, 0.00001, 0.000005, 0.000001, 0.0000005, 0.0000001, 0.00000005, 0.00000001
Proj. test
Run
Projectile test run
Available Options: disabled, enabled
Type
Projectile test type
Available Options: camera, general, firefight, pen-test
Repeat
Projectile test repeat mode
Available Options: once, counter, unlimited
Repeat count
Set projectile test repeat count.
Range Settings:
Min: 5
Max: 100
Current Value: 5
Step: 5
Repeat freq.
Projectile test repeat frequency
Available Options: 1, 2, 5, 10, 30, 60
Proj. count
Set projectile test shot count.
Range Settings:
Min: 10
Max: 100
Current Value: 10
Step: 10
Pen. type
Projectile penetration test type
Available Options: disc, sphere, box
Matrix type
Projectile test matrix type
Available Options: actual, saved
Matrix save
Projectile test matrix save
Available Options: disabled, enabled
Projectile
Projectile test projectile type
Available Options: bullet, rpg
Kill timer
Projectile test kill timer
Available Options: 0, 1, 2, 5
Kill
Projectile test kill switch
Available Options: disabled, enabled
Proj. tests
Show plot
Projectile test show plot
Available Options: disabled, enabled
Plot type
Projectile test plot type
Available Options: 1dscatter, 2dscatter, 1dhistogram, 2dhistogram, defl_scatter, defl_hist
Gauss param
Set projectile test gauss parameter.
Range Settings:
Min: 0
Max: 5
Current Value: 0
Step: 0.1
Proj. settings
Max concurrent debug lines
Maximum amount of trajectories that are shown at once Defalut value: 16 (can be changed to up 1024 trajectories)
Available Options: 128, 8, 16, 32, 64, 256, 512, 1024
Version
Projectile version
Available Options: default, experimental
Proj. ballistics
Print Hit Info
Projectile print hit info
Available Options: false, true
Show shell trajectory
Show projectile trajectory in 3D space, name of the flying prefab, impact points and also additional projectile data in top left corner (including projectile speed, data from prefab and impact data)
Color of the trace represents speed of the projectile, while green represents 100% of projectile initial speed and red represents speeds close to 0.

Available Options: false, true
Show stats
Shows statistics regarding current, largest & total amount of different type of projectiles: Shells, Missiles & Grenades

Available Options: false, true
Show predicted shell trajectory
Show prediction of projectile trajectory. You can still follow bullet path by observing where textbox with prefab name is located.

Available Options: false, true
Shell name
Controls whether shell name is visible next to projectile prefab.

Available Options: true, false
Player shell only
Controls if projectile diag should be applied to only player fired projectiles
Available Options: false, true
Visibility
How many projectiles should be visible
Available Options: all, 128, 64, 32, 16, 8, 4, 2, 1
Persistence
Controls how long trajectory is visible after projectile destruction. By default it is set to 15 seconds
Available Options: 15s, 30s, 60s, 120s, permanent, 0s, 5s
Clear trajectories
Works as a toggle.
When activated, it clears world from all debug trajectories
Available Options: disabled, enabled
Info visible
Controls infobox visibility
Available Options: true, false
Info persistence
Controls how long infobox in top left corner is visible after projectile destruction. By default it is set to 0 seconds
Available Options: 0s, 5s, 15s, permanent
Info segment length
Interval at which speed data in infobox is measured and persisted.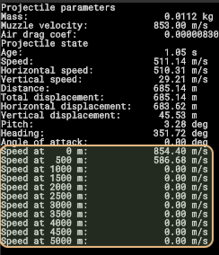
500m interval

50m interval
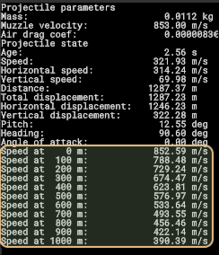
100m interval


Available Options: 100, 200, 500, 25, 50
Hide info
Projectile hide info box
Available Options: disabled, enabled
Dump data
Doesn't work in retail version of the game
Available Options: disabled, enabled
Special case
Projectile special case
Available Options: none, north, up, down, drop
Deflection
Controls whether projectiles have a chance to deflect from surface.
Available Options: true, false
Penetration
Controls whether projectiles is able to penetrate other objects.
Available Options: true, false
Deviation
Controls whether projectiles randomly deviates after penetration.
Available Options: true, false
Gravity
Controls whether projectiles is affected by gravity.
Available Options: true, false
Decals
Controls whether projectiles are leaving impact decals
Available Options: true, false
Decals advanced
Projectile advanced decals
Available Options: true, false
Decals use diameter
Projectile decals use diameter
Available Options: false, true
Override material
Projectile material override
Available Options: true, false
Bullet time
Reduces speed to 0.01 when projectile is fired. Time doesn't restore to normal speed unless DTime Multiplier in Cheats is turned off manually.
Available Options: false, true
Grenade simulation
Grenade simulation mode
Available Options: true, false
Show actions states
Enable/disable showing of actions states.
Available Options: false, true
Gridmap diags
Enable/disable gridmap diagnostics.
Available Options: false, true
Show explosion debug
Enable/disable showing of explosion debug.

When an explosion occurs, "traces" (singular: "trace") are visual lines that represent the paths to each hitzone. These traces provide diagnostic feedback about whether damage was dealt or blocked. Here's how the trace system works
- Red Sphere :
- Represents the explosion's current damage radius .
- The transparency of the sphere changes based on the explosion's size:
- Less transparent (solid) : Indicates larger, more impactful explosions.
- More transparent (faded) : Indicates smaller, less significant explosions.
- Red: Normal explosion
- Yellow Sphere:
- Impulse explosion
- Dark Yellow Sphere
- Fragmentation explosion
- Helps distinguish explosions of varying magnitudes and reduces visual clutter in overlapping scenarios.
- Blue Lines :
- Represent unblocked traces , indicating successful paths from the explosion’s origin where damage was applied to targets.
- Red Lines :
- Not visible in this image but would represent blocked traces , showing paths where damage was obstructed (e.g., by terrain or obstacles).
- Additionally, each hitzone (a specific area of the target) is represented by a sphere at its location:
- Blue Sphere : Indicates a hitzone that successfully took damage (unblocked).
- Red Sphere : Indicates a hitzone where damage was blocked and not applied.
Available Options: false, true
Show player events
Enable/disable showing of player events.
Available Options: false, true
Show target events
Enable/disable showing of target events.
Available Options: false, true
Show aim directions
Enable/disable showing of aim directions.
Available Options: false, true
Factions
Enable/disable showing of factions debug.
Available Options: false, true
Contacts
Enable/disable showing of contacts debug.
Available Options: false, true
Smooth steering in vehicle
Enable/disable smooth steering for vehicles.
Available Options: false, true
Character acceleration in vehicle
Set character acceleration debug in vehicle.
Available Options: acceleration, gforce
FOV override
Set field of view override.
Range Settings:
Min: 0.0
Max: 89.9
Current Value: 0.0
Step: 0.1
Time and Weather Diag
Enable/disable time and weather diagnostics.
Available Options: false, true
Enable better interpolation
Enable/disable better interpolation.
Available Options: true, false
Log GameEntity events
Enable/disable logging of GameEntity events.
Available Options: false, true
Log GameEntity events (simple)
Enable/disable logging of GameEntity events (simple).
Available Options: false, true
Log shooting queues
Enable/disable logging of shooting queues.
Available Options: false, true
Log SlotInfo
Set SlotInfo logging mode.
Available Options: off, attached, detached, both
Door ColTest
Enable/disable door collision test.
Available Options: false, true
Use traces for possible volume data
Enable/disable traces for volume data.
Available Options: false, true
Show world volumes collection
Enable/disable showing of world volumes collection.
Available Options: false, true
Enable Decal Slots
Enable/disable decal slots.
Available Options: false, true
Game state diag
Enable/disable game state diagnostics.
Available Options: false, true
Force fog at camera
Force fog at camera.
Available Options: false, true
Override fog
Override fog.
Available Options: false, true
Height bias
Set height bias.
Range Settings:
Min: -500
Max: 500
Current Value: 0
Step: 5
Groups
Enable groups diag
Enable/disable groups diagnostics.
Available Options: false, true
Show input manager
Set input manager debug mode.
Available Options: disabled, active, all
Log player damage
Enable/disable logging of player damage.
Available Options: false, true
Cheats
Disable player damage
Enables god mod. Has an instant effect on a currently controlled character that persists on that character even after switching to GM or a different character
Hotkey: Ctrl + Alt + F1
Available Options: Cheat disabled, Force invulnerable, Force vulnerable
Teleport
Teleport player.
Hotkey: Ctrl + Alt + F2
Available Options: false, true
Infinite ammo
Enable/disable infinite ammo (magazines). Doesn't work in 1.2.1
Hotkey: Ctrl + Alt + F3
Available Options: false, true
Infinite bullets
Enable/disable infinite bullets. The bullet in the chamber is never consumed, which means only first bullet in magazine array will be only used (cannot be used for testing mixed mags for instance)
Hotkey: Ctrl + Alt + F4
Available Options: false, true
Commit suicide
Commit suicide.
Hotkey: Ctrl + Alt + F5
Available Options: false, true
Execute characters in front
Execute characters in front.
Hotkey: Ctrl + Alt + F6
Available Options: false, true
DTime multiplier
Toggles time progression multiplication by Dtime multiplier value (DTime stands for dilatation time, also known as time slice in Enfusion)
Available Options: false, true
DTime multiplier value
Set delta time multiplier value.
Range Settings:
Min: 0.01
Max: 20
Current Value: 1.0
Step: 0.01
Debug manual camera
Enable/disable free manual camera. While the "Debug camera" (aka "Free camera" or "Freecam") is active, you can use the spacebar to teleport your character under the cursor
Hotkey: Ctrl + Alt + C
Available Options: false, true
ECS
ECS archetypes
Enable/disable ECS archetypes debug.
Available Options: false, true
ECS registered types
Enable/disable ECS registered types debug.
Available Options: false, true
ECS type matching
Enable/disable ECS type matching debug.
Available Options: false, true
ECS deleted entities
Enable/disable ECS deleted entities debug.
Available Options: false, true
Character
Character physics
Prequery
Enable/disable character physics prequery.
Available Options: enabled, disabled
Use idle character optimization
Enable/disable idle character physics optimization.
Available Options: enabled, disabled
Show charcter info
Enable/disable showing of character collision info.
Available Options: disabled, enabled
Always apply collision
Enable/disable always applying character collision.
Available Options: disabled, enabled
Ground offset diag
Enable/disable showing of ground offset.
Available Options: disabled, enabled
Draw character mode
Set draw mode for character physics debug.
Available Options: None, Everything, Collision, Movement Path, Surface, Prequery
Enable desync detection
Enable/disable desync detection.
Available Options: false, true
Show desync detection window
Enable/disable desync detection window.
Available Options: false, true
Interpolation enabled
Enable/disable character interpolation.
Available Options: true, false
Animation LOD
Set animation LOD.
Range Settings:
Min: -1
Max: 3
Current Value: -1
Step: 1
Aiming direction
Enable/disable showing of aiming direction.
Available Options: false, true
Head aiming direction
Enable/disable showing of head aiming direction.
Available Options: false, true
Heading angle
Enable/disable showing of heading angle.
Available Options: false, true
Surface slope
Enable/disable showing of surface slope.
Available Options: false, true
Entity transform
Enable/disable showing of entity transform.
Available Options: false, true
AnimPhysAgent transform
Enable/disable showing of animation physics agent transform.
Available Options: false, true
Foot down anim event
Enable/disable showing of foot down animation event.
Available Options: false, true
Animation events
Enable/disable showing of animation events.
Available Options: false, true
Animation tags
Enable/disable showing of animation tags.
Available Options: false, true
Climb command physics test
Enable/disable climb command physics test.
Available Options: false, true
Show current ladder
Enable/disable showing of current ladder.
Available Options: false, true
Input actions
Enable/disable showing of input actions.
Available Options: false, true
Lock view horizontal
Enable/disable locking of view horizontal.
Available Options: false, true
Lock view vertical
Enable/disable locking of view vertical.
Available Options: false, true
Disable Inertia
Enable/disable character inertia.
Available Options: false, true
Disable Inertia exponential
Enable/disable character exponential inertia.
Available Options: false, true
Show additive handler tasks
Enable/disable showing of active additive tasks.
Available Options: false, true
Stamina
Enable/disable showing of character stamina.
Available Options: false, true
Disable animation from velocity
Enable/disable animation from velocity.
Available Options: false, true
Enable new passive weapon mode (sling)
Enable/disable new passive weapon mode (sling).
Available Options: false, true
Disable anim driven icremental turns
Enable/disable anim driven incremental turns.
Available Options: false, true
Disable hit reaction
Enable/disable hit reaction.
Available Options: false, true
Enable ragdoll debug (melee attack to toggle)
Enable/disable ragdoll debug (melee attack to toggle).
Available Options: false, true
Enable feet IK
Enable/disable feet IK.
Available Options: false, true
Show player identity
Enable/disable showing of player identity.
Available Options: false, true
Show inspection diag
Enable/disable showing of inspection debug.
Available Options: false, true
Show drowning / water level diag
Enable/disable showing of drowning/water level debug.
Available Options: false, true
Inspection keeps orientation
Enable/disable keeping orientation during inspection.
Available Options: false, true
Prone root motion transl
Enable/disable root motion translation for prone turns.
Available Options: false, true
Toggle unconsciousness
Enable/disable toggling of character unconsciousness.
Available Options: false, true
Forced unconsciousness pose
Set forced unconsciousness pose.
Range Settings:
Min: -1
Max: 5
Current Value: -1
Step: 1
Show Frustum
Enable/disable showing of frustum.
Available Options: false, true
Disable velocity DTime
Enable/disable velocity delta time.
Available Options: false, true
Enable turret overriding logging
Enable/disable turret overriding logging.
Available Options: false, true
Skip simulation points prequery
Enable/disable skip simulation points prequery.
Available Options: false, true
Show simulation points
Enable/disable showing of simulation points.
Available Options: false, true
Cycle Debug View
Set character debug view cycle.
Range Settings:
Min: 0
Max: 8
Current Value: 0
Step: 1
Draw Camera Collision Solver
Enable/disable drawing of camera collision solver.
Available Options: false, true
Enable Debug UI
Enable/disable character debug UI.
Available Options: false, true
Disable Banking
Enable/disable character banking.
Available Options: false, true
Enable transform info
Enable/disable character transformation info.
Available Options: false, true
Disable recoil cam shake
Enable/disable recoil camera shake.
Available Options: false, true
Disable additional cam shake
Enable/disable additional camera shake.
Available Options: false, true
Show shake diag
Enable/disable showing of camera shake test window.
Available Options: false, true
Inspection LookAt
Enable/disable inspection look at.
Available Options: false, true
ADS Camera
Set ADS camera mode.
Range Settings:
Min: 0
Max: 3
Current Value: 0
Step: 1
Deal damage debug
Enable/disable damage debug for character.
Available Options: false, true
Show Perceived Faction
Enable/disable showing of perceived faction.
Available Options: false, true
AimModifier Debug
Enable/disable aim modifier debug.
Available Options: false, true
Vehicles
Helicopter
Draw trajectory
Enable/disable drawing of helicopter trajectory.
Available Options: false, true
Draw velocity
Set helicopter velocity visualization mode.
Available Options: none, resultant, res+local, res+world
Draw HUD
Enable/disable helicopter HUD debug.
Available Options: false, true
Toggle autohover
Enable/disable helicopter autohover.
Available Options: disabled, enabled
Collective
Set helicopter collective debug mode.
Available Options: localYOffset, default, localY, worldY, direct
Flight limits
Enable/disable helicopter flight limits debug.
Available Options: false, true
Yaw/Roll
Set helicopter stick mode.
Available Options: LS/RS, RS/LS
Tracked
TrackSim
Enable/disable Track simulation.
Available Options: true, false
Draw tracks
Enable/disable drawing of tracks.
Available Options: false, true
Track dynamic
Enable/disable track dynamic.
Available Options: true, false
Track gravity
Enable/disable track gravity.
Available Options: true, false
Reset tracks
Enable/disable resetting of tracks.
Available Options: disabled, enabled
Vehicle Networking and Reconciliation
Determinism testing
Record Moves
Enable/disable recording of vehicle moves.
Available Options: false, true
Clear Record
Clear recorded vehicle moves.
Available Options: false, true
(F)Replay Full
Enable/disable full replay of vehicle moves from full state.
Available Options: false, true
(I)Replay Full
Enable/disable full replay of vehicle moves from init state.
Available Options: false, true
(F)Replay Unconstrained
Enable/disable unconstrained replay of vehicle moves from full state.
Available Options: false, true
(I)Replay Unconstrained
Enable/disable unconstrained replay of vehicle moves from init state.
Available Options: false, true
(U)Replay until Move
Set number of unconstrained replays.
Range Settings:
Min: 0
Max: 4096
Current Value: 0
Step: 1
Num of Instances
Set number of vehicle instances.
Range Settings:
Min: 1
Max: 100
Current Value: 1
Step: 1
X axis spread
Set X axis spread for vehicle instances.
Range Settings:
Min: 0
Max: 100
Current Value: 0
Step: 1
Z axis spread
Set Z axis spread for vehicle instances.
Range Settings:
Min: 0
Max: 100
Current Value: 0
Step: 1
Num of Columns(X)
Set number of columns for vehicle instances.
Range Settings:
Min: 0
Max: 100
Current Value: 0
Step: 1
Draw recorded paths
Set draw mode for recorded vehicle paths.
Available Options: Off, Client, Server, FullSim(W), FullSim(I), Uncon(W), Uncon(I), All
SimState to CSV
Export simulation state to CSV.
Available Options: false, true
WS of (U) to CSV
Export unconstrained simulation state to CSV.
Available Options: false, true
InitState to CSV
Export initialization state to CSV.
Available Options: false, true
Prediction options
C: Disable Correction
Enable/disable client side vehicle correction.
Available Options: false, true
C: Disable Prediction
Enable/disable client side vehicle prediction.
Available Options: false, true
C: (T)Prediction Allowance
Set client side vehicle prediction distance allowance.
Range Settings:
Min: 0
Max: 1000
Current Value: 25
Step: 1
C: (T)Prediction offset
Set client side vehicle prediction offset.
Range Settings:
Min: 0
Max: 1000
Current Value: 150
Step: 1
C: Lerping options
C: Debug Lerping
Enable/disable client side vehicle lerping debug.
Available Options: false, true
C: Lerping Allowance
Set client side vehicle lerping allowance.
Range Settings:
Min: 0
Max: 1000
Current Value: 1000
Step: 1
C: Lerping Distance Percentage
Set client side vehicle distance lerping percentage.
Range Settings:
Min: 0
Max: 100
Current Value: 35
Step: 1
C: Lerping Angle Percentage
Set client side vehicle angle lerping percentage.
Range Settings:
Min: 0
Max: 100
Current Value: 50
Step: 1
C: Allowance options
S: Enable allowance
Enable/disable server side vehicle allowance.
Available Options: false, true
S: Speed Scaled Allowance
Enable/disable speed scaling for server side vehicle allowance.
Available Options: true, false
S: Distance Allowance
Set server side vehicle distance allowance.
Range Settings:
Min: 0
Max: 1000
Current Value: 300
Step: 1
S: Angle Allowance
Set server side vehicle angle allowance.
Range Settings:
Min: 0
Max: 1000
Current Value: 3
Step: 1
S: Angular Velocity Allowance
Set server side vehicle angular velocity allowance.
Range Settings:
Min: 0
Max: 1000
Current Value: 25
Step: 1
S: Linear Velocity Allowance
Set server side vehicle linear velocity allowance.
Range Settings:
Min: 0
Max: 1000
Current Value: 30
Step: 1
Server Car Overrides
S: Override KMH
Enable/disable server side KMH override.
Available Options: false, true
S: -||- close to 0
Enable/disable server side KMH override close to zero.
Available Options: false, true
S: Override STEERING
Enable/disable server side steering override.
Available Options: false, true
S: Override THROTTLE
Enable/disable server side throttle override.
Available Options: false, true
S: Override BRAKE
Enable/disable server side brake override.
Available Options: false, true
S: Override GEAR
Enable/disable server side gear override.
Available Options: false, true
S: Override CLUTCH
Enable/disable server side clutch override.
Available Options: false, true
Vehicle type
Set vehicle type.
Available Options: Wheeled, Helicopter
Heli prefab selection
Select helicopter prefab.
Available Options: Mi8, UH1
Show vehicle id
Enable/disable showing of vehicle ID.
Available Options: false, true
Vehicle selection
Set vehicle selection.
Range Settings:
Min: 0
Max: 512
Current Value: 0
Step: 1
S: Input/Output Diags
Set input/output diagnostic mode.
Available Options: Off, Sim Out, Sim In, Controller, All
Debug path correction
Enable/disable path correction debug.
Available Options: false, true
Debug history
Enable/disable network history debug.
Available Options: false, true
Debug engine flags
Enable/disable engine inputs debug.
Available Options: false, true
Draw Phys Comp Debug
Enable/disable drawing of physics component debug.
Available Options: false, true
C: Resend rate
Set client side vehicle resend rate.
Range Settings:
Min: 1
Max: 5
Current Value: 2
Step: 1
S: Replay delay
Set server side vehicle replay delay.
Range Settings:
Min: 0
Max: 300
Current Value: 2
Step: 1
S: Max Rtt allowed
Set server side vehicle max RTT allowed.
Range Settings:
Min: 0
Max: 300
Current Value: 60
Step: 1
Compartments
Compartment positions
Enable/disable showing of compartment positions.
Available Options: false, true
Show entry points
Enable/disable showing of compartment entry points.
Available Options: false, true
Show accessibility
Enable/disable showing of compartment accessibility.
Available Options: false, true
Show get out prediction
Enable/disable showing of get out prediction.
Available Options: false, true
Show character obstruction trace during get out
Enable/disable showing of character obstruction trace during get out.
Available Options: false, true
MT simulation
Enable/disable multithreaded vehicle simulation.
Available Options: true, false
Show Controller Diags
Enable/disable showing of vehicle controller diagnostics.
Available Options: false, true
Show Compartment Events Diags
Enable/disable showing of vehicle compartment events diagnostics.
Available Options: false, true
Show stats
Enable/disable showing of vehicle statistics.
Available Options: false, true
Show vehicle debug
Enable/disable showing of vehicle debug.
Available Options: false, true
Player vehicle only
Enable/disable showing of player vehicle only.
Available Options: true, false
Show CoM
Enable/disable showing of vehicle center of mass.
Available Options: false, true
Show inertia
Enable/disable showing of vehicle inertia.
Available Options: false, true
Show forces
Enable/disable showing of vehicle forces.
Available Options: false, true
Show engine
Enable/disable showing of vehicle engine.
Available Options: false, true
Show contacts
Enable/disable showing of vehicle contacts.
Available Options: false, true
Show raycast
Enable/disable showing of vehicle raycast.
Available Options: false, true
Show suspension
Enable/disable showing of vehicle suspension.
Available Options: false, true
Show swaybar
Enable/disable showing of vehicle swaybar.
Available Options: false, true
Show wheels
Enable/disable showing of vehicle wheels.
Available Options: false, true
Show bones
Enable/disable showing of vehicle bones.
Available Options: false, true
Show slope
Enable/disable showing of vehicle slope.
Available Options: false, true
Test raycast
Enable/disable testing of raycast.
Available Options: false, true
Reset vehicle
Reset vehicle.
Hotkey: Ctrl + Alt + R
Available Options: disabled, enabled
Teleport up
Teleport vehicle up.
Hotkey: Ctrl + Alt + T
Available Options: disabled, enabled
Wheel drag set
Enable/disable overriding of wheel drag.
Available Options: false, true
Wheel drag value
Set wheel drag value.
Range Settings:
Min: 0
Max: 1
Current Value: 0
Step: 0.05
Disable freelook
Enable/disable freelook for vehicles.
Available Options: false, true
Enable debugger trace
Enable/disable debugger trace for vehicles.
Available Options: false, true
wheel drag set
Enable/disable overriding of wheel drag (duplicate).
Available Options: false, true
Fuel consumption
Enable/disable fuel consumption debug.
Available Options: false, true
Visualize push force
Enable/disable visualization of push force.
Available Options: false, true
Show dust materials
Enable/disable showing of vehicle dust materials.
Available Options: false, true
Statistics
FPS
Display FPS statistics.
Hotkey: Ctrl + NUM 1
Available Options: none, basic, detailed, average
General
Display general statistics.
Hotkey: Ctrl + NUM 2
Available Options: disable, basic, detailed, all
Shape stats
Enable/disable shape statistics.
Available Options: disabled, enabled
MeshObject stats
Display mesh object statistics.
Available Options: none, count, mesh, faces, verts
Decal stats
Display decal statistics.
Available Options: none, all
Resource memory stats
Display resource memory statistics.
Available Options: none, memory, age
Texture memory stats
Display texture memory statistics.
Available Options: none, memory, age
Slow script
Set threshold for slow scripts log.
Available Options: off, 1ms, 2ms, 5ms, 10ms
Verbose script Print
Enable/disable verbose script prints.
Available Options: false, true
Script profiler
Enable/disable script profiler.
Available Options: off, frame, average
Script prof. external
Enable/disable external script profiler.
Available Options: false, true
Test mem-stress
Enable/disable memory stress testing.
Available Options: off, once, periodic
Flush memory
Enable/disable memory flushing.
Available Options: disabled, enabled
Flush audio
Enable/disable audio flushing.
Available Options: disabled, enabled
Memory validation
Enable/disable memory validation.
Available Options: none, on, off
Dump render resources
Enable/disable dumping of render resources.
Available Options: disabled, enabled
Counters
Enable/disable performance counters.
Hotkey: Ctrl + NUM 3
Available Options: disabled, enabled
Slow down
Slow down the game.
Available Options: off, 1ms, 5ms, 10ms, 20ms, 50ms, 100ms
Limit FPS
Limit the game's FPS.
Available Options: off, 120, 60, 40, 30, 20, 10, 5, 2
Widget statistics
Enable/disable widget statistics.
Available Options: false, true
Widget hierarchy to log
Log widget hierarchy.
Available Options: off, once
Widget update to log
Log widget updates.
Available Options: none, hierarchy, time
Loaded particle FX
Enable/disable loaded particle FX statistics.
Available Options: false, true
Resource category stats
Enable/disable resource category statistics.
Available Options: disabled, enabled
Dump resources
Toggle. Dumps all resources.
Available Options: disabled, enabled
Log prefab spawn
Log prefab spawning.
Available Options: off, non-instant, all
Data Collection
Enable/disable data collection debug menu.
Available Options: false, true
Render
RT
Main RT format
Override main render target format.
Available Options: no override, R8G8B8A8_SRGB, R8G8B8A8, R10G10B10A2, R11G11B10F, R16G16B16A16F
Main RT MSAA
Override main render target MSAA settings.
Available Options: no override, none, 2x, 4x, 8x
Force custom resolve
Force custom resolve for render target.
Available Options: false, true
Use resolved RT for PPs
Control post-processing RT usage.
Available Options: default, disabled, enabled
Various
Reload shaders
Enable/disable shader reloading.
Hotkey: Ctrl + F12
Available Options: disabled, enabled
Offline shaders
Enable/disable offline shaders.
Available Options: disabled, enabled
Scene prep. mode
Set scene preparation mode.
Available Options: Multithreaded, Singlethreaded
Cmd list mode
Set command list mode.
Available Options: Multithreaded, Singlethreaded
Log GPU perf diags
Log GPU performance diagnostics.
Available Options: off, once, permanent
Log CMD lists
Log command lists.
Available Options: off, once, permament
Over-sync barriers (PS5)
Set over-sync barriers.
Available Options: none, all, RenderTarget, DepthSurface, StencilSurface, RoTexture, RoBuffer, RwTexture, RwBuffer
Clear RT with
Clear render target with color.
Available Options: none, black, white, red, green, blue
Clear temporal RTs to
Clear temporal render targets.
Available Options: none, black, NaN
GBuffer
Set G-Buffer mode.
Available Options: default, AmbientDepthNear, AmbientNear, AmbientDepthFull, AmbientFull
GBuffer decals
Enable/disable G-Buffer decals.
Available Options: false, true
Decals
Enable/disable decals.
Available Options: true, false
Disable HTILE (PS4&PS5)
Enable/disable HTILE.
Available Options: false, true
Check GPU commands (PS5)
Enable/disable checking of GPU commands.
Available Options: false, true
VSync imm.treshold
Set VSync immediate threshold.
Available Options: 0, 10, 20, 30, 40, 50
VSync limit
Set VSync limit.
Available Options: default, 20, 30, 40, 60
DX12: log trans. barriers
Enable/disable logging of DX12 transition barriers.
Available Options: false, true
DX12: log state commit
Enable/disable logging of DX12 state commits.
Available Options: false, true
CopyHWDepth use depth
Control if CopyHWDepth should use depth.
Available Options: true, false
CopyHWDepth filter
Set filter mode for CopyHWDepth.
Available Options: default, firstSample, min, max
CB draw calls min limit
Enable/disable command buffer draw calls minimum limit.
Available Options: true, false
Validate Input (DP)
Enable/disable validation of input.
Available Options: false, true
System textures
IBL
log messages
Enable/disable IBL logging.
Available Options: false, true
Env map num
Select which environment map to display.
Available Options: none, GlobalSky, GlobalPlaced, 1, 2, 3, 4, 5, 6, 7, 8, 9, 10, 11, 12, 13, 14, 15, 16
Refresh
Set refresh mode for IBL.
Available Options: no, yes, always, disable
Apply HDRmul
Apply or disable HDR multiplier for IBL.
Available Options: true, false
DFG specular
Enable/disable DFG specular for IBL.
Available Options: false, true
DFG diffuse
Enable/disable DFG diffuse for IBL.
Available Options: false, true
Environment
Enable/disable environment for IBL.
Available Options: false, true
LD specular
Enable/disable LD specular for IBL.
Available Options: true, false
LD diffuse
Enable/disable LD diffuse for IBL.
Available Options: false, true
Maximize size
Enable/disable Dynamic Texture size maximization.
Available Options: false, true
Show shadowmap
Display shadowmap.
Available Options: disable, full smask, R-smask NdotL, G-smask, B-AO, A-wetAdd
Show combined rainmask
Display combined rainmask.
Available Options: disable, full smask, R-wetness, G-c.wetness, B-rain, A-underwate
Show light shadowmap
Set light shadowmap to show.
Range Settings:
- Min: 0
- Max: 36
- Current Value: 0
- Step: 1
Show cascades
Show shadow cascades.
Available Options: disable, cascade 1, cascade 2, cascade 3, cascade 4
Show rain mask
Show rain mask.
Available Options: disable, cascade 1, cascade 2, cascade 3, cascade 4
Show wetness mask
Show wetness mask.
Available Options: disable, cascade 1, cascade 2, cascade 3, cascade 4
Show custom wetness mask
Show custom wetness mask.
Available Options: disable, cascade 1, cascade 2, cascade 3, cascade 4
Show wetness add mask
Show wetness add mask.
Available Options: disable, cascade 1, cascade 2, cascade 3, cascade 4
Show depthmap
Enable/disable depthmap visualization.
Available Options: disabled, enabled
Show HW depthmap
Enable/disable HW depthmap visualization.
Available Options: disabled, enabled
Terrain shadow map
Show terrain shadow maps.
Available Options: none, terrain shadow, shadow raw, shadow volume high, shadow volume low
Disable SPD
Disable Screen-Space Particle Depth.
Available Options: false, true
Show GBuffer
Show G-Buffer channels (normals, roughness, metalness, albedo, AO).
Available Options: none, normals, roughness, metalness, albedo, AO
Show GBuffer
Show G-Buffer channels (normals, roughness, metalness).
Available Options: none, normals, roughness, metalness
Show volumetric light rays
Enable/disable volumetric light ray visualization.
Available Options: disabled, enabled
Show reflections
Enable/disable reflection visualization.
Available Options: disabled, enabled
Show user textures
Enable/disable user texture visualization.
Available Options: disabled
Show virtual lights RT
Enable/disable virtual lights RT visualization.
Available Options: disabled, enabled
Textures
Mipmap bias
Set mipmap bias.
Available Options: 0, 1, 2, 3, 4, 5, 6, 7, 8, 9, 10, 11, 12, -1, -0.75, 0.5, -0.25
Max mipmap
Set maximum mipmap level.
Available Options: 0, 1, 2, 3, 4, 5, 6, 7, 8, 9, 10, 11, 12
Defrag
Enable/disable defragmentation of texture resources.
Available Options: true, false
Mode
Set mode of defrag.
Available Options: auto, once, continuous
Defrag heap
Set heap for defrag.
Available Options: MA heaps, manTextures, manBuffers
Defrag alg
Set algorithm of defrag.
Available Options: fast, balanced, full
Scene lighting
Force PBR light
Force or disable PBR light.
Available Options: false, true
Ambient lighting
Enable/disable ambient lighting.
Available Options: true, false
Directional lighting
Enable/disable directional lighting.
Available Options: true, false
Diffuse lighting
Enable/disable diffuse lighting.
Available Options: true, false
Specular lighting
Enable/disable specular lighting.
Available Options: true, false
Emission lighting
Enable/disable emission lighting.
Available Options: true, false
Desaturate Atmosphere (cubemap)
Set desaturation of atmosphere (cubemap).
Range Settings:
- Min: 0
- Max: 1
- Current Value: 0
- Step: 0.01
Remove interiors fog
Remove fog in interiors.
Available Options: true, false
Capture with glob.probe
Enable/disable capturing with global probe.
Available Options: false, true
Negative probe ambient
Enable/disable negative probe ambient.
Available Options: false, true
IBL reflection/roughness
Set IBL reflection/roughness power.
Range Settings:
- Min: 0
- Max: 1
- Current Value: 0
- Step: 0.01
IBL multiscattering
Enable/disable IBL multiscattering.
Available Options: true, false
Probe lighting mode
Enable/disable probe lighting mode.
Available Options: false, true
Object probe LV
Set object probe luminance value.
Range Settings:
Min: -4
Max: 4
Current Value: 0
Step: 0.01
Show scene LV
Show scene luminance.
Available Options: none, pure, NaN, luminance, max.lum, perc.lum, luminanceHM, maxHM, log2HM
LV auto
Enable/disable automatic adjustment of scene LV.
Available Options: true, false
manual LV middle
Set manual luminance value. Options: -10 20 5 0.01
LV +-Range
Set luminance range.
Range Settings:
- Min: 1
- Max: 20
- Current Value: 5
- Step: 0.01
LV watcher
Set luminance watcher.
Range Settings:
- Min: 0
- Max: 1
- Current Value: 0.5
- Step: 0.001
LV watcher size
Set luminance watcher size.
Range Settings:
- Min: 0
- Max: 0.2
- Current Value: 0.025
- Step: 0.001
Shadows
Shadows
Enable/disable shadows.
Available Options: true, false
Shadows OOF
Enable/disable out of frustum shadows.
Available Options: true, false
Shadows multileaf
Enable/disable multileaf shadows.
Available Options: true, false
Particle shadows
Set particle shadows.
Available Options: default, per pixel, per vertex, disabled
Particle cascades
Set particle shadow cascades.
Available Options: default, 1, 2, 3, 4
PP effects
DOF Advanced
Enabled
Enable/disable advanced depth of field.
Available Options: true, false
Format
Set the format for advanced depth of field.
Available Options: default, R11G11B10F, R16G16B16A16F
Quality
Set the quality level for advanced depth of field.
Available Options: default, 0, 1, 2, 3
Rings
Set the number of rings for advanced depth of field.
Available Options: default, 3, 4, 5
Combine FS Blur
Set mode to combine full screen blur for advanced depth of field.
Available Options: default, enabled, disabled
Gather quality
Set gather quality for advanced depth of field.
Available Options: default, low, high
Force dilate rad.
Set force dilate radius for advanced depth of field.
Range Settings:
- Min: 0
- Max: 16
- Current Value: 0
- Step: 1
Debug vis
Set debug visualization mode for advanced depth of field.
Available Options: disabled, fields, gather, combine, bg col, bg alpha, fg col, fg alpha, fill col, fill alpha
Override near blur
Enable/disable overriding the near blur value for advanced depth of field.
Available Options: false, true
near blur
Set near blur value for advanced depth of field. Options: -0.0001 0.04 0.02 0.001
Override far blur
Enable/disable overriding the far blur value for advanced depth of field.
Available Options: false, true
far blur
Set far blur value for advanced depth of field. Options: -0.0001 0.04 0.02 0.001
Override FStop
Enable/disable overriding the FStop value for advanced depth of field.
Available Options: false, true
FStop
Set FStop value for advanced depth of field.
Range Settings:
- Min: 0.1
- Max: 32
- Current Value: 2.0
- Step: 0.1
Override focus dist
Enable/disable overriding the focus distance for advanced depth of field.
Available Options: false, true
focus dist
Set focus distance for advanced depth of field.
Range Settings:
- Min: 0.0
- Max: 100
- Current Value: 2.0
- Step: 0.1
Override focal length
Enable/disable overriding the focal length for advanced depth of field.
Available Options: false, true
focal length
Set focal length for advanced depth of field.
Range Settings:
- Min: 0.01
- Max: 1
- Current Value: 0.05
- Step: 0.01
Postprocess
Enable/disable all postprocessing effects.
Hotkey: Ctrl + Alt + P
Available Options: enabled, disabled
Rain
Enable/disable rain postprocessing effect.
Available Options: enabled, disabled
Snow
Enable/disable snow postprocessing effect.
Available Options: enabled, disabled
Chrom aber
Enable/disable chromatic aberration postprocessing effect.
Available Options: enabled, disabled
Color grading
Enable/disable color grading postprocessing effect.
Available Options: disabled, enabled
Colors
Enable/disable color correction postprocessing effect.
Available Options: enabled, disabled
Depth of field
Enable/disable standard depth of field postprocessing effect.
Available Options: enabled, disabled
Physical Depth of field
Enable/disable physical bokeh depth of field postprocessing effect.
Available Options: enabled, disabled
Force Quality
Set the quality for physical bokeh depth of field.
Available Options: default, low, middle, high
Physical fast Depth of field
Enable/disable fast physical bokeh depth of field postprocessing effect.
Available Options: enabled, disabled
Force Quality
Set the quality for fast physical bokeh depth of field.
Available Options: default, low, middle, high
Dynamic blur
Enable/disable dynamic blur postprocessing effect.
Available Options: disabled, enabled
Film grain
Enable/disable film grain postprocessing effect.
Available Options: enabled, disabled
FXAA
Enable/disable FXAA postprocessing effect.
Available Options: enabled, disabled
God rays
Enable/disable god rays postprocessing effect.
Available Options: enabled, disabled
HBAO
Enable/disable HBAO postprocessing effect.
Available Options: enabled, disabled
Debug
Enable/disable HBAO debugging visualization.
Available Options: disabled, enabled
DebugFullScreen
Enable/disable HBAO fullscreen debugging visualization.
Available Options: disabled, enabled
NumSteps
Set the number of HBAO steps.
Available Options: default, 1, 2, 3, 4, 5, 6, 7, 8
NumDirections
Set the number of HBAO directions.
Available Options: default, 1, 2, 3, 4, 5, 6, 7, 8
HDR
Enable/disable HDR postprocessing effect.
Available Options: enabled, disabled
Debug
Set HDR debug visualization.
Available Options: none, mask, LVBlend
Bloom
Enable/disable bloom effect for HDR.
Available Options: enabled, blured, disabled
Bloom CS
Enable/disable bloom compute shader for HDR.
Available Options: false, true
Bloom Upsample
Select bloom upsample method for HDR.
Available Options: before tonemap, in tonemap
EV
Set HDR exposure value.
Range Settings:
Min: -10.0
Max: 10.0
Current Value: 0.0
Step: 0.1
Show curves
Show HDR curves.
Available Options: disabled, histogram, <0..2>lin filmic, <-6..0>LV filmic, <0.01..10>log filmic
Disable autoExp
Disable auto exposure for HDR.
Available Options: false, true
New LV adaptation
Enable/disable new luminance adaptation for HDR.
Available Options: false, true
HaightmapAO
Enable/disable heightmap based AO postprocessing effect.
Available Options: enabled, disabled
Gauss filter
Enable/disable gaussian blur postprocessing effect.
Available Options: enabled, disabled
Outlines
Enable/disable outline postprocessing effect.
Available Options: enabled, disabled
Radial blur
Enable/disable radial blur postprocessing effect.
Available Options: enabled, disabled
Rot blur
Enable/disable rotation blur postprocessing effect.
Available Options: enabled, disabled
SMAA
Enable/disable SMAA postprocessing effect.
Available Options: enabled, disabled
Edge detection method override
Set the edge detection method override for SMAA.
Available Options: Disabled, Color, Depth, Luma
Show debug textures
Display SMAA debug textures.
Available Options: Disabled, SMAAEdgeDetection, SMAABlendingWeightCalculation
SSAO
Enable/disable SSAO postprocessing effect.
Available Options: enabled, disabled
Method
Set SSAO method.
Available Options: non-linear, linear, mask non-linear, mask linear
BlurSteps
Set blur steps for SSAO.
Available Options: default, 0, 1, 2, 3, 4, 5, 6, 7
SSDO
Enable/disable SSDO postprocessing effect.
Available Options: enabled, disabled
Debug
Enable/disable SSDO debugging visualization.
Available Options: disabled, enabled
DebugFullScreen
Enable/disable SSDO fullscreen debugging visualization.
Available Options: disabled, enabled
SSR (global)
Enable/disable global SSR postprocessing effect.
Available Options: enabled, disabled
SSR (objects only)
Enable/disable object only SSR postprocessing effect.
Available Options: enabled, disabled
Use FFX SSR
Enable/disable FFX Screen Space Reflection.
Available Options: enabled, disabled
Temporal filtering
Enable/disable temporal filtering for SSR.
Available Options: enabled, disabled
Min fade distance
Set minimum fade distance for SSR.
Range Settings:
- Min: 0
- Max: 100
- Current Value: 0.5
- Step: 0.01
Max fade distance
Set maximum fade distance for SSR.
Range Settings:
- Min: 0
- Max: 100
- Current Value: 2
- Step: 0.01
Behind ambient
Correct reflection with ambient.
Available Options: disabled, enabled
UnderWater
Enable/disable underwater postprocessing effect.
Available Options: enabled, disabled
Wet distort
Enable/disable wet distortion postprocessing effect.
Available Options: enabled, disabled
Terrain
Enable/disable terrain rendering.
Available Options: enabled, disabled
LOD mode
Set terrain LOD mode.
Available Options: auto, exact lod, frac only
Force exact LOD
Set force exact LOD.
Range Settings:
- Min: 1
- Max: 5
- Current Value: 5
- Step: 0.01
Layers diag mode
Set terrain layers diagnostic mode.
Hotkey: Ctrl + Alt + L
Available Options: disabled, layers, projection
Show tiles error
Enable/disable showing of terrain tile errors.
Available Options: false, true
Tile error modif
Set terrain tile error modification. Options: -10 10 0 0.01
Blocks' bounding boxes
Enable/disable bounding boxes for terrain blocks.
Available Options: disabled, enabled
MaxLOD blocks' AABB
Enable/disable AABBs for max LOD terrain blocks.
Available Options: disabled, enabled
Biased blocks' AABB
Enable/disable AABBs for biased terrain blocks.
Available Options: disabled, enabled
Tiles' bounding boxes
Enable/disable bounding boxes for terrain tiles.
Available Options: disabled, enabled
Detail texture
Enable/disable terrain detail texture.
Hotkey: Ctrl + Alt + S
Available Options: enabled, disabled
Water LOD bias
Set water LOD bias.
Range Settings:
- Min: 0
- Max: 1
- Current Value: 0
- Step: 0.001
Detail texture detail
Set terrain detail texture level.
Available Options: normal, -10, -9, -8, -7, -6, -5, -4, -3, -2, -1, 0, 1, 2, 3, 4, 5, 6, 7, 8, 9, 10
Reload only curr. shaders
Enable/disable reloading of only current terrain shaders.
Available Options: false, true
Use layer cache
Enable/disable terrain layer cache.
Available Options: true, false
Terrain render info
Enable/disable terrain render information.
Available Options: false, true
Holes debug vis
Enable/disable terrain holes debug visualization.
Available Options: false, true
Disabled block debug vis
Enable/disable visualization of disabled terrain blocks.
Available Options: false, true
Grass/Clutter/Obstacles
Render clutter
Set clutter render mode.
Available Options: full, prepare only, disabled
Show clutter stats
Set clutter statistics.
Available Options: none, general, detailed
Reload clutter configs
Enable/disable reloading of clutter configurations.
Available Options: disabled, enabled
3D clutter AABB
Enable/disable 3D AABBs for clutter.
Available Options: disabled, enabled
Clutter LOD debug
Enable/disable clutter LOD debugging.
Available Options: disabled, enabled
Clutter LOD blend size
Set clutter LOD blend size.
Range Settings:
- Min: 0.0
- Max: 5.0
- Current Value: 1.5
- Step: 0.1
Thinning slope
Set clutter thinning slope.
Range Settings:
- Min: 0.01
- Max: 1.0
- Current Value: 0.25
- Step: 0.01
Clutter fadeout size
Set clutter fadeout size.
Range Settings:
- Min: 0
- Max: 30
- Current Value: 15
- Step: 0.1
Shadow casting
Enable/disable shadow casting for clutter.
Available Options: enabled, disabled
Clutter position jitter
Set clutter position jitter.
Range Settings:
- Min: 0.0
- Max: 1.0
- Current Value: 0.5
- Step: 0.01
Enable obstacles
Enable/disable obstacles on terrain.
Available Options: true, false
Enable clutter mask
Enable/disable clutter masking.
Available Options: true, false
Show clutter occldrs
Enable/disable showing of clutter occluders.
Available Options: false, true
Show obst.map
Set obstacle map visualization.
Available Options: none, runtime, perm. depth, perm. mask
Force params:
Enable/disable forcing of obstacle parameters.
Available Options: false, true
RadiusX
Set obstacle radius X.
Range Settings:
- Min: 0.5
- Max: 5
- Current Value: 1
- Step: 0.1
RadiusZ
Set obstacle radius Z.
Range Settings:
- Min: 0.5
- Max: 5
- Current Value: 1
- Step: 0.1
Offset
Set obstacle offset. Options: -1.0 1.0 0 0.01
Render grass
Enable/disable grass rendering.
Available Options: enabled, disabled
Grass log
Enable/disable grass logging.
Available Options: false, true
Basic cluster size (10) mul
Set grass cluster size multiplier.
Range Settings:
- Min: 1.5
- Max: 10
- Current Value: 10
- Step: 0.01
Grass distance <50..150>
Set grass detail distance. Options: -1 1 0 0.1
Freeze grass pos
Enable/disable freezing of grass positions.
Available Options: disabled, enabled
Grass clusters' boxes
Enable/disable visualization of grass cluster boxes.
Available Options: disabled, enabled
Force grass lod
Set grass LOD level.
Available Options: default, 0, 1, 2, 3
Force grass blend
Set grass blend mode.
Available Options: default, alphatest, edges, ATOC(if msaa)
Grass sort
Enable/disable sorting of grass.
Available Options: true, false
MT rendering
Enable/disable multi-threaded grass rendering.
Available Options: true, false
MT caching
Enable/disable multi-threaded grass caching.
Available Options: true, false
Grass terrain blend
Enable/disable grass terrain blending.
Available Options: false, true
start dist
Set grass terrain blend start distance.
Range Settings:
Min: -100
Max: 150
Current Value: 0
Step: 0.1
end dist
Set grass terrain blend end distance.
Range Settings:
Min: -100
Max: 150
Current Value: 0
Step: 0.1
Enable roads
Enable/disable road rendering.
Available Options: enabled, disabled
Materials settings
Grass/Tree wind
Wind override
Enable/disable wind override for grass and trees.
Available Options: false, true
Grass/tree par override
Enable/disable override of parameters for grass and trees.
Available Options: false, true
Enable MultiMat det.mask
Enable/disable use of multi-material detection mask.
Available Options: false, true
Tree colorization
Set tree colorization mode.
Available Options: full, color only, disable
Tree volume fake
Set tree volume fake mode.
Available Options: both, geomOcclElipsoid, elipsoidAO, none
Tree volume shadow
Set tree volume shadow mode.
Available Options: none, geomOcclElipsoid, geomOccl, elipsoidAO
Override geomOccl distance
Enable/disable overriding of geometric occlusion distance.
Available Options: false, true
Max distance
Set max distance for geometric occlusion.
Range Settings:
- Min: 0
- Max: 250
- Current Value: 100
- Step: 1
Sky
Sky
Enable/disable sky rendering.
Available Options: enabled, disabled
Fog
Enable/disable fog rendering.
Available Options: enabled, disabled
Fog in env. map
Enable/disable fog in environment map.
Available Options: enabled, disabled
Lens Flares
Enable/disable lens flares.
Available Options: enabled, disabled
Godrays
Enable/disable god rays.
Available Options: enabled, disabled
Show planets
Enable/disable rendering of planets.
Available Options: enabled, disabled
Show stars
Enable/disable rendering of stars.
Available Options: enabled, disabled
Show real stars constellations
Enable/disable rendering of real star constellations.
Available Options: enabled, disabled
Show far layer
Enable/disable rendering of far sky layer.
Available Options: enabled, disabled
Show dynamic layer
Enable/disable rendering of dynamic sky layer.
Available Options: enabled, disabled
Rivers
Central flow func
Set the central flow function for rivers.
Available Options: sine, polynomial
Debug output
Display debug information of river flow.
Available Options: no debug, flow map, flow map x, flow map y, flow noise, flow noise - LF part, flow noise - HF part, phase noise, flow mod map
LightSourcVis
Blend
Set blend mode for light sources.
Available Options: default, additive, alphablend, max
Subsurface Scattering
SSSSS override params
Enable/disable overriding of SSSSS parameters.
Available Options: false, true
Enabled
Enable/disable subsurface scattering.
Available Options: false, true
Scale
Set subsurface scattering scale.
Range Settings:
- Min: 0
- Max: 4
- Current Value: 1
- Step: 0.01
Random rotation
Enable/disable random rotation for subsurface scattering.
Available Options: false, true
Log kernel
Enable/disable logging of subsurface scattering kernel.
Available Options: false, true
Use stencil
Enable/disable stencil buffer for subsurface scattering.
Available Options: true, false
Profile resolve
Set profile resolve mode for subsurface scattering.
Available Options: default, first, min, max, avg
SSSSS quality
Set quality for subsurface scattering.
Available Options: default, low, medium, high
Analytic lights
Disable far lights
Disable or enable far analytic lights.
Available Options: false, true
Show far lights
Show or hide far analytic lights.
Available Options: disabled, show, no clip
Invert geometry
Enable/disable inverting of geometry.
Available Options: false, true
Enable vol lights
Enable/disable volumetric lights.
Available Options: enabled, no blend, disabled
Show log
Enable/disable logging of far lights.
Available Options: false, true
Farlight intensity
Set far light intensity. Options: -3 20 0 0.1
Analytic lights
Enable/disable analytic lights.
Available Options: true, false
Lights shadows
Enable/disable analytic lights shadows.
Available Options: true, false
Override limits
Enable/disable overriding of light shadow limits.
Available Options: false, true
Memory budget
Set memory budget for light shadows.
Range Settings:
- Min: 10
- Max: 100
- Current Value: 40
- Step: 2
Max shadows count
Set max shadow count for lights.
Range Settings:
- Min: 4
- Max: 64
- Current Value: 16
- Step: 1
Basic tex size
Set basic texture size for lights shadows.
Available Options: 64, 256, 512, 768, 1024, 1536, 2048, 2560, 3072, 3584, 4096
Aggr. particle lights
Enable/disable aggregation of particle lights.
Available Options: true, false
Autoshrink part. lights
Enable/disable auto shrinking of particle lights.
Available Options: true, false
Occlusion Queries
Benchmark
Enable/disable occlusion queries benchmark.
Available Options: false, true
TestSun
Enable/disable occlusion queries test sun.
Available Options: false, true
Snow
Quantize speed
Enable/disable quantization of snow speed.
Available Options: true, false
Quantize dir
Enable/disable quantization of snow direction.
Available Options: true, false
Fix dir
Enable/disable fixing of snow wind direction.
Available Options: false, true
Enable logs
Enable/disable snow logs.
Available Options: false, true
Use underwater mask
Enable/disable underwater mask for snow.
Available Options: true, false
Macro mask debug
Show macro mask debug for snow.
Available Options: disabled, layer 1, layer 2, layer 3
Override snow
Enable/disable overriding snow.
Available Options: false, true
Density
Set snow density.
Range Settings:
- Min: 0.0
- Max: 1.0
- Current Value: 1.0
- Step: 0.01
Time coef
Set snow time coefficient.
Range Settings:
- Min: 0.0
- Max: 10.0
- Current Value: 1.0
- Step: 0.01
Deferred Decals
Render
Enable/disable rendering of deferred decals.
Available Options: true, false
HW depth
Enable/disable HW depth usage for deferred decals.
Available Options: true, false
Debug visualization
Enable/disable debugging visualization of deferred decals.
Available Options: true, false
Light portals
Enable light portals
Enable/disable light portals.
Available Options: enabled, disabled
Probe blending mode
Set probe blending mode for light portals.
Available Options: directional, diffuse, disabled
Specular proj. tex.
Enable/disable specular projection texture.
Available Options: disabled, enabled
Proj. tex. offset fix
Enable/disable projection texture offset fix.
Available Options: disabled, enabled
Portal light mode
Set light mode for light portals.
Available Options: none, diffuse+specular, diffuse, specular
Normalize L by area
Enable/disable normalization of light by area.
Available Options: disabled, enabled
Direct light contrib.
Enable/disable direct light contribution.
Available Options: disabled, enabled
Light volume lerp (m)
Set light volume lerp.
Available Options: 0.00001, 0.0001, 0.001, 0.01, 0.05, 0.1, 0.15, 0.2, 0.25, 0.3, 0.5, 0.75, 1.0
Disable light volumes
Disable light volumes.
Available Options: false, true
Show active subscene
Show or hide active subscene.
Available Options: disabled, enabled
Show area rectangles
Show or hide area rectangles.
Available Options: disabled, enabled
Show portal rectangles
Show or hide portal rectangles.
Available Options: disabled, enabled
Show light rectangles
Show or hide light rectangles.
Available Options: disabled, enabled
Show debug info
Show light portals debug info.
Available Options: none, portals, areas, all
Virtual light range
Set virtual light range.
Range Settings:
- Min: 5
- Max: 50
- Current Value: 25
- Step: 0.1
BSP diag
Enable/disable BSP diagnostics.
Available Options: disabled, enabled
Hide mesh
Hide light portal mesh.
Available Options: disabled, enabled
Show src. geometry
Show source geometry for light portals.
Available Options: disabled, opaque, transparent
Show occupancy grid
Show occupancy grid for light portals.
Available Options: disabled, enabled
Freeze camera
Enable/disable freezing of camera for light portals.
Available Options: disabled, enabled
Show BSP tree
Show BSP tree for light portals.
Available Options: none, AABB, planes, convex
Leaf mode
Set leaf mode for BSP tree debug.
Available Options: all, opaque, non-opaque
BSP disp. mode
Set display mode for BSP debug.
Available Options: normal, at depth, active, connectivity
Wanted depth
Set wanted depth for BSP debug.
Range Settings:
- Min: 0
- Max: 64
- Current Value: 0
- Step: 1
Show leaf split plane
Show leaf split plane.
Available Options: disabled, enabled
Show areas
Show light portal areas.
Available Options: none, AABB, convex
Area disp. mode
Set display mode for light portal areas.
Available Options: all (excl. out), all, single, active
Area ID
Set area ID for light portals.
Range Settings:
- Min: 0
- Max: 128
- Current Value: 0
- Step: 1
Show portals
Show light portals.
Available Options: none, all, single, per area, active
Portal ID
Set portal ID for light portals.
Range Settings:
- Min: 0
- Max: 512
- Current Value: 0
- Step: 1
Portal disp. mode
Set display mode for light portals.
Available Options: rect, AABB, rect no clip, AABB no clip
Show portal volumes
Show light portal volumes.
Available Options: disabled, enabled
Show virtual lights
Show virtual lights.
Available Options: disabled, active all, active single
Light disp. mode
Set display mode for virtual lights.
Available Options: rect, rect+cone, rect no clip, rect+cone no clip
Terrain shadows
Shadow cascades
Terrain num cascades
Set number of terrain shadow cascades.
Available Options: default, 0, 1, 2
Terrain near type
Set near cascade type for terrain.
Available Options: default, movable, static
Terrain near m/px
Set near cascade meters per pixel for terrain.
Available Options: default, 0.5, 1, 1.5, 2, 3, 4, 5, 6, 7, 8
Terrain far type
Set far cascade type for terrain.
Available Options: default, movable, static
Terrain far m/px
Set far cascade meters per pixel for terrain.
Available Options: default, 0.5, 1, 1.5, 2, 3, 4, 5, 6, 7, 8
Objects num cascades
Set number of object shadow cascades.
Available Options: default, 0, 1, 2
Objects near type
Set near cascade type for objects.
Available Options: default, movable, static
Objects near m/px
Set near cascade meters per pixel for objects.
Available Options: default, 0.5, 1, 1.5, 2, 3, 4, 5, 6, 7, 8
Objects far type
Set far cascade type for objects.
Available Options: default, movable, static
Objects far m/px
Set far cascade meters per pixel for objects.
Available Options: default, 0.5, 1, 1.5, 2, 3, 4, 5, 6, 7, 8
AO num cascades
Set number of AO shadow cascades.
Available Options: default, 0, 1, 2
AO near type
Set near cascade type for AO.
Available Options: default, movable, static
AO near m/px
Set near cascade meters per pixel for AO.
Available Options: default, 0.5, 1, 1.5, 2, 3, 4, 5, 6, 7, 8
AO far type
Set far cascade type for AO.
Available Options: default, movable, static
AO far m/px
Set far cascade meters per pixel for AO.
Available Options: default, 0.5, 1, 1.5, 2, 3, 4, 5, 6, 7, 8
Objects heightmap
Obj. heightmap movable
Set object heightmap movability.
Available Options: movable, static
Draw volumetric info
Draw volumetric debug info.
Available Options: false, true
Draw object heightmap
Draw object heightmap.
Available Options: disabled, set regions, set bits, all bits
Obj.height.full upd
Enable/disable full object heightmap update.
Available Options: false, true
Obj.height. dbg region
Enable/disable object heightmap region debug.
Available Options: false, true
Obj.height.reset
Reset object heightmap.
Available Options: false, true
Obj.height.reset stats
Reset object heightmap statistics.
Available Options: false, true
Obj.height.print stats
Print object heightmap statistics.
Available Options: false, true
Obj.height.use prepare
Enable/disable prepare for object heightmap.
Available Options: true, false
Obj.height.use CB
Enable/disable command buffer for object heightmap.
Available Options: false, true
Obj.height.max merge
Set maximum merge for object heightmap.
Available Options: unlimited, 1, 4, 8, 16
Obj.height. subdiv
Enable/disable object heightmap subdivision.
Available Options: false, true
Obj.height. sync draw
Set object heightmap draw call synchronization.
Available Options: default, sync, no sync
Obj. heightmap tex size
Set object heightmap texture size.
Available Options: no override, 1024, 2048, 4096, 8192
Obj. heightmap m/pixel
Set object heightmap meters per pixel.
Available Options: default, 0.5, 1, 1.5, 2, 3, 4, 5, 6, 7, 8
Min entities per frame
Set min entities per frame for heightmap.
Available Options: default, 512, 1K, 2K, 4K, 8K, 16K, 32K, 64K, 128K, unlimited
Max entities per frame
Set max entities per frame for heightmap.
Available Options: default, 512, 1K, 2K, 4K, 8K, 16K, 32K, 64K, 128K, unlimited
Terrain shadows
Set terrain shadows mode.
Available Options: default, on (slice), on (full), no update, disabled
Freeze update
Freeze terrain shadow update.
Available Options: false, true
Quality profile override
Override terrain shadow quality profile.
Available Options: no override, disabled, low, medium, high
Diag messages
Enable/disable terrain shadows debug messages.
Available Options: false, true
Texture size
Override terrain shadow texture size.
Available Options: no override, 1024, 2048, 4096, 8192
Blur override
Override terrain shadow blur.
Available Options: no override, 0, 3, 5, 7, 9
Hierarchical raytrace
Enable/disable hierarchical raytrace for terrain shadows.
Available Options: true, false
Force mipmap rebuild
Enable/disable forcing of mipmap rebuild for terrain shadows.
Available Options: false, true
Herarchical mip1
Set hierarchical mip 1 level.
Available Options: default, none, 0, 1, 2, 3, 4, 5, 6
Herarchical mip2
Set hierarchical mip 2 level.
Available Options: default, none, 0, 1, 2, 3, 4, 5, 6
Herarchical mip3
Set hierarchical mip 3 level.
Available Options: default, none, 0, 1, 2, 3, 4, 5, 6
Herarchical mip4
Set hierarchical mip 4 level.
Available Options: default, none, 0, 1, 2, 3, 4, 5, 6
Override Angle bias
Enable/disable overriding of angle bias.
Available Options: false, true
Angle bias (deg)
Set angle bias for terrain shadows.
Range Settings:
Min: -10
Max: 10
Current Value: -0.5
Step: 0.1
Override Height bias
Enable/disable overriding of height bias.
Available Options: false, true
Height bias (m)
Set height bias for terrain shadows.
Range Settings:
Min: 0
Max: 10
Current Value: 0.5
Step: 0.1
Override Trace bias
Enable/disable overriding of trace bias.
Available Options: false, true
Trace bias
Set trace bias for terrain shadows.
Range Settings:
Min: 0
Max: 10
Current Value: 0.0
Step: 0.1
Override Trace bias obj
Enable/disable overriding of object trace bias.
Available Options: false, true
Trace bias obj min
Set object trace bias minimum.
Range Settings:
Min: 0
Max: 10
Current Value: 0.1
Step: 0.1
Trace bias obj max
Set object trace bias maximum.
Range Settings:
Min: 0
Max: 10
Current Value: 1.5
Step: 0.1
Object shadows
Set object shadows mode.
Available Options: default, force off, force on
Object shadow type
Set object shadow type.
Available Options: no override, Physics, Physics+AAB, AAB, AABScaled, Volume
Occ grid runtime
Enable/disable runtime creation of occupation grid.
Available Options: false, true
Blend mode
Set blend mode for terrain shadows.
Available Options: blend, min
Border size
Set border size for terrain shadows.
Available Options: default, 0, 0.05, 0.1, 0.15, 0.2, 0.3, 0.4, 0.5
Sun move test
Set sun move test mode.
Available Options: off, fwd slow, fwd medium, bwd fast, bwd slow, bwd medium, bwd fast
Min pixels per frame
Set min pixels per frame for terrain shadows.
Available Options: default, 16K, 32K, 64K, 128K, 256K, 512K, unlimited
Max pixels per frame
Set max pixels per frame for terrain shadows.
Available Options: default, 16K, 32K, 64K, 128K, 256K, 512K, unlimited
Obj shadow blend dist(m)
Set object shadow blend distance.
Range Settings:
Min: 0
Max: 20
Current Value: 10.0
Step: 0.1
Terrain shadow blend dist(m)
Set terrain shadow blend distance.
Range Settings:
Min: 0
Max: 20
Current Value: 3.0
Step: 0.1
AO mode override
Set AO mode override for terrain shadows.
Available Options: no override, disabled, PP half, PP mixed, PP full, force precomputed, presomputed+runtime, force runtime
Override AO coef
Enable/disable overriding of AO coefficient.
Available Options: false, true
AO coef
Set AO coefficient.
Range Settings:
- Min: 0
- Max: 1.0
- Current Value: 0.3
- Step: 0.02
AO radius
Set AO radius.
Range Settings:
- Min: 0
- Max: 10.0
- Current Value: 3.0
- Step: 0.2
AO blend distance
Set AO blend distance.
Range Settings:
- Min: 0
- Max: 10.0
- Current Value: 5.0
- Step: 0.2
AO PP mode
Set AO post-processing mode.
Available Options: default, full res, half res, half res + reconst
Terr. light angle limit
Set light angle limit for terrain shadows.
Available Options: default, user
Limit angle
Set light limit angle.
Range Settings:
- Min: 1
- Max: 60
- Current Value: 15
- Step: 0.1
FSR
Resolution scale
Set resolution scale for FSR.
Available Options: default, manual, 100%, FSR Ultra (77%), FSR Quality (67%), FSR Balanced (59%), FSR Perf (50%)
Manual scale
Set manual scale for FSR.
Range Settings:
- Min: 0.1
- Max: 2.0
- Current Value: 1.0
- Step: 0.01
Use pixel shader
Enable/disable pixel shader for FSR.
Available Options: false, true
Override FSR settings
Enable/disable overriding of FSR settings.
Available Options: false, true
FSR enabled
Enable/disable FSR.
Available Options: false, true
FSR sharpen
Enable/disable FSR sharpening.
Available Options: true, false
FSR sharpen att.
Set FSR sharpen amount.
Range Settings:
- Min: 0.0
- Max: 2.0
- Current Value: 0.5
- Step: 0.01
FSR dither
Set FSR dither amount.
Range Settings:
- Min: 0.0
- Max: 1.0
- Current Value: 1.0
- Step: 0.01
FSR RT format
Set render target format for FSR.
Available Options: default, R8G8B8A8, R10G10B10A2, R11G11B10F, R16G16B16A16F
FSR mip bias
Set mip bias for FSR.
Available Options: disabled, automatic, manual
manual mip bias
Set manual mip bias for FSR. Options: -4.0 0.0 0.0 0.01
CAS
Shader
Set shader type for CAS.
Available Options: default, force PS, force CS
Override CAS settings
Enable/disable overriding of CAS settings.
Available Options: false, true
enabled
Available Options: false, true
sharpness
Set CAS sharpness.
Range Settings:
- Min: 0.0
- Max: 1.0
- Current Value: 0.8
- Step: 0.01
Rain
Wetness
Override wetness
Enable/disable overriding of rain wetness.
Available Options: false, true
Wetness
Set rain wetness.
Range Settings:
- Min: 0.0
- Max: 1.0
- Current Value: 0.0
- Step: 0.01
Flood cracks
Set rain flood level for cracks.
Range Settings:
- Min: 0.0
- Max: 1.0
- Current Value: 0.0
- Step: 0.01
Flood puddles
Set rain flood level for puddles.
Range Settings:
- Min: 0.0
- Max: 1.0
- Current Value: 0.0
- Step: 0.01
Tree scale
Set rain tree scale.
Range Settings:
- Min: 0.0
- Max: 1.0
- Current Value: 0.0
- Step: 0.01
Wetness simulation
Enable/disable wetness simulation.
Available Options: false, true
Simulation value
Set wetness simulation value.
Range Settings:
- Min: 0.0
- Max: 1.0
- Current Value: 0.0
- Step: 0.002
Override wetness render params
Enable/disable overriding of wetness render params.
Available Options: false, true
Wind
Override rain wind
Enable/disable overriding of rain wind.
Available Options: false, true
Mask operator
Set mask operator for rain wind.
Available Options: add, mul
Override splash wind
Enable/disable overriding of splash wind.
Available Options: false, true
Mask operator
Set mask operator for splash wind.
Available Options: add, mul
Downsample
Set rain color downsample method.
Available Options: default, simple, blur, none
Blend method
Set rain blend method.
Available Options: default, standard, noRefraction
Diag refr. tex
Enable/disable rain refraction texture diagnostic.
Available Options: false, true
Stop time
Enable/disable stopping of rain simulation time.
Available Options: false, true
Use underwater mask
Enable/disable underwater mask for rain.
Available Options: true, false
Override rain density
Enable/disable overriding of rain density.
Available Options: false, true
Rain density
Set rain density.
Range Settings:
- Min: 0.0
- Max: 1.0
- Current Value: 0.0
- Step: 0.02
Override direction
Enable/disable overriding of rain direction.
Available Options: false, true
Override dirX
Set rain direction X. Options: -1.0 1.0 0.0 0.05
Override dirY
Set rain direction Y. Options: -1.0 1.0 -1.0 0.05
Override dirZ
Set rain direction Z. Options: -1.0 1.0 0.0 0.05
Distant noise mask debug
Enable/disable rain distant noise mask debug.
Available Options: false, true
Override ripple tex size
Override rain ripple texture size.
Available Options: default, 128, 256, 512, 1024
Sliding drops obj space
Enable/disable sliding drops object space.
Available Options: false, true
Override ripples
Enable/disable overriding of rain ripples.
Available Options: false, true
Ripples count min
Set rain ripples count minimum.
Range Settings:
- Min: 1.0
- Max: 100.0
- Current Value: 10.0
- Step: 1.0
Ripples count max
Set rain ripples count maximum.
Range Settings:
- Min: 1.0
- Max: 100.0
- Current Value: 50.0
- Step: 1.0
Ripples size min
Set rain ripples size minimum.
Range Settings:
- Min: 1.0
- Max: 20.0
- Current Value: 1.0
- Step: 1.0
Ripples size max
Set rain ripples size maximum.
Range Settings:
- Min: 1.0
- Max: 20.0
- Current Value: 5.0
- Step: 1.0
Ripples height min
Set rain ripples height minimum.
Range Settings:
- Min: 0.0
- Max: 1.0
- Current Value: 0.5
- Step: 0.01
Ripples height max
Set rain ripples height maximum.
Range Settings:
- Min: 0.0
- Max: 1.0
- Current Value: 1.0
- Step: 0.01
Ripples speed
Set rain ripples speed.
Range Settings:
- Min: 1.0
- Max: 2000.0
- Current Value: 500.0
- Step: 10.0
Ripples damping
Set rain ripples damping.
Range Settings:
- Min: 0.01
- Max: 1.0
- Current Value: 0.04
- Step: 0.01
Ripples normal strength
Set rain ripples normal strength.
Range Settings:
- Min: 0.1
- Max: 20.0
- Current Value: 8.0
- Step: 0.1
Ripples reset
Enable/disable resetting of rain ripples.
Available Options: false, true
Shore Wetness
Shore wetness enabled
Enable/disable shore wetness.
Available Options: default, enable, disable
Shore wetness override
Enable/disable overriding of shore wetness.
Available Options: false, true
Shore wet height above
Set shore wet height above.
Range Settings:
Min: 0.0
Max: 10.0
Current Value: 0.5
Step: 0.01
Shore wet fade above
Set shore wet fade above.
Range Settings:
Min: 0.0
Max: 10.0
Current Value: 0.5
Step: 0.01
Shore wet height below
Set shore wet height below.
Range Settings:
Min: 0.0
Max: 10.0
Current Value: 0.5
Step: 0.01
Shore wet fade below
Set shore wet fade below.
Range Settings:
Min: 0.0
Max: 10.0
Current Value: 0.5
Step: 0.01
Shore wet fade coef
Set shore wet fade coefficient.
Range Settings:
Min: 0.001
Max: 10.0
Current Value: 1.0
Step: 0.01
Shore wet rough fade start
Set shore wet rough fade start.
Range Settings:
Min: 0.0
Max: 10.0
Current Value: 0.0
Step: 0.01
Shore wet rough fade size
Set shore wet rough fade size.
Range Settings:
Min: 0.001
Max: 10.0
Current Value: 1.0
Step: 0.01
Shore wet rough coef
Set shore wet rough coefficient.
Range Settings:
Min: 0.001
Max: 10.0
Current Value: 1.0
Step: 0.01
River wetness enabled
Enable/disable river wetness.
Available Options: default, enable, disable
River wetness override
Enable/disable overriding of river wetness.
Available Options: false, true
River wet height above
Set river wet height above.
Range Settings:
Min: 0.0
Max: 10.0
Current Value: 0.5
Step: 0.01
River wet fade above
Set river wet fade above.
Range Settings:
Min: 0.0
Max: 10.0
Current Value: 0.5
Step: 0.01
River wet height below
Set river wet height below.
Range Settings:
Min: 0.0
Max: 10.0
Current Value: 0.5
Step: 0.01
River wet fade below
Set river wet fade below.
Range Settings:
Min: 0.0
Max: 10.0
Current Value: 0.5
Step: 0.01
River wet fade coef
Set river wet fade coefficient.
Range Settings:
Min: 0.001
Max: 10.0
Current Value: 1.0
Step: 0.01
River wet rough coef
Set river wet rough coefficient.
Range Settings:
Min: 0.001
Max: 10.0
Current Value: 1.0
Step: 0.01
LensFlares
Debug render
Enable/disable lens flare debug rendering.
Available Options: false, true
HalfRes render
Set half resolution render for lens flares.
Available Options: no override, false, true
Force flare dirlight
Set force flare dirlight. Options: -1 100 -1 1
Force flare pointlight
Set force flare pointlight. Options: -1 100 -1 1
Force flare spotlight
Set force flare spotlight. Options: -1 100 -1 1
Override flare set
Override lens flare set.
Available Options: no override, none, 1st person, 3rd person
Override offset spot
Enable/disable overriding of offset spot for lens flares.
Available Options: false, true
Offset spot
Set offset spot for lens flares. Options: -2 2 0 0.01
Override offset point
Enable/disable overriding of offset point for lens flares.
Available Options: false, true
Offset point
Set offset point for lens flares. Options: -2 2 0 0.01
Use new occl.system
Set new occlusion system for lens flares.
Available Options: no override, false, true
Use intens.occ.for all
Enable/disable intensity occlusion for all lens flares.
Available Options: no override, false, true
Ocean & Water
Shore
Shore enabled
Enable/disable shore rendering.
Available Options: true, false
Debug visualize
Show debug visualization of shore.
Available Options: disabled, waves, DF distance, DF direction, DF near, peaks tex, noise onShore, noise foam start, noise foam, damp wave, damp peak, damp depth, on shore coef, custom foam, mask
Debug displacement
Enable/disable shore displacement debugging.
Available Options: false, true
Debug height
Show shore height debug.
Available Options: none, final, shore, final+shore
Use height lerp
Enable/disable height lerp for shore.
Available Options: false, true
Force live preview each frame
Enable/disable forcing live preview for shore.
Available Options: false, true
WaterErase
Water erase enabled
Enable/disable water erase.
Available Options: true, false
Debug visualize
Show water erase debug visualization.
Available Options: disabled, front faces, back faces, front & back
Ocean render
Set ocean render mode.
Available Options: enabled, disable simulation, disabled
Show ocean tex
Display ocean texture.
Available Options: disable, height, displaceX, displaceZ, normal, foam, UW topdown, UW topdown depth, UW geom depth
Tex size
Set ocean debug texture size.
Available Options: 1, 2, 3, 4, 0.25, 0.33, 0.5
Water bodies
Show water bodies.
Available Options: invisible, camera, all
Ocean foam
Set ocean foam mode.
Available Options: enabled, mask, foam
Atmosphere
Show Sky LUTs
Enable/disable showing of sky LUTs.
Available Options: false, true
Show CameraVolume
Enable/disable showing of CameraVolume.
Available Options: false, true
FullScreen
Enable/disable fullscreen view for CameraVolume.
Available Options: false, true
Haze source
Set haze source for atmosphere.
Available Options: User(CloudsCycle), Atmosphere, GlobalProbe
Enable a.fog shadows
Enable/disable analytical fog shadows.
Available Options: false, true
Use SkyAmbient tex.
Enable/disable use of sky ambient texture.
Available Options: true, false
Probe fake
Set probe ambient for atmosphere.
Available Options: probe lut, sky lut, original
Overcast fix.
Set overcast fix mode for atmosphere.
Available Options: enabled, disabled
Original lighting
Set original lighting mode for atmosphere.
Available Options: enabled, disabled
Final output brightness mod.
Enable/disable final brightness modification for atmosphere.
Available Options: disabled, enabled
Show Fog Debug.
Enable/disable fog debugging visualization.
Available Options: disabled, enabled
Show constellations
Enable/disable rendering of constellations.
Available Options: false, true
Volumetric Clouds
Use New
Use the new volumetric cloud system.
Available Options: false, true
Render clouds
Enable/disable volumetric cloud rendering.
Available Options: enabled, disabled
Render Mode
Set volumetric cloud render mode.
Available Options: Quarter, Full, Experimental
Output Optimization
Set volumetric cloud output optimization.
Available Options: default, none, vertexShader, CPU
Show Output Optim Diag
Show output optimization diagnostic for clouds.
Available Options: false, true
Apply cycle values
Apply cycle values for clouds.
Available Options: true, false
Sky light mode
Set sky light mode for clouds.
Available Options: Default(Artistic), New(Probe+Atmo), Gray, PBR(OriginalTechnique)
Disable direct light
Disable direct light for clouds.
Available Options: false, true
Enable occlusion map
Enable/disable occlusion map for clouds.
Available Options: enabled, disabled
Disable wind
Enable/disable wind for clouds.
Available Options: false, true
Stop wind
Stop wind for clouds.
Available Options: false, true
Show cloud lighting
Show or hide cloud lighting visualization.
Available Options: disabled, enabled
Force noise recompute
Force recomputation of cloud noise.
Available Options: disabled, enabled
Show detail noise
Enable/disable detail noise visualization for clouds.
Available Options: disabled, enabled
Show noise tiling
Set noise tiling visualization for clouds.
Available Options: disabled, base, middle, detail, newBase_R, newBase_G, newBase_B, newBase_A, newDetail_R, newDetail_G, newDetail_B, newDetail_A
Show noise tiling
Set noise tiling visualization for clouds (base, middle, detail).
Available Options: disabled, base, middle, detail
Show height detail noise
Enable/disable height detail noise texture visualization.
Available Options: disabled, enabled
Detail noise resolution
Set resolution of detail noise for clouds.
Available Options: default, 16, 32, 64, 128, 256, 512
Weather map resolution
Set weather map resolution for clouds.
Available Options: default, 256, 512, 1024, 2048
Temporal multiplier
Set temporal multiplier for clouds.
Range Settings:
Min: 0
Max: 5
Current Value: 0.0
Step: 0.01
Max. Num. samples
Set max number of samples for clouds.
Range Settings:
Min: 0
Max: 256
Current Value: 0.0
Step: 1.0
HeightMin
Set minimum height for clouds.
Range Settings:
Min: 0
Max: 20000
Current Value: 0.0
Step: 10.0
Show shadowmap
Enable/disable showing of shadow map for clouds.
Available Options: disabled, enabled
Shadowmap resolution
Set shadow map resolution for clouds.
Range Settings:
Min: 0
Max: 256
Current Value: 0
Step: 1
Shadowmap dispatches p. frame
Set shadow map dispatches per frame for clouds.
Range Settings:
Min: 0
Max: 4
Current Value: 0
Step: 1
Debug shape
Set debug shape visualization for clouds.
Available Options: none, cylinders, spheres
haze value
Set haze value for clouds.
Range Settings:
Min: 0.0001
Max: 0.1
Current Value: 0.018
Step: 0.001
Enable dist. fog
Enable/disable distance fog for clouds.
Available Options: enabled, disabled
dist. fog range
Set distance fog range for clouds.
Range Settings:
Min: 0
Max: 400000
Current Value: 65000
Step: 1000
debug detail noise weights
Enable/disable main shape noise weights debug.
Available Options: false, true
disable noise(middle,micro)
Enable/disable noise (middle, micro) for clouds.
Available Options: false, true
offet X
Set offset X for clouds.
Range Settings:
Min: 0
Max: 1000000
Current Value: 0
Step: 10
offet Z
Set offset Z for clouds.
Range Settings:
Min: 0
Max: 1000000
Current Value: 0
Step: 10
No render
Disable rendering.
Available Options: false, true
Shape instancing
Enable/disable shape instancing.
Available Options: enabled, disabled
Render debug mode
Set render debug mode.
Hotkey: RCtrl + AltGr + W
Available Options: none, wire, wire only, ovedraw, overdrawZ, albedo, world norm, roughness, rough.scene, metalness, mask, ao, vert.color, sss, detail light, diffuse, iblDiffuse, reflection, iblReflection, full diffuse, full reflection, emissive, albedo lin, wetness, porosity, vertex norms, vfx, global layer
Widgets
Set widget rendering mode.
Available Options: on, onlyRT, off
Active GPU wait
Enable/disable active GPU wait.
Available Options: false, true
Allocator stats
Set allocator statistics display.
Available Options: none, show, dump
Show VRAM resources
Enable/disable showing of VRAM resources.
Available Options: false, true
Scene
Filter
MeshObject
Enable/disable MeshObject filter.
Available Options: enabled, disabled
Particle
Enable/disable Particle filter.
Available Options: enabled, disabled
Occluders
Occluders
Enable/disable occluders.
Available Options: true, false
Occlude entities
Enable/disable occluding of entities.
Available Options: true, false
Show active occluders
Show or hide active occluders.
Available Options: false, true
Show occluded
Show or hide occluded objects.
Available Options: false, true
Show occluder volumes
Show or hide occluder volumes.
Available Options: false, true
Terrain Occlusion
Terrain occlusion culling
Enable/disable terrain occlusion culling.
Available Options: true, false
Occlusion mode
Set terrain occlusion mode.
Available Options: Voxelization, Hybridvoxel
Cull dynamic objects
Enable/disable culling of dynamic objects.
Available Options: true, false
Cull individual objects
Enable/disable culling of individual objects.
Available Options: true, false
Cull entity lists
Enable/disable culling of entity lists.
Available Options: true, false
Cull kd-tree leafs
Enable/disable culling of kd-tree leafs.
Available Options: false, true
Cull terrain
Enable/disable culling of terrain.
Available Options: false, true
Cull kd-tree nodes
Enable/disable culling of kd-tree nodes.
Available Options: true, false
# voxel render jobs
Set number of voxel render jobs.
Range Settings:
- Min: 1
- Max: 8
- Current Value: 8
- Step: 1
Show depth texture
Enable/disable depth texture visualization.
Available Options: false, true
Show FOV deb shapes
Enable/disable showing of FOV debug shapes.
Available Options: false, true
Voxel height scale
Set voxel height scale.
Range Settings:
- Min: 0.25
- Max: 32
- Current Value: 1
- Step: 0.01
Voxel depth LOD step
Set voxel depth LOD step.
Range Settings:
- Min: 0.01
- Max: 10
- Current Value: 0.25
- Step: 0.01
Depth buffer fraction
Set depth buffer fraction.
Range Settings:
- Min: 1
- Max: 100
- Current Value: 16
- Step: 1
Voxel near plane
Set voxel near plane.
Range Settings:
- Min: 1
- Max: 100
- Current Value: 20
- Step: 1
Override far plane
Enable/disable overriding of far plane.
Available Options: false, true
Voxel far plane
Set voxel far plane.
Range Settings:
- Min: 1
- Max: 5000
- Current Value: 2000
- Step: 50
Show AAB of occluded
Show AAB of occluded objects.
Available Options: None, Occluded, Visible, All
Voxel occlusion check
Set voxel occlusion check method.
Available Options: Hi-Z, Full-Z raster
Rasterize AABB
Enable/disable rasterization of AABBs.
Available Options: false, true
Show rasterized AABB
Enable/disable showing of rasterized AABBs.
Available Options: false, true
Draw silhouette edges
Enable/disable drawing of silhouette edges.
Available Options: false, true
Cull beyond frustum edges
Enable/disable culling beyond frustum edges.
Available Options: false, true
# frames reuse voxel buffer
Set number of frames to reuse voxel buffer.
Range Settings:
- Min: 0
- Max: 60
- Current Value: 0
- Step: 1
Raster size threshold
Set raster size threshold.
Range Settings:
- Min: 0
- Max: 1024
- Current Value: 64
- Step: 2
Render world
Enable/disable world rendering.
Available Options: enabled, disabled
Force vertical FOV
Force vertical field of view.
Available Options: default, 65, 70, 75, 80, 85, 90, 95, 100, 105, 110, 120, 2.5f, 5, 10, 15, 20, 25, 30, 35, 40, 45, 50, 55
Render world env
Enable/disable rendering of world environment.
Available Options: enabled, disabled
Show clips
Show or hide scene clips.
Available Options: disabled, enabled
LOD multiplier
Set LOD multiplier.
Available Options: 1, 1.5, 2, 3, 4, 5, 10, 0.001, 0.01, 0.1, 0.25, 0.5
Size multiplier
Set size multiplier.
Available Options: 1, 1.5, 2, 3, 4, 5, 10, 0.001, 0.01, 0.1, 0.25, 0.5
Override object far plane
Set object far plane override.
Range Settings:
- Min: 0
- Max: 50000
- Current Value: 0
- Step: 100
Force clear visent
Force clear of visible entities.
Available Options: false, true
Render world ents
Enable/disable rendering of world entities.
Available Options: enabled, disabled
Render world leafs
Enable/disable rendering of world leafs.
Available Options: enabled, disabled
RenderEnts
Enable/disable entities rendering.
Available Options: enabled, disabled
Fast way
Enable/disable fast rendering path.
Available Options: false, true
Show light
Set global light to show. Options: -1 32 -1 1
Show active PPs
Show or hide active post processes.
Available Options: false, true
Cube map size
Set cubemap size.
Available Options: 32, 16, 32, 64, 128, 256, 512, 1024
Capture cube map
Capture cube map.
Available Options: no, capture, capture&insert
Override far plane
Set far plane override.
Range Settings:
- Min: 0
- Max: 50000
- Current Value: 0
- Step: 100
Force linear depth
Enable/disable forcing of linear depth.
Available Options: false, true
Linear depth
Set linear depth.
Range Settings:
- Min: 50
- Max: 5000
- Current Value: 250
- Step: 10
Visualize groups
Enable/disable group visualization.
Available Options: false, true
Colorize objects LODs
Colorize objects by LOD.
Available Options: disabled, colorize, LOD0 only, +LOD1, +LOD2, +LOD3, +LOD4, +LOD5, +LOD6, +LOD7
World
Animation
Enable/disable apply pose in animation.
Available Options: true, false
Streaming
Enable/disable world streaming.
Available Options: true, false
Trace stresstest
Set trace stress test mode.
Available Options: none, nearest, any, all, nearestVis, anyVis, allVis
Query stresstest
Enable/disable query stress test.
Available Options: disabled, enabled
Update stresstest
Enable/disable update stress test.
Available Options: disabled, enabled
Update MT stresstest
Enable/disable multithreaded update stress test.
Available Options: disabled, enabled
Show scene tree
Show scene tree.
Available Options: None, KDTree, QuadTree
Show entity bounds
Show or hide entity bounds.
Available Options: disabled, enabled
Async traces
Enable/disable asynchronous traces.
Available Options: enabled, disabled
Async queries
Enable/disable asynchronous queries.
Available Options: enabled, disabled
Use quadtree
Enable/disable quadtree usage.
Available Options: enabled, disabled
Show AABB
Show AABB.
Hotkey: Alt + NUM 5
Available Options: disabled, real, quantized, rendered
Show multileaf ents.
Show or hide multileaf entities.
Available Options: disabled, all, single, multi
Show active
Show or hide active entities.
Available Options: enabled, disabled
Show bones
Show or hide bones.
Available Options: disabled, enabled
Show wind emitters
Show or hide wind emitters.
Hotkey: Ctrl + NUM 8
Available Options: disabled, enabled
Disable wind
Disable wind.
Hotkey: Ctrl + NUM 9
Available Options: disabled, enabled
Game update
Enable/disable game update.
Available Options: enabled, disabled
MT entity sim
Enable/disable multithreaded entity simulation.
Available Options: enabled, disabled
MT entity update
Enable/disable multithreaded entity update.
Available Options: enabled, disabled
Entity diag
Enable/disable entity diagnostics.
Available Options: false, true
Entity hierarchy changes
Enable/disable entity hierarchy change diagnostics.
Available Options: false, true
Debug prefabs
Enable/disable debug prefabs.
Available Options: disabled, enabled
New skeleton
Enable/disable new skeleton.
Available Options: false, true
JobManager Callstack
Set JobManager callstack logging mode.
Available Options: off, ext, all
JobManager Print CS
Set JobManager print callstack mode.
Available Options: off, once, always
Ambient Life
Enable/disable ambient life.
Available Options: false, true
Animation
Enable debugger
Enable/disable animation debugger.
Available Options: disabled, enabled
Root motion always enabled
Enable/disable root motion always enabled.
Available Options: false, true
Force animation LOD
Set force animation LOD. Options: -1 4 -1 1
Show transforms before IK
Enable/disable showing of transforms before IK.
Available Options: false, true
Show transforms after IK
Enable/disable showing of transforms after IK.
Available Options: false, true
Show IK offsets
Enable/disable showing of IK offsets.
Available Options: false, true
Show IK solver details
Enable/disable showing of IK solver details.
Available Options: false, true
Show procedural solver details
Enable/disable showing of procedural solver details.
Available Options: false, true
Show cached MS transforms
Enable/disable showing of model space cache.
Available Options: false, true
Show RBF details
Enable/disable showing of RBF details.
Available Options: false, true
Record animations
Enable/disable animation recording.
Available Options: false, true
Record local player
Set animation recording entities mode.
Available Options: Only characters, All entities
Animation traffic
Enable/disable animation traffic logging.
Available Options: false, true
Min IK blend time
Set minimum IK blend time.
Range Settings:
- Min: 0.01
- Max: 1
- Current Value: 0.01
- Step: 0.01
Physics
Settings
Update rate
Set physics update rate.
Range Settings:
Min: 20
Max: 1000
Current Value: 60
Step: 10
Max fixed steps
Set maximum fixed steps for physics.
Range Settings:
Min: 1
Max: 60
Current Value: 10
Step: 1
Apply
Enable/disable physics settings apply.
Available Options: disabled, enabled
Bullet
Max. Collider Distance
Set maximum distance for Bullet collider.
Available Options: 0, 1, 2, 5, 10, 20, 50, 100, 200, 500
Draw Bullet shape
Enable/disable drawing of Bullet shape.
Available Options: enabled, disabled
Draw Bullet wireframe
Enable/disable drawing of Bullet shape wireframe.
Available Options: enabled, disabled
Draw Bullet shape AABB
Enable/disable drawing of Bullet shape AABB.
Available Options: disabled, enabled
Draw obj center of mass
Enable/disable drawing of object center of mass.
Available Options: disabled, enabled
Draw Bullet contacts
Enable/disable drawing of Bullet contacts.
Available Options: enabled, disabled
Force sleep Bullet
Enable/disable forcing of Bullet to sleep.
Available Options: disabled, enabled
Profile Bullet
Set threshold for Bullet profiling.
Available Options: disabled, >1ms, >5ms, >10ms, >20ms, >50ms
Bullet MT
Enable/disable multithreaded Bullet simulation.
Available Options: true, false
Dump contacts on server
Enable/disable server side physics contacts dump.
Available Options: false, true
Show bodies
Show or hide physics bodies. Visible colliders can be controlled with Show layer
Hotkey: Alt + NUM 6
Available Options: disabled, flat-mesh, transp-mesh, flat+mesh, transp+mesh
Show layer
Show physics bodies by layer. Example layers available:
- Filtered - default mode, shows all the most important layers, most of the time there is no need to switch away from it
- Fire geometry - "realistic" resolution colliders used for hit detection

- View geometry - used by AIs, acts as solid wall

- Foliage - used by AIs, slows down detection time (tree crowns, bushes)

- Interaction layer - used by UserAction together with fire geometry, when fire geometry is not enough for pleasant user action experience (used on stuff like wire fence doors)


- Mine layer - mines and objects that are meant to collide with mines, such as wheels of vehicles

- Char collider - used for collision between character and terrain

- Vehicle simple - used for collision between body of the car and non-characters

Available Options: See Collision Layer page for all options
Show collider type
Show physics bodies by collider type. See collider shape pargraph on FBX Import page
Available Options: all, sphere, box, capsule, cylinder, convex, trimesh
Show simulation state
Show physics bodies by simulation state.
Available Options: col+sim, none, collision, simulation, all
Show body type
Show physics bodies by body type.
Available Options: all, static, dynamic, kinematic
Color by
Set physics bodies color mode.
Available Options: collider type, activation state, body type, by entity
Show COM
Show or hide physics center of mass.
Available Options: false, true
Simulation
Enable/disable physics simulation.
Hotkey: Ctrl + NUM 7
Available Options: enabled, disabled
Dump non-static bodies
Enable/disable dumping of non-static physics bodies.
Available Options: disabled, enabled
Dump contacts
Enable/disable dumping of physics contacts.
Available Options: false, true
Show stats
Set physics statistics display mode.
Available Options: disabled, basic, detailed, all
Show Bullet
Enable/disable showing of Bullet physics debug.
Available Options: disabled, enabled
Scripts
Show interior bounding box
Show or hide interior bounding box.
Available Options: false, true
Show helper trace
Show or hide physics helper trace.
Available Options: false, true
Game
Weather
Force weather update (WB edit mode)
Enable/disable forcing of weather update.
Available Options: false, true
Debug time
Enable/disable weather debug time.
Available Options: disabled, enabled
time
Set weather debug time.
Range Settings:
Min: 0
Max: 1
Current Value: 0.0
Step: 0.0001
Show diag.
Show or hide weather diagnostics.
Available Options: false, true
Show diag. values
Show or hide weather diagnostic values.
Available Options: false, true
Override wet speeds
Enable/disable overriding wetness speeds.
Available Options: false, true
- Wetting speed
Set current wetting speed.
Range Settings:
- Min: 0
- Max: 100
- Current Value: 1.0
- Step: 0.1
- Drying speed
Set current drying speed.
Range Settings:
- Min: 0
- Max: 100
- Current Value: 1.0
- Step: 0.1
Override states
Enable/disable overriding weather states.
Available Options: false, true
- State source
Set current weather state source.
Range Settings:
- Min: 0
- Max: 10
- Current Value: 0
- Step: 1
- State destination
Set current weather state destination.
Range Settings:
- Min: 0
- Max: 10
- Current Value: 0
- Step: 1
Override variants
Enable/disable overriding weather variants.
Available Options: false, true
- Variant source
Set current weather variant source.
Range Settings:
- Min: 0
- Max: 10
- Current Value: 0
- Step: 1
- Variant destination
Set current weather variant destination.
Range Settings:
- Min: 0
- Max: 10
- Current Value: 0
- Step: 1
Dialogue
Demo
Enable/disable dialogue demo mode.
Available Options: false, true
Superscreenshot to file
Save super screenshot to file.
Hotkey: Ctrl + ⇧ Shift + F7
Available Options: false, true
Screenshot to clipboard
Save screenshot to clipboard.
Hotkey: ⇧ Shift + F7
Available Options: false, true
Screenshot to file
Save screenshot to file.
Hotkey: Ctrl + F7
Available Options: false, true
Deployable SpawnPoints
Show Exclusion Zones
Show or hide deployable spawn points exclusion zones.
Available Options: false, true
Voting
Enable All Vote Types
Enable/disable all vote types.
Available Options: false, true
Show bounds overlap target info
Show or hide bounds overlap target info.
Available Options: false, true
Show cursor target info
Show or hide cursor target info containing information about prefab you are looking at and its full path to find it in the Workbench

Available Options: false, true
Copy view link
Create World Editor view link using hotkey (lctrl+lshift+l).
Hotkey: Ctrl + ⇧ Shift + L
Available Options: false, true
Sounds
Audio Debug Context
Template Debug Context
Select audio debug context.
Available Options:
Signal info
Enable/disable showing of signal info.
Available Options: false, true
Samples
Enable/disable showing of audio samples.
Available Options: false, true
VON
Play recorder VON
Enable/disable playing of recorded VON.
Available Options: false, true
Replace VON with 440Hz
Enable/disable replacement of VON with 440Hz tone.
Available Options: false, true
Bypass loudness
Enable/disable loudness bypass for VON.
Available Options: false, true
Log starving
Enable/disable logging of VON starving.
Available Options: false, true
Sound World
Sound map
Set sound map type.
Available Options: none, terrain, water
Sound map range
Set sound map range.
Range Settings:
Min: 25
Max: 250
Current Value: 50
Step: 25
Sound map create
Set sound map creation mode.
Available Options: none, create, create+save
Sound Geometry
Sound Geometry Map
Shadowed
Enable/disable showing of shadowed areas.
Available Options: false, true
Visible
Enable/disable showing of visible areas.
Available Options: false, true
Obstacle
Enable/disable showing of obstacles.
Available Options: false, true
Edge
Enable/disable showing of edges.
Available Options: false, true
Diffract
Enable/disable showing of diffraction.
Available Options: false, true
Tile Type
Set tile type display for sound geometry.
Available Options: Square, Value
Sample Visibility
Enable/disable showing of sound sample visibility.
Available Options: false, true
Set Sample Pos
Enable/disable setting of sound sample position.
Available Options: false, true
Enable Diag
Enable/disable sound geometry diagnostics.
Available Options: disabled, enabled
System Info
Enable/disable showing of sound geometry system info.
Available Options: disabled, enabled
Interior Cache Info
Enable/disable showing of sound geometry interior cache info.
Available Options: disabled, enabled
Show Update Range
Enable/disable showing of sound geometry update range.
Available Options: disabled, enabled
Object Info
Enable/disable showing of sound geometry object info.
Available Options: disabled, enabled
Show Building Portals
Show building portals.
Available Options: none, all, single, per area, active
Show Buildings Rect
Show or hide buildings rectangles.
Available Options: disabled, enabled
Hide Building Mesh
Hide building mesh.
Available Options: disabled, enabled
Obstruction Pos
Enable/disable obstruction position debug.
Available Options: disabled, enabled
Freeze Positions
Enable/disable freezing of positions for sound geometry.
Available Options: disabled, enabled
Interior Handler
InteriorHandler
Select interior handler debug.
Available Options:
Old interior detection
Enable/disable old interior detection.
Available Options: false, true
Enable Debug
Enable/disable interior handler debug.
Available Options: false, true
Queries
Enable/disable interior queries debug.
Available Options: false, true
SoundMap
SoundMap
Select sound map debug.
Available Options:
Show values
Enable/disable showing of sound map values.
Available Options: false, true
Draw Regions
Enable/disable drawing of sound map regions.
Available Options: false, true
Layer to draw
Select sound map layer to draw.
Available Options: Terrain, Coast, Freshwater
Show memory allocated
Enable/disable showing of sound map memory allocated.
Available Options: false, true
Force generation
Enable/disable forcing of sound map generation.
Available Options: false, true
Force default SoundMap
Enable/disable forcing of default sound map.
Available Options: false, true
Chimera Sounds
Signals Debug
Enable/disable chimera sound signals debug.
Available Options: false, true
Signals Debug by Entity
Enable/disable chimera sound signals debug by entity.
Available Options: false, true
Ambients
Set ambients debug mode.
Available Options: None, River, Coast, Lake
Freeze cam position
Enable/disable freezing of camera position for ambients debug.
Available Options: false, true
Debug Com.Sound
Enable/disable communication sound debug.
Available Options: false, true
MM - debug info
Enable/disable music manager debug info.
Available Options: false, true
Debug RadioBroadcast
Enable/disable radio broadcast debug.
Available Options: false, true
Show invalid event
Enable/disable showing of invalid sound events.
Available Options: false, true
Show system info
Set sound system info display.
Available Options: none, generic, cmds, alloc
Resources
Set sound resources display.
Available Options: none, all, events
Show categories
Enable/disable showing of sound categories.
Available Options: false, true
Show sounds
Enable/disable showing of playing sounds.
Available Options: false, true
Show sounds 3D
Set 3D sound visualization.
Available Options: none, all, waiting, playing, fading
Log source info
Enable/disable logging of sound source info.
Available Options: false, true
Com debug
Enable/disable communication debug.
Available Options: false, true
Enable ITD
Enable/disable ITD.
Available Options: true, false
Play recorded VON
Enable/disable playing of recorded VON.
Available Options: false, true
Print Melee Surface
Enable/disable printing of melee surface.
Available Options: false, true
Reload AmbientSounds Conf
Enable/disable reloading of ambient sound configurations.
Available Options: false, true
Random Ambient Sounds
Enable/disable random positional ambient sounds.
Available Options: false, true
Show MPD Impulse Values
Enable/disable showing of MPD impulse values.
Available Options: false, true
Sound Manager
Enable/disable sound manager debug.
Available Options: false, true
Global Variables
Enable/disable sound global variables debug.
Available Options: false, true
Particles
Disable particle render
Enable/disable particle rendering.
Available Options: false, true
Disable particle update
Enable/disable particle update.
Available Options: false, true
Show particle FX LOD
Enable/disable showing of particle FX LOD.
Available Options: disabled, enabled
Show 3D rotation spaces
Set scale for showing of particle rotation spaces.
Available Options: off, 0.5, 1.0, 1.5, 2.0, 2.5, 3.0, 3.5, 4.0
Overdraw optimization
Set overdraw optimization mode.
Available Options: off, overhead (prerender), overhead (complete), on
Render
Set particle render mode.
Available Options: full, background only, no background
Depth write mode
Set particle depth write mode.
Available Options: full-screen tri, particle draw
Prerender mask
Set particle prerender mask mode.
Available Options: on, off, overhead
Copy from main RT
Enable/disable copying frommain render target.
Available Options: enabled, disabled
Show internal texture
Show particle internal texture.
Available Options: none, depth ranges, alpha pre, alpha full
Show Particle Contacts
Enable/disable showing of particle contacts.
Available Options: false, true
Input
Sink Input
Enable/disable sink input.
Available Options: false, true
Debug Contexts
Set input context debug mode.
Available Options: disabled, active, all
Show Cursor
Enable/disable showing of input cursor.
Available Options: false, true
UI
Disable Loc
Enable/disable localization.
Available Options: false, true
Show UI Diag
Enable/disable UI diagnostics.
Available Options: false, true
Log Construction
Enable/disable logging of UI construction.
Available Options: false, true
refactored
Override config
Override radial menu config.
Available Options: true")", false, true
Close on open
Close radial menu on open.
Available Options: true")", false, true
Perform on close
Perform action on radial menu close.
Available Options: true")", false, true
Close on perform
Close radial menu on perform.
Available Options: true")", false, true
Delect in center
Deselect radial menu in center.
Available Options: true")", false, true
Large size
Use large size for radial menu.
Available Options: true")", false, true
Override size
Override radial menu custom size.
Available Options: true")", false, true
Sustom size
Set custom radial menu size.
Range Settings:
Min: 100
Max: 1000
Current Value: 100
Step: 1
Entries setup
Enable/disable custom entry count for radial menu.
Available Options: true")", false, true
Entries
Set custom entry count for radial menu.
Range Settings:
Min: 2
Max: 32
Current Value: 2
Step: 1
Close All Menus
Close all menus.
Available Options: false, true
Open Main Menu
Open main menu.
Available Options: false, true
Log widgets under cursor
Enable/disable logging of widgets under cursor.
Available Options: false, true
Ignore hint persistency
Enable/disable ignoring of hint persistency.
Available Options: false, true
Enable/disable map debug menu.
Available Options: false, true
Show all settings
Enable/disable showing of all UI settings.
Available Options: false, true
AI
Performance
Show IsAIActivated
Enable/disable showing of IsAIActivated flag.
Available Options: false, true
AILib counters
Enable/disable AI library counters.
Available Options: false, true
Load balancing
Enable/disable AI load balancing.
Available Options: true, false
Forced AI simulation LOD
Set forced AI simulation LOD.
Range Settings:
Min: -1
Max: 10
Current Value: -1
Step: 1
BT holder
Enable/disable BT holder debug.
Available Options: false, true
AI Limits
Enable/disable AI limits debug.
Available Options: false, true
Enable/disable showing of NavMesh.
Available Options: false, true
Enable/disable generation of NavMesh without navlinks.
Available Options: true, false
Show links between polygons
Enable/disable showing of links between polygons.
Available Options: false, true
Enable/disable Navlinks validation.
Available Options: false, true
Enable/disable showing of Navlink active direction.
Available Options: false, true
Set Navmesh project index to show.
Range Settings:
- Min: 0
- Max: 1000
- Current Value: 0
- Step: 1
Ignore area costs
Enable/disable ignoring of area costs for pathfinding.
Available Options: false, true
Path smoothing (on/off)
Set path smoothing mode.
Available Options: default, on, off
Movement
Path
Enable/disable path debug.
Available Options: false, true
Path index
Enable/disable showing of current path index.
Available Options: false, true
Obstacle Avoidance diag
Enable/disable obstacle avoidance debug.
Available Options: false, true
Enable/disable showing of current Navlink.
Available Options: false, true
Request parameters
Enable/disable showing of request parameters.
Available Options: false, true
Movement parameters
Enable/disable showing of movement parameters.
Available Options: false, true
Request Target
Enable/disable showing of request target.
Available Options: false, true
Movement Target
Enable/disable showing of movement target.
Available Options: false, true
Orientation Target
Enable/disable showing of orientation target.
Available Options: false, true
Formation offsets
Set formation offsets debug mode.
Available Options: off, projected, default, both
Formation Center
Enable/disable showing of formation center.
Available Options: false, true
Move Handlers
Enable/disable showing of move handlers.
Available Options: false, true
Stuck Teleport
Enable/disable teleport if stuck.
Available Options: false, true
Enable/disable teleport if out of NavMesh.
Available Options: false, true
Memory
Enable/disable showing of movement memory.
Available Options: false, true
Pathfinding
Debug of AStar
Enable/disable AStar debug.
Available Options: false, true
Make a step of AStar
Step AStar pathfinding.
Hotkey: Ctrl + Alt + V
Available Options: false, true
Pathfinding component
Enable/disable pathfinding component debug.
Available Options: false, true
Road network
Set road network debug mode.
Hotkey: Ctrl + Alt + N
Available Options: off, active, roads, children, bridges, offRoad, links, all
Show Road Width
Enable/disable showing of road widths.
Hotkey: Ctrl + Alt + W
Available Options: false, true
Road network component
Set road network component debug.
Range Settings:
Min: -1
Max: 300
Current Value: -1
Step: 1
Road Id
Enable/disable showing of road IDs.
Hotkey: Ctrl + Alt + I
Available Options: false, true
RoadPart Min Max Id
Enable/disable showing of road part min max ids.
Available Options: false, true
Pathfinding errors
Enable/disable reporting of pathfinding errors.
Available Options: false, true
Link on bridge Id
Set link on bridge ID.
Range Settings:
Min: 0
Max: 1000
Current Value: 0
Step: 1
Aiming
Aiming component
Enable/disable aiming component debug.
Available Options: false, true
Aiming component PID
Enable/disable aiming component PID debug.
Available Options: false, true
Head aiming component
Enable/disable head aiming component debug.
Available Options: false, true
Use aim at version of ai aiming
Enable/disable usage of aim at version of AI aiming.
Available Options: false, true
Show target aimpoint
Show or hide target aimpoint.
Available Options: false, true
Show target projected size
Show or hide projected target size.
Available Options: false, true
Enabled
Enable/disable AI navigator debug.
Available Options: false, true
Previous agent
Select previous AI navigator agent.
Hotkey: RCtrl + RShift ⇧ + 9
Available Options: false, true
Next agent
Select next AI navigator agent.
Hotkey: RCtrl + RShift ⇧ + 0
Available Options: false, true
Driving
Show character detection
Enable/disable character detection debug.
Available Options: false, true
Vehicle driving diag
Enable/disable vehicle driving diagnostics.
Available Options: false, true
AI Forbid Reversing
Enable/disable AI reversing.
Available Options: false, true
AI No Steer Adjustments
Enable/disable AI steering adjustments.
Available Options: false, true
Curve Circumference
Enable/disable curve circumference debug.
Available Options: false, true
PID Display
Enable/disable PID debug.
Available Options: false, true
Show avoidance
Enable/disable vehicle avoidance debug.
Available Options: false, true
Perception
Perception targets
Enable/disable perception targets debug.
Available Options: false, true
Perception sensors eyes
Enable/disable perception sensors eyes debug.
Available Options: false, true
Perception sensors ears
Enable/disable perception sensors ears debug.
Available Options: false, true
Perception recognition
Enable/disable perception recognition factors debug.
Available Options: false, true
Cached perceiveble positions
Enable/disable showing of cached perceived positions.
Available Options: false, true
Animals
Show animals debug info
Enable/disable animals debug.
Available Options: false, true
Manager to debug
Select animal manager to debug.
Available Options: None, Birds
Show current Animal positions
Enable/disable showing of current animal positions.
Available Options: false, true
Draw tile boundaries
Enable/disable drawing of animal tile boundaries.
Available Options: false, true
Draw Animal despawn range
Enable/disable drawing of animal despawn range.
Available Options: false, true
Draw Animal to Animal minimum spawn range
Enable/disable drawing of animal to animal minimum spawn range.
Available Options: false, true
Turn correction debug
Enable/disable turn correction debug.
Available Options: false, true
POV Pathfinder
Extend of querry box
Set extend of query box.
Range Settings:
Min: 1
Max: 20
Current Value: 10
Step: 1
Number of iterations
Set number of iterations.
Range Settings:
Min: 1
Max: 10
Current Value: 5
Step: 1
Fail on hitting origin
Enable/disable pathfinding failure on hitting origin.
Available Options: false, true
Set start position
Set pathfinder start position.
Hotkey: Ctrl + Alt + NUM 0
Available Options: false, true
Set end position
Set pathfinder end position.
Hotkey: Ctrl + Alt + NUM 1
Available Options: false, true
Run pathfinder
Run pathfinder.
Hotkey: Ctrl + Alt + NUM 3
Available Options: false, true
Generate Graph
Generate pathfinder graph.
Hotkey: Ctrl + Alt + NUM 2
Available Options: false, true
Show Cover Query
Enable/disable showing of cover query.
Available Options: false, true
Disable AI damage
Set AI damage mode.
Available Options: Cheat disabled, Force invulnerable, Force vulnerable
Disable AI actions
Enable/disable AI action processing.
Hotkey: Ctrl + Alt + F9
Available Options: false, true
Smart actions usage
Enable/disable smart actions debug.
Available Options: false, true
Group members
Enable/disable showing of AI group members.
Available Options: false, true
Waypoints
Set waypoint visualization.
Available Options: off, cylinder, sphere
AI Units
Enable/disable AI units debug.
Available Options: false, true
Messages
Enable/disable AI messages debug.
Available Options: false, true
Show target AI context
Enable/disable showing of target AI context.
Available Options: false, true
AIScript
AI Debug Category
Set AI debug category.
Available Options: MISSING CATALOGS!
Set BT Breakpoint
Enable/disable BT breakpoint.
Available Options: false, true
Print debug from BTs
Enable/disable printing of debug from BTs.
Available Options: false, true
Print init of groups
Enable/disable printing of group init info.
Available Options: false, true
Show fireteams
Enable/disable showing of fireteams.
Available Options: false, true
Show subgroups
Enable/disable showing of subgroups.
Available Options: false, true
Show target clusters
Enable/disable showing of target clusters.
Available Options: false, true
Print stats for aiming
Enable/disable printing of aiming statistics.
Available Options: false, true
Print new activity
Enable/disable printing of new AI activity.
Available Options: false, true
Show debug shapes from BTs
Enable/disable showing of debug shapes from BTs.
Available Options: false, true
Show fiendly in aim
Enable/disable showing of friendly units in aim.
Available Options: false, true
Show target last seen
Enable/disable showing of target last seen position.
Available Options: false, true
Select fixed AIAgent
Enable/disable selection of fixed AI agent.
Available Options: false, true
Debug cover search
Enable/disable cover search debug.
Available Options: false, true
Show Comms Handlers
Enable/disable showing of comms handlers.
Available Options: false, true
Show perception panel
Enable/disable showing of perception panel.
Available Options: false, true
Show grenade positions
Enable/disable showing of grenade positions.
Available Options: false, true
Show suppression debug
Enable/disable showing of suppression debug.
Available Options: false, true
Show illum flares positions
Enable/disable showing of illum flares positions.
Available Options: false, true
Show aim leading debug
Enable/disable showing of aim leading debug.
Available Options: false, true
Show sector threat filter
Enable/disable showing of sector threat filter.
Available Options: false, true
Show search and destroy points of interest
Enable/disable showing of search and destroy points of interest.
Available Options: false, true
Show Send Message Menu
Enable/disable showing of send message menu.
Available Options: false, true
Open Debug Panel
Enable/disable opening of AI debug panel.
Available Options: false, true
Show Grenade Trace
Enable/disable showing of grenade trace.
Available Options: false, true
Systems
DynSim Distance Diag
Enable/disable Dynamic Simulation distance diagnostics.
Available Options: false, true
DynSim Visibility Diag
Enable/disable Dynamic Simulation visibility diagnostics.
Available Options: false, true
ProcAnim Registration Diag
Enable/disable procedural animation registration diagnostics.
Available Options: false, true
HandleControls Registration Diag
Enable/disable handle controls registration diagnostics.
Available Options: false, true
NwkMovement Registration Diag
Enable/disable network movement registration diagnostics.
Available Options: false, true
Sound Registration Diag
Enable/disable sound registration diagnostics.
Available Options: false, true
Backend Diag
Enable/disable backend diagnostics.
Available Options: false, true
AnimKeyFrame Fake Time
Set animation keyframe fake time.
Range Settings:
Min: 0
Max: 1.0
Current Value: 0.0
Step: 0.05
Systems diag
Set systems diagnostics display.
Available Options: none, basic, full
Show diag system stats
Enable/disable showing of system statistics.
Available Options: false, true
Platform
PlayStation Network matches
Show match status
Enable/disable showing of match status.
Available Options: false, true
Create dummy match
Enable/disable creation of dummy match.
Available Options: false, true
Start match
Enable/disable start of match.
Available Options: false, true
Cancel match
Enable/disable cancelation of match.
Available Options: false, true
Finish match (submit result)
Enable/disable finishing of match (submit result).
Available Options: false, true
*Join match (dummy player)
Enable/disable joining of match (dummy player).
Available Options: false, true
*Leave match (dummy player)
Enable/disable leaving of match (dummy player).
Available Options: false, true
Add player via update (dummy player)
Enable/disable adding of player via update (dummy player).
Available Options: false, true
Pick user
Enable/disable picking of user.
Available Options: false, true
Simulate Sign-out
Simulate user sign out.
Available Options: false, true
Obtain save data
Obtain save data.
Available Options: false, true
Commit save data
Commit save data.
Available Options: false, true
Open URL
Open URL in browser.
Available Options: false, true
Change user name
Change user name.
Available Options: false, true
Show local player profile
Show local player profile.
Available Options: false, true
Request & log privileges
Request and log privileges.
Available Options: false, true
Revoke privilege: Text comm
Revoke text communication privilege.
Available Options: false, true
Revoke privilege: Voice comm
Revoke voice communication privilege.
Available Options: false, true
Revoke privilege: Multiplayer
Revoke multiplayer privilege.
Available Options: false, true
Revoke privilege: Lobby
Revoke lobby privilege.
Available Options: false, true
Revoke privilege: UGC
Revoke UGC privilege.
Available Options: false, true
Revoke shared sessions privilege.
Available Options: false, true
Revoke privilege: Social network sharing
Revoke social network sharing privilege.
Available Options: false, true
Accept dummy invitation
Accept dummy invitation.
Available Options: false, true
Invite using platform GUI
Invite using platform GUI.
Available Options: false, true
Log list of achievements
Log list of achievements.
Available Options: false, true
Serialization
Enable log reports
Enable/disable serialization log reports.
Available Options: none, errors, all
Manual Camera
Enable/disable manual camera debug menu.
Available Options: false, true
Control player
Enable/disable control player using manual camera. Option is only available when Debug Manual Camera is enabled
Available Options: false, true
Speed boost up debug
Enable/disable manual camera speed boost debug.
Available Options: false, true
Paste view link
Paste view link using hotkey (lshift+lalt+l).
Hotkey: ⇧ Shift + Alt + L
Available Options: false, true
Unlimited Movement
Enable/disable unlimited manual camera movement.
Available Options: false, true
Editor
Is Opened
Enable/disable editor opened flag debug.
Available Options: false, true
Can Open
Enable/disable editor can open flag debug.
Available Options: false, true
Can Close
Enable/disable editor can close flag debug.
Available Options: false, true
Show Debug
Enable/disable editor debug.
Available Options: false, true
Force Limited
Enable/disable forcing of limited editor.
Available Options: false, true
Log Async Load
Enable/disable logging of async loading for editor.
Available Options: false, true
Show Screenshot
Enable/disable showing of screenshot for editor.
Available Options: false, true
Simulated Network Delay
Set simulated network delay.
Range Settings:
- Min: 0
- Max: 1000
- Current Value: 0
- Step: 100
GameMode
Game Mode
Enable/disable showing of game mode debug.
Available Options: false, true
Show kill log
Enable/disable showing of kill log.
Available Options: false, true
Respawn Component
Enable/disable respawn component debug.
Available Options: false, true
Respawn Time Measures
Enable/disable respawn time measurement debug.
Available Options: false, true
Respawn Timer
Enable/disable respawn timer component debug.
Available Options: false, true
Scoring System
Enable/disable showing of scoring system debug.
Available Options: false, true
Player Factions
Enable/disable showing of player factions debug.
Available Options: false, true
Player Loadouts
Enable/disable showing of player loadouts debug.
Available Options: false, true
Conflict
Instant composition spawning
Enable/disable instant composition spawning.
Available Options: false, true
Promotion
Promotes player to higher rank.
Available Options: false, true
Demotion
Demotes player to higher rank.
Available Options: false, true
Singleplayer
Disable Game Over
Enable/disable game over.
Available Options: false, true
Tutorial
Course locations
OBSTACLE COURSE
Enable obstacle course location.
Available Options: false, true
FIRING RANGE
Enable firing range location.
Available Options: false, true
COMBAT ENGINEERING
Enable combat engineering location.
Available Options: false, true
SEIZING
Enable seizing location.
Available Options: false, true
FIRST AID
Enable first aid location.
Available Options: false, true
DRIVING
Enable driving location.
Available Options: false, true
NAVIGATION
Enable navigation location.
Available Options: false, true
HELICOPTER PILOTING
Enable helicopter piloting location.
Available Options: false, true
SPECIAL WEAPONS
Enable special weapons location.
Available Options: false, true
LONG-DISTANCE SHOOTING
Enable long range shooting location.
Available Options: false, true
FIRE SUPPORT COURSE
Enable fire support course location.
Available Options: false, true
SQUAD LEADERSHIP
Enable squad leadership location.
Available Options: false, true
VEHICLE MAINTENANCE
Enable vehicle maintenance location.
Available Options: false, true
Disable course reqs
Enable/disable tutorial course requirements.
Available Options: false, true
Skip intro sequence
Enable/disable skip intro sequence.
Available Options: false, true
Regenerate course tasks
Enable/disable regeneration of course tasks.
Available Options: false, true
Skip AI Driving
Enable/disable skipping AI driving.
Available Options: false, true
Finish current stage
Enable/disable finishing of current stage.
Available Options: false, true
Move to waypoint
Enable/disable moving to waypoint.
Available Options: false, true
Set evening time
Enable/disable setting evening time.
Available Options: false, true
Dump stages into log
Enable/disable dumping of stages into log.
Available Options: false, true
Finish all courses
Enable/disable finishing of all courses.
Available Options: false, true
Draw Area Restrictions
Enable/disable drawing of area restrictions.
Available Options: false, true
ScenarioFramework
Tasks
Enable/disable scenario framework tasks debug.
Available Options: false, true
Registered Areas
Enable/disable scenario framework registered areas debug.
Available Options: false, true
Debug Areas
Enable/disable scenario framework debug areas.
Available Options: false, true
Layer Inspector
Enable/disable scenario framework layer inspector.
Available Options: false, true
Action Inspector
Enable/disable scenario framework action inspector.
Available Options: false, true
Logic Inspector
Enable/disable scenario framework logic inspector.
Available Options: false, true
Plugin Inspector
Enable/disable scenario framework plugin inspector.
Available Options: false, true
Condition Inspector
Enable/disable scenario framework condition inspector.
Available Options: false, true
Tasks
Execute tasks
Enable/disable execution of tasks.
Available Options: true, false
Print all tasks
Enable/disable printing of all tasks.
Available Options: false, true
Radial Menu
Enable diagnostics
Enable/disable radial menu diagnostics.
Available Options: false, true
Enable logging
Enable/disable radial menu logging.
Available Options: false, true
- 1 Modding
- 2 GameCode
- 3 Cheats
- 4 ECS
- 5 Character
- 6 Vehicles
- 7 Statistics
- 8 Render
- 9 Scene
- 10 World
- 11 Animation
- 12 Physics
- 13 Game
- 14 Sounds
- 15 Particles
- 16 System
- 17 Input
- 18 UI
- 19 AI
- 20 Systems
- 21 Platform
- 22 Serialization
- 23 Manual Camera
- 24 Editor
- 25 GameMode
- 26 Conflict
- 27 Singleplayer
- 28 Tutorial
- 29 ScenarioFramework
- 30 Tasks
- 31 Radial Menu