Animation Editor – Arma Reforger
Lou Montana (talk | contribs) m (Some wiki formatting) |
Lou Montana (talk | contribs) m (Text replacement - "Arma Reforger:Animation Editor: Vehicles Actions Commands" to "Arma Reforger:Animation Editor: Vehicle Action Commands") |
||
| Line 205: | Line 205: | ||
'''2''': When the '''Graph''' is running, you can trigger the conditions to provoke certain animations to play. | '''2''': When the '''Graph''' is running, you can trigger the conditions to provoke certain animations to play. | ||
Here you can find a list of the conditions used in {{armaR}}: {{Link|Arma Reforger:Animation Editor: Human Variables}} and {{Link|Arma Reforger:Animation Editor: | Here you can find a list of the conditions used in {{armaR}}: {{Link|Arma Reforger:Animation Editor: Human Variables}} and {{Link|Arma Reforger:Animation Editor: Vehicle Action Commands}}. | ||
Revision as of 14:58, 2 December 2024
The Animation Editor is used to connect the animations in the game in a logical way using a node-based graph, using files called Workspaces.

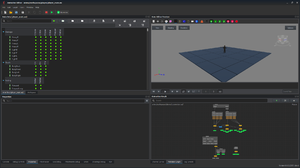
Each tab can be docked/undocked anywhere, or remain floating. the Layout is entirely customizable.
- 1. Toolbar
- 2. Anim Editor Preview
- 3. Workspace / Anim Set
- 4. Animation Graph / Log Console
- 5. Controls / Debug Controls / File Browser / Properties / Live Debug / Attachments Debug / Errors
Toolbar
- File: perform actions such as load/save Workspace, create new Workspace...
- Edit: perform copy, paste and cut actions.
- Graph:
- View: open or close any window
- Play: play the Animation Graph from the default node. If no default node is setup, nothing will play.
- Checks: verify Source Sync and display all Tags used in the current Workspace
- Tools: reload animation files, rebinarise TXA files and perform a stress test
Top Bar
From left to right:
- create new workspace (Ctrl + N)
- open workspace (Ctrl + O)
- save workspace (Ctrl + S)
- save changes in animation files but not in workspace
- cut selection (Ctrl + X)
- copy selection (Ctrl + C)
- paste (Ctrl + V)
- stop animation playing
- play default node
- error button - shows if there are any errors, and opens the Errors window when clicked on
Anim Editor Preview
The Anim Preview Window is where you will see the model moving according to which animation is playing, in real time or not. Also used to preview a specific animation clip alone, when selection from the Anim Set directly.
The camera can be rotated around the center by pressing left mouse button in the viewport and dragging.
The camera can be rotated around its own axis be pressing right mouse button in the viewport and dragging.
The camera can be moved by pressing middle mouse button in the viewport and dragging.
The timeline can be scrolled through by pressing left mouse button on the cursors on the timeline and dragging left or right.
Top Bar
From left to right:
- show/hide the floor grid
- move (Inverted Kinematics)
- rotate (Inverted Kinematics)
- show/hide the Evaluation Information (the window must have focus for it to display evaluation information)
- show/hide colliders
- show/hide IK targets
- show/hide all bones
- show/hide specific bones from a hierarchical list containing all bones
- select an animation from folder, that will be used as a base to play an Additive Animation on top
- set the field of view for the preview camera
- select which animation LOD is played 0 being least detailed and 3 most detailed
- switch between first person and third person animation (feature not working)
Viewport
Buttons
- View: choose the camera view (perspective, front, left ect...)
- Shading: choose the lighting and shading type used in the viewport
- Overlays: manage overlays such as wireframe
- Options: access preview option (mostly useless in the context of the animation editor)
Display
- Evaluation Information displays: animation file name, current time, active event, active tag and amount of bones being animated
- Timeline: timeline with cursor showing current frame - can be scrolled/clicked through.
- Timeline Controls:

- First Frame
- Step Backward
- Play / Pause
- Step Forward
- Last Frame
- Loop Animation: should the animation restart when ending
- Show Motion Options:
- Move Ground: moves the entity and places the ground back when the entity has moved away
- Move And Rotate Ground: keeps the camera relative to the entity
- Move Entity: moves the entity, does not place the ground back
- Move Entity, Reset Movement Each Loop: moves the entity but resets its position every time the animation plays
- Inplace: does not move nor rotate the entity
- Playback Speed: speed at which the animation is played
- Current Frame: the current frame number
- Frame Count: the total frame count
- Snap Cursor to Keyframe: if selected, the timeline cursor can slide between the frames, using interpolation
Workspace
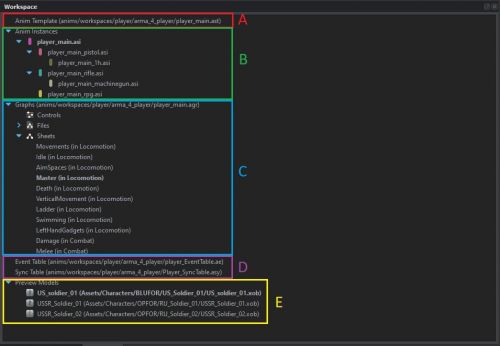
This window is used to create all the files necessary for a workspace to work, as well as selecting Animation Instance, or Sheet. Right-click on any category to create a new one of it (right-click on instances to create a new instance for example)
- A: animation template file, contains the list of animation slots by categories, that is edited from the Anim Set window
- B: animation instances. each one represents a unique set of animations, that are used to fill the same template. multiple instances allows for multiple sets of animations that will use the same logic (for example rifle locomotion animations and pistol locomotion animations)
- C: Sheets. each sheet is a "page" containing logic nodes, visible from the Graph Window. Technically it is not necessary to have more than one, however as the graph grows bigger, it is better to separate into in different sheets, to stay organised.
- D: Sync table, contains the different Sync events that are going to be used throughout the graph.
- E: preview models: models that you are going to use to preview animations on. It can be character, weapon, vehicle...
Anim Set
The Anim Set is a table containing groups, each groups has columns and lines. you can then assign animation to every cell on this table, they will appear as a green dot. Grey dot means no animation is assigned.
each animation that you fill in is specific to the Instance currently selected. On the player workspace, we typically use instances for different weapons, because they have different animations that will be used in the same context (for instance run forward with rifle and run forward with pistol.
no need to create a line for each, just create a run forward line then fill it with run forward rifle in rifle instance and run forward pistol in pistol instance)
First line, from left to right:
- search bar that allows you to look for a specific line inside the Anim Set
- toggle button to only show missing animations
- add, rename and remove group buttons
- add, rename and remove line buttons
- add, rename and remove column buttons
Second line, from left to right:
- currently selected animation file, then file controls: Open file (opens selected file in a new tab in the Workbench), locate selected file in the File Browser, browse and clear selected animation
- add selected (in File Browser) animation to selected line/column
- create new line from selected (in File Browser) animation (it will automatically create a new line with the same name as the selected animation)
Animation Graph
Here is where you create ad manage the visual logic, in the form of a graph made of nodes connected together.
It displays the content of the currently selected Sheet.
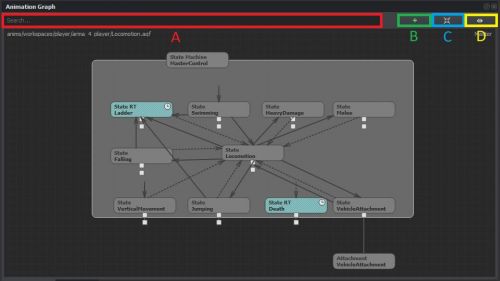
A graph is made of State Machines, containing States, and other nodes that live outside of a State Machine. States can only be created inside a State Machine, and need to be connected to a children.
You can see states as empty logical containers connected together using conditions.
Here you can see a State Machine (grey rectangle) with States inside it. Notice that each node is connected to a children outside of the State Machine.
Navigation: Use Left Click to select, drag to select multiple nodes. alternatively, press Left Ctrl and left click to add to current selection.
- Press Middle Mouse Button and drag to move around the graph
- Scroll Middle Mouse Button to zoom/unzoom
- Right Click opens a contextual menu that depends on your current selection/what is under the mouse cursor. Also allows to use selected node as default running node when pressing the play button in the Toolbar.
Let's Breakdown the window:
- A: search bar to look for a specific node, by its name.
- B: create new node
- C: Center view on current selection
- D: Center the view on the whole graph, does not depend on current selection
Log Console
Here is the same log available in the Resource Manager, that will tell you if anything is wrong with the engine.
From left to right:
- search bar
- button to clear the console
- Show errors only
- Show warnings only
- Show info only
- Filters list
Controls
The control panel contains all the logical conditions that are then used in the graph.
It has 2 different states:
1: When the Graph is NOT running, you can create, rename and modify conditions.
2: When the Graph is running, you can trigger the conditions to provoke certain animations to play.
Here you can find a list of the conditions used in Arma Reforger: Animation Editor: Human Variables and Animation Editor: Vehicle Action Commands.
Debug Controls
The debug controls allows you to link a specific condition to a simple button, and sort these buttons with custom groups. This way you can trigger a set of conditions faster than when looking for them in Controls.
It has the same 2 states as controls:
- When the Graph is NOT running, you can create, rename and modify buttons.
- When the Graph is running, you can trigger the conditions via the buttons to provoke certain animations to play.
File Browser
A simple file browser (that only displays .anm files) to find animation files and assign them to the Anim Set.
Properties
Here you can change the properties of any node/transition that you have selected in the Graph window.
Live Debug
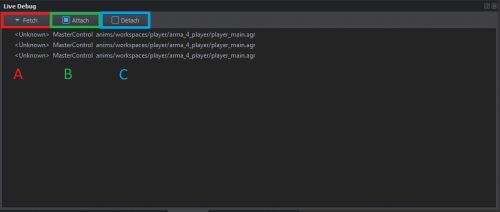
Here you can connect a running instance of the game to the animation editor. This way what you do in the game will also be recorded in the animation editor.
Useful to find source of some issues, if the conditions are being triggered properly in the game ect...
- A: Finds the different entity from the running game session that you can attach into the animation editor
- B: Attaches the selected entity from the list and attaches it to the animation editor
- C: Detaches selected entity from the animation editor
Here you can find a short document on how to use Live Debug: Animation Editor: Live Debug Tutorial.
Attachments Debug
Here you can set binding names for each attachment node (an attachment node allows you to plug in a workspace into another workspace. we typically use them for weapons/vehicles. therefore each weapon/vehicle has its own animation logic separated from the player logic)
Errors
In this window you can see anything that is wrong with the animation logic, such as invalid condition, invalid node etc, anything that will prevent the graph from running correctly.


