Capture & Hold Setup – Arma Reforger
Poslovitch (talk | contribs) |
Poslovitch (talk | contribs) (→Creation Steps: format the whole page with galleries) |
||
| Line 19: | Line 19: | ||
Start by opening the mod in Workbench and launch the World Editor from either the Quick Launch screen or Editors context menu. | Start by opening the mod in Workbench and launch the World Editor from either the Quick Launch screen or Editors context menu. | ||
<gallery mode="traditional" widths=600px heights=400px> | <gallery mode="traditional" widths=600px heights=400px perrow=1> | ||
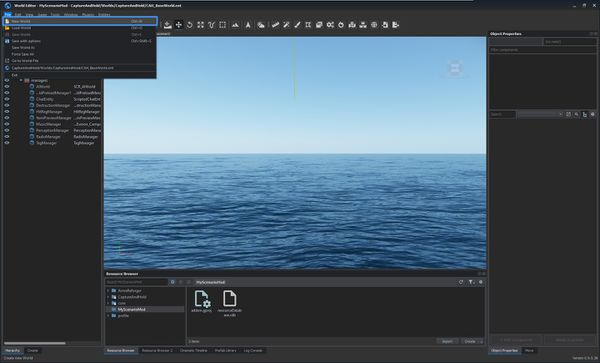
File:armareforger-cah_01_baseworld.jpg|'''1.''' Open the '''CAH_BaseWorld.ent''' world file by double clicking the file in {{hl|CaptureAndHold/Worlds/CaptureAndHold}} directory. | File:armareforger-cah_01_baseworld.jpg|'''1.''' Open the '''CAH_BaseWorld.ent''' world file by double clicking the file in {{hl|CaptureAndHold/Worlds/CaptureAndHold}} directory. | ||
File:armareforger-cah_02_newworld.jpg|'''2.''' In the '''File''' context menu, select the '''New World''' option. | File:armareforger-cah_02_newworld.jpg|'''2.''' In the '''File''' context menu, select the '''New World''' option. | ||
| Line 30: | Line 30: | ||
=== Scenario Setup === | === Scenario Setup === | ||
In the Resource Browser window navigate to {{hl|CaptureAndHold/Prefabs/MP/Modes/CaptureAndHold}} and drag the {{hl|GameMode_CaptureAndHold.et}} prefab into the world. | <gallery mode="traditional" widths=600px heights=400px perrow=1> | ||
File:armareforger-cah_07_gamemode.jpg|'''1.''' In the Resource Browser window navigate to {{hl|CaptureAndHold/Prefabs/MP/Modes/CaptureAndHold}} and drag the {{hl|GameMode_CaptureAndHold.et}} prefab into the world. | |||
File:armareforger-cah_08_managers.jpg|'''2.''' In the Resource Browser window navigate to {{hl|Prefabs/MP/Managers/Factions}} and drag the {{hl|FactionManager_USxUSSR.et}} prefab into the world (or simply search for "USxUSSR"). In the Resource Browser window navigate to {{hl|Prefabs/MP/Managers/Loadouts}} and drag the {{hl|LoadoutManager_USxUSSR.et}} prefab into the world. | |||
File:armareforger-cah_09_area.jpg|'''3.''' In the Resource Browser window navigate to {{hl|CaptureAndHoldPrefabs/MP/Modes/CaptureAndHold/Areas}} and drag the {{hl|CaptureAndHoldArea_Major.et}} prefab into the world. | |||
In the Resource Browser window navigate to {{hl|Prefabs/MP/Managers/Factions}} and drag the {{hl|FactionManager_USxUSSR.et}} prefab into the world (or simply search for "USxUSSR"). | File:armareforger-cah_10_area_setup.jpg|'''4.''' While the '''SCR_CaptureAndHoldArea''' entity is still selected, adjust the shape as desired. | ||
File:armareforger-cah_11_spawns.jpg|'''5.''' In the Resource Browser window navigate to {{hl|Core*/Prefabs/MP/Spawning}} and drag the {{hl|SpawnPoint_US.et}} prefab into the world. In the Resource Browser window navigate to {{hl|Core*/Prefabs/MP/Spawning}} and drag the {{hl|SpawnPoint_USSR.et}} prefab into the world.<br>''*Core is {{armaR}} core data'' | |||
In the Resource Browser window navigate to {{hl|Prefabs/MP/Managers/Loadouts}} and drag the {{hl|LoadoutManager_USxUSSR.et}} prefab into the world. | </gallery> | ||
For automatic deletion of dead bodies and destroyed vehicles, the {{hl|CaptureAndHold/Prefabs/MP/Managers/Garbage/CaptureAndHoldGarbageManager_Small.et}} or similar can be added into the world. | For automatic deletion of dead bodies and destroyed vehicles, the {{hl|CaptureAndHold/Prefabs/MP/Managers/Garbage/CaptureAndHoldGarbageManager_Small.et}} or similar can be added into the world. | ||
Now '''save''' the scenario and proceed. | |||
=== System Test === | |||
<gallery mode="traditional" widths=600px heights=400px perrow=1> | |||
File:armareforger-cah_12_play.jpg|'''1.''' Make sure that the '''Play from camera position''' option is disabled and press the '''Play''' button. | |||
File:armareforger-cah_13_test.jpg|'''2.''' Verify that the scenario is working as intended - capture points, respawn, etc. Drawing of the area trigger can help visualising its coverage. | |||
File:armareforger-cah_14_disable_drawing.jpg|'''3.''' Press Escape to return to the Edit mode. Select the '''SCR_CaptureAndHoldArea''' entity and uncheck '''Draw Shape'''. | |||
</gallery> | |||
Once done, save your changes once more and close the World Editor. | |||
{{Feature|informative|It is highly recommended to use BohemiaInteractive-prepared scenarios for inspiration and usage examples of individual features and components available in {{armaR}} and the '''Capture & Hold''' mod.}} | |||
=== Scenario Header === | |||
To launch the scenario in-game a Scenario header (named {{hl|MissionHeader}}) config must be created. | |||
Exit the World Editor and return to the Resource Browser. | |||
In the Resource Browser find your mod root directory and create a "Missions" directory inside. | |||
<gallery mode="traditional" widths=600px heights=400px perrow=1> | |||
File:armareforger-cah_15_new_missionheader.jpg|'''1.''' {{Controls|RMB}} in your directory and select Create Resource → Config File in the context menu. | |||
File:armareforger-cah_16_missionheader_class.jpg|'''2.''' Pick a name for your Mission Header and then select the {{hl|SCR_MissionHeader}} class from the list. | |||
</gallery> | |||
Open the newly created Mission Header config. | |||
{{ | In the '''World''' field, navigate to and select the world file. In our example it is the {{hl|MyScenario.ent}} in the mod's root directory. | ||
<gallery mode="traditional" widths=600px heights=400px perrow=1> | |||
File:armareforger-cah_17_missionheader_edit.jpg|'''1.''' Fill in remaining fields as desired then save the file. | |||
</gallery> | |||
=== In-Game Test === | === In-Game Test === | ||
Launching {{armaR}} with this newly created mod enabled should allow you to see the and launch the scenario directly: | Launching {{armaR}} with this newly created mod enabled should allow you to see the and launch the scenario directly: | ||
<gallery mode="traditional" widths=600px heights=400px perrow=1> | |||
File:armareforger-cah_18_scenarios.jpg|'''1.''' Navigate to '''Scenarios'''. | |||
File:armareforger-cah_19_result.jpg|'''2.''' Verify that your scenario is working as intended. | |||
</gallery> | |||
=== Ship It === | === Ship It === | ||
Revision as of 22:14, 19 May 2022
Setting up a new Capture & Hold scenario based on Eden is easy, thanks to the Prefab system and already existing base world available as part of the Capture & Hold mod.
Prerequisites
Not much is needed besides the access to the following:
- Arma Reforger's Workbench
- Capture & Hold Mod subscription
Let's start with creating a mod with Capture & Hold as its dependency. For this please refer to the modding guide.
Prepare your mod, open it in the Workbench and follow the guide below.
Creation Steps
Initial Setup
Start by opening the mod in Workbench and launch the World Editor from either the Quick Launch screen or Editors context menu.

1. Open the CAH_BaseWorld.ent world file by double clicking the file in CaptureAndHold/Worlds/CaptureAndHold directory.
2. In the File context menu, select the New World option.
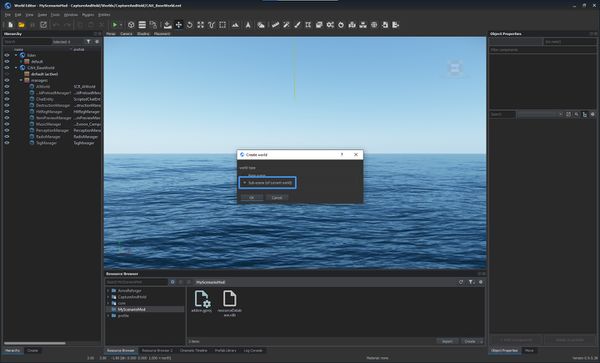
3. Make sure that the Sub-scene (of current world) option is selected in the dialog.
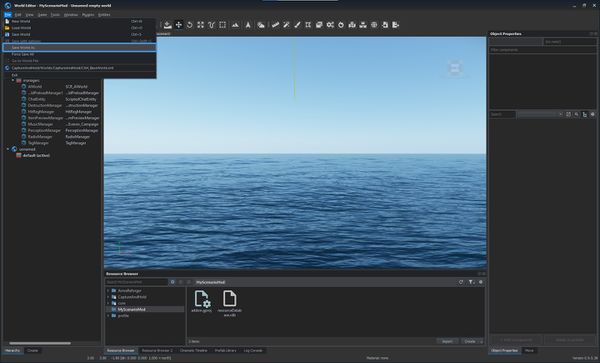
4. In the File context menu select the Save World As option and pick the scenario's save destination.
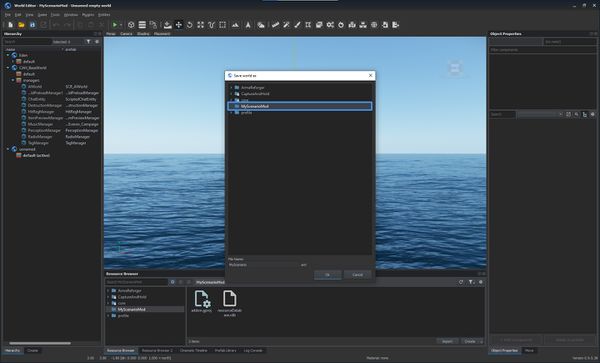
4bis. In our case, we select the root directory.
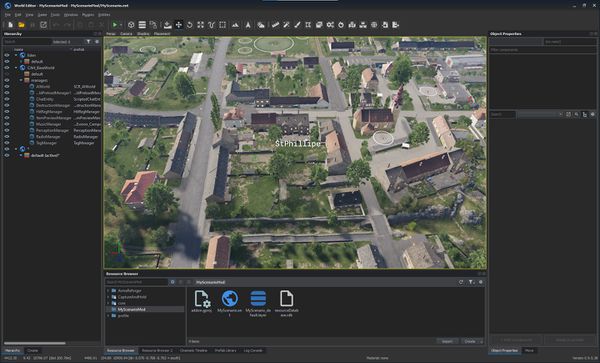
5. Find a suitable scenario location. In our example, we chose St Philippe.


Scenario Setup
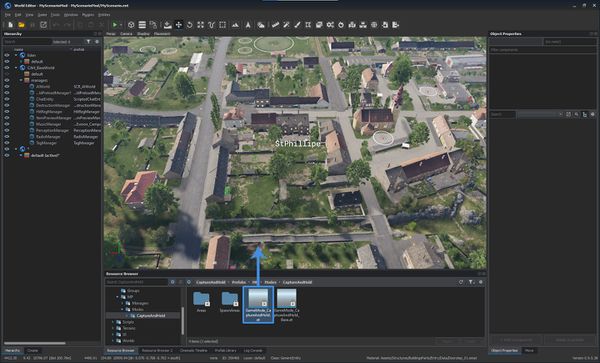
1. In the Resource Browser window navigate to CaptureAndHold/Prefabs/MP/Modes/CaptureAndHold and drag the GameMode_CaptureAndHold.et prefab into the world.
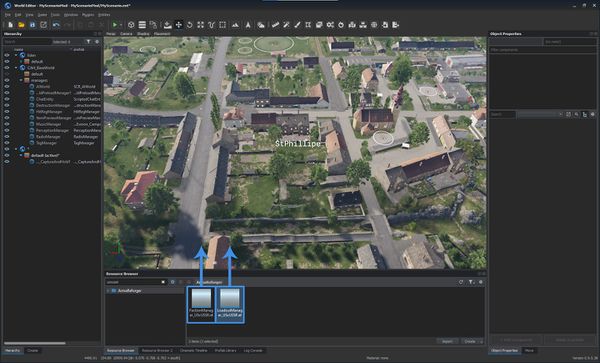
2. In the Resource Browser window navigate to Prefabs/MP/Managers/Factions and drag the FactionManager_USxUSSR.et prefab into the world (or simply search for "USxUSSR"). In the Resource Browser window navigate to Prefabs/MP/Managers/Loadouts and drag the LoadoutManager_USxUSSR.et prefab into the world.

3. In the Resource Browser window navigate to CaptureAndHoldPrefabs/MP/Modes/CaptureAndHold/Areas and drag the CaptureAndHoldArea_Major.et prefab into the world.
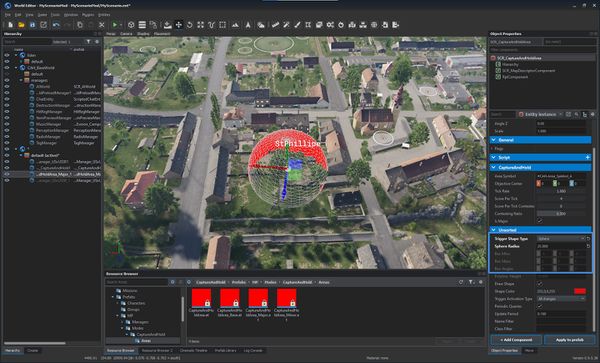
4. While the SCR_CaptureAndHoldArea entity is still selected, adjust the shape as desired.
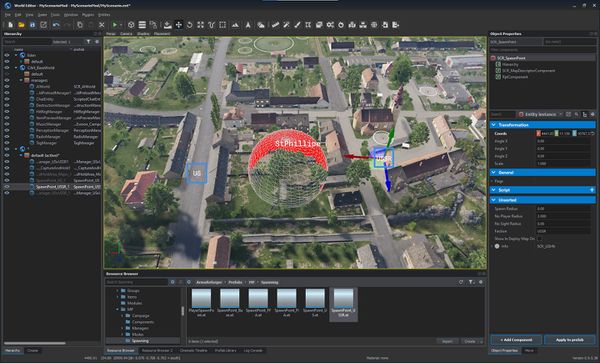
5. In the Resource Browser window navigate to Core*/Prefabs/MP/Spawning and drag the SpawnPoint_US.et prefab into the world. In the Resource Browser window navigate to Core*/Prefabs/MP/Spawning and drag the SpawnPoint_USSR.et prefab into the world.
*Core is Arma Reforger core data


For automatic deletion of dead bodies and destroyed vehicles, the CaptureAndHold/Prefabs/MP/Managers/Garbage/CaptureAndHoldGarbageManager_Small.et or similar can be added into the world.
Now save the scenario and proceed.
System Test
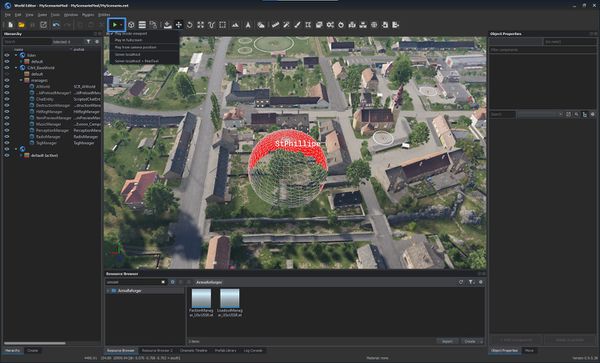
1. Make sure that the Play from camera position option is disabled and press the Play button.
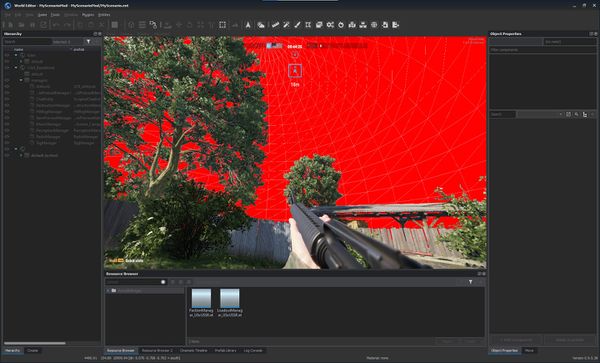
2. Verify that the scenario is working as intended - capture points, respawn, etc. Drawing of the area trigger can help visualising its coverage.
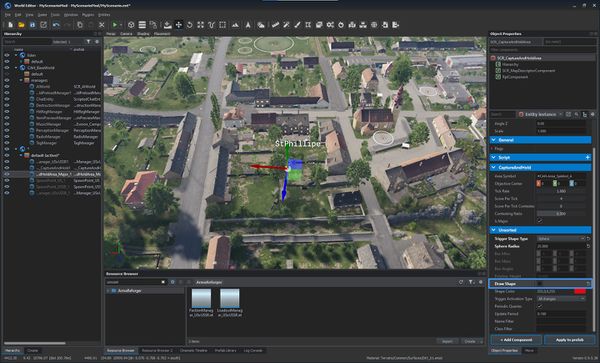
3. Press Escape to return to the Edit mode. Select the SCR_CaptureAndHoldArea entity and uncheck Draw Shape.


Once done, save your changes once more and close the World Editor.
Scenario Header
To launch the scenario in-game a Scenario header (named MissionHeader) config must be created.
Exit the World Editor and return to the Resource Browser.
In the Resource Browser find your mod root directory and create a "Missions" directory inside.
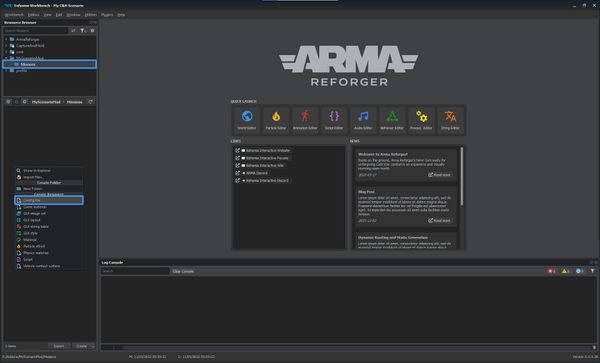
1.
 in your directory and select Create Resource → Config File in the context menu.
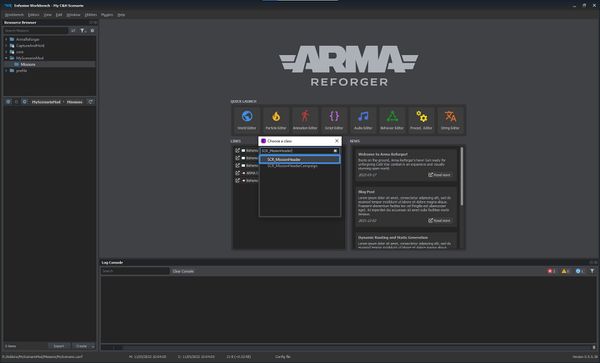
2. Pick a name for your Mission Header and then select the SCR_MissionHeader class from the list.


Open the newly created Mission Header config.
In the World field, navigate to and select the world file. In our example it is the MyScenario.ent in the mod's root directory.
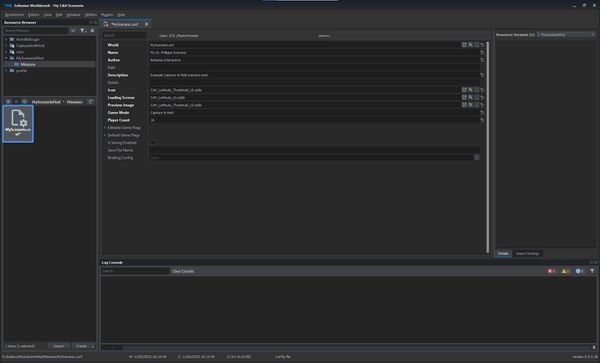
1. Fill in remaining fields as desired then save the file.

In-Game Test
Launching Arma Reforger with this newly created mod enabled should allow you to see the and launch the scenario directly:
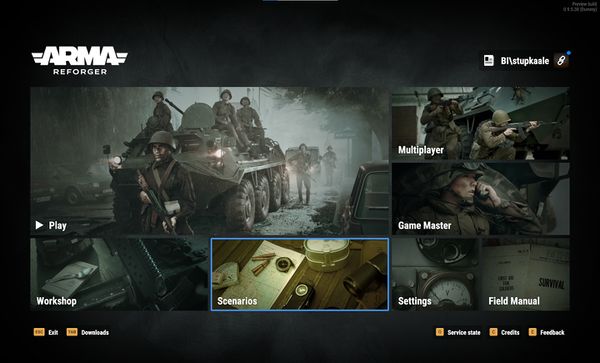
1. Navigate to Scenarios.
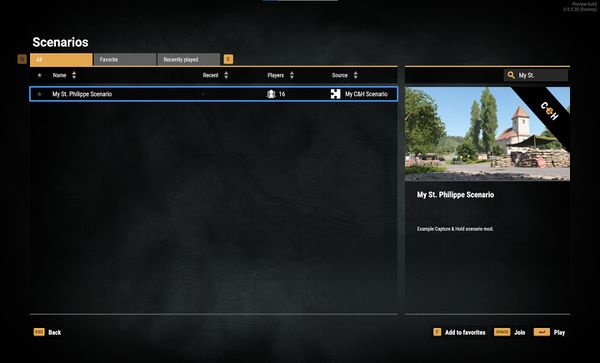
2. Verify that your scenario is working as intended.


Ship It
Now that the scenario can be launched from the game, only a few things remain. Testing the scenario in multiplayer is important, making sure that there are enough spawn points and other gameplay details.
Last, but not least is to publish the mod in the Bohemia Interactive Workshop for other people to see and play!