OAC:DownloadAndPlay: Difference between revisions
| Line 26: | Line 26: | ||
Required packages to run OAC: | Required packages to run OAC: | ||
* .\x\oac\oac_core | * .\arma\x\oac\oac_core | ||
Required if no other islands are used: | Required if no other islands are used: | ||
* .\@aceip | * .\arma\@aceip | ||
* .\userconfig | * .\arma\userconfig | ||
Optional OAC addons: | |||
* .\arma\campaigns | |||
* .\arma\missions\OAC | |||
* .\arma\mpmissions | |||
* .\arma\x\oac\oac_optional_additions | |||
* .\arma\x\oac\oac_optional_cwc_res_music | |||
==Detailed process description== | ==Detailed process description== | ||
Revision as of 09:20, 4 April 2009
# I. Download and play
The OAC files are available via Yoma Addon Synchronizer (YAS).
First please download the latest version of YAS at http://yomatools.be.
Hint: You find the download in the left navigation bar.
Once you have downloaded and installed YAS, add a new server with following data:
OAC YAS server data
Server name: OAC Project
Server url: http://oac.quest-link.net/updater
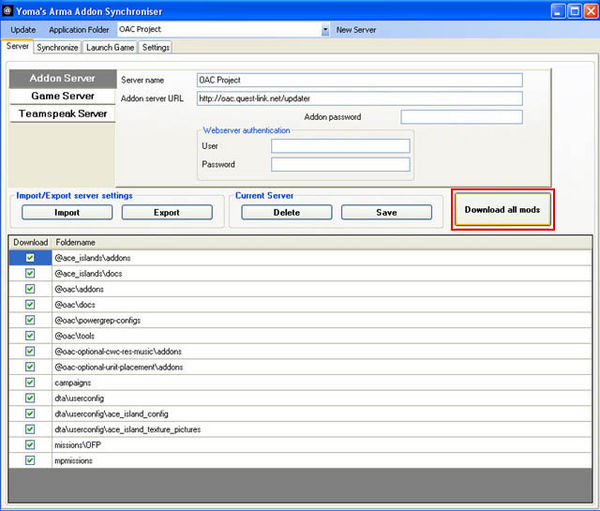
Press Download all mods to get all files, missions and campaigns (large
button on the lower right).
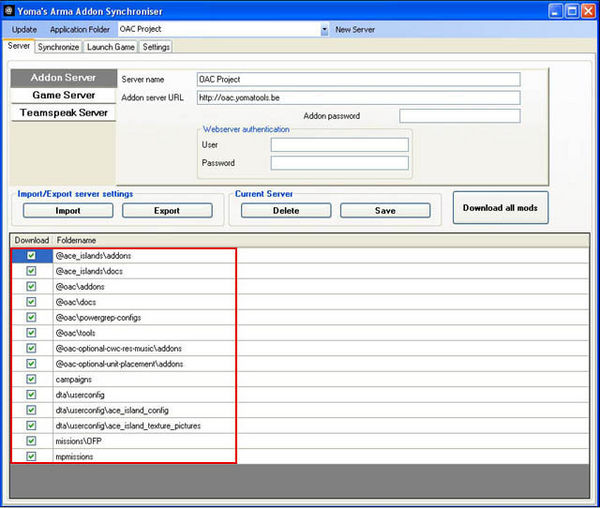
You can also have a look at the different packages by clicking on in the
respective line and de-/select the files of your interest.
OAC YAS server file overview
Required packages to run OAC:
- .\arma\x\oac\oac_core
Required if no other islands are used:
- .\arma\@aceip
- .\arma\userconfig
Optional OAC addons:
- .\arma\campaigns
- .\arma\missions\OAC
- .\arma\mpmissions
- .\arma\x\oac\oac_optional_additions
- .\arma\x\oac\oac_optional_cwc_res_music
Detailed process description
Here is a step by step guide.
Please head over to the OAC forum if questions remain after the guide.
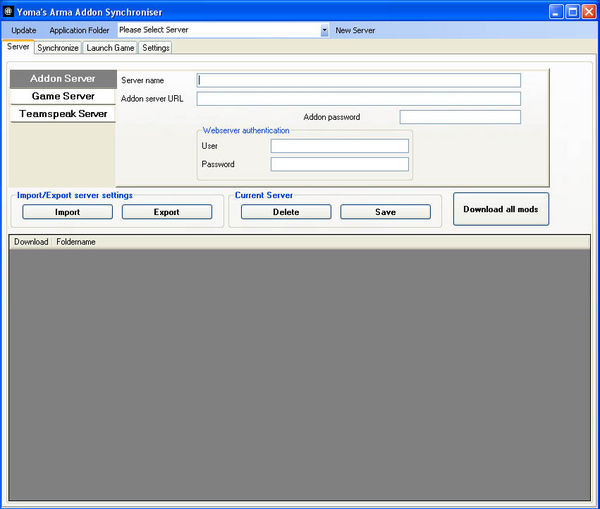
# I. Start YAS
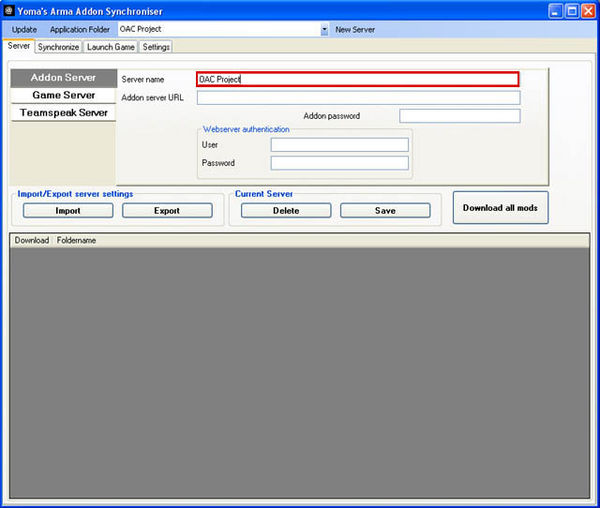
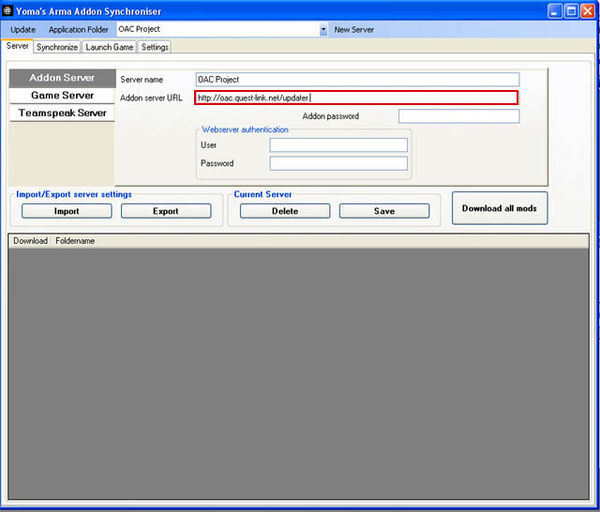
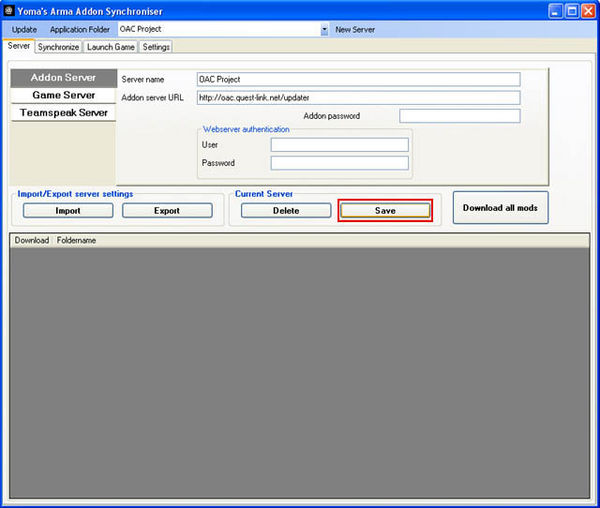
# II. Add new server
For Server name insert: OAC Project.
For Addon Server URL insert: http://oac.quest-link.net/updater.
Now save the server settings on the save button.
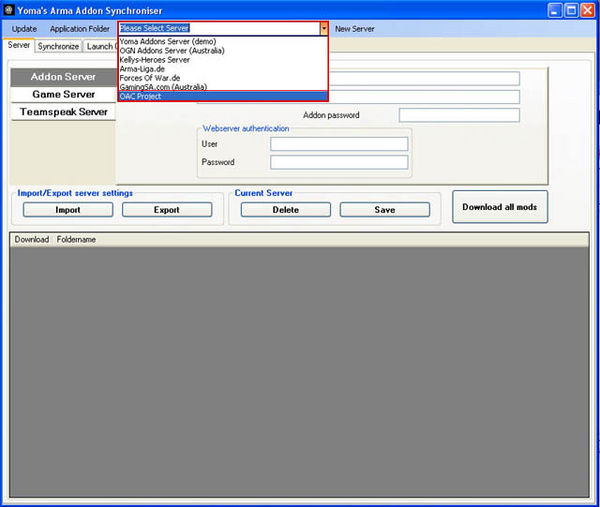
# III. OAC in server list
The OAC Project server is now available in the list box at the top.
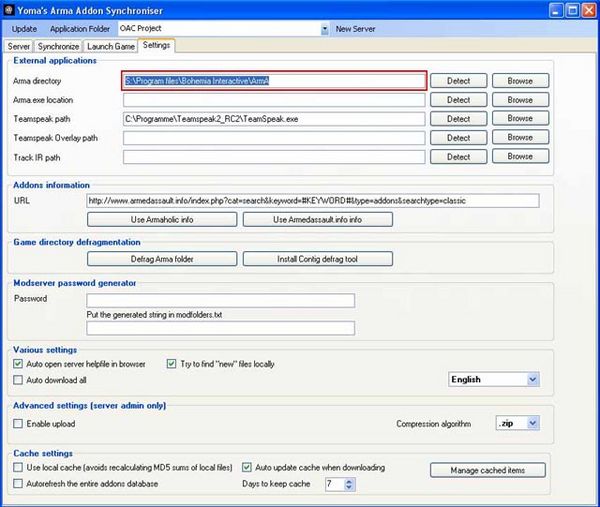
# IV. Configure ArmA settings
Next you should check Settings to verify if it found your ArmA directory.
Normally this works automatically.
# V. Select OAC server
Now you should select the OAC Project server from the server list.
You will see all packages from the OAC Project server in the large list box below.
# VI. Download OAC files
The last step is to click on the Download all mods button.
YomaTools will automatically download all files from the server to your ArmA folder and create the mod folders.
# VII. Modfolder loading order
Queens Gambit
DBE1 always first. QG is *not required* for OAC.
-mod=DBE1;...
OAC
OAC always last:
-mod=...;x\oac\oac_core;
Islands
- ACE Island Pack
@aceip just before OAC ones:
-mod=...;@aceip;x\oac\oac_core;
- Other community CWC island conversions
- CWR Malden requires CWR
- CWR Winter Kolgujev requires CWR and x\oac\oac_optional_additions
- SgtAce Everon runs out of the box
Optional files
The optional OAC modfolders in this order
-mod=...;x\oac\oac_optional_cwc_res_music;x\oac\oac_optional_additions;x\oac\oac_replacements_units;@aceip;x\oac\oac_core;
- oac_optional_cwc_res_music
- oac_optional_additions
- oac_replacements_units
CWR
CWR and oac_replacements_cwr in this order and before any other modfolders
-mod=DBE1;CWR;x\oac\oac_replacements_cwr;x\oac\oac_replacements_islands;...;x\oac\oac_core;
# VIII. Update OAC
Just run YAS again, connect to the OAC YAS server and download all.
The application will sort all for you automatically.
# IX. Replacement addons
Note that you need to download a some addons yourself for optional unit and vehicle replacements.
More information about optional unit and vehicle replacements.
# X. Play OAC with CWR
We are happy to announce that you can now combine OAC with CWR.
Instructions
- Download CWR and install.
- Download CWR Addons and install.
- Move CWR_Ed_T80.pbo of CWR to a new folder called #backup.
- Load OAC along with x\oac\oac_replacements_cwr and CWR.
Important notes
Load the CWR and x\oac\oac_replacements_cwr folders first, like:
Required modfolders:
-mod=CWR;x\oac\oac_replacements_cwr;@aceip;x\oac\oac_core;
With all OAC replacements and additional OAC modfolders:
-mod=CWR;x\oac\oac_replacements_cwr;x\oac\oac_optional_cwc_res_music;x\oac\oac_optional_additions;x\oac\oac_replacements_islands;@aceip;x\oac\oac_replacements_units;x\oac\oac_core;@

