Reyhard/Sandbox – User
Animations for Enfusion are exported into an intermediate human-readable format TXA. This format needs to be further compiled by the Enfusion engine into ANM - a binary format used during the runtime.
APR files are used for animations export. These files contain export profiles. Profiles can be found in anims\export_profiles. The export profile defines which bones to export and how to export them. Export profiles have to correspond with the used skeleton in the action.
It exports animation data for Enfusion. To have an animation created in Blender in Enfusion, follow these steps:
- Export the FBX model from Blender with an armature matching the animation you want to export
- Import the FBX model into Enfusion
- Export the animation from Blender (TXA format)
- Import the animation TXA file into the Enfusion
FBX
Export FBX from Blender
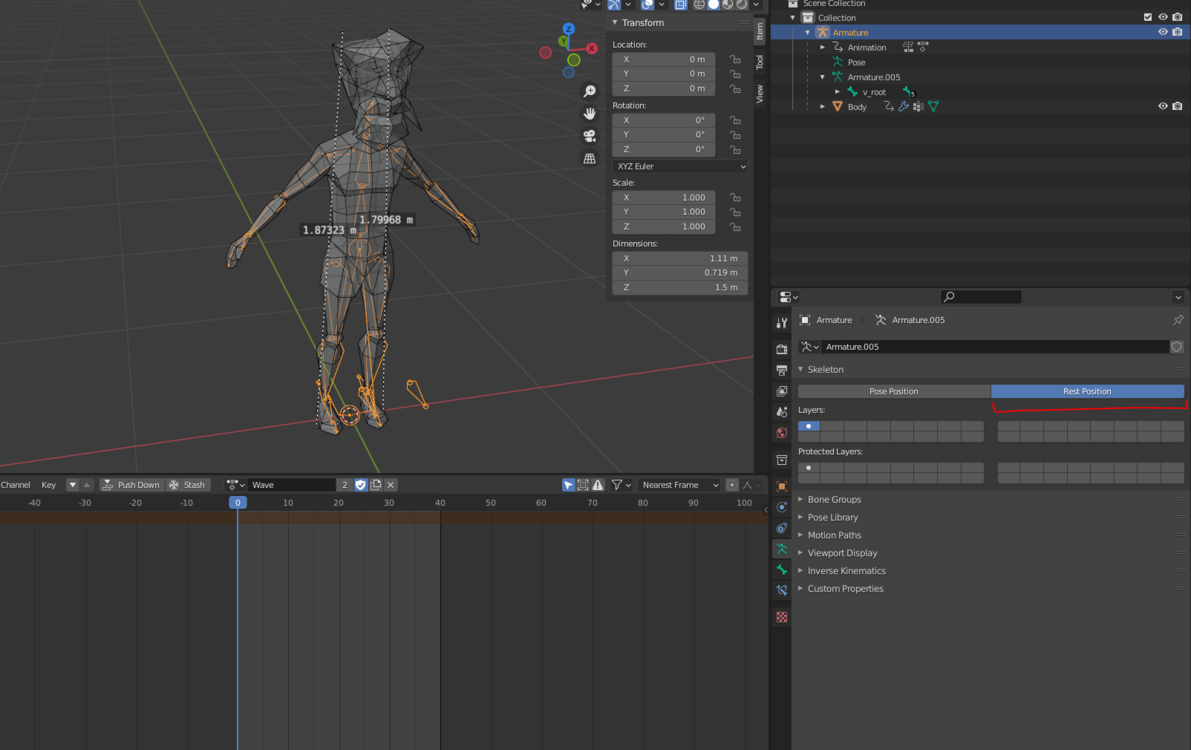
Rest position
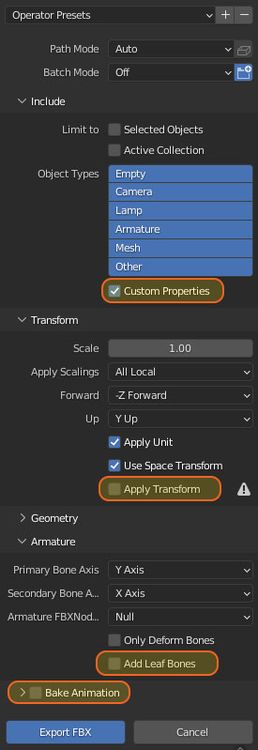
Blender FBX export settings


Set the pose mode to rest for a given skeleton to export the rig. When exporting this FBX, make sure that you uncheck Add leaf bones option.
Import FBX to Enfusion

Import the model "As Model" and afterwards set import to import skinning too.

Animation
Export Animation from Blender
TXA Export is available in top section of 3D viewport. To perform export, following things are necessary:
- at least one Armature & Action present in the current scene
- at least one folder is defined in Export Profile Folder with some valid animation export profiles (see Enfusion Blender Tools page)
- running Workbench with net API enabled
If all above conditions are meet, from top bar select Enfusion Tools -> Export -> Enfusion Animation (.txa) to initiate animation export.

Once that button is pressed, following window should be visible:

Top section

Top section contains following things:
- Save location - folder where the exported actions will be stored. You can either type in the location or use Change save location button located on the right side
- Folder with export profiles - folder with animation export profiles which should be currently used. This list populated through Export Profile Folder parameter located in Enfusion Blender Tools settings.
- Armature name - name of the armature which will be used for export. Bone transformations from this armature are processed by the exporter and stored in exported TXA file.
- Secondary armature name (optional) - name of the secondary armature which will be used during export . This is parameter is useful when armature which you want to export, is constrained to another armature and doesn't have any motion itself and you want to export multiple actions at once. In case of Rigify rig, in this field should be selected name of the Rigify control rig.
Action list

Action list contains actions found in the scene. Actions marked as assets are hidden from this list. Each individual action has Show exports checkbox, which controls the visibility of Action export list - this option is quite useful when dealing with large amount of actions like on example picture above.
Action export list

Action export list is the hear of TXA exporter. Over there it is possible to add exports & define how those actions will be processed. New entries in that list can be added by clicking on + button located on the right side.
- Enable checkbox - control if this export is active or not. In inactive state no txa will be generated
- Profile - animation export profile which will be used on this export. By default, assuming Enfusion Blender Tools Data was correctly installed, there should be dozens of available animation exports which were used on Reforger assets. Selected profile has to correspond with the skeleton - otherwise no animation will be exported.
- File - name of resulting txa file
- Diff pose (optional) - name of the action which will be used as difference target for additive transformations. If you are using animation profile which doesn't have any additive transformations, you can leave that field empty
- Diff pose frame (optional) - frame of diff pose which will be used as a base for additive animations export
Once all desired animation actions are selected and properly configured for export (meaning they have correct animation export profile selected), it is now possible to finally perform export to TXA. To do so, press OK button in bottom section of the export window.
Default Profile
If you create a new rig, you will need to create a new set of export profiles for it. As this can get tedious, you can generate a new export profile from the Workbench by following instructions located on Arma Reforger:Animation Export Profiles page.
Import Animation to Enfusion
Once TXA is generated, there are two ways how to convert TXA into .ANM file:
- Drag and drop the TXA file into the Resource Browser.
- Click on TXA with Right Mouse Button and select "Register and Import" option from the Context Menu.
Once animation is imported, .ANM file will be automatically regenerated every time Workbench detects change in .TXA. If TXA was modified when Workbench was closed, manual reimport might be necessary.