Animals: Ambient System – Arma 3
Jump to navigation
Jump to search
Animals can be placed in Arma 3 either directly by the mission designer (scripting command createAgent, animal sites in modules) or created by the Ambient System. This page is only about the Ambient System presented in Arma 3, which is not the same as the Ambient System implemented in Arma 2.
System description
Basic terms
- Ambient animal - An animal created by the automatic Ambient System.
- Ambient config - A config class placed in configFile >> CfgWorlds >> Name_of_map >> AmbientA3.
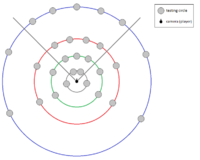
- Main spawn circle - A circle with defined radius (parameter areaSpawnRadius) on which border are testing circles being created. The center is placed on a camera position. Main spawn circles are marked by green, red and blue colors on the attached image.
- Testing circle - A circle with a defined radius. Every testing circle belongs to the main spawn circle. The center of a testing circle is placed on a border of the defined main spawn circle. Conditions for a creation of animals are tested in the center of this circle, animals are created in the area of whole circle.
System steps
Creation of animals
- The system checks there are not too many animals already (if the total cost of all animals is the same or higher than the maximal cost).
- Every animal has defined the cost parameter in the ambient config (see Config Structure).
- Every map has defined the maxCost parameter in ambient config (see Config Structure).
- If there are too many animals present already, all following steps are skipped.
- Main spawn circle is processed.
- The system places each testing circle on the border of the main spawn circle (with a higher probability in front of the player, see attached picture).
- Conditions in the center of each testing circle are checked and evaluated, the number of missing animals for the testing circle area is counted ([how many animals should be here according to conditions] - [how many animals are already here]).
- One animal type for each main spawn circle is created according to the counted probability.
- Example: 4 rabbits and 2 goats are missing, probability is 2:1 for rabbits.
- The number of created animals is dependent on the parameter spawnCount defined for each animal in the ambient config (see Config Structure).
Removing of animals
An animal is removed if its position is out of the circle (the center is placed on the position of camera) which radius is defined by the parameter areaMaxRadius.
Config structure
The ambient config is placed in configFile >> CfgWorlds >> terrainName >> AmbientA3.
Structure:
class AmbientA3
{
	maxCost = 500;						// max. cost of all animals spawned by the ambient system

	class Main_spawn_circle_name
	{
		areaSpawnRadius = 440.0;		// radius of the main spawn circle, testing circles are placed on this radius
		areaMaxRadius = 500.0;			// radius where animals are removed
		spawnCircleRadius = 30.0;		// radius of testing circles
		spawnInterval = 4.7;			// how often is the creation process started in seconds

		class Species
		{
			class Animal_config_class	// class of animal from CfgVehicles
			{
				maxCircleCount = 5;		// expression - max. number of a given kind in testing circle
				maxWorldCount = 8;		// max. number of animals on map
				cost = 3;				// cost of animal
				spawnCount = 1;			// how many animals should be spawned at once
				groupSpawnRadius = 10;	// radius for spawning of animal group
				maxAlt = 200;			// if defined, an animal can be created only if [camera height above/under water/ground] < maxAlt
				minAlt = -10;			// if defined, an animal can be created only if [camera height above/under water/ground] > minAlt
			};
		};
	};
};
In parameter maxCircleCount can be used:
- rain [0-1] - intensity of rain
- night [0-1] - intensity of night
- meadow [0-1] - how much it seems here like meadow
- trees [0-1] - how much trees is around
- hills [0-1] - 160 m above sea level -> 0; 400 m above sea level -> 1
- houses [0-1] - how many houses is around
- windy [0-1] - intensity of wind
- forest [0-1] - how much it seems here like forest
- deadBody [0-1] - how far is corpse (1 for corpse very close)
- sea [0-1] - how far is sea (1 for position in sea)
- waterDepth [0-max.Depth] - depth of water in meters
- camDepth [0-max.Depth] - depth of camera position in water in meters
Stratis Example
class CfgWorlds
{
	class Stratis
	{
		class AmbientA3
		{
			maxCost = 500;

			class Radius440_500
			{
				areaSpawnRadius = 440.0;
				areaMaxRadius = 500.0;
				spawnCircleRadius = 30.0;
				spawnInterval = 4.7;

				class Species
				{
					class Seagull
					{
						maxCircleCount = ((sea * (1 - night)) + (2 * houses * sea)) * (1 - night);
						maxWorldCount = 8;
						cost = 3;
						spawnCount = 1;
						groupSpawnRadius = 10;
						maxAlt = 200;
						minAlt = -10;
					};
					class Rabbit_F
					{
						maxCircleCount = (20 * (0.1 - houses)) * (1 - sea);
						maxWorldCount = 4;
						cost = 5;
						spawnCount = 1;
						groupSpawnRadius = 10;
						maxAlt = 80;
						minAlt = -5;
					};
				};
			};
			class Radius40_60
			{
				areaSpawnRadius = 50.0;
				areaMaxRadius = 83.0;
				spawnCircleRadius = 10.0;
				spawnInterval = 1.5;

				class Species
				{
					class CatShark_F
					{
						maxCircleCount = (4 * (WaterDepth interpolate [1,30,0,1]));
						maxWorldCount = 10;
						cost = 6;
						spawnCount = 1;
						groupSpawnRadius = 10;
						maxAlt = 10;
						minAlt = -80;
					};
					class Turtle_F
					{
						maxCircleCount = (2 * (waterDepth interpolate [1,16,0,1]) * ((1-houses) * (1-houses)));
						maxWorldCount = 6;
						cost = 5;
						spawnCount = 1;
						groupSpawnRadius = 10;
						maxAlt = 10;
						minAlt = -80;
					};
				};
			};
		};
	};
};
