2D Map Creation – Arma Reforger
Jump to navigation
Jump to search
In order to display a 2D map when using the map item in-game, a MapEntity.et must be placed.
It is possible to use custom geometry and/or texture using the following fields:
- Map Geometry Data - this file contains road network, buildings, airfields etc information for them to be displayed on the 2D map
- Satellite Background Image - this file contains the map background texture: forests, shaded relief, etc.
Generate Map Geometry Data
The Map Geometry Data field takes a topography data file (.topo extension).
Generate TOPO
- Run World Editor with the wanted world
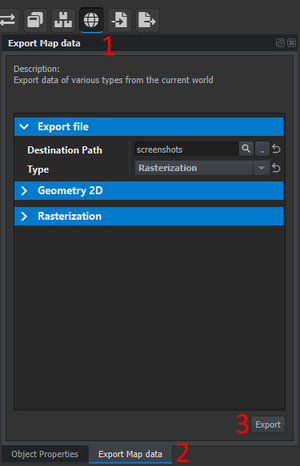
- Locate Export Map Data tool in toolbar (marked as 1)
- Click Export Map Data tab (marked as 2) to display the tool's panel if needed
- Set the Type to Geometry2D
- Set up the settings under the Geometry 2D category, such as color and scale
- Click the Export button (marked as 3)
Generate Terrain Rasterization Background Image
The Satellite Background Image field takes a .edds file.
Generate TGA
- Run World Editor with the wanted world
- Locate Export Map Data tool in toolbar (1)
- Click Export Map Data tab (2) to display the tool's panel if needed
- Set the Type to Rasterization
- Set up the settings under the Rasterization category, such as color and scale
- Click the Export button (3)
This will have generated the 4096×4096 upside-down worldname.tga file - it now needs to be converted to PNG in order to be properly imported in Enfusion to the .edds format.
Convert to PNG
TGA can be converted with an image editor - here Paint.NET and GIMP will be used.
Paint.NET
- Open Paint.NET
- Open the TGA file Ctrl + O
- Flip it vertically: Image > Flip Vertical
- Use the Save As option Ctrl + ⇧ Shift + S
- Save as PNG using the dialog's dropdown
GIMP
- Open GIMP
- Open the TGA file Ctrl + O
- Flip it vertically: Image > Transform > Flip Vertically
- Use the Export As option Ctrl + ⇧ Shift + E
- Select PNG file type and click Export
Import PNG
- Place the PNG file in the Data
\UI directory\Textures \Map \worlds - Navigate to the PNG file in Resource Manager
- Right-click > Register
- Go to the Import Settings tab, set Color Space to ToSRGB
- Click the Import resource button at the top of the tab to generate the .edds file.
Setup
- Find the world's MapEntity by using the Hierarchy tab's Search field - if it does not exist, create it by drag-and-dropping a MapEntity.et Prefab into the world.
- Fill Map Geometry Data with the .topo file generated previously
- Fill Satellite Background Image with the .edds file generated previously
