Weapon Animation/Basic Tutorial – Arma Reforger
Introduction
In this second part things will be more focused on creation of animations in Blender and then trying to export them so they can be used in previously created animation workspace & prefab.
Below is short list of topics covered in this chapter:
- Preparing Workbench & Blender to work
- Preparing Blender scene for animation
- Creating IK pose & plugging it in game
- Creating basic weapon animations (bolt, trigger, fire selector) and plugging it into weapon prefab
Preparing Workbench
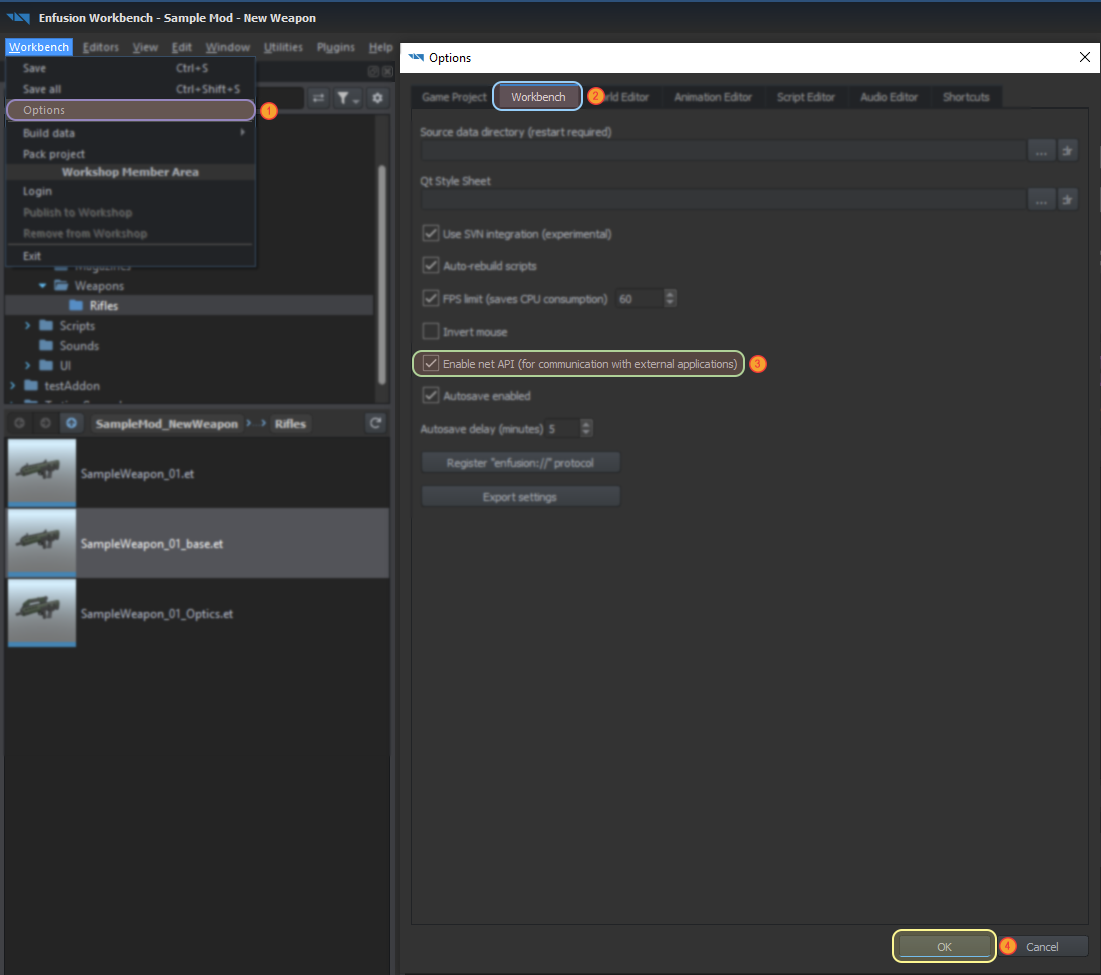
Before moving to Blender, make sure that net API is enabled in the Workbench settings - without that Blender will be unable to export TXA animations.
To do so, perform following steps:
- Navigate to Workbench → Options (1) in the top menu of the Resource Manager
- In Options window, switch to Workbench tab (2)
- Check Enable net API (for communication with external applications) (3) option
- Click on OK (4) button. This will save all the changes made in Workbench Options. Please keep in mind that saving process can take a while
Preparing Blender
This tutorial covers animation creation workflow in Blender using the Enfusion Blender Tools plugin. This plugin is used to export Blender actions to Enfusion text based animation files (.txa) which can be then converted to Enfusion binary animation files (.anm). With this addon it is also possible to export actions with selected amount of bones (which is extremely important when it comes to Enfusion animations) via the export profiles functionality and export of additive animations.
Enfusion Blender Tools addon is designed to work with Blender 3.6 LTSversion so it is recommended to use at least this version of Blender. Newer versions of Blender might work without problem although this is not guaranteed (especially with snapshot builds). Installation instructions of the plugin can be found on the Enfusion Blender Tools Wiki page - pay attention to paragraph about configuration of Export Profile Folder parameter which is mandatory for TXA exporter.
Enabling Pose Library addon
Beside Enfusion Blender Tools, this tutorial is using also additional addon which is quite handy when it comes to animation creation:
- Pose Library - this addon adds ability to use library of poses, which can be then applied to all characters using specific rig. In this tutorial it will be used mainly for creation of base weapon IK animation but not only.
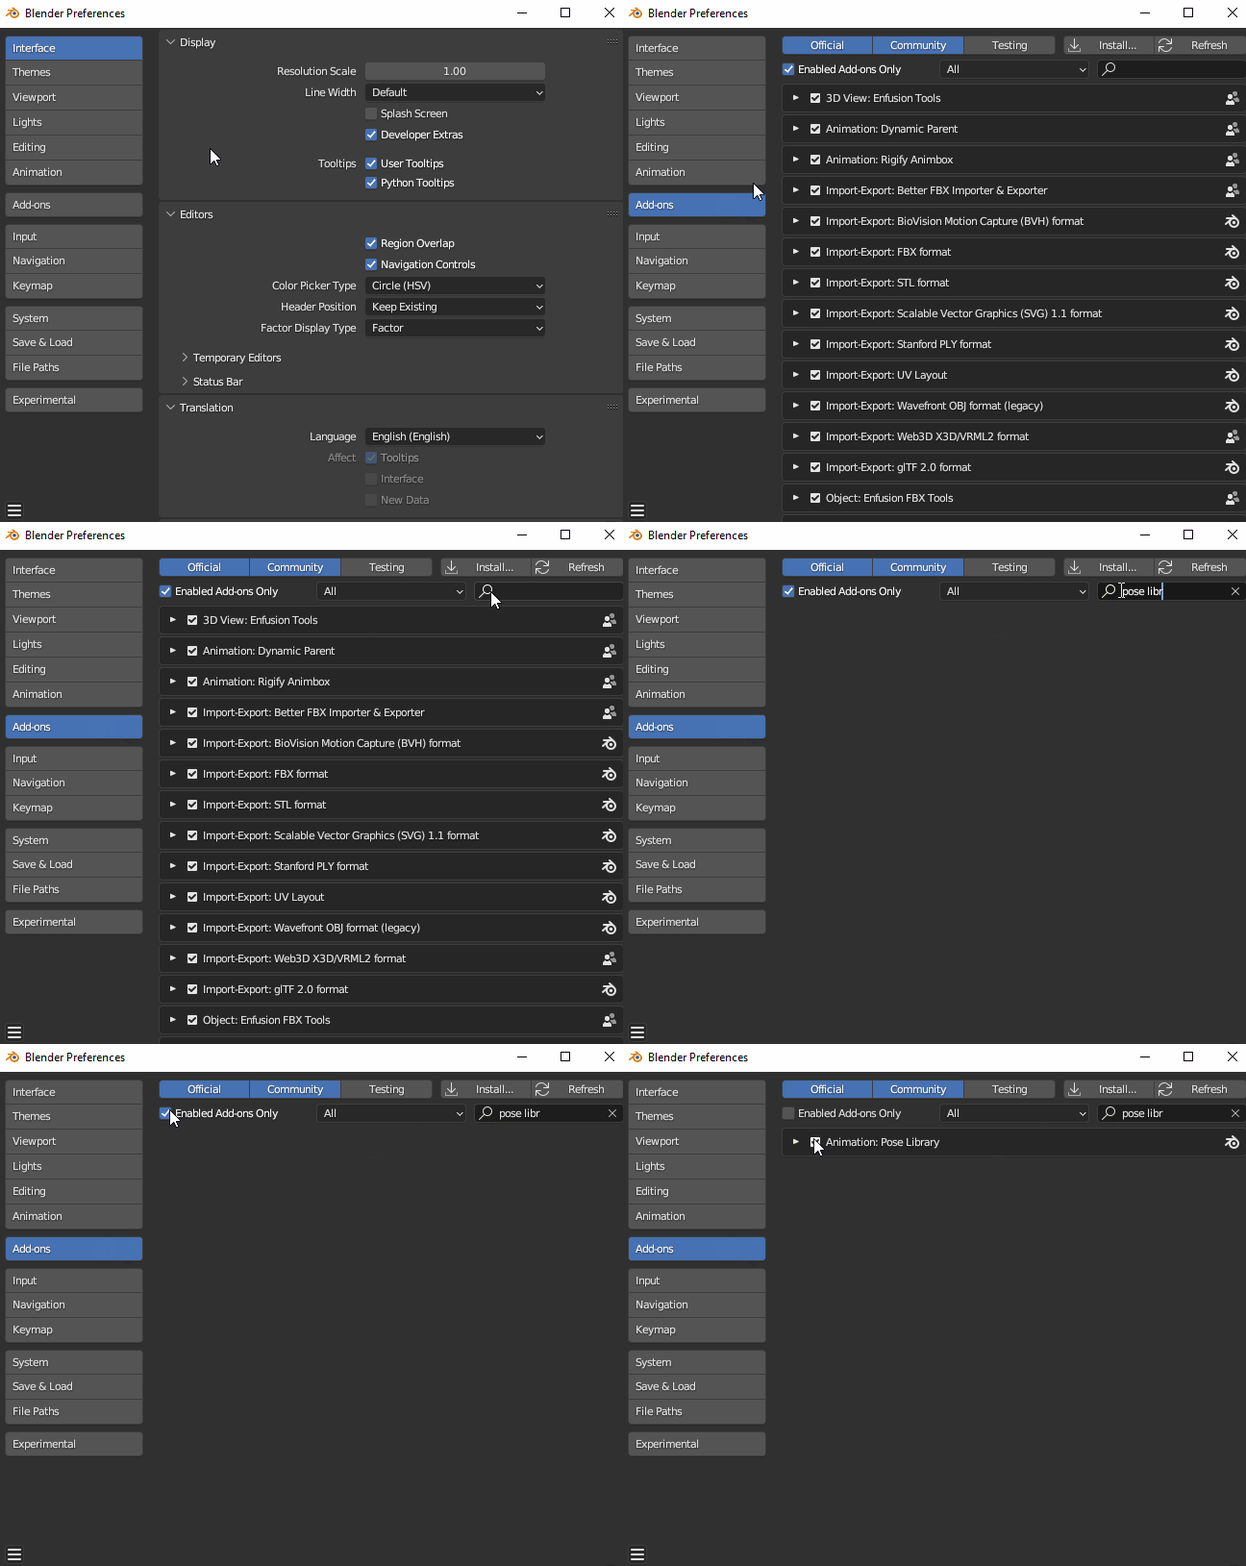
This addon is bundled with Blender but needs to be activated manually. To do so, open Blender Preferences (Edit → Preferences... in top menu), navigate to the Add-ons tab in Blender Preferences and search for Animation: Pose Library addon. If you cannot find this addon, make sure that Enabled Add-ons Only filter is disabled. Once this addon is found, click on the checkbox next to it to activate it.
Loading example file
Reforger character is using bit different skeleton compared to what Blender would expect. After loading for instance Character_Template.fbx in Blender, it is obvious that something is seemingly wrong - bones are not connected to each other and are rotated in seemingly random way. This is due to the fact that this skeleton was created in Autodesk software, where skeletons work on a slightly different principle.
Modifying this skeleton is out of question, as any changes to it would result in incorrect animations when re-imported into the workbench. One of the solutions to this problem is to create an intermediate, Blender-friendly skeleton to which the original skeleton is constrained. Such Blend file is provided on Arma Reforger Github - Character_AnimationRig_Example.blend - and this file will be used in this tutorial. Once this file is loaded in Blender, you can find following things on the screen:
- Character armature - Reforger original character skeleton constrained to empty objects located in Extras/Constraints collection
- Rig armature - Rigify armature which is used for animations. You should only use this armature for character animation
- Constraints helper objects - Those objects are constrained to Rig armature and are transferring the motion back to Character armature
- IK Targets collection - Objects in this collection are used for creation of weapon IK pose & also for control of character movement in world via EntityPosition object.
- IKTarget/Origin/Direction objects are constrained itself to bones located in Rig, so basically in this tutorial you don't need to touch any of the objects located there.
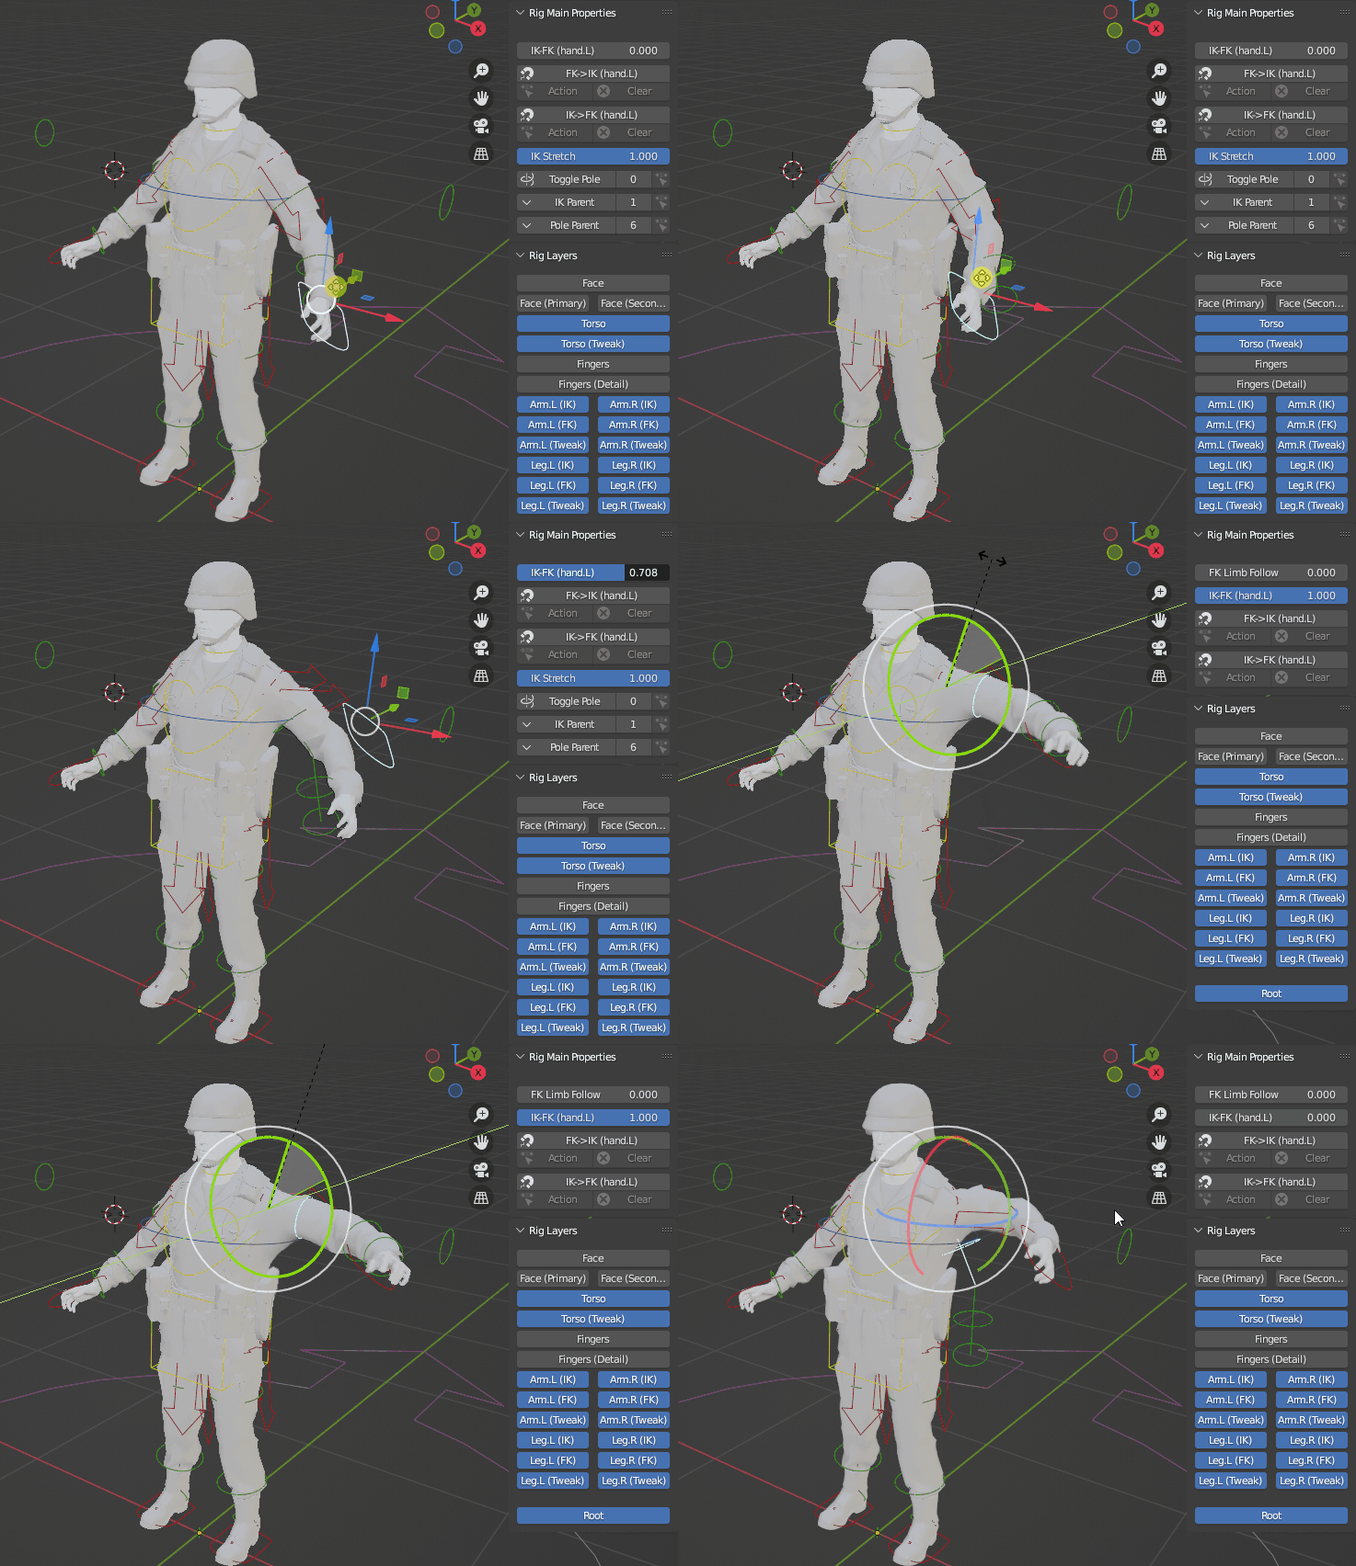
Rigify control rig contains controls both for Forward Kinematic (FK) & Inverse Kinematic (IK) motion.
By default, Character_AnimationRig_Example.blend file should start in Animation workspace with Action Editor & NLA editor being present next to the main view port. Of course, you can change layout of those windows as you want but this setup should be quite good for starters.
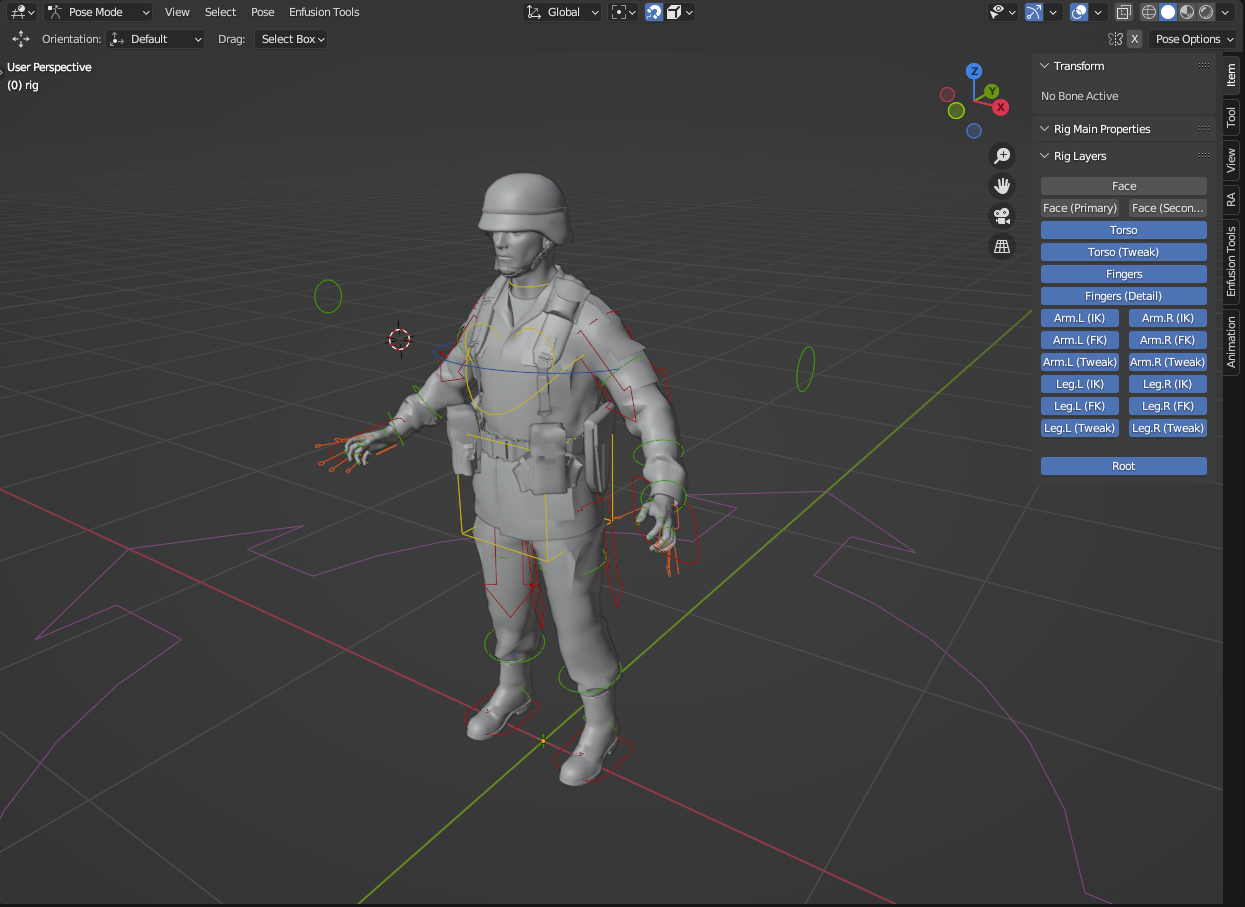
If you haven't used Rigify rig before, it might be worth to play with it. After selecting Rig object in Outliner and switching to Pose Mode, bunch of Rigify controls should be visible.
You can see that all these bones have different colors, which have different meanings. Below is short list explaining the basics of that coloration system:
- Red bones represents controls responsible for IK motion
- Green bones are responsible for FK motion
- Blue bones are used to do tweaks
- Yellow bones are for Torso & Face controls
- Purple bone is for root motion
- Orange bones is for finger details
Visibility of those layers can be switched by clicking with Left Mouse Button on one of the buttons in Rig Layers section of Item tab on the right. It is also possible to disable and enable multiple layers by holding Left Mouse Button and moving cursor above layers.
When it comes to weapons, most of the time you are not going to need all those controls, so it is wise to turn on & off those layers depending on what you are working on in given moment. Furthermore, faces of Reforger heads are not rigged yet so it's better to hide face related Rigify controls.
Switching between IK & FK is done by changing value of IK-FK (name of bone) slider in Rig Main Properties section - where 0 means full IK control and 1 full FK influence.
Setting up reference poses
Once Pose Library addon is activated, it is now possible to add first asset to Asset Libraries in Blender. On Arma-Reforger-Misc Github repository you can find small Blender library of weapon poses which will be used later in tutorial to set weapon IK animation. Characters in Reforger are using few archetypes sets for handling of weapon animations so for instance soldier holding RPG-7 is walking or running differently than a soldier with AK-74 or PKM.
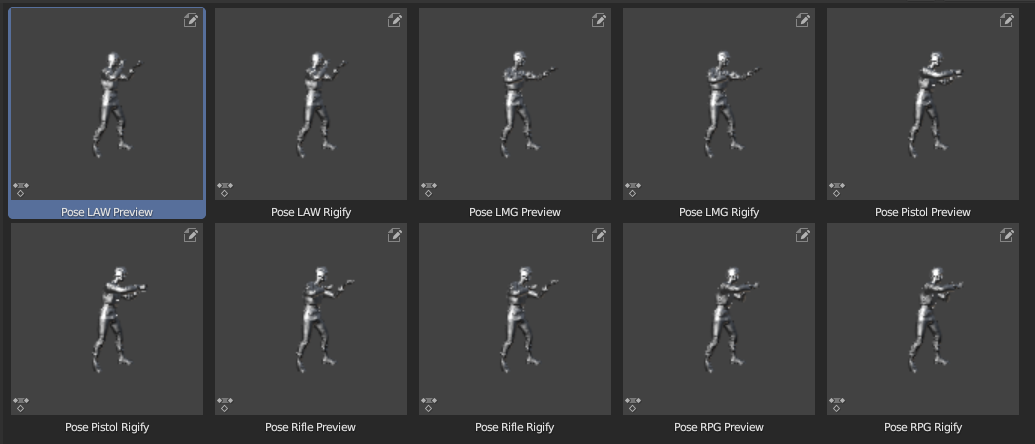
BlenderPoses.blend library contains poses for all those weapon archetypes:
- Rifle
- Pistol
- LMG
- RPG
- Disposable launcher (LAW)
All those archetypes are available in two formats - raw animation which can be applied to character (useful for skinning testing) and Rigify compatible poses.
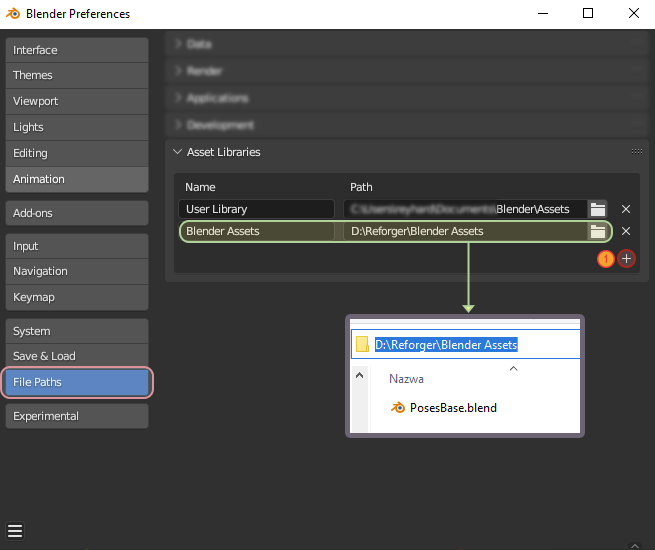
To make this blend file active in Pose Library menu, following actions have to be performed:
- Download BlenderPoses.blend and put it somewhere on the drive (in this tutorial "D:\Reforger\Blender Assets" folder was used)
- Open Blender Preferences (Edit → Preferences... in top menu)
- Switch to File Paths tab in the left section of the window
- Find Asset Libraries section
- Click on + plus button (1) on the right side to add new element to the list
- Put some name in Name field (f.e. Blender Assets) and in Path field select folder where blend file is located ("D:\Reforger\Blender Assets" )
After that, it should be possible to access Pose Library in main view port by expanding Animation tab on the right side of the viewport. Keep in mind though, that this tab is only available in Pose Mode.
Applying poses from Pose Library
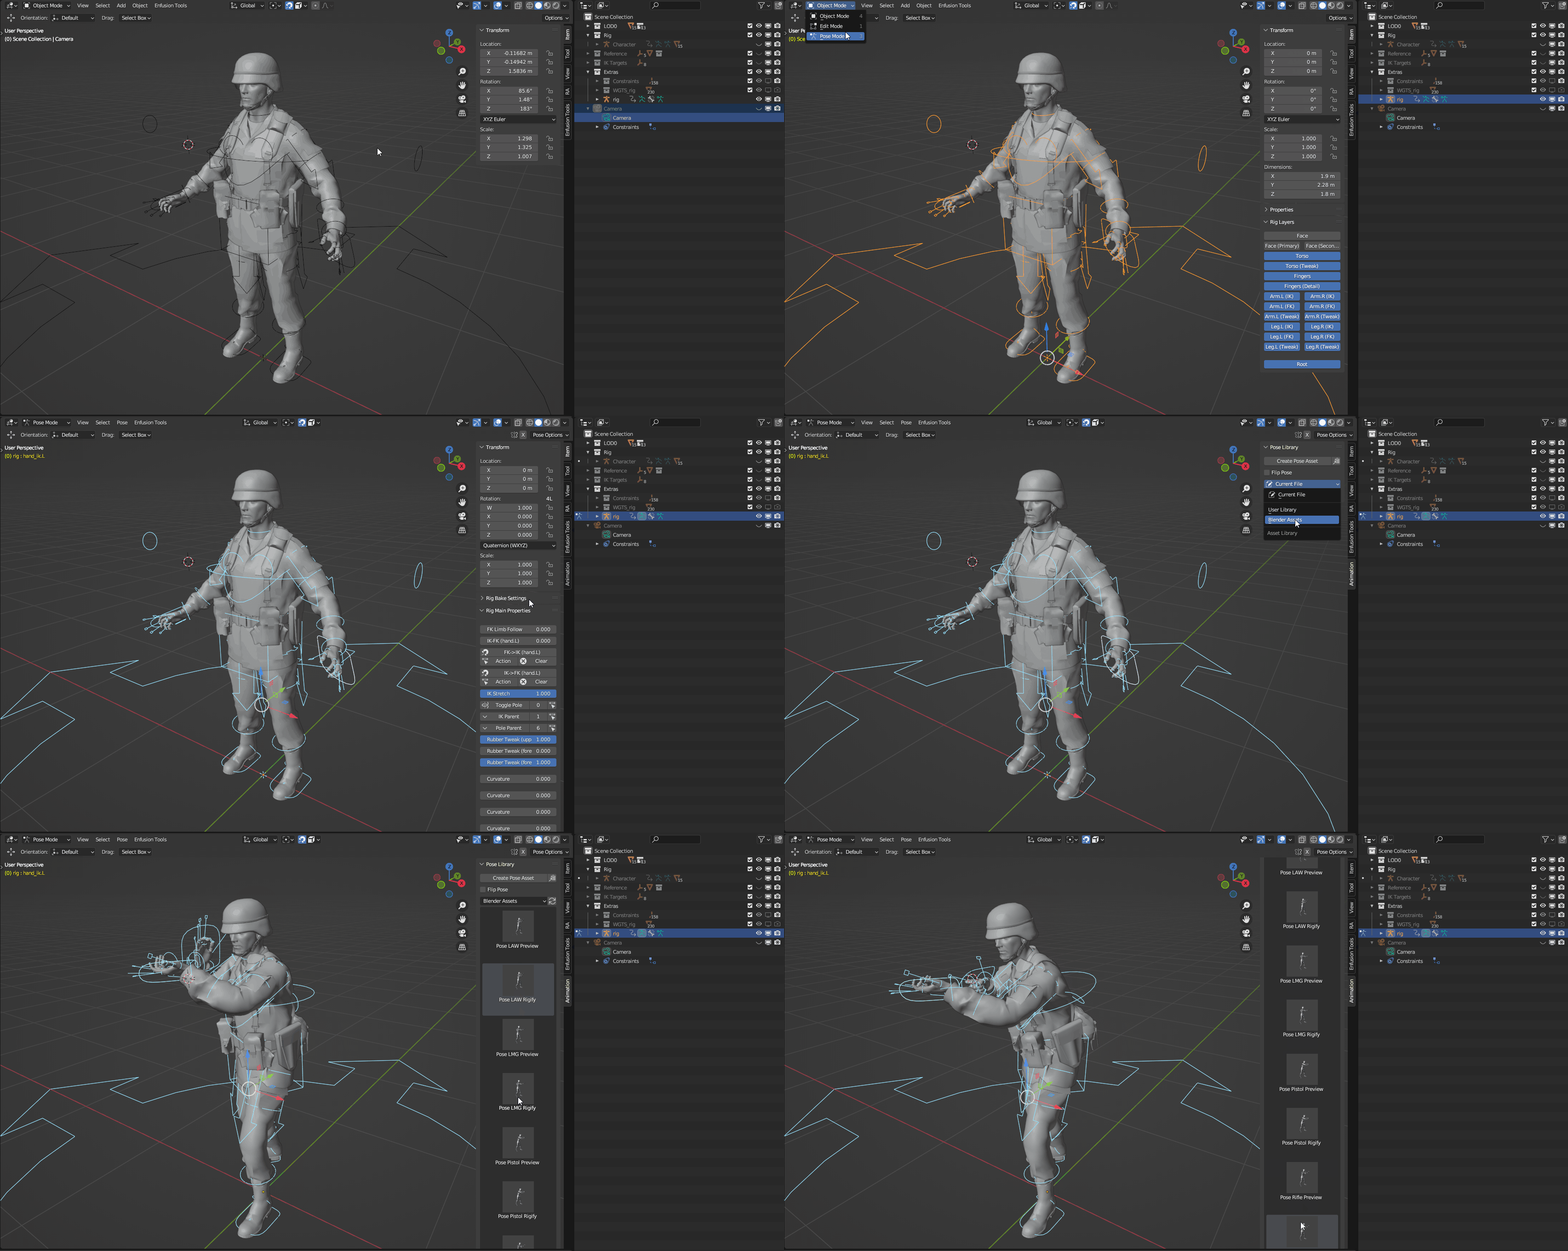
Assuming Character_AnimationRig_Example.blend is open, it is now possible to test how those animations are working on this sample character. To do so, perform following steps:
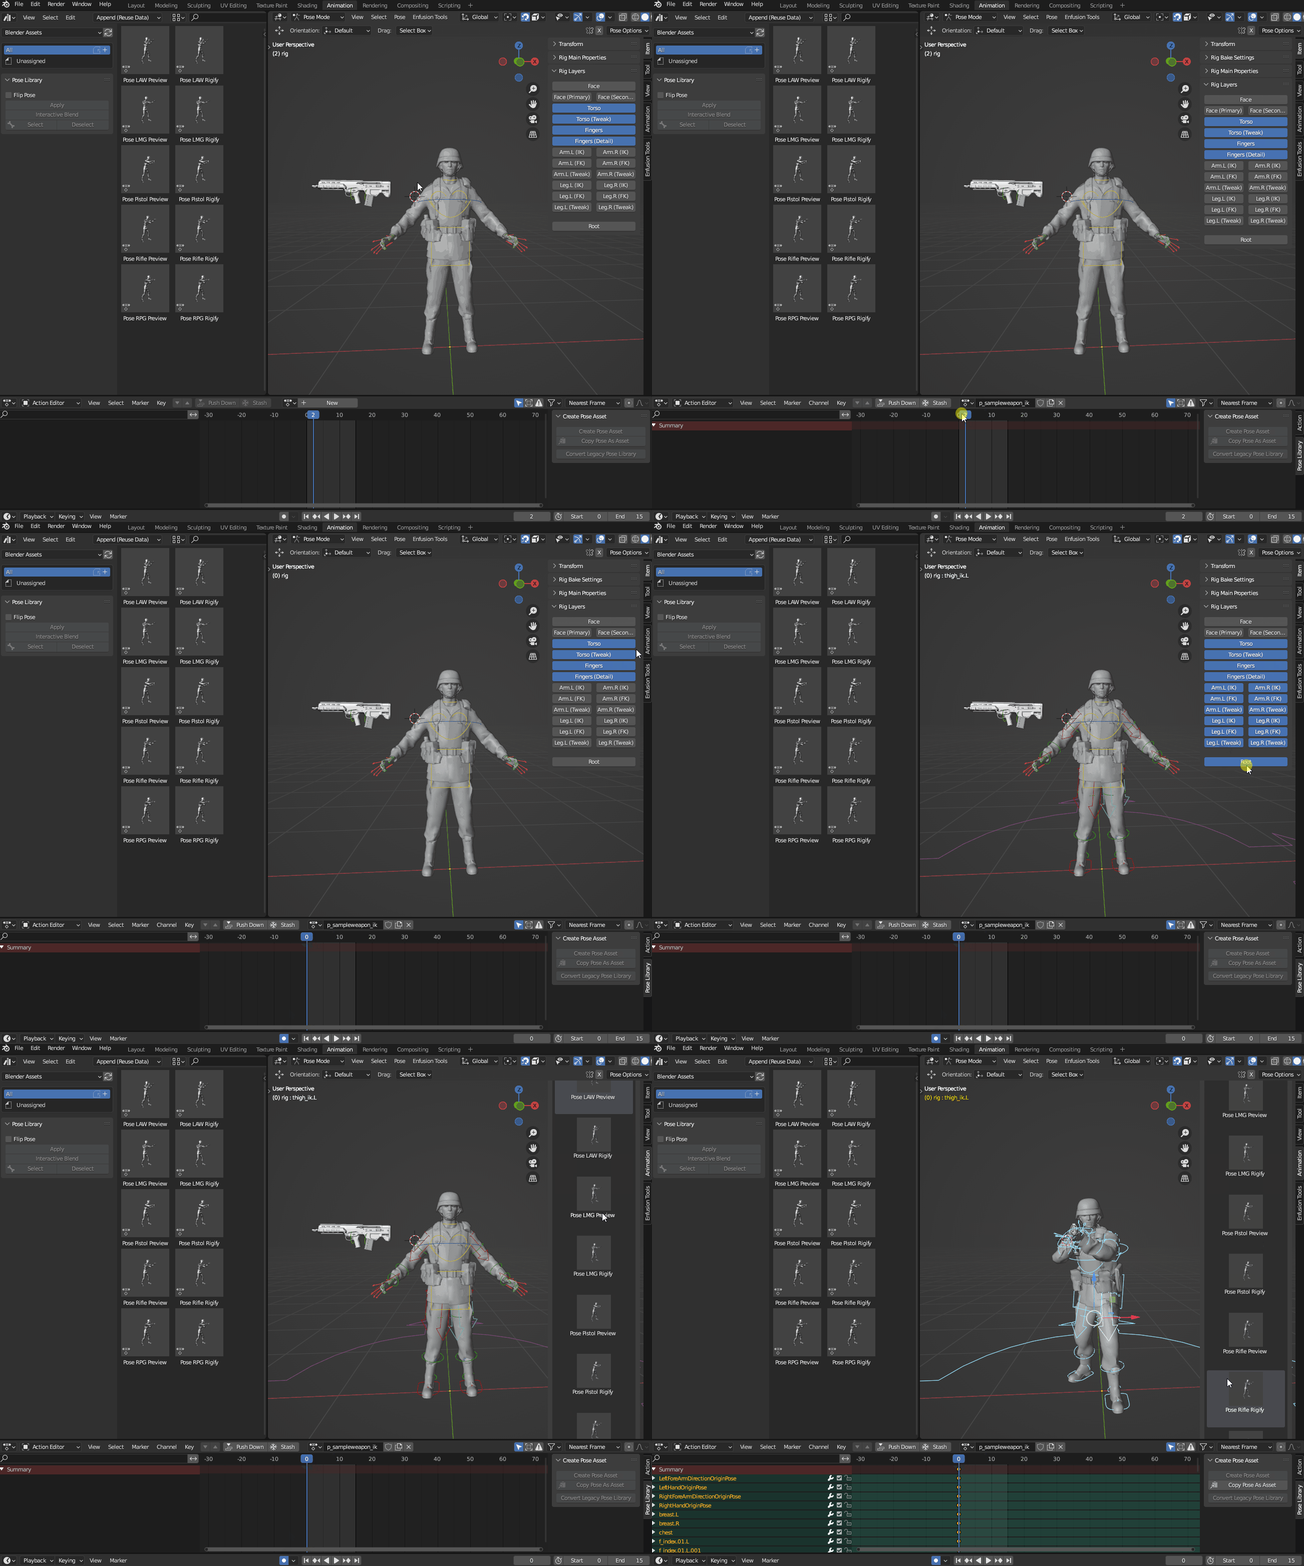
- Select Rig armature in Outliner and switch to Pose Mode (if you haven't done that before).
- Select bones on Rig which you want to animate. In this case all bones were selected via Ctrl+A shortcut but later, you might find it very useful to apply pose to f.e. only hand or legs.
- In Animations tab in Pose Library section, change Active Asset Library from Current File to Blender Assets
- It is also possible to use Asset Browser instead of Animation tab
- Apply pose to current selection either by clicking on one of the entries in library which has Rigify in its name or by clicking on it with Right Mouse Button and selecting Apply pose option from the context menu.
As it was mentioned before, poses can be partially applied and furthermore, they can be also blended - all those options are available in context menu of the action.
Setting up scene
Adding Weapon to the Scene
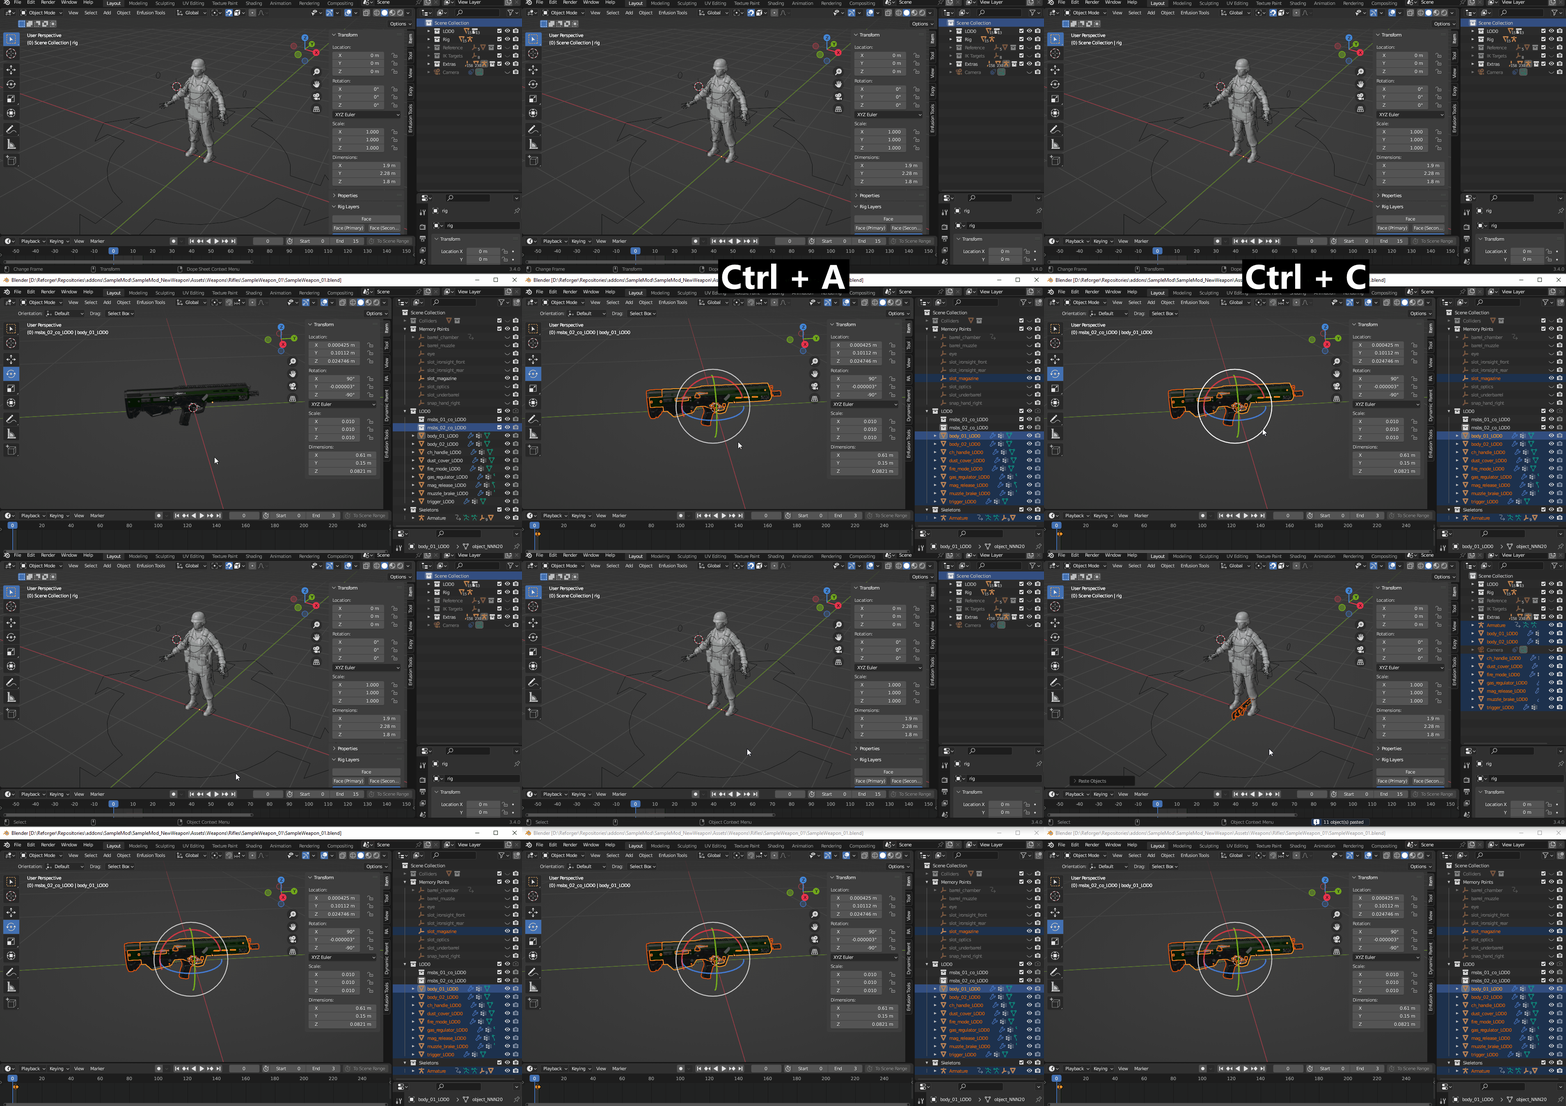
Creating a blend file which contains both character and the weapon involves multiple steps and it is quite important to do it properly, to avoid problems with for instance weird offsets of weapon when animation is exported. Below is list of all steps that you need to follow in order to prepare such scene:
- Open blend file containing weapon (SampleWeapon_01.blend in this case)
- Switch to Object Mode
- Make sure that scale of weapon armature & empty objects is set to 1. If not, select the Armature and then apply at least scale to object via Object → Apply me
- Link selected slot empty objects to Armature by changing their Parent in Relations sections of Object Properties
- Tip: You can use Copy to selected feature mentioned above to do it to multiple objects
- Select all objects which you want to have present in animation (like mesh, armature or empty objects used as slots) file and copy them to clipboard with Ctrl + C
- Open second instance of the Blender and load blend Character_AnimationRig_Example.blend file
- Switch to Object Mode in second instance of Blender
- Paste content of the clipboard to the scene by using Ctrl + V
- Rename weapon armature to f.e. Weapon - this should help distinguishing character and weapon armatures
Now, there are few ways how to snap weapon to correct bone and below are described two of them.
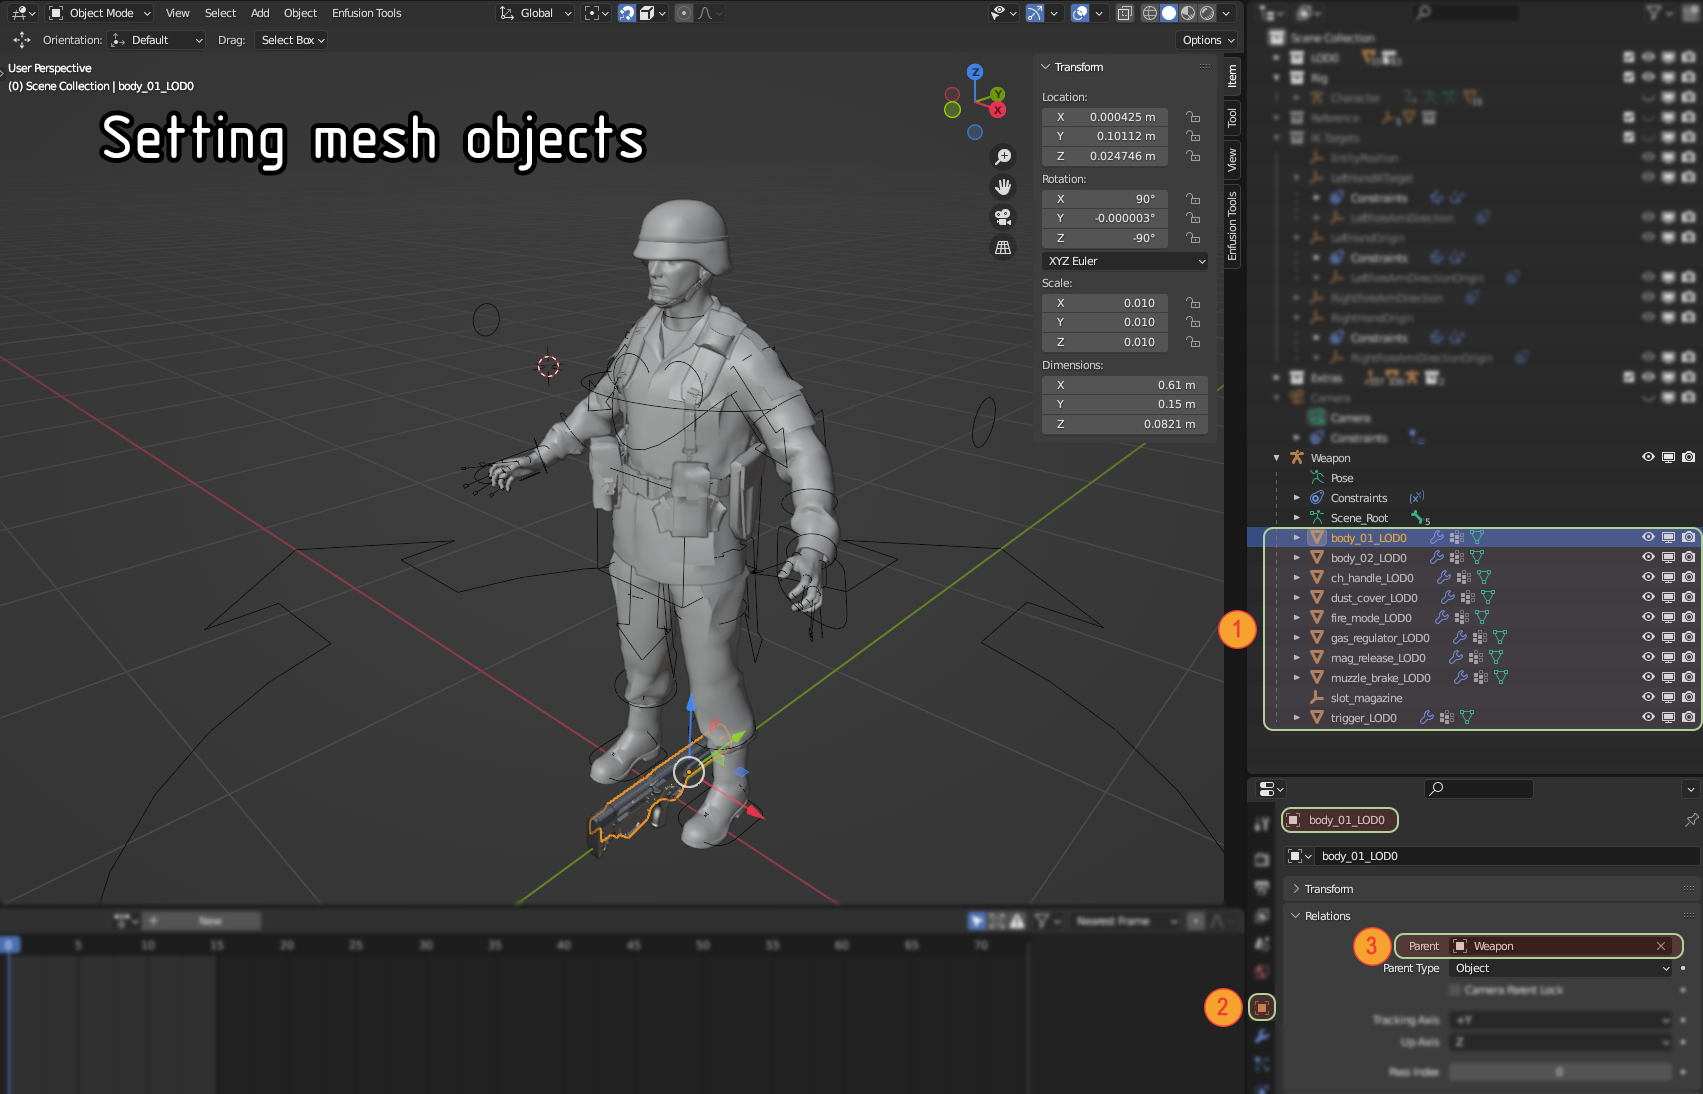
Method 1: Use Object Relations
- Switch to Object Mode
- Change Parent (3) in Relations section of Object Properties (2) tab on all mesh objects (1) to Weapon armature
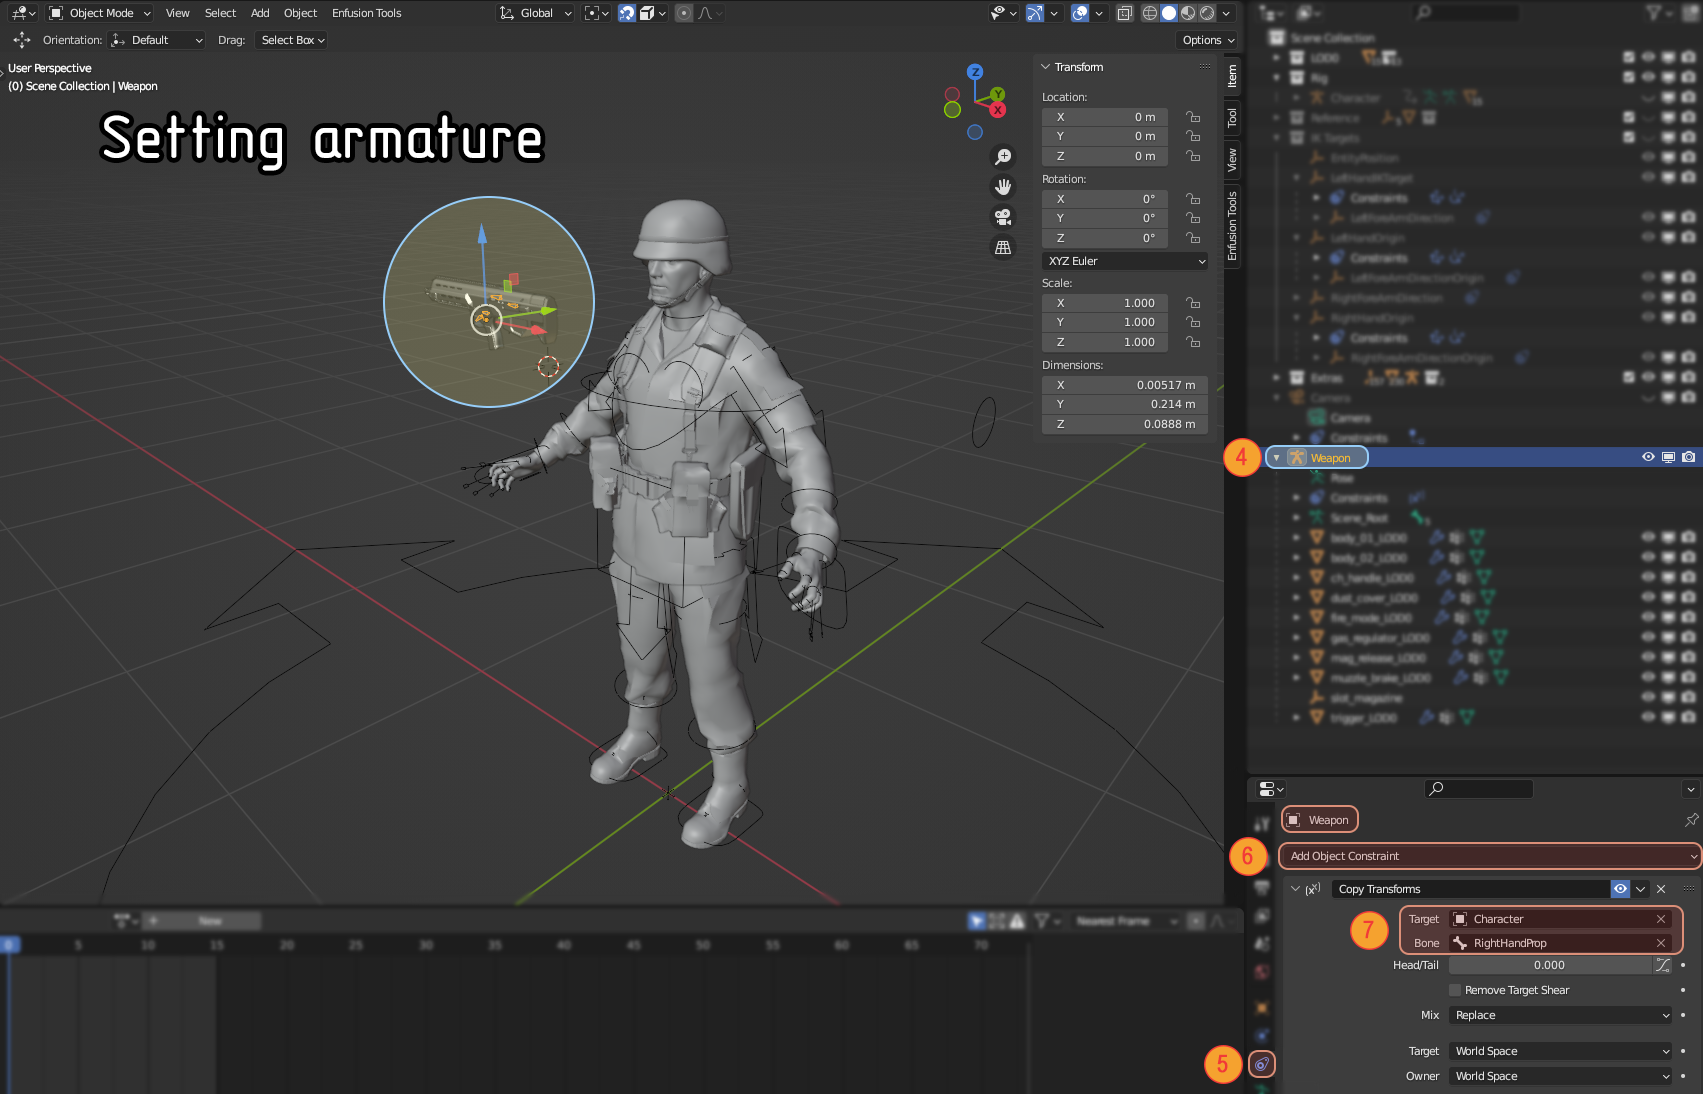
- Select Weapon (4) armature
- Go to Object Constraints Properties (5) tab and add new Copy Transforms modifier via Add Object Constraint (6) button
- In Target (7) field select Character (original skeleton of character)
- In Bone (7) field select RightHandProp - this should snap the weapon to RightHandProp bone
Method 2: Use Bone Constraint
- Select Weapon armature and switch to Pose Mode
- Select w_root bone
- In Bone Constraint Tab add Copy Transforms constraint via Add Bone Constraint button
- In Target field select Character armature
- In Bone field select RightHandProp bone
- Create new empty object called Weapon_Helper with Copy Transforms object constraint and select Weapon as target and w_root as Bone
- Select slot_magazine object and change Parent in Object Properties to Weapon_Helper object
- Optionally: Grab all objects in separate collection
In this tutorial, the first method was used. If you have some issues with objects being in wrong size of position, make sure that transforms of armature are matching object that you try to parent.
This should be enough to have decent setup for weapon animation creation in Blender and now such file - containing both character and weapon - should be saved to a separate file.
Adding magazine to the Scene
Procedure for adding magazine to the scene is quite similar to the weapon but in the last step, instead of attaching to RightHandProp, magazine should be attached to LeftHandProp. In this tutorial, Magazine_65x39c_SampleWeapon_01_30rnd.fbx will be added to main scene containing weapon & character.
If you have snap_magazine empty object, then you might consider parenting magazine mesh to it. To do so, follow below steps:
- Open magazine model (Magazine_65x39c_SampleWeapon_01_30rnd) in Blender
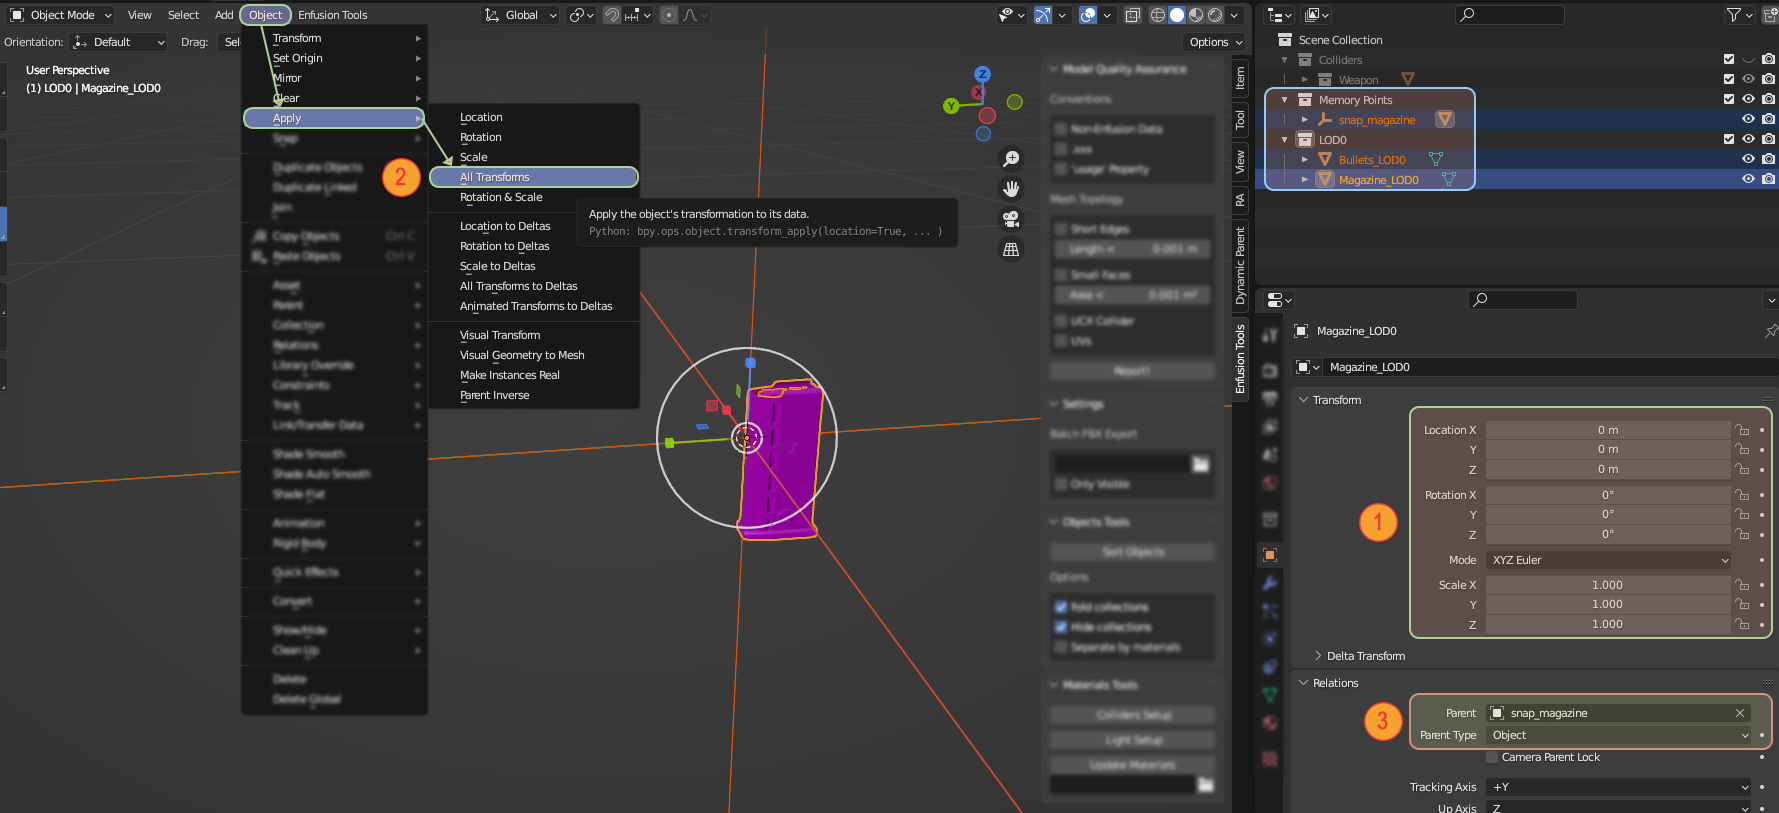
- Make sure that all objects (including snap_magazine empty object) that you want to parent have same transforms (1) - scale is especially important
- If not, apply all transforms via Object → Apply (2) menu
- Select mesh objects (Magazine_LOD0) and in Relations section of Object Properties, change Parent (3) to snap_magazine
- Copy paste both snap_magazine and mesh object into main scene
After magazine is present in main scene, there is one remaining step left:
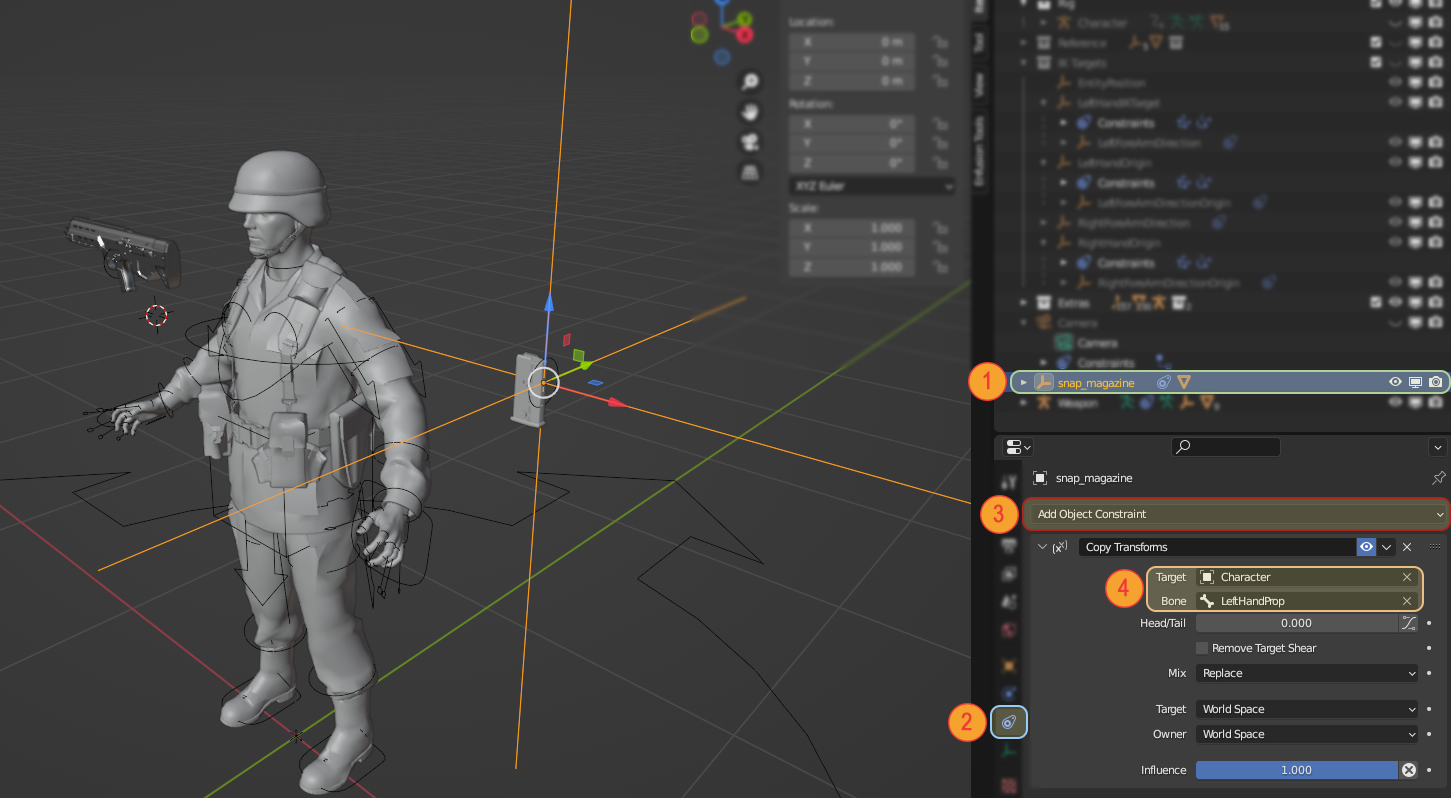
- In main scene, select snap_magazine (1) and add to it Copy Transform (3) constraint in Object Constraint Properties (2) tab
- In Target (4) field select Character armature
- In Bone (4) field select LeftHandProp bone
Once this has been done, it is already possible to set up the magazine in such a way that it is attached to the gun itself.
To do this, follow the instructions below:
- Select Rig armature in the scene
- Switch to Pose Mode
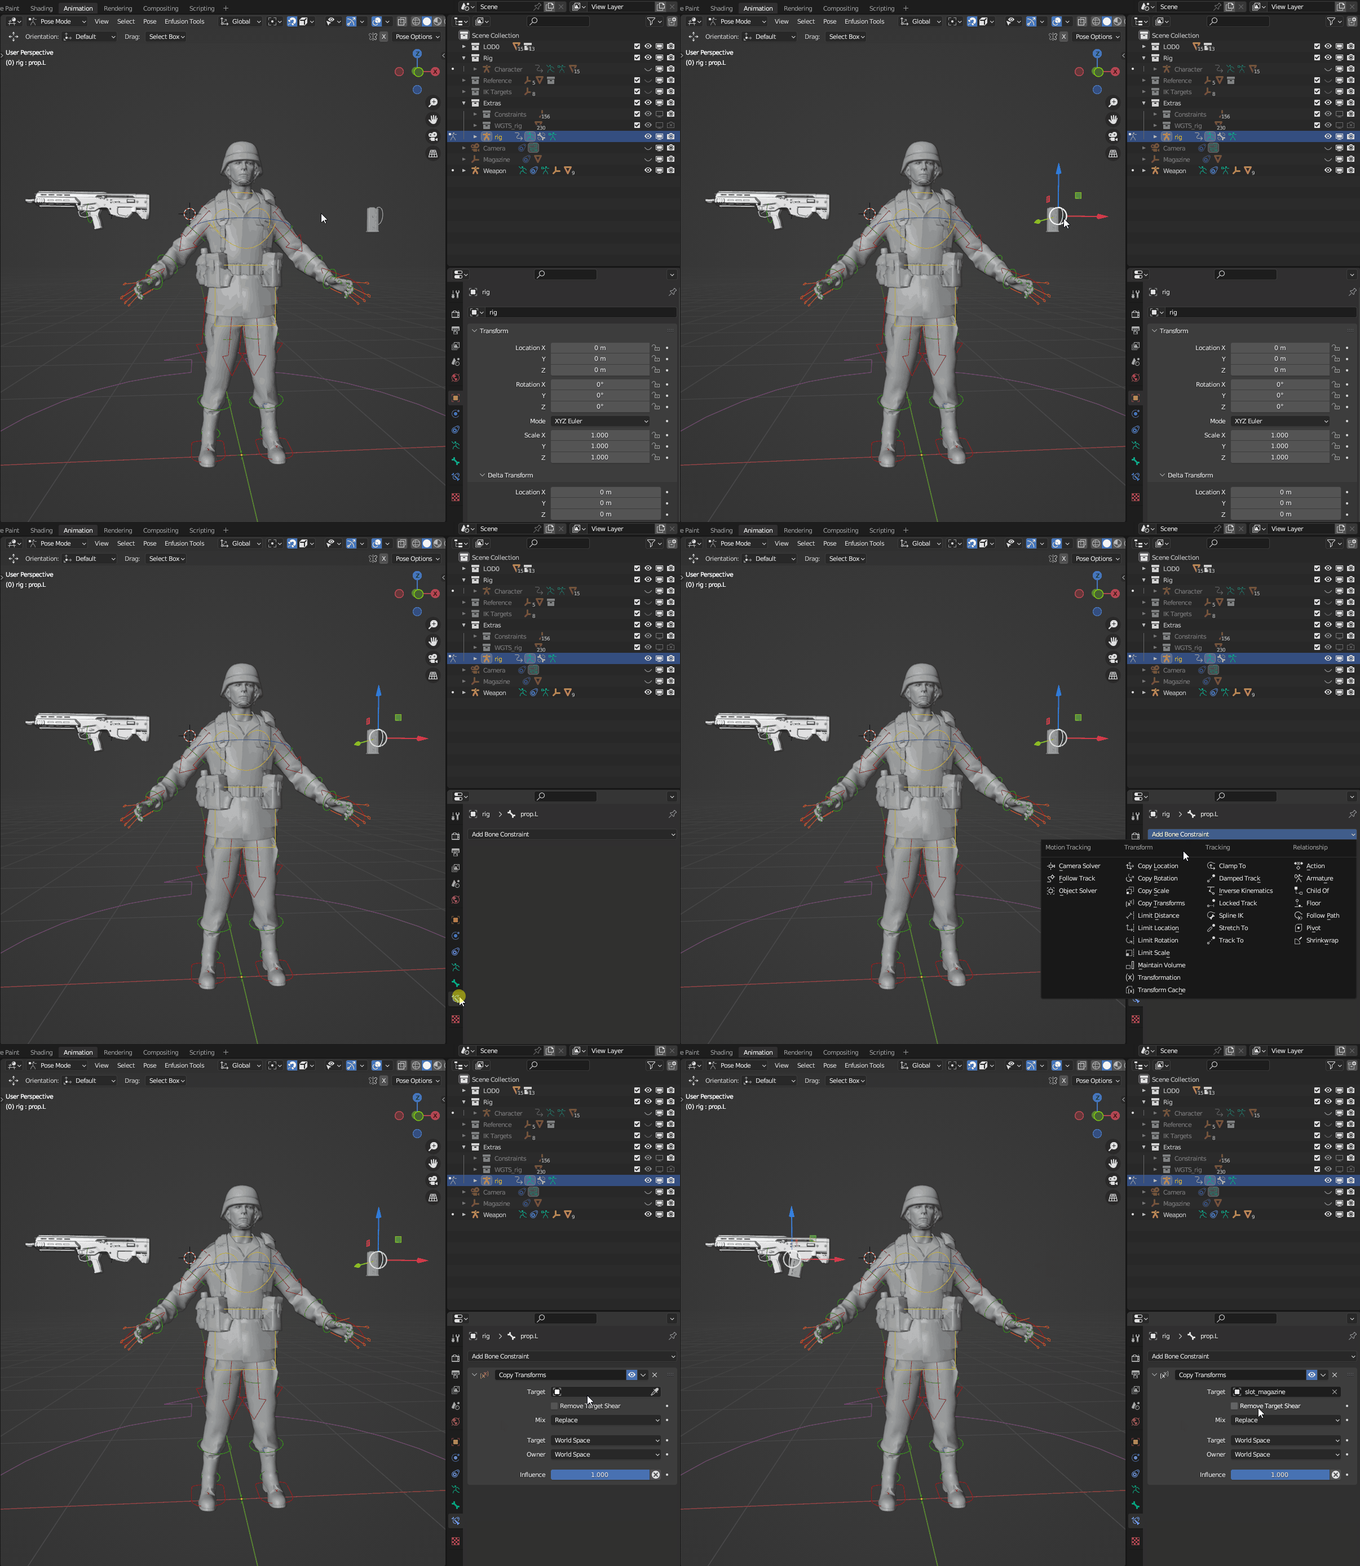
- Locate prop.L in the scene - by default it should be green circle on the left side of character. If magazine was correctly attached to LeftHandProp before, then you should also see your magazine inside of that circle
- In Bone Constraint Properties tab add new Copy Transform constraint via Add Bone Constraint button
- Make sure that slot_magazine has 1.0 scale before - if not, you can use apply scale via Object → Apply menu
- In Target field select slot_magazine object
At this stage such setup should be enough but later you will find out that few more constraint (like Child Of) are needed to create f.e. reload animations.
Creating IK Pose
Setup Base Pose
Now that both the character and the weapon are in Blender, it is time to create the first animation - weapon IK pose - which is responsible for proper holding of the weapon in game.
From this point, it is assumed that all work is happening on blend file containing Rigify rig and weapon in place created in previous steps. Also, as it was mentioned before, character animation should be performed on Rig armature and Character armature should be left untouched. Below are brief instructions that explain the entire process:
- Switch to Pose Mode
- Create new action - p_sampleweapon_ik
- Make sure new action is set to frame 0
- Optionally: Turn on Auto Keying option - without it, keyframe will have to be created manually at the end of the process
- Select all Rig armature bones (make sure you did unhide all the Rig Layers in Item tab! )
- In Pose Library, apply appropriate base pose - for rifle it is Pose Rifle Rigify - to the selection (see Applying poses from Pose Library paragraph for details)
- Different type of weapon archetypes are using different base IK pose and this is working together with Animation Instance parameter in SCR_WeaponAttachmentsStorageComponent - more on that latter. If you are f.e. creating RPG-7 type of weapon then use Pose RPG Rigify
- 🔵It is also possible to use Asset Browser for management and creation of new poses
After that, it's a matter of setting up the position of the hands correctly. Here are some tips to make this process easier:
- Start with rough placement of the hands. In Rig Layers section, leave only enabled Finger, Arm.L (IK) & Arm.R (IK) and then use hand_ik.L and hand_ik.R bones to positions hands correctly
- Once hands are roughly were they are supposed to be, it is possible to start tweaking finger - to do so, enable Fingers & Fingers (Detail) layers
File:armareforger-new-weapon-animation-setting-ik-pose-fast.mp4 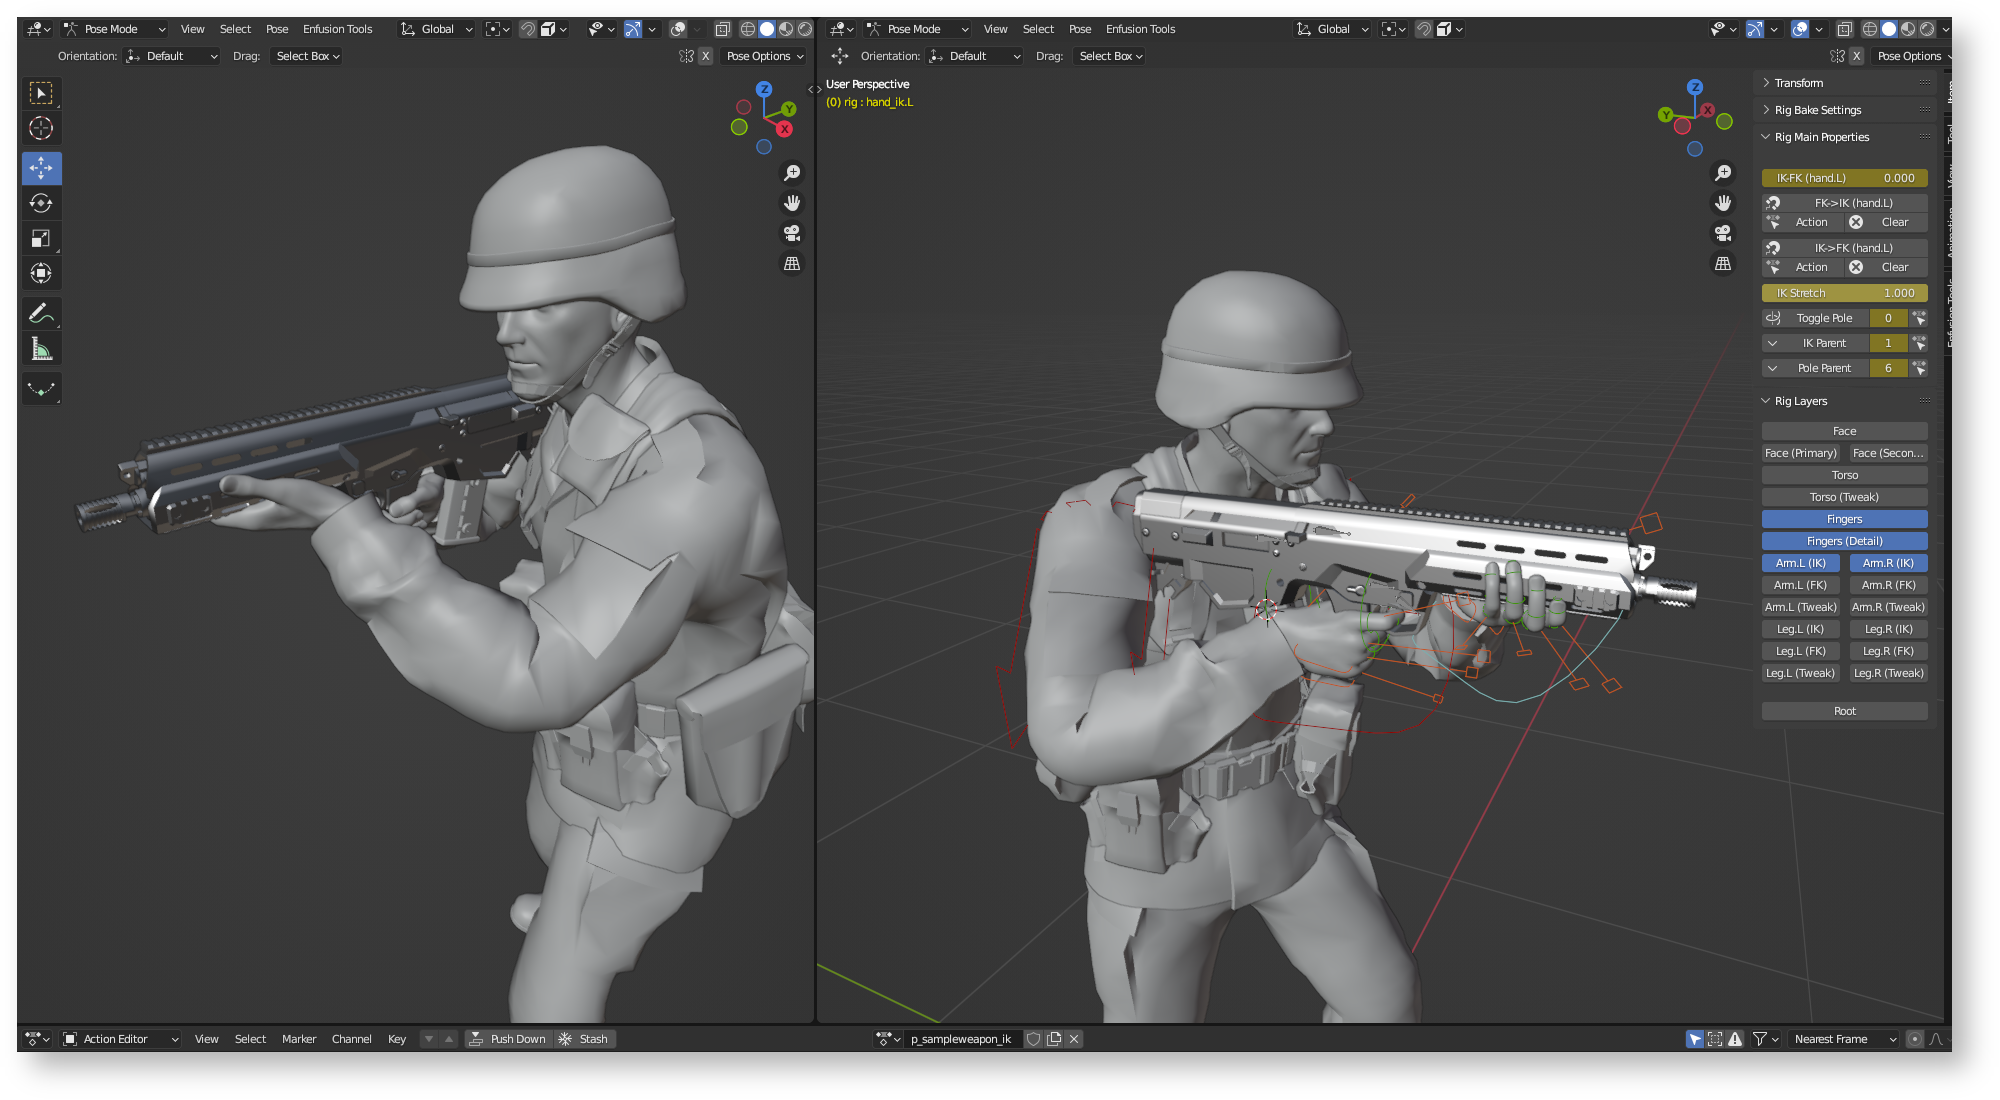
First Time TXA Export
Once the action is ready, it is possible to export p_sampleweapon_ik' to game readable format'. On weapon animation instances reference page you can check how actions should be exported. As you might observe, p_sampleweapon_ik action should be exported to three separate files. Some of you might wonder why not use single file instead of duplicating it and the answer is - export profiles.
Export profiles allows to export just certain bones from the selected action, and this is quite important. Without that, all animations in animation graph would overwrite each other and the last one would probably emerge victorious, showing some static pose. Furthermore, as suggested before, export profiles allows to create additive animations.
In this case, p_sampleweapon_ik should be exported into 3 files:
- p_rfl_sampleweapon_01_ik - using 501_IK export profile
- p_rfl_sampleweapon_01_offset - using 101_FullBodyABS export profile
- p_rfl_sampleweapon_01_safety - using 502_IK_RightHand export profile
The first step in exporting is to make sure that the Workbench is running, as this is mandatory for this export functionality. Next, click on Enfusion Tools → Export → Enfusion Animation (.txa) in top section of the 3D Viewport.
This should open a new window in the center of Blender showing two parameters and listing all actions present in the blend file with collapsed visibility (1) parameter next to them. Expand action params by clicking on it once and then perform following actions:
- Select save location by either copy pasting path in text field or by pressing Change save location button
- Save location should be pointing to a folder inside of your project. By default, Enfusion Blender Tools suggest using relative path which is quite handy if you share project between multiple people.
- In Sample New Weapon, save location is located in Assets/Weapons/Rifles/SampleWeapon_01/Anims folder inside the addon
- Select Character armature in Armature name - exporter will attempt to export bones movement from this skeleton
- In Secondary armature name select rig skeleton.
- At this stage this is not going to do anything but it is nice to have it filled in table now. This is parameter is useful when armature which you want to export, is constrained to another armature and doesn't have any motion itself and you want to export multiple actions at once. In case of Rigify rig, in this field should be selected name of the Rigify control rig.
- Add 3 entries to the list by clicking on + Add (2) button on the right side of the window
- Fill in data as picture below
- Click on large OK button to start TXA export
Importing TXA in Resource Manager
If action was correctly exported, three TXA files should be present in selected location. By default, Enfusion Blender Tools will try to automatically register TXA files - it might fail however if you are using symbolic links or save location is incorrect (outside of your project).
If registration didn't succeed yet TXA files are inside of your project, in Resource Manager click on them with Right Mouse Button ![]() and select Register & Import option in context menu.
This should trigger conversion of txa files into anm - binary form of animation - and generate meta file for it.
and select Register & Import option in context menu.
This should trigger conversion of txa files into anm - binary form of animation - and generate meta file for it.
Previewing Animation in Resource Manager
To quickly verify if animation was exported correctly it is possible to play it in Resource Manager tab. To do so, follow below steps:
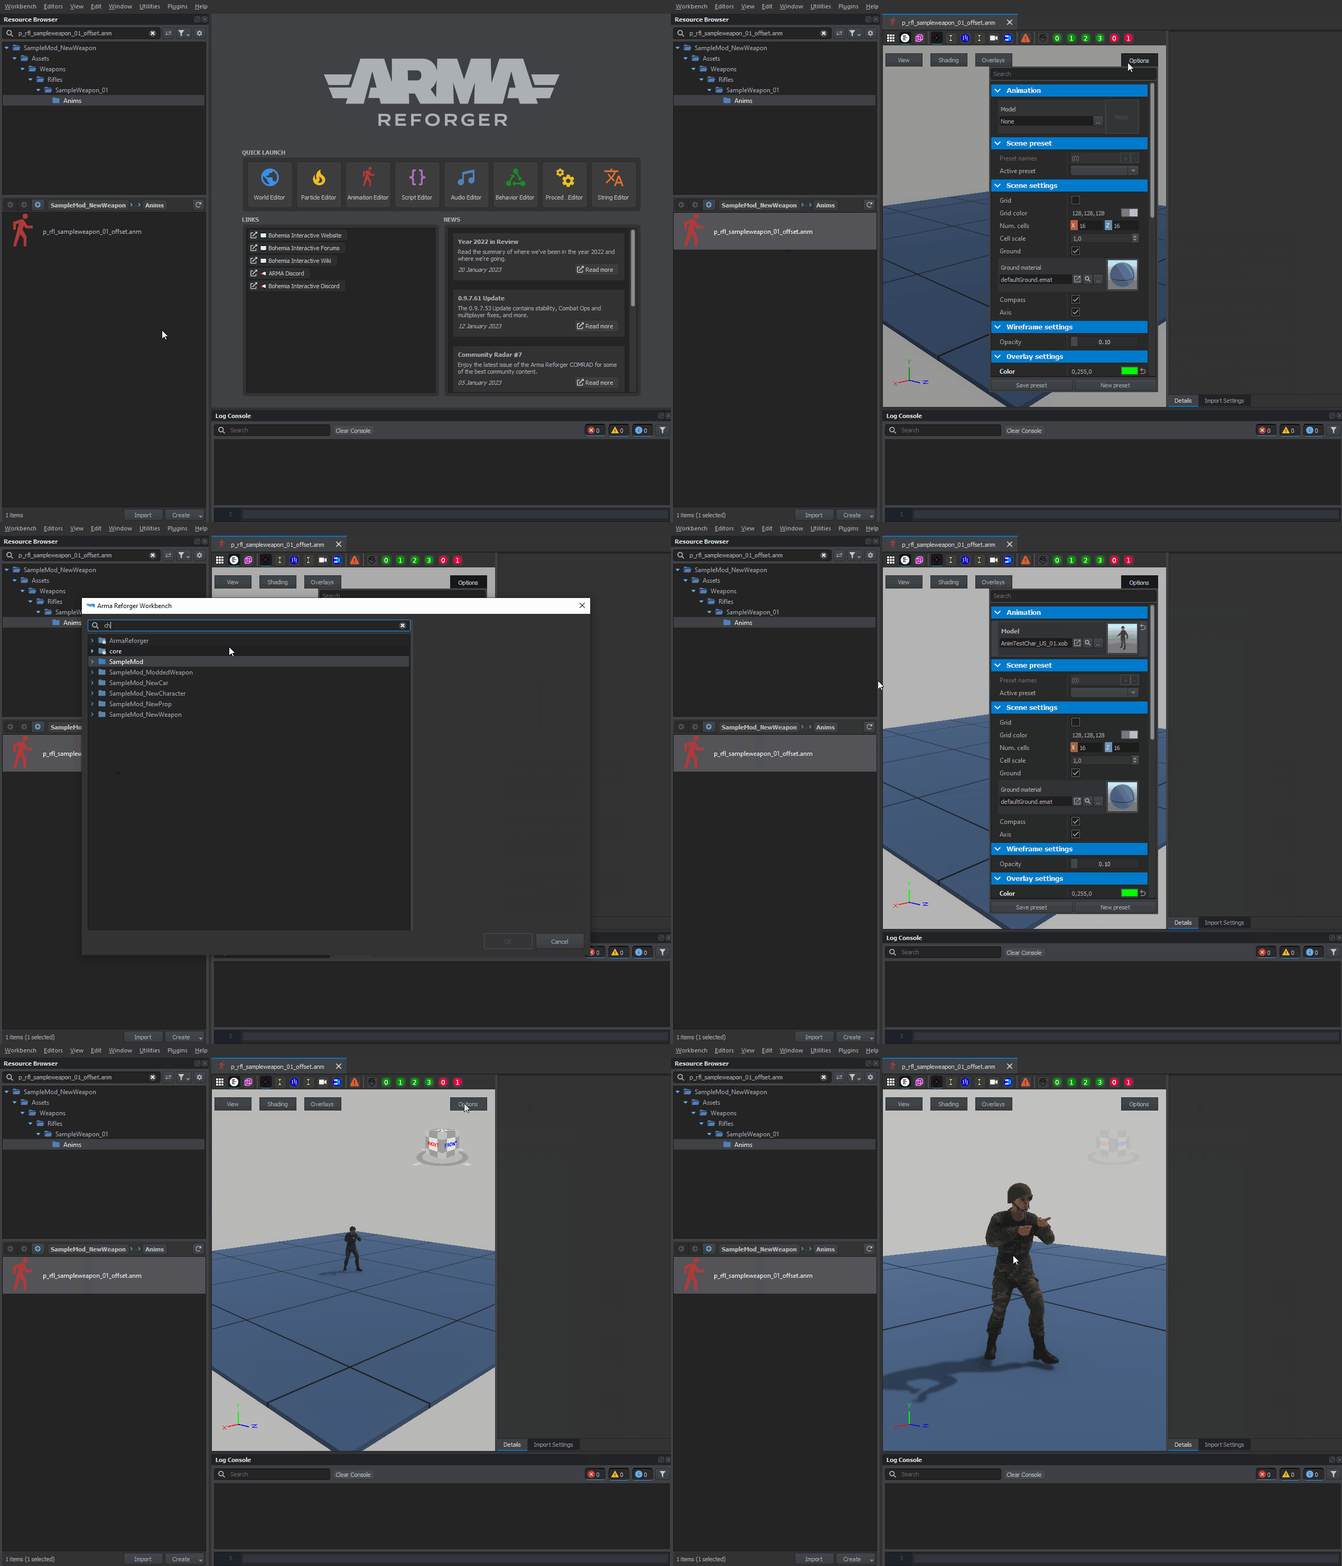
- Double click on p_rfl_sampleweapon_01_offset.anm - this should open this animation in new, seemingly empty, tab
- Click on Option button in top right corner of the viewport
- In Animation section, change Model property by clicking on two dots .. next to it
- Select one of the character anim preview models like i.e. AnimTestChar_USSR_01.xob
After that, you should see your animation in Resource Manager viewport played on previously selected preview character.
Assigning animations in Animation Editor
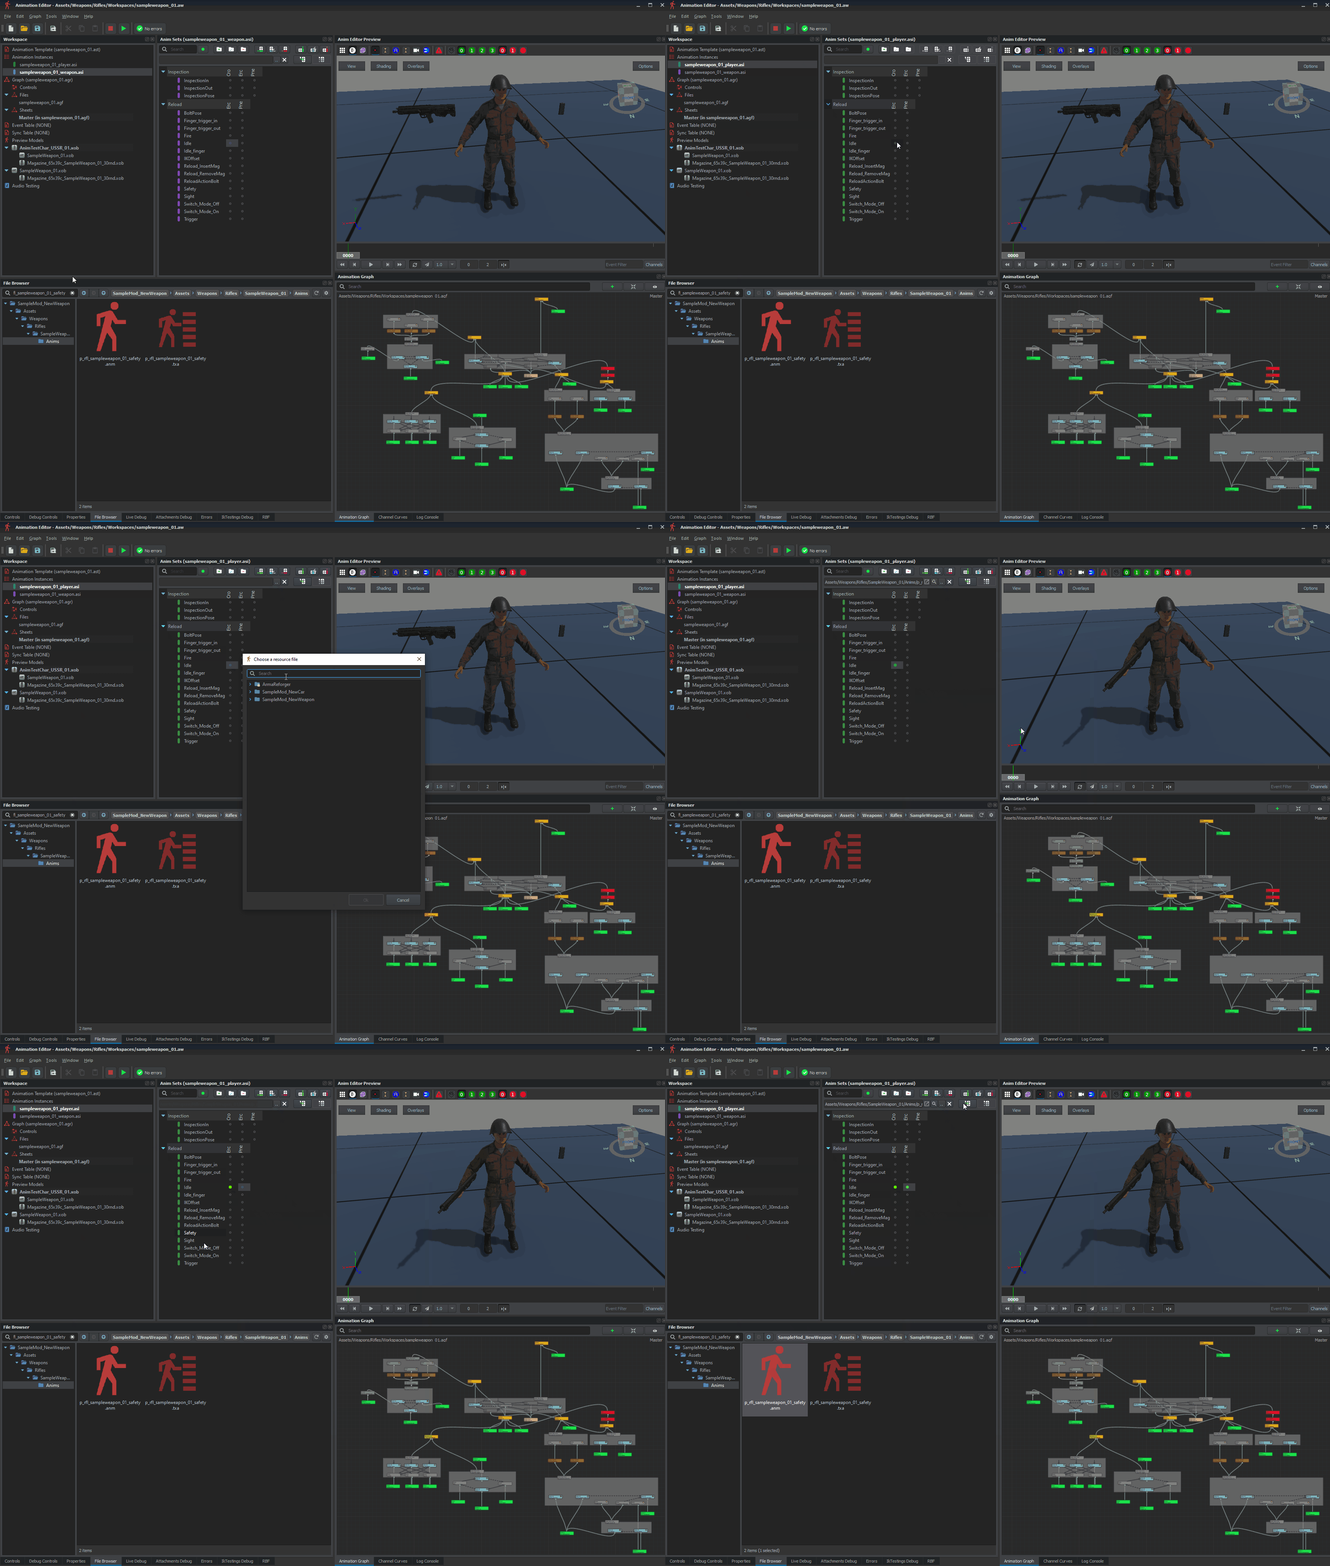
Two of the generated animation p_rfl_sampleweapon_01_offset & p_rfl_sampleweapon_01_safety have to be assigned in Player Animation Instance fields in Animation Editor - without this, IK animation might not work correctly.
Assigning of the animations in the Animation Editor can be done by performing the following actions:
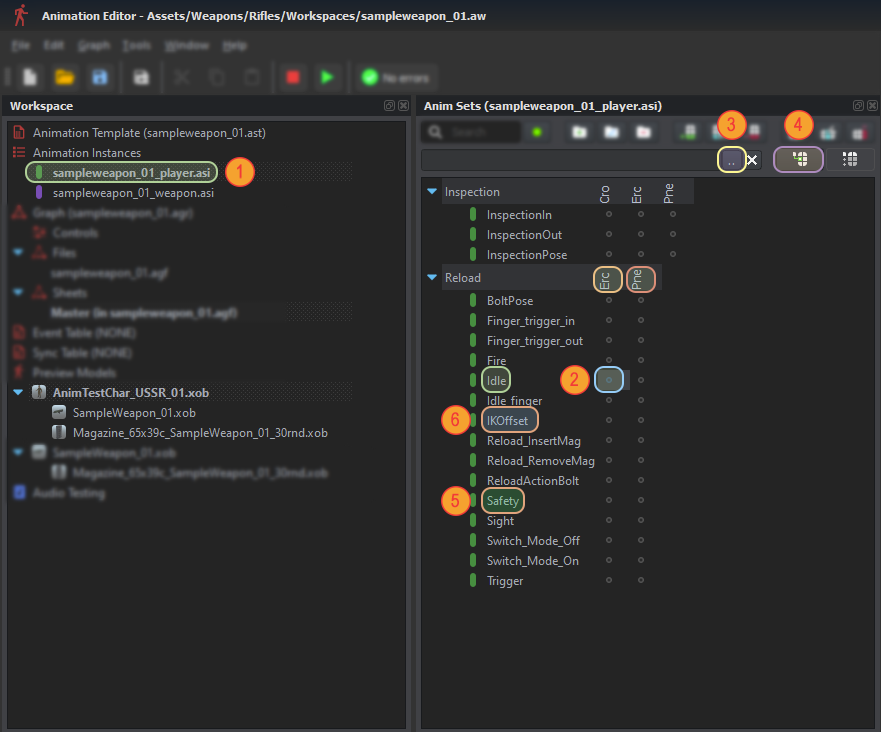
- Open previously created animation workspace ( sampleweapon_01.aw ) in Animation Editor
- Activate character animation instance by double clicking on it (1) with Left Mouse Button
- In Anim Sets window click on dot in Erc (2) column in Idle row
- Assign p_rfl_sampleweapon_01_safety.anm animation to selected field by:
- Clicking on two dots in top section (3) of Anim Sets window
- Selecting animation in File Browser window connected to Animation Editor and then clicking on Set Animation button (4)
- Assign same animation for Pne column and then for Erc & Pne columns in Safety (5) row.
- In IKOffset (6) row assign p_rfl_sampleweapon_01_offset animation in both Erc & Pne columns.
Additionally, to avoid hand animation distortion when weapon is picked up, 🔴 temporarily 🔴 assign p_rfl_sampleweapon_01_offset to Switch_Mode_On & Off fields. 🔴 You should later replace that animation with proper one 🔴, since with this temporary incorrect animation you will get glitch when weapon fire mode (or safety) is changed.
Animation playback in Animation Editor
When all those animations are assigned in Animation Workspace, it is possible to preview them in Anim Editor Preview window. In order to do this, you can perform following steps:
- Make Sure that AnimTestChar is activated in Preview Models list in Workspace window
- If not, activate it by i.e. double clicking on it with Left Mouse Button (more info can be found in previous chapter)
- Double click on green dot in Anim Set window
- A good example will be IKOffset animation
- Observe character in Anim Editor Preview window
Assigning animation to prefab
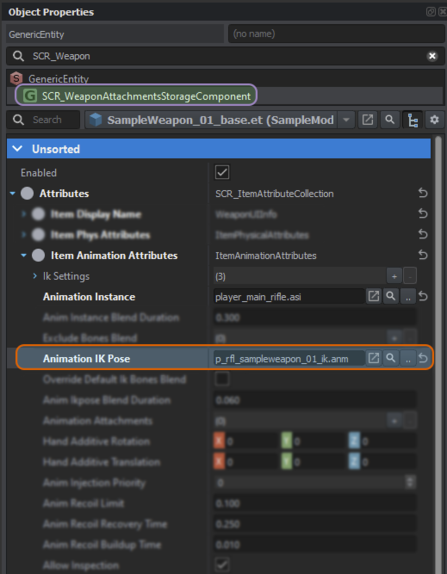
The actual IK pose has to be assigned outside of Animation Editor. First step towards assigning this animation will be loading weapon prefab in World Editor (SampleWeapon_01_Base.et) and then locating SCR_WeaponAttachmentsStorageComponent component. Over there, find Animation IK Pose parameter in Attributes → Item Animation Attributes section of the component and assign your previously exported IK animation (p_rfl_sampleweapon_01_ik.anm).
If you plan to do different type of weapon, make sure to also change Animation Instance parameter so it matches desired type - of course you need to use also proper IK base animation in Blender! In most cases, if you are duplicating similar type of weapon then this parameter will be already set correctly.
This animation is very important for proper handling of character weapon holding animation but it doesn't work alone and it requires IKOffset, Safety & Idle animations which were assigned before in Animation Editor itself. Once that animation was assigned to Animation IK Pose field, don't forget to save your changes to prefab (use Apply to prefab button if change was made to entity instead of prefab).
Testing result in game
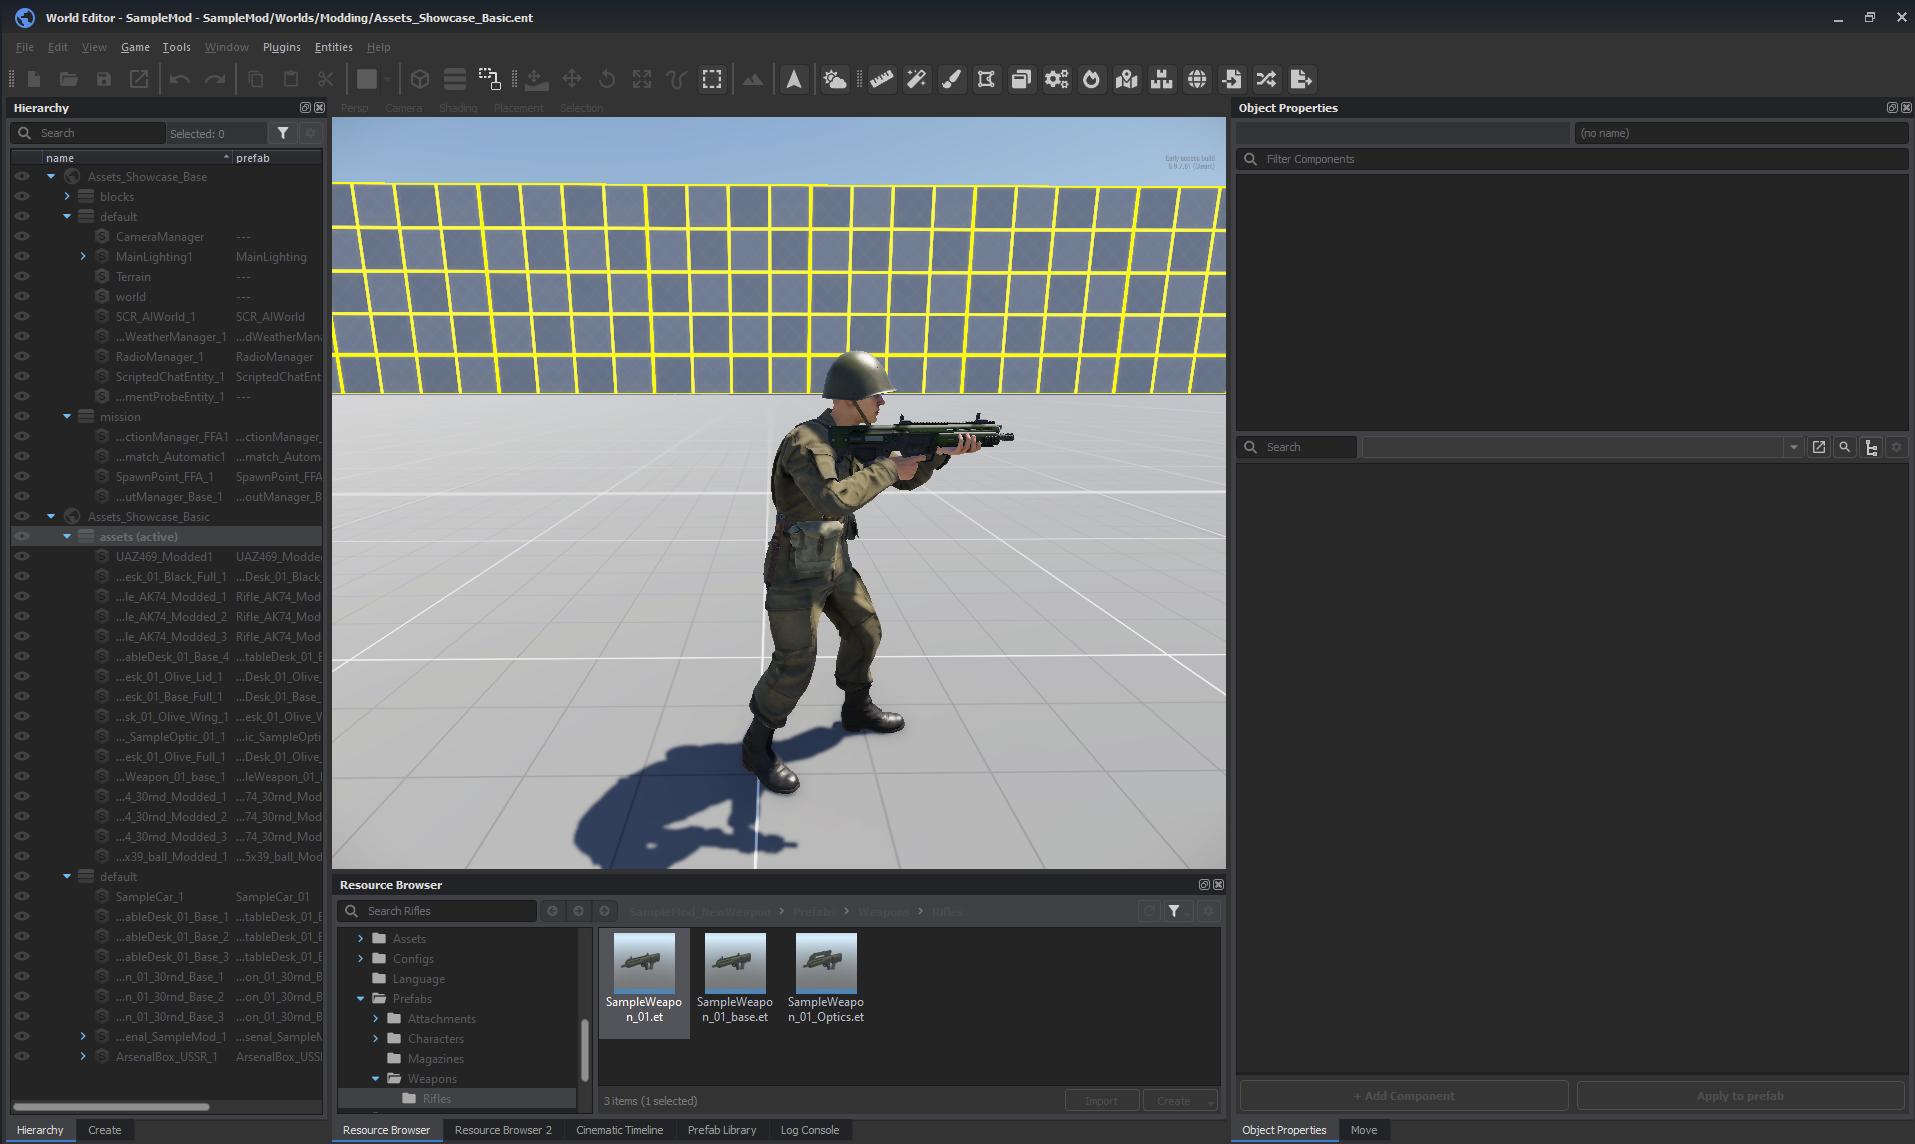
With all those pieces in place, it should be now possible to test the animations in game already. To do so, load i.e. Assets_Showcase_Basic scenario from main sample mod and place in the world weapon prefab (SampleWeapon_01.et). Alternatively, it is also possible to load MpTest.ent scenario, make new sub-scene world and then place the weapon in the world.
Creating Basic Weapon Mechanics Animations
Basic weapon mechanics animations, such as those responsible for the bolt, trigger, or safety, can be created either in the main blend file containing the character and weapon, or in a separate blend file containing only the weapon. In this tutorial, second approach was used and SampleWeapon_01.blend was utilised as a base.
Bolt and Trigger Animations
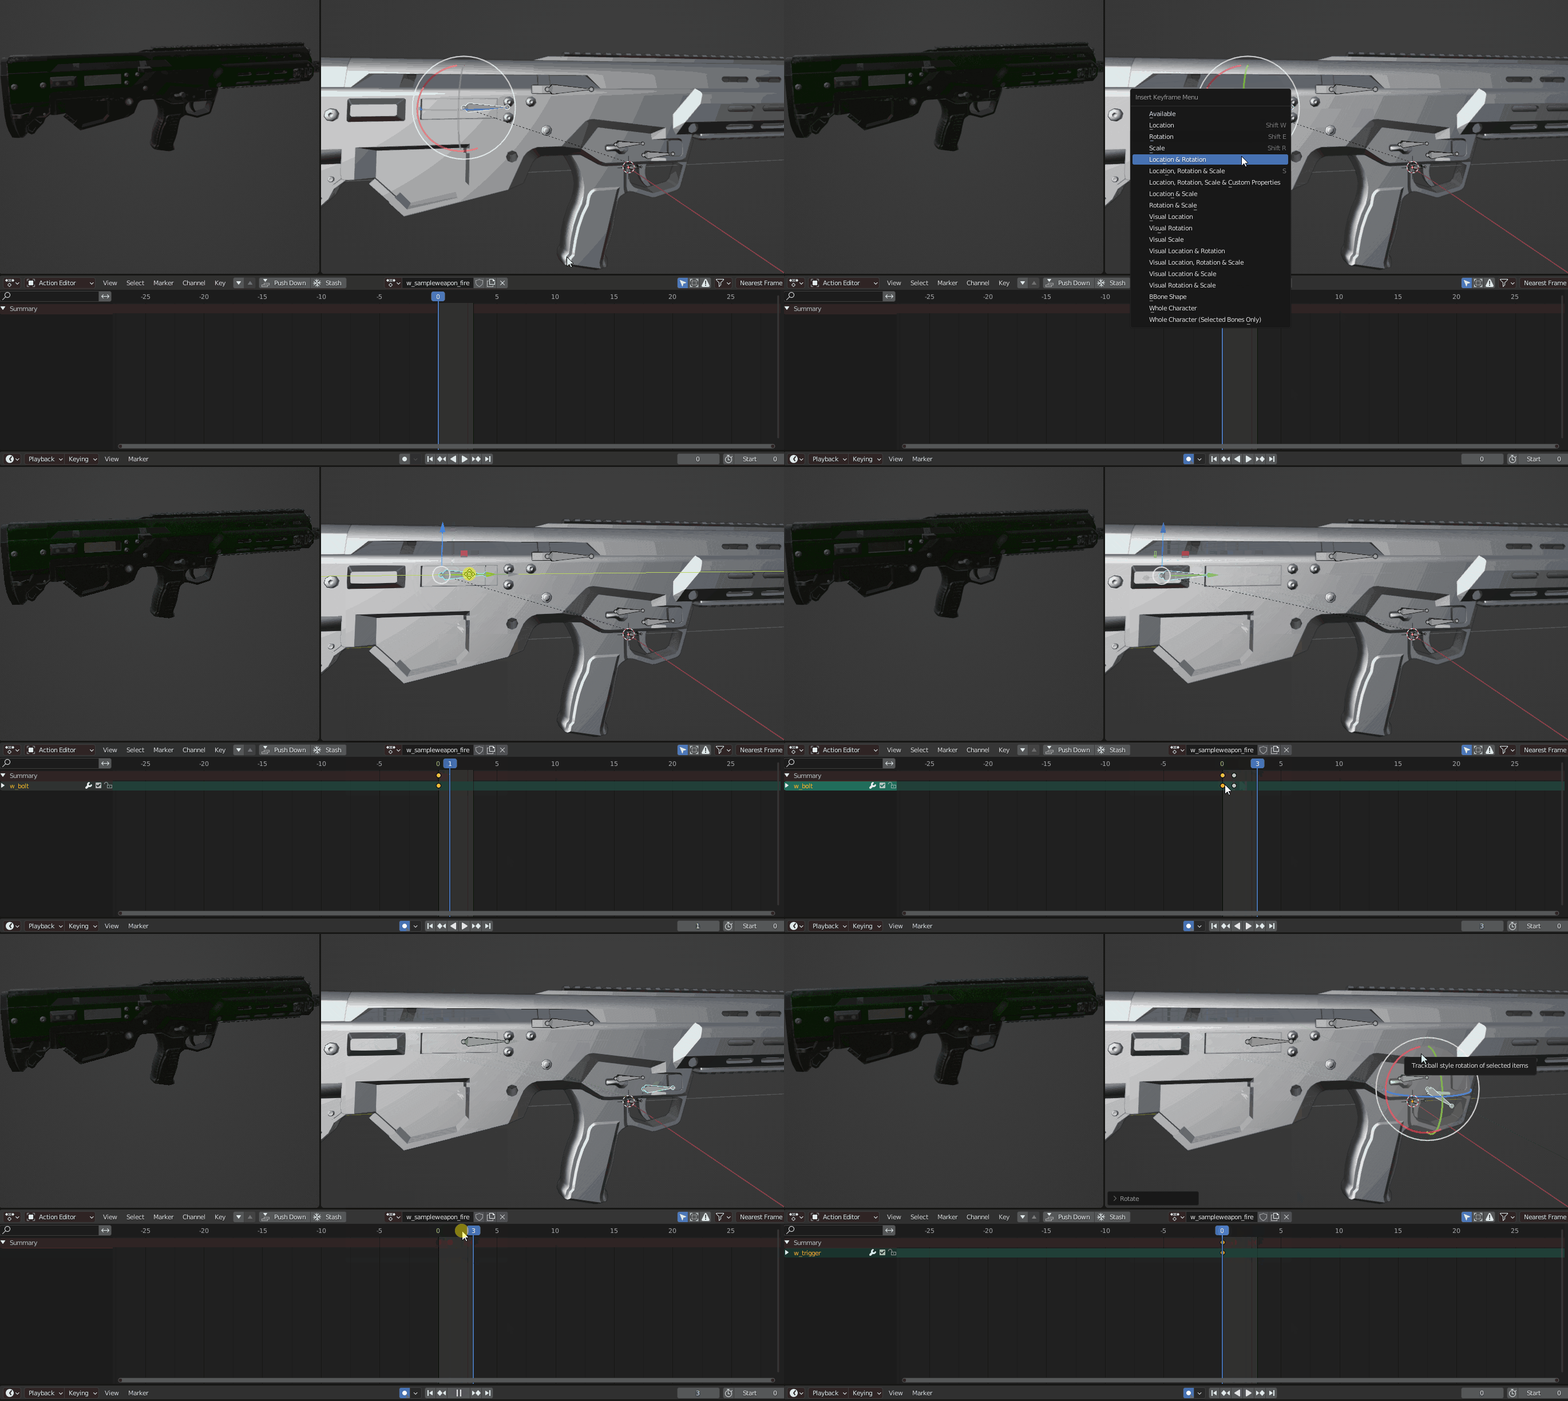
For weapon bolt pose, trigger and fire anim it is possible to utilize just single action. In this tutorial, this action was called w_sampleweapon_fire.
The animation itself is very simple and in this tutorial we will start with w_trigger bone.
Select that bone, switch to frame number 0, turn on Auto Keying and rotate bone by around 25 degrees so it looks like the trigger is being pressed.
Next on the list is w_bolt bone. As mentioned in BoltPose section of weapon animation instances reference, the bolt animation should contain 3 states:
- Closed bolt at frame 0
- Open bolt at frame 1
- Closed bolt at last frame (can be frame 2 or 3 if you want to smooth thing out a little bit)
Select w_bolt, switch to frame 0 if you are not already in it and then save current position and location of the bone in the timeline via Insert Keyframe menu (accessible via shortcut or Right Mouse Button click in view port). This frame will be representing closed bolt.
In frame 1, w_bolt bone should be moved back so it represents open bolt. In the last frame (depending on preferences it can be frame 2 or 3) it is possible to copy paste first frame, so it is back to closed state.
And that's it - this should be enough now to create w_rfl_sampleweapon_01_fire, w_rfl_sampleweapon_01_bolt_pose & w_rfl_sampleweapon_01_trigger animations which can be imported into Enfusion.
Fire Mode Selector
Safety animation, as mentioned in weapon animation instances reference, should contain as many key frames as there weapon modes on the weapon. In this case, Sample New Weapon have three states:
- Safe
- Semi
- Full Auto
First step towards creating animation for all those 3 states will be creating new action called w_sampleweapon_safety. This can be done by clicking on New Action button in top section of Action Editor.
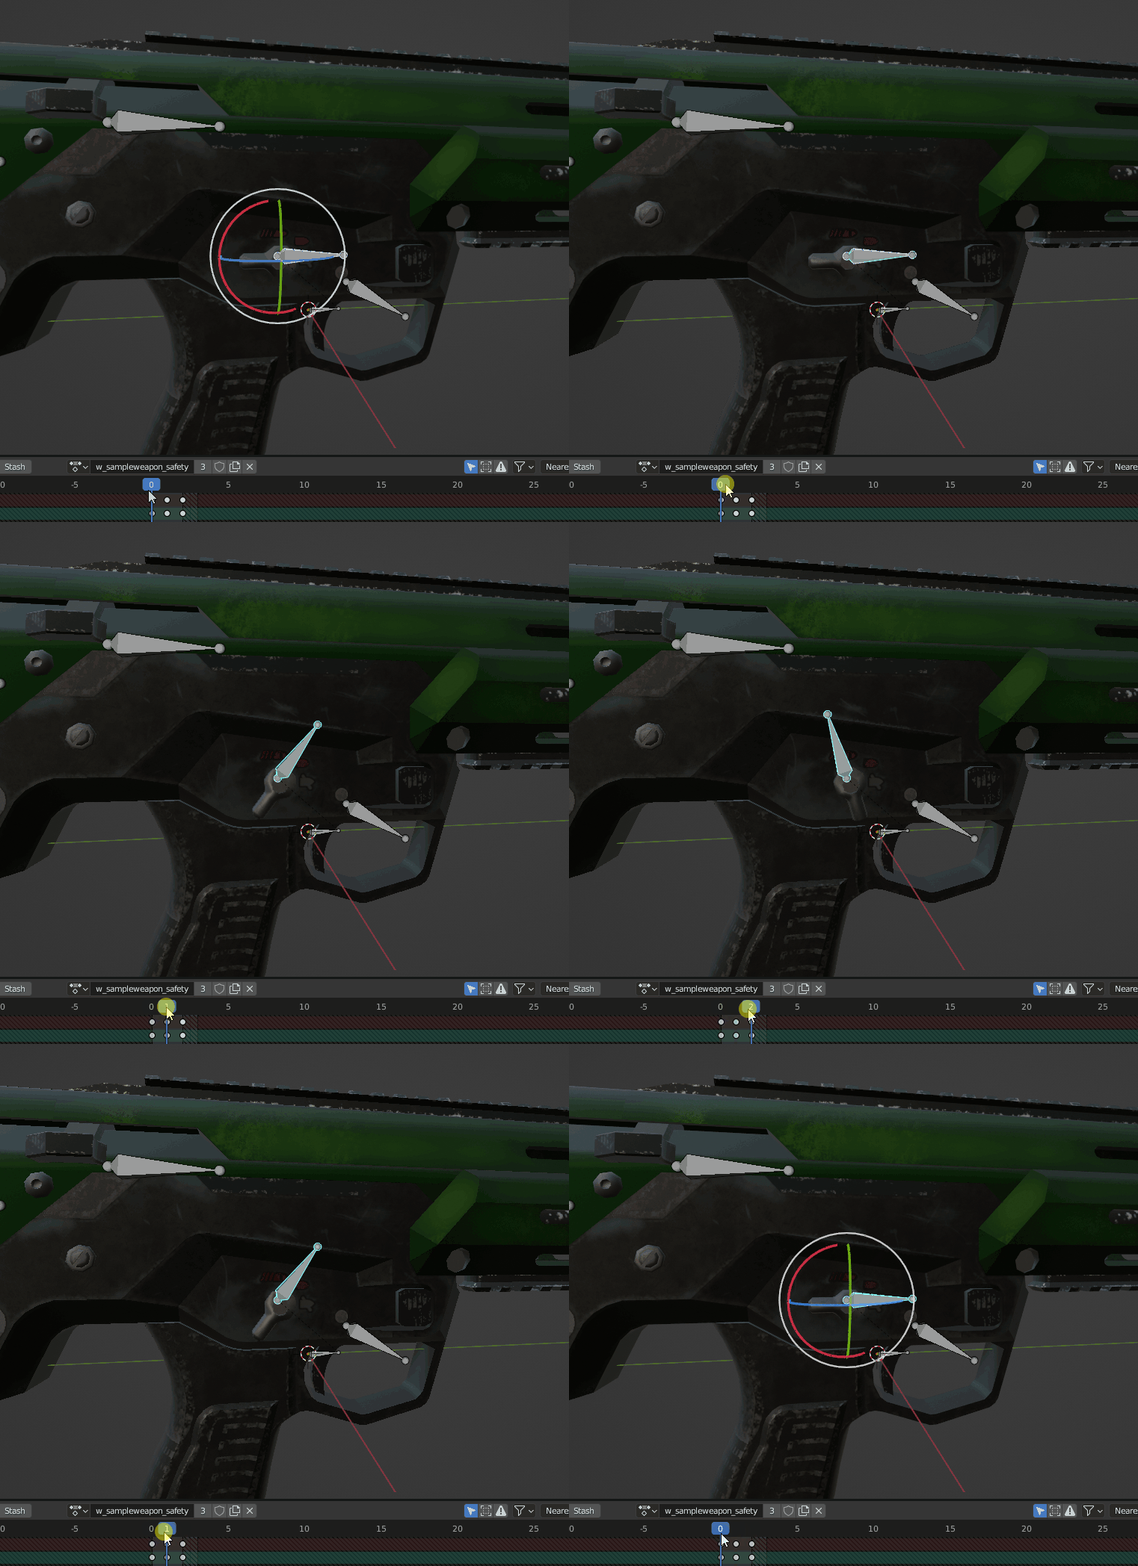
Once this new action is prepared, it is possible to start animating w_fire_mode bone which is rigged to fire selector. Below are steps describing how to prepare w_sampleweapon_safety action:
- Select w_fire_mode bone
- Switch to key frame 0 and animate the w_fire_mode so it points at the safe mode. It might be handy to turn on textures Viewport Shading to Material Preview mode to see the textures on the model
- If fire selector points to safe mode in rest pose, then simply current position and location of the bone in the timeline via Insert Keyframe menu
- Switch to frame 1 and rotate fire selector so it points to single fire fire mode
- Switch to frame 2 and rotate fire selector so it points to full auto fire mode
If everything went smooth, both actions should be now ready for export!
Export Weapon Animations
Exporting weapon animations follows the same principle as exporting character hand animations.
Open TXA export menu ( EBT → Export → Enfusion Animation (.txa) ) and using weapon animation instances reference, fill data as follows:
- Add 3 export fields to w_sampleweapon_fire action
- w_rfl_sampleweapon_01_trigger with 721_Weapon_Trigger export profile
- w_rfl_sampleweapon_01_bolt_pose with 724_Weapon_Bolt export profile
- w_rfl_sampleweapon_01_fire with 726_Weapon_Bolt_Trigger export profile
- Add 1 export field to w_sampleweapon_safety action
- w_rfl_sampleweapon_01_safety with 701_Rifle_Idle export profile
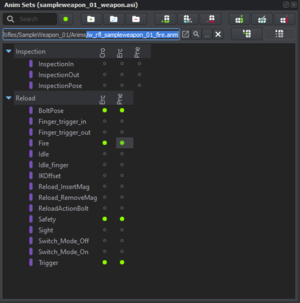
Once animations are exported, import & register them in Workbench and then proceed to animation workspace of the rifle in Animation Editor. Over there activate weapon animation instance (sampleweapon_01_weapon.asi) and in Anim Sets window and fill animations to Erc & Pne columns as on list below:
- w_rfl_sampleweapon_01_trigger → Trigger
- w_rfl_sampleweapon_01_bolt_pose → BoltPose
- w_rfl_sampleweapon_01_fire→ Fire
- w_rfl_sampleweapon_01_safety → Safety
Assignment of animations to all lines can be again performed in two ways as described before. In general, when dealing with multiple lines, it is faster to use Set Animation button together with File Browser.
Tweaking Animation Graph
While debugging weapon switch animations in Animation Editor, you might observe that semi & auto positions are swapped. This is caused by the fact, that AK74, which was used as base for animation graph, has fire selector which goes from Safe to Full Auto and then the last position if Semi Auto.
This problem can be solved in several ways, e.g. the animation itself can be adjusted so that, for example, frame number 1 on the example weapon represents full auto and frame 2 is responsible for semi-auto. Transitions between such fire modes might not look good, so instead of changing the animations, the graph will be modified.
Such modification of the animation graph can be done in a few steps:
- Open in Animation Editor animation workspace of your weapon
- In Animation Graph try to locate Pose - SemiPose node and click on it once with Left Mouse Button
- In Properties window change Time property from 1 to 0.5 - this property goes from 0 to 1, where 0 means beginning of the animation and 1 means end of the animation.
- Select node Pose - AutoPose
- In Properties window change Time property from 0.5 to 1
Testing Result in Animation Editor
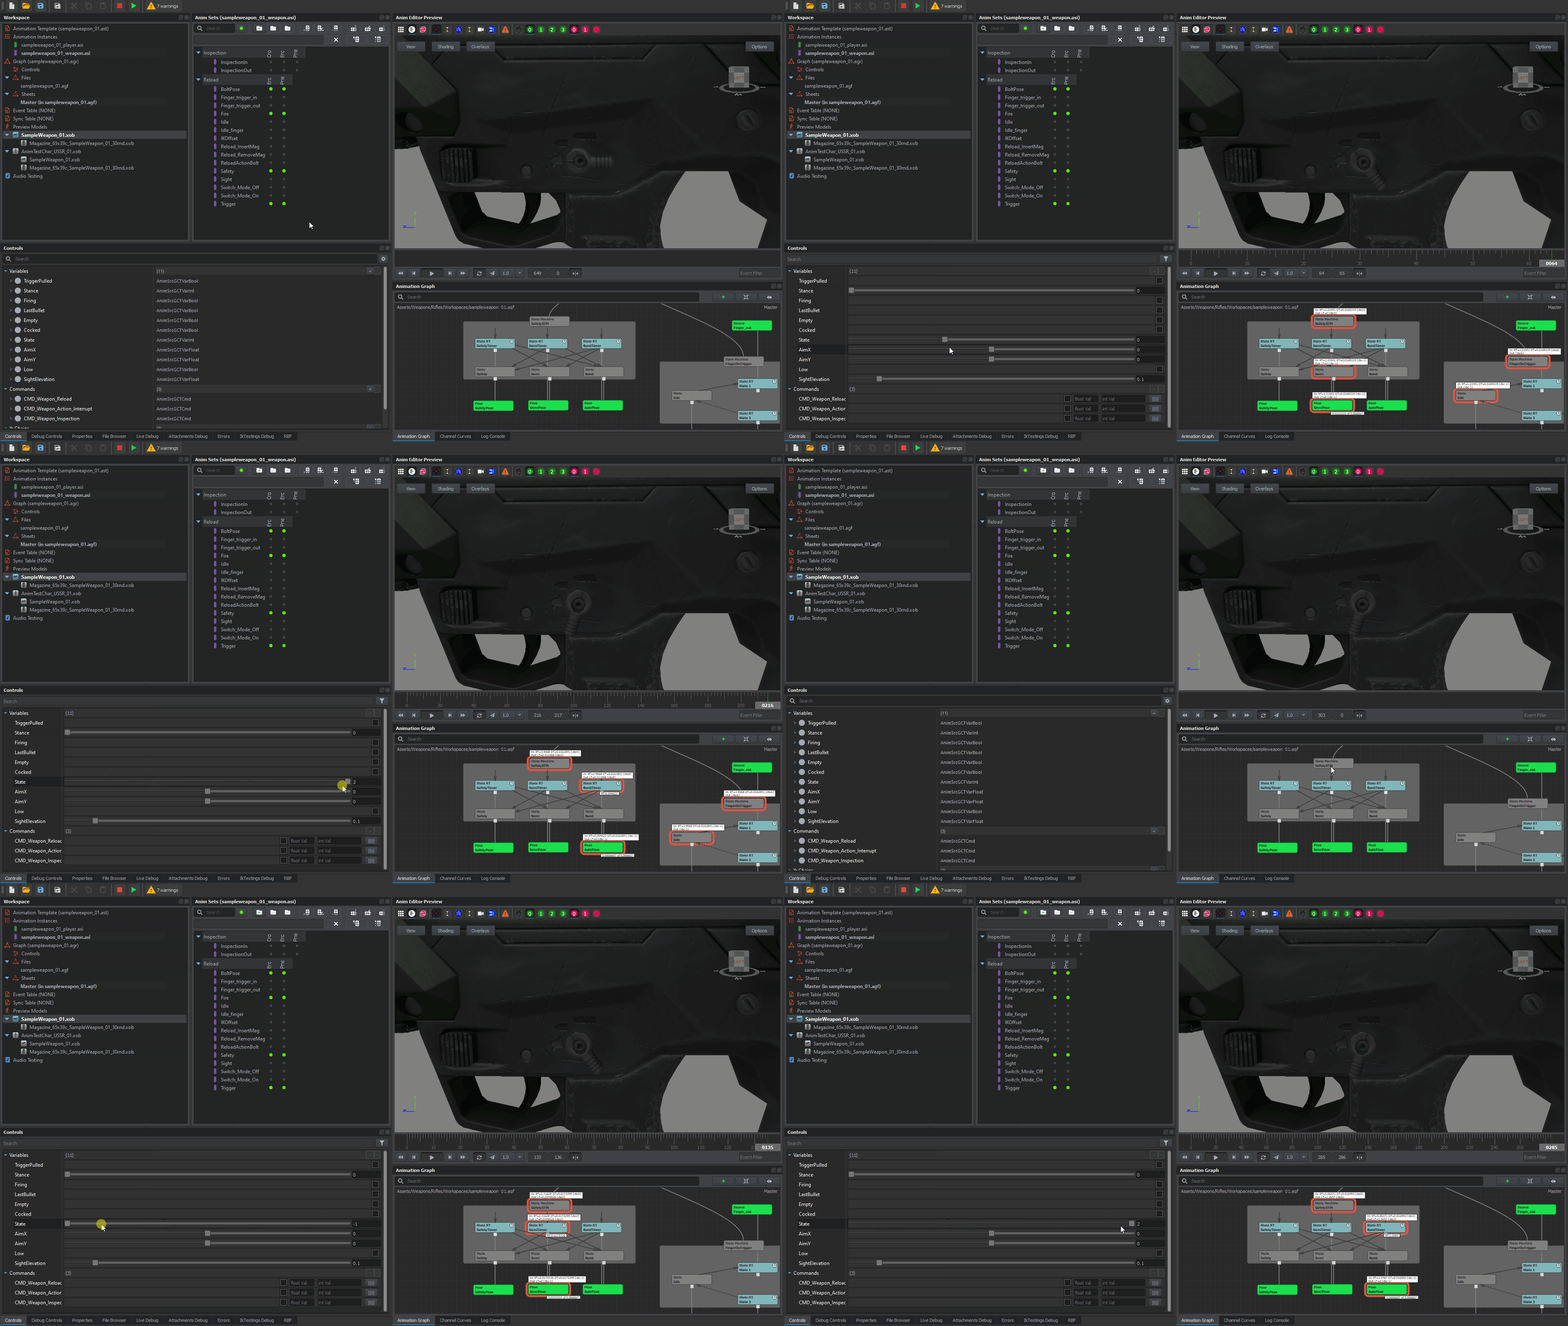
Tweaks to the animation graph can be tested without switching to play mode in World Editor. Instead Animation Editor provides an option to play graph (part of it or the whole thing) and see the playback results in Anim Editor Preview window.
This can be done in two ways:
- By using Play default node button in toolbar
- By double clicking on node with Left Mouse Button inside Animation Graph
Once debug is turned on, it is possible to change state of variables in Controls window either by clicking on check boxes or using sliders. Fire selector is controlled by State variable, which can use following values:
- -1 - safe mode
- 0 - single
- 1 - burst mode
- 2 - full auto
Try to change values of State slider and observe how it changes in Anim Editor Preview window.
Once you are done with previewing animation, you can use big red Stop button in the toolbar or double click with Left Mouse Button on the background of Animation Graph.