Global Mobilization Force Recon
Game Mode
What is Force Recon
Force Recon is a game mode for Global Mobilization focused on running stealthy recon missions behind enemy lines.
Your goal is to collect sufficient intelligence about enemy forces. Transmit details about their type and position via the radio and take photographs for identification.
Once sufficient intel has been collected, you will need to successfully exfiltrate.
You can try to stay undetected, but stealth is optional.
How to Play it
At minimum you’ll need just a friend to play with, but can also play with a bigger group of up to 8 people.
Before you step off into the mission make sure to have a plan ready for what to do when you encounter enemy forces:
Will you engage or evade? Perhaps pursue and track them back to their base?
At a certain point along the way you may be tempted to raid military field camps and command posts.
There you will find enemy maps, code-books and other valuable information.
Only you will know if you can do this with extreme stealth or brute force.
But consider that killing enemy forces can be detrimental to your mission’s destruction goal:
Only destroy what must be destroyed and stay out of combat with the enemy.
Once they have you tracked you will be outgunned and trapped behind enemy lines.
Whichever way you decide to play the enemy will be on the hunt for you.
The longer you stay to transmit info over the radio, and the more destruction you cause, the harder the enemy will try to locate and eliminate you.
Steam Workshop Collection
You will find all the latest missions for all officially supported terrains on the Steam Workshop.
If you're a fan of the old school way or want to host the missions differently, you can also download a zipped archive of all missions as pbo from here.
Different Play Styles Possible
The recommended playstyle is to try and remain undetected during the entire mission.
Via the mission’s parameters in the MP Lobby you can adjust the scenario parameters to allow also for alternative rule sets. To enable the extraction normally you will require either a set amount of recon points or destruction points: These goals can be adjusted in their amount, disabled or combined.
Other features such as penalty destruction points for killing enemy patrols can be turned into reward points to enable a more force-oriented playthrough. Whichever way you prefer to play this mission, you will be able to customise it.
Recommended Difficulty Settings
Part of the challenge in this game mode is to accurately locate yourself and other units on the map. To keep this a challenge it is recommended to play without extended map information, the shift-click waypoint features or any other navigational aid from the difficulty settings.
Supported Maps and Factions
Force Recon is currently available on these terrains:
- Weferlingen (East and West variants)
- Livonia
- Tanoa
- Malden
- Altis
- Stratis
- Temppa's Cham
- CUP Chernarus 2020
- CUP Takistan
From the MP Mission Parameter screen you can adjust which enemy to fight for.
By default you can choose between:
- West Germany
- East Germany
- Denmark
- Poland
- Arma 3's NATO
- Arma 3's NATO (Pacific)
- Arma 3's CSAT
- Arma 3's CSAT (Pacific)
- Arma 3's LDF
- Arma 3's AAF
Further, through a plug-and-play system, these mod-factions are also available from the parameter screen.
They are only selectable should you have the corresponding Mods loaded and active.
(No new dedicated mission file is required for these)
- GMX CDF
- GMX CDF 2022
- GMX ChDKZ
- GMX Takistan
- Anthrax' Altis ‘90
- Anthrax' Volksrepublik Ostbayern
- Anthrax' Lombakka
- Roadkill's Nogovan Armed Forces
- Lennard's Cold War Livonian People’s Army
- RHS Russia
- RHS US Army
Modding
The force recon game mode was designed with customization and community-made variations in mind.
Introducing new custom faction templates and enabling a new terrain to play on are very easy tasks and take only 10 to 15 minutes, depending on the terrain’s scale.
It is recommended to simply make use of the template mission provided. Make a copy of this scenario and change the ending of the folder name to match your terrain’s config name.
Porting the mission to “my_island” would have you then rename the folder from gm_force_recon.terrain to gm_force_recon.my_island.
Mission Template
The easiest way to modify this mission is to load an existing mission template to change and edit things according to your liking.
You can find the mission templates here.
Default Parameters Override
If you wish to have different custom parameters as the recommended selection, such as enabling the full arsenal by default every time your mission is loaded in the MP Session Screen, then you can make use of the following define commands:
// Set this to 1 to make "Full Arsenal" the default selection
#define GM_FR_PARAM_FULL_ARSENAL 1

// Set this to 1 to make "Behind Enemy Lines" the default spawn location
#define GM_FR_PARAM_INSERTIONMODE 1

// Set this to 0 make "No Extraction" the default selection. The game will end once necessary points were reached
#define GM_FR_PARAM_EXTRACTIONMODE 0

// Set this to any full number without decimals, it will become the default start hour selected
#define GM_FR_PARAM_STARTHOUR 12

// Set this to any of theses numbers (1, 2, 4, 8), it will set the time acceleration value selected
#define GM_FR_PARAM_TIMEACC 1

// Set this to 0 to make "No Revive" the default selection.
#define GM_FR_PARAM_REVIVE 0

// Set this to 0 to set "No" as the default selection for showing the tutorial at the start
#define GM_FR_PARAM_SHOWTUTORIAL 0

// Set this to 0 to make "None" the default selection for "Penalty Points"
// Set this to -1 to make "Rewards for Killing Soldiers" the default selection for "Penalty Points"
#define GM_FR_PARAM_DESTRUCTIONPENALTIES -1

// Set this to 0 to have players simply respawn at base when they die, instead of failing the mission when the entire team is killed. Pair this with the "No Revive"
#define GM_FR_PARAM_FAILONDEATH 0
You'll only need to add these if you do not wish to use the standard settings that Force Recon always applies in the MP Lobby.
You can pick and choose which ones you want. If you only wish to enable full Arsenal, only add that one line.
Adding a Custom Terrain
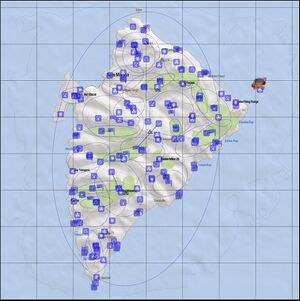
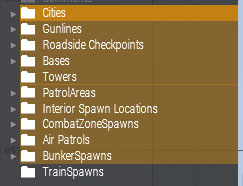
Force Recon is using helper objects on the terrain to designate locations for the various objectives and AI controlled areas.
Simply place these objects on the map in suitable locations and the mission is ready to go. No specific naming, no other scripting or custom trigger conditions are required.
Settlements
These objects will inform AI traffic and generate a small patrol around that searches for players. Place one of these per city, town or village.
Recommended placement:
Directly on top of a junction inside a city.
Checkpoints
These objects will designate spots on roads that can potentially spawn military checkpoints to control traffic. The exact location is still somewhat uncertain, as it will randomly select a location within 300m along the road it was placed on.
Recommended placement:
Directly on top of roads outside of cities. Once every 1500-2000m
Units
These objects designate spots on the terrain where Gun Line groups are created. The orientation (direction) of this object will control the direction of the gun line when it is created. For example a Unit object placed near a forest should be placed in such a way that it is facing towards a potential enemy threat.
Recommended placement:
In forest clearings and by the edge of wooded areas, lines of large shrubberies. Aim to have one per each square kilometre.
Military Bases
These objects designate areas where military installations are created. If the spot is in the open, then bunkers, tents and other barricades are created to form a field camp. If this spot is located inside a built up area, then one of the houses in this area will be converted into a command post with furniture.
Recommended placement:
Military bases, factories, farms, secluded hamlets, radio towers. Anything worth of interest to the player to investigate on the map.
Guard Towers
These objects will find the nearest tower object and place a guard unit plus a search light in there. The searchlight will automatically scan the surroundings.
Recommended placement:
One or two guard towers per base.
Bunker Location
These objects create a hidden bunker complex with staff. The spawning of these bunkers will hide whatever else is in the way such as vegetation or other houses.
Recommended placement:
Hidden in valleys and deep inside forests. Once every 2000-3000m.
Train Location
These objects will enable a train with cargo to spawn on the nearest railway object (anything indicated by a red line on the map). If you have no railway on your map, simply don't place these.
Recommended placement:
Trainyards, stations or sections of railway that are straight. Have these every 2000m or more.
Patrol Areas
These location objects must be paired with a trigger. The trigger is purely used to read the location and dimensions of the patrol area. Circular and ellipse shapes are supported, square areas will be treated as if they are ellipse areas.
The size of the area that these triggers will influence the amount of patrols created. So a smaller trigger will always have at least one patrol, but a larger trigger will create more patrols to keep the density of the patrolled area the same. However, the location objects are used to trigger zones nearby, so do not simply create one big trigger for the entire map.
Recommended placement:
A maximum 1000x2000m ellipse size trigger. Place these on every forest area, mountain area or other sections you wish to patrol. Avoid open areas such as empty fields.
Aerial Surveillance
These objects are also paired with a trigger. The trigger area will define the possible location for two helicopters to spawn and patrol that area. You can link multiple triggers to expand the patrolled areas, but this will mean the helicopter will fly between these zones, essentially covering zones that may not be designated as aerial patrol areas.
Recommended placement:
One large trigger for the entire terrain
Spawn Location
These locations, paired with a trigger, will designate areas that players can insert to when the mission has selected “Behind Enemy Lines” as the deployment location. The triggers will designate a possible area that the squad leader will be able to select at the start of the mission.
Recommended placement:
Inside large or small forest sections all over the map.
Interior Spawn Location
These locations, paired with a trigger, will designate areas that players can insert to when the mission has selected “On Friendly Territory” as the deployment location. The triggers will designate a possible area that the squad leader will be able to select at the start of the mission.
Also, these areas will need to be reached during the exfiltration phase of the mission.
Recommended placement:
At the edges of the map, near a DMZ, border or the coast of islands.
Adding a Custom Faction
Adding new factions is done by preparing a template file in the mission folder. This template file is then linked in the description.ext to be both available for the mission’s internal logic and also for users to be selectable in MP Lobby’s parameters screen.
A simple checklist of things needed:
- Custom Faction Template
- Registering this new class in the description.ext’s class
gm_fr_unitTemplates - Linking your new faction inside the coptional_factions.inc
Custom Faction Template
The faction template handles all the specific objects, units and groups that will be encountered during the playthrough. Start by copying one of the other templates to use this as your basis, for example “gm_ge_summer.inc”.
Each entry in this template has a helpful comment assigned to guide you through the use and purpose of this parameter.
Fill in the template as the comments recommend and guide you.
Custom Faction Template Validation
At the start of Force Recon in the single player editor the mission itself will validate the template you have select as the default selection. (First item in cLIST_OF_ENEMY_TEMPLATES_CLASS) It will check that each value you have added actually exists in the config, that parameters have what they expect (for example pairs of classnames and probabilities) and that not any parameter was forgotten.
If your template is fine then the mission will simply continue as normal. Should it detect an issue then it will interrupt the mission with a message letting you know what the validator has objected to. It will also tell you what and where exactly it found an error, and what it is expecting to see there to validate this class.
Additionally all issues are also logged to the .rpt file if you prefer to work with log files.
