Revive – Arma 3
Lou Montana (talk | contribs) m (Text replacement - "{|class" to "{| class") |
Lou Montana (talk | contribs) m (Text replacement - "[[Image:" to "[[File:") |
||
| (2 intermediate revisions by the same user not shown) | |||
| Line 1: | Line 1: | ||
{{TOC|side}} | {{TOC|side}} | ||
{{GVI|arma3|1.62}} | {{GVI|arma3|1.62}} | ||
Revive is a multiplayer system built to enhance teamwork during infantry gameplay. Its main highlights are: | Revive is a multiplayer system built to enhance teamwork during infantry gameplay. Its main highlights are: | ||
* Deep customization that allows tailoring for different gamestyles | * Deep customization that allows tailoring for different gamestyles | ||
| Line 9: | Line 8: | ||
* Stable performance with minimal CPU load and network footprint | * Stable performance with minimal CPU load and network footprint | ||
* Lightweight 3D visualization | * Lightweight 3D visualization | ||
== Settings == | == Settings == | ||
Revive's settings can be controlled from 3 different places. The most convenient is to use the ([[Eden]]) Editor. Other methods include the mission config ([[Description.ext]]) and the server setting in the multiplayer Lobby. If Revive settings are found on more than one location, the local settings take precedence: | |||
Revive's settings can be controlled from 3 different places. The most convenient is to use the ([[:Category:Eden Editor|Eden]]) Editor. Other methods include the mission config ([[Description.ext]]) and the server setting in the multiplayer Lobby. If Revive settings are found on more than one location, the local settings take precedence: | |||
# Server settings (in the multiplayer Lobby) overwrite everything | # Server settings (in the multiplayer Lobby) overwrite everything | ||
# Mission config (defined in the description.ext) overwrites Editor/mission settings | # Mission config (defined in the description.ext) overwrites Editor/mission settings | ||
| Line 29: | Line 30: | ||
=== Editor Settings === | === Editor Settings === | ||
Controlling Revive from the Eden Editor settings is the recommended and most comfortable method. It is meant to be used to set the default Revive behavior for that particular mission. | Controlling Revive from the Eden Editor settings is the recommended and most comfortable method. It is meant to be used to set the default Revive behavior for that particular mission. | ||
| Line 34: | Line 36: | ||
{| class="wikitable" | {| class="wikitable" | ||
|-style="vertical-align:top;" | |-style="vertical-align:top;" | ||
|[[ | |[[File:arma_3_revive_eden_01.jpg|500px|Mission settings]] | ||
'''Mission settings''' | '''Mission settings''' | ||
|[[ | |[[File:arma_3_revive_unit_01.jpg|250px|Unit settings]] | ||
'''Unit settings''' | '''Unit settings''' | ||
|} | |} | ||
| Line 44: | Line 46: | ||
=== Config settings === | === Config settings === | ||
Revive can also be controlled outside the Editor. Setting Revive this way is not that intuitive, but it has its benefits: | Revive can also be controlled outside the Editor. Setting Revive this way is not that intuitive, but it has its benefits: | ||
* Allows you to change Revive's settings without modifying the mission | * Allows you to change Revive's settings without modifying the mission | ||
* All settings can be changed without running the game, making it much quicker | * All settings can be changed without running the game, making it much quicker | ||
* Force the same settings over multiple missions, i.e. create a definition that will be included in multiple mission configs | * Force the same settings over multiple missions, i.e. create a definition that will be included in multiple mission configs | ||
<syntaxhighlight lang="cpp"> | <syntaxhighlight lang="cpp"> | ||
ReviveMode = 1; | ReviveMode = 1; //0: disabled, 1: enabled, 2: controlled by player attributes | ||
ReviveUnconsciousStateMode = 0; | ReviveUnconsciousStateMode = 0; //0: basic, 1: advanced, 2: realistic | ||
ReviveRequiredTrait = 0; | ReviveRequiredTrait = 0; //0: none, 1: medic trait is required | ||
ReviveRequiredItems = 2; | ReviveRequiredItems = 2; //0: none, 1: medkit, 2: medkit or first aid kit | ||
ReviveRequiredItemsFakConsumed = 1; | ReviveRequiredItemsFakConsumed = 1; //0: first aid kit is not consumed upon revive, 1: first aid kit is consumed | ||
ReviveDelay = 6; | ReviveDelay = 6; //time needed to revive someone (in secs) | ||
ReviveMedicSpeedMultiplier = 2; | ReviveMedicSpeedMultiplier = 2; //speed multiplier for revive performed by medic | ||
ReviveForceRespawnDelay = 3; | ReviveForceRespawnDelay = 3; //time needed to perform force respawn (in secs) | ||
ReviveBleedOutDelay = 120; | ReviveBleedOutDelay = 120; //unconscious state duration (in secs) | ||
</syntaxhighlight> | </syntaxhighlight> | ||
=== Multiplayer Lobby Settings === | === Multiplayer Lobby Settings === | ||
{| class="wikitable" | {| class="wikitable" | ||
|-style="vertical-align:top;" | |- style="vertical-align:top;" | ||
|<syntaxhighlight lang="cpp"> | | <syntaxhighlight lang="cpp"> | ||
class Params | class Params | ||
{ | { | ||
#include "\a3\Functions_F\Params\paramRevive.hpp" | |||
}; | }; | ||
</syntaxhighlight> | </syntaxhighlight> | ||
|[[ | |[[File:revive_mission_parameters.jpg|500px|Mission settings]] | ||
|} | |} | ||
== Damage Modeling == | == Damage Modeling == | ||
Because Revive can change game play significantly, we had to make sure its behavior can fit as many scenario types as possible. Because of this there are now 3 different damage presets. Each preset handles damage, incapacitation and death with different levels of realism. | Because Revive can change game play significantly, we had to make sure its behavior can fit as many scenario types as possible. Because of this there are now 3 different damage presets. Each preset handles damage, incapacitation and death with different levels of realism. | ||
=== Basic === | === Basic === | ||
Basic is the least-harsh preset. Damage received is calculated in the same way as is in vanilla, non-modded Arma 3. The defining difference is that the player will always enter the incapacitated state when they would otherwise be killed. | Basic is the least-harsh preset. Damage received is calculated in the same way as is in vanilla, non-modded Arma 3. The defining difference is that the player will always enter the incapacitated state when they would otherwise be killed. | ||
=== Advanced === | === Advanced === | ||
The Advanced preset uses a new damage calculation system which is built around the unconscious state. The calculation is more harsh in general, and improves effectiveness of lower-caliber weapons. | The Advanced preset uses a new damage calculation system which is built around the unconscious state. The calculation is more harsh in general, and improves effectiveness of lower-caliber weapons. | ||
| Line 88: | Line 96: | ||
* Unlike the Basic preset, the Advanced preset allows players to die if massive wounds are inflicted. Standard hits to protected areas usually trigger incapacitation | * Unlike the Basic preset, the Advanced preset allows players to die if massive wounds are inflicted. Standard hits to protected areas usually trigger incapacitation | ||
=== | === Realistic === | ||
The Realistic preset uses the same calculation as the Advanced preset, but the death threshold is lower. As a result, becoming incapacitated is more rare and dying is more common. | The Realistic preset uses the same calculation as the Advanced preset, but the death threshold is lower. As a result, becoming incapacitated is more rare and dying is more common. | ||
== Interaction == | == Interaction == | ||
The new Revive system uses new technology that was developed specifically for it - [[BIS_fnc_holdActionAdd|continuous actions]]. These actions use the same framework as normal fire & forget actions, but their execution takes time. They are ideal for activities that should not have an instant effect. | The new Revive system uses new technology that was developed specifically for it - [[BIS_fnc_holdActionAdd|continuous actions]]. These actions use the same framework as normal fire & forget actions, but their execution takes time. They are ideal for activities that should not have an instant effect. | ||
| Line 97: | Line 108: | ||
=== Revive === | === Revive === | ||
The action will appear when the player approaches an incapacitated unit. The player must be close enough and have the unit highlighted. | The action will appear when the player approaches an incapacitated unit. The player must be close enough and have the unit highlighted. | ||
| Line 104: | Line 116: | ||
|-style="vertical-align:top;" | |-style="vertical-align:top;" | ||
|style="width:500px;"|'''Force Respawn available''' | |style="width:500px;"|'''Force Respawn available''' | ||
[[ | [[File:arma_3_revive_forcerespawn_available.jpg|500px|]] | ||
Behavior & visualization (same as Revive): | Behavior & visualization (same as Revive): | ||
| Line 112: | Line 124: | ||
* The circular progress bar plays an idle pulsating animation to indicate that it is a continuous action | * The circular progress bar plays an idle pulsating animation to indicate that it is a continuous action | ||
|style="width:500px;"|'''Force Respawn in progress''' | |style="width:500px;"|'''Force Respawn in progress''' | ||
[[ | [[File:arma_3_revive_action_forcerespawn_inprogress.jpg|500px|]] | ||
Behavior & visualization (similar to Revive): | Behavior & visualization (similar to Revive): | ||
| Line 119: | Line 131: | ||
|} | |} | ||
=== Force Respawn === | === Force Respawn === | ||
The force respawn action appears to players when they enter the unconscious state while the Revive system is active. The action allows them to terminate the bleeding process and kill themselves without waiting to be revived. This feature is useful in situations where player do not expect to be revived due to their position, team composition, or if the situation in general is not going to work out. | The force respawn action appears to players when they enter the unconscious state while the Revive system is active. The action allows them to terminate the bleeding process and kill themselves without waiting to be revived. This feature is useful in situations where player do not expect to be revived due to their position, team composition, or if the situation in general is not going to work out. | ||
''Note: Forcing respawn | ''Note: Forcing respawn does not incur any additional consequences.'' | ||
== 3D Visualization == | == 3D Visualization == | ||
The 3D visualization uses similar logic to the 2D visualization. There is no circular progress bar as displaying the progress in such a detailed manner would require sending frequent updates over the network. | The 3D visualization uses similar logic to the 2D visualization. There is no circular progress bar as displaying the progress in such a detailed manner would require sending frequent updates over the network. | ||
=== Icon (Unit State) === | === Icon (Unit State) === | ||
* Unit is incapacitated - the icon is either a static heartbeat or pulsates between heartbeat and skull icon. The closer the unit is to death, the more often the skull appears. | * Unit is incapacitated - the icon is either a static heartbeat or pulsates between heartbeat and skull icon. The closer the unit is to death, the more often the skull appears. | ||
* Unit is dead - the icon changes to a grey skull | * Unit is dead - the icon changes to a grey skull | ||
| Line 134: | Line 150: | ||
=== Color (Interactivity) === | === Color (Interactivity) === | ||
* Red color - the player can interact with the unit. The unit is alive and the player possesses the means to revive them | * Red color - the player can interact with the unit. The unit is alive and the player possesses the means to revive them | ||
* Grey color - the player cannot interact with the unit. The unit is either dead, forcing respawn (doesn't want to be revived) or the player cannot revive them (i.e. they're missing required gear or specific trait) | * Grey color - the player cannot interact with the unit. The unit is either dead, forcing respawn (doesn't want to be revived) or the player cannot revive them (i.e. they're missing required gear or specific trait) | ||
=== Shape (Group) === | === Shape (Group) === | ||
* Circle - unit is not in the player's group | * Circle - unit is not in the player's group | ||
* Hexagon - unit is a member of the player's group | * Hexagon - unit is a member of the player's group | ||
=== Sample visualization === | === Sample visualization === | ||
{| class="wikitable" | {| class="wikitable" | ||
|-style="vertical-align:top;" | |-style="vertical-align:top;" | ||
|style="width:500px;"|'''Incapacitated unit''' | |style="width:500px;"|'''Incapacitated unit''' | ||
[[ | [[File:arma_3_revive_3dicon_unconscious_revivable.jpg|500px|]] | ||
|style="width:500px;"|'''Dead unit''' | |style="width:500px;"|'''Dead unit''' | ||
[[ | [[File:arma_3_revive_3dicon_dead.jpg|500px|]] | ||
|-style="vertical-align:top;" | |-style="vertical-align:top;" | ||
|style="width:500px;"|'''Incapacitated group member''' | |style="width:500px;"|'''Incapacitated group member''' | ||
[[ | [[File:arma_3_revive_3dicon_unconscious_revivable_ingroup.jpg|500px|]] | ||
|style="width:500px;"|'''Dead group member''' | |style="width:500px;"|'''Dead group member''' | ||
[[ | [[File:arma_3_revive_3dicon_dead_ingroup.jpg|500px|]] | ||
|} | |} | ||
== Limitations and Notes == | == Limitations and Notes == | ||
There are several limitations with the current state of Revive. Please take them into consideration when building your scenarios: | There are several limitations with the current state of Revive. Please take them into consideration when building your scenarios: | ||
* AI support - only players are supported | * AI support - only players are supported | ||
* Basic damage model - currently, the Basic damage model uses the new calculation that is being used by Advanced and Realistic damage model; this will be changed soon™ | * Basic damage model - currently, the Basic damage model uses the new calculation that is being used by Advanced and Realistic damage model; this will be changed soon™ | ||
{{GameCategory|arma3|Tutorials}} | {{GameCategory|arma3|Tutorials}} | ||
{{GameCategory|arma3|Editing}} | {{GameCategory|arma3|Editing}} | ||
[[Category:Introduced with Arma 3 version 1.62]] | [[Category:Introduced with Arma 3 version 1.62]] | ||
Latest revision as of 00:11, 21 November 2023
![]() 1.62
Revive is a multiplayer system built to enhance teamwork during infantry gameplay. Its main highlights are:
1.62
Revive is a multiplayer system built to enhance teamwork during infantry gameplay. Its main highlights are:
- Deep customization that allows tailoring for different gamestyles
- 3 levels of damage modeling with different level of realism / harshness
- Robust, engine-driven unconscious state
- New, non-intrusive continuous actions for smooth interaction
- Stable performance with minimal CPU load and network footprint
- Lightweight 3D visualization
Settings
Revive's settings can be controlled from 3 different places. The most convenient is to use the (Eden) Editor. Other methods include the mission config (Description.ext) and the server setting in the multiplayer Lobby. If Revive settings are found on more than one location, the local settings take precedence:
- Server settings (in the multiplayer Lobby) overwrite everything
- Mission config (defined in the description.ext) overwrites Editor/mission settings
- Editor/mission settings are considered last and do not overwrite anything
The following settings can be changed:
- Revive Mode - who can revive and who can be incapacitated
- Required Trait - controls whether special training is required to revive someone
- Required Items - controls whether any items are required to revive someone
- First Aid Consumed on Revive - controls whether a First Aid Kit is consumed after reviving * someone
- Revive Duration - how long it takes to revive someone
- Medic Speed Multiplier - decreases the time it takes for a Medic to revive someone
- Force Respawn Duration - how long it takes players to force their respawn
- Incapacitation Mode - how deep is the simulation of damage and incapacitation
- Bleed Out Duration - how long it takes to bleed out when incapacitated
Editor Settings
Controlling Revive from the Eden Editor settings is the recommended and most comfortable method. It is meant to be used to set the default Revive behavior for that particular mission.
The Editor settings also allow turning Revive on or off on a per-unit basis. This option is only available if "Revive Mode" is set to "Controlled by Player Attributes". The unit attribute covers both aspects of the system, incapacitation and ability to revive.
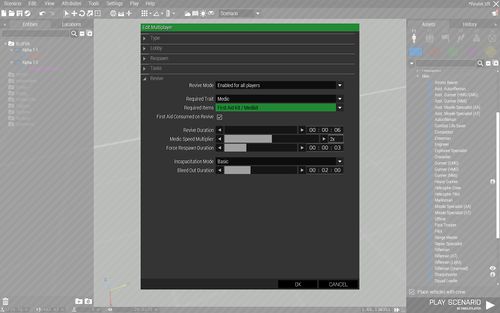
Mission settings |
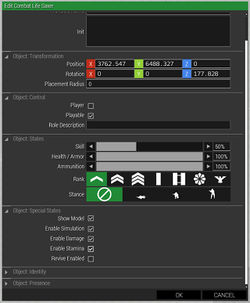
Unit settings |
To access the Revive settings go to: Attributes >> Multiplayer >> Revive.
Notice that, by default, Revive is disabled. Use "Revive Mode" to enable it. Check the tooltips of each section and non-numerical values to get more information about their purposes.
Config settings
Revive can also be controlled outside the Editor. Setting Revive this way is not that intuitive, but it has its benefits:
- Allows you to change Revive's settings without modifying the mission
- All settings can be changed without running the game, making it much quicker
- Force the same settings over multiple missions, i.e. create a definition that will be included in multiple mission configs
ReviveMode = 1;						//0: disabled, 1: enabled, 2: controlled by player attributes
ReviveUnconsciousStateMode = 0;		//0: basic, 1: advanced, 2: realistic
ReviveRequiredTrait = 0;			//0: none, 1: medic trait is required
ReviveRequiredItems = 2;			//0: none, 1: medkit, 2: medkit or first aid kit
ReviveRequiredItemsFakConsumed = 1;	//0: first aid kit is not consumed upon revive, 1: first aid kit is consumed
ReviveDelay = 6;					//time needed to revive someone (in secs)
ReviveMedicSpeedMultiplier = 2;		//speed multiplier for revive performed by medic
ReviveForceRespawnDelay = 3;		//time needed to perform force respawn (in secs)
ReviveBleedOutDelay = 120;			//unconscious state duration (in secs)
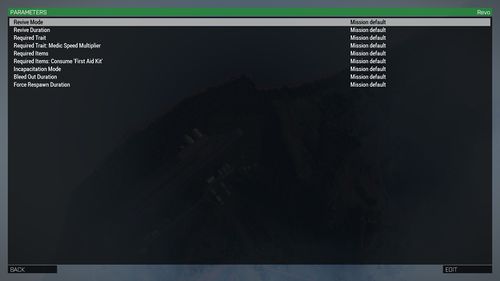
Multiplayer Lobby Settings
class Params
{
	#include "\a3\Functions_F\Params\paramRevive.hpp"
};
|
|
Damage Modeling
Because Revive can change game play significantly, we had to make sure its behavior can fit as many scenario types as possible. Because of this there are now 3 different damage presets. Each preset handles damage, incapacitation and death with different levels of realism.
Basic
Basic is the least-harsh preset. Damage received is calculated in the same way as is in vanilla, non-modded Arma 3. The defining difference is that the player will always enter the incapacitated state when they would otherwise be killed.
Advanced
The Advanced preset uses a new damage calculation system which is built around the unconscious state. The calculation is more harsh in general, and improves effectiveness of lower-caliber weapons.
The new preset highlights are:
- Hits to extremities, like are arms or legs, rarely cause immediate death. Instead, they will more-likely trigger the unconscious state
- Lower-caliber hits have a much larger effect but, while hits from higher-caliber weapons kill players straight away, lower-caliber hits often "just" trigger incapacitation
- Unlike the Basic preset, the Advanced preset allows players to die if massive wounds are inflicted. Standard hits to protected areas usually trigger incapacitation
Realistic
The Realistic preset uses the same calculation as the Advanced preset, but the death threshold is lower. As a result, becoming incapacitated is more rare and dying is more common.
Interaction
The new Revive system uses new technology that was developed specifically for it - continuous actions. These actions use the same framework as normal fire & forget actions, but their execution takes time. They are ideal for activities that should not have an instant effect.
In Revive there are 2 such activities: reviving of am unconscious unit, and forcing respawn when incapacitated. Both can be executed directly from the 3D scene by using the "Default Action" keybind (Middle Mouse Button or Space by default). These actions are also accessible from the Action Menu.
Revive
The action will appear when the player approaches an incapacitated unit. The player must be close enough and have the unit highlighted.
Note: If there are any special requirements in the mission for revive (like being a medic), the player needs to meet them too. If the requirements are not met, the action won't appear.
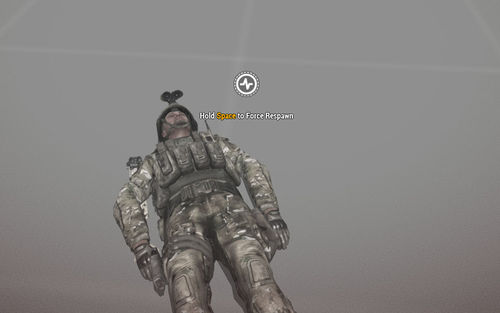
| Force Respawn available
Behavior & visualization (same as Revive):
|
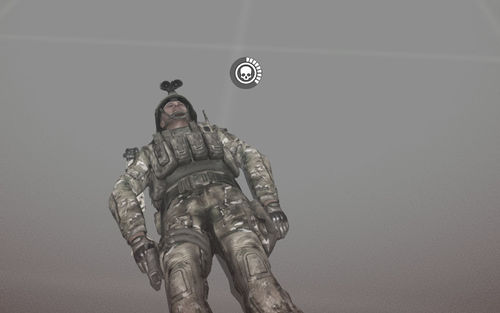
Force Respawn in progress
Behavior & visualization (similar to Revive):
|
Force Respawn
The force respawn action appears to players when they enter the unconscious state while the Revive system is active. The action allows them to terminate the bleeding process and kill themselves without waiting to be revived. This feature is useful in situations where player do not expect to be revived due to their position, team composition, or if the situation in general is not going to work out.
Note: Forcing respawn does not incur any additional consequences.
3D Visualization
The 3D visualization uses similar logic to the 2D visualization. There is no circular progress bar as displaying the progress in such a detailed manner would require sending frequent updates over the network.
Icon (Unit State)
- Unit is incapacitated - the icon is either a static heartbeat or pulsates between heartbeat and skull icon. The closer the unit is to death, the more often the skull appears.
- Unit is dead - the icon changes to a grey skull
- Unit is being revived - the icon pulsates between heartbeat and asterisk
- Unit is forcing respawn - the icon pulsates between heartbeat and skull
Color (Interactivity)
- Red color - the player can interact with the unit. The unit is alive and the player possesses the means to revive them
- Grey color - the player cannot interact with the unit. The unit is either dead, forcing respawn (doesn't want to be revived) or the player cannot revive them (i.e. they're missing required gear or specific trait)
Shape (Group)
- Circle - unit is not in the player's group
- Hexagon - unit is a member of the player's group
Sample visualization
| Incapacitated unit | Dead unit |
| Incapacitated group member | Dead group member |
Limitations and Notes
There are several limitations with the current state of Revive. Please take them into consideration when building your scenarios:
- AI support - only players are supported
- Basic damage model - currently, the Basic damage model uses the new calculation that is being used by Advanced and Realistic damage model; this will be changed soon™

